... comes with an Ultrasonic Sensor (left), two Touch. Sensors (middle), and a
Color Sensor (right). 2x. 1x. 1x. The LEGO MINDSTORMS NXT 2.0 Discovery
Book.
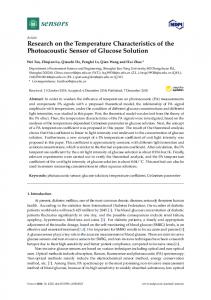
6 understanding sensors The LEGO MINDSTORMS NXT 2.0 robotics kit includes three types of sensors: Ultrasonic, Touch, and Color. You can use these sensors to build a robot that makes sounds when it sees you or to build a vehicle that drives around while avoiding walls or that follows the black line on the Test Pad. This second part of the book will teach you what you need to know in order to create working robots with sensors. To learn how to work with sensors, you’ll upgrade the Explorer robot by adding several sensor attachments to it to create the Discovery robot shown in Figure 6-1. You’ll learn to create programs for robots with sensors as you upgrade your robot with an Ultrasonic Sensor attachment. Once you have a good working knowledge of how to program with sensors, you’ll continue creating more sensor attachments for this robot in Chapter 7.
what are sensors? Figure 6-1: The Discovery robot: an enhanced version of the Explorer
LEGO MINDSTORMS robots can’t actually see or feel the way humans do, but by adding sensors to them, they can collect and report information about the environment around them. Your programs can interpret sensor information in ways that will make your robot seem to respond to its environment as if it is experiencing it. For instance, you could create a program that makes the robot say “Blue” when one of its sensors sees a piece of blue paper.
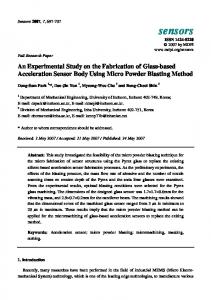
understanding the sensors in the NXT 2.0 kit Your NXT kit contains three sensors, as shown in Figure 6-2. The Ultrasonic Sensor reads the distance to objects, the Touch Sensors detect button presses, and the
equipped with an Ultrasonic Sensor to make the robot “see”
1x
2x
1x
Figure 6-2: The NXT kit comes with an Ultrasonic Sensor (left), two Touch Sensors (middle), and a Color Sensor (right).
The LEGO MINDSTORMS NXT 2.0 Discovery Book (C) 2010 by Laurens Valk
Color Sensor detects the color of a surface (among other things, as you’ll learn in Chapter 7). You connect the sensors to the NXT via input ports, numbered 1 through 4, as shown in Figure 6-3.
1 2
could make your robot say “Hello” when the ultrasonic sensor reports an object in front of it that’s nearer than 50 cm. As you’ll learn in this and the following chapters, you can use the Ultrasonic Sensor in a number of interesting ways. For example, you can use it to make a vehicle avoid walls (Chapter 6), create an intruder alarm and detect targets to shoot at (Chapter 8), find objects to grab (Chapter 13), and even detect a ceiling so that a vertical climber knows to go down again (Chapter 15).
creating the ultrasonic sensor attachment
Sensor
3
To begin, add an Ultrasonic Sensor to the Explorer robot as shown in the directions on the following page.
4 N O T E If you have trouble following these steps, try disconnecting the motor cables and then reattaching them after you connect the Ultrasonic Sensor. Be sure to connect the Ultrasonic Sensor to input port 4 on the NXT using a medium-sized cable.
Figure 6-3: Sensors are connected to input ports.
polling sensors In this chapter, you’ll explore the Ultrasonic Sensor, and you’ll take a more detailed look at the other sensors in Chapter 7. The programming techniques that you’ll learn for the Ultrasonic Sensor can be used for all the sensors in the kit.
Without having to do any programming, you can view the sensor readings on the NXT’s View menu. Gathering information from a sensor is sometimes referred to as polling. To poll a sensor, follow these steps:
understanding the ultrasonic sensor
1.
Turn on your NXT, navigate to the View menu (Figure 6-5), and select the sensor you want to poll.
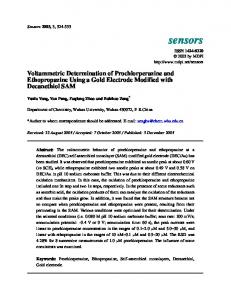
The Ultrasonic Sensor serves as your robot’s eyes. To “see,” the sensor measures the distance between it and other objects (as shown in Figure 6-4). The NXT retrieves the information from the sensor and uses its measurements in programs. For example, using input from this sensor, you
2.
Choose Ultrasonic cm (or Ultrasonic Inch).
3.
Select the input port the sensor is connected to (port 4), and you should see the sensor’s measurement, which is 37 cm in this case.
DISCOVERY #19: MIND YOUR HEAD!
37 cm
Figure 6-4: The T Ultrasonicc Sensor is used to detect objects by measuring the distance to them. It can see things up to 200 cm (80 inches) away, but the
Difficulty: Easy How could you find out how far your robot is from the ceiling of a room? Use the View mode and the Ultrasonic Sensor to find out, making sure to point the sensor’s “eyes” toward the ceiling while measuring. If you see only question marks on the screen, you might need to hold the sensor up a little closer to the ceiling.
farther the object is, the harder it is for the sensor to see it. When the sensor doesn’t see anything, it reports a value of 255 cm.
��
CHAPTER 6
The LEGO MINDSTORMS NXT 2.0 Discovery Book (C) 2010 by Laurens Valk
The LEGO MINDSTORMS NXT 2.0 Discovery Book (C) 2010 by Laurens Valk
UNDERSTANDING SENSORS
��
Figure 6-5: Polling a sensor with the View menu
programming with sensors You’ve just seen how to poll a sensor yourself. Programs can also poll a sensor in order to use the sensor’s data. As an example, you’ll create a program that has the robot play a sound when the Ultrasonic Sensor sees something that’s closer than 50 cm (20 inches), as shown in Figure 6-6. You can use several programming blocks to poll sensors including the Wait and Loop blocks as well as the Switch block.
The program tells me to make a sound once the sensor reports a value below 50 cm.
sensors and the wait block You can use a Wait block to pause a program for several seconds, but also to pause until a sensor reading goes above or below a certain value. For example, Figure 6-7 shows a Wait block halting a program until the Ultrasonic Sensor detects a sensor value less than 50 cm. This value of 50 cm is called the trigger value. Once this trigger value is reached, the sensor is triggered, the Wait block stops waiting, and the next block in the program (i.e., a Sound block) runs.
using the configuration panel You’ve just learned how a Wait block is used to poll a sensor. Now you’ll have a look at the configurations of this block. First select the Wait block configured to poll the Ultrasonic Sensor from the Programming Palette, as shown in Figure 6-7. (This is really just the Wait block you’ve been using with the Control setting set to Sensor instead of Time.) -
-
-
Sensor reading: 26 cm
You use the Port setting to select the input port to which the sensor is connected. You set the trigger value in the Distance setting in the Until box by entering its value or by dragging the slider to the left (closer) or right (farther). You use the Distance setting to select whether the block should wait until a value above (>) or below (