Advanced Queries. Using Microsoft Access. Advanced Queries. Parameter
Queries. In the last section you created queries with various criteria. If you wanted
to ...
Using Microsoft Access
Advanced Queries
Using Microsoft Access Advanced Queries Parameter Queries In the last section you created queries with various criteria. If you wanted to keep a query with specific criteria you could save it. For example, if you wanted a query that shows all students who live in Dianella, you could create a query with appropriate criteria and save it with a name such as students in dianella. It would get a little complicated, however, if you wanted a query for every suburb, especially if your database contained a dozen different suburbs. Parameter queries are a solution to this problem. A parameter query allows you to create a query that prompts the user for the criteria when the query is run. You could set up a query so that when it is run, it asks the user to enter a suburb and uses whatever they enter as the criteria. You could use the same query repeatedly without having to modify the design if you want to change the criteria. Creating a parameter query is like creating a regular select query. The only difference is that where you would normally enter your query criteria, you instead enter square brackets [ ]. This tells access that the user will be prompted for the criteria in this field. If you want to customise the message that is used to prompt the user you can type your own custom message between the square brackets.
© Steve O’Neil 2005
Page 1 Of 10
http://www.oneil.com.au/pc/
Using Microsoft Access
Exercise 1.
Advanced Queries
Creating a Parameter Query
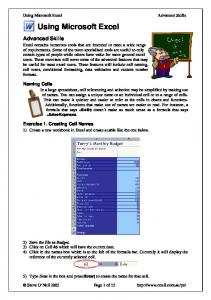
1) Make sure your Student List database is open and make sure you are in the queries section of the Database Window (your test query should be the only query in the query list). 2) Double-click the option which says Create a query in Design view. 3) Double-click, STUDENTS in the Show Table dialog to add it to the query design and then click Close to move to the design window. 4) Adjust your design window as shown in the previous section so that you have plenty of room for selecting fields from your table. 5) Add the following fields to the QBE grid: • Last Name • First Name • Address • Suburb • Postcode • State 6) In the criteria row for the Suburb field, add two square brackets as shown.
to view the results of the query. A prompt will appear asking you to enter 7) Click the View icon the criteria for the field.
8) Enter Dianella and click OK. The query results will show students from Dianella. 9) Click the View icon to return to design view. We will put a custom message in the criteria prompt. Enter a custom message between the square brackets so that it appears as the following. [Enter a suburb] 10) Click the View icon again. This time the prompt will include your custom message.
11) Enter Yokine and click OK (or press [Enter]. This time you will see all students from Yokine. 12) Return to design view. 13) Click the Save icon . Name the query parameter: students by suburb. 14) Close the query when done. Note
If you try running a parameter query and get a message about Replication IDs, it is probably because you uses curly brackets { } instead of square brackets [ ].
© Steve O’Neil 2005
Page 2 Of 10
http://www.oneil.com.au/pc/
Using Microsoft Access
Exercise 2.
Advanced Queries
Using a Saved Parameter Query
Your parameter query should now appear in the query list.
1) Double-click the parameter: students by suburb query to run it.
2) Enter Bedford as the suburb and click OK. You will see all of the students who live in Bedford. 3) Close the query. You should be returned to the Database Window. 4) Double-click the parameter: students by suburb query to run it again.
5) Enter Morley as the suburb and click OK. You will see all of the students who live in Morley. You can run the query with any suburb being used as the criteria without changing the design of the query.
© Steve O’Neil 2005
Page 3 Of 10
http://www.oneil.com.au/pc/
Using Microsoft Access
Exercise 3.
Advanced Queries
Creating a Parameter Query with Multiple Criteria
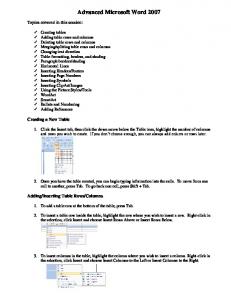
In regular select queries, you can have criteria on as many fields as you like. This applies for Parameter queries as well. If you have more than one parameter criteria in a query then a prompt will appear for each criterion, one after the other before the query results appear. You can also use parameters for range criteria as the following exercise demonstrates. We will create a query that allows the user to enter two amount, and see all students with marks between those amounts. 1) Create a new query that uses the following fields: • Last Name • First Name • Gender • Mark • Comment 2) For the Mark field, enter the following for the criteria >=[Enter a minimum mark] and =50,"Pass","Fail") The first part will be the name of the new field (Pass). This is followed by the IIF. Like all functions, its components are enclosed in brackets. This type of function has three parts separated by commas. The first part specifies the criteria. In this case [Mark]> meaning are the contents of the Mark field greater than or equal to 50. The second part specifies what the answer will be when the condition is true (display the text “Pass”). When test is being referred to in a calculation it always need to be enclosed in “ ”. The third part specifies what the answer will be when the condition is false (display the text “fail”). 3) Click the View icon
to view the results of the query.
Any student with a mark less than 50 will have Fail in the Pass field. 4) Click on the mark for Laura Davies as shown above. 5) Change the mark to 48. Ass soon as you move on to a different record, the Pass column will update. 6) Make sure you are still in the Mark column and click the Sort Descending icon so that the highest marks are at the top. Changes to the sort order will be saved as part of the query design. 7) Save the query as student marks and close the query when done. Note
when you are viewing the results of a query you are actually viewing a selection from the table. When you change data in a query’s datasheet view those same changes are being made to the table data. Any formula depending on that data will automatically update.
© Steve O’Neil 2005
Page 8 Of 10
http://www.oneil.com.au/pc/
Using Microsoft Access
Advanced Queries
Summary Queries Unlike other queries you have done, a summary query won’t show individual records. It will only show a summary in the form of averages, totals and other available calculations. Summary Queries are useful for reporting where you are only interested in a summary of the information without the detail.
Exercise 8.
Creating a Query with a Total
1) Create a new query with only the Mark field. 2) To change to a Summary Query, select Totals from the View menu or click the toolbar. 3) Your QBE grid will now include a Total row. 4) Change the Total figure for the Mark field from Group By to Sum. 5) View the results of the query. Because of this change the query result will now show the Sum of the Mark field instead of showing each record.
icon on the
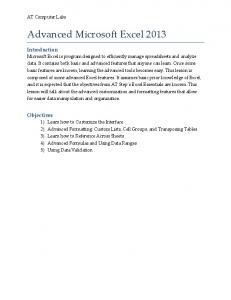
6) Return to Design View. 7) Add the Mark field to the QBE grid three more times. Change the total row for each one to Avg, Min and Max as shown below.
8) View the results of the query. The results will now show the Sum of the Mark field, the Average of the mark field, the Minimum amount in the Mark field and the Maximum amount in the Mark field.
9) Return to Design View. 10) Save the query as summary: student marks.
© Steve O’Neil 2005
Page 9 Of 10
http://www.oneil.com.au/pc/
Using Microsoft Access
Exercise 9.
Advanced Queries
Using Grouping in a Summary Query
When using Summary Queries it is common to group the results by a particular field instead of viewing the totals for the entire query. 1) Drag the Gender field on to the first Mark field. This will insert the Gender field to the left of the first Mark field. 2) Leave the Total row for the Gender field as Group By.
3) View the results of the Query. Now you will see totals for the Female students and totals for the Male students.
4) Return to Design View. 5) Add the Suburb field as shown below.
6) View the results of the query. The results will now show the totals grouped by Gender and grouped by Suburb.
7) Save and close the query.
© Steve O’Neil 2005
Page 10 Of 10
http://www.oneil.com.au/pc/