RNS-E. SAFETY WARNING: THIS INTERFACE IS DESIGNED TO ACTIVATE ...
ACTIVATION FOR VOLKSWAGEN MFD2/ RNS2 & AUDI w/RNS-E RADIOS.
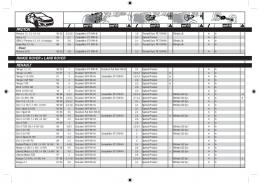
Rear alloy light panel. One piece moulded ... RNF244. Replacement seal for fuel
can lid. ..... Replacement Bulb H1 12V 100W (relay required).............$ 5.20 .....
1995 and 1997 Defender 90 Soft top ..... Mercedes offers diesel power on their
GL
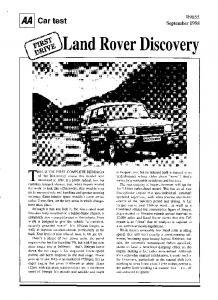
Sophisticated oil filtration extends service intervals to. 12,000 miles and Land
Rover claims that this Td5 engine is so “clean” that no catalyser is ... the
Discovery, particularly as the manual shift isn't anything to write home about. ...
Pa
PAGES. 12-15. Discovery 3: 2005-2009 Accessories ... please see your Land
Rover Dealer for further information. When choosing .... Compatible with manual.
Land Rover â Rugby World Cup 2015 â Ticket Giveaway ... The Prize Draw is open to all UK residents (excluding the Ch
Sep 28, 2015 - By submitting an entry to the Rugby World Cup 2015 Ticket Giveaway Prize Draw (âPrize. Drawâ), courte
JAGUAR LAND ROVER. EMC Isilon drives Big Data simulation for award-
winning Land Rover products. ESSENTIALS. Industry. Automotive Design ...
Defender (1990-2006). 1998 Td5 engine introduced. ... Defender. The
introduction in 2007 of the distinctive power bulge in the bonnet denoted an ...
2007 2.4 litre Diesel engine, six-speed manual transmission and new interior
introduced. 3 ...
JAGUAR LAND ROVER. EMC Isilon drives Big Data simulation for award-
winning Land Rover products. ESSENTIALS. Industry. Automotive Design ...
Oct 11, 2015 - Entry into the Prize Draw is free. 5. The Prize .... The message sent to the winning entrant will include
seals, engine units and ancillary equipment, consult the Repair Manual. Each
major section starts with a contents page, listing the information contained in the
...
brakes ventilated discs front, drums rear, with ... conversion that looks remarkably
similar .... Honda CR-V (petrol) ... Renault Scenic RX4 (petrol) 4/1998/140.
2009-02. Defender. 60th Anniversary. Special Edition. Santorini Black. PAB / 820.
Range Rover. 35h Anniversary. Special Edition. Anniversary Claret. CVL / 677 ...
Page 2 ... painted it red with a white top and used it for my family car for about
eight years, rebuilding almost ... new owner my old shop manual because I knew
a new one was available ... (I have several on my Disco), and I love the black
hats a
Born of a lineage stretching back to the debut of the first Land Rover in 1948, today’s Defender has capability at its heart and takes pride of place as the most ...
Land Rovers are one of the nicest vehicles on the road today. They are great whether you are driving through NYC, or taking it somewhere a little more rural. These vehicles were designed to really combine luxury and utility, and have earned a reputat
Please see your Land Rover dealership for further details. ... Discovery 4 features
the legendary Land Rover command driving position, which gives ..... Transfer
box ratio .... single slot in-dash CD player and steering wheel mounted ....
Includes
Please consult the owner's manual or your local authorized Land Rover ... The
design of the Land Rover LR4 has constantly evolved during its life and that is ...
brakes ventilated discs front, drums rear, with ... conversion that looks remarkably
similar .... Honda CR-V (petrol) ... Renault Scenic RX4 (petrol) 4/1998/140.
Land Rover â Rugby World Cup 2015 â Ticket Giveaway ... The Prize Draw is open to all UK residents (excluding the Ch
Industry. Automotive Design, Engineering, ... desirable premium automotive vehicles available today. ... The company not
VIDEO IN-MOTION FOR SELECT MERCEDES BENZ S and CL-CLASS 2007-
2014. MERCEDES BENZ: 2007 - 2012 S-550. 2008 - 2014 CL-Class.
Range Rover to complement our existing 1996 Land Rover Discovery. Rovers ...
My 1970 Series II-A and I just spent two long days in the woods cutting, haul-.
2005 - 2009 Land Rover Discovery (L319) ... 2005 - 2009 Range Rover Vogue (
L322) ... Remove the factory radio to gain access to the factory connectors. 2.
Rev. 051413
INTERFACING SOLUTIONS
VIMLR-88
VIDEO IN-MOTION ACTIVATION FOR LAND ROVER w/TOUCH-SCREEN NAV SYSTEMS V1 AND V2 We recommend reading this installation guide first before starting any work. Following these instructions from “Start” to” Finish” will ensure a smooth and hassle free installation. We offer telephone support M-F 9:00 AM – 5:00PM PDT at 1 (855) 822-1348. We are here to help.
INSTALLATION OVERVIEW
PARTS INCLUDED: (1) LR-88 Interface (1) LR-88 Harness (1) Instruction
PRECAUTIONS: VERSION 1: 2005 - 2009 Land Rover Discovery (L319) 2005 - 2009 Range Rover Sport (L320) 2005 - 2009 Range Rover Vogue (L322) VERSION 2: 2010 - 2011 Land Rover Discovery (L319) 2010 - 2011 Range Rover Sport (L320) 2010 - 2012 Range Rover Vogue L322)
- Remove the negative side of the battery to avoid any short circuits durring the installation. - Do not install the interface near any major components or near the HVAC system. This may cause damage or overheating to the vehicle.
20-PIN
(male plug)
- Do not disconnect the airbag connection behind the radio panel.
PRELIMINARY:
Please read the entire mannual before installing this interface. Vehicle must be equipped with factory DVD changer. This interface does not activate DVD reader.
GREEN/ VDO UNLOCK WHITE/ 12V OUTPUT
SAFETY WARNING: THIS INTERFACE IS DESIGNED TO ACTIVATE VIDEO IN-MOTION TO ALLOW THE PASSENER ACCESS TO THE ADDRESS INPUT WHILE THE VEHICLE IS IN-MOTION. THIS INTERFACE MAY CAUSE AN ERROR WHEN SERVICED AT THE OEM DEALER. BE AWARE THAT MOST DEALERS WILL ATTEMPT TO VOID THE MANUFACTURERS WARANTY WHEN INSTALLING ANY AFTERMARKET EQUIPMENT. IMPROPER USE OF THIS INTERFACE BY THE DRIVER MAY RESULT IN CITATION. DRIVER MUST KEEP FULL ATTENTION ON THE ROAD AND RESPOSIBILITY ON THE SAFETY OF HIS PASSENGERS.
TO ENABLE VIDEO IN-MOTION ON 1
2
3
4
5
6
1. On = Enable 2. Used 3. Not Used 4. Not Used 5. ON 6. ON
TO FACTORY HARNESS
INTERFACE
8-PIN
(male plug)
20-PIN
(female plug)
INSTALLING THE INTERFACE:
1. Remove the factory radio to gain access to the factory connectors. 2. Make the T-Harness connections behind the factory radio. (if the connectors do not match please contact tech support) 3. Test and make sure the Reverse gear triggers the interface and also test the video in-motion while the car is rolling. (Navigation address input should be active while rolling) 4. Make all other connections before re-installing the factory radio.
DIP SWITCH NUMBER 2 SETTING:
The interface works with vehicles with and without the factory rear-view camera. Depending on the vehicle type you have, dip switch number 2 must be on “ON” or “OFF”
DIP SWICTHES: 2 FACTORY CAMERA ON NO FACTORY CAMERA OFF
NON-PERMANENT VIDEO IN-MOTION: Important Note: This interface only supports the following radio types: -Touch-Screen navigation Version 1 & Version 2.
If the customer wants the option to deactivate the video in-motion. The installer can use the GREEN wire instead of the dip switch setting to activate and deactivate the video in-motion. This way the user can have access to the wire without having to get behind the radio if eanting to deactivate.
TROUBLE SHOOTING 1. No video display while driving. - Make sure the dip swithces are in the proper location.