ethernet bridge. A wireless ethernet bridge is a device that ties a wired Ethernet
network to a wireless network. These devices are commonly used to connect.
Using WebRelayTM in a Wireless Network WebRelayTM is an electro-mechanical relay device with a built in web server. It can be used for remote monitor and control applications, or as a convenient way to add I/O to a computer or handheld device. It is designed to be rugged and reliable so it works well in industrial environments. One of the real strengths of WebRelayTM is that is uses TCP/IP/Ethernet networking and not a proprietary bus. Ethernet networks are common in offices, but are becoming very popular for Industrial applications also. Many Ethernet devices are available, and they range from inexpensive home electronics, to midrange office equipment, to robust industrial devices. Ethernet usually uses a thin, twisted pair cable (sometimes referred to as cat 5) which can be simple and inexpensive to install. In some situations however, it may be very difficult or simply not cost effective to install cables for an Ethernet network. In such cases, wireless networking may be desirable. Currently, there is not a wireless version of WebRelayTM, but WebRelayTM can still be connected to a wireless network. This application note describes how WebRelayTM can be used in a wireless network. It should not be surprising that there is more than one approach to connecting WebRelayTM to a wireless network. The goal in writing this application note was to show the overall concept by illustrating a simple example and not to cover every possible scenario. This example uses inexpensive equipment that is readily available. Components Needed: Only a few components are needed. First, you need a WebRelayTM device (with socket and power supply). Second, you need a Wireless Access Point. If you are connecting WebRelayTM to an existing wireless network, you already have this. For our testing, we connected WebRelayTM to an existing wireless network that has a Linksys WAP11 access point (WAP11 is an older model but it works). Third, you need a wireless ethernet bridge. A wireless ethernet bridge is a device that ties a wired Ethernet network to a wireless network. These devices are commonly used to connect peripherals such as printers to a wireless network. Many wireless access points can be configured to operate as a bridge so a second wireless access point may work for you as well. In our case, we found a device from Linksys (model WGA54G) that performs the bridging function. The WGA54G is sold as a “Game Adapter” to connect video games to a wireless network (no matter what you call it, it’s still a Wireless Ethernet Bridge and it worked fine in our tests). This application note uses the WGA54G, but other Wireless Ethernet Bridges have similar settings and should work almost the same. Note that we did try a D-Link DWL-G810 which we never got working (problem was unrelated to WebRelayTM). D-Link technical support told us that our DWL-G810 Page -1-
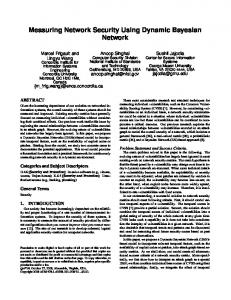
device was faulty so we returned it and tried the Linksys. Another thing to mention is that the WGA54G would only allow us to connect a single device (one WebRelayTM per WGA54G). Other Wireless Ethernet Bridge devices will allow you to connect multiple devices on the remote side of the ethernet bridge. In our case we only wanted to test the concept so the WGA54G worked fine. Connection: The following illustration shows a simplified version of the network used in this example. The illustration shows a small Local Area Network connected to a larger IP network through a router. The Local Area Network consists of wired devices which connect to an Ethernet Switch and wireless devices which connect through a Wireless Access Point. Additional WebRelayTM units could be added to the wired network or the wireless network. All devices on this Local Area Network use IP addresses that begin with 192.168.1, and have a subnet mask of 255.255.255.0. Setup: Simple Network Example
IP Network Gateway Router IP Address: 192.168.1.1
Ethernet Switch
Ethernet Cable
Ethernet Cable
Wireless Access Point IP Address: 192.168.1.4
Computer
Wireless Bridge
IP Address: 192.168.1.101
IP Address: 192.168.1.3
Other Wireless Devices may be on the same wireless network.
Ethernet Cable
WebRelay IP Address: 192.168.1.2 MAC Address: 00-0C-C8-01-00-01
Page -2-
In this application note, it is assumed that WebRelayTM is being connected to an existing wireless network so setting up the wireless access point will not be discussed. Adding the WebRelayTM unit to the wireless network consists of two basic steps. First, set up the wireless bridge using a computer and verify proper operation. Second, set up WebRelayTM, connect it to the Wireless Bridge, and verify proper operation. Step 1: Wireless Bridge Setup 1a.
Temporarily connect a computer to the ethernet port on the wireless bridge (in the figure, WebRelayTM is connected to that port). Make sure the computer has an IP address that is on the same network as the wireless bridge. In our case, the wireless bridge came with at default IP address of 192.168.1.250. Our computer has a IP address of 192.168.1.101 so it is on the same network.
1b.
Now you can configure the wireless bridge from the computer. The WGA54G offers two options for configuration. First, the WGA54G comes with a CDROM that contains a configuration utility. You can run the configuration utility and answer the questions. The second option is to use a web browser based setup. In this case you would open a browser and type the address http://192.168.1.250 into the URL line. Either way you choose, the setup is similar. For detailed instructions see the instructions that came with your device. -set the network type to Infrastructure (this may be a mechanical switch instead of a web page setting) -set up the security to match the security settings in your wireless access point. If WEP encryption is enabled in your wireless access point you must enable WEP encryption in your wireless ethernet bridge. The encryption values and key must also match the wireless access point settings. -Set the LAN IP settings. In our example network the settings are... IP Address: 192.168.1.3 Subnet Mask: 255.255.255.0 Gateway: 192.168.1.1 Note that the IP address given here is the IP address that is used to communicate with the device. This means that when you change the IP address, you will need to change the IP address that your browser uses to communicate with the wireless bridge.
1c.
If your wireless access point is set up to filter MAC addresses, you will need to add the MAC address of your computer to the list of allowed addresses. While you are at it, add the MAC address (serial number) of the WebRelayTM unit that you will be using.
Page -3-
1d.
Test connectivity from the computer. Try pinging the gateway router (type ping 192.168.1.1). If you get a response, the wireless bridge is working.
Step 2: WebRelayTM Setup WebRelayTM comes from the factory with a default that matches the WebRelayTM device in the network drawing. In this case, no setup is required. Connect the WebRelayTM device to the wireless bridge. You should be able to use WebRelayTM over the wireless network. Troubleshooting: Before connecting WebRelayTM to the wireless network, make sure you get connectivity across the wireless bridge by using a computer. If you cannot get connectivity across the bridge, try (temporarily) simplifying the configuration on your access point. Disable WEP encryption on both the access point and the wireless bridge. Disable MAC address filtering on the access point. With this simple configuration you should be able to get the computer to communicate over the network. If not, you may need to disable the firewall in the PC. Once the computer is working properly, you can turn on the security features one at a time and verify proper operation after each change.
Page -4-


![network! network! network! how global technology start-ups ... - Etla [PDF]](https://m.moam.info/img/260x300/network-network-network-how-global-technology-star_647d00fa098a9ef7468b457b.jpg)