From the Main Menu select Setup Menu/Print Mode. Menu/Quality Mode. 2. ...
The prime test pattern consists of bands of color for each cartridge and a sloping
...
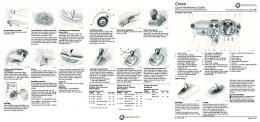
8142 and 8160 WIDE FORMAT COLOR PRINTER Quick Reference Guide Control Panel Features: Select printing mode 1.
From the Main Menu select Setup Menu/Print Mode Menu/Quality Mode.
2.
At the Quality Mode Menu select High Speed, Productivity, Fine, User Mode or Ultramode – all predefined printing modes. User mode allows you to customize printing modes and save for repeated use. Use the Previous and Next buttons to scroll to the desired setting.
Main Menu
Activate dryer 1.
From the Main Menu select Setup Menu/Dryer Menu/Dryer Setting. Use the Previous and Next buttons to scroll to the desired setting.
Move carriage to the center of the platen (for maintenance or cartridge replacement) 1. 2.
From the Main Menu select Utility Menu/Access Cartridge.
Setup Menu
To return the carriage to the home position, press Access Cartridge again.
Change displayed language 1.
From the Main Menu select Setup Menu /User Setup Menu/ Language. Use the Previous and Next buttons to scroll to the desired setting.
Check cartridge information 1.
User Setup Menu
From the Main Menu select Utility Menu/ Service Menu/Ink Status Menu/Disp: Cart Info or Print: Cart Info.
Activate automatic pass correction 1.
From the Main Menu select Setup Menu/Print Mode Menu/Pass Correction.
2.
Then select Auto or Off. Use the Previous and Next buttons to scroll to the desired setting.
Print Mode Menu
1
08/2004
Figure 1.
Evaluating the Prime Pattern: To print the Prime Pattern:
To interpret the prime test pattern (Figure 1):
1.
With media loaded, from the Main Menu select Utility Menu/Prime Menu/Prime All. A test pattern prints.
2.
If the printed results are unsatisfactory perform the cartridge maintenance procedure.
The prime test pattern consists of bands of color for each cartridge and a sloping line. Within the prime test pattern, each jet is represented with a short horizontal line. Together, these short horizontal line form a “stair step” pattern. Clogged jets appear as missing or misdirected lines in the “stair step” pattern. Electrically defective jets appear as solid bars. Electrically defective jets can be automatically compensated in certain modes. The print modes for which compensation is available are shown clearly above the Prime. Note: At some point there may be too many defective jets to compensate for. When this happens, replace the cartridge with a new cartridge.
2
10/2004
Slide Shaft
Routine Maintenance:
Note: Perform every 40 plot hours.
Cartridges
1.
Apply distilled water to a lint-free pad and wipe the entire surface area of the slide shaft, including the service station.
2.
Apply Xerox Film Remover (8R27) to a lint-free pad and wipe the entire surface area of the slide shaft, including the service station a second time.
1.
From the Main Menu, select Utility Menu/Prime Menu/Clean.
2.
Select the appropriate cartridge and press OK.
3.
Print the prime pattern. The Vacuum Prime feature can be used if more thorough cleaning is required. Print the prime pattern again.
4.
Encoder Strip Note: Perform every 20 plot hours.
If further cleaning is needed, remove the cartridge from the carriage. Dampen a lint-free cloth with distilled water.
Note: The encoder strip is a clear plastic strip located behind the shaft under the trailing cable shelf.(Figure 4)
Note: If you remove the cartridge from the carriage, a recalibration will be required.
1.
Remove power from the printer.
5.
2.
Dampen an industrial swab with distilled water.
3.
Clean the top and bottom surfaces of the entire length of the encoder strip. Several swabs may be necessary to completely clean it
4.
Perform a second cleaning using Xerox Film Remover (8R27).
Clean all ink residue by wiping the carriage bottom edges. Blot the jet plate surface. Thoroughly wipe the rear electrical contacts. (Figure 2.)
Figure 2.
6.
Clean the flex driver cable to prevent ink residue transfer.
Flex Driver Cables Figure 4
Note: Perform every 75 plot hours. (Utility Menu>Display Status to check plot hours.)
Platen Surface
1.
Remove power from the printer and lower the air plenum.
1.
Remove power from the printer
2.
Remove the cartridges from the carriage. Stand cartridges on end to prevent leakage.
2.
Lower the air plenum.
3.
3.
Apply distilled water to a lint-free pad and wipe the entire surface area of each cable. Allow cables to dry completely before installing cartridges. (Figure 3)
Apply distilled water to a lint-free pad and wipe the entire surface area of the platen (Figure 5).
Note: Ensure no ink residue or cloth fibers remain on the platen. 4.
Allow platen to dry completely before reinstalling media.
Figure 3 Figure 5
3
10/2004
Waste Bottle
Replacing Ink Bottles
1.
Empty waste bottle before it is full.
1.
Open the left cover. Pull up on a bottle to remove.
2.
Dispose of ink properly according to regulations for your area.
2.
Replace with a full bottle. Ensure reservoir ink fittings mate properly with each intermediate reservoir fitting.
Service Station
Note: Wait 5 minutes before filling lines or printing.
Note: Perform every 40 plot hours.(Utility Menu>Display Status to check plot hours.) 1.
Move carriage to the maintenance position.
2.
Open service station access door.
3.
Dampen a lint-free pad with distilled water and apply to wipers and seals. Figure 7
4. Clean all wipers and seals thoroughly. Ensure no lint fibers remain on surfaces. Lowering the Air Plenum
Replacing Print Cartridges 1.
From the Main Menu press Utility Menu/Access Car tridge.
2.
Lower the air plenum.
3.
Open the carriage door (pull out, then up) and remove the cartridge. (Figure 6)
4.
Remove tape from the new cartridge and install in the cartridge stall. Close the carriage door.
5.
Press Access Cartridge to return the carriage to the home position.
6.
Raise the air plenum.
7.
Run the Prime Test.
8.
Perform the color deadband, vertical and horizontal color calibrations.
1.
Hold the center of the plenum and pull out the retaining pins on the left and right sides. (Figure 8)
2.
Gently lower the plenum.
Figure 8
Replacing/Loading Media 1.
Place media on feed roller and fully insert media edge into media path channel.
2.
Align media to white mark on left rear side of platen. Note: After a 6 second delay media will be automatically pulled into the printer path, and sensed and sized automatically.
Figure 6
4
10/2004
Calibration Procedures:
a.
Color Deadband (Db) Calibration 1.
From the Main Menu, select Utility Menu/Calibration Menu/Color Db Menu/Color Db Test.
2.
For each color, select the best value under each aligning set of vertical bars.
5.
From the Main Menu, select Utility Menu/Calibration Menu/Paper Calib Menu/Paper Calib Value and note the value (i.e. 4794) b.
Horizontal Color Calibration
Measure the distance between the T’s and enter the value under ‘Line Length Value’.
Add 12 to the Paper Calib value and enter the new value in the ‘Paper Calib Value’ (i.e. 4793 + 12 = 4806).
6.
Ensure the Paper Calib is set to ‘Yes’.
7.
Calibrate the Color Deadband (Db) (see previous procedure for more details).
8.
Calibrate the Horizontal Color (see previous procedure for more details). Calibrate the Vertical Color (see previous procedure for more details).
1.
From the Main Menu, select Utility Menu/Calibration Menu/Color Calib Menu/Horiz. Calib Test.
9.
2.
For each color select the best value under each aligning set of colors. Enter values for all six colors.
10. From the Main Menu, select Utility Menu/Service Menu/Calibration Menu/Deadband Test Verify alignment at 3 primary points, vertically at right side (observe next to last line), left side (next to last line) and center area of printed pattern. It is best to perform this final test on widest media possible.
Vertical Color Calibration 3.
From the Main Menu, select Utility Menu/Calibration Menu/Color Calib Menu/Vert. Calib Test.
4.
For each color select the best value under each aligning set of colors. Enter values for all six colors.
Media Heat/Drying Recommendations: Media
Set the dryer to a heat setting of 4.
2.
Ensure that both paper guides are not touching the media edges.
3.
Load the media.
4.
From the Main Menu, select Utility Menu/Calibration Menu/Paper Calib Menu/Line Length Test.
Fan
Film
High
On
Photo
Medium
On
Non-Photo
Low
On
Note: If you experience problems while using the take-up roll, try increasing the heat setting and adding extra drying time.
Image Quality Calibration (Basic Calibration) 1.
Heat
5
10/2004
Prepared by: Xerox Corporation Global Knowledge & Language Services 800 Phillips Road Building 845-17S Webster, New York 14580-9791 USA Printed in the United States of America 701P42246
6
10/2004