Windows Movie Maker Instructions Note: A LOC Digital Story that uses Movie Maker consists of titles, pictures/photos from the LOC, video
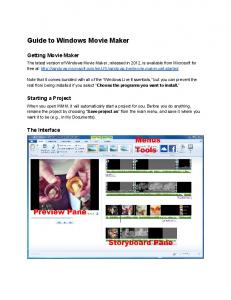
Windows Movie Maker Instructions Note: A LOC Digital Story that uses Movie Maker consists of titles, pictures/photos from the LOC, video clips from the LOC, voice over, copy-free music and/or audio tracks, transitions, and credits. You may also use: ______________________________________________ Secondly: When you’ve completed editing the movie, you “render” it- this takes all the parts and melds them together into one final movie file that you save on your flash key. Instructions: 1. If you have not created a folder, create a folder on your flash key called story_folder_lbrown (first initial, last name) 2. Start/open Windows Movie Maker from the programs on the computer that you are working on. 3. File Menu: Save Project: Name the project and save it in the folder you created. 4. Understand the Movie Maker Interface:
5. Importing pictures, videos, and audio to your digital story project: a. If the Movie Tasks pane is not available, click the
button.
b. If necessary, expand the 1. Capture Video section by clicking the button. c. Click Import pictures link, select your pictures and click the [Import] button. (Remember you can use the Click key and/or Shift key to select more than one picture.) 1
d. If you have a LOC video or audio, repeat # 4. select the respective Import link under Capture Video. 6. Drag your pictures/videos to the white rectangles in the Storyboard. 7. To change the order of pictures/videos, drag picture to new position. 8. To add titles or credits: a. Select a picture, click the Make titles or Credits link b. Click the link of the desired type of title or credits c. Change the title animation and select desired animation d. Click Done and Title will be added to your movie. 9. To add narration: a. b. c. d.
Use the Narrate Timeline button to add a voiceover. Position the scrub bar (aka the playback indicator) where you want to start. Click Start Narration, record your narration, and click Stop Narration. Navigate to your video player project folder in the Save in box, name your narration file and click [Save]. e. You can play your narration to test it. You can move the scrub bar to adjust. f. You can adjust the recording audio level (the Input level). g. Click Done when you’re done. h. You can change the time that a picture or frame is shown by hovering between one image and another to reveal a double red arrow. i. Note: If you pick up sounds from the computer’s speakers as you’re narrating, you can i. Click Show more options ii. Click Mute speakers iii. Be sure to unclick Mute speakers when you’re done iv. You can split, trim, or delete an audio clip. See directions on the next page. j. To adjust the volume of an audio clip on the Audio/Music track: i. Right-click on the clip and select Volume… ii. Adjust the volume as desired and click [OK] iii. Note: You can also right-click on an audio clip and mute it or set it to fade in or fade out. 10. To Preview your movie a. Position the scrub bar where you want to start on the timeline. b. Click the Play button in the preview control bar c. Click the Full Screen button or use Ctrl Enter d. Tap Esc or Ctrl Enter to exit full screen 11. Rendering/finishing your movie a. In 3. Finish Movie section click Save to my Computer and find your called story_folder_lbrown on your flash key by clicking on the Browse Button b. Enter a different name for the movie if you like or use the one that shows up c. Click [Next] d. Make sure Best Quality is selected and click [Next] e. When your movie is finished, click [Finish] 2
Free music sites: http://www.freesound.org http://freeplaymusic.com
Movie Maker Tutorials http://www.windowsmoviemakers.net/
3


![Manual Básico de Windows Movie Maker [PDF]](https://m.moam.info/img/260x300/manual-basico-de-windows-movie-maker-pdf_59b816ce1723ddddc609420c.jpg)


