0 Introduction. This supplement covers the following topics: 1 Installing JDK 8. 2
Installing NetBeans 7.4. 3 Compiling and running JavaFX in a regular project.
Working with JavaFX on NetBeans For Introduction to Java Programming By Y. Daniel Liang 0 Introduction This supplement covers the following topics: 1 Installing JDK 8 2 Installing NetBeans 7.4 3 Compiling and running JavaFX in a regular project 4 Setting JDK and source format 5 Deploying and running JavaFX as a Web Start application or as an applet
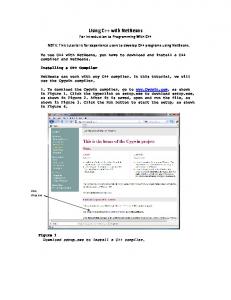
1 Installing the right version of JDK 8 The old version of JDK 8 may not work with NetBeans, so please download the most recent JDK 8 from https://jdk8.java.net/download.html. If you already installed JDK 8, you have to first remove it and then install the new JDK 8. 2 Installing NetBeans 7.4 NetBeans incorporates all new features of JDK 8 including the support of lambda expressions. You can download NetBeans 7.4 from https://netbeans.org/community/releases/74/. When installing NetBeans 7.4, you will be prompted to select a JDK, choose jdk1.8.0, as shown in the following screen shot.
3 Compiling and running JavaFX programs in a regular project You can create a regular Java application project and run JavaFX programs from the project. Here are the steps to create such a project: Step 1: Choose File, New Project to display the New Project dialog box. Step 2: Choose Java in the Categories and Java Application in the Projects. Step 3: Click Next to display the New Java Application dialog box. Step 4: Enter MyJavaFXSample as project name and c:\temp as project location, uncheck Use Dedicated Folder for Storing Libraries and Create Main Class. Step 5: Create Finish to create the project. You will see the project named MyJavaFXSample appearing in the project pane. Here are the steps to create a JavaFX class in the project: Step1: Right-click the MyJavaFXSample project to choose New, Java Class to display the New Java Class dialog box. Step 2: Enter MyJavaFX as the class name and leave the Package field empty. Step 3: Click Finish to create the class named MyJavaFX in the project. Step 4: Copy the code from Listing 14.1 to MyJavaFX. Step 5: You can now run MyJavaFX by right-clicking MyJavaFX.java and choosing Run. If your program does not compile or run, go to the next section to set the correct library and source format. 4 Setting JDK and source format If your program does not compile or run, make sure you have set the JDK to JDK 1.8 and source format to JDK 8. Here are the steps to do so:
Step 1: Right-click the project node for MyJavaFXSample and choose Properties to display the Project Properties dialog box, as shown Figure 1. Step 2: Choose Libraries in the Categories pane and choose a Java platform. If the platform is not listed, click Manage Platforms to create the platform. Step 3: Choose Sources in the Categories pane to display the properties for the source and make sure that you selected JDK 8 for the source format, as shown Figure 2. Figure 1
Figure 2
5 Deploying JavaFX as a Web Start application or applet A JavaFX program can be deployed to run in three modes: as a standalone application, as a Web Start application, or embedded in a Web page. The preceding example shows a sample run from running standalone. You can use NetBeans to deploy a JavaFX as a Web Start application or an applet. To do so, you need to create a JavaFX project. Here are the steps to create a JavaFX program in a JavaFX project and deploy it as a Web Start application. Step 1: Choose File, New Project to open the New Project dialog box. Click Next to display the New JavaFX Application dialog box. Step 2: Enter MyJavaFXDeploySample as the project name and c:\temp as the project location, choose JDK 1.8 as the JavaFX platform, and uncheck all other check boxes. Step 3: Click Finish to generate the project. To run it as a Web Start, right-click the project and choose Set Configuration, Run as Webstart. Now you can run it as an applet from Web Start. To run it as an applet, right-click the project and choose Set Configuration, Run in Browser. Now you can run it as an applet from Web Start.