Apr 27, 2015 - 4.1 IBM Case Manager object model . ... Contents v. 4.1.7 Configuring role pages . ... 4.5 Object model f
Front cover
Advanced Case Management with IBM Case Manager
Introducing case management and IBM Case Manager Building IBM Case Manager solutions with use case example Covering customization, rules, deployment, and more
Wei-Dong Zhu Brian Benoit Bob Jackson Johnson Liu Mike Marin Seema Meena Juan Felipe Ospina Guillermo Rios
ibm.com/redbooks
International Technical Support Organization Advanced Case Management with IBM Case Manager May 2014
SG24-7929-03
Note: Before using this information and the product it supports, read the information in “Notices” on page xiii.
Fourth Edition (May 2014) This edition applies to Version 5.2.0, IBM Case Manager (product number 5725-A15). © Copyright International Business Machines Corporation 2013, 2014. All rights reserved. Note to U.S. Government Users Restricted Rights -- Use, duplication or disclosure restricted by GSA ADP Schedule Contract with IBM Corp.
Contents Notices . . . . . . . . . . . . . . . . . . . . . . . . . . . . . . . . . . . . . . . . . . . . . . . . . . . . . . xiii Trademarks . . . . . . . . . . . . . . . . . . . . . . . . . . . . . . . . . . . . . . . . . . . . . . . . . . . xiv Preface . . . . . . . . . . . . . . . . . . . . . . . . . . . . . . . . . . . . . . . . . . . . . . . . . . . . . . xv Authors . . . . . . . . . . . . . . . . . . . . . . . . . . . . . . . . . . . . . . . . . . . . . . . . . . . . . . . xv Now you can become a published author, too! . . . . . . . . . . . . . . . . . . . . . . . xviii Comments welcome. . . . . . . . . . . . . . . . . . . . . . . . . . . . . . . . . . . . . . . . . . . . . xix Stay connected to IBM Redbooks . . . . . . . . . . . . . . . . . . . . . . . . . . . . . . . . . . xix Summary of changes . . . . . . . . . . . . . . . . . . . . . . . . . . . . . . . . . . . . . . . . . . . xxi May 2014, Fourth Edition . . . . . . . . . . . . . . . . . . . . . . . . . . . . . . . . . . . . . . . . . xxi Part 1. Concept and overview . . . . . . . . . . . . . . . . . . . . . . . . . . . . . . . . . . . . . . . . . . . . . . . . . 1 Chapter 1. Case management concept . . . . . . . . . . . . . . . . . . . . . . . . . . . . . 3 1.1 Case management overview. . . . . . . . . . . . . . . . . . . . . . . . . . . . . . . . . . . . 4 1.2 What makes case management unique . . . . . . . . . . . . . . . . . . . . . . . . . . . 6 1.2.1 Cases are goal-driven and unpredictable . . . . . . . . . . . . . . . . . . . . . . 6 1.2.2 Cases are knowledge-intensive . . . . . . . . . . . . . . . . . . . . . . . . . . . . . 7 1.2.3 Modeling . . . . . . . . . . . . . . . . . . . . . . . . . . . . . . . . . . . . . . . . . . . . . . . 8 1.2.4 Tasks. . . . . . . . . . . . . . . . . . . . . . . . . . . . . . . . . . . . . . . . . . . . . . . . . . 8 1.2.5 Routine work and knowledge work . . . . . . . . . . . . . . . . . . . . . . . . . . 10 1.3 Case Management and IBM BPM Solutions . . . . . . . . . . . . . . . . . . . . . . . 10 1.4 The need for Enterprise Content Management . . . . . . . . . . . . . . . . . . . . . 14 1.4.1 Information complexity . . . . . . . . . . . . . . . . . . . . . . . . . . . . . . . . . . . 14 1.4.2 Security . . . . . . . . . . . . . . . . . . . . . . . . . . . . . . . . . . . . . . . . . . . . . . . 15 1.4.3 Retention . . . . . . . . . . . . . . . . . . . . . . . . . . . . . . . . . . . . . . . . . . . . . . 15 1.5 The need for collaboration. . . . . . . . . . . . . . . . . . . . . . . . . . . . . . . . . . . . . 17 1.6 Case management solutions. . . . . . . . . . . . . . . . . . . . . . . . . . . . . . . . . . . 17 1.6.1 Case encoding="UTF-8" standalone="yes"?> 0 sdf Solution Definition File dave 2013-08-21T22:59:58.429Z 1 peconfig PE Configuration File dave 2013-08-21T22:59:58.548Z 2 CmAcmCASE_PAGE CmAcmCASE_PAGE Case Details Form paula 2013-08-22T12:17:20.959Z 5 SRIXX_Task11 Task11 SRIXX_CaseType11 paula 2013-08-22T12:17:36.699Z
170
Advanced Case Management with IBM Case Manager
Locking the SDF The SDF is locked when any of the solution objects that are stored in it are locked, such as properties, choice lists, document types, case types, and tasks. When a user adds, modifies, or deletes any of the SDF object, the SDF is locked for that user. For example, when a user is editing properties in Case Manager Builder, SDF is locked and other users can see the lock icon for all of the SDF objects, as shown in Figure 5-50.
Figure 5-50 Properties that are locked by another user
Locking the Process Engine Configuration File The Process Engine Configuration File contains details about roles and in-baskets. When a user modifies any artifact that is stored in the Process Engine Configuration File, the file is locked for that user and other users can view only the configuration assets, such as roles and in-baskets.
Locking pages, views, and rules Pages, views, and rules contain separate configuration files for each object. When a user edits any of these objects, the respective assets are locked. Other users can view only the basic asset information, such as name and description. In the example that is shown in Figure 5-51 on page 172, a page Work is locked by a user and it appears as locked to other users.
Chapter 5. IBM Case Manager tools
171
Figure 5-51 Page that is locked by another user
Page Work is shown to users in read-only mode. Users can view only the details of the page, such as name and description, as shown Figure 5-52.
Figure 5-52 Read-only view of page that is locked by another user
172
Advanced Case Management with IBM Case Manager
An error message is shown to the user when the user clicks the page name to edit the page content, which is locked by another user, as shown in Figure 5-53.
Figure 5-53 Error message that is shown on edit of a locked artifact
Locking tasks Tasks are locked when the task workflow that is opened for editing is a step designer or process designer. Other users can still open the locked task to view the workflow in a read-only mode. A lock icon is shown to indicate that a task is locked. Different users can simultaneously lock and edit different task workflows under a case type.
Show locked objects In IBM Case Manager Builder, users can click the Show Locked Items link from anywhere inside the solution. Clicking this link shows the assets that are locked by the logged in user and the assets that are locked by other users who are editing the solution, as shown in Figure 5-54.
Figure 5-54 Show locked items link in Case Manager Builder
Chapter 5. IBM Case Manager tools
173
The locked item information window provides the details of the locked solution artifacts, as shown in Figure 5-55.
Figure 5-55 Details of locked items
Draft objects When user clicks the Save button in Case Manager Builder, it saves the changed assets in their respective draft objects. The following draft objects are available for different assets: The draft object for SDF, PE configuration, page, rule, and view asset is their respective CPE reservation object. For each case type XPDL, there is a separate custom draft object. If the encoding="utf-8"?>
Chapter 10. User interface and widgets
397
The second build.xml file creates the WAR and EAR files for the custom page widget, as shown in Example 10-9. Example 10-9 Ant build file for the custom page widget EAR and WAR files
398
Advanced Case Management with IBM Case Manager
The third build.xml file packages the IBM Content Navigator plug-in JAR file, the EAR file for the custom page widget, and the directory that is holding the widget definition and catalog JSON files into one .zip file that is ready to deploy into IBM Case Manager, as shown in Example 10-10. Example 10-10 Main Ant build file
Chapter 10. User interface and widgets
399
10.5.7 Deploying the custom widget package If the custom widget package does not contain the optional EAR file, the IBM Case Manager administration client deploys and registers the custom widget package. If the custom widget package contains an optional EAR file, the IBM Case Manager configuration tool deploys and registers the custom widget package. Both options are described in this section. Do not perform both options; instead, perform only one option, depending on the structure of the custom widget package. Complete the following steps to deploy the custom widget package by using the IBM Case Manager administration client: 1. Open the IBM Case Manager administration client. 2. Click to open the design object store under the Object Stores folder in the navigation tree. 3. Click the Widget Packages folder to open it in a new tab, as shown in Figure 10-26.
Figure 10-26 Widget Packages tab in Case Manager administration client
4. Click Register Custom Widgets.
400
Advanced Case Management with IBM Case Manager
5. Browse to the newly created custom widget package file. Then, click Next. 6. Verify the selected widget package details and click Finish to register the custom widget package, as shown in Figure 10-27. Note: Selecting the Replace if already registered option in the Verify the selected widgets package window replaces the existing custom widget with the updated widget package if the custom widget package is already deployed and registered on the Application Server.
Figure 10-27 Verify selected widgets package in the administration client
Complete the following steps to deploy a custom widget package by using the IBM Case Manager configuration tool: 1. Open the IBM Case Manager configuration tool. 2. Click File → Open Profile and select the IBM Case Manager configuration profile file. 3. Right-click Deploy and Register Widgets Package and select Copy Selected Task, as shown in Figure 10-28 on page 402. A copy of the existing task with the existing values is made.
Chapter 10. User interface and widgets
401
Figure 10-28 Copying the Deploy and Register Widgets Package task
402
Advanced Case Management with IBM Case Manager
4. Open the newly copied Deploy and Register Widgets package task. Change the value in Widgets package file path to the path of the newly created custom widget package, as shown in Figure 10-29.
Figure 10-29 Modifying the Widgets package file path in the configuration tool
5. After all of the information is verified as correct on the copied version of the Deploy and Register Widgets Package, click Save and then click Run Task. 6. Validate that you see that the task finished running successfully without any errors in the Console window on the bottom of the IBM Case Manager configuration tool. The expected output looks as is shown in the following example: Starting to run Copy_of_Deploy and Register Widgets Package Copy_of_Deploy and Register Widgets Package ************ Finished running Copy_of_Deploy and Register Widgets Package
Chapter 10. User interface and widgets
403
Note: If the custom widget package is deployed and registered on the Application Server, rerunning the Deploy and Register Widgets Package with the updated custom widget package updates the existing widget package. If there are changes to the widget definition or catalog JSON files, it is strongly recommended that you uninstall the custom widget package and then reinstall it.
10.5.8 Adding the custom widget to the page After successfully deploying and registering the custom widget package by using the IBM Case Manager administration client or the IBM Case Manager configuration tool, the custom widget must be added to the page (or pages) via Page Designer. Note: If the custom widget package includes an EAR file, make sure that the custom widget enterprise application in WebSphere or other application server is started before the custom widget is added to the page. Complete the following steps to add the custom widget to the page: 1. In IBM Case Manager Builder, edit the wanted solution. 2. Open Page Designer with the wanted page on which to add the custom widget. For the custom search widget, it is added to the Cases page. 3. Drag the custom widget from the widget palette to the main layout area, as shown in Figure 10-30 on page 405. Note: The custom widget's catalog and definition JSON files specify the widget palette category section in which the widget appears within Case Manager Builder.
404
Advanced Case Management with IBM Case Manager
Figure 10-30 Dragging the custom search widget onto the main layout area
4. Click Save to save the custom widget onto the page. 5. Open Case Manager Client to view the new custom widget (or widgets).
10.6 Creating a custom task This section shows a simple step-by-step example of how to create a custom task in IBM Case Manager V5.2. A custom task allows a case worker to define a custom workflow for a work item. Case workers can now create custom tasks to represent procedures that are not predefined in the case type. For more information about custom tasks, see the IBM Case Manager Information Center at this website: http://pic.dhe.ibm.com/infocenter/casemgmt/v5r2m0/topic/com.ibm.casemgm t.client.doc/acmrth09.htm
Chapter 10. User interface and widgets
405
Custom tasks must be enabled for the solution before case workers can make use of this feature. Complete the following steps: 1. Open Case Manager Builder and edit the wanted solution. 2. Edit the wanted case type. 3. On the Case Type attributes page, select the Enable case workers to create custom tasks option, as shown in Figure 10-31.
Figure 10-31 Enable case workers to create custom tasks
After the custom tasks are enabled, make sure that you commit the changes and deploy the solution. Then, the case worker can create custom tasks by completing the following steps: 1. Browse to the case details, work details, or the tasks tab in the Case Information widget to create a custom task. Click Add custom task to create a custom task. The custom task editor pop-up window opens to allow the case worker to start creating the custom task. 2. Enter a name and a description for the custom task.
406
Advanced Case Management with IBM Case Manager
3. Click insert an item and choose from the following options: – Work item: i. Enter the name for the work item. ii. Assign the work item to a user or group. iii. Click the editable properties for this work item drop-down menu to include case properties to include in the custom task. iv. Click the deadline drop-down menu to specify a time frame for which the work item must be completed. v. Enter instructions to complete the work item. A document reference, the value of a selected case property, and a hyperlink can be added to the instruction field. – Decision point: i. Enter a label for the response button. ii. Insert an item for the decision point and add any child items if the user selects the response. Note: A decision point must follow a work item. The user must make a decision if the work item is assigned to the user. – Wait until or for Enter a date and time to delay a work item until a specific time and date or for a specified amount of time. 4. After a custom task is created, click Validate to validate the task and click Start to start the custom task. Figure 10-32 on page 408 shows a sample custom task.
Chapter 10. User interface and widgets
407
Figure 10-32 Sample custom task
10.7 Using the Timeline Visualizer and Instruction widgets This section describes the Timeline Visualizer widget and the Instruction widget, which are the two new preinstalled widgets for IBM Case Manager V5.2. The Timeline Visualizer widget provides a visual representation of the history of a case. For more information about the timeline visualizer widget, see the IBM Case Manager Information Center at this website: http://pic.dhe.ibm.com/infocenter/casemgmt/v5r2m0/topic/com.ibm.casemgm t.help.doc/acmwrh124.htm The Instruction widget displays instructions to complete a work item through a custom task. For more information about the instruction widget, see the IBM Case Manager Information Center at this website: http://pic.dhe.ibm.com/infocenter/casemgmt/v5r2m0/index.jsp?topic=%2Fco m.ibm.casemgmt.help.doc%2Facmwrh129.htm
408
Advanced Case Management with IBM Case Manager
10.7.1 Configuring auditing and case history store To use the Timeline Visualizer widget, it is necessary to configure auditing and a case history store to track the history of the cases. Complete the following steps to configure auditing and the case history store for the Timeline Visualizer widget: 1. Open the IBM Case Manager administration client. 2. Select the design or staging object store and select Solutions. 3. Right-click the wanted solution and select Configure → Auditing. 4. Follow the wizard steps to configure auditing. Select the appropriate properties to audit within the wizard and apply the audit profile. For more information about configuring auditing, see the IBM Case Manager Information Center at this website: http://pic.dhe.ibm.com/infocenter/casemgmt/v5r2m0/index.jsp?topic=%2 Fcom.ibm.casemgmt.design.doc%2Facmdt036.htm After auditing is configured, a new case history store must be made to hold the data that is needed by the Timeline Visualizer widget to track extended history of cases. 5. Within the IBM Case Manager administration client, click the target object store to open it in a new tab. 6. Click New Case History Store and follow the wizard to create a case history store for the target object store.
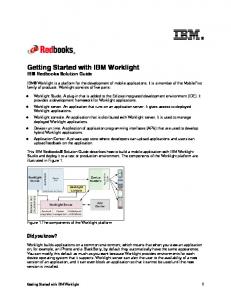
10.7.2 Displaying case history in the Timeline Visualizer widget The Timeline Visualizer widget contains a horizontal bar as the timeline, which shows the time duration and the work items for the case. The Timeline Visualizer also uses vertical bars to represent events. Through an event density histogram, the widget displays a view of when case events occurred over the life of a case. The user interface of the Timeline Visualizer widget includes a primary and a secondary timeline. The primary timeline shows the duration of the entire case. Users can move sliders and zoom in on the specific range within the case timeline, which is represented by the secondary timeline. The Timeline Visualizer widget is on the case details page by default. The user interface of the Timeline Visualizer widget (when it is maximized) is shown in Figure 10-33 on page 410.
Chapter 10. User interface and widgets
409
Toolbar
Primary Timeline
Histogram
Secondary Timeline (zoom) Case Series
Tasks and Step Series
Figure 10-33 Timeline Visualizer widget user interface
10.7.3 Displaying instructions in the Instruction widget The Instruction widget displays the instructions for completing a work item as set in the instructions field creating a custom task is created. The instructions are displayed in rich text format and can include hyperlinks and property values. The Instruction widget is on the Custom Task Details page by default. A sample view of the Instruction widget is shown in Figure 10-34.
Figure 10-34 Sample view of Instruction widget
410
Advanced Case Management with IBM Case Manager
11
Chapter 11.
Customization topics This chapter provides a detailed description of many important or advanced topics that you might need to learn when you customize a case management solution. This chapter includes the following sections:
Using project areas when developing solutions Automated handling of ingested documents Splitting a case Basic customization scenarios Intermediate customization scenarios Advanced customization scenarios Multilingual support
© Copyright IBM Corp. 2013, 2014. All rights reserved.
411
11.1 Using project areas when developing solutions Companies require solutions for various purposes. Creating these solutions requires the involvement of various teams, business analysts, and the departments of the organization. The solutions can be grouped by using project areas so that only the relevant business analysts are given access privileges to the solution and solution definition. Project areas add security and autonomy to IBM Case Manager solution development. In addition, project areas help to limit the effect of resetting the test environment to other users who are working on other projects in the same development environment. Resetting the test environment removes deployed case solution artifacts from the target object store and the process configuration information. A reset also reinitializes the target object store and the isolated region that is associated with the project area. Instead of resetting everything in a test environment, you can use project areas to reset the development environment only of a particular project area. This isolation prevents the reset that disrupts the work of other business analysts who are working on different project areas. Note: Before resetting the test environment, it is important to save user-defined assets from the target object store or they are deleted and cannot be restored. For more information about how to save user-defined assets, see the IBM Case Manager Information Center at this website: http://pic.dhe.ibm.com/infocenter/casemgmt/v5r2m0/index.jsp?topic=%2 Fcom.ibm.casemgmt.design.doc%2Facmdr001.htm Users and solutions can easily be moved from one project area to another, but each user can belong only to one other project area in addition to the default project area. After a user is assigned to a project area, the user can modify or define solutions within that specific project area. Project areas are available only in the development environment. There is at least one default project area. You can create secondary project areas according to your business needs. Project areas can be created and modified by using Case Manager administration client, the Case Manager configuration tool, or the command line.
412
Advanced Case Management with IBM Case Manager
We recommend the use of the Case Manager administration client to manage project areas. For more information about how to set up and manage project areas in IBM Case Manager V5.2, see the IBM Case Manager Information Center at this website: http://pic.dhe.ibm.com/infocenter/casemgmt/v5r2m0/topic/com.ibm.casemgm t.design.doc/acmdt015.htm
11.2 Automated handling of ingested documents Case Manager solutions often ingest incoming documents from external systems. These documents can be from any of the following sources: Scanned documents: – Datacap Taskmaster and other capture systems – Desktop scanning software IBM Content Collector: – IBM Content Collector for Email (Microsoft Exchange, IBM Lotus Domino®, or SMTP) – IBM Content Collector for Sharepoint – IBM Content Collector for Files Microsoft Office: – FileNet Integration for Microsoft Office (Microsoft Outlook) – FileNet Integration for Microsoft Office – FileNet Services for IBM Lotus Quickr® (Microsoft Office or IBM Lotus Notes®) Desktop documents: – Documents that are uploaded into the system with Workplace or WorkplaceXT – FileNet Services for Lotus Quickr – Drag-and-drop with IBM Case Manager, IBM Content Navigator, and WorkplaceXT APIs: – Java – Content Manager Interoperability Services (CMIS) – WebDAV
Chapter 11. Customization topics
413
Other systems: – IBM Content Platform Engine Bulk Import Tool – Third-party software that interfaces with FileNet APIs to ingest documents
11.2.1 Generalized approach for handling ingested documents Whenever possible, it is an efficient and good practice to automatically handle these incoming documents; for example, by automatically attaching them to existing relevant cases or creating cases and attaching them to these created cases. To design a process that automatically handles the ingested documents, consider the following factors: The document ingest software should classify only the document according to the document types that are defined in the solution. The case type and document type have a property (or set of properties) that serves as the key to the case. That is, each case has a unique, business-level identifier that is associated with every case. Examples of keys are Claim Number, Loan Number, Investigation ID, Case Number, Quote Number, and Request Number. Every ingested document that is filed into a case folder is indexed with this key. An event action can be triggered by the document class (type) if there is an event subscription to the creation event. The event action locates the corresponding case folder by using the case identification key from the document and files the document into the case folder.
414
Advanced Case Management with IBM Case Manager
11.2.2 Implementation methods Table 11-1 lists several ways to implement the automation process. Table 11-1 Implementation methods for automated case document filing Location
Method
Description
Client-side
Custom code that runs on client application
The client application runs the case folder search and stores the document in the matching case folder upon ingest.
Server-side
JavaScript Event Action
A JavaScript based event action is created to handle the matching and filing of the case document. This method is appropriate for low-volume and non-production implementations.
Server-side
Java Event Action
A Java based event action is created to handle the matching and filing of the case document. This method is the best method for production implementations.
Server-side
Workflow Event Action
A workflow-based event action starts a workflow to perform some processing that is based on a document or folder action.
11.2.3 Sample JavaScript based implementation procedure You can implement the automated-filing of the ingested documents by using JavaScript. From Case Manager Builder, complete the following steps: 1. Define the case property that is to be used as the key. For example, use Case Number as the key. Remember: The key that is used is not necessarily the same as the Case Title designated property, although this is a common practice. 2. Add the property to the document type that is ingested. 3. Deploy the solution.
Chapter 11. Customization topics
415
From Administration Console for Content Platform Engine (ACCE), complete the following steps: 1. Select the object store in the domain navigation pane. We first define an event action before we create a subscription. In the Administration Console for Content Platform Engine, this allows the new subscription to use the newly created JavaScript Event action. 2. Create an event action by selecting object store → Events, Actions, Processes → Event Actions → New Event Action, as shown in Figure 11-1.
Figure 11-1 Adding a new event action
3. By using the wizard, add an event action. In the example, the display name is called Automated Case Document Filing Action. 4. In the next window in the wizard, select JavaScript as the event action type. 5. Paste the JavaScript code that is provided in Example 11-1 on page 417.
416
Advanced Case Management with IBM Case Manager
Example 11-1 Sample JavaScript code
importPackage(java.io); importClass(java.lang.System); importClass(java.lang.Integer); importClass(java.util.Iterator); importClass(Packages.com.filenet.api.engine.EventActionHandler); importClass(Packages.com.filenet.api.util.Id); importPackage(Packages.com.filenet.api.events); importPackage(Packages.com.filenet.api.property); importPackage(Packages.com.filenet.api.exception); importPackage(Packages.com.filenet.api.core); importPackage(Packages.com.filenet.api.constants); importClass(Packages.com.filenet.api.query.SearchSQL); importClass(Packages.com.filenet.api.query.SearchScope); importClass(Packages.com.filenet.api.collection.IndependentObjectSet );
function onEvent(event, subscription) { // customize to some other string property symbolic name as needed var keyIdentifierName = "CC_CaseNumber"; var os = event.getObjectStore(); var id = event.get_SourceObjectId(); // get document's key identifier value var fe = new FilterElement(null, null, null, "Name " + keyIdentifierName, null); var pf = new PropertyFilter(); pf.addIncludeProperty(fe); var doc = Factory.Document.fetchInstance(os, id, pf); var identifier = doc.getProperties().get(keyIdentifierName).getStringValue(); // find case folder of same key identifier value var sqlStr = "SELECT [" + keyIdentifierName + "], [FolderName], [PathName], [Id] FROM [CmAcmCaseFolder] WHERE ([" + keyIdentifierName + "] = '" + identifier + "')"; var sql = new SearchSQL(sqlStr); var ss = new SearchScope(os); var objectSet = ss.fetchObjects(sql, new Integer(1), null, null); var iter = objectSet.iterator(); if (iter.hasNext()) {
Chapter 11. Customization topics
417
var folder = iter.next(); // file the doc and save var drcr = folder.file(doc, AutoUniqueName.AUTO_UNIQUE, doc.getProperties().getStringValue("Name"), DefineSecurityParentage.DO_NOT_DEFINE_SECURITY_PARENTAGE); drcr.save(RefreshMode.NO_REFRESH); } } 6. Create a subscription for the wanted document class or object by using the newly created event action. Complete the following steps: a. Identify and click the wanted document class or object for which you want to create a subscription. The example uses the Correspondence document type. b. From the Action menu, click New Subscription to add a subscription (see Figure 11-2) to this document class.
Figure 11-2 Adding a subscription to the Correspondence document class
418
Advanced Case Management with IBM Case Manager
7. By using the wizard, enter a display name. In this example, the display name is Automatic Case Document Filing Subscription, as shown in Figure 11-3.
Figure 11-3 Creating a subscription
8. In the Select the Triggers window of the wizard, select the wanted triggers for the new subscription. In our example, select Creation Event, as shown in Figure 11-4 on page 420.
Chapter 11. Customization topics
419
Figure 11-4 Specify triggers window for creating a new subscription
9. In the Select an Event Action window of the wizard, choose the newly created event action and finish the wizard to complete the new subscription. Test your implementation by creating a document of the specified class. Make sure that the document is filed into the appropriate case folder. For more information about how to create a code module for automated document ingesting can be found at the IBM FileNet P8 Information Center, which is available at this website: http://pic.dhe.ibm.com/infocenter/p8docs/v5r2m0/topic/com.ibm.p8.ce.adm in.tasks.doc/p8pcc047.htm For more information about how to handle ingested documents through workflow, see 14.5, “Using Content Platform Engine workflow integration” on page 555.
420
Advanced Case Management with IBM Case Manager
11.3 Splitting a case There are instances in which you must split a single case into two separate cases. For example, in the Customer Complaints solution, a customer might file a complaint for a product defect and a service failure on the same complaint form or email. Based on company guidelines, these are two different types of complaints that must be resolved through two separate review processes. In this situation, the case worker must split the original case into two separate cases. Many of the details, such as customer name and the date when the complaint was filed, are the same for both cases. The Split Case page is designed for splitting cases. The Split Case page is started when the case worker clicks Split Case on the Case toolbar. When a case is split, a case is created that is based on information from the original case. Documents in the original case can be selectively moved to the new case. The new case can be of the same case type or a different type within the same solution. After the split, the two cases continue independently. The case history shows the split action and the other related case. This section describes how to split a case by using the Split Case page.
Chapter 11. Customization topics
421
11.3.1 Splitting a case into two cases The Split Case window is opened by clicking Split Case in the Case Details page, as shown in Figure 11-5. If there are multiple case types in the solution, you can select the case type to be created from the split action.
Figure 11-5 Split Case window
The Split Case page contains the following widgets: Case toolbar: Displays header information. Split Case Data: Shows the case properties that can be edited for the new case. The properties fields are completed with matching values from the original case. Select Case Documents: Allows a user to select documents from the original case to be added to the new case. Original Case Data: Displays read-only property values from the original case. Tip: The property fields in the new case are completed with matching values from the original case. However, if the case has a property that has a default value and the current value of the property in the original case is NULL, the property is set to the default.
422
Advanced Case Management with IBM Case Manager
Review the data that is presented for the new case, edit it if necessary, and then select the case documents to be added to the new case. After user confirmation, the split operation is completed, which copies the information to a new case instance. The new case and original case continue independently and complete separately. The tasks from the original case continue to run, and new tasks for the new case are started in the normal fashion. They function the same as though they were created through the Add Case function. If the user chooses to do so, selected documents are filed into new case at the case root level. The history of the original and the new case shows the split action and a link to the other case. Figure 11-6 shows the history of the split case activity for the example use case.
Figure 11-6 History of the case
Chapter 11. Customization topics
423
11.4 Basic customization scenarios Disclaimer: IBM does not warrant, represent, or imply reliability, serviceability, or function of the code that is presented in association with this book. IBM is under no obligation to update content nor provide further support. All code is provided “as is,” with no warranties or guarantees whatsoever. In IBM Case Manager, there are various ways to customize a solution to add functionality by using custom code in the custom action or toolbar, code in the script adapter widget that is wired with preinstalled widgets, or with custom widgets. These can be considered as basic, intermediate, and advanced levels of customization to IBM Case Manager. This section focuses on the basic customization scenarios. The customization scenarios are provided as a subset of the many different ways to customize IBM Case Manager. Each customization scenario can be altered to achieve a different result and be provided as working examples. The following basic customization examples are shown in this section: Adding a button to the toolbar Adding custom actions to menu action
11.4.1 Adding a button to the toolbar In this example, we add two new buttons to the toolbar. The first button opens a web page to the Toolbar widget. Complete the following steps: 1. From Case Manager Client, open Page Designer on the wanted page. 2. Edit the settings of the Toolbar widget on the page. 3. Click the Add button icon to show the Action and Alignment drop-down menus for a new button. For the Action drop-down menu, choose from Add Case, Custom Add Case Action, Event Action, Manage Roles, Open Web Page, Preferences, and Script Action. For the Alignment drop-down menu, choose from Left, Right, or Center. 4. In this example, we select Open Web Page as the action, Left as alignment, and enter http://ibm.com as the URL, as shown in Figure 11-7 on page 425.
424
Advanced Case Management with IBM Case Manager
Figure 11-7 Adding a custom button to the toolbar
5. Click OK to add the new button to the toolbar. Then, click OK again to exit the Toolbar window and save the changes. 6. Commit and deploy the changes to the solution and validate the button in Case Manager Client.
11.4.2 Adding custom actions to menu action We customize the menu action of the Case List widget in this example. The menu options for the Case List widget are called when the user right-clicks a case in the Case List widget. Complete the following steps to add an option to show a link to the case through a menu action in the Case List widget: 1. From Case Manager Builder, open Page Designer on the wanted page. 2. Edit the settings of the Case List widget on the page. In this example, we edit the settings of the Case List widget on the Cases page. 3. Click the Menu tab, and then click Add Menu Item. There are various actions that are available by default. For example, choosing Script Action allows a custom script to be run when the button or menu is selected.
Chapter 11. Customization topics
425
4. Select Script Action as the action. The window automatically fills with three other text areas: execute, show this script action, and enable this script action. 5. Copy and paste the script that is provided in Example 11-2 into the Execute section of the window. This script checks against the Case Title to see whether it matches with a variable set. In this script, we acquire the value of the case from the Case List widget by using this.getActionContext(“CaseReference”). Then, we perform a simple IF statement to check against the first element in the array that is given from the function call this.getActionContext(“CaseReference”). Example 11-2 Sample script action
var x = this.getActionContext("CaseReference"); var c = "CC_Complaint_000000100001"; if(c == x[0].getCaseTitle()) { alert("This is a special case, please review this case."); } else { alert("This is a normal case, please proceed."); } 6. Click OK to add the menu item. Click OK again at the bottom of the Case List settings window to save the changes. 7. Commit and deploy the changes to the solution and validate the script in Case Manager Client.
11.5 Intermediate customization scenarios There are various ways to customize an IBM Case Manager solution. This section focuses on the intermediate level of customization scenarios. This type of customization involves adding code in the script adapter widget that is wired with preinstalled widgets. The customization scenarios are provided as a subset of the many different ways to customize IBM Case Manager. Each customization scenario can be altered to achieve a different result and are provided as working examples.
426
Advanced Case Management with IBM Case Manager
We show the following intermediate level of customization examples:
Enumerating documents Opening multiple work items Adding entry template via custom action Adding an attachment to the case Creating in-basket dynamic filter Filtering Case Information widget to show comments only Modifying property attributes by using the Property Controller Getting the next work item with custom logic after completing a work item Filling the Case List widget based on search results
11.5.1 Enumerating documents This customization scenario allows a user to enumerate the number of documents that are attached to a case by using the Script Adapter widget and wiring it to the Case List widget on the Cases page. We want the user to select a case in the Case List widget, for a pop-up window to show the number of documents, and show the document ID of each document in the root folder of the case. We want to use a script that gets the case folder ContentItem from the case editable object that is passed in the payload. Complete the following steps: 1. From Case Manager Builder, open Page Designer on the Cases page. 2. Drag the Script Adapter widget from the widget palette area to the main layout area. The location of the widget does not matter (whether it is in the hidden widget area or in a column on the page). 3. Click the Edit Settings icon of the Script Adapter widget and paste the code in Example 11-3 into the text area that is labeled JavaScript. Click OK to exit the window. Example 11-3 Sample script for enumerating documents
var caseEditable = payload.caseEditable; var caseObj = caseEditable.getCase(); var caseFolder = caseObj.caseFolder; var actionsHandler = ecm.model.desktop.getActionsHandler(); if (actionsHandler) { actionsHandler.actionOpen(caseFolder, function(caseFolder, resultSet) { alert("The selected case folder has " + resultSet.items.length + " items."); for (var i = 0 ; i < resultSet.items.length; i ++) {
Chapter 11. Customization topics
427
console.log("Document ID : " + resultSet.items[i].id + "\n" + "Document Title: " + resultSet.items[i].name); alert("Document ID : " + resultSet.items[i].id + "\n" + "Document Title: " + resultSet.items[i].name ); } }); } return payload; 4. Click the Edit Wiring icon of the Script Adapter widget and wire it to the Case List widget to receive the Select Case outgoing event. Click Add Wire and then click OK to exit the window. 5. Save and close the Cases page, deploy the changes to the solution, and validate this customization scenario in Case Manager Client, as shown in Figure 11-8.
Figure 11-8 Viewing pop-up window from enumerating document sample
11.5.2 Opening multiple work items In this customization scenario, the user can add a custom script to the Script Adapter widget to open multiple work items with multiple tabs in Case Manager Client. This opens multiple work items simultaneously in one action. The Script Adapter widget is wired to the In-baskets widget. Complete the following steps: 1. Within Case Manager Builder, open Page Designer on the Work page. 2. Click the Edit Settings icon in the In-baskets widget then click the Menu tab. 3. Click the Add Menu Item icon and select Event Action for the Action drop-down menu.
428
Advanced Case Management with IBM Case Manager
4. Enter Open All for the Label field, open_all for the Menu Identifier field, open_all_event for the Event Name field, and select Broadcast as the Event Type, as shown in Figure 11-9.
Figure 11-9 Adding a menu action for the In-baskets widget
5. Click OK to add the new menu action for the In-baskets widget. Click OK to save the changes to the In-baskets widget. 6. Drag the Script Adapter widget from the widget palette area to the main layout area. Click the Edit Settings icon and paste the script that is shown in Example 11-4 on page 430 into the JavaScript text area. Then, click OK to save the changes to the Script Adapter widget. Tip: When possible, it is recommended that you add the Script Adapter to the hidden widgets page to avoid cluttering the page.
Chapter 11. Customization topics
429
Example 11-4 Sample script to open multiple work items
for (var i in payload.WorkItem){ var w = payload.WorkItem[i]; var h = new icm.util.WorkItemHandler(this, true); w.retrieveStep(function(workItem){ h.handleWorkItem(workItem); }); } 7. Click the Edit Wiring icon on the Script Adapter widget to wire the Script Adapter widget to the In-baskets widget. Select In-baskets as the source widget, select *open_all_event as the outgoing event, and select Receive event payload as the Incoming event. 8. Click Add Wire and then click OK to exit the window. 9. Save and close Page Designer and deploy the changes to the solution. To validate this customization scenario, click the first work item once and hold the Shift key to highlight the second work item in the In-baskets widget. Then, right-click either case and select Open All to open them in multiple tabs, as shown in Figure 11-10.
Figure 11-10 Opening multiple work items
430
Advanced Case Management with IBM Case Manager
11.5.3 Adding entry template via custom action This customization scenario allows the user to create a custom toolbar action to open an IBM Content Navigator action for an entry template. The entry template must be created beforehand and then the custom toolbar action starts the IBM Content Navigator action. Complete the following steps: 1. Create an entry template that uses FileNet Workplace XT by using the IBM FileNet Workplace XT Entry Template Designer. For more information about entry templates, see the IBM FileNet P8 Information Center at this website: http://pic.dhe.ibm.com/infocenter/p8docs/v5r1m0/index.jsp?topic=%2Fc om.ibm.usingeuc.doc%2Feuche013.htm 2. Copy the version series ID of the newly created entry template. 3. Within Case Manager Builder, open Page Designer on the Cases page. 4. Click the Edit Settings icon on the Toolbar widget and click the Add Button icon. 5. Select Script Action when you are clicking the drop-down menu for Action. Add the value Add Entry Template for the label field. 6. Paste the script that is in Example 11-5 on page 432 into the Execute text area. Make sure to replace the text in the first line with the version series ID of the newly created template. This script allows you to open a window to add an entry template that is started as an IBM Content Navigator action. The script calls the Navigator action through ecm.model.desktop.getActionsHandler(lang.hitch(this,function(actions Handler). We can display the entry template through the version series ID and the repository ID.
Chapter 11. Customization topics
431
Example 11-5 Sample script for opening an entry template
var entryTemplateId = "YOUR VERSION SERIES ID HERE"; var repositoryId = this.getWidget().getSolution().getTargetOS().id; require([ "dojo/_base/declare", "dojo/_base/lang" ], function( declare, lang ) { ecm.model.desktop.getActionsHandler(lang.hitch(this, function(actionsHandler) { var repository = ecm.model.desktop.getRepository(repositoryId); repository.retrieveItem(entryTemplateId, function(item) { if (item && item.mimetype) { switch (item.mimetype) { case "application/x-filenet-documententrytemplate": case "application/x-filenet-entrytemplate": actionsHandler.actionView(repository, [ item ]); break; } } }, "EntryTemplate", "current", entryTemplateId); })); }); 7. Click OK to add the button to the toolbar widget and then click OK to save the changes to the toolbar widget. 8. Save and close the page in Page Designer, then deploy the changes to the solution. To validate this customization scenario, click Add Entry Template to open a pop-up window to add the entry template, as shown in Figure 11-11 on page 433.
432
Advanced Case Management with IBM Case Manager
Figure 11-11 Adding an entry template in Case Manager Client
11.5.4 Adding an attachment to the case Often, a case worker wants to add an attachment to the case from the local system but does not want to browse to the repository each time to find the case folder. This customization scenario allows the case worker to add an attachment to file into the case without having to browse to the case folder in the Save in field for the Add Document window on the Work Details page. This customization scenario uses custom script in an event action in the Attachment widget. It also uses custom script in a Script Adapter widget.
Chapter 11. Customization topics
433
Note: If you are using the Customer Complaints solution, make sure that the appropriate step has an attachment added as part of the workflow. Complete the following steps: 1. From Case Manager Builder, open Page Designer on the Work Details page. 2. Click the Edit Settings icon for the Attachments widget on the page. 3. Click the Menus tab, then click the Add Menu Item icon. 4. Select Event Action under the Action drop-down menu. Then, enter the following values: – – – –
Label: Add Document From Local File System Event Name: icm.AddDocToBothCaseAndAttachment Event Type: Wiring Enable this event action: Paste the script that is shown in Example 11-6.
Example 11-6 Sample script for Attachment widget event action
if (attachment && attachment.length > 0) { attachment = attachment[0]; } if ((attachment && (attachment.get("readOnly") == true)) || (!attachment)){ return false; }else{ return true; } 5. Click OK at the bottom of the form to add the new menu item. Click OK again to save the changes to the Attachments widget. 6. Drag the Script Adapter widget from the widget palette area to the main layout area. It is recommended to put this Script Adapter widget into the hidden widgets area. Click Show/Hide Hidden Widgets in the toolbar area of Page Designer to show the hidden widgets area. 7. Click the Edit Settings icon on the Script Adapter widget. 8. Select the Block outbound event option.
434
Advanced Case Management with IBM Case Manager
9. Paste the custom script that is shown in Example 11-7 into the JavaScript text area. This custom script uses the Add Document dialog, retrieves the case folder, and makes it as the parent folder of the Add Document dialog. It also hides the Save in field that is present in the Add File from Add Document dialog. Example 11-7 Sample custom script for adding an attachment
var self = this; /*Wire to page container icm.SendWorkItem event, retrieve the workitem related case.*/ if(payload.eventName == "icm.SendWorkItem"){ self.workItemEdt = payload.workItemEditable; self.workItemEdt.retrieveStep(function(){ self.case = self.workItemEdt.getCase(); }); } /*Wire to event action on attachment, which published the user configured event icm.AddDocToBothCaseAndAttachment*/ if(payload.eventName == "icm.AddDocToBothCaseAndAttachment"){ /*Get the selected attachment sent from event action*/ self.attachment = payload.Attachment; /*Callback to add case document as attachment*/ var _addToAttachment = function(contentItem){ self.onPublishEvent("icm.SendEventPayload", {"attachmentName":self.attachment.id, "documents":[contentItem]}); }; /*retrieve the case folder, make it as the parent folder of the add document dialog*/ self.case.retrieveCaseFolder(function(){ var parentFolder = self.case.getCaseFolder(); require(["dojo/dom-style", "ecm/widget/dialog/AddContentItemDialog"],function(domStyle, AddContentItemDialog){ /*Create the add document dialog*/ self.addContentItemDialog = new AddContentItemDialog(); var contentItemGeneralPane = self.addContentItemDialog.addContentItemGeneralPane; /*Hide the "Save in" field - ICM requirement*/
Chapter 11. Customization topics
435
domStyle.set(contentItemGeneralPane._documentOnlyArea, "display", "none"); /*Show the add document dialog*/ self.addContentItemDialog.show(parentFolder.repository, parentFolder, true, false, _addToAttachment, null, false, null, true); }); }); } 10.Click OK in the Script Adapter widget. Then, click the Edit Wiring icon on the Script Adapter widget. 11.Under the section that is labeled Incoming Events for the Script Adapter, specify the following values under each drop-down menu: – Source widget: Page Container – Outgoing event: Send work item – Incoming event: Receive event payload 12.Click Add Wire. 13.Specify a second incoming event for the Script Adapter with the following values: – Source widget: Attachments – Outgoing event: *icm.AddDocToBothCaseAndAttachment – Incoming Event: Receive event payload 14.Click Add Wire. 15.Under the section that is called Outgoing Events for the Script Adapter, specify the following values under each drop-down menu: – Outgoing event: Send event payload – Target widget: Attachments – Incoming event: Add document attachment 16.Click Add Wire. Then, click OK to save the changes to the wiring for the Script Adapter widget. 17.Save the changes to the page, deploy the changes in Case Manager Builder, and open Case Manager Client to validate the customization scenario. 18.On the Work Details page, browse to the Attachments widget, click Actions, and then select the newly created menu item, Add Document From Local File System. The window that opens after you click the menu item does not require the user to specify where to save the attachment. The attachment is automatically saved to the case folder.
436
Advanced Case Management with IBM Case Manager
11.5.5 Creating in-basket dynamic filter This customization scenario adds an in-basket dynamic filter. The in-basket widget loads when the dynamic filter is received so that the results that are shown in the in-basket widget already are filtered to the case worker. Complete the following steps: 1. From Case Manager Builder, open Page Designer on the Work page. 2. Drag the Script Adapter widget from the widget palette area to the main layout area. 3. Wire the Script Adapter widget to the Page Container widget under the Incoming Events section by setting the following values: – Source widget: Page Container – Outgoing event: Page Activated – Incoming event: Receive event payload Click Add Wire to add this wiring setting. 4. Wire the Script Adapter widget to the Page Container widget under the Outgoing Events section by setting the following values: – Outgoing Event: Send event payload – Target widget: In-baskets – Incoming event: Apply filter Click Add Wire to add this wiring setting. 5. Validate that the In-basket widget is wired appropriately. 6. Click the Edit Settings icon for the Script Adapter widget and paste the script that is shown in Example 11-8 on page 438 into the JavaScript text area. The following script grabs the current user name and constructs variables to pass to the icm.model.InbasketDynamicFilter.fromJSON(data); function to perform the dynamic filter. Note: The script that is shown in Example 11-8 on page 438 is specific to the Customer Complaints solution. Make sure to create a case property for the Customer Complaints solution that is called AssignedToUser. The in-basket dynamic filter searches on this case property and matches it to the user name, which is case-sensitive.
Chapter 11. Customization topics
437
Example 11-8 Sample script for in-basket dynamic filter
var myUser = ecm.model.desktop.userDisplayName; var data = { "queueName":"CC_Specialist", "inbasketName":"Specialist", "hideFilterUI":false, "queryFilter":"(CC_AssignedToUser = :A)", "queryFields":[ { "name":"CC_AssignedToUser", "type":"xs:string", "value":"*" } ], "hideLockedByOther":"true" }; data.queryFields[0].value = myUser; var model = icm.model.InbasketDynamicFilter.fromJSON(data); console.log(model); var modelArray = []; modelArray.push(model); return {"dynamicFilters":modelArray}; 7. Click the Edit Settings icon for the In-baskets widget and select the Do not populate the in-basket until the dynamic filter is received option. This ensures that the in-basket widget loads only when the filter is received. 8. Save and close the changes to the page within Page Designer. Ensure that the newly created case property AssignedToUser is available to the case type and the Specialist in-basket. 9. To validate this customization scenario, create a case and enter P8Admin if you are logged in as P8Admin for the case property AssignedToUser on the Work Page in Case Manager Client. Ensure that the case is opened to the Specialist queue and it appears in the in-basket widget on Case Manager Client. In Figure 11-12 on page 439, there are three work items in the Specialist queue, but only one is available because it has the value P8Admin, which matches the logged in user.
438
Advanced Case Management with IBM Case Manager
Figure 11-12 In-basket widget dynamic filter
11.5.6 Filtering Case Information widget to show comments only This customization scenario allows the Case Information widget to show only comments that are attached to the case. This helps to filter down the History tab of the Case Information widget. Complete the following steps: 1. From Case Manager Builder, open Page Designer for a page or a custom page with the Case List widget. In this example, we customize the Cases page. 2. Drag the Script Adapter widget from the widget palette area to the main layout area. 3. Wire the Script Adapter widget to the Page Container widget under the Incoming Events section by setting the following values: – Source widget: Page Container – Outgoing event: Page Opened – Incoming event: Receive event payload Click Add Wire to add this wiring setting. 4. Wire the Script Adapter widget to the Page Container widget under the Outgoing Events section by setting the following values: – Outgoing Event: Send event payload – Target widget: Case Information – Incoming event: Filter History Click Add Wire to add this wiring setting.
Chapter 11. Customization topics
439
5. Click the Edit Settings icon for the Script Adapter widget. Paste the code that is shown in Example 11-9 into the JavaScript text area. This script filters the payload of the Case Information widget to show only case comments. Example 11-9 Sample script to show comments only
payload = {"show":"Summary", "showValue":"Summary", "forEntry":"Comments", "forValue":"Comments"}; return payload; 6. Save the changes to the page, deploy the changes to the solution, and open Case Manager Client to the page with the Case List widget. In this example, we open the Cases page and click a case in the Case List widget. The History tab of the Case Information widget shows the comments of the case.
11.5.7 Modifying property attributes by using the Property Controller This customization scenario involves hiding or showing certain case properties, depending on what the user selects in a choice list case property. This scenario demonstrates how to adjust the PropertyController settings in the context of the Coordination topic. When the page broadcasts a SendCaseInfo event, for example, each widget begins the process of loading their widget content. This loading is asynchronous and can take longer for some widgets, such as the Form widget. In the case of data widgets, such as the Properties, Form, Attachments widgets, one widget can complete the loading process and prepare for user input before another. Therefore, the user can begin interacting with that widget’s user interface while the other widgets are still loading. Because all of these widgets share a controller instance, it becomes difficult to ascertain the controller’s initial state when testing for dirty state. The LOADWIDGET and AFTERLOADWIDGET topics were introduced to coordinate the loading process so that all widgets can be certain of the moment when the loading process was complete by all data widgets. Important: This customization scenario and the LOADWIDGET and AFTERLOADWIDGET topics are not available in IBM Case Manager V5.2. It is available in IBM Case Manager V5.2.0.001. Specifically, the LOADWIDGET topic indicates that a widget can begin loading its content. The completion callback is called when the loading process is complete. The Properties widget responds to this topic by loading the widget in a read-only state to temporarily prevent user input.
440
Advanced Case Management with IBM Case Manager
After all of the widgets respond to the LOADWIDGET topic, then the AFTERLOADWIDGET topic is triggered. Its payload includes a time stamp that indicates the moment when all data widgets were loaded. The Properties widget responds to this topic by switching the view to an editable state to allow user input. The following customization scenario shows how coordination topics can be used to customize some of the controller while the page is loaded: 1. Open the Case Details page in Page Designer. 2. Drag the Script Adapter widget from the widget palette area to the main layout area or the hidden widgets area. 3. Wire the Script Adapter to the Send case information event from the Page Container widget. 4. Click the Edit Settings icon for the Script Adapter widget and paste the custom script that is shown in Example 11-10 into the JavaScript text area. This custom script uses the Property Controller to detect if the user changed the Upgrade Category case property value to Product or Service Plan on the Case Details page. If the user selects Product, the Part Number case property becomes required and the Customer Since case property is hidden. If the user selects Service Plan, the Customer Since case property becomes required and the Part Number case property is hidden. IBM Case Manager V5.2.0.001 adds the LOADWIDGET and AFTERLOADWIDGET topics that allows the coordination events to be run. Example 11-10 Sample custom script for modifying property attributes
require(["icm/base/Constants", "icm/model/properties/controller/ControllerManager"], function(Constants, ControllerManager) { var coordination = payload.coordination; var editable = payload.caseEditable; var collectionController; var upgradePropertyController; var productPropertyController; var servicePropertyController; var handle; /* Define the value change handler for the CC_UpgradeCategory property. This handler updates the state of the CC_PartNumber and CC_CustomerSince properties each time the value of the CC_UpgradeCategory property changes. */
Chapter 11. Customization topics
441
var upgradeMethodValueChangedHandler = function(upgradeMethodValue) { productPropertyController.set("hidden", upgradeMethodValue !== "Product"); productPropertyController.set("required", upgradeMethodValue === "Product"); servicePropertyController.set("hidden", upgradeMethodValue !== "Service Plan"); servicePropertyController.set("required", upgradeMethodValue === "Service Plan"); }; /* Define the handler for the LOADWIDGET topic. */ var loadTopicHandler = function(context, complete, abort) { /* Create the controller binding. */ collectionController = ControllerManager.bind(editable); upgradePropertyController = collectionController.getPropertyController("CC_UpgradeCategory"); productPropertyController = collectionController.getPropertyController("CC_PartNumber"); servicePropertyController = collectionController.getPropertyController("CC_CustomerSince"); /* Wire up the value changed handler for the CC_UpdateCategory property. */ handle = upgradePropertyController.watch("value", upgradeMethodValueChangedHandler); /* Call the value changed handler directly to update the initial state of the CC_PartNumber and CC_CustomerSince properties based on the current value of the CC_UpgradeCategory property. */ upgradeMethodValueChangedHandler(upgradePropertyController.get("valu e")); /* Call the coordination completion method. */ complete(); }; /* Define the handler for the AFTERSAVE and AFTERCANCEL topics. */ var closeTopicHandler = function(context, complete, abort) { /* Release the value changed handler. */
442
Advanced Case Management with IBM Case Manager
handle.remove(); /* Release the controller binding. */ ControllerManager.unbind(editable); /* Call the coordination completion method. */ complete(); }; /* Wire up the coordination topic handlers. */ coordination.participate(Constants.CoordTopic.LOADWIDGET, loadTopicHandler); coordination.participate(Constants.CoordTopic.AFTERSAVE, closeTopicHandler); coordination.participate(Constants.CoordTopic.AFTERCANCEL, closeTopicHandler); }); 5. Save the changes to the page and deploy the changes to the solution. To validate this customization scenario in Case Manager Client, open the Case Details page and notice that the Customer Since field is hidden and the Part Number field is required when Product is selected in the Upgrade Category field. Similarly, notice that the Part Number field is hidden and the Customer Since field is required when Service Plan is selected in the Upgrade Category field. Note: This customization scenario can be modified to be added to the Work Details page, Add Cases page, or Add New Task page. The wiring and the custom script must be modified accordingly.
11.5.8 Getting the next work item with custom logic after completing a work item This customization scenario allows the user to complete a work item, then have some custom logic to retrieve the next work item automatically. The custom logic in this specific example retrieves the next work item that has the same step name as the one that was opened from the In-baskets widget. This customization scenario uses the get next option that is available in the Work Item Toolbar widget’s Complete action. The Complete action in the Work Item Toolbar widget can be enabled to automatically get the next work item. This retrieves the next work item when the case worker clicks Complete.
Chapter 11. Customization topics
443
This customization (as shown in Figure 11-13) extends this standard feature in IBM Case Manager and adds custom logic.
Figure 11-13 Work Item Toolbar widget’s Complete action
For the Customer Complaints solution, if a case worker is of the Specialist Role and opens the only Review Product Compliant work item in the work queue and the rest of the work items in the queue for the Specialist role are Review Non-Product Compliant work items, the work details page notifies the case worker that there are no more work items to retrieve. Complete the following steps to customize the solution: 1. Open the page or custom Work Details page in Page Designer. In this example, we use the Work Details page. 2. Open the Edit Wiring window and select the Page Container widget. Click the Event Broadcasting tab and clear the Send work item. This ensures that the custom script we add in later broadcasts this event, instead of the page.
444
Advanced Case Management with IBM Case Manager
3. Click the Edit Settings icon on the Work Item Toolbar widget. Click the Toolbar tab and double-click the Complete toolbar label to edit it. 4. Select the Automatically get the next work item option. This enables the Complete button on the work details page to retrieve the next work item. Click OK to save the changes to the Complete button, then click OK again to save the changes to the Work Item Toolbar. 5. Drag the Script Adapter widget from the widget palette area to the main layout area. 6. Click the Edit Settings icon on the Script Adapter widget and paste the script that is shown in Example 11-11 into the JavaScript text area. This script is a sample that requires the next work item to have the same step name as the first work item that was opened from the In-baskets widget directly. This can be changed or modified if you want to retrieve the next work item by using different criteria. Example 11-11 Sample script to process a work item
var widget = this; require([ "dojo/_base/declare", "dojo/_base/lang", "icm/util/WorkItemHandler", ], function( declare, lang, WorkItemHandler ) { if(payload !== null){ var workItemEditable = payload.workItemEditable; var UIState = payload.UIState; if ( workItemEditable !== null) { /*If the current work item is not gotten from get next function, just show it*/ var stepName = workItemEditable.getStepName(); if(UIState !== null && UIState.get("GetNext") === true){ /*do any rules based on business logic*/ if ( widget.lastWorkItemStepName && stepName !== widget.lastWorkItemStepName){ /* if the work item is not expected. We always need to handle the work item with same stepName for handling */ var icmWorkitem = workItemEditable.getWorkItem();
Chapter 11. Customization topics
445
if(UIState !== null && UIState.get("workItemReadOnly") !== true){ icmWorkitem.abortStep(lang.hitch(this, function(){ var handler = new WorkItemHandler(widget); handler.handleNextWorkItem(icmWorkitem); })); }else{ var handler = new WorkItemHandler(widget); handler.handleNextWorkItem(icmWorkitem); } }else{ widget.lastWorkItemStepName = stepName; widget.onBroadcastEvent("icm.SendWorkItem", payload); } }else{ widget.lastWorkItemStepName = stepName; widget.onBroadcastEvent("icm.SendWorkItem", payload); } } } }); return null; 7. Click the Edit Wiring icon on the Script Adapter widget and enter the following values under the section that is labeled Incoming Events for the Script Adapter: – Source widget: Page Container – Outgoing event: Send work item – Incoming event: Receive event payload 8. Click OK to save the changes to the Script Adapter widget. 9. Save the changes to the page, deploy the changes to the solution, and open Case Manager Client to validate this customization scenario. To validate, open a work item directly from the In-baskets widget to view the work item on the Work Details page. Then, complete the work item and notice that the next work item with the same step name comes up automatically. When there are no more work items with the same name in the In-baskets widget, a window opens.
446
Advanced Case Management with IBM Case Manager
11.5.9 Filling the Case List widget based on search results This customization scenario allows the user to automatically complete the Case List widget with a list of cases that is based on search results. This allows the user to load a page with the Case List widget that already contains the cases that are relevant to the user. This customization scenario can be added to a custom page so that a case worker has the cases already preinstalled that are based on the customer state and sorted by the complaint received date. Complete the following steps: 1. Open the page or custom page with the Case List widget in Page Designer. In this example, we use the Cases page. 2. Drag the Script Adapter widget onto the page. 3. Click the Edit Wiring icon for the Script Adapter widget. 4. Under the Incoming Events section, make the following selections: – Source widget: Page Container – Outgoing event: Page opened – Incoming event: Receive event payload Click Add Wire to add the wiring. 5. Under the Outgoing Events section, make the following selections: – Outgoing event: Send event payload – Target widget: Case List – Incoming event: Search cases Click Add Wire to add the wiring. 6. Click the Edit Settings icon for the Script Adapter widget and paste the script that is shown in Example 11-12 on page 448 into the JavaScript text area. This script creates a case search that filters on cases by the customer state field, removes that field from the Case List view, and sorts the result by the complaint received date. This is done by using the utility class of icm.util.SearchPayload that can be referenced in the IBM Case Manager JavaScript API reference documentation.
Chapter 11. Customization topics
447
Example 11-12 Sample custom case list script
var solution = this.solution; var params = {}; var self = this; var caseType = solution.getPrefix() +"_Complaint"; var complaintReceivedAttrId = solution.getPrefix() +"_ComplaintReceivedDate"; var customerStateAttrId = solution.getPrefix() +"_CustomerState"; var customerStateAttrDisplayName = "Customer State"; require(["icm/util/SearchPayload"],function(SearchPayload){ solution.retrieveCaseTypes(function(){
solution.retrieveAttributeDefinitions(function(attributesDef) { var searchPayload = new SearchPayload(); searchPayload.attributeDefinitions = attributesDef; params.ObjectStore = solution.getTargetOS().id; var criterion = new ecm.model.SearchCriterion({"id": customerStateAttrId, "name":customerStateAttrDisplayName, "selectedOperator": "NOTIN", "dataType": "xs:string","defaultValue" : "Completed", "value": "Completed", "values": ["Completed"]}); params.criterions = [criterion]; params.CaseType = caseType; params.solution = solution; var searchPayload = new SearchPayload(); searchPayload.setModel(params); var var var for
payload = searchPayload.getSearchPayload(); property; newdvprops = []; (var i=0; i


![Certification Study Guide: IBM Tivoli Access Manager ... - IBM Redbooks [PDF]](https://m.moam.info/img/260x300/certification-study-guide-ibm-tivoli-access-manage_64903b46098a9e2b5e8b4611.jpg)
![Certification Study Guide: IBM Tivoli Access Manager ... - IBM Redbooks [PDF]](https://m.moam.info/img/260x300/certification-study-guide-ibm-tivoli-access-manage_64903b3e098a9e541a8b465f.jpg)


![IBM i 7.1 Technical Overview with Technology ... - IBM Redbooks [PDF]](https://m.moam.info/img/260x300/ibm-i-71-technical-overview-with-technology-ibm-re_647a5748098a9eae448b4612.jpg)

![IBM Sterling Managed File Transfer Integration with ... - IBM Redbooks [PDF]](https://m.moam.info/img/260x300/ibm-sterling-managed-file-transfer-integration-wit_647ce6e0098a9e603c8b460f.jpg)