3 The technology used here with the WiFiRanger router can be used with any router and act as a CPE. At the end of this document is a discussion of doing that.
Building a Wireless Internet “Capture” Device Jack Mayer www.jackdanmayer.com Original 5/18/2011; Edited 6/17/2011 Copyright © 2011 John Mayer. All rights reserved. You may distribute and republish this article only in its entirety.
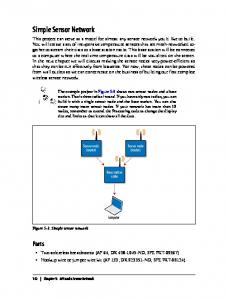
The purpose of this Guide is to enable you to build your own CPE (Customer Premises Equipment) for the mobile environment – specifically this is oriented to RV use, although the principles apply to other environments such as a fixed location like a Park Model or an apartment complex. A CPE is a device (radio and antenna) that is typically placed outside a dwelling or vehicle whose purpose is to capture available WiFi signals. Typically these are then fed to a local wireless router and redistributed. A CPE allows connection to the Internet when it is otherwise not available because of power limitations, obstructions, or distance from the signal. Successfully done, building your CPE will enable you to utilize WiFi signals from a much greater distance than otherwise possible – up to a mile or more is feasible. The only turnkey commercial product that does this and is oriented to the consumer market is the WiFiRanger WFRBoost Mobile. If you do not want to build your own CPE that is the product to own.
Contents
Building Your Own WFRBoost Equipment Selection Building the Boost (CPE) Pick the Radio Pick Your Antenna Build Your Mount
Connecting the Antenna and Bullet Ethernet Wiring Building a Replica of the WFRBoost Mobile Weatherproofing Connections Using a Ubiquity “Device” without the WiFiRanger IP Addressing Basic CPE Configuration Debugging
Required Skills To be successful in building your own Boost device you should either already have these skills, or be willing to learn them: 1
A familiarity with computer networking. If you are interfacing to the WiFiRanger Pro then very little knowledge is required – if things go well. If you intend to interface to any other router then a higher level of skill is required. Configuration Guides are provided, but basic knowledge is useful and will make configuration less frustrating. Ability to debug problem situations. DIY skills in fabricating mounts, routing wires, building Ethernet connections. The ability to solder is helpful in some cases, especially if you try to light your mount.
Warning: You are building and configuring a complex network device. If things go well this Guide will help you to a successful conclusion. But things can go bad fast. When they do, consider how you are going to recover the situation. If you do not have the skills to build and debug networks you might want to reconsider tackling this project and buy the commercial WiFiRanger WFRBoost Mobile.
Building Your Own WFRBoost The WiFiRanger is a consumer router that is oriented towards the mobile environment. It can handle multiple Internet sources – cellular air cards, DSL/cable, and WiFi. WiFi as WAN is the term becoming common to indicate using WiFi as a source for Internet. Like a DSL line, the WiFi signal is used to connect your local wireless LAN (supported by the WiFiRanger) back to the Internet. For the mobile user (RV or vehicle) this provides an important new source of service. The ability to capture this WiFi signal from greater distances is the purpose of the WFRBoost, which is an optional product available from WiFiRanger.com. This “Boost” product uses a separate carrier-grade radio and antenna placed on the roof of the RV, vehicle, or fixed dwelling to better capture WiFi signals. While I recommend that those wanting better wifi reception use the commercial version of the WFRBoost Mobile, available from WiFiRanger.com, you “can” build an equivalent capability from offthe-shelf parts. As long as you have the Pro version of the WiFiRanger the firmware that allows for centralized configuration, management and a unified user interface is already present on your WiFiRanger. You simply need to configure your “home made” WFRBoost via the WFRBoost tab in the WiFiRanger web-based configuration. There are a lot of small details to successfully building your own Boost. Most people will want to buy one, but for those that want to attempt building their own this Guide should help. The WFRBoost Mobile, or your home built version of it, will give you substantially better wifi reception. As I’m typing this I’m connected to a wifi network 1.1 miles away (by air) without a problem. The limit to useful signal acquisition is going to be in the neighborhood of ¾ - 1.5 miles because of access point (AP) issues (power, timing, etc.). Public access points (APs) are typically not designed for long distance clients – to expect more range than this in a typical situation is not realistic, no matter what equipment you have. Remember, you only control your end of the two-way communication.
2
The technology used here with the WiFiRanger router can be used with any router and act as a CPE. At the end of this document is a discussion of doing that. The WFRBoost, in conjunction with the WiFiRanger is a nice package that does all this for you. But if you are a “hobbyist” and want to build your own, all the info to do so is in this document.
Equipment Selection Before I get into how to build a Boost for use with the WiFiRanger (WFR) I need to address some important issues. You are building a high-power radio device that will interface to a network that you do not control. These radios and antennas are carrier-class equipment. They are expected to be handled by people that understand the issues in interfacing them, and in putting together different combinations of antennas and radios. If you do not follow the advice here, you can easily build a radio/antenna combination that will exceed FCC broadcast guidelines, cause interference in RV parks (and I mean serious interference), and provide you with equipment that does not perform optimally (or well at all). The benefit of the WFRBoost is that you don’t have to understand how to configure the radio – it is done for you. In fact, you cannot configure the radio, so you cannot account for use of equipment outside the parameters the WFRBoost was designed for.
There is no reason that in the typical RV environment that you need more than a 100mW Tx radio. I do not recommend the use of a higher Tx radio with the WFRBoost. You can cause issues in the close confines of an RV park. 100mW is more than enough power to connect at the distances supported by the typical AP. You do not need to use a Bullet with 600, 800 or 1000 mW of power. All those devices can be configured to use less power, but not with the WFR configuration. Do not use them.
The major benefits of the Boost come from a) getting it on the roof for best LOS (line of sight), b) a really sensitive Rx section in the Bullet. c) a superior antenna. It does not need excessive Tx power.
I suggest that you limit the omni antenna to 8dbi unless you have a specific reason – and the knowledge – to go higher. Higher gain omni antennas have a narrower vertical beam “height” and may not perform as well because the narrow beam is not optimally focused on the AP – terrain and height have a major impact. I can connect at a mile or more with a 3dbi antenna and 100 mW of Tx power. That is sufficient for most situations. Plus, the larger antennas are harder to handle in a fashion that will not cause damage to them over the long-term. Large antennas – not properly supported – can end up with damaged connectors, and vibration in the mobile environment can cause element breakdown. These issues show up in various non-obvious ways…..and can cause you lots of headaches. You don’t need a 15dbi panel antenna or a 15dbi 3
omni antenna unless you have a specific fixed situation that requires it. DO NOT use an antenna like that inside an RV park.
Public Access Points (APs) are not designed for a long-distance client. By that I mean a client connecting at multiple miles. The ACK timing, power level balancing and other parameters have to be carefully configured on both ends for long distance connections to work properly. Thus, you do not need a radio/antenna combination that would support such a long range scenario. It is unlikely to work because the AP is not configured to support it.
The WFRBoost is designed to support optimal connections to WiFi hotspots in the mobile environment. The equipment is tailored to that goal. If you replicate the Boost with that in mind you will have a successful piece of equipment. If you exceed the limits of reasonable equipment combinations you will likely have issues with the equipment, and you will cause other people issues. The bottom line is that “more” is not “better”. In the past I have stayed away from publishing a DIY guide because of these issues, and because of the complexity of configuration and tuning of the CPE. Instead, I provided preconfigured and matched CPEs for specific situations (turnkey CPEs). The WFR has resolved the complexity of configuration and management. But the proper combination of equipment is still critical, so if are building it yourself you are responsible to make sure that you build the right thing.
4
Building the Boost (CPE) There are three steps involved in setting up your own capability. Some of these are required for installation of the commercial version of the product, as well. Pick Your Radio Decide which physical device you will use as the “boost”. Any Ubiquity AirOS device that can be placed in Station Mode will work with the WFR “boost” firmware. The commercial version of the WFRBoost Mobile uses a Ubiquity Bullet, and I recommend that you do the same, unless you have a specific need to do otherwise. There are two product lines that are labeled “Bullet”. The Bullet2 and the Bullet2 HP are “WiFi Solutions” and are currently running v3.6.1 firmware. The Bullet M2-HP is in the “AirMax ISP” product family and currently runs v5.3.2 firmware. I recommend the Bullet2, which retails for around $40 and has a 100mW transmitter in it. Using a higher-powered transmitter is tempting, but in an RV park environment you may cause issues with the park Access Points under some circumstances with the high powered devices. Note: when looking at Bullets be sure you do not inadvertently order a 5 GHz version – you want the 2.4 GHz model(s). If you need a directional capability you can use the Nanostation family, which has a built in directional antenna, or you can use a directional antenna with the Bullet. Very few people will need a directional capability. If you do decide to use a Nanostation there are several to choose from. I like the NS2 and own one. The Nanostation 2 Loco has less power and less antenna but would work well inside an RV Park or in nearby locations – and is far cheaper if you are building a “budget” system, or just want to play with the technology. The WiFiRanger WFRBoost Fixed product uses a Ubiquity PicoStation. Pick Your Antenna Decide on the antenna. With the Bullet, an omni antenna is the common choice. Once mounted you will not have to point the antenna, since it can receive from 360 degrees. You can use a directional with the Bullet, but you will probably need a pigtail to connect the antenna. If you need a directional antenna you are better off using a Nanostation. The WFRBoost Mobile comes with a 3dbi omni N-mount antenna built by Laird. This is a bulletproof antenna. It can take physical trauma and shrug it off. But it is only 3dbi. While that is sufficient for most situations (like inside an RV Park) since you are building your own you might consider an 8dbi short omni, like in my test setup. Take a look at the 8dbi Omni at Streakwave for a good example of what I’d recommend. This antenna will directly attach to the Bullet. I feel the Laird makes for a better overall setup given all the tradeoffs, but the 8dbi is a viable option if you want to deal with the additional 5
mounting complexities. If you want a small directional with the Bullet, the mini 12dbi directional at Streakwave works well. You will need a 90* adaptor or a pigtail to connect it to the Bullet. N-male to N-female. I mention this directional only because some people do have situations where it would be useful – but normally a directional would be far down on the choice list. Almost everyone is better served by an omni.
You want to mount the antenna in such a fashion that it gets above any roof obstructions, but yet does not exceed the high point on the RV by much (if any). Mounting it on the left side of the rig will help prevent tree limb strikes, since limbs do not often stretch that far over the road.
Mount the Device Design and fabricate the mounting bracket. I’d recommend this be as simple as possible. If you have a crank-up batwing antenna and are using the larger 8dbi omni, consider mounting it all on that. Refer to the Antenna section of my website for a number of different mounting methods. My Picasa Album has an example of a batwing mount of a “home made” Boost. Be careful of physical damage to the Bullet body if you are using clamps on it. Stainless pipe clamps hold it well, as do commercial (large) plastic wire ties. You can wire-tie it to the ladder without issues – then just run the cat5 cable up to the roof and secure it. Mounting to the batwing or the ladder are the easiest ways to mount. You can also bend some 1.5”-2” flat aluminum stock in a shape similar to the WFRBoost Mobile mount. It does not have to have two legs – you can simply suspend the bullet and the small Laird from an oversized Z shaped bracket and secure one end of the Z to the RV. Face the top part of the Z to the rear – this will offer some protection to the Bullet. Do not do this with the taller 8dbi omni – there is not enough stability in the Z mount. Plus it likely will place the omni too high. On any mount you need to make sure you minimize vibration. And with the Bullet you need to ensure that the connection between the antenna and the Bullet (the N connector) is reasonably supported. The N-connector on the Bullet is soldered directly to the printed circuit board. This connection can be easily damaged if not properly supported. You need clear LOS (line of sight) to the source of the wifi signal for best reception.
6
Connecting the Antenna and Bullet
These screw together – assuming you have the right antenna. The Bullet is N-Male, so you need an N-female antenna. Screw them securely together – firmly, but do not really crank them down with pliers. For testing, just cover with electrical tape. For permanent connection use the technique described in the Weatherproofing section at the end of this article – do not use just electrical tape. If you do, you might as well plan on debugging a flakey connection, because it is only a matter of time till it happens. Shown in the first picture is my test setup with the 100mW Bullet and 8dbi omni. Since this is a temporary setup it is simply tie-wrapped to the RV ladder. The antenna sticks above the roof of the RV while the Bullet is below the roof level. This both reduces the overall height, and offers good protection to the Bullet while under way. The black area at the top tie-wrap is the “forbidden” electrical tape….use Coax Seal on top of it when done testing. Also, it is wise to use coax seal at the bottom where the Ethernet enters the Bullet housing. There is a seal there, but it needs “help”, especially if you mount it on a batwing and it faces into the wind while driving. For a more permanent ladder mount cut the sleeve that comes with the antenna down so that the connection area is covered. Then you can use that sleeve area for a firm attachment to the ladder. (You will see once you get the antenna.)
7
The second picture is a Bullet mounted to a painter’s pole. I like the longer poles for this purpose, but make sure you use one that can be stored in your RV when under way. The longer ones may not fit well. You can also permanently mount this so that in the lowered position the antenna is below the roof line. Raise the upper section when required. The picture shows the Bullet before being weatherproofed. The single clamp holds it fine if the device is disassembled for travel. A permanent version of this would support the Bullet better. For permanent mounting place a spacer between the Bullet body and the pole, and wrap a stainless hose clamp around the whole thing. The spacer needs to be sized such that the clamping force does not put stress on the N-connector of the Bullet. The purpose is to provide structural support to the N-connector region. The clamp that you see comes with the antenna.
8
Ethernet Wiring The Bullet uses a 15 volt POE injector (power over Ethernet) – this generally does not come with the Bullet, so you will have to buy one from the same source you buy the Bullet (some sources do bundle them together). The POE injector sends DC power to the Bullet over the cat5 cable to power it. You only have to run one Ethernet line – it gets its power from the injector device that you place near the router. The POE uses 120-volt power and converts it to DC. Many people use the 120-volt injector in their RV. However, the Bullet will run on 12-volt RV power if that is more convenient for you. To connect the injector directly to DC you need to cut the wire that goes from the POE splitter to the transformer brick and splice it into a DC line. If you do this you MUST maintain polarity.
9
An alternative to sacrificing the “brick” line is to buy a passive POE injector designed to plug directly into DC power. In the schematic above, #3 is the DC power source, #2 goes to the WFR, and #1 goes to the Bullet. You will have to buy or make the connector that plugs into the DC source on the injector – it needs a 2.1mm male end with pigtails on the other end. Radio shack has the connectors or you can get them from Amazon – search for 2.1mm security camera power pigtails. The picture directly above shows a passive POE on the left, with a separate pigtail that connects directly to 12volt power. The Ethernet line from the WFR to the Bullet is required to be a “crossover” cable. (Note: the only reason the crossover is required is that the autosensing port on the Ubiquity AirRouter that the WiFiRanger hardware is based on is unreliable – on most routers you do not need to do this.) You only need “crossover” at one of the cable terminations – it does not matter where, or which end of the cable plugs into which device. If you are not going to terminate your own cat5 cable you need to buy a cable already terminated as crossover. Crossover cables are generally impossible to find locally – you will likely have to mail order it. Since only one end of one of the cables need be crossover, if you use the regular POE injector the line from the WFR to the injector is probably the best to make crossover (it is shorter than the run from the roof to the injector). If you use the passive DC injector I noted above, the short line (#2) is already terminated as straight thru, and you probably do not want to cut it and re-terminate it. Thus, the long line to the roof will have to be crossover (or, if you modify the weatherproof connector as I show below then that can be the crossover). You can buy 25’ crossover cables at most online sources for terminated cables. If you want to learn to make your own cables, here is a good guide. One 10
caution on that article – it demonstrates using the 568A standard for a straight thru line. The 568-B standard is more commonly used in the US. Suggestion: mark your crossover cables with a colored tape – otherwise you will mix them up and not know which is the crossover cable.
The drawing above shows a crossover cable. Pin layout is left to right with the tab of the RJ-45 plug down. Pins 4, 5, 7, 8 are not used for data but they must be in the line (for a “normal” cable). When used with a POE pins 4 and 5 are positive (+) and pins 7 and 8 are negative (-). The WFRBoost Mobile with the LED lights powers the LEDs with pins 5 and 7. To make a straight thru cable, make both ends to the T-568B standard. That is the cable used as patch cables. To make a crossover cable, make one end to the T-568A standard, and one end to the B standard as shown above. When you plug in a crossover cable it does not matter which end plugs into which location. You can buy RJ-45 plugs at Home Depot or Lowes, along with the crimper to make the lines. Buy the crimper that does phone lines as well as Ethernet connectors – it also has a wire stripper on the end for removing the cable sheathing from the cat5 cable. I also like this kit, but the crimper at Lowes is cheaper. I recommend learning to make cables. It is a handy skill to have – and it is not “rocket science”. But it can be frustrating at the beginning. How you get the cable to your RV roof is installation specific. You can go thru the roof directly, thru a vent pipe, thru the refrigerator space, or any number of other routes. One of the advantages of terminating your own cables is that you can use a smaller hole for routing a cable without the RJ-45 connector on it. The Ethernet cable you use that is outside your RV must be outdoor-rated cable. You should not use plenum-rated cable outdoors – ultraviolet will break down the cable within a year. Routing on the roof is pretty simple. Use wire ties (black UV resistant ones) to tie the cable to other wire bundles or objects on the roof. I usually lay the cable in small pools of adhesive caulk every 4-5’, but 11
don’t do this until you have tested everything. Once the initial caulk dries, add a little more over the top of the cable. This will hold the cable just fine – there is no need to screw it down. Be sure not to kink the cable or make sharp bends in it, and if pulling it through cabinets do not pull it hard (you need to stay under 20 lbs pull). Any sharp kink in the cable will cause data transmission issues that will be very hard to debug.
Building a Replica of the Commercial WFRBoost Mobile In this sequence I’ll show you how to build a pretty good replica of the WFRBoost Mobile. I show it with the LED for lighting up the Boost. If you don’t have the laser-cut logo you may not want to do this part – but it looks cool even without the logo. With the exception of the bracket you can build a pretty good replica of the commercial product. To replicate the bracket you can bend some flat aluminum stock to a similar shape and drill the appropriate size hole in the top for the antenna to pass through. It just will not look as “polished”. Drill the hole undersized and file it out to just pass through the connector from the Laird. Before inserting the Laird through the hole, place flat pieces of coax seal around the hole so that the Laird compresses them when joined to the Bullet. Make sure you make the “top” of the bracket long enough so that there is space around the Bullet to wrap tape. The commercial bracket is fairly tight in this area and makes it difficult to wrap properly. Instead of hardwiring everything on the roof unit we are going to modify the design to make it simple to remove the rooftop Ethernet line. In the commercial product the LED power breakout is physically inseparable from the Ethernet fed from the POE inside the RV. Ours will be removable. To do this we use a RJ45-ECS weatherproof connector. We will cut off the RJ-45 connector on the end of it and pull out the 5 and 7 pin for power. Then re-crimp it as a crossover cable (without the 5 and 7 pins). Note: ONLY use the weatherproof connector if you are going to break out the power lines for lighting. Otherwise there is no need for the weatherproof connector – you connect the line directly to the Bullet. Use of the weatherproof connector adds complexity and another potential failure point to the installation. If you do use the weatherproof connector, check it at least every 6 months for water contamination and/or corrosion.
12
Below is the modified connector. Note the Ethernet lines pulled out of it. The easiest way to crimp a connector with the two power lines pulled out is to substitute “dummy” lines (short 3” pieces) when you go to insert the cut cable ends into the RJ45 connector. That way, once inserted, you can visually make certain that the lines are in the proper locations (crossover, in this example). Then, before inserting the connector into the crimper, carefully pull out the dummy lines leaving a blank space. Be careful to bend the “real” lines that you are using for power back along the sheathing tightly. You have to have the sheathing well into the connector – just like a normal crimp. Note: this is not a very easy thing to do unless you are experienced building cables. Practice first until you can easily build a normal cable end. Then practice a “breakout” on a scrap piece of cable. Only then should you tackle modifying the weatherproof connector pigtail. The pigtail is only long enough to get two shots at it. The foil and ground lines that are often on these pigtails can simply be cut off.
13
Next we have to take the partially built Boost and solder the LED lines to the power lines broken out of the Ethernet line in the step above (see the picture below). Solder them together and use heat shrink over both lines to make a neat single-line assembly. I use solder-type butt connectors in 22 gauge to make it easy. You can find these at most HD and Lowes (I bought my last ones at Lowes, which generally has a better electrical section than HD). Make sure you maintain polarity….the LED is a diode….it won’t work if you switch the lines. Now you have all the parts ready for assembly. It is critical after attaching the antenna and Bullet together that you secure them firmly, and then wrap the connection in Coax Seal. Do not use electric tape – it will let moisture in and you will have a flakey connection.
14
Below you can see the entire unit assembled, ready to go on the roof. The small Ethernet pigtail coming out of the weatherproof connector is just for demonstration purposes….it was a piece leftover. This is where you will insert the line from the WFR. Of course I tested the completed product before mounting it.
15
I built the Boost in the picture above to be a (mostly) replica of the commercial product. It took me about half an hour to build after getting all my tools together. But I build similar items frequently. The main thing I changed was the external weatherproof RJ-45 connector. The commercial product will not have this – the 25’ of Ethernet will be directly connected to the Bullet and LED. Since I was modifying this end, I also put the crossover cables into the weatherproof pigtail. Note: For most people I don’t recommend trying to use a lighted device. The amount of complexity involved in pulling out the power for the LED lighting is beyond the capabilities of most people, and it adds considerable risk to “getting it right”. It looks cool, but functionally adds nothing – except complexity. Also, use of the weatherproof connector adds a failure point to the installation.
Once you have all the parts assembled, plug the Ethernet line into the WAN port of the WFR and then power up the injector. Follow the configuration instructions in the WFR manual for setting up the WFRBoost.
16
Weatherproofing Connections It is imperative that you weatherproof the antenna and Ethernet (entry) connections to the Bullet. If you do not do this sufficiently, over time you will get what appears to be equipment failure, but in reality is just a wet and flakey connection. I can’t tell you how many antennas I have taken off of APs and found the connection wet. (None of mine of course ) Here is the proper weatherproofing method for antenna connections:
1)
Use a silicone or Teflon dielectric and fill the female void before making the permanent connection. I like Stuf, which is available many places online. Don’t do this during testing, but only when you are making the final connection – it is messy. When the two parts are screwed together (typically N connectors with this gear) the excess will be squeezed out of the fitting. Clean the connectors good because you want a clean surface for tape. The purpose is to fill the voids to prevent moisture contamination. Don’t use this on the Ethernet lines – just on the coax connectors for antennas.
2) Next, wrap with good quality electrical tape. Scotch 35 is one such tape (available at HD or Lowes). If you use cheap tape you might as well not bother. (If you did not pay at least $3 for the roll of tape it is “cheap” tape, and likely not worth using.) Start on the coax about 1” below the connector and wrap “up” to and over the connector – this keeps water from running “in” to the connector. Wrap as high as you can. In this project, if you can get the edge of the tape on the bottom of the aluminum, that is good.
3) Cover the tape with Coax-Seal. This is a moldable, soft, waterproofing putty-like tape. Start at the bottom and work up over the connection. Cover all of the electrical tape. Overlap the Coax Seal about half the width of the seal. When done you can mold the tape together with your fingers. 17
I don’t recommend rubbing silicone caulk around everything. It is difficult to remove, and really does not add anything to the weatherproofing if you do the above. IF you feel “compelled” to play with silicone, then restrict its use to a small bead around the top side of the bracket and antenna “joint”.
Using a Ubiquity “Device” Without the WiFiRanger The WFRBoost Mobile is a Ubiquity Bullet that is interfaced to the WiFiRanger mobile router. The valueadd of the WiFiRanger is that its firmware is modified so that there is a unified configuration of both the Bullet and the WiFiRanger router. You can use the Bullet with any router, but you will not have the unified configuration and management that you get with the WiFiRanger. You interface directly to the Bullet each time you want to change the SSID (access point) that you are picking up WiFi from. After the initial configuration of the Bullet, you really only have to change the SSID – everything else remains the same. While this does add some extra steps and complexity to the task, if you are familiar with router configuration you will probably be successful with configuring the Bullet. To set up an AirOS device as a CPE (client bridge) you can use this document from the Ubiquity website. If that link no longer works, you can download it from my website. This document can be used to configure any of the AirOS devices, including the Bullet – although it is written using the Nanostation as the example. Note: If during the configuration and testing process you cannot get the Bullet to allow selection of the SSID - you get an error in the Site Survey screen - then try putting in the MAC of the AP you are connecting to in the "Lock to AP MAC" on the Link Tab. You can see that MAC address in the SSID screen. If it then works to that AP, then you need to upgrade the firmware level of the Bullet.....there is a bug in some of the firmware levels. Also, on some devices/levels of firmware, the Link Setup tab has been changed to Wireless. It is the same thing. After getting the Bullet configured I recommend that you test it directly connected to your computer. Only after it works well there should you attempt to connect it to the WAN port of your router and use it as an Internet source. You will have to modify the configuration of your router to use the CPE – the configuration guides and notes below show you how to do that. Warning: please read and adhere to the advice in the Equipment Selection section at the beginning of this document. You can really cause havoc on WiFi networks by mis-configuring your Bullet or other CPE. You should always use the minimum power setting to start with, and only increase power if required.
18
IP Addressing An understanding of the pragmatics of IP addressing will help you get your own CPE up and running easier. I’m not going to explain all the nuances of the addressing scheme here – I’ll simply provide some pragmatic recommendations. Your local network will operate in its own address space – you control that. Your network encompasses the Bullet, your router, and the wireless/wired network supported by your router. The RV Park or other source of wifi signal will have a different address space. You need them to be separate. To ensure that, you need to choose a subnet for “your side” that is likely to provide that separation. I recommend that your local network be 192.168.10.xxx. The subnet in this example, and in the example that Ubiquity provides, is “10”. The CPE device – in our example a Bullet (but it could be a Nanostation or PicoStation) – uses two addresses; the first comes from the WiFi network it attaches to, and is assigned by that network; the second is the address you assign it. The first address is on the Bullet wireless connection; the second address is for the Bullet wired connection that goes to your router from the Bullet. You control the addressing from the wired side “down”, and the addressing on the wireless side of the Bullet is controlled by the wifi access point. Otherwise they would not be able to talk. There is logic inside the Bullet that links the two sides – it acts as a bridge between the parks network and your network. The AP in the RV Park has an address range (subnet) that it works in. It assigns the wireless side of the Bullet an address in that range via DHCP (dynamic host configuration protocol, if you care). The wired side of the Bullet is assigned an address space (subnet) by you. Then you have your router to deal with. It also needs an address space so it can assign addresses to your laptops, tablets, printers, etc. This should be different than the Bullets wired address. (I realize this is confusing, but hang in there, some examples will help…) Most routers have a default address of 192.168.0.1 or 192.168.1.1 (so they have a subnet of 0 or 1). You want to change this. Make sure that the router subnet is different than the Bullet – I recommend 192.168.12.xxx for the router. There are plenty of configuration guides around for the various routers. Not all of them tell you to change the default address, though. You configure the other settings of your router in the normal fashion. The thing that changes when using a CPE is that you have to tell your router that the Internet is coming from the Bullet (the Ethernet line from the Bullet is plugged into the WAN port on your router). To do this use the routers WAN configuration routine to tell it to use DHCP to obtain an address. When you do that, the wired side of your router will get an address from the Bullet via DHCP. Thus, it will be able to transfer info to the Bullet. How you configure this varies by router, but all of them have a WAN configuration screen. On a Cradlepoint 1000 it is the Basic / WAN screen and you select “Dynamic IP (DHCP)” from the Wired Connection Type section.
19
A detailed step-by-step configuration of a Cradlepoint 1000 can be downloaded here. This is on Mark Bruss’s website (DMBruss.com) in the Internet section. There is also additional info on configuring the Bullet there if the Ubiquity guide is confusing to you. When you are done, your router should be in the 12 subnet, and using DHCP to be auto configured to talk to the Bullet. The Bullet should be in the 10 subnet, and be using DHCP to be auto configured from the WiFi source (RV Park). Yes, it is complicated and confusing at first. The configuration guides step you through it, but things can go wrong. Be careful configuring and it should work. I suggest that instead of just trying to follow instructions by “rote” that you draw out your network, their connections, and the addressing scheme and try to understand what is happening. But following the configuration instructions exactly should result in a working system. Note: I have had a LOT of people that are familiar with networking skip over the configuration Guides and jump right in. I usually get the call (or email) when it does not work. DO NOT assume that because you are familiar with networking you can just dive in. The configuration is critical, and a small error will cause issues. At the very least, look at the Guides and my cheat sheet below.
In the example below I use subnets of .10 (Bullet) and .12 (router). In the Ubiquity Configuration Guide they use .10 for the CPE (same as mine). Mark Bruss, in his examples, uses .12 (Bullet) and .15 (router). It does not matter what subnet you use – it just needs to be different than the RV Park Access Point. You must also keep your DHCP ranges outside of the fixed device address (e.g. if the device is at 192.168.12.001 your DHCP range cannot include that address).
20
Debugging It is impossible to write a complete debugging guide. There are lots of things that can go wrong when you build up your own CPE. If you are a logical thinker and step through the process – eliminating problem areas as you go – then eventually you will solve your problem. I’ll note random things to look at and techniques here, in no particular order.
Make sure you have a 2.4 GHz product. A number of people have inadvertently ordered the 5 GHz Bullet. You cannot use the default settings in any of the devices discussed here. Pay attention to the Configuration information. Ensure that you have power and signal at the Bullet or other device – look at the lights on the body. When interfacing to the WiFiRanger router, you generally will find that the CPE just works after configuration. If it does not, try to directly interface to the “configured” CPE with your laptop via a wired connection. Examine the status screen and make sure you are getting the proper attributes assigned. Consult the Ubiquity example configuration screens. 21
When installing a CPE to interface to a non-WiFiRanger router, ALWAYS test it first directly connected to your laptop. ONLY after it is working there should you attempt to interface it to your router. Consult the Configuration Guides. Make sure the DHCP ranges do not overlap your device address. Make sure that DHCP is enabled in your router, if it is not a WFR. Follow the configuration guides carefully. A small mistake can cause lots of issues. “The devil is in the details.” Most routers (other than the WiFiRanger) do not require a crossover cable to be used – they have autosensing ports that will function properly. If you do have issues connecting the Bullet to the router then try a crossover cable. Sometimes the autosense ports do not work reliably. The WFR requires a crossover cable. Test your cables: if you made them yourself you will likely want to own a cable tester. Even purchased cables can be bad – if they are not new cables they are suspect. Make sure that the firmware on the CPE is not real old. Do not upgrade the firmware unless you have an issue that “might” be related to firmware level, but when all other corrections fail, upgrade the firmware. In general it is a last resort. If using the WFR and a home-made Boost Mobile, after setting up the SSH key and generating it, you may need to power cycle the Bullet. Wait at least a minute before doing this. Just unplug the Ethernet line that goes to the Bullet for 15 seconds and then plug it back in. Also, when configuring the Boost, turn off “Enable Failover Support”. To access your WFR you can use port 8080, eg. 192.168.251.1:8080. Or directly address it by figuring out the IP address of the device. It is based on the WFR ID. If your ID is 771187 then you can build the device IP by using the last four digits of the id – in this case 1187. Substitute the 1187 into this IP template: 10.1xx.yy.1. Where xx are the first 2 digits (11) and yy are the last 2 digits (87). This creates your WFR IP as 10.111.87.1
22