Xilinx Platform Studio (XPS), which is the development environment that we will
be ... we will be launching XPS and XSDK directly from the command-line, after
..... for video out, including horizontal and vertical synchronization pulses and ...
and a 16-bit pixel value as stored in the framebuffer (with 4 extra bits of padding).
CprE 488 – Embedded Systems Design MP-0: Platform Introduction Assigned: Monday of Week 2 Due: Monday of Week 4 Points: 100 + bonus for any creative extensions to the main design [Note: The goal of this Machine Problem is for you to work with your group to gain some early experience in three areas: 1. Lab software infrastructure – the first week is intended to serve as a rapid introduction to the Linuxbased embedded system platform development and software design tools. 2. Lab hardware infrastructure – you will get to run your first hardware designs on the provided Xilinx Zedboard FPGA boards, and perform some simple hardware / software interfacing. 3. System prototyping – you will design and implement an FPGA-based embedded system to perform a specific task (NES emulation). The systems will be evaluated for functional correctness, and significant bonus points will be given for any creative additional features you successfully implement.]
1) Your Mission. The year is 1990, and fueled by the recent release of Super Mario Bros. 3 (as well as accompanying Universal Studios film The Wizard), Nintendo and their Nintendo Entertainment System (NES) are dominating the video game console industry. As engineering head for a rival startup company, your latest products haven’t fared nearly as well: both the Tennindo Entertainment System (TES) and the included game Awesome Maria Sisters were universally panned as derivative (unfairly, in your opinion). Your CEO has assessed the internal financial projections and has come to the inevitable conclusion: design a better system or the company is doomed! Fortunately, you do have two significant advantages over those showoffs from Nintendo – 1) a new FPGA-based platform that enables more complex designs than the competition’s simple 8-bit processor, and 2) superior embedded system design skills. Starting from a barebones platform targeting the Xilinx Zedboard development board, your goal is to prototype the hardware functionality needed to port an existing NES emulator as proof of concept for your new video game platform.
2) Getting Started. First, open up a console and create a new directory for this class and lab: mkdir cpre488; cd cpre488 Note that by default, opening up a terminal will put you in the /home// directory, otherwise known as your “home” directory. This also maps directly to your U:/ drive when logged into a departmental Windows machine.
We are using SVN this semester to manage the hundreds of files of lab infrastructure. To download the MP-0 code repository, execute the following SVN checkout command (if needed, the username and password are both “anonsvn”): svn checkout https://source.ece.iastate.edu/svn/cpre488/MP-0 You may want to instead execute an “svn export” command instead if you plan on using a different SVN repository to track your group’s changes. In either case, your local directory tree should now look like the following (confirm using the ls or the tree command): |-| | | |-|--
docs |-- IP |-- Tools `-- ZedBoard sdcard.zip sw |-- nes_bootloader `-- vga_test `-- system
// MP-0 specific documentation
// Files for loading to SD card // Software code and project files // System configuration and project files
Change your directory to the software sub-directory, and examine the C code implementation of the existing NES bootloader and emulator, starting with nes_bootloader.c: pushd sw/nes_bootloader/src emacs nes_bootloader.c & In your report, describe how nes_bootloader.c currently works. Using a similar approach as what is presented in Chapter 1 of the Wolf textbook, draw a high-level structural diagram. How does NESCore_Callback_OutputFrame() get called? Note that you won’t be able to compile the application outside of the Xilinx-specific Eclipse workspace we will be creating. Before proceeding, make sure to get back to the main directory you created for MP-0: popd
3) Creating the System. In your main cpre488/MP-0 directory, there is a file setup.sh which is used to correctly point your environment to the CprE 488 tools and libraries. Every time you open up a new console window to work on your labs, you need to source this file: source setup.sh The main tool we will be using this semester for FPGA design and implementation is the Xilinx Embedded Development Kit (EDK), which is a suite of tools and IP that you can use to design a complete embedded processor system for implementation in a Xilinx FPGA device. EDK consists of the following components:
Xilinx Platform Studio (XPS), which is the development environment that we will be using for designing the hardware portion of our embedded processor system. 2
The Xilinx Software Development Kit (XSDK) is used for C/C++ embedded software application and verification. XSDK is built on the Eclipse open-source framework and may appear familiar to tools you have used in previous classes. Various embedded / soft IP for Xilinx embedded processors and peripherals; compilers, drivers and libraries for embedded software development; documentation and sample projects.
Although the EDK tools can be started from within the traditional Xilinx Integrated Software Environment (ISE) or more recent Vivado toolset, we will be launching XPS and XSDK directly from the command-line, after verifying that the setup.sh file has been properly sourced: xps & By default, XPS will not open up any project (for future attempts, this can be accomplished by specifying the location of the system.xmp file after xps on the command-line, or by clicking “Open Project” on the main XPS screen). Until we are more comfortable with XPS, we will be using the “Create New Project Using Base System Builder”, so click on that icon to begin. Your screen should look similar to the following:
For consistency purposes, click the “Browse” button under “New Project”, and navigate to your cpre488/MP0/system/ directory and hit “Save”. The rest of the settings are fine by default, so click “OK” to continue. On the next screen, you will configure XPS for the appropriate board. We are using RevC of the ZedBoard Zynq Evaluation and Development board, and targeting the Zynq Processing System 7 (PS7). Fortunately this is the only board in the default XPS installation for which Avnet is the vendor, so by changing the “Board Vendor” dropbox to “Avnet”, the remainder of the defaults will suffice for targeting our ZedBoard: 3
Read the description of the ZedBoard on this screen, and then click “Next”. Click “Finish” on the next screen to keep the default Peripherals to attach to the PS7 (5 buttons, 8 LEDs, and 8 switches). Congratulations, you’ve created your first Xilinx-based embedded design! Let’s briefly analyze the main XPS window:
System Configuration Window
Project Files FPGA Device Target XSDK Export
Status Update Window
4
Each green box in the System Assembly view corrseponds to a configurable portion of the Xilinx Zynq FPGA. Click three different green boxes and in your writeup, describe what configuration options are available and how they may be potentially useful in an embedded system. The Zynq-7000 Concepts, Tools, and Techniques document found under MP-0/docs/ may be helpful in decoding some Xilinx-specific terminology and acronyms. While visually the system configuration window takes up most of the screen real estate, the “System Assembly View” is a bit misleading, as it encapsulates the entirety of the reconfigurable portion of the FPGA as a small gray region lablelled “Programmable Logic (PL)”. As it’s also a bit unnecessarily complicated for our current purposes, the following simplification might be more useful at this point:
Processing System (software configurable components) Peripherals / Interconnect UART
ARM Cortex-A9 Multi-Core CPU
Core 1
Core 2
GPIO ENET
Caches, OnData Queues Data Queues Chip Memory, etc.
Caches, OnData Queues Data Queues Chip Memory, etc.
AXI Controller(s)
HW/SW Interconnect AXI Controller(s)
Reconfigurable Peripherals
Co-Processors, Accelerators, etc.
Programmable Logic (hardware reconfigurable components) Logically, you can separate the Zynq FPGA into these two main regions, the Processing System (PS) section, for which we write C/C++ code to configure existing CPUs and peripherals, and the Programmable Logic (PL) section, in which a conventional FPGA-style reconfigurable fabric is configured to implement various peripherals and hardware accelerators. Note that due to this division, some peripherals will be “free” (in terms of PL resources) to use, since the controller logic for these peripherals is already built-in to the PS region of the Zynq FPGA itself. Other periphals will require conventional FPGA synthesis and bitfile generation, and for some we will have the choice whether to use PS or PL resources. Other system views in XPS are more useful for our purposes. Both the “Bus Interfaces” and the “Addresses” tabs are quite useful in seeing how the default system is currently connected:
5
Here, we can explicitly see the peripherals that we added in the Base System Builder wizard when we first started XPS. Are these buttons, LEDs, and switches connected via the PS subsystem or the PL subsystem? Briefly defend your answer. Note also that all three peripherals appear to be the same exact IP type (axi_gpio) – how can this be possible? The documentation for the axi_gpio is available in the docs/IP/ directory. Based on the datasheet and the address map shown above, how would you (in software) read the current state of the switches? Be specific. While you can directly create the bitstream file needed to program our FPGA with this default configuration, it is easier to do so in the context of configuring the entire system, which as previously mentioned includes both hardware and software components. Click the “Export Design” button. The default directory for this option should be ok – click “Export & Launch SDK” and then go grab a snack.
4) Your First Design. Hopefully you had a tasty snack. As the designs get more complex it will be important to implement a time-overlapping strategy so that you always have software tasks to work on while the hardware system is being generated, and some system configuration and simulation tasks to work on while you are testing the previous iteration of the software you’ve written. XPS and XSDK can be launched independently of each other (with the xps and xsdk commands, respectively), with the resulting system from an XPS project being automatically reflected in the system software configuration of a connected XSDK project. Note that before XSDK opens for the first time (for a new project), it will ask where you would like your current Eclipse workspace to be located. For sake of consistency, it is recommended you place your workspace in the MP-0/sw/ directory, and do NOT check the “Use this as default” option, as depicted in the figure below.
Noooooooooooo!
6
Click “OK”. As previously mentioned, since XSDK is Eclipse-based, this window should look (somewhat deceptively) familiar to those who have used Eclipse in the past:
Xilinx Widgets
SW Project(s) Software Development Window
HW Platform(s)
Status Update Window
By default, you will only have the main platform configuration (system_hw_platform, assuming your main XPS project was named “system”). To create a new software project, select “File -> New -> Application Project”. The New Project window contains a few non-standard features and should be configured carefully on your first go: For the Project name, type in “hello_world” (you can probably guess at this point where we are heading). For the hardware platform, select “system_hw_platform”. This feature will allow you to independently work on different hardware platforms while testing the same piece of software, and vice versa. For the processor, select “ps7_cortexa9_0”. This is the first of the two cores in the ARM Cortex A9 CPU. Select “standalone” as the OS/Platform, and “C” as the language. For the Board Support Package, you can either leave this as default (which for this project would be “hello_world_bsp”), or name your BSP as something more generic, such as “system_bsp”. There is typically no need for us to have multiple sets of drivers since we are not making significant changes as we iterate through hardware platforms. 7
Click “Next”, and select the “Hello World” application under the listing of project templates. Click “Finish” – note that this step may take more time than expected, as by default XSDK is configured to automatically compile all new libraries and applications for you. The Hello World application that XSDK automatically generates for you is actually pretty terrible, at least for our configuration. The comments at the top are not applicable to our Zynq-based system, the init_platform() function essentially does nothing (and can lock up the entire board if you mess with the ps7_init() function, which is automatically run in the background when launching using XSDK). A nice feature of Eclipse is the ability to right-click on any function to view its declaration – do this for the print() function. In your writeup, use this feature and describe what print() does, and how. Why do you believe this function is used by Xilinx for their Hello World application, as opposed to the more conventional printf() function?
5) Hardware / Software Interfacing. When the “Build Project” task is completed, we can program and test the FPGA. Since the design outputs its results over UART, we will first need to open up PuTTY to view the results using a serial console. Change the default UART configuration to PuTTY to 115200-8N1 and connect via COM7 (or whatever port is selected by Windows) – your configuration should look similar to the following:
With the PuTTY terminal window still open, navigate back to XSDK and “Xilinx Tools / Configure JTAG Settings”. We are using a unique configuration in which our development tools are being hosted on remotely-accessible Linux machines (for performance and stability reasons), while the FPGA boards themselves are locally connected to Windows machines in the lab. Modify the JTAG settings as follows:
Set JTAG Cable:Type to “Xilinx Hardware Server” Set Hostname to co2041-XY.ece.iastate.edu, where XY is co2041-XY is the name of the machine you have physically connected to the ZedBoard. Ask your TA if you need help finding this information. Set the Port to 50001, and leave the other options as default.
8
Finally, navigate to the Windows Start -> “All Programs -> Xilinx Design Tools -> Lab Tools 14.6 -> Accessories -> ISE Design Suite 64-bit Command Prompt”. Run the following command from the ISE command prompt (again, where XY is the number for your machine in Coover 2041): > hw_server –s tcp:co2041-XY.ece.iastate.edu:50001 Ensure that the jumpers labelled “MIO4” and “MIO5” on the ZedBoard are connected to ground. Next, click on the small “Program FPGA” button (also available under “Xilinx Tools / Program FPGA”). The default system.bit file should correctly represent your software project’s targeted hardware platform, so hit “Program” on the window that pops up. After 15 seconds or so, the status update window should display “FPGA configured successfully with bitstream system.bit”. We are still not running our Hello World application yet, in order to do this you must specify in XSDK in what mode you would like to run it. Click “Run -> Run-As -> Launch on Hardware (GDB)”. There are two things to note about this process:
XSDK remembers your per-application setting, so on subsequent tests you can just click the green “Run” button to download the ARM executable to the board. The Zedboard can lock up (requiring either a fresh bitfile download or even a power cycle) when running an application. Do NOT attempt to run a new application on the Zedboard without explicitly exiting or killing the currently running one. The red square icon in the lower-right corner is your friend.
Modify the hello_world application to also interface with the switches, buttons, and LEDs that are configured in the programmable logic. For example, have the application print out the state of the switches when a button is pressed, or light up certain LEDs given an input integer. Here you will gain your first exposure to the Xilinx BSP structure, the extent to which you use it is up to you:
The built-in functions Xil_Out32() and Xil_In32() will serve as a good starting point, or you can explicitly access pointers in the memory map for your peripherals. #include to use the automatically-generated memory map macros, or hard-code the pointers yourself based on the “Addresses” tab in XPS. For the GPIO peripherals we have connected to the buttons / switches / LEDs, the peripheral base address is where the current on/off state is read or written to. Not all of the buttons on the board are connected to the AXI_GPIO peripheral. Pins 50 and 51 of the I/O pins on the Processing System side are connected to buttons on the ZedBoard, and are accessed via the more flexible (and complex) gpiops interface. You may want to access these buttons for step 7) below, so read up on this documentation as well at some point. .
Continue experimenting until you have confidence in this aspect of memory-mapped peripheral interfacing.
6) Video Display. After enough tinkering with LEDs and switches, it’s time to return our focus to the video game (emulation) system. One key feature we have not yet touched on is displaying video to a monitor, which in the context of our ZedBoard platform and Xilinx EDK tools can be accomplished via a combination of hardware peripherals and software configuration. Unlike other platforms that have dedicated video display controller hardware, on the ZedBoard we will need to drive all the necessary signals ourselves. 9
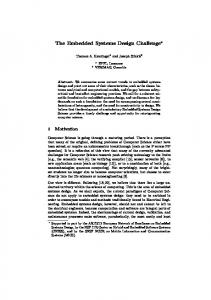
Specifically, there are three components that we will be using to output a 640x480 display over VGA:
A Video Direct Memory Access (VDMA) peripheral – axi_vdma – which provides high-bandwidth direct memory access between a memory component (typically DRAM) and the AXI Stream video protocol. A Video Timing Controller (VTC) peripheral – v_tc – which generates the necessary timing signals for video out, including horizontal and vertical synchronization pulses and blanking timing. A Video Out peripheral – axi4s_vid_out – which interfaces with a video source using the AXI Stream protocol and in conjunction with a VTC core, produces the appropriate video output.
In XPS, add these peripherals to your project , connect and then configure them to generate a 640x480 output signal. Assume a 12-bit VGA data output value (4 bits each for Red, Green, and Blue components of the pixel), and a 16-bit pixel value as stored in the framebuffer (with 4 extra bits of padding). Note that this is a non-trivial task, so please be sure to ask questions and check Blackboard and the class wiki along the way. Some quick resources and tips to help you with this part: 1. Cores can be added by double-clicking their name under the “IP Catalog” tab in XPS. The Video Out and the Video Timing Controller peripherals cores are under the “Video and Image Processing” subsection, while the Video DMA is found under the “DMA and Timer” subsection. Once added, the cores can be found in the “System Assembly View” of your XPS project, and can be double-clicked to configure settings, see interfaces, and view datasheets (although we’ve provided the necessary
Xilinx Zynq XC7Z020 FPGA
DDR3 Memory
DDR Memory Controller
ARM CPU Core
Framebuffer Region(s) AXI Interconnect Frame Data
Config Data
Timing Controller (axi_v_tc) Timing Information
Video Streamer (axi_vdma) Streaming Video
Video Display Controller (axi_vid_out)
VGA Monitor
VGA Signals 10
datasheets under MP-0/docs/IP/). 2. The figure below provides a high-level depiction of the necessary connections. The high-level connections are easiest to make under the “Bus Interfaces” tab of the System Assembly View. Specific connections that need to be made: a. The axi_v_tc, axi_vdma, and axi4s_vid_out components all require a conventional connection to the AXI bus so that configuration data can be written to their registers from software. b. The axi_vdma component also needs to be a master on the AXI bus, so that it can read from framebuffer data located in DRAM. The ARM side (PS7 logic) has a port specifically for this purpose. c. The axi4s_vid_out requires both the timing data from the axi_v_tc module, as well as the streaming video data from the axi_vdma_module. These can both be direct connections. 3. Beyond the bus connections in the figure, there are also multiple connections needed to specific ports on the peripherals, as well as the Zynq FPGA itself. These connections are made under the “Ports” tab of the System Assembly view – and some are more straightforward than others: a. The axi_v_tc as well as the axi4s_vid_out have unique clocking requirements in order to drive a 640x480 VGA signal. HW #0 should provide some insight for this portion. b. The VGA interface for the ZedBoard consists of HSYNC and VSYNC signals, as well as a 12-bit RGB signal. These ports must be constrained to the particular external pins on the Zynq FPGA – the MP-0/system/data/system.ucf file (edited under the “Project” tab or directly in a text editor) is where these constrains are typically placed. The master constraints file (for every possible I/O connection on the board) is located under MP0/docs/ZedBoard/. In general, these peripherals can either be configured using hardware generics (in XPS), or via explicitly writing values to configuration registers (in XSDK). The AXI Video Direct Memory Access guide found at MP0/docs/IP/pg020_axi_vdma.pdf is extremely helpful for the software side of configuration, if you know where to look. Pages 90-95 provide some explanation of the general operation of the VDMA core, and the configurable registers are described starting on page 30. We’ve provided a partially-completed vga_test application that you can use to test your configuration. In XSDK, select “File -> Import”, and then select “General -> Existing Projects into Workspace”. Click “Next”, then “Browse”, and navigate to your MP-0/sw/vga_test/ directory. Click “Ok”, then “Finish”, and you should be able to see the vga_test application in XSDK. The last few lines of vga_test.c (starting at line 61) are intended to set the VDMA configuration register values. Currently these are all set to a dummy value (the CHANGE_ME macro). Modify the configuration registers for correct VDMA operation, and in your writeup, provide a justification based on the VDMA documentation for how you set these values. Finally, create a new project called cyclone_checker, that draws a cyclone-colored checkerboard to the screen. A standard checkerboard is 8x8 squares, with the “Cyclone Cardinal” color having an RGB hex code of 0xC8103E, and the “Cyclone Gold” color having an RGB hex code of 0xF1BE48. In your writeup, explain how you converted these color values valid values for the 16-bit framebuffer.
11
7) NES Emulation. The starter code for the NES emulation can be found in the nes_bootloader application. Import nes_bootloader using the same steps as in the previous part for vga_test, and examine the code. While you previously built a system-level diagram, we can now focus on implementation aspects:
Function xil_init() in nes_bootloader.c is mostly complete, save for the VDMA initialization code that you can copy/paste from vga_test. Function nes_load() reads in the .nes file from the sdcard connected to your ZedBoard. Double-check that your card is loaded with these files – if not, the sdcard.zip file provided in the MP-0 repository can be unzipped and copied using any sdcard writer. Place the files directly on the top level of the sdcard; do not add any sub-directories. There are two main callbacks (for now) that are left for you to complete: o Function NESCore_Callback_OutputFrame() takes as input a 256x240 frame of pixel data from the current state of the emulator, and copies it as a 640x480 frame for the ZedBoard framebuffer. There are several valid approaches for how to perform this copy. o Function NESCore_Callback_InputPadState() passes a pointer to data words representing the current controller state for players 1 and 2. Overwrite at least the player 1 pointer to reflect appropriate button presses on the ZedBoard.
Modify the nes_bootloader code such that the NES games are reasonably playable. In your report, describe your general approach to implementing both of the NESCore_Callback functions. What to submit: a .zip file containing your modified source files (modifications to hello_world.c, system.mhs, system.ucf, vga_test.c, cyclone_checker.c, nes_bootloader.c, and NESCore_Callback.c) and your writeup in PDF format containing the sections highlighted above. In the Blackboard submission, list each team member with a percentage of their overall effort on MP-0 (with percentages summing to 100%).
What to demo: at least one group member must be available to demo the current state of your implementation. A full demo score requires a correctly-emulated system, but partial credit will be given for effort. Be prepared to briefly discuss your source code.
BONUS credit. MP-0’s bonus point criteria is creativity. The current nes_bootloader design is very limited in terms of functionality. Bonus points will be provided for groups that successfully implement the following features: Interactive menu for selecting NES games, either a nice text-based menu (5 bonus points) or a graphical menu (20 bonus points). A method for exiting a current game and returning back to the menu (5 bonus points). Interfacing with arcade buttons and a joystick, for a more user-friendly input method (15 bonus points) Interfacing with an original NES controller (15 bonus points) The ability to emulate sound using the appropriate callback function (25 bonus points). Each group is limited to 100 bonus points for the entire semester.
12