U105 sa0, U110 sa0. U105, U110. 35. U119 sa0, U125 sa0. U119, U125. 36. U99 sa0, U103 sa0, U105 sa0. U105, U159. 37. U70 sa0, U100 sa0, U130 sa0 ...
Diagnosis of Multiple Defects on Scan Enable and Clock Trees Yu Huang
Liyang Lai
Ruifeng Guo
Wu-Tung Cheng
Mentor Graphics Corporation, 8005 S.W. Boeckman Rd., Wilsonville, OR 97070, USA
Abstract This paper discusses the defects on scan enable trees and clock trees. A diagnosis algorithm is proposed to locate multiple scan enable / clock defects. The problem is formulated as a minimum vertex cover on a hypergraph. A heuristic algorithm is then presented to diagnose the defects. Preliminary experimental results show that the proposed diagnosis algorithm is effective in terms of diagnosis resolution and accuracy.
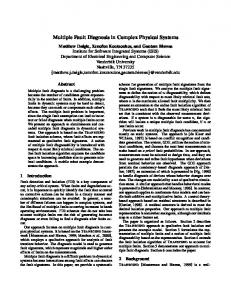
example diagram of LSSD scan architecture. In shift mode, when activating Clk_A, it shifts scan data into the scan cell through master latch. Activating Clk_B, it propagates scan data to the output of the scan cell through slave latch. So the data is shifted in / out with alternating pulses of Clk_A and Clk_B. The scan chain is in capture mode when the Clk_A and Clk_B are held off and the System_Clk is activated.
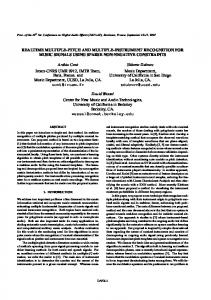
1. Introduction Scan is the most widely used DFT technique in today’s VLSI industry. Mux-DFF scan architecture is one of the most popular scan architectures. Figure 1 illustrates an example diagram of Mux-DFF scan architecture. When Scan_Enable is set to “1”, the scan chain is in shift mode. When Scan_Enable is set to “0”, the scan chain is in capture mode. Clock signals from the clock tree will control shift and capture operations in different modes.
Figure 1: An Example of a Mux-DFF Scan Architecture Design Level Sensitive Scan Design (LSSD) [SAR92] is another widely used scan architecture. Figure 2 shows an
Figure 2: An Example of a LSSD Scan Architecture Scan based testing of VLSI chips typically occurs in two phases. The first test phase is a chain integrity test (also know as a chain flush test or simply a chain test). The purpose of a chain integrity test is to check if the scan chains themselves function as expected. Usually, one or multiple chain flush patterns are applied while the scan chain is in shift mode. The second test phase is a scan test. The purpose of scan test is to check for faults in the system logic. When a chain integrity test and the following scan test fail, chain diagnosis plays a vital role to locate the defects and guide the Physical Failure Analysis (PFA) wherein the root cause of a failure is determined. Chain diagnosis is performed to locate which scan chain(s) and scan cell(s) had malfunction during shift. However, sometimes, the real culprit could be on scan chain control logic such as scan enable or clock signals. In this paper, we target the diagnosis of multiple defects in scan enable trees or scan clock trees.
The remainder of this paper is outlined as follows. Section 2 describes how to model scan enable / clock defects and gives a brief review of previous work. In Section 3, a new diagnosis algorithm is proposed to locate multiple scan enable / clock defects. Experimental results are given in Section 4, followed by the conclusions in Section 5.
defect will impact shift alone. Diagnosing such defects is to be discussed in this paper.
2. Scan Enable / Clock Defects
Defect Type III: If a scan enable signal is shorted to some other part in the design such that its logic value can be toggled, it means sometimes the defect behaves like stuck-at-0, sometimes it behaves like stuck-at-1. Such defect may lead to both incorrect shift and capture. Similar situation may happen when a defective clock is used for both shift and capture.
Similar to the defects on other signals, faulty scan enable / clock signals may be caused by numerous types of defects, e.g., a shorted net, an open net or an incorrect timing with respect to clock or scan data stream. These defects can be classified into three categories based on the faulty behaviors: (1) incorrect shift only, (2) incorrect capture only and (3) both incorrect shift and incorrect capture. For scan enable defects in Mux-DFF scan designs, we can use stuck-at-0, stuck-at-1 and stuck-at-X respectively to model each type of faulty behavior. For clock defects, it also can cause incorrect shift or incorrect capture or both depending on the clock’s function. In some designs, shift clock and capture clock are separating, but in some designs, the same clock is used for both shift and capture. Next, a few examples are used to illustrate different behaviors for scan enable / clock defects.
It is also possible for a scan enable or clock signal to have incorrect timing with respect to the data stream. This could be caused by a design error (e.g., undersized buffers may introduce extra delay) or signal integrity problems (e.g., a crosstalk may speed up or slow down the scan enable signal leading to unacceptable skew). An example of scan enable timing errors is shown in Figure 3, where Case A illustrates the correct timing diagram and Cases B and C illustrate two types of incorrect timing diagrams. In Case B, a delayed scan enable will cause incorrect capture operation followed by one or multiple incorrect shift operations (depending on the skew value) at the beginning of loading/unloading each pattern. In Case C, a fast-arrived scan enable will cause incorrect capture operation after one or multiple incorrect shift operations (depending on the skew value) at the end of loading/unloading each pattern.
Defect Type I: If a scan enable signal is shorted to VCC, only incorrect capture will result and the shift operation is always correct. Instead capturing data from system logic, the impacted scan cells will always capture data from the previous scan cell. The short defect changes the capture operation to a shift operation. A stuck-at-1 fault model is appropriate for this scenario. Clearly, the chain integrity test will pass since chain patterns don’t have the capture operation. Only the scan patterns would fail. Since the shift operation is correct, existing logic diagnosis algorithms can be applied in this scenario. In the rest of this paper, we do not discuss this category of scan enable defects. Similarly, if a defective clock does not impact shift operation, logic diagnosis should be able to handle the scenario as well. In this paper, we do not discuss this category of clock defects either. Defect Type II: If a scan enable signal is shorted to ground, only incorrect shift will result. That is, the capture operation is always correct. So we could use a stuck-at-0 fault model in this scenario. We know that the shift operation sometimes is incorrect because instead of obtaining the data from the previous scan cell, it will get the data from the system logic during each shift cycle. Similarly, if a clock is dedicated to shift operation, its
Figure 3: Scan Enable Timing Diagrams In reality, it is very difficult to distinguish Defect Type II and III, since we do not really know if the capture operation is also failed with shift operation together or not. We may assume it is always be Type III. It is a little bit pessimistic, but it is always on the safe side. To our best knowledge, there were only three prior work in this specific diagnosis area: [CRO05], [HUA06] and [LEE08]. To identify the defect on a scan enable tree, three approaches are proposed in [CRO05]. The first method is to use a scan pattern and vary the timing of the capture (scan enable deassertion) with respect to the clock. The second method is to vary the capture timing with respect to the data stream, which requires
the shift operation at very slow frequency to have enough time to deassert / assert the scan enable. The third method proposed in [CRO05] is to pad the capture cycle with “dead clocks”. These proposed methods may identify timing related defect on scan enable (Refer to Figure 3). However, it is not clear how to use them to identify other types of defects. Besides, it requires some extra efforts to manipulate ATE test parameters. In [HUA06] and [LEE08], they both use software based diagnosis algorithms that do not require any extra effort manipulating test parameters. In [HUA06], scan chain diagnosis is run at first by using stuck-at-X model. After chain diagnosis, analysis on scan enable / clock is performed based on the scan cell suspects. [LEE08] has one more step comparing to [HUA06]. It uses serial simulation to further validate and rank the suspects. As we know when a scan chain is long, simulating every shift cycle for all the patterns would be extremely time consuming. Besides, it is hard to tell whether a defective scan enable / clock is permanently stuck-at a particular value at every shift cycle. Hence using serial simulation based on one permanent single stuck-at fault model could lead to inaccurate results. Moreover, all of the prior work suffers the following two problems. (1) They can only diagnose single defect on scan enable / clock signal. (2) They may not handle Type III defect correctly. As explained earlier, it is hard to know if a defect can only impact shift or both shift and capture. In this paper, we propose a new algorithm that primarily tries to solve the above-mentioned two problems.
3. Diagnose Scan Enable / Clock Defect(s) If a chain integrity test fails, we would not know if the failure is caused by defects in the scan chains or defects in the scan chain control logic. Therefore, like the prior work [HUA06], we also start with scan chain diagnosis. First, we use previously published chain diagnosis algorithms [GUO01] [HUA03], [HUA04], [HUA05] to identify the suspect scan cells. An example is illustrated next to explain this step. Conventionally, each scan cell in a scan chain is given an index. The cell connected to scan chain output is numbered 0 and the cells in the scan chain are numbered incrementally from scan output to scan input sequentially. Assume only one scan chain (Chain1) failed the chain integrity test. Based on chain pattern
failures, we first select an appropriate fault model for this chain [GUO01] [HUA03]. Then we use the failed scan test to do diagnosis based on the fault model we deduced from chain test. We simulate one fault per cell at a time until we find the suspects whose simulation results match the observed results from ATE. For example, if we model Chain1’s defect as stuck_at_1 fault, when we simulate the fault at scan cell 100 on Chain1, we modify each scan pattern on the faulty chains in the following way: (1) Modify the loading values for cells at downstream of cell 100 (not including cell 100) to “1”s. (2) Mask the cell 100 as a tie-to-X value. It will make the diagnosis results still correct even for Type III defects. (3) Capture the test responses based on the modified loading values and modified cell. (4) Modify the captured (unloading) values for cells at upstream of cell 100 (not include cell 100) to “1”s, while cell 100 is still tie-to-X. After simulation of each candidate we compare the simulated result against to the observed results from ATE. If at least one observation point shows a conflict between simulation results and observation results, we know that cell 100 is not a suspect defect location. If we cannot find any suspect cell based on the single stuck-at1 fault model, we know that the fault model is not right. Based on previous work [HUA05], we “relax” our fault model to either intermittent single fault or multiple faults and reiterate the previous procedure until we found suspect(s) on the faulty chain. For single fault per chain, the identified suspect is either one scan cell or a range of consecutive indistinguishable scan cells. For multiple faults per chain, the identified suspects include two ranges. Each range includes either one scan cell or multiple consecutive indistinguishable scan cells. The identified range(s) are called failure range(s). For some cases, “Stuck-at-X” has to be used as fault model when a faulty chain behaves as Stuck_at_1 for some patterns and behaves as Stuck_at_0 for other patterns. It is especially hard to diagnose down to a specific cell when the fault model is “relaxed” to multiple “Stuck-at-X”. Under the circumstance, we may not locate all faulty cells. However, we can identify the boundaries of two special faulty cells: the faulty cell located closest to the scan input (called input-end faulty cell) and the faulty cell located closest to the scan output (called output-end faulty cell). We first use a binary search algorithm to identify the lower bound (L) for the input-end faulty cell. Suppose the design has only one faulty scan chain with 200 scan cells. We start with partitioning the chain into
two segments at the middle (at cell 100). For each scan pattern, we modify the scan cells on this faulty chain such that all cells at downstream of cell 100 (including cell 100) are tie-to-X. Then we run simulation and capture the test responses based on the modified design. Next, we compare the simulated results against the observed results on good chains or POs. Note that the observed failure bits on good chains or POs are the results of incorrect shift or capture on the faulty chain. If at least one observation point on good chains or POs shows a conflict between simulation results and ATE results, we know that the at least one cell in the range [199, 101] has incorrect loading values. We then move our partition point to cell 150 and repeat the above binary search. If there is no conflict in the upper section of the chain [199, 100], we move the partition point to cell 50 and repeat the above binary search. The search will converge on a cell L such that setting the partition point at cell L leads no conflict at good chains or POs, whereas setting the partition point at cell (L-1) (i.e. the adjacent downstream cell of L) leads to conflict at good chains or POs. We know that the conflict was introduced because cell L has an incorrect loading value, which makes cell L a lower bound for the input-end faulty cell. The range between L and scan input cell is called a failure range. Note that: (1) The conflicts on faulty chains cannot be used because we cannot tell these conflicts are the results of incorrect loading / unloading or incorrect capture. (2) We cannot say the input-end faulty cell is exactly at cell L because Stuck-at-X fault model inherently has an intermittent property. E.g., suppose the input-end faulty cell is somewhere in the upstream of cell L. However it is possible the fault is not triggered until the loading bit to cell L passes this faulty cell. Therefore we can only confidently say that cell L is the lower bound of the input-end faulty cell. (3) It is possible that more than one faulty cells in the range from scan input to cell L. However, all the other faulty cells in this range are masked when using the stuck-at-X fault model. We don’t have enough information to tell exactly how many faulty cells in this range. We can only say that at least one faulty cell is in the range between scan input and cell L. Next, we use faulty chain to identify the upper bound (U) for the output-end faulty cell. This is same as the upper bound calculation method for single fault proposed in [GUO01] [HUA03] except that we have to consider both shift / and capture failures by masking the targeted scan cell. The details of upper bound calculation can be found at prior work, and we will not explain it in
this paper. The range between U and scan output cell is also called a failure range. Note that: (1) We only use the information on faulty chains for the upper bound calculation. (2) We have no information to calculate the lower bound for the output-end faulty cell due to the possible intermittent fault behavior. (3) It is also possible that there are multiple faulty cells in the range from cell U to the scan output. However, all the rest faulty cells in this range are masked by the output-end faulty cell with the stuck-at-X fault model. We don’t have enough information to tell exactly how many faulty cells in this range. We can only say that at least one faulty cell is in the range between cell U and the scan output. (4) If there are some scan cells between the two ranges at the ends of a faulty chain, it is hard to tell whether there are any faulty cells between the two ranges. This middle range is called “potential failure range”. After chain diagnosis, we obtain one or two failure ranges for each faulty chain. If scan enable / clock signals are the root cause, they must (1) drive at least one scan cell within each failure range (2) Do not drive any scan cells outside the identified failure ranges and potential failure ranges. Our purpose in the next step is to locate suspect faulty scan enable / clock signal. It is done by the following steps. Without loss generality, we use the scan enable diagnosis as an example. The same flow can be applied to clock diagnosis as well. Step 1: We perform backward trace on the scan enable tree from the scan cells in each failure range. For a suspect scan cell j on scan chain i, we find a set of signals, denoted as SEi,j, on the scan enable tree, which drives the scan enable pin of this suspect scan cell. Obviously, if a node drives a scan cell, all its parent and ancestor nodes on the same scan enable tree are the drivers of this scan cell as well. Step 2: Find the union of the suspect nodes on scan enable tree of all cells in the same failure range. For a failure range r, we denote this union as Ur and Ur = ∪(all cells in failure range r) SEi,j. Step 3: We order the nodes in set Ur based on its depth on the scan enable tree, in decreasing order. We then perform forward trace from each node in set Ur to all scan cells. The forward trace is performed one node at a time according to its order in Ur. If a node also drives at least one scan cell outside the identified failure and potential failure ranges, it is not a suspect. So we
drop this node from Ur. Meanwhile, we drop all its parent and ancestor nodes on the scan enable tree if any of them are in Ur as well. The searching order of Ur avoids any unnecessary forward trace from higher level nodes. After we apply this procedure to all nodes remained in set Ur, we will find all suspect scan enable nodes that satisfy the conditions (a) drive at least one scan cell for each failure range we identified on faulty chains and (b) don’t drive any cell outside all failure and potential failure ranges. An example shown in Figure 4 is used to illustrate the 3 steps of the algorithm proposed above. This example has two failed scan chains (Scan_In1>Scan_Out1 and Scan_In2->Scan_Out2). Each chain has 11 cells numbered from 0 to 10, where cell 0 is the cell connected to scan output. On the first failed scan chain (from Scan_In1 to Scan_Out1), there are two identified failure ranges: cells [1, 0] and cells [10, 8]. On the second scan chain (from Scan_In2 to Scan_Out2) there is only one identified range: cells [6, 5]. Next, we apply the above proposed three steps of diagnosis algorithm on this example. Step 1: Through back trace, we get: SE1,10 = {S21, S13, Scan_Enable}; SE1,9 = {S22, S13, Scan_Enable}; SE1,8 = {S23, S13, Scan_Enable}; SE1,1 = {S21, S13, Scan_Enable}; SE1,0 = {S23, S13, Scan_Enable}; SE2,6 = {S11, Scan_Enable}; SE2,5 = {S11, Scan_Enable} Step 2: Find unions for the three ranges: U1 = SE1,10 ∪ SE1,9 ∪ SE1,8 ={S21, S22, S23, S13, Scan_Enable}, U2 = SE1,0 ∪ SE1,1 = {S21, S23, S13, Scan_Enable} U3 = SE2,6 ∪ SE2,5 = { S11, Scan_Enable} Step 3: Order sets U1, U2, U3. (In fact, in this example, U1, U2, U3 have been already in the desired order.) Then forward trace each node in each union until it reaches all scan cells it is driving. We can drop S23 because it also drives scan cell 2 on the second faulty chain, which is neither in a failure range nor a potential failure range. We can also drop S13 and Scan_En because they are parent and ancestor nodes respectively to node S23. Now we have – U1 = {S21, S22}; U2 = {S21}; U3 = { S11}
Figure 4: An Example of Scan Enable Tree Diagnosis Step 4: After the previous three steps, we need pick a minimum set of signals to “cover” all the failure ranges. By “cover”, it means at least one scan cell in each range is driven by at least one picked suspect signal. The problem can be formulated as a minimum vertex cover on a hypergraph, which is described as follows. In graph theory, a hypergraph is a generalization of a graph, where an edge can connect any number of vertices. Formally, a hypergraph H is a pair H = (V, E) where V is a set of elements, called nodes or vertices, and E is a set of non-empty subsets of V called hyperedges. To build a hypergraph for the problem at hand, we first assign a label of integer k to each signal in set Uk. Note that a signal may have been labeled with different numbers if it appears in different union sets. In the above example: Label_ S21 = {1, 2}; Label_ S22 = {1}; Label_ S11 = {3} Then we build a hypergraph H. Its vertices include all signals in all sets Uk. A hyperedge k (representing kth failure range) connects all vertices if a vertex has a label k. Note that one hyperedge may connect > 2 vertices. However, in this simple example, the hypergraph is “downgraded” into a graph since no more than 2 vertices share a hyperedge. In this example, there are three vertices: V = {S21, S22, S11}, and three hyperedges: E = {1, 2, 3}. The hypergraph is shown in Figure 5.
(2) We add S21 to the cover, since it has the highest degree 2. (3) Remove S21 and all its associated hyperedges {1, 2} (4) Remove S22, since it has no hyperedge associated with it. Figure 5: Hypergraph of the Example The problem is then formulated as to find a minimum vertex cover in this hypergraph. If we can find a minimum set of vertices that can cover all edges, it means we find a minimum set of signals in scan enable / clock tree that can explain all the failure ranges. In graph theory, the problem of finding a minimum vertex cover is a classical optimization problem and is a typical example of an NP-hard optimization problem [GAR79]. The minimum vertex cover problem can be formulated as a binary integral linear programming (ILP), as follows: Minimize
∑
Xv
for all vertices in V,
subject to Xu + Xv ≥ 1, for all {u, v} ∈ E (i.e. cover every hyperedge of this hypergraph) and Xi ∈ {0, 1} for all i ∈ V (i.e., every vertex is either in the vertex cover or not) As we know, the ILP problem may be computationally expensive if the size of the problem is large. A greedy algorithm is proposed as follows: (1) Order all the vertices based on its degree, in descending order. (2) Add to the cover the vertex v with the highest degree.
(5) Add S11 to the cover, remove S11, and edge {3}. The final cover includes {S21, S11}. It means there are defects on the scan enable tree. One is at S21, and the other is at S11. They can form a minimum cover to explain all the failure ranges.
4. Experimental Results The proposed algorithm is implemented with C++. We use a small design – 8051 with ~8K gates as our experimental circuit. First we use ATPG to generate one chain pattern and 347 scan patterns. We then create 30 cases with multiple clock defects and 10 cases with multiple scan enable defects by using Modelsim. In each clock defect case, we randomly pick 2 or 3 clock buffers in the clock tree, and inject all stuck-at-0 or all stuck-at-1 or mixed stuck-at faults at the selected clock buffers. In each scan enable defect case, we randomly pick 2 or 3 scan enable signals from the scan enable tree, and inject all stuck-at-0 faults at the selected signals. After setting the initial states for all scan cells to “0”, we use Modelsim to serially simulate all the patterns and dump out failure log files. We then diagnose each failure log and compare the reported signals with the injected ones. The fault injection and diagnosis results are in the following 4 tables. Table 1: All Faults are Stuck_At_0 at Clock Buffers Fail log ID
Injected fault sites
Reported fault sites
1
U189 sa0, U199 sa0
U189
2
U189 sa0, U256 sa0
U189, U256
3
U256 sa0, U266 sa0
U256, U266
4
U204 sa0, U247 sa0
U204, U247
5
U194 sa0, U245sa0, U310 sa0
U194, U245, U310
6
U210 sa0, U216 sa0, U258 sa0
U210, U258
Next we use the above example to explain the proposed heuristic.
7
U214 sa0, U255 sa0, U311 sa0
U214, U255, U311
8
U192 sa0, U248 sa0, U293 sa0
U192, U248, U293
(1) We order the vertices based on their degrees. We end up with {S21, S22, S11}.
9
U210 sa0, U271 sa0, U276 sa0
U210, U271, U276
10
U219 sa0, U245 sa0, U276 sa0
U219, U45, U276
(3) Remove v together with all the hyperedges associated with v. (4) If a vertex has no more hyperedge associated with it, remove this vertex as well. (5) Repeat the above operations on the remaining vertices and hyperedges until all vertices are gone. Report the cover.
Table 2: All Faults are Stuck_At_1 at Clock Buffers Fail log ID
Injected fault sites
Reported fault sites
11
U189 sa1, U199 sa1
U189
12
U189 sa1, U256 sa1
U189, U256
13
U256 sa1, U266 sa1
U256, U266
14
U204 sa1, U247sa1
U204, U247
15
U194 sa1, U245sa1, U310 sa1
U194, U245, U310
16
U210 sa1, U216sa1, U258 sa1
U210, U258
17
U214 sa1, U255sa1, U311 sa1
U214, U255, U311
18
U192 sa1, U248sa1, U293 sa1
U192, U248, U293
19
U210 sa1, U271sa1, U276 sa1
U210, U271, U276
20
U219 sa1, U245sa1, U276 sa1
U219, U45, U276
Table 3: Mixed Stuck_At_0 and Stuck_At_1 Faults at Clock Buffers Fail log ID
Injected fault sites
Reported fault sites
21
U189 sa0, U199 sa1
U189
22
U189 sa1, U256 sa0
U189, U256
23
U256 sa0, U266 sa1
U256, U256
24
U204 sa0, U247sa1
U204, U247
25
U194 sa1, U245sa0, U310 sa1
U194, U245, U310
26
U210 sa0, U216sa1, U258 sa1
U210, U258
27
U214 sa1, U255sa0, U311 sa0
U214, U255, U311
28
U192 sa1, U248sa0, U293 sa1
U192, U248, U293
29
U210 sa1, U271sa0, U276 sa1
U210, U271, U276
30
U219 sa0, U245sa1, U276 sa0
U219, U45, U276
In Table 1, all clock faults are stuck_at_0. In Table 2, all clock faults are stuck_at_1. In Table 3, the injected clock faults are mixed stuck_at_0 and stuck_At_1. It seems that the fault types do not impact the diagnosis results. Among them, for 80% cases, we got perfect diagnosis results. That is to say, the reported suspects include exactly the injected fault locations. The diagnosis accuracy and resolution are all perfect for these cases. There are 20% cases (fail log ids are 1, 6, 11, 16, 21, 26) such that the diagnosis reports are not complete. In case 1, for example, 1 out of 2 injected faults is missing.
In Case 6, for example, 1 out of 3 injected faults is missing. We use Case 6 as an example to further analyze why this is happening.
Figure 6: The Cells Driven by /U216 and /U210 As illustrated in Figure 6, the clock signal /U216 is driving scan cells 19, 26, 31, 32, and 33 on one scan chain. Unfortunately, the clock signal /U210 is driving scan cells 14, 15, 48, and 49 on the same scan chain. As we explained earlier, the chain diagnosis could not report any scan cells between the two failure ranges at the two ends of this chain. In other words, the faulty cells caused by /U216 are masked by the faulty cells caused by /U210. Eventually, it only reported /U210, but /U216 was missing from the report. To enhance the problem, we may use some special diagnostic patterns to identify more failure ranges, which will not be discussed in this paper.
Table 4: All Faults are Stuck_At_0 at Scan Enable Signals Fail log ID
Injected fault sites
Reported fault sites
31
U113 sa0, U127 sa0
U113, U127
32
U111 sa0, U141 sa0
U111, U141
33
U98 sa0, U102 sa0
U98, U102
34
U105 sa0, U110 sa0
U105, U110
35
U119 sa0, U125 sa0
U119, U125
36
U99 sa0, U103 sa0, U105 sa0
U105, U159
37
U70 sa0, U100 sa0, U130 sa0
U68, U100, U130
38
U104 sa0, U135 sa0, U167 sa0
U104, U135, U167
39
U66 sa0, U90 sa0, U120 sa0
U66, U99, U120
40
U99 sa0, U132 sa0, U136 sa0
U99, U132, U136
For multiple scan enable defect diagnosis, we got perfect diagnosis results on 70% cases. We use Case 36 as an example to further analyze why it reported /U159 instead of /U99 and /U103. The scan cells driven by /U99 include – {
Preliminary experimental results showed that the proposed diagnosis algorithm is effective in terms of diagnosis resolution and accuracy. 80% of the multiple clock defect cases and 70% of the multiple scan enable defect cases can get perfect diagnosis results. The reasons of the incompletely diagnosed and misdiagnosed cases were also investigated.
chain4 cell (20); chain7 cells (72, 71, 21, 20, 19)
}
The scan cells driven by /U103 include – {
chain8 cell (74); chain7 cells (53, 52, 51, 50, 49);
this kind of scan control signals was investigated. A general diagnosis algorithm was proposed. The problem was formulated as finding a minimum vertex cover on a hypergraph. A greedy heuristic algorithm was proposed to solve this NP-hard problem.
}
The scan cells driven by /U159 include – {
chain8 cell (76);
REFERENCES
chain4 cells (24, 23, 22, 21); chain7 cells (74, 73, 70, 69, 68, 67, 60, … 54)
}
The chain diagnosis report include – {
chain8 cell (76 …69); chain4 cells (21, 20); chain7 cells (76, … … 41)
}
From the above data, it is shown that the misdiagnosis was because the chain diagnosis accuracy and resolution are not good enough for this case. Chain diagnosis reported a few more suspect cells in the failure range on chain4 and chain8, and meanwhile missed some suspect cells on chain7. In scan enable diagnosis, multiple chains may fail and multiple stuck-at-Xs are normally used for each chain. The chain diagnosis accuracy and resolution will drop with the increase of injected faults on scan enable trees. The other nonperfect diagnosis cases (Case 37 and 39) were due to the similar reason. In future work, it is desirable to improve chain diagnosis accuracy and resolution when multiple stuck-at-X models are applied. Since the proposed algorithm has linear computational complexity, the diagnosis of multiple scan enable and clock defects can be performed very fast. For this small circuit, each diagnosis ran about 10 seconds.
5. Conclusions Defects could be anywhere on scan enable trees or scan clock trees. They will affect shift operation or capture operation or both. It would be more difficult when multiple faults exist in the scan enable or clock trees. For the first time, diagnosing multiple defects on
[CRO05] A. Crouch, “Debugging and Diagnosing Scan Chains,” Electronic Device Failure Analysis, Vol. 7, Feb., 2005, pp 16-24. [GAR79] M.R.Garey and D.S.Johnson, Computers and Intractability: A Guide to The Theory of NPCompleteness, W.H.Freeman Company, 1979. [GUO01] R. Guo and S. Venkataraman, “A Technique for Fault Diagnosis of Defects in Scan Chains,” Proc. Int’l Test Conference, 2001, pp. 268-277. [HUA03] Y. Huang, W.-T. Cheng, S. M. Reddy, C.-J. Hsieh and Y.-T. Hung, “Statistical Diagnosis for Intermittent Scan Chain Hold-Time Fault,” Proc. International Test Conference (ITC), 2003, pp.319-328. [HUA04] “Intermittent Scan Chain Fault Diagnosis based on Signal Probability Analysis” Y. Huang and W.-T. Cheng, Design, Automation and Test in Europe Conference (DATE) 2004. pp.1072 – 1077. [HUA05] “Using Fault Model Relaxation to Diagnose Real Scan Chain Defects,” Y. Huang, W.-T. Chang and G. Crowell, Asian and South Pacific Design Automation Conference (ASPDAC) 2005, pp.1176-1179. [HUA06] “Diagnosis of Defects on Scan Enable and Clock Trees,” Y. Huang and K. Gallie, Design Automation and Test in Europe (DATE), 2006. [LEE08] “Diagnosis of Scan Clock Failures”, K.L. Lee, N.Z. Basturkmen, and S. Venkataraman, VLSI Test Symposium (VTS), 2008. pp. 67 - 72. [SAR92] G.A. Sarrica and B.R. Kessler, “Theory and Implementation of LSSD Scan Ring & STUMPS Channel Test and Diagnosis”, IEEE/CHMT Int’l Electronics Manufacturing Technology Symposium, 1992.