Troubleshooting Intersite Networking Setup in Cisco Unity. Connection .... of the
Network” Error When Creating an Intersite Link on the Cisco Unity. Connection ...
CH A P T E R
20
Troubleshooting Networking in Cisco Unity Connection 8.x See the following sections: •
Troubleshooting Intersite Networking Setup in Cisco Unity Connection 8.x, page 20-36
•
Troubleshooting Message Addressing in Cisco Unity Connection 8.x, page 20-39
•
Troubleshooting Message Transport in Cisco Unity Connection 8.x, page 20-43
•
Troubleshooting Directory Synchronization in Cisco Unity Connection 8.x, page 20-46
•
Cross-Server Sign-In and Transfers in Cisco Unity Connection 8.x, page 20-51
Troubleshooting Intersite Networking Setup in Cisco Unity Connection 8.x Use the troubleshooting information in this section if you have difficulty creating an intersite link between two site gateways (regardless of whether you are linking two Cisco Unity Connection sites or a Connection site and a Cisco Unity site). See the following sections: •
“Unable to Contact the Remote Site” Error When Manually Creating an Intersite Link on the Cisco Unity Connection 8.x Site Gateway, page 20-36
•
”Hostname Entered Does Not Match That on The Remote Site Certificate” Error When Manually Creating an Intersite Link on the Cisco Unity Connection 8.x Site Gateway, page 20-37
“Unable to Contact the Remote Site” Error When Manually Creating an Intersite Link on the Cisco Unity Connection 8.x Site Gateway When you create an intersite link in Cisco Unity Connection Administration by using the Link to Cisco Unity Site or Cisco Unity Connection Site by Manually Exchanging Configuration Files option, the site gateway on which you are creating the link reads the fully-qualified domain name (FQDN) for the remote site gateway from the configuration file that you upload, and attempts to resolve the FQDN by using DNS. If DNS has not been configured on the Cisco Unity Connection site gateway, or the remote site gateway that you are linking to cannot be resolved via DNS, Connection Administration displays the error, “Unable to contact the remote site. You may choose to go ahead and create a link to this site, but synchronization with this site will not begin until communication can be established without errors. Do you wish to continue?” (The use of DNS name resolution is optional with Connection.)
Troubleshooting Guide for Cisco Unity Connection Release 8.x
20-36
Chapter 20
Troubleshooting Networking in Cisco Unity Connection 8.x
Troubleshooting Intersite Networking Setup in Cisco Unity Connection 8.x
When you see this error, do the following procedure to continue creating the link and to enable the synchronization tasks, which are automatically disabled when Connection encounters this error condition. To Manually Create an Intersite Link When the Remote Site Gateway Cannot Be Resolved Via DNS Step 1
On the New Intersite Link page, with the error displayed in the Status message, select Link. (If you have navigated away from the page, expand Networking, expand Links, and select Intersite Links. Then select Add. Select Link to Cisco Unity Site or Cisco Unity Connection Site by Manually Exchanging Configuration Files, and select Browse to upload the Remote Site Configuration File. Configure other settings on the page as applicable, and select Link. Select Link again when the error is displayed in the Status message.)
Step 2
On the Edit Intersite Link page, change the Hostname value from the FQDN to the IP address of the remote site gateway.
Step 3
Select Save.
Step 4
Enable the directory synchronization task by doing the following sub-steps: a.
Tip
In the Related Links field in the upper right corner of the Edit Intersite Link page, select Remote Site Directory Synchronization Task, and then select Go.
Alternatively, you can navigate to the task by expanding Tools, selecting Task Management, and selecting the Synchronize Directory With Remote Network task on the Task Definitions page. To edit the task schedule, on the Task Definition Basics page, select Edit, and then select Task Schedules.
b.
Check the Enabled check box.
c.
Configure the task to run on the desired schedule. (By default, the task runs every 15 minutes.)
d.
Select Save.
Step 5
To return to the list of tasks, select Task Definition, and then select Task Definitions.
Step 6
Optionally, enable the voice name synchronization task by doing the following sub-steps: a.
On the Task Definitions page, select Synchronize Voice Names with Remote Network.
b.
On the Task Definition Basics page, select Edit, and then select Task Schedules.
c.
Check the Enabled check box.
d.
Configure the task to run on the desired schedule. (By default, the task runs every 15 minutes.)
e.
Select Save.
”Hostname Entered Does Not Match That on The Remote Site Certificate” Error When Manually Creating an Intersite Link on the Cisco Unity Connection 8.x Site Gateway When you create an intersite link in Cisco Unity Connection Administration by using the Link to Cisco Unity Site or Cisco Unity Connection Site by Manually Exchanging Configuration Files option, the site gateway on which you are creating the link reads the fully-qualified domain name (FQDN) for
Troubleshooting Guide for Cisco Unity Connection Release 8.x
20-37
Chapter 20
Troubleshooting Networking in Cisco Unity Connection 8.x Troubleshooting Intersite Networking Setup in Cisco Unity Connection 8.x
the remote site gateway from the configuration file that you upload, and, if you check the Use Secure Sockets Layer (SSL) check box, verifies whether the FQDN matches the servername on the remote site gateway web SSL certificate (the certificate for browsing to the machine over HTTPS). If the values do not match, Connection Administration displays the error, “Hostname entered does not match that on the remote site certificate.” When you see this error, you can do the following procedure to repeat the link creation process and to circumvent the error by checking the Ignore Certificate Errors check box. To Manually Create an Intersite Link When the Remote Site Gateway Hostname Does Not Match the Name on the Certificate Step 1
On the New Intersite Link page, select Link to Cisco Unity Site or Cisco Unity Connection Site by Manually Exchanging Configuration Files, and select Browse to upload the Remote Site Configuration File.
Step 2
For Transfer Protocol, check the Ignore Certificate Errors check box.
Step 3
Configure other settings on the page as applicable, and select Link.
“Unable to Link to the Specified Remote Site. Cause: Failed to Assess the Current Network Size” Error When Creating an Intersite Link on the Cisco Unity Connection 8.x Site Gateway When you create an intersite link in Cisco Unity Connection Administration, the Connection site gateway checks to see if the combined number of users and contacts on the gateway after the link is created would exceed the user and contact limit. It also checks if the combined number of system distribution lists on the gateway would exceed the system distribution list limit. If the site gateway is unsuccessful at performing these checks, Connection Administration displays the error, “Unable to Link to the Specified Remote Site. Cause: Failed to Assess the Current Network Size.” If you see this error, you can view the default traces for the Connection Tomcat Application service (trace log filenames matching the pattern diag_Tomcat_*.uc) and search the file for the term “GetDirectoryCurrentSize.” For detailed instructions on viewing the trace logs, see the “Diagnostic Traces in Cisco Unity Connection 8.x” chapter. For more information on the directory size limits, see the “Cisco Unity Connection 8.x Directory Size Limits” section in the “Overview of Networking Concepts in Cisco Unity Connection 8.x” chapter of the Networking Guide for Cisco Unity Connection Release 8.x, available at http://www.cisco.com/en/US/docs/voice_ip_comm/connection/8x/networking/guide/8xcucnetx.html.
“Failed to Link to This Remote Site As This Specified Location Is Already Part of the Network” Error When Creating an Intersite Link on the Cisco Unity Connection 8.x Site Gateway The error “Failed to link to this remote site as this specified location is already part of the network” is displayed when you attempt to create an intersite link in Cisco Unity Connection Administration under any of the following conditions:
Troubleshooting Guide for Cisco Unity Connection Release 8.x
20-38
Chapter 20
Troubleshooting Networking in Cisco Unity Connection 8.x
Troubleshooting Message Addressing in Cisco Unity Connection 8.x
•
You attempt to create an intersite link from a location to the location itself.
•
You attempt to create an intersite link from one location to another location that is a member of the same Connection site.
•
You attempt to create an intersite link from a location on one site to a location on another site, and the sites are already linked.
If you see this error, check the hostname information or the configuration file that you are using to create the link. Verify that you are linking to the correct remote site gateway and that a link does not already exist between sites, then retry the linking process.
Troubleshooting Message Addressing in Cisco Unity Connection 8.x Message addressing involves the ability to select recipients when creating a new message. Use the troubleshooting information in this section if users report that they are unable to address messages to recipients on another voice messaging system. See the following sections: •
Cisco Unity Connection Users Cannot Address Messages to Remote Users, Contacts, or System Distribution Lists, page 20-39
•
Cisco Unity Connection Users Cannot Address Messages to Recipients at a VPIM Location, page 20-42
•
Cisco Unity Connection Users Cannot Blind Address Messages to a Mailbox at a VPIM Location, page 20-43
If a message is successfully created and sent to a remote recipient but is not received by the recipient, see the “Troubleshooting Message Transport in Cisco Unity Connection 8.x” section on page 20-43. For addressing issues involving only local recipients on the same Cisco Unity Connection server, see the “Troubleshooting Searching and Addressing in Cisco Unity Connection 8.x” chapter.
Cisco Unity Connection Users Cannot Address Messages to Remote Users, Contacts, or System Distribution Lists If Cisco Unity Connection users are unable to address messages to remote objects within a Cisco Unity Connection site or on a linked Connection or Cisco Unity site, do the following tasks in the order presented: 1.
Check for the presence of the remote object in Cisco Unity Connection Administration on the location on which users are experiencing the problem. This indicates whether the remote object has been replicated. If the object is not found, see the “Troubleshooting Directory Synchronization in Cisco Unity Connection 8.x” section on page 20-46 for further troubleshooting steps.
2.
Check the partition and search space configuration. The remote object to which the message is being addressed must belong to a partition that is a member of the search space configured as the search scope for the user. See the “Checking the Partition and Search Space Configuration for Addressing to Remote Objects” section on page 20-40.
3.
Turn on the CDE micro trace (level 12 CDL Access). For detailed instructions on enabling the traces and viewing the trace logs, see the “Diagnostic Traces in Cisco Unity Connection 8.x” chapter.
Troubleshooting Guide for Cisco Unity Connection Release 8.x
20-39
Chapter 20
Troubleshooting Networking in Cisco Unity Connection 8.x Troubleshooting Message Addressing in Cisco Unity Connection 8.x
Checking the Partition and Search Space Configuration for Addressing to Remote Objects If you have only a single Cisco Unity Connection site, when you initially set up the site between locations, users who are homed on one location are not able to address messages to users at other locations, because the users on each location are in separate partitions and use search spaces that do not contain the partitions of users on the other locations. After initial replication completes between the locations, you can reconfigure your search spaces to include partitions that are homed on other servers, and you can change the search scope of users, routing rules, call handlers, directory handlers, and VPIM locations to use a search space that is homed on a remote location. (Note that while both partitions and search spaces are replicated between locations, you cannot assign users or other objects to a partition that is homed on another location.) If you have linked one Cisco Unity Connection site to another Connection site, partitions and search spaces are replicated between the sites. However, when you initially set up the link between sites, the users are in separate partitions and use search spaces that do not contain the partitions of users on the locations in the other site. After initial replication completes between the sites, you can reconfigure your search spaces to include partitions that are homed on the remote site, and you can change the search scope of users, routing rules, call handlers, directory handlers, and VPIM locations to use a search space that is homed on a location in the remote site. When you link a Cisco Unity Connection site and a Cisco Unity site, a partition is automatically created in the Connection directory for each Cisco Unity server, and all Cisco Unity users and replicated system distribution lists that are homed on the server are placed in the partition. However, the partition is not automatically added to search spaces on the Connection locations. In order for Connection users to have permission to address messages to Cisco Unity users or replicated distribution lists, you must add the partition to the search spaces used by those Connection users. Note that the order a partition appears in a search space is important if users address messages by extension. If, for example, Connection and Cisco Unity users have overlapping 4-digit extensions and you want Connection users to be able to reach other Connection users by their 4-digit primary extension and reach Cisco Unity users by a unique 7-digit alternate extension, make sure that the Cisco Unity partition appears after any Connection partitions that contain the overlapping 4-digit extensions. At a minimum, when a Connection user is unable to address to a remote user or other object, you can do the following procedure to check whether the partition of the remote object is in the search space of the user that is attempting to address to the object. To Check Whether the Partition of a Remote Object Belongs to the Search Space of a Cisco Unity Connection User Step 1
In Cisco Unity Connection Administration on the location on which the Cisco Unity Connection user who is having the addressing problem is homed, browse to the Edit page for the object the user is trying to address to: •
For a remote user, select Users. On the Search Users page, use the Search Limits fields and the search criteria to find the remote user. Select the user alias of the remote user to display the Edit User Basics page.
•
For a remote contact, select Contacts. On the Search Contacts page, use the Search Limits fields and the search criteria to find the remote contact. Select the alias of the remote contact to display the Edit Contact Basics page. (Note that contacts are only replicated within a single site.)
•
For a remote system distribution list, expand Distribution Lists, then select System Distribution Lists. On the Search Distribution Lists page, use the Search Limits fields and the search criteria to find the remote system distribution list. Select the alias of the remote list to display the Edit Distribution List Basics page. (Note that, depending on the intersite link and distribution list configuration, distribution lists may not be replicated across an intersite link.)
Troubleshooting Guide for Cisco Unity Connection Release 8.x
20-40
Chapter 20
Troubleshooting Networking in Cisco Unity Connection 8.x
Troubleshooting Message Addressing in Cisco Unity Connection 8.x
Step 2
On the Edit page for the object, note the value in the Partition field.
Step 3
Note the search space of the Cisco Unity Connection user who is having the addressing problem:
Step 4
a.
Select Users.
b.
On the Search Users page, use the Search Limits fields and the search criteria to find the user who is having the addressing problem.
c.
Select the alias of the user to display the Edit User Basics page.
d.
On the Edit User Basics page, note the value of the Search Scope field.
Check the configuration of the search space that you noted in Step 3: a.
Expand Dial Plan, and select Search Spaces.
b.
On the Search Spaces page, use the Search Limits fields and the search criteria to find the search space that you noted in Step 3.
c.
Select the name of the search space.
d.
On the Edit Search Space page, if the partition that you noted in Step 2 is not in the Assigned Partitions list, find it in the Unassigned Partitions list, select it, and click the up arrow to move it to the Assigned Partitions list. Then click Save.
Note
If the search space is homed on another location, select the link in the Status message at the top of the page to edit the search space from the remote location. A new window opens to Connection Administration on the remote location.
Cisco Unity Users Cannot Address Messages to Cisco Unity Connection Users or System Distribution Lists If Cisco Unity users are unable to address messages to users on a Connection site to which Cisco Unity is linked via an intersite link (also known as Connection Networking), do the following tasks in the order presented: 1.
Check for the presence of the Connection user object as a Connection Networking subscriber in the Cisco Unity Administrator. This indicates whether the Connection user object has been replicated. If the object is not found, see the “Troubleshooting Directory Synchronization in Cisco Unity Connection 8.x” section on page 20-46 for further troubleshooting steps.
2.
If the problem involves addressing by extension, check to see if the Connection user object has an extension in Cisco Unity, and if so, check whether the extension matches the format that Cisco Unity users are expecting. See the “Troubleshooting Cisco Unity Connection User Extension Creation in Cisco Unity” section on page 20-41.
Troubleshooting Cisco Unity Connection User Extension Creation in Cisco Unity When you link a Cisco Unity Connection site and aCisco Unity site, the Connection user and system distribution list objects that are created in the Cisco Unity directory belong to the dialing domain that is configured on the Cisco Unity site gateway. Because the Connection search space and partition design accommodates overlapping extensions and may include users who have a primary extension and alternate extensions in different partitions, you must choose how to map Connection extensions to the
Troubleshooting Guide for Cisco Unity Connection Release 8.x
20-41
Chapter 20
Troubleshooting Networking in Cisco Unity Connection 8.x Troubleshooting Message Addressing in Cisco Unity Connection 8.x
Cisco Unity Dialing Domain. To do so, for each Connection location, you specify a single partition that Cisco Unity pulls extensions from. (In Cisco Unity Connection Administration, you configure the Local Partition That Cisco Unity Users Can Address to By Extension field on the Edit Location page for the local location.) When users from a particular Connection location are replicated to Cisco Unity, only extensions belonging to Local Partition That Cisco Unity Users Can Address to By Extension are replicated to Cisco Unity. Because extensions within a dialing domain must be unique, the collection of all partitions chosen across the Connection site should not contain duplicates of any extension. When the collection includes duplicate extensions, or extensions that already exist in the Cisco Unity site gateway Dialing Domain, one or more extensions are omitted from the Cisco Unity directory. When this occurs, warnings appear in the Cisco Unity application event log indicating the owner of each omitted extension. After remedying any conflicts, you may need to do a manual resynchronization on the Cisco Unity site gateway (by selecting Total Sync on the Network > Connection Networking Profile page in Cisco Unity Administrator) in order to update the extensions. It is also possible for a Connection user to not have any extensions belonging to the Local Partition That Cisco Unity Users Can Address To By Extension configured on the server on which the user is homed. In this case, as in other cases where the Connection user object is created without an extension, Cisco Unity users will not be able to address to the user by extension. If the problem involves many user extensions on the same Connection location, you may need to change the partition chosen as the Local Partition That Cisco Unity Users Can Address to By Extension for the location. Do the following procedure to check or change this value. To Configure the Partition that Cisco Unity Users Can Address To for a Cisco Unity Connection Location Step 1
In Cisco Unity Connection Administration on the Connection location, expand Networking, then select Locations.
Step 2
Expand Local Site and select the display name of the local location (the location on which you are accessing Connection Administration).
Step 3
Under Local Partition That Cisco Unity Users Can Address To By Extension, for Partition, select the name of the partition to use.
Step 4
Select Save.
Cisco Unity Connection Users Cannot Address Messages to Recipients at a VPIM Location Addressing to a particular recipient at a VPIM location can fail for one of the following reasons: •
Blind addressing is disabled for the VPIM location, and no VPIM contact exists for the recipient. If you are relying on automatic VPIM contact creation to populate VPIM contacts based on incoming messages, it is possible that contact creation is not set up properly for this location, or that no messages have been received from the remote user. Check the settings on the Contact Creation page for the VPIM location in Cisco Unity Connection Administration.
•
A VPIM contact exists, but users are unable to locate it because the extension is incorrect or the contact name does not match user searches. Check the VPIM contact configuration in Connection Administration.
Troubleshooting Guide for Cisco Unity Connection Release 8.x
20-42
Chapter 20
Troubleshooting Networking in Cisco Unity Connection 8.x
Troubleshooting Message Transport in Cisco Unity Connection 8.x
•
Users are attempting to blind address to VPIM recipients, but the DTMF Access ID of the VPIM location is incorrect or does not match the pattern users are attempting to enter when addressing. Check the value of the DTMF Access ID setting on the Edit VPIM Location page in Connection Administration, and confirm that users are aware of the correct value.
•
The user search scope does not include the partition of the VPIM contact or VPIM location. If the VPIM contact partition does not match the partition of the VPIM location to which the contact belongs, the search results depend on the method used to address the message as well as the partition and search space configuration. When users address messages to a VPIM mailbox by entering a VPIM location DTMF Access ID plus a remote user mailbox number, or when voice-recognition users say a name and location (for example, “John Smith in Seattle”), the action is allowed or denied based on the partition of the VPIM location. However, when users address to a VPIM contact by using spell-by-name or by entering the local extension of the contact, or when voice-recognition users say the name of a contact without the location (for example, “John Smith”), the action is allowed or denied based on the partition of the VPIM contact, regardless of whether the partition of the VPIM location is out of scope for the user. In Connection Administration, on the Edit User Basics page for the user, check which search space is configured as the search scope. Then check which partition is configured for the VPIM contact (on the Edit Contact Basics page) or for the VPIM location (on the Edit VPIM Location page), as applicable. Finally, check the Edit Search Space page for the user search space to determine whether the partition appears in the Assigned Partitions list.
Cisco Unity Connection Users Cannot Blind Address Messages to a Mailbox at a VPIM Location Blind addressing allows users to send messages to recipients at the VPIM location even if the recipients are not defined as contacts in the Cisco Unity Connection directory. If blind addressing is not working, confirm that you have enabled it for an individual VPIM location by checking the Allow Blind Addressing check box on the VPIM Location page in Cisco Unity Connection Administration. When this check box is checked for a location, users can address messages to recipients at this location by entering a number that is made up of the VPIM location DTMF Access ID and the mailbox number of the recipient, or by saying the digits of the mailbox number and the display name of the VPIM location (for example, “five five at Seattle office”).
Troubleshooting Message Transport in Cisco Unity Connection 8.x Cisco Unity Connection uses SMTP to exchange voice messages with other systems. This includes VPIM messages, messages between users within a Connection site, messages to users on a different Connection site or on a Cisco Unity site, and messages sent to Connection by IMAP clients or forwarded by Connection to the relay address configured on the Message Actions page for a user. In order for a Connection system to exchange SMTP messages with other voice messaging systems or Connection locations, the system must either be able to directly access TCP/IP port 25 on the remote system, or be configured to deliver messages to an SMTP smart host that can relay messages to the system. When VPIM Networking is in use within a Connection networking site, typically you create each VPIM location on only one Connection server in the site; the other locations in the site then forward messages that are addressed to users at the VPIM location to the Connection server that homes the VPIM location for delivery. In this case, only this Connection server needs SMTP connectivity (either directly or through a smart host) with the remote messaging system.
Troubleshooting Guide for Cisco Unity Connection Release 8.x
20-43
Chapter 20
Troubleshooting Networking in Cisco Unity Connection 8.x Troubleshooting Message Transport in Cisco Unity Connection 8.x
When a message is recorded by a Connection user for delivery to a remote system, the message is first processed by the Message Transfer Agent (MTA). This service formats the message. For example, for a VPIM message, the MTA formats the To: and From: fields on the message, sets the content-type of the message to multipart/Voice-Message, and sets other header properties. It then places the message in a pickup folder on the Connection server. The SMTP service periodically checks the pickup folder for messages, removes a message from the folder, determines the destination server from the message header, establishes an SMTP connection to the correct server, and sends the message. The process is reversed when Connection receives an incoming message via SMTP—the message is first processed by the SMTP service, then the MTA service. Use the troubleshooting information in this section if you are experiencing difficulties with message transport. See the following sections: •
Messages Sent from Users on One Cisco Unity Connection 8.x Location Are Not Received by Users on Another Cisco Unity Connection Location, page 20-44
•
Replies to Messages Sent by Remote Senders are Not Delivered, page 20-44
•
Messages Sent from a VPIM Location Are Not Received by Cisco Unity Connection Users, page 20-45
•
Messages Sent from Cisco Unity Connection Are Not Received by Users at a VPIM Location, page 20-45
Messages Sent from Users on One Cisco Unity Connection 8.x Location Are Not Received by Users on Another Cisco Unity Connection Location In general, messages that are successfully addressed to a remote user by using the phone interface should be delivered as long as SMTP connectivity is established between the locations. A notable exception occurs when a user replies to all recipients of a received message, and some of those recipients are not in the search scope of the replying user. In this case, the replying user receives a non-delivery receipt for any recipient who is not in the search scope. Messages sent by using an IMAP client to a remote user can fail if the profile information for the remote user (specifically, the SMTP proxy address information of the remote user) has not fully replicated to the Connection location of the sending user. To diagnose and correct this condition, see the “Troubleshooting Directory Synchronization in Cisco Unity Connection 8.x” section on page 20-46. If the issue does not appear to be related to the partition and search space configuration or directory replication, you may be able to further diagnose the problem by turning on the Message Tracking Traces macro trace. For detailed instructions on enabling the traces and viewing the trace logs, see the “Diagnostic Traces in Cisco Unity Connection 8.x” chapter.
Replies to Messages Sent by Remote Senders are Not Delivered In cases where you have recently added a location to a site or linked sites, it is possible for messages to be received from remote senders whose user object has not yet replicated to a location. If a user attempts to reply to a message that was sent by a sender whose user object has not yet replicated, the reply is not delivered, and the sender receives a non-delivery receipt (NDR). When this happens, the user who attempted the reply can resend the reply after the user object of the original message sender has replicated, and the reply will be successfully delivered.
Troubleshooting Guide for Cisco Unity Connection Release 8.x
20-44
Chapter 20
Troubleshooting Networking in Cisco Unity Connection 8.x
Troubleshooting Message Transport in Cisco Unity Connection 8.x
Messages Sent from a VPIM Location Are Not Received by Cisco Unity Connection Users In order for incoming VPIM messages to be received and processed correctly, the following are required: •
SMTP connectivity must be available between the originating voice messaging system and Cisco Unity Connection.
•
If messages from the originating voice messaging server are routed through a smart host that is different from the one that is configured on the System Settings > SMTP Configuration > Smart Host page in Cisco Unity Connection Administration, the IP address of this smart host must be added to the IP Address Access List as an allowed connection. (On the System Settings > SMTP Configuration > Server page, select Edit > Search IP Address Access List to view or modify the access list.)
•
The domain name in the incoming message “From” field must match the Remote VPIM Domain Name value that is defined for the VPIM location in Connection Administration.
•
If a Remote Phone Prefix value is defined for the VPIM location, the mailbox number in the incoming message “From” field must begin with the prefix digits.
•
If a Cisco Connection Phone Prefix is defined for the VPIM location, the mailbox number in the incoming message “To” field must begin with the prefix digits.
•
The Connection users receiving the message must be in a partition that is a member of the search space that is defined as the search scope of the VPIM location on the receiving server.
•
If intersite networking is in use, the VPIM location must be configured on a Connection location within the Connection site on which the recipient is homed. VPIM locations and contacts are replicated within a site but are not replicated across intersite links, and site gateways do not relay VPIM messages to other sites.
You can verify SMTP connectivity and check the format of the “From” and “To” fields by turning on all levels of SMTP micro traces. (“MAIL FROM” and “RCPT TO” appear in the SMTP trace logs.) In addition, when you turn on all levels of MTA micro traces, the MTA log contains information about the processing of the message, including messages describing prefix processing errors. You can use the message ID listed at the end of the output file path name in the SMTP logs (for example, csUnitySmtp-30-1223425087697), to locate a message in the MTA log, or search by the recipient address (for example,
[email protected]). For detailed instructions on enabling the traces and viewing the trace logs, see the “Diagnostic Traces in Cisco Unity Connection 8.x” chapter.
Messages Sent from Cisco Unity Connection Are Not Received by Users at a VPIM Location In order for outgoing VPIM messages to be received and processed correctly, the following are required: •
SMTP connectivity must be available between Cisco Unity Connection and the receiving voice messaging system, either through direct TCP/IP connectivity to port 25, or through an SMTP smart host. (You can configure the SMTP smart host on the System Settings > SMTP Configuration > Smart Host page in Cisco Unity Connection Administration.)
•
The audio attachment on the VPIM message must be in a format that is playable on the remote system. If the remote voice messaging system is not Connection or Cisco Unity, you may need to configure the Outbound Messages setting for the VPIM location in Cisco Unity Connection Administration to use the G.726 codec to transcode the audio format.
Troubleshooting Guide for Cisco Unity Connection Release 8.x
20-45
Chapter 20
Troubleshooting Networking in Cisco Unity Connection 8.x Troubleshooting Directory Synchronization in Cisco Unity Connection 8.x
As with incoming VPIM messages, when troubleshooting outgoing messages, we recommend that you start by turning on all MTA and SMTP micro traces. When examining the logs for outgoing message issues, start with the MTA log first, then review the SMTP log. For detailed instructions on enabling the traces and viewing the trace logs, see the “Diagnostic Traces in Cisco Unity Connection 8.x” chapter.
Troubleshooting Directory Synchronization in Cisco Unity Connection 8.x Use the troubleshooting information in this section if you are experiencing difficulties with directory synchronization either within a Cisco Unity Connection site (intrasite networking) or between sites (intersite networking). See the following sections: •
Troubleshooting Directory Synchronization within a Cisco Unity Connection Site in Cisco Unity Connection 8.x, page 20-46
•
Troubleshooting Directory Synchronization Between Two Cisco Unity Connection Sites, page 20-48
•
Troubleshooting Directory Synchronization Between a Cisco Unity Connection Site and a Cisco Unity Site, page 20-49
Troubleshooting Directory Synchronization within a Cisco Unity Connection Site in Cisco Unity Connection 8.x Within a site, each location uses SMTP to exchange directory synchronization information and messages directly with every other location. Use the troubleshooting information in this section if you are experiencing difficulties with directory synchronization within a single Connection site. See the following sections: •
Unique Sequence Numbers (USNs) Are Mismatched Between Locations, page 20-46
•
Automatic Directory Replication Is Stalled, page 20-47
•
Manual Directory Replication Is Stalled, page 20-47
•
Push and Pull Status Are Mismatched Between Locations, page 20-48
Unique Sequence Numbers (USNs) Are Mismatched Between Locations The Connection Locations pages in Cisco Unity Connection Administration provide information about the status of replication between locations. On the Edit Connection Location page for a remote location, the Last USN Sent, Last USN Received, and Last USN Acknowledged fields indicate the sequence numbers of replication messages sent to and from the remote location. When two locations are fully synchronized, the Last USN Sent and Last USN Acknowledged values on the location that is sending replication updates should equal the Last USN Received on the location that is receiving updates. During replication, it is normal for the Last USN Acknowledged value to lag behind the Last USN Sent value. During a push synchronization, the Last USN Sent may display a very large value while the Last USN Acknowledged shows a much smaller value. This is normal. Monitor the Last USN Acknowledged to make sure it continues increasing toward the Last USN Sent value. If it does not, see the “Manual Directory Replication Is Stalled” section on page 20-47.
Troubleshooting Guide for Cisco Unity Connection Release 8.x
20-46
Chapter 20
Troubleshooting Networking in Cisco Unity Connection 8.x
Troubleshooting Directory Synchronization in Cisco Unity Connection 8.x
You can also use the Voice Network Map tool in Cisco Unity Connection Serviceability to check replication status within a site. The tool is particularly useful because it allows you to view replication status for all locations in the network from one place, so that you can quickly locate replication problems within a site. For more details, select Help > This Page from within the tool, or see the “Understanding the Voice Network Map Tool in Version 8.x” chapter of the Administration Guide for Cisco Unity Connection Serviceability Release 8.x at http://www.cisco.com/en/US/docs/voice_ip_comm/connection/8x/serv_administration/guide/8xcucser vagx.html.
Automatic Directory Replication Is Stalled Revised April 23, 2013
Directory changes on one Cisco Unity Connection server are automatically propagated to other locations in the site. If either the Last USN Acknowledged value that is displayed on the sending location or the Last USN Received value that is displayed on the receiving location stops incrementing toward the Last USN Sent value that is displayed on the sending location, replication may be stalled. This can happen when a Connection location receives an update to an object that depends on another object about which it has not received information. For example, the addition of a member to a distribution list depends on the presence of a user record for the member being added. If the location has not received the information about the user record, it waits for a default of five minutes to see if the directory message containing the user record information arrives to satisfy the dependency. The reasons of stalled replication can be as follows: •
SMTP not working on either of the node or all nodes.
•
Connection Digital Networking Replication Agent service not activated on either of the node or all nodes.
•
Duplicate data may exist.
In most cases, the problem should resolve itself after the five minute time-out, at which point the receiving Connection system requests that the record be re-sent. If the problem is not resolved, use the Real-Time Monitoring Tool (RTMT) or the command line interface (CLI) to check the Application System log to see if any errors have been reported by the CuReplicator application. For information on using RTMT to view system logs, see the Cisco Unified Real-Time Monitoring Tool Administration Guide at http://www.cisco.com/en/US/products/ps6509/prod_maintenance_guides_list.html. You may also want to turn on Digital Networking macro traces to diagnose a replication issue. For detailed instructions on enabling intrasite networking replication traces and viewing the trace logs, see the “Diagnostic Traces in Cisco Unity Connection 8.x” chapter.
Manual Directory Replication Is Stalled When an administrator initiates a manual push or pull of the directory between two Cisco Unity Connection locations, the Push Directory or Pull Directory status displayed on the Networking > Connection Locations page for the remote location in Cisco Unity Connection Administration may indicate that replication is in progress, but the Last USN Acknowledged or Last USN Received values on the Edit Connection Location page may not be changing. If this problem occurs, try stopping the push or pull operation by checking the check box next to the display name of the remote location on the Connection Locations page and selecting Stop Push (if the Push Directory status for that location indicates a push is in progress) or Stop Pull (if the Pull Directory status for that location indicates a pull is in progress). You can then restart the manual replication.
Troubleshooting Guide for Cisco Unity Connection Release 8.x
20-47
Chapter 20
Troubleshooting Networking in Cisco Unity Connection 8.x Troubleshooting Directory Synchronization in Cisco Unity Connection 8.x
Push and Pull Status Are Mismatched Between Locations When an administrator initiates a manual push or pull of the directory between two Cisco Unity Connection locations, the Push Directory status displayed on the Networking > Links > Intrasite Links page in Cisco Unity Connection Administration on the sending location should match the Pull Directory status displayed in Connection Administration on the receiving location (for example, both should display In Progress during replication). If the status does not match, wait at least five minutes. If it still does not match, you may be able to correct the mismatch by doing the following procedure. To Resynchronize Push and Pull Status Between Locations Step 1
In Cisco Unity Connection Administration on the location that displays Idle status for the push or pull, check the check box next to the display name of the mismatched location, and select Push Directory To or Pull Directory From to start the operation that should display In Progress. For example, if location one shows a push is in progress and location two shows a pull is idle, on location two, check the check box next to the location one display name and select Pull Directory From.
Step 2
When the operation status displays as In Progress, wait a minute, then recheck the check box for the remote location and stop the operation by selecting either Stop Push or Stop Pull, as applicable.
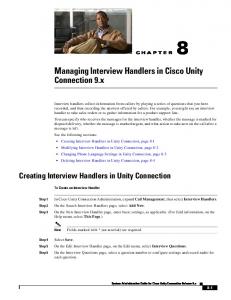
Troubleshooting Directory Synchronization Between Two Cisco Unity Connection Sites Replication between sites is accomplished by means of a Feeder service and a Reader service (also referred to as the FeedReader) running on each site gateway. The Reader service periodically polls the remote site gateway for any directory changes since the last poll interval. The Feeder service checks the change tracking database for directory changes and responds to poll requests with the necessary information. The Feeder service is implemented as a web site that returns directory information in XML format when it receives a request from the remote Reader. Because directory information includes names and extensions, it is treated as confidential, and authentication is required to access the feed. We also recommend that you configure SSL on each site gateway in order to encrypt the directory information. The synchronization that occurs after two sites are first joined can take anywhere from a few minutes to a few hours depending on the directory size. Later updates will only synchronize changes since the last cycle, unless you manually request a full resynchronization. On a Connection site gateway, you can configure the schedule on which the Reader polls the remote Feeder for directory data, and the schedule on which it polls for recorded names. You can access the schedules in Cisco Unity Connection Administration on the Tools > Task Management page by selecting either the Synchronize Directory With Remote Network task or the Synchronize Voice Names With Remote Network task. Table 20-1 lists some of the tools you can use to collect information about the operation of the Feeder and Reader applications for intersite networking.
Troubleshooting Guide for Cisco Unity Connection Release 8.x
20-48
Chapter 20
Troubleshooting Networking in Cisco Unity Connection 8.x
Troubleshooting Directory Synchronization in Cisco Unity Connection 8.x
Table 20-1
Application Reader
Feeder
Troubleshooting Tools for Intersite Replication Between Cisco Unity Connection Sites
Troubleshooting Tool(s) •
The Networking > Links > Intersite Links > Edit Intersite Link page displays statistics about the number of replicated objects and object changes, the time of last synchronization, and the last time an error occurred during synchronization.
•
Enable FeedReader micro trace levels 00, 01, 02, 03, 10, and 14. See the “Diagnostic Traces in Cisco Unity Connection 8.x” chapter for instructions.
•
Enable Feeder micro trace levels 00, 01, 02, and 03. See the “Diagnostic Traces in Cisco Unity Connection 8.x” chapter for instructions.
If you want to manually start an incremental update of the directory on either site, you can do so by using the Sync button on the Networking > Links > Intersite Links page in Cisco Unity Connection Administration on the Connection site gateway. To initiate a full resynchronization of the entire directory, use the Resync All button on the same page.
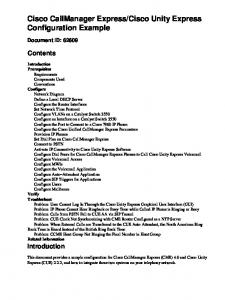
Troubleshooting Directory Synchronization Between a Cisco Unity Connection Site and a Cisco Unity Site Replication between sites is accomplished by means of a Feeder service and a Reader service running on each site gateway. The Reader service periodically polls the remote site gateway for any directory changes since the last poll interval. The Feeder service checks the change tracking database for directory changes and responds to poll requests with the necessary information. The Feeder service is implemented as a web site that returns directory information in XML format when it receives a request from the remote Reader. Because directory information includes names and extensions, it is treated as confidential, and authentication is required to access the feed. We also recommend that you configure SSL on each site gateway in order to encrypt the directory information. The synchronization that occurs after two sites are first joined can take anywhere from a few minutes to a few hours depending on the directory size. Later updates will only synchronize changes since the last cycle, unless you manually request a full resynchronization. On the Connection site gateway, you can configure the schedule on which the Reader (also referred to as the FeedReader in Connection) polls the remote Feeder for directory data, and the schedule on which it polls for recorded names. In Cisco Unity Connection Administration on the site gateway, you can access the schedules on the Tools > Task Management page by selecting either the Synchronize Directory With Remote Network task or the Synchronize Voice Names With Remote Network task. On the Cisco Unity site gateway, you can enable or disable synchronization of recorded names, and configure the interval at which the Reader polls the Connection Feeder for directory updates and recorded names. In the Cisco Unity Administrator on the site gateway, you can access both settings (Synchronize Voice Names and Feeder Interval) on the Networking > Connection Networking page. Note that unlike the Connection Reader, which has separate configurable schedules for polling directory data and recorded names, the Cisco Unity Reader polls for both (if recorded name synchronization is enabled) during each cycle. Table 20-2 lists the tools and details you can use to collect information about the operation of the Feeder and Reader applications for both Cisco Unity Connection and Cisco Unity.
Troubleshooting Guide for Cisco Unity Connection Release 8.x
20-49
Chapter 20
Troubleshooting Networking in Cisco Unity Connection 8.x Troubleshooting Directory Synchronization in Cisco Unity Connection 8.x
Table 20-2
Troubleshooting Tools for Intersite Replication Between Cisco Unity Connection and Cisco Unity
Application Cisco Unity Connection Reader
Troubleshooting Tool(s) •
The Networking > Links > Intersite Links > Edit Intersite Link page displays statistics about the number of replicated objects and object changes, the time of last synchronization, and the last time an error occurred during synchronization.
•
Enable FeedReader micro trace levels 00, 01, 02, 03, 10, and 14. See the “Diagnostic Traces in Cisco Unity Connection 8.x” chapter for instructions.
Cisco Unity Connection Feeder
•
Enable Feeder micro trace levels 00, 01, 02, and 03. See the “Diagnostic Traces in Cisco Unity Connection 8.x” chapter for instructions.
Cisco Unity Reader
•
The Networking > Connection Networking page in the Cisco Unity Administrator on the site gateway displays statistics about the number of replicated objects and object changes, the time of last synchronization, and the last time an error occurred during synchronization.
•
The Cisco Unity Reader logs operational and error messages to the Windows Application Event Log.
•
For additional troubleshooting information, use the Cisco Unity Diagnostic Tool to configure the CuDirReader micro traces (all levels except level 2). Note that there are several threads involved in reading objects from Connection and writing them to SQL and to Active Directory. To follow an object through the log file, search by its Unique Sequence Number (USN), the ID of the object, or the alias. For instructions, see the “Diagnostic Trace Utilities and Logs in Cisco Unity 8.x” chapter of the Troubleshooting Guide for Cisco Unity Release 8.x at http://www.cisco.com/en/US/docs/voice_ip_comm/unity/8x/ troubleshooting/guide/8xcutsgx.html.
Caution
Cisco Unity Feeder
•
The log file may grow very large if you have Reader traces turned on while the initial synchronization or a full resynchronization is in progress between sites.
Use the Cisco Unity Diagnostic Tool to configure the CuFeeder micro traces. The trace logs can be found in diag_w3wp. For instructions, see the “Diagnostic Trace Utilities and Logs in Cisco Unity 8.x” chapter of the Troubleshooting Guide for Cisco Unity Release 8.x at http://www.cisco.com/en/US/docs/voice_ip_comm/unity/8x/ troubleshooting/guide/8xcutsgx.html.
If you want to manually start an incremental update of the directory on either site, you can do so by using the Sync button on the Networking > Links > Intersite Links page in Cisco Unity Connection Administration on the Connection site gateway or by using the Sync Now button on the Network >
Troubleshooting Guide for Cisco Unity Connection Release 8.x
20-50
Chapter 20
Troubleshooting Networking in Cisco Unity Connection 8.x
Cross-Server Sign-In and Transfers in Cisco Unity Connection 8.x
Connection Networking page in the Cisco Unity Administrator on the Cisco Unity site gateway. To initiate a full resynchronization of the entire directory, use the Resync All button on the Networking > Links > Intersite Links page in Cisco Unity Connection Administration on the Connection site gateway or the Total Sync button on the Network > Connection Networking page in the Cisco Unity Administrator on the Cisco Unity site gateway.
Cross-Server Sign-In and Transfers in Cisco Unity Connection 8.x When a Cisco Unity Connection servers is networked with other Connection or Cisco Unity locations, cross-server features can be configured such that: •
Calls are transferred to users who are not associated with the local server, according to the call transfer and screening settings of the user who is receiving the transfer. (This includes calls that are transferred from the automated attendant or the corporate directory, and live reply calls that are transferred when a user listens to a message and chooses to reply by calling the sender.) This functionality is referred to as a cross-server transfer.
•
When calling from outside the organization to sign in, users—no matter which is their home server—can call the same number and are transferred to the applicable home server to sign in. This functionality is referred to as a cross-server sign-in.
Use the troubleshooting information in this section if you are experiencing difficulties with cross-server sign-in or transfers. See the following sections: •
Users Hear the Opening Greeting Instead of the PIN Prompt When Attempting to Sign In, page 20-51
•
Users Hear a Prompt Indicating That Their Home Server Cannot Be Reached During Cross-Server Sign-In, page 20-52
•
User ID and PIN Are Not Accepted During Cross-Server Sign-In, page 20-52
•
Callers Are Prompted to Leave a Message Rather Than Being Transferred to the Remote User, page 20-53
•
Callers Are Transferred to the Wrong User at the Destination Location, page 20-53
•
Callers Hear a Prompt Indicating That Their Call Cannot Be Completed When Attempting to Transfer to a Remote User, page 20-53
Users Hear the Opening Greeting Instead of the PIN Prompt When Attempting to Sign In If a user attempts a cross-server sign-in and hears the opening greeting, the problem may be caused by one of the following: •
The originating location is not configured for cross-server sign-in hand-offs to the destination location. In Cisco Unity Connection Administration on the originating location, confirm that the Allow Cross-Server Sign-In to this Remote Location check box is checked on the Edit Connection Location page for the destination location.
•
The user is not found in the search scope on the originating location. Connection uses the search scope of the call when it reaches the Attempt Sign-In conversation to identify which user is trying to sign in. In Cisco Unity Connection Administration on the originating location, check the direct
Troubleshooting Guide for Cisco Unity Connection Release 8.x
20-51
Chapter 20
Troubleshooting Networking in Cisco Unity Connection 8.x Cross-Server Sign-In and Transfers in Cisco Unity Connection 8.x
call routing rules to determine which search space is set by the rule that sends calls to the Attempt Sign-In conversation. If the partitions that contain remote users are not a part of this search space, cross-server sign-in does not work, even if it is enabled.
Users Hear a Prompt Indicating That Their Home Server Cannot Be Reached During Cross-Server Sign-In When a cross-server sign-in hand-off fails to complete successfully, users hear a prompt indicating that their home server cannot be reached at this time. This may happen for one of the following reasons: •
The destination location is not configured to accept cross-server hand-offs. In Cisco Unity Connection Administration on the destination location, confirm that the Respond to Cross-Server Handoff Requests check box is checked on the System Settings > Advanced > Conversations page.
•
The Cross-Server Dial String that is defined for the destination location on the originating location is incorrect, or the originating location is unable to place a call to this string by using the phone system integration that is used to dial out. In Connection Administration on the originating location, check the Cross-Server Dial String value on the Edit Connection Location page.
•
No ports are available to dial out on the originating location or to answer the call on the destination location. You can use the Connection Port Usage Analyzer to help determine if port usage is becoming a problem for cross-server transfers. You can download the tool and view the Port Usage Analyzer Help at http://www.ciscounitytools.com/App_CUC_PortUsageAnalyzerLL.htm.
User ID and PIN Are Not Accepted During Cross-Server Sign-In If a user attempts a cross-server sign-in and the call appears to be handed off correctly to the destination location but the user cannot sign in, the most likely cause is that the user is not found in the search scope on the destination location, or another user with an overlapping extension is found first in the search scope. Cisco Unity Connection uses the search scope of the call when it reaches the Attempt Sign-In conversation to identify which user is trying to sign in, both on the originating and destination locations. In general, we recommend that the same search scope be used by the routing rules that handle cross-server sign-in on both the originating and destination locations. If necessary, you can add a routing rule on the destination location that specifically handles cross-server calls (for example, based on the calling number matching the extension of a port at the originating location). To determine which search space is in use as the search scope during the call, turn on the CDE micro trace (level 4 Search Space). For detailed instructions on enabling the traces and viewing the trace logs, see the “Diagnostic Traces in Cisco Unity Connection 8.x” chapter. For information on configuring call routing rules and managing partitions and search spaces, see the “Managing Call Routing Tables in Cisco Unity Connection 8.x” and “Managing Partitions and Search Spaces in Cisco Unity Connection 8.x” chapters of the System Administration Guide for Cisco Unity Connection Release 8.x, available at http://www.cisco.com/en/US/docs/voice_ip_comm/connection/8x/administration/guide/8xcucsagx.htm l.
Troubleshooting Guide for Cisco Unity Connection Release 8.x
20-52
Chapter 20
Troubleshooting Networking in Cisco Unity Connection 8.x
Cross-Server Sign-In and Transfers in Cisco Unity Connection 8.x
Callers Are Prompted to Leave a Message Rather Than Being Transferred to the Remote User If callers are prompted to leave a message for a user at the destination location even though the active transfer rule for that user is configured to transfer calls to an extension, this is may be a sign that the cross-server transfer hand-off has failed. This can happen for one of the following reasons: •
The originating location is not configured to perform cross-server transfers to the destination location. In Cisco Unity Connection Administration on the originating location, confirm that the Allow Cross-Server Transfer to this Remote Location check box is checked on the Edit Connection Location page for the destination location.
•
The destination location is not configured to accept cross-server hand-offs. In Connection Administration on the destination location, confirm that the Respond to Cross-Server Handoff Requests check box is checked on the System Settings > Advanced > Conversations page.
•
The Cross-Server Dial String that is defined for the destination location on the originating location is incorrect, or the originating location is unable to place a call to this string by using the phone system integration that is used to dial out. In Connection Administration on the originating location, check the Cross-Server Dial String value on the Edit Connection Location page.
•
No ports are available to dial out on the originating location or to answer the call on the destination location. You can use the Connection Port Usage Analyzer to help determine if port usage is becoming a problem for cross-server transfers. You can download the tool and view the Port Usage Analyzer Help at http://www.ciscounitytools.com/Applications/CxN/PortUsageAnalyzer/PortUsageAnalyzer.html.
Note that if the currently active transfer extension for the user is configured to perform a supervised transfer to an extension that is busy, callers are transferred to voicemail to leave a message when the If Extension Is Busy field is configured to do so, even if the cross-server transfer was successful.
Callers Are Transferred to the Wrong User at the Destination Location If a caller attempts a cross-server transfer and the call appears to be handed off correctly to the destination location but the caller reaches the wrong user at the destination, the most likely cause is that another user with an overlapping extension is found first in the search scope when the call is passed to the destination. To determine which search space is in use as the search scope during the call, turn on the CDE micro trace (level 4 Search Space). For detailed instructions on enabling the traces and viewing the trace logs, see the “Diagnostic Traces in Cisco Unity Connection 8.x” chapter.
Callers Hear a Prompt Indicating That Their Call Cannot Be Completed When Attempting to Transfer to a Remote User If a caller attempts a cross-server transfer and the call appears to be handed off correctly to the destination location, but the caller hears a prompt indicating that the call cannot be completed and Cisco Unity Connection hangs up, the most likely cause is that the remote user is not found in the search scope when the call is passed to the destination. To determine which search space is in use as the search scope during the call, turn on the CDE micro trace (level 4 Search Space). For detailed instructions on enabling the traces and viewing the trace logs, see the “Diagnostic Traces in Cisco Unity Connection 8.x” chapter.
Troubleshooting Guide for Cisco Unity Connection Release 8.x
20-53
Chapter 20
Troubleshooting Networking in Cisco Unity Connection 8.x Cross-Server Sign-In and Transfers in Cisco Unity Connection 8.x
Troubleshooting Guide for Cisco Unity Connection Release 8.x
20-54
Chapter 20 Cross-Server Sign-In and Transfers in Cisco Unity Connection 8.x
Troubleshooting Guide for Cisco Unity Connection Release 8.x
20-55
Troubleshooting Networking in Cisco Unity Connection 8.x