Learning AutoCAD, AutoCAD2000 / AutoCAD2002 has never been easier than
with ... listen as your instructor guides you step by step to mastering AutoCAD, ...
Learning AutoCAD, AutoCAD2000 / AutoCAD2002 has never been easier than with streaming video. Watch and listen as your instructor guides you step by step to mastering AutoCAD, AutoCAD2000 / AutoCAD2002. Learning AutoCAD using our technique makes you feel like you are in a classroom. We have over 6 hours of streaming video for AutoCAD, AutoCAD2000 / AutoCAD2002. We also have online tutors. This is the place to go if you really want to learn AutoCAD! Before you can do the exercise below you need to download the file that is referenced in the instructions. To download, RIGHT click on the link on the Free/ Sample page label “Download AutoCAD File”. Then left click on “Save target as” and save the file on your computer in a convenient location.
Practice: Stretch
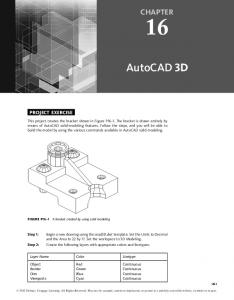
In this practice, you will use the STRETCH command to increase the width of classrooms A and B by 4 feet, and increase the width of the office and reception area by 2 feet. Estimated time for completion: 5 minutes. 1. Open the drawing CLASS-A. 2. Turn POLAR on. 3. Start the STRETCH command. At the “Select objects:” prompt, use a crossing window with corners at points B and A as shown above. 4. At the “Specify base point or displacement:” prompt, pick a point near the upper right corner of the office. At the “Specify second point of displacement:” prompt, pull your cursor to the right and type 4’ . 5. Start the STRETCH command again. At the “Select objects:” prompt, use a crossing window with corners at points B and C. 6. At the “Specify base point or displacement:” prompt, pick a point near the upper right corner of the office. At the “Specify second point of displacement:” prompt, pull the cursor to the right and type 2’ . 7. Save and close the drawing.
Practice: Break at Point
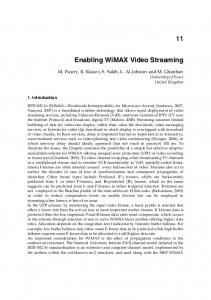
In this practice, you will use Break at Point to break lines into separate segments, and then change the linetype of the new segments. Estimated time for completion: 5 minutes. 1. Open the drawing SHAFT2-M. 2. Pick the two long horizontal lines. Notice that they are single line segments. Press to deselect the lines. 3. Turn on OSNAP and set it to Intersection. 4. Start Break at Point. At the “Select object:” prompt, pick the top long horizontal line. You can accomplish the same thing by use the regular Break command and just select the first point and the second point as the same point.
5. Only do this step if you used Break at Point in step 4 . For the first break point, pick the Intersection labeled A in the illustration above.
6. Start Break at Point again. At the “Select object:” prompt, pick the same horizontal line near the right end. 7. For the first break point, pick the Intersection labeled B in the illustration above. 8. Pick the horizontal line between the vertical lines. Notice it is now a separate segment. Use the Layer dropdown list to change its layer to HIDDEN. Press to deselect the line.
9. Repeat the procedure on the lower horizontal line. Save the drawing.
Practice: Selecting Objects In this practice you will use advanced techniques to select objects for several different commands. Estimated time for completion: 10 minutes. 1. Open the drawing SELECT2. 2. Start the STRETCH command. Use a Crossing Polygon selection to select the square tabs with yellow circles at the right (but not the red section). Stretch the tabs 3 units to the right, as shown below.
3. Start the TRIM command. Pick the blue line as the cutting edge. At the “Select object to trim:” prompt, use a Fence selection to trim off the yellow lines left of the blue line, as shown below.
4. Start the MOVE command. Use a Crossing selection to select all the red objects, and move them to another part of the drawing. 5. Start the ROTATE command. At the “Select objects:” prompt, type P (for Previous). Rotate the objects 90 degrees. 6. Draw a circle anywhere in the drawing. Start the MOVE command. At the “Select objects:” prompt, type L. What object is selected?


![video streaming - Ustream [PDF]](https://m.moam.info/img/260x300/video-streaming-ustream-pdf_6496b7c4098a9e46588b4605.jpg)