NET and PHP platforms for applications such as collaboration, video, mapping, ...
9. Subscription Commerce: The ability to publish apps for subscription-based ...
INTRODUCTION TO SAAS MAKER™
SaaS Maker™ Developer’s Guide Build & deploy software-as-a-service applications
www.saasmaker.com July 2013 Page 1
INTRODUCTION TO SAAS MAKER™ Contents Introduction to SaaS Maker™ ____________________________________________________________________________ 3 Getting Started With SaaS Maker ________________________________________________________________________ 5 Developer Console________________________________________________________________________________________ 9 The SaaS Maker Factory________________________________________________________________________________ 14 Preview Mode___________________________________________________________________________________________ 24 Report Designer ________________________________________________________________________________________ 28 SaaS Maker Open Platform API ________________________________________________________________________ 32 Conclusions _____________________________________________________________________________________________ 57 APPENDIX 1: SaaS Maker™ Feature List _____________________________________________________________ 58
Page 2
INTRODUCTION TO SAAS MAKER™ Introduction to SaaS Maker™ SaaS Maker is an online toolkit and platform-as-a-service (PaaS) for rapidly creating and deploying business software systems on the cloud. It features point-and-click tools to rapid prototype, build and deploy applications without programming. The SDK and open API make it easy to write add-on modules for new functionality, and to integrate with open-source, third-party, and legacy software systems. The SaaS Maker platform manages challenging tasks that would otherwise need to be engineered at great expense into every software application: single sign-on, application multitenancy, federated search, role-based security, workflow, reporting, and other shared services. The ‘One-click Sell’ feature makes it easy to publish apps for sale; developers merely need to set a price, click a button, and their app is instantly available to the world.
A SaaS Maker Factory guides software developers through the steps to instantiate an enterprise-class, cloud computing architecture that provides much of the target software's functionality. In some cases, SaaS Maker delivers 100% of development functionality with no additional programming needed, saving months or years of writing code from scratch. Based on user experience to date, software developers can typically build and deploy software in a 30% (saving 70%) of the time and cost associated with traditional software development. SaaS Maker is offered “as-a-service”, meaning that you can use it on-demand over the Internet or intranet with no need to ever install, upgrade, or host an application. The platform manages Page 3
INTRODUCTION TO SAAS MAKER™ underlying complexities of applications, so there is no need for developers to provision and configure hardware or databases. SaaS Maker aligns with NIST's definition for platform-as-aservice, “The capability provided to the consumer to deploy onto the cloud infrastructure consumer-created or acquired applications created using programming languages and tools supported by the provider.” In other words, SaaS Maker makes it significantly easier for developers to build and deploy business applications on a public or private cloud infrastructure. SaaS Maker helps developers get their apps to completion much faster and easier by avoiding labor intensive system development and integration efforts. SaaS Maker offers several strategic advantages to stakeholders:
Rapid prototype software on the cloud – Create concept business apps quickly without writing code. Rapid prototyping can serve as a way to gain customer buy-in or feedback earlier in the software development process.
Faster time-to-market – Dramatically reduce time-to-market by using the platform as a launch pad for software engineering efforts. Delivering to customers faster. Software companies can enter new markets faster and accelerate ongoing efforts.
Return on Investment – Software developers can deliver more for substantially less to customers and improve margins on fixed price contracts.
Lower costs and risks – Reduce risks because common functions are already tested over a period of several years.
Higher security and interoperability – SaaS Maker provides a common security model. If cloud software uses the platform, then it is inherently secured by the platform's security implementations, such as role-based access control.
Cloud ready – SaaS Maker applications are all inherently ready for the cloud. Applications can be deployed easily, as part of the end-to-end offering, in either a public or private cloud.
Page 4
GETTING STARTED WITH SAAS MAKER Getting Started With SaaS Maker SETTING UP A SAAS MAKER™ ACCOUNT Welcome to SaaS Maker! Account setup is required. This is a simple three step process. All required fields are marked with a red asterisk.
DEVELOPER ACCOUNT SETUP
When you first sign on to SaaS Maker, you will be asked to choose a name for your app and enter your user name and password. Please make certain to keep your username and password secure. It is recommended you utilize a highly secure password (a “complex password”) consisting of a combination of uppercase and lowercase letters as well as numbers and special characters to help prevent unauthorized access.
Page 5
GETTING STARTED WITH SAAS MAKER ADMINISTRATOR INFORMATION
The second step requires that you complete Administrator Information. Enter your first name, last name, and email address into the indicated fields. All three fields must be completed to continue. You will also be required to enter a spam filter code (CAPTCHA) in order to proceed with set-up.
CONFIRMATION
Page 6
GETTING STARTED WITH SAAS MAKER The final step of the registration process requires confirmation of registration information. After the Account Information and service Terms of Use have been reviewed under the User Conditions, click the check box to validate acceptance followed by the FINSH button to complete the registration process.
GET STARTED
The final step in the registration process verifies the URL for the Developer Console and username you will use to login. Clicking the link below the box containing your information will take you to the login page where you will provide your credential to start developing your own SaaS Maker™ application.
Page 7
GETTING STARTED WITH SAAS MAKER
You are now at the SaaS Maker™ homepage. Log in is required for access to the Developer Console where you can access your applications as well as publish Gizmos for public use. Enter your username and password in the upper right corner of the page. If you forget your password to access the Developer Console, follow the Forgot password? link to retrieve a new password.
Page 8
DEVELOPER CONSOLE Developer Console HOME PAGE
This area of is where you can access the applications you will create with SaaS Maker™. The second link, My Apps, within the pane on the left of the page will take you to a directory of your applications. The My Gizmos link is an area where you can upload custom Gizmos created with the SaaS Maker™ SDK. Others will be able to access Gizmos uploaded here through the Gizmos Store.
Page 9
DEVELOPER CONSOLE MY APPS
In the My Apps section of the Developer Console, applications that have been created in SaaS Maker™ will populate here. Creating a new application is as simple as clicking the Create New App icon. You need to choose a unique name for the application which will become part of the URL associated with the application. You must also choose how the app will be available to users from the drop down menu. 1. 2. 3.
Many Business – This makes the app available to multiple, potentially large organization who may have several users that will be managed in house. Many People– This places your app in an “open community” where anyone can sign up and use the application. In-house Only – This creates a “closed community” for your business that must be administered.
After clicking the Create App! button, the application will be ready for development. Click the Design App next to application will take you immediately to the application where you can begin designing.
Page 10
DEVELOPER CONSOLE MY GIZMOS
This area of the Developers Console allows you to upload custom widgets known as Gizmos for use within SaaS Maker. You will also have the ability to do when logged in as a developer to a SaaS™ Maker application. When Gizmos are uploaded here, they will be available to other SaaS Maker™ developers to use in their applications. Methods for using the SDK as well as registering and publishing Gizmos plug-ins is explained in the SaaS Maker Open Platform API section later in the guide.
Page 11
DEVELOPER CONSOLE LOGGING INTO YOUR SAAS MAKER™ APPLICATION
This page is customizable, so you can change the appearance as desired. We will discuss how that is done a little later. Once you log in, you will be taken to the SaaS Maker™ Factory and have access to the tools for development of your app. When you return to SaaS Maker™ to make changes to your App, you will need to use your unique URL to reach the homepage and log in. You should receive an email shortly after you establish your account that contains the web address for your homepage, as well as your username and password. Please refer to this email should you misplace or forget your unique URL.
GETTING TO KNOW FEATURES OF SAAS MAKER™ SaaS Maker™ offers a set of powerful and intuitive tools that a developer can implement to create their own custom applications. Within the core of SaaS Maker™ Factory the components that you will use to create your application are categorized under icons that allow you to easily navigate between sections as you build your applications. Each section represents an area of predefined tasks that gives you the power to tailor your application’s look and feel, while employing the mechanisms that will bring the application to life. When logging into your SaaS Maker™ application as the developer, you will be taken to the core interface for application development that is Design Mode. On the left side of the page, you will see icons for nine different SaaS Maker™ design functions. You can select the different functions by either clicking on the icon, or using the “next” and “previous” buttons on the top right of the page. Until you are very familiar with SaaS Maker™, it is generally recommended that you progress through the design functions in order to familiarize yourself with the application. Page 12
DEVELOPER CONSOLE Preview Mode is also a powerful tool that can be used by advanced developers. It provides access to your master template, and any changes that you make there will be reflected in your app, so you should exercise caution when making changes in this mode. Preview Mode allows you as the developer to interact with your application in the same way an end user would. This feature is suitable for experienced developer use, and those with less experience should generally rely on the wizard to guide them through the app development process.
Page 13
THE SAAS MAKER FACTORY The SaaS Maker Factory The SaaS Maker Factory is an online toolkit for developing business applications without programming. The point-and-click approach of SaaS Maker Factory may appear simple, yet it is customizable and extensible to support the specialized requirements of the complex organizations. The SaaS maker Factory includes tools for designing a user interface, data-driven forms, workflow, and bold-on modules. With zero programming, developers can “turn on” features for the end users, such as for searching or designing reports. The platform manages many of the more difficult functions on behalf of developers, such as authentication, federated search, role-based access control and application multi-tenancy.
The SaaS Maker Factory includes several functions for building robust applications: 1.
Custom Interface: Create rich user experiences using a WYSIWYG editor, including look-and-feel, help files, email notifications, and more without programming.
2.
Workflow: With a mouse click, developers can give their users an integrated workflow designer, workspace management, or federated full-text search capabilities.
3.
Remote Administration: The Admin Control panel makes it easy for administer users, security, bolt-on modules, and other system-wide and workshop-wide settings.
4.
Data-driven Forms: The Tenant Manager automatically integrates data entry forms into the security and reporting engines.
Page 14
THE SAAS MAKER FACTORY 5.
SDK / Open API: Easy addition of third-party web services as reusable modules. Examples include Java, .NET and PHP platforms for applications such as collaboration, video, mapping, geospatial, remote desktop, and more.
6.
Security: Integrated user management system via Role-based Security engine for improved security and privacy in multi-tenant environments.
7.
Workshop Management: Quickly implement multi-tenant applications for virtual organizations and sub-organizations.
8.
Reporting and Business Intelligence: Integrated Report Designer and Business Intelligence engine to deliver data in ways that are more meaningful.
9.
Subscription Commerce: The ability to publish apps for subscription-based revenues with integrated e-commerce capabilities. SaaS Maker handles the trials, subscription management, email notifications, and back-end commerce.
The SaaS Maker Factory implements a unique “Idea to Revenue” approach that guides developers through the steps from rapid prototyping through deployment for subscription-based revenues. The SaaS Maker Factor allows developers to focus on developing mission-critical functions instead of getting distracted with mundane development activities and without being caught up in the complexities that are typically associated with runaway SOA projects. On the surface, the SaaS Maker Factory may appear easy; however, it implements sophisticated business application architecture behind the scenes. USING THE SAAS MAKER FACTORY (DESIGN MODE) When you log into the application as the account holder, your application will open in Design Mode. Design Mode is the core of the SaaS Maker™ factory that hosts all the tools needed to create a custom SaaS application. As a developer, you will implement the necessary tools and assign appropriate permissions for end users. The seven icons that can be seen on the left side of the home page within SaaS Maker™ Factory are what the developer will use to build their application and user experience. After logging in, you will be taken to the landing page which falls under the Getting Started icon. From this area, you are presented with a welcoming statement, as well as a few tips to get you on your way. Here you will see the other areas for app development laid out as icons along the left side of the application. As a developer, you have the ability to switch between Design Mode and Preview Mode, where you can instantly access the application as an end user administrator. The Tools link will help you manage preferences and administrates the developers account. Tools also features a link to access the Role-based Workflow application where you assign duties and define the roles of the users you create. If needed, the Help link will reveal information pertaining to the application and framework, including version and build date. The drop down menu on the right side can be used to select a defined space created by either a privileged user or administrator. Selecting Go to Space will change the workspace to the desired space.
Page 15
THE SAAS MAKER FACTORY GETTING STARTED The first icon is the default area called Getting Started, where you are taken to as a developer after successful login. Virtual Global, the developers of the SaaS Maker™ application welcome you to the platform and offer suggestions for developing your SaaS. The page indicates that Preview Mode can be used to glide between modes to utilize advanced techniques. If you feel that you need further assistance in creating your application, you can contact Virtual Global by following the link on this page.
USER EXPERIENCE The first actual tool that you encounter beneath the Getting Started icon is the User Experience area. This area of the application allows the developer to detail the layout of the pages within the application as well as the login page.
The user can use either the drop down list or the My Click feature on the pictorial representation to the right to make edits to that particular area. The layout of both the login page and master page displayed after login can be repurposed with graphics or text that can be formatted in a variety of fashions. The developer can use plain text or text formatted for Microsoft Word. HTML can be utilized for web scripting and formatting as well. Pictures can be dropped into the field and manipulated using the provided tools to achieve the desired position and layout. This is also the area where you create additional pages for your application. Here you can add new content as well as manage the content of any additional pages that will be a part of the application. The page you are currently viewing will be present in the drop down box at the top left of the interface. Here you can edit the content of your pages in the same way you can with the login and landing page. This is where you will implement other features of the application from the developer created Forms. Other tools like Gizmos and
Page 16
THE SAAS MAKER FACTORY other applications, such as web plug-ins are also accessible. Adding a new page can be accomplished simply by clicking Add Page and supplying a name for the page.
FORMS Forms is the area of the application used for creating custom made tools to collect data. Forms are tables the developer defines for users to categorize and retain data. SaaS Maker™ has one form predefined as a type of basic sample that can be viewed when the Show Embedded Forms box is checked and it may be edited if the developer wishes.
By selecting the icon link New the developer will be taken through a short, two-step wizard to define the layout and parameters of the form. You are first asked to define the layout style, turn on optional visible fields like the dashboard, and alter the date/time format. Proceeding to the next section of the wizard will allow the developer to add and label, as well as edit fields of the form. Selecting the icon Create Field will create a new field that the developer must name. Here the developer may also engage other options by checking the provided boxes, such as the option to make the field “mandatory.” Navigating through fields can be accomplished through the drop down list in the top right of the interface. Clicking Finish will create the form and take you back to the main page of the Forms area of the application. Clicking on any of the Forms that have been created will allow the developer to edit the content and parameters of that form.
GIZMOS The Gizmos of SaaS Maker™ are the applications that users will rely heavily upon within their own space of the application. Gizmos are powerful tools embedded into SaaS Maker™ that will give users the ability to accomplish a variety of tasks from creating spreadsheets to unified communication abilities.
Page 17
THE SAAS MAKER FACTORY
On the main page of the Gizmos page, the developer can add the desired Gizmos into the application mainframe. The interface is very straightforward: by selecting the desired application from the Available Gizmos pane, then clicking the Add button, the Gizmo is moved to the Included Gizmos area, where it will be available for use from within the application. When a user supplied with appropriate permissions is logged into their account, the Gizmos that appear in the Included Gizmos window will be available for use in the application. By default, Gizmos will appear on the left within the Toolbox pane inside the SaaS Maker™ application. The second tab under the Gizmos section in SaaS Maker™ allows the developer to allocate permissions based on user Role. The user groups created by the developer or by an administrator can be assigned privileges based on the desired level of control. A short description for the abilities of individual permissions is outlined at the top of the page of this section to guide the developer in appointing the correct permissions. Calendar Calendar is a tool to help with workflow management for end users of the SaaS Maker™ application. Projects and tasks within projects that have been assigned starting and/or completion dates will populate based on the specified date with respect to the prioritization status assigned to that task. Components of other Gizmos, such as files stored in the File Cabinet, or a document created within the Spreadsheets app may have an assigned start time and completion time that will be reflected within Calendar.
Page 18
THE SAAS MAKER FACTORY Mail By adding the Mail Gizmo to the application, users have access to a built in web mail interface to send and receive messages to users within the application. After the application has been published, both users and the developer may send emails to recipients outside of the SaaS Maker™ domain. Recycle Bin This Gizmo should be very familiar to most users as it functions much like the Recycling Bin that has been featured in Windows since Windows 95. When an item is deleted from another area of the application, it will populate in the Recycle Bin Gizmo. Notes The Notes Gizmo is a useful tool that allows users within the application to create notes using a word processor interface. A user can append files as attachments to the notes created as well. Notes may have attached priorities as well as assigned start and completion times. As such, notes created by users will appear both in the Notes Gizmo, as well as in the Calendar Gizmo, if available. Contacts Contacts is the contact management system used for applications created in SaaS Maker™. Adding Contacts into the application will allow users to build and maintain a contact database. All users that have access to the Contacts Gizmo will have the ability to use the features of this tool based on permissions assigned to their Role, which include attaching and viewing files associated with instances stored in Contacts. Business Intelligence The Business Intelligence Gizmo is an analytical tool that allows users to refine information contained in reports. Here users can access the features of the Report Designer function to compile and manipulate information from a variety of sources within the SaaS Maker™ application such as data from user created Forms and Spreadsheets. This Gizmo allows a user to pull up reports generated within SaaS Maker™ that can be set to view in a multitude of different formats from bar graphs to trending charts. Spreadsheet Spreadsheets is an area within the application that allows a user to create, manipulate, and share spreadsheets depending on the limitations defined by the user’s Role. A user can easily import files from Microsoft Excel that are saved in current XLS format as well as export to a Microsoft Excel file. Chat Enabling the Chat Gizmo allows team members to join in on a group discussion. Within the application users can easily take part in a discussion with an interface that allows users to quickly send and receive information in a group chat setting.
Page 19
THE SAAS MAKER FACTORY Discussion Discussion is another tool that gives your application an area to create conversation and post relevant information in a forum fashion. Unlike Chat, posts that are made in Discussion will show up for all users to view as threads within this Gizmo. File Cabinet File Cabinet allows you to utilize storage space within your application to consolidate and share resources. A folder-based data storage structure can be created to organize files. Files and folders may be assigned access credentials to prevent unauthorized users from accessing data based on their user class. Tasks The Tasks Gizmo grants users within the application the ability to create workflow specific notes much like the Notes Gizmo. A user will have the ability to attach files as needed, as well as assign priority to the tasks created.
ROLES
In a centralized public environment, the idea of multiple application instances where software is logically separated for software supporting multi-tenant domains could seem daunting in regards to security. SaaS Maker™ applications can be broken down into several layers of security for any application instance. Each Space can have its own distinctions of record level access through feature access, such as administrating access to certain Gizmos. Team Members can be assigned to predefined groups called Roles, which serve as a template for creating security protocols. Authentication for each individual user of a SaaS Maker™ application is handled by the unique user name and password attributed. Team Members can be defined by the developer and administrators with Page 20
THE SAAS MAKER FACTORY appropriate credentials. Both administrator Team Members and regular users can have different permissions attributed depending on the Space accessed. For example, if a SaaS Maker™ has three Spaces, an administrator could be assigned full privileges for each space or, in certain cases, could have full privileges in one Space, but regular user privileges in other Spaces. Within each Space, different Roles may have different levels of access. When creating a Space, administrators and developers have the option of porting Tools, Team Members, and/or Security features to the new Space versus creating a Space with default privileges and available Tools. Ported items from other Spaces may be further refined within that Space for enhanced security without affecting other Spaces.
FEATURES
The next icon on the list is Features. Under the Features area the developer can assign permissions based on user classification. Here the developer has the ability to name and define user abilities for the Role in which they are classified. The developer can create a set of access control lists that will define the features an administrator, or user, will have access to when logged into the application. A privileged user or administrator may have access to Security under the Manage Space within the application where user access may be tweaked and further developed by adding and defining new Roles as needed. Clicking on the drop down menu will reveal Roles created by the developer or administrator. After a Role is selected, permissions may be assigned or removed by selecting applicable features from the area below. If a group exists in multiple Spaces the checkbox can be selected to either apply to all existing Spaces or only the current Space in which you are logged in.
Page 21
THE SAAS MAKER FACTORY SPACES
Within each SaaS Maker™ application, different Spaces can be created for different workgroups. A Space may be utilized to separate functionality from other areas within the same program. Team member and their associated Roles may be ported across Spaces or entirely new Team members may be created for each individual Space depending on the intended goal of the application. Creating new Spaces may not be necessary for every application.
OTHER The area known as Other in Design Mode allows the developer to manage areas of the application that affect all users. The developer can access such global settings as defining the names of users and Spaces within the application, as well as the name of the application itself. When new users are added to the application, you have the option to choose whether that user enters a private or a shared Space.
Page 22
THE SAAS MAKER FACTORY
Here the developer can access features that will be used within the application itself. You have the ability to both manage workflow and access the report designer without switching to Preview Mode. Future provisions to SaaS Maker™ are listed here so developers can see what lies down the road for future updates. If you require assistance building your application, you can use the link to contact Virtual Global.
PUBLISH Once you have created your application and have tied all the loose ends down, it is time to publish your creation! Here you can choose to publish the application. Depending on the development package selected, the application will be available for purchase or use within a business environment. You have the ability to set the price the end users will pay to use the software as a service you created. Virtual Global assess platform fees. However, as the developer, you can choose to increase usage fees paid to you.
Page 23
PREVIEW MODE Preview Mode Welcome to the core of your application! This is the testing ground where you will actually use the features of your application as a highly privileged administrator. Here you will see your application as an end user will with the exception of having more tools available depending on the user’s classification.
The toolbar at the top of the page hosts tools that are unique to preview mode. Some of these features can be used to alter the core functionality of the program if logged in as a developer. Many of the features found in Design Mode can also be accessed to make instant changes to the application. On the left side of the page is where a user will access the Gizmos that have been added for use within the application. Simply clicking on the Gizmos will take you to a page where you can utilize the features of that Gizmo. It is also possible to embed Gizmos within the page itself.
TOOLBAR FEATURES The Toolbar features five menu items which contain important tools to help you further develop your application. Although most of the features that are found within these lists can be accessed within Design Mode, accessing the tools in Preview Mode will allow you to make changes instantly without having to switch between modes. Some of the features in Preview Mode are unique as well, allowing a developer to further flesh out the application
New The New menu gives the developer, or an administrator, two options to further add to the functionality of the program. Page 24
PREVIEW MODE
Team Member– Selecting Team Member will allow you to add a new user to your SaaS Maker™ application. Simply create the user name and preliminary password, and then add their name and email address. Upon receiving the email, the user can use the credentials provided in the email to login and get started.
Space– Here the developer or administrator can create additional workspaces. You can easily
carry over as many options from the original Space by selecting the options to copy to Tools, Team Members, and Security. This is very useful for staying organized when managing separate projects.
Admin Admin features tools that will allow a developer, or administrator, to manage various features of the application.
Space List– These are the Spaces that have been created for the application. Here the Spaces that exist can be managed, edited, or disabled.
Team Member List– The Team Member List shows all the Team Members created for the application. Existing user data can be edited or disabled from the application.
Security– Within Security, you or an administrator will have the ability to manage and define roles as well as privileges for users of the application. The first tab, Roles, allows the developer to edit the names of non-core roles as well as add or remove new roles. The Features tab allows you to change the availability of the tools based on the Role in which a Team Member is placed. Privileges grants abilities to Team Members, such as defining which Roles are allowed to edit items within the application. Members allow you to assign Team Members to the Roles that have been created.
Customizable Area– This area grants the same ability to the developer, or privileged user,
as the User Experience area from Design Mode. Here edits and additions can be made to the aesthetics of the application, as well as add functionality by creating new pages, or refining existing pages.
Settings– In Settings you have the ability to change the names used for different parts of the
application. You can choose to change the name of the application itself, the users, and spaces. You also have the option to implement strong passwords for increased security.
Manage Space Under the Manage Space menu, the developer, administrator, or privileged user has the ability to edit various features of the space you are currently in.
Invite– This area allows you to request other users to join the Space you are in. Users that join the Space will have access to its features to the extent of the user’s privileges.
Refresh–Refresh will update the application with newest changes. After Refresh is selected, you will be taken back to the main page of the application.
Page 25
PREVIEW MODE
Rename– The option Rename allows you to edit both the name and description of the current Space.
Security–Security gives the user the ability to change the security features of the existing Space. The security applies only to the space, but the Roles, Privileges, and Members tabs function in the same way security does in other areas of the application. o Roles – Under this tab, Roles can be set up where Team Members may be placed such that access privileges may be assigned to various components of the SaaS Maker™ application. o Privileges – Here, default and administrator defined Roles can be customized for the desired level of access to features within the application. o Members – This is where Team Members within the currently selected Space may be placed into Roles depending on the required level of access for each Team Member.
Gizmos– Under Gizmos, you have the ability to change the Gizmo availability to that Space. The Gizmo Group tab is an area where you have the ability to change the name of the Gizmo Toolbox on the left side of the page, as well as create additional custom Gizmo toolboxes.
Folders– The Folders menu option gives you, or a privileged user, the ability to manage folders and their naming convention for that particular Space. You can add additional folders as well as delete or suspend folders that are not in use or not needed.
Priorities– Custom priority levels can be defined for the Space in which you are in. You have the ability to edit the name of each existing Priority, as well as change its hierarchy.
Customizable Areas – The Customizable Areas feature allows you to make visual and minor functionality changes to other areas of the application. Here, plug-ins such as Gizmos can be edited for a more personalized presence in the application.
Leave– By selecting Leave, your account will become separated from the Space that you are in currently. An administrator will be required to place a user into an appropriate Space, or a user with appropriate credentials must invite that user to join a new Space.
Tools The Tools menu grants access to several areas of the application that a user or administrator will require for various functions.
My Preferences– Under My Preferences, details about the user currently logged in may be edited. If logged in as a developer, your SaaS Maker™ account options such as billing and payment information can be edited, as well the development package that was initially selected when the SaaS Maker™ account was created.
Role-Based Workflow– With this option, the developer and the administrator have the
ability to assign workflow based on user role. The link opens a second page where you will have the ability to assign tasks based on priority to different user classifications defined within the application.
Page 26
PREVIEW MODE
Workflow Designer– The Workflow Designer is an organization tool that allows a privileged user to set stages for a project. Here, details pertaining to specific tasks can be outlined in detail to help set goals for Team Members.
Form Designer–Forms for compiling information within a SaaS Maker™ application can also be accessed using the Form Designer. The developer, as well as privileged users, may create additional Forms that can be implemented into the application, as well as modify existing Form parameters.
Reports–Reports gives you access to the reports that you have created in Report Designer. You may edit the reports in the same fashion that the forms were created. You have the option to sort the reports based on Team Member or Space by selecting the check box. You can also choose to view the reports in HTML or as a PDF that can be exported into a file.
Report Designer– The Report Designer is the area of the application where users will
create reports from within the application. The user will be taken to a separate area of the application that is the Report Designer, where the user will be asked to provide their account credentials again, as if logging into the application itself. Users will have the ability to compile information from other resources in the application such as from Forms and Spreadsheets. Further details on Report Designer can be found at the end of this section.
Bug Report– In the event that a user encounters a glitch in the program interface, Bug Report allows the user to send a detailed report to the developers at Virtual Global. If the user is frequently encountering a problem it is important to send a Bug Report so that it may be promptly corrected.
Send Status Email– Within the Send Status Email console, an administrator or privileged
user will have the ability to send update emails based on Task priority. Tasks that are past due can be consolidated by the user based on space and time past due. Email notifications can be scheduled to occur as a one-time event, or on a regular basis as either a daily or weekly occurrence.
Search– The Search function allows a user to input a word or phrase into the search field to find information. The search may be refined to look through specific Gizmos, or it can be left to search throughout the entire application. An advanced search will allow a user to specify dates and priorities that may have been assigned to the search item in question to conduct a more accurate search.
Download Tray Notifier– The Tray Notifier is a downloadable console application that gives a user the ability to quickly monitor the status of their SaaS Maker™ application. A user can quickly see chat activity and unread mail notifications in this console without navigating to that area within the actual application.
Page 27
REPORT DESIGNER Report Designer Featured within the SaaS Maker platform is the utility known as Report Designer, which gives an appropriately credentialed end user the ability to create highly customized reports based on data contained within Gizmos and custom Forms from the application. The Report Designer is an intuitive interface that allows data to be compiled into a desirable format. When accessing the application you are asked to first provide appropriate credentials. A new name must be created for each individual report. You also have the ability to access reports created previously to modify the capabilities or look of the report.
CREATING A NEW REPORT
When initially creating a report template within Report Designer you will first be taken to the Report Data Source Editor. This utility is where you will implement the data stored from various sources stored within your application into a format conducive for a custom report. This data can be manipulated by various tools within Report Designer and tailored into a presentable format. Here you will choose from a Gizmo or Form from which you will collect data. Based on the item you select, you will have the capability to disseminate instances from within the object that contains information and integrate the values or conditions of the data into the report. This information is what will be used by other components and utilities in Report Designer.
Page 28
REPORT DESIGNER After adding a component into the report, instances that hold information will populate in the left most field named Available Fields. After making a selection, clicking the Add button will move the item into the Selected Field box in the center of the screen. Filters can be applied to the item selected from the Selected Field table. To right of Applied Filters filed you will be able to modify the parameters of the data that will integrate into the other functions of Report Designer. The data selected and corresponding parameters defined in Report Data Source Editor will be available in the application by using specific tools.
When looking at the main page of Report Designer, there are specific areas where different aspects of creating a report will take place. The center of the page is the workspace where tools from the application (on the left) will be used to create fields and spaces for displaying information. The left side of the page holds icons for tools that, when selected, will create the corresponding utility in the workspace of the report. The right side of the main page breaks down the items within the workspace by section. Selecting the containing area of utility you wish to manipulate will expand the element to reveal the items within that section. After choosing an item, the parameters of that item can be edited in the area below by scrolling through the list and selecting the appropriate field. The toolbox on the left side is where you will first choose a utility to implement in the workspace. Further clicking in the workspace will give you the ability to expand the tool to a necessary size, though it can be further edited later. The tools available are as follows:
Page 29
Label – The Label tool allows the user to create an area on the report to brand an adjacent utility on the final report within the workspace. TextBox – Using the TextBox tool, the user can create an area to display text based information in the workspace and on the final report.
REPORT DESIGNER
CheckBox – A CheckBox can be implemented in the workspace for use in the final report to select or remove information defined in the tool’s parameter. RichTextBox – Much like TextBox tool – a user can display text based data but this tool can utilize more advance formatting standards to display information. Shape – By selecting Shape, a user can place an object in the workspace to assist in formatting the information displayed in the workspace. The default Shape is a rectangle, but it can be modified to a rounded rectangle, as well as an ellipse. Line – Like the Shape utility, Line can be used for formatting and aesthetic purposes in the report workspace and final report as well. PageBreak – This tool is much like the Line but with predefined dimensions. PageBreak inserts a line across the workspace from where it is placed. Barcode – The Barcode tool can be used to differentiate different reports by associating the space in which it is inserted with a user defined barcode. The user can define the parameters of a Barcode to integrate values used by scanners to catalog reports and for quick access when handling a printed version of the report. SubReport – Within the SubReport tool, the user can place a field that contains information extracted from the application based on its inclusion in the Report Data Source Editor. ReportInfo – Utilizing the ReportInfo tool is how data will be generated in the report. The DataField parameter will be used to define what information is utilized within a ReportInfo field in the final report.
After the appropriate tools have been included in the workspace in the Report Designer, the defining fields underneath the right-most window need to be modified so that each field may function appropriately. When selecting the included tool above, the parameters available for modification will populate in the window below. Before modifying the parameters of the individual parameters of each tool, the data included in the report will need definition. By selecting the overall report contained in the top the window on the right, the functionality of information integrated into the report can be defined for use by the included tools. Underneath the Data section in the space below, the user can expand the field to reveal areas to modify both Relations and Tables of the integrated data. Modifying these fields will adapt information for use within the tools implemented into the workspace of the Report Designer.
Help The Help menu gives users the ability to access detailed information on features within the SaaS Maker™ application
Page 30
REPORT DESIGNER
Contents– In the Contents section, a user can search through information on all features of the SaaS Maker™ application. The user may scroll through and select topics of interest or search for specific information on the item in question.
Developer License Agreement– The Developer License Agreement allows the
developer to create a legal agreement for their application. The agreement can be custom edited to contain whatever legalities the developer wishes the users of the application to abide by. This can be edited by the developer within Preview Mode under the Admin menu with the Customizable Areas option, or from Design Mode under User Experience.
About– The About section gives a user the version number and build date of the actual SaaS Maker™ application. This can be cited in a Bug Report if a user, or developer, is experiencing a problem to further assist a member at Virtual Global in resolving the issue in a timely manner.
Page 31
SAAS MAKER OPEN PLATFORM API SaaS Maker Open Platform API Early cloud rollouts were often made in isolation, sometimes as “proof of concept” designs, with the idea that the enterprise had to be all-or-nothing. This led to an early resistance of the cloud, giving rise to the idea that every app and data store would have to be converted and rewritten. SaaS Maker overcomes this objection, and allows cloud applications to exist in harmony with the entire enterprise, including legacy apps. SaaS Maker’s open platform API allows software companies, government agencies, and other developers to integrate SaaS Maker apps with their existing solutions and stacks. Furthermore, ISVs can deliver solutions on the platform using a variety of vendor-independent languages and technologies; in doing so, they will lower the long-term costs of ownership for their customers. As PaaS gain market traction, openness will gain relevance. That's why open platforms are important as the cloud unfolds. The term “open” has many meanings, and some “open” platforms may still have limitations. In truth, platforms usually have degrees of openness, rather than “all or nothing” openness. For example, Microsoft Windows is an excellent example of an open platform, especially in its earliest incarnations because any vendor could develop on Windows. At the same time, you couldn't run a Windows program on an Apple computer. You needed to run it on Windows. This is the most common type of open platform— open, but with some inherent limitations. SaaS Maker is an open platform (with an open API) for integrating 3rd-party, open source, legacy web services, and data sources from a wide variety of vendors, and using a variety of programming languages including Java, .Net and PHP. SaaS Maker developers are free to take advantage of the millions of emerging and existing web services, without being limited by any single vendor or technology to support its mission requirements. The SaaS Maker platform may optionally be installed on traditional servers for “cloud readiness”. Architectural highlights include a point-and-click-wizard for rapid prototyping and building business applications without programming, scalable design to accommodate large datasets, integrated security model for authentication, Rolebased Access Control and data protection, an open API and modular architecture for integrating with legacy systems, remote administrative consoles for managing users, security and system configuration, integrated Firebird database for affordable scaling, available for SQL Server and Oracle databases, and a robust feature-set for building and deploying mission-critical applications.
SAAS MAKER™ INTEGRATION AND EXTENSION Software companies can integrate SaaS Maker™ with their existing solutions and stacks using the open platform API. Furthermore, ISVs can deliver solutions on the platform using a variety of vendor-independent languages and technologies; in doing so, they will lower the long-term costs of ownership for their customers.
Page 32
SAAS MAKER OPEN PLATFORM API SaaS Maker™ is a highly intuitive tool that has the ability to create robust applications without back end programming. Though you can create applications with only the GUI provided, a developer may access the application programming interface (API) to further customize their application, as well as embed custom applications. SaaS Maker™ exposes an API consisting of web and Java Script methods which allow you to extend your application using the tools of your choice. SaaS Maker™ Plug-in is a web application that is compiled and runs within the SaaS Maker framework. This empowers the user to create SaaS Maker extensions that consume the web service API using the tools/language of his choice. While our SDK is currently only available for .NET developers, the SaaS Maker API can be consumed by any client and web applications implemented in Java, PHP, and other languages can also be SaaS Maker plug-ins.
Plug-in structure Plug-ins can be developed, tested, and published within the SDK for .NET developers. Plug-ins that are written in Java, PHP, or other languages will need to be developed (using the web services API), tested, and published using tools outside SaaS Maker. The basic structure of the plug-ins will be the same in that they will have 3 types of pages, XML files for registration and compiled application code.
Plug-in page Types:
Workshop Page: Each plug-in must have one workshop page. This is the page that is loaded when someone clicks the plug-in icon in the SaaS Maker website. This functions as a home or dashboard page.
Container Page: This page type is for CRUD (Create Read Update Delete) operations on records that will be part of a work flow and/or needs system/workspace/record level permissions. The name comes from the records being wrapped in a data access “Container”.
Other: Any other web page that is not a workshop or container page.
Page 33
SAAS MAKER OPEN PLATFORM API Setting up your software development environment (.NET SDK) Prerequisites: There are some development tools you will need in order to use the SDK.
FireBird 2.5 or greater MS Visual Studio 2010 (Express version works fine) MS .NET 4.0
The SaaS Maker SDK for .NET developers is an ASP.NET website project that makes it very simple to develop, test, and publish custom plug-in applications within your SaaS Maker environment using any .NET language. Follow these simple steps to setup your development environment once you have the prerequisites installed. 1.
Download the SaaS Maker Plug-in SDK from the SaaS Maker home page.
2.
Extract the files in the SDK .zip file to a location on your hard drive. The SDK has the following folder structure:
3.
Page 34
Bin: Contains the assemblies necessary to run the SDK environment which is an emulation of the SaaS Maker framework.
Db: Contains database files.
Doc: Contains sample plug in pages and documentation.
Plug-in: This will be the root of your plug in code base and the web application root. There are 2 existing sub directories (bin, SDK) that contain the files that run the SDK environment. Do not modify any of these files.
Publish: This is where your compiled and zipped plug in file will be saved when you publish the plug in.
Software: Any add-ons needed for the SDK runtime environment will be available here. At the time of this writing it is the firebird add-ons only.
XML: The XML files for registration are stored here. These files are created by the SDK.
Find your Firebird installation directory and copy files from Plug-in\software\firebird_addons\UDF to the firebird UDF directory. Copy files from Plug-in\software\firebird_addons\Lib to the firebird lib directory. These files have user defined functions and libraries for firebird that SaaS Maker framework needs to run.
SAAS MAKER OPEN PLATFORM API 4.
Edit Prepare.cmd in the root directory. Set FIREBIRD_HOME = %Your Firebird install directory containing the bin folder%
5.
Run Prepare.cmd in the root of the directory you extracted the SDK to. This will prepare a working database for your application on the local Firebird installation.
6.
Now you are ready to open the Visual Studio solution file named “Plug-in.sln” in the root of your extracted SDK directory. Once the solution is loaded in visual studio you can begin developing. Simply run the solution to debug your Plug-in code and to configure the Plug-in settings as defined in the next section.
Configuring your plug-in settings and navigating the .NET SDK 1.
With the solution “Plug-in.sln” open in Visual Studio, run the website. This will launch the SDK user interface in your default browser.
2.
Configure permissions: In addition to the built in system and workspace level permissions, Plug-ins can also use permissions that are defined for the Plug-in alone. The permissions are defined here. Once defined they can be added to roles via the security feature and checked in the Plug-in code.
3.
Configure container options. These options apply to any page that is implemented as a “container page” to leverage the system and workspace level security and workflow functionality of the framework.
4.
Create and administer Plug-in database tables. Using the Plug-in manager you can create and drop database tables used by your Plug-in. The manager creates the database tables locally and also saves an XML file that is used to create the database schema for the Plug-in when registered.
Page 35
SAAS MAKER OPEN PLATFORM API SaaS Maker Application Programming Interface (API) Creating custom plug-ins to run on the SaaS Maker platform is simple regardless of your level of development experience. There are only 3 things you need to create your own custom plug-ins: 1.
Basic web programming skills.
2.
Knowledge of API specific logic: There are a couple fundamentals that are unique to SaaS Maker plug-ins the developer will need to be familiar with. These are detailed below.
3.
Knowledge of the API: A SaaS Maker™ plug-in interfaces with the platform framework via the web services API, which is defined below.
Using the Container Wrapper A database record and the corresponding web page must be wrapped in a “container” in order to take advantage of the built in workflow and the system/workspace/record level security engine. A container page should be focused on reading and writing to one record. To open a container page: Use Java Script call " window.parent.openPlug-inItem_p(pagename);" to open Container with empty fields for creating new plug-in Item. Use "window.parent.openPlug-inItem_p(pagename, recordid, tablename)" to open Container with an existing item in the database. When a container page is closed (this can be via the save, delete or exit container commands), the command attempts to execute a Java Script method onContainerClosed(arg) in the calling page where “arg” is an object having .reason, .id and .table properties. The developer can use this method to handle events when container records are saved, deleted or simply closed. To inspect properties: function onContainerClosed(arg) { window.alert("container closed! Reason:"+arg.reason+", id:"+arg.id+", table:"+arg.table); }
If a Plug-in page is opened and saved in a container, the save event for the page must be called in the page’s LoadComplete event handler. Example: Page 36
SAAS MAKER OPEN PLATFORM API if(IsPostBack && ContainerHelper.GetOperation(Request) == ContainerOperation.Save) { Save(long.Parse(Request.QueryString[RequestConstants.RECORD_ID])); }
Class PluginManager: Constructors: PluginManager(string apiKey): apiKey argument is a unique key that identifies all calls to the SaaS Maker framework. This argument can be obtained/passed in two ways.
1.
Plug-in running in SaaS Maker site (Obtain key from framework): If the call originated within a Plug-in page, the value is taken from URL parameter “tlpageid” (or RequestConstants.API_KEY). Example: var apiKey = Request.QueryString[“RequestConstants.API_KEY”]; var manager = new PluginManager(apiKey); All framework calls are made via manager object which has key
2.
Client running external plug-in through SaaS Maker™ site (pass login data): If the call originated outside a SaaS Maker™ web site, the API key must contain the identity information the platform framework needed in place of a key. In this case, it requires a “;” delimited string, in this order: user name;password;Plug-in name; company name where plug-in name is the internal plug-in name of an existing plug-in to impersonate.
Examples: Passing login data works in place of an API Key delivered in request by the platform framework in the following cases: a.
Mobile client that wants to consume API.
b.
Client running external to a SaaS Maker™ site. May be any platform (Java, PHP, Cold Fusion etc.)
Example: var apiKey = “theUserName;password;yourPluginName;yourCompanyName”; apiKey is passed as first parameter to all web service calls.
Page 37
SAAS MAKER OPEN PLATFORM API Class PluginManager: Constructors: QueryData(string apiKey). Methods Name
Parameters
Return Type
Description
GetTableSchema
(String tableName)
DataTable
Returns an empty data table for the specified DB table
DeleteRecord
(string tableName, string keyField, long recordId)
Boolean (true for success)
Permanently deletes one record. Returns true for success false = not deleted
RecycleRecord
(string tableName, string keyField, long recordId)
Boolean (true for success)
Moves one record to the recycle bin. Returns true for success false = failure
SaveRecords
(SaveParams accessParams)
SaveRecordsResult
Saves a collection of records to one data table. Records many be of type Insert, Update,Delete or any combination of these. (See Classes SaveRecordsResult and SaveParams)
GetRecords
(GetParams getParams)
DataTable
Gets all records for the specified table with empty filters collection. Add filters if desired. (See class GetParams)
Overload (string tableName) GetRecordById
(GetParams getParams)
DataTable
Gets one record by DB table key (See class getParams)
ExecuteQuery
(QueryData query)
DataTable
Executes complex query as defined by QueryData structure and returns results in data table. (See class QueryData)
GetSpaceName
(Long spaceId)
String
Returns the name of the space for the space id
GetPrivilegeIds
(Long spaceId)
IList
Returns a list of privilege ids for the user
Page 38
SAAS MAKER OPEN PLATFORM API HasContainerPrivilege
(long recordId, string tableName, ContainerPrivilege privilege)
Boolean
Does the logged in user have the privilege for the record?
HasPluginPrivilege
(string privilegeName)
Boolean
Does the logged in user have the plugin privilege?
Properties Name
Type
Description
ApiKey
String
Gets the API Key set by the constructor
CurrentUserName
String
Gets the user name of the logged in user
CurrentUserId
Long
Gets the user id of the logged in user
CurrentSpaceId
Long
Gets the current work space id
CompanyName
String
Gets the company name of the logged in user
GroupIds
IList
Gets a list of group ids the logged in user belongs to
PluginName
String
Gets the name of the plug-in
SubDomain
String
Gets the sub domain of the application the plug-in is running in
OnlineUsers
IList
Gets a list of user ids belonging to users online at the time
OnlineSpaceUsers
IList
Gets a list of user ids belonging to users online at the time
Page 39
SAAS MAKER OPEN PLATFORM API Class Query: Constructors: One constructor, Query(string apiKey): apiKey argument is a unique key that identifies all calls to the SaaS Maker framework. See PluginManager class
Methods Name
Parameters
Return Type
Description
Execute
(QueryData queryData)
DataTable
Executes query defined in the queryData param (See class QueryData)
Class QueryData: Constructors: One constructor, QueryData(). Properties Name
Type
Description
PrimaryTable
TableDef
Gets and Sets the primary database table to query. (See class TableDef)
JoinedTables
IList
Gets and Sets a list of tables to join (See class TableJoin)
Class TableDef: Constructors: TableDef().
TableDef(string name) set the table name
Properties Name
Type
Description
Name
String
Gets and Sets the table name
Columns
IList
Gets and Sets a list of columns to include in the query for this table (See class TableColumn)
Page 40
SAAS MAKER OPEN PLATFORM API Conditions
IList
Gets and Sets a list of filter conditions to include in the query for this table
Class TableColumn: Constructors: TableColumn(). Properties Name
Type
Description
Visible
Boolean
Show the column in the query results?
Name
String
Gets and Sets the database column name
Alias
String
Gets and Sets an alias that replaces DB column name in results if not null or empty
Name
Type
Description
Table
TableDef
Gets and Sets the table to be joined
ForeignKey
String
Gets and Sets the name of the FK to use in the DB
Joiner
TLRelations
Gets and Sets the join type(Inner, LeftOuter, RightOuter)
Conditions
IList
Gets and Sets a list of conditions for the join
Class TableJoin: Constructors: TableJoin(). Properties
Methods Name
Parameters
Return Type
Description
AddCondition
(string columnName, PluginService.TLCondition condition, ArrayOfString parameters)
void
Adds one condition to the list
Page 41
SAAS MAKER OPEN PLATFORM API Class SaveParams: Constructors: SaveParams(). Properties Name
Type
Description
TableName
String
Gets and Sets the DB name of the table to save the record(s) to
ContainerData
ContainerData
Gets and Sets the container data for the record. Set null for records that are unmanaged.
Records
IList
Gets and Sets the list of records to be saved. (See class RecordData)
Methods Name
Parameters
Return Type
Description
AddRecord
(DataRow record, string keyField, SaveType operation, long recordId)
void
Adds one record to the list
Class RecordData: Constructors: RecordData(). Properties Name
Type
Description
Record
DataRow
Gets and Sets the data row.
Operation
Enum SaveType
Gets and Sets the database operation to be performed on the record (Insert, Update, Delete)
PublicName
String
Gets and Sets a user friendly name that is exposed for record in search
RecordId
Long
Gets and Sets the id of the key column
KeyField
String
Gets and Sets the DB name of the key column
Page 42
SAAS MAKER OPEN PLATFORM API Class SaveRecordsResult: Constructors: SaveRecordsResult (). Properties Name
Type
Description
Result
Enum SaveResult
Gets and Sets the status of the operation (Success, Failure).
RecordIds
IList
Gets and Sets the list of recordIds affected by the operations
Class GetParams: Constructors: GetParams (). Properties Name
Type
Description
TableName
String
Gets and Sets the name of the DB table to get data from
RecordId
Long
Gets and Sets the name of the DB table to get data from
OnlyCurrentSpace
Boolean
Limit records to within current workspace? default = true
Keyfield
String
Gets and Sets the name of the DB column that is key for the get call
Filters
IList
Gets and Sets the list filters used for the get call
Sort
TLPluginUtils.TLConditionSort
Gets and Sets the sort used for the get call
Methods Name
Parameters
Return Type
Description
AddFilter
(string columnName, string coalesceValue, TLPluginUtils.Enumerations.TLCondition
void
Adds one filter condition to the list
Page 43
SAAS MAKER OPEN PLATFORM API sqlOperator, List parameterValues, TLPluginUtils.Enumerations.TLLinkType bitWise)
Exceptions: Custom exceptions are thrown by the API to inform the developer if calls are not made correctly and to help differentiate types of failures. Exceptions include the full .NET exception plus an informative message for the invalid call or failure. Exception
Throw Conditions
PlatformDataAccessException
An unexpected error occurs while making any data access call to the platform framework
PlatformArgumentException
Any argument passed to an API method fails validation
Code Samples:
The following code samples are provided to illustrate use of the most commonly
used API methods and scenarios:
Instantiate PluginManager: using DotNetFacade; var pluginMananger = new PluginManager(Request.QueryString[RequestConstants.API_KEY]);
Select a single record from a single table: var dataTable = PluginManager. GetRecordById(new GetParams() {KeyField = "fieldHoldingRecordId", TableName = "TableName", RecordId = yourRecordId});
Select many records from a single table using a filter: This sample shows a single filter but many filters can be added to the filters collection as desired. var getParams = new GetParams(){TableName=”TableName”}; This filter is for a numeric datatype where the value is between 1 and 100 nulls are coalesced to 0 getParams.AddFilter("yourNumericColumn","0", TLCondition.CondBetween, new List(){"1", “3”}, TLLinkType.ltAND); var dataTable = PluginManager.GetRecords(getParams); Page 44
SAAS MAKER OPEN PLATFORM API Select from multiple tables: When data is needed from multiple tables, the Query object is used to compose a query. Inner, left outer and right outer joins are supported. The Query object can be directly instantiated or may be accessed via the PluginManager.ExcecuteQuery(QueryData) method. Select from 2 tables using inner join – queries are constructed using the QueryData object. var queryData = new QueryData(); var prime = new TableDef() {Name = "PrimaryTableName"}; These are the columns that will be included in your query. Only one here but limited only by DB schema. prime.Columns.Add(new TableColumn() { Name = "DbColumnName", Visible = true, Alias=”ColumnNameInResults” }); queryData.PrimaryTable = prime; var child = new TableDef("CHILD"); child.Columns.Add(new TableColumn() { Name = "DbColumnName", Visible = true, Alias=”ColumnNameInResults” }); var join = new TableJoin() {ForeignKey = "TheDBNameOfFK", Table = child, Joiner = TLRelations.InnerJoin}; Add the joined table to query data. There is only one here but you may add as many joins as needed. queryData.JoinedTables.Add(join); Execute the query. var queryResult = pluginManager.ExecuteQuery(queryData);
Save a single new record: Use this approach when you know that you are creating a new record Get the table definition, create the new row and update column values. var dataTable = PluginManager.GetTableSchema("TableName"); var dataRow = dataTable.NewRow(); Update the columns as desired – create the SaveParams object and populate. var saveParams = new SaveParams() {TableName = "TableName"}; Page 45
SAAS MAKER OPEN PLATFORM API Add row to save collection. saveParams.AddRecord(dataRow, "PrimaryKeyColumn", SaveType.Insert, 0); pluginManager.SaveRecords(saveParams);
Save a single existing record: Use this approach when you know you will be updating an existing record Get the record from the db and update column values. var dataTable = PluginManager. GetRecordById(new GetParams() {KeyField = "fieldHoldingRecordId", TableName = "TableName", RecordId = yourRecordId}); var dataRow = dataTable.Rows[0]; Update the columns as desired – create the SaveParams object. var saveParams = new SaveParams() {TableName = "TableName"}; Add row to save collection. saveParams.AddRecord(dataRow, "PrimaryKeyColumn", SaveType.Update, 0); pluginManager.SaveRecords(saveParams);
Save a single record: Use this approach when you do not know if the operation will be insert or update. Get the record from the database and update column values. var dataTable = PluginManager. GetRecordById(new GetParams() {KeyField = "fieldHoldingRecordId", TableName = "TableName", RecordId = yourRecordId}); Create a data row resulting from the returned data table it will have one row for existing 0 for insert. var operation = dtTask.Rows.Count == 0 ? SaveType.Insert : SaveType.Update; var dataRow = operation == SaveType.Insert ? dtTask.NewRow():dtTask.Rows[0]; Page 46
SAAS MAKER OPEN PLATFORM API Update the columns as desired - create the SaveParams object. var saveParams = new SaveParams() {TableName = "TableName"}; Add row to save collection. saveParams.AddRecord(dataRow, "PrimaryKeyColumn", operation, 0); pluginManager.SaveRecords(saveParams);
Save many records in a single call: Use this approach when you wish to perform operations on multiple records for the same DB table. You can insert update and delete in one call to SaveRecords method. var dataTable = PluginManager. GetRecordById(new GetParams() {KeyField = "fieldHoldingRecordId", TableName = "TableName", RecordId = yourRecordId}); var updateRec = dataTable.Rows[0]; Update the columns as desired. var insertRow = dataTable.NewRow(); Enter column values for new row as desired. var saveParams = new SaveParams() {TableName = "TableName"}; saveParams.AddRecord(updateRow, "PrimaryKeyColumn", SaveType.Update, yourRecordId ); saveParams.AddRecord(insertRow, "PrimaryKeyColumn", SaveType.Insert, 0 ); pluginManager.SaveRecords(saveParams);
Checking the status of SaveRecords: The SaveRecords method returns a results object of type SaveRecordsResult. This object informs the developer of the status of the call (Success or failure) and provides a collection of Ids for effected records. If many records are being saved and an error is encountered, the save process is aborted immediately after the error and result is returned.
Page 47
SAAS MAKER OPEN PLATFORM API Use any of the save methodologies detailed above setting a local variable to the result var result = pluginManager.SaveRcords(saveParams); If(result.Status == SaveStatus.Failure) { //If only a single record was passed to SaveRecords there is no need for this step //Check for multiple records //iterate through the recordIds that are returned foreach(long id in result.RecordIds) { If(id == 0) { //This is the record that failed order will correspond to order of the records collection passed to SaveRecords. } } }
Permanently delete a single record: Use this approach when you want to delete a record permanently. var success = pluginManager.DeleteRecord("TableName", "PrimaryKeyColumn”, recordId); if(!success) { //Something went wrong handle it here }
Move a single record to the recycle bin: Use this approach when you want to move a record to the recycle bin. var success = pluginManager.RecycleRecord ("TableName", "PrimaryKeyColumn”, recordId); if(!success) { //Something went wrong handle it here }
Page 48
SAAS MAKER OPEN PLATFORM API Check container privilege: While container privileges are enforced by the platform, there are cases when it is advantageous to check them within the plugin code. If(pluginManager.HasContainerPrivilege(“TableName”, recordPrimaryKey, ContainerPrivilege.CanEdit) { //Logged in user has privilege to edit the record }
Check custom plug-in privilege: Any number of custom plug-in privileges may be added by the plug-in developer and assigned to roles in the platform. Check custom privileges for the logged in user as follows: If(pluginManager.HasPluginPrivilege (“PrivilegeName”) { //Logged in user has privilege }
Page 49
SAAS MAKER OPEN PLATFORM API SaaS Maker Web Service Application Programming Interface (API) DeleteRow(plGuid As String, TableName String, FieldName String, RecordID Long, bSingleItem Boolean) Deletes one record from database table Parameters: 1.
TableName – name of Gizmo table
2.
FiledName – name of Key field
3.
RecordID - value of the Key
4. bSingleItem – if “true”, the record will be deleted physically; if “false” then item is deleted to SaaS Maker™ RecycleBin Returns True if row is deleted successfully, False if Row was not deleted
GetRecords(request WSGetDataRequest) This method is used to get records from a database table. Parameters: This function has only one parameter of type WSGetDataRequest which has the following properties: 1.
TableName – name of table from which data are retrieved
2.
Key – The API key (plguid)
3. RecordID - value of the Key. RecordID can be “0” – in this case method returns all records in the table if no filter is defined. 4.
OnlyCurrentWorkshop – if “true”, the record will be retrieved from Current Workspace only
5.
ExtensionData- This is a string that will be associated with the record as an “Attachment”
6.
DataFilter- This property is of type TLTableConditionList and is used to filter and sort data.
Returns WSGetDataResponse, which has property StrData which holds the Serialized.NET Object “Dataset”.
Page 50
SAAS MAKER OPEN PLATFORM API GetRecords method example using filter: var filter = new PluginService.TLTableConditionList(); var conditions = new TLJoinerCondition[1]; conditions[0] = new TLJoinerCondition(){column = "InstanceAws_WorkGroupId", SQLCondition = TLCondition.CondEQ, SQLParameters = new ArrayOfString(){_workGroupId.ToString() } }; filter.ConditionList = conditions;
var response = _soapClient.GetRecords(new PluginService.WSGetDataRequest() {TableName = "InstanceAws", Key = _plGuid, DataFilter = filter}); var dataSet = API.DeserializeDataset(response.StrData);
SaveRecord(request WSSaveDataRequest) Saves one record to database table. Parameters: This function has only one parameter of type WSSaveDataRequest which has the following properties: 1.
TableName- The name of the table.
2.
Key – The API key (plguid).
3. RecordID - value of the Key. RecordID can be “0” – in this case method returns all records in the table if no filter is defined. 4. ContainerHeader- Type of PluginService.ContainerData. If record is managed pass new PluginService.ContainerData() else null. 5. StrData- This is serialized dataset object. It should only contain the one record to be inserted/updated.
Returns WSSaveDataResponse, which has property RecordId which is the id of the saved record.
Page 51
SAAS MAKER OPEN PLATFORM API GetPluginName(plGuid String) Returns String, Gizmo name by plGUID. GetSubDomain(plGuid String) Returns String, Company name by plGUID. GetPluginIcon(plGuid String) Returns String, Relative Path to small icon image(see registration process) of Gizmo by GUID. CheckPluginPermission(plGuid String, _ Permission_Name String) Returns Boolean, true if currently logged on user has Gizmo Permission, which is defined by permission name Permission_Name. GetPluginIDByAttachmentID(plGuid String, Attachment_ID Long) Returns Long, Gizmo ID –type long by given SaaS Maker™ Attachment ID – of type Long (May be used in Gizmo, which works with groups of other Gizmos, like “SaaS Maker™ File Cabinet”) GetPluginNameByAttachmentID(plGuid String, AttachmentID Long) Returns String, Gizmo Name by given SaaS Maker™ Attachment ID – of type Long (May be used in Gizmo, which works with groups of other Gizmos) GetRecordIDByAttachmentID(plGuid String, Attachment_ID Long) Parameter: AttachmentID – ID of SaaS Maker™ Attachment Returns Long, Gizmo Item Main table Record ID - of type Long by given SaaS Maker™ Attachment ID – of type Long (May be used in Gizmo, which works with groups of other Gizmos, like “SaaS Maker™ File Cabinet”) GetTHDbStuct(plGuid String) Returns Byte[] of serialized XML, which keeps Gizmo databases structure GetNewContainerURL(plGuid String, CategoryID Long) Parameter: CategoryID - ID of SaaS Maker™ Category in which new Item Container will be inserted. Returns String, which contains URL. This URL can be used by Gizmo to open SaaS Maker™ Container with Gizmo item page in Container frame. This URL can be assigned in toolbar button “New” or link “New” on Workspace page in order to User can create new Gizmo item in SaaS Maker™ Container.
Page 52
SAAS MAKER OPEN PLATFORM API GetContainerURL(plGuid String, RecordID Long) Parameter: RecordID – ID of record in main table of Gizmo Returns String, which contains URL. This URL can be used by Gizmo to open SaaS Maker™ Container with Gizmo item page in Container frame. This URL can be assigned in toolbar button “Edit” or link “Edit” on Workspace page to allow user to modify existing Gizmo item in container. GetCurrentWID(plGuid String) Returns Long, ID of Current Workspace GetContainerStatus(plGuid String, RecordID Long) Returns Int current status of container by RecordID of Gizmo item record GetUserName(plGuid String, UID Long) String Returns String, Name of User by User ID GetSpaceName(plGuid String, WID Long) Returns String, Name of Workspace by Workspace ID GetGroupName(plGuid String, GroupID Long) Parameter: GroupID – of type Long, defines SaaS Maker™ Role ID Returns String,SaaS Maker™ Role Name GetSpaceUsers(plGuid String) Returns Long[], ID of all Users in current SaaS Maker™ Workspace GetSpaceGroups(plGuid String, WID Long) Parameter: WID – of type Long, defines SaaS Maker™ Workspace ID Returns Long[] –IDs of Roles in given Workspace GetMyGroups(plGuid String) Returns Long[] – ID of Roles for currently logged in User GetMyPermissionMap(plGuid String, UId Long) Parameter: UID – of type Long, defines SaaS Maker™ User Returns Long[] , ID of Permissions for given User
Page 53
SAAS MAKER OPEN PLATFORM API GetGroupPermissionMap(plGuid String, GroupID Long) Parameter: GroupID – of type Long, defines SaaS Maker™ Role ID Returns Long[] , ID of Permissions for given Role GetSpaceOnlineUsers(plGuid String, UserId Long) Returns Long[], ID of User currently being logged in SaaS Maker™ GetActiveSpaceGismos(plGuid String) Returns Long[], ID of Gizmos currently available in current SaaS Maker™ workspace
Publishing your Plug-in Publishing your plug-in consists of compiling your Visual Studio web application and preparing a compressed .zip for registering the plug-in. This process is automated by the SDK and SaaS Maker™ framework. Publishing is as easy as clicking a button and viewing a log file. If errors occur during the build, they will be recorded in the publish log to help you troubleshoot.
Figure 6: Initiate publishing the plug-in
Page 54
SAAS MAKER OPEN PLATFORM API
Figure 6.1: Configure build properties and start the build
Figure 6.2: Review the publish results. Any build errors will be recorded here
Page 55
SAAS MAKER OPEN PLATFORM API
Figure 6.3: Output is published to the publish directory in the root of the SDK directory
Registering your Plug-in To register your plug-in, log into the SaaS Maker™ Application with a developer account and while in preview mode, navigate to Tools > Plug-in Manager. Click New, upload the .zip file that was output when you published your plug-in and that’s it! SaaS Maker™ does the magic work of integrating your plug-in in the platform. Your plug-in now has the honor of having become a SaaS Maker™ Gizmo! To add your new Gizmo to the application, switch to design view and click the Gizmos icon. You will see your new Gizmo in the list of available Gizmos. Here you can add the Gizmo to the application by selecting it and clicking Add.
Page 56
CONCLUSIONS Conclusions SaaS Maker™ applications are powerful tools that can quickly build from nothing to robust applications in little time at a fraction of the cost of other SaaS applications. Users with no experience in programming can use these tools to create business specific applications in a fraction of the time and investment it would take to have a custom SaaS created by other services. Virtual Global stands behind SaaS Maker™ with award winning customer service and can be contacted any time to assist developers and users with the application. Visit http://virtualglobal.com/ to get started and see how a custom SaaS can take your business to new heights.
Page 57
APPENDIX 1: SAAS MAKER™ FEATURE LIST APPENDIX 1: SaaS Maker™ Feature List The following is feature list is included to illustrate platform maturity. Platform features and modules are tightly integrated as part of “platform instances” that are delivered on demand.
SaaS Maker Factory Tools / Cloud IDE SaaS Maker Factory is An online toolkit to help developers to build and deploy custom PaaS and SaaS solutions on top of the platform, without programming:
Ability to create a custom user experience, including Web pages, store-front, help file, license file, custom email notifications, etc. Ability to create custom data entry forms Ability to enable/disable platform features based on needs Ability to install/uninstall reusable modules Ability to customize reports, workflows, etc. Ability to publish SaaS apps for B2B, B2C, or end-user SaaS, for multi-user sale, consumer sale, or ad-supported model.
Consolidated Platform Services Forms/Record Management - Ability to create data entry forms; route, track and report on form data, with integrated support for attachments and workflow. The forms engine is integrated with the RBAC, search and reporting engines for deploying multi-tenant apps. Presence Awareness - Ability for users to see who’s logged on. Search Services - Ability to search by full text, content type (record, task, contact, etc.), content owner, workspace, or global search or search by date range. Workflow Services - Ability to implement custom business processes. Historical Audit Trail - Track changes to records by user, date, etc. File Manager (Repository Services) - Integrated file manager, with version tracking. Common Security Model Authentication Services - User ID/password authentication, password retrieval, change passwords and timeouts; Allow the administrator to specify authentication type (strong passwords, optional RSA token support, etc.), and password reset. Global Role-based Access Control (RBAC) Services – User-defined role/privilege pairs for Page 58
APPENDIX 1: SAAS MAKER™ FEATURE LIST controlling access to tools and system features. Workspace RBACServices – Separate Role-based Security for each workspace in a multi-tenant environment. Row-level security – Ability to control read/modify/delete privileges at the record level. Workspace (Tenant) Management Services Incorporates a logical separation of user groups within a multi-user implementation, such that no one user (or group of users) can access data or functions that “belong” to another user, except as explicitly granted. Data Management Services Ensures that no SaaS Maker module can be created that uses the API to wrongfully interact with the underlying SQL database. That is, SaaS Maker modules are not permitted direct access to the underlying database without “going past” the data management layer, which serves as a gatekeeper. Remote Administration Console Instance Management – Allows for platform instances to be created and destroyed on demand. Workspace Management – Allows for workspaces to be created, destroyed, customized and otherwise managed. User Management – Allows for users to be added, modified and disabled; including password management. Security Management (RBAC/Row-level Security) – Allows for role/user/privileges to be added and managed. Platform Utilities Report Designer – Ability to create business intelligence reports, which are integrated and controlled by the security model; and which are accessible by the records management engine. BI Designer - Ability to create business intelligence reports, which are integrated and controlled by the security model; and which are accessible by the records management engine. Workflow Designer – Ability to create workflows, which are integrated and controlled by the security model; and which are accessible by the records management engine. Forms/DB Designer – Ability to create and manage database-driven forms, which are integrated and controlled by the security model; and which are accessible by the reporting and BI engines. Graphical User Interface Page 59
APPENDIX 1: SAAS MAKER™ FEATURE LIST Graphical User Interface – A portal-like user interface for accessing Admin functions; and for “running” SaaS Maker modules as a visually integrated system. The SaaS Maker GUI provides a common user experience that makes resulting software easier to use. Open Platform Browser Independence - The platform works with Firefox 4.x, Safari 5.x, Internet Explorer 6 and later, and Google Chrome 10 and later. Open API - Incorporates a programmable interface for “tightly integrating” existing Web apps and services. To “tightly integrate” allows for the creation of systems, versus simple portals, and requires functions for interfacing with other plug-ins and data within the system, as defined by the security definitions. The interface should NOT rely on Microsoft “User Controls”, “Web Parts”, “COM”, or other proprietary object technologies. Rather, it should work over regular Web services from a variety of software languages. Integrated Modules - Includes a core set of default modules for team management, collaboration and document repository. Include integrated modules for chat, calendar, discussion, mail, task management, etc. Includes integrated web services to demonstrate the API, such as Google language translation service, VNC remote desktop, and Alfresco document repository. Enterprise Enabled Back-end Scalability - Scalable to accommodate large numbers of users and heavy usage loads with 100s of thousands of SaaS systems, millions of end users and large record sets. Front-end Scalability – Implement “paging”, drilldowns and lookups for lists. Cost Scalability – Available for free Firebird SQL. SQL Server or Oracle database also available. Desktop Integration SaaS Maker also includes features for MS Outlook, MS Project sync and MS Windows Desktop integration.
Page 60
Page 61


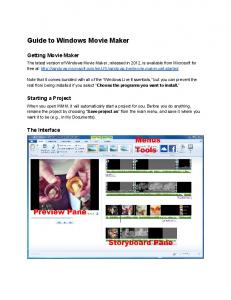


![[11;55;29] - PDF Download AWS; Developers Guide ... - WordPress.com](https://m.moam.info/img/260x300/115529-pdf-download-aws-developers-guide-wordpress_6479f42c097c476c028bfe23.jpg)
