Makers’ Marks: Physical Markup for Designing and
Fabricating Functional Objects
Valkyrie Savage* , Sean Follmero , Jingyi Li* , Bjo¨ rn Hartmann* * UC Berkeley EECS, o Stanford University
[email protected],
[email protected],
[email protected],
[email protected]
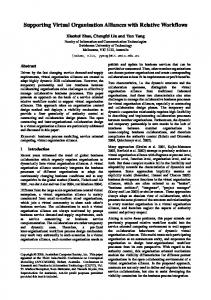
Figure 1. Example objects designed with the Makers’ Marks system. Left, modeled and annotated object geometry. Center, view of 3D-scanned digital models with generated mounts for functional components. Right, completed objects.
ABSTRACT
Author Keywords
To fabricate functional objects, designers create assemblies combining existing parts (e.g., mechanical hinges, electronic components) with custom-designed geometry (e.g., enclo sures). Modeling complex assemblies is outside the reach of the growing number of novice “makers” with access to digital fabrication tools. We aim to allow makers to design and 3D print functional mechanical and electronic assemblies. Based on a formative exploration, we created Makers’ Marks, a sys tem based on physically authoring assemblies with sculpting materials and annotation stickers. Makers physically sculpt the shape of an object and attach stickers to place existing parts or high-level features (such as parting lines). Our tool extracts the 3D pose of these annotations from a scan of the design, then synthesizes the geometry needed to support inte grating desired parts using a library of clearance and mount ing constraints. The resulting designs can then be easily 3D printed and assembled. Our approach enables easy creation of complex objects such as TUIs, and leverages physical ma terials for tangible manipulation and understanding scale. We validate our tool through several design examples: a custom game controller, an animated toy figure, a friendly baby mon itor, and a hinged box with integrated alarm.
Tangible Design Tools; 3D Printing ACM Classification Keywords
H.5.2 User Interfaces: Prototyping INTRODUCTION
3D printers have evolved from professional equipment in in dustrial design to staples in makerspaces; 3D scanners are fol lowing, with inexpensive phone or webcam-based solutions increasingly available. As such tools move out of the work place and into maker clubs, libraries, museums, and homes, two large questions remain: what objects can people make with these machines, and how can they design those objects? Novices, who are new to or uncomfortable with 3D CAD modeling, include hobbyists, who prefer hands-on tangible modeling to the abstract software task of CAD; students in programming courses, who feel more accomplished with cus tom electronics cases; and artists, who have strong bases in tangible modeling. Various snap-together kits (e.g., lit tleBits1 ) and easy-to-use languages (e.g., Scratch [14]) allow novice users to create functional electronics: we tackle the modeling task to help them design free-form objects integrat ing such electronics, as well as mechanical features. A look at Thingiverse, an online 3D printing community2 , reveals that novices mostly create static and decorative ob jects, while experienced designers model functional objects, often as assemblies which include existing, non-printed parts
Permission to make digital or hard copies of part or all of this work for personal or
classroom use is granted without fee provided that copies are not made or distributed
for profit or commercial advantage and that copies bear this notice and the full citation
on the first page. Copyrights for third-party components of this work must be honored.
For all other uses, contact the Owner/Author.
Copyright is held by the owner/author(s).
UIST’15, November 9–11, 2015, Charlotte, North Carolina, USA.
ACM 978-1-4503-3779-3/15/11.
1 2
http://dx.doi.org/10.1145/2807442.2807508
103
http://littlebits.cc/ http://thingiverse.com
target integration of existing and novel parts, but we focus on tangible rather than gesture-based modeling.
such as hinges or electronics. One reason for this disparity is designing assemblies with functional components in CAD remains complicated: designers must specify not only where to place functional components, but also how to mount them to allow assembly and ensure functionality.
Some systems focus on model manipulation through annota tion: pen annotations on a papercraft model can specify ex trusions or cuts [17], while sketches on photos of a scene can provide measurements for correct scaling [8]. We also lever age annotations, but use them to add higher-level functional components instead of specifying underlying shape directly.
We take inspiration from prior work on prototyping inter active objects [10] and 3D modeling via physical annota tion [17]: our goal is to allow novice users to create printable functional objects integrating commercially-available com ponents. We foreground working entirely with physical me dia rather than CAD software—our formative work suggests novices can express design intent by combining sculpting (larger shapes) and annotation of functionality (finer details).
Fabricating with libraries of pre-existing parts
Recently, researchers have explored fabricating interactive functionality directly through the use of additive man ufacturing techniques, e.g., by printing light pipes [22] or acoustically-sensed components [6]. However, massmanufactured standard parts can be cheaper, more durable, or offer other performance benefits over printed parts. Accord ingly, other projects have offered ways to integrate existing parts into novel 3D models. Lau, et al., analyze 3D models to automatically place existing fasteners and IKEA compo nents [7], thus easing assembly. Mueller, et al., accelerate 3D printing processes by 3D printing high-detail areas around assembled low-resolution LEGO blocks [12]. Villar, et al., built CAD extensions to design enclosures for .NET Gad geteer sensors and actuators [18]. With Weichel, they gen erated laser-cuttable enclosures [20]. Although we use .NET Gadgeteer components in our work, allow users to tangibly model full 3D objects that integrate them alongside other offthe-shelf electronic and mechanical components.
With our system, Makers’ Marks, users first sculpt the overall shape they would like to print, using clay or other physical materials. They then add annotations with physical stickers, indicating placement for functional components. In our pro totype, supported parts include components for user interac tion (e.g., joysticks) as well as mechanical parts (e.g., hinges). Makers’ Marks captures user-created geometry using a 3D scanner and replaces annotations with precise 3D geometry from a library, allowing the indicated components to be ac cessible and fastened post-print. By employing physical au thoring for rough shapes and digital tools for precise assem bly geometry, we hope to enable easier, quicker creation of complex functional objects (see Figure 1). M-Marks focuses on a subset of functional objects. It is restricted to rigid, shelled objects whose surface func tional components require 3D models and additional clear ance metadata. Created objects can range from whimsical and decorative (a waving shark) to precise and functional (a game controller). We contribute (1) an approach for tangibly authoring objects with sculpted geometry and physical anno tations; and (2) a pipeline to process these annotations and add mounting features to 3D models to assemble printed ob jects and existing parts.
FORMATIVE DESIGN STUDY
We conducted a formative design study with 7 participants (3 experts and 2 women) ages 21-55 recruited from a large tech company and a university. Participants completed three de sign tasks using clay, pen and paper, or a combination of the two. Participants designed 3 assemblies: an ergonomic grip for a screwdriver (clay), a travel case for office supplies (pa per), and a bike mount for a cell phone (combination). We said the designs were to be given to another engineer for it eration, but that they should convey as much of the design as possible. We recorded these sessions, asked post-test ques tions, and later analyzed their sketches and sculpted designs.
RELATED WORK
Our research draws upon work in tangible and sketch-based 3D modeling, and digital fabrication with pre-existing parts.
We saw a wide variety of solutions to our design tasks, but the most striking result was the use of annotations. In the sketching condition, we observed call-outs and labels to an notate design sketches, often indicating features which were
3D modeling in context
Researchers have have looked to tangible interfaces to lower the barrier of 3D content authoring.Tracked building blocks—implemented with integrated electronics [5] or exter nal computer vision [4]—create digital models corresponding to users’ physical manipulation. Smart measurement tools can copy real-world measurements to digital model dimen sions [9, 19]. However, these projects cannot capture com plex freeform geometry, like the body of a game controller. Other tools allow users to capture some aspects of existing objects as input to designs: for example to copy their geom etry in 2D [2] or 2.5D [3]. These projects align with our vi sion, but target different types of objects. MixFab [21] uses a mixed-reality environment to spatially position CAD models around scanned geometry of existing objects. Similarly, we
Figure 2. In our formative study, we observed use of annotations in both the sculpting and sketching conditions. Left: Green material indicates where a joint should be placed to connect to another part. Right: Anno tations indicate where complex parts are located on a simple sketch.
104
Figure 3. Makers’ Marks has users model (a) and annotate (b) geometry physically. Then, they capture their designs with a 3D scanner (c). M-Marks performs several computational steps to ensure printability and assembleability of the model (d-f). Finally, users print and assemble their objects (g).
challenging for the designer to draw, like an attachment fea ture labeled “plastic clips to hold phone in place” (see Figure 2 right). In the sculpting condition we saw participants use multiple materials as annotations, for example paired green clay dots to indicate connectivity of parts (see Figure 2 left).
ure 3a), then applies annotation stickers marking locations for functional components in the final object. Our maker places marks for three buttons to enter the code, a gyroscope to sense when the box is opened or moved, and a speaker to play an alarm. She also situates an internal pro cessing unit, one of the components supported in Table 1. During this design process, she can continually modify her decorations and the locations of the inputs. Once satisfied with the design, she adds one more annotation indicating a hinge (Figure 3b), which also implies a parting line: when the object is printed and a hinge is attached, it can be opened along this line to allow her access to the inside.
Sculpting may have been accessible, but it had some fun damental limitations. Although useful for expressing rough design intent and simple geometry, clay is a challenging medium for creating precise geometry or complex topologies like handles. Affixing objects with significant weight to clay is problematic, as the clay can deform and crack. In these situations, we noted participants using annotations, whether physical or sketched.
She scans the box’s geometry and appearance with a 3D scan ner (Figure 3c). In the M-Marks UI, she indicates she wants an alignment lip. M-Marks locates annotations on her object, and each is classified as “button”, “speaker”, etc. (Figure 3d). The system reconstructs the 3D pose of each annotation and hollows out the box geometry; then, it adds mounting points to attach components after printing (Figure 3e), ensuring they will not interfere with each other when physically assembled. The box model is split along the parting line defined by the hinge, and the lip is generated (Figure 3f).
Novices employed fewer annotations, and did not go into as much depth about joining assemblies (e.g., mounting points or placement of screws). Experts had more detailed drawings, and called out more features. Based on these observations, we developed Makers’ Marks (M-Marks), which blends sculpting and annotations to cre ate functional objects. Annotations give context and describe function, while clay defines a rough form. Our users did not annotate directly on clay, as tools for this are lacking: we thus use stickers. M-Marks encapsulates many specifics that novices ignored, like mount points and fastener placement.
Our maker now prints the processed geometry. As it prints, she has time to program the interactions she wants to sense. M-Marks does not assist with the programming; our maker is well-versed in Scratch [14]. Once the print finishes, she snaps in the input, speaker and processing modules, connects them with cables, and screws on the hinge of the box (Figure 3g).
DESIGNING WITH MAKERS’ MARKS
We introduce a typical scenario in which a novice designer uses Makers’ Marks to make a functional object. A teenage maker wishes to create a safe box to hide a stash of her favorite items away from her brother. She wants to make a secret code to open the box: if opened without the code, it sounds an alarm. To form the size she wants, she finds two cardboard tubes and tapes them together. She molds a “MINE” sign in polymer clay for the front of the box (Fig electronic mechanical other
IMPLEMENTATION
The Makers’ Marks pipeline begins after users model and scan an annotated object. The scan’s result is a full-color 3D model with vertex and triangle information for the mesh, as well as links to texture files (i.e., photographs), and mappings of texture files to mesh triangles. M-Marks uses pre-authored component definitions and has a simple GUI that calls a Python script. Using MeshMixer [16], M-Marks first hollows the object keeping a 1.5mm shell. Then it detects and localizes marks (performed in Matlab and C++); checks for interference, replaces geometry, and gener
button, joystick, Raspberry Pi, camera, gyroscope, IR rangefinder, servo (2-part), processing unit hinge, knob, handle parting line, hole
Table 1. Components currently supported in Makers’ Marks’s library.
105
Figure 4. M-Marks performs mark detection and localization, interference checking, geometry replacement, and assembly structure generation.
ates the assembly structure (openSCAD) (see Figure 4). Fi nally, users fabricate and assemble objects.
the 3D coordinates to compute the mark’s pose. As a result, we obtain translation and rotation information to accurately position components in the final, processed model.
Component Definition
To work with M-Marks, existing components (listed in Ta ble 1) must be modeled and added to the part library. For each physical component (Figure 5a), we maintain several metadata. First, we store sticker designs. Second, we store an approximation of the actual component geometry (Figure 5b). Third, we store its clearance information, which includes space for, e.g., electronic connectors or a joystick’s motion (Figure 5c). Finally, we store mounting geometry (Figure 5d)—in this case, bosses and snap-fit arms that will later hold the joystick PCB in place in the printed model (Figure 5e).
Mark Design
For optimal classification, each mark has unique features which distinguish it from others; we use descriptive text, vec tor art, and component photos. To preserve uniqueness, we cannot use duplicate marks: thus if a user wants two buttons on an object, she places two unique button marks. We differ entiate within a class with different fonts and vector art, keep ing the image and size constant. Marks are sized to match represented physical components, aiding in space planning. Our marks are adhesive-backed for easy deployment.
Mark Detection and Localization Component Placement
We detect and localize user-placed annotations, or “marks,” in the 2D texture images associated with a scanned object. We then calculate each mark’s 3D pose (Figure 4 left).
Once we determine component placement, we perform sev eral checks. Using clearance geometry, we determine a sur face offset for components: the internal boards of the elec tronic components cannot intersect the surface of the model, and must be recessed appropriately. We step backwards along component normals 1mm at a time until we no longer detect intersection. Then, we determine if any user-placed compo nents intersect internally. If so, for certain components whose exact location is not critical (i.e., processing units), we can step forwards along the normal until the parts no longer in tersect, then extend the captured geometry with a new hol low addition large enough to fit the component. Future work could explore elastic deformation techniques [13] to avoid box-like protrusions. We create mounting geometry from the calculated offsets. This consists of both adding fasteners and subtracting space necessary for clearance (e.g., for a joystick to protrude through the surface) (see Figure 4 right).
Our mark detection algorithms are implemented in Matlab us ing SIFT [11] and RANdom SAmple Consensus (RANSAC) [1]. We iterate through our library of marks and all texture im ages associated with the OBJ file generated by the 3D scan ner. A mark is discriminated by first finding the SIFT keypoints between its reference image and a texture image, and then by using RANSAC to iteratively take random samples of these keypoints to find the best-fit model. RANSAC selects inliers, which we use for a tighter mark match. For each tex ture image, we save every detected mark’s corner and center points’ (u, v) coordinates. In C++ we map these 2D texture coordinates to 3D mesh locations. Finally, Matlab processes
We use several fastening techniques to attach functional com ponents. For electronics we create bosses to register parts in 3D space and use tabs mounted on flexure bearings, which parts snap into, to stay in place. These bosses and tabs are scaled to meet the interior surface of the shell. For mechan ical components mounted on the exterior of the object, such as hinges, we print internal geometry to capture a hex nut, allowing a machine screw to fasten the part.
Figure 5. For each physical component (a), we store several metadata: b) approximate component geometry, c) clearance information (here: extends below component for ribbon cable connection), and d) mounting geometry. We then e) fabricate this geometry (shown from back).
106
For multi-part components which attach two separate objects—for example the servo, which is mounted on one ob ject and moves another object—we use a and b marks. In placement, these marks generate unique geometries for inter facing with the two sides of the component.
Safe Box
The box, described in Designing with Makers’ Marks, was modeled with cardboard tubes wrapped in paper and cus tomized with clay, showing the variety of materials that can be used to design with M-Marks. The box combines mechan ical and electronic features seamlessly — users simply print out different sticker marks. The speaker component’s aes thetic feature, the grill pattern which cuts through the shell, implies that beyond functional components M-Marks can add purely aesthetic components to assemblies.
Assembly Structures
Generated geometry can assist in assembly, like parting lines (to cut objects in half) and fasteners (to re-attach the halves). Some user-specified components define a particular parting line implicitly: e.g., a hinge only works when straddling a break in the object. In cases where such components are not used, users can specify a parting line using annotations. Plac ing two parting line annotations on opposing sides of the ob ject increases precision in estimating line orientation (we take the average parting plane defined by such annotations).
Video Game Controller
Most game controllers are not designed for a specific user and can be too big, too small, or just uncomfortable.We mod eled a clay controller to fit one author’s hands perfectly and processed it using M-Marks: dual joysticks and buttons can control video games. Users can quickly iterate during the prescan clay phase, as tangible manipulation has a low barrier.
We employ three methods to re-join the halves of a shelled assembly. The simplest uses adhesive and no additional ge ometry. We can also generate internal mounting bosses to allow for repeatable access to the interior of the objects (see Figure 6a): to do so we create a uniform field of bosses run ning perpendicular to the calculated parting plane, then re move bosses from this field that intersect with user-placed components and intersect the pruned field with the target ge ometry. Third, we can create a “lip” to assist in alignment, generated using the 2D cross-section of the object’s parting plane. We vertically extrude this outline, offsetting the inner edge to create a 1.5mm thick “lip” (see Figure 6b).
Animated Left Shark
We sculpted a bust of Left Shark3 to make an animated smart toy. We annotated its arm and bust with a two part servo sticker and its chest with an IR rangefinder sticker. After printing and assembly, Left Shark waves when you walk close. This example highlights using two-part marks to po sition two pieces relative to each other that can be sculpted independently, i.e., the shark body and fin. Friendly Baby Monitor
We created a friendly baby monitor from a popular children’s toy shaped like a potato. It has a Raspberry Pi and camera in side, and holes punched through the surface to allow cribside attachment and WiFi connectivity. We sculpted additional nose space to fit the camera, but were able to use the rest of the body as-is, indicating that even makers without sculpting expertise can create interesting and unique functional objects with the M-Marks system.
Fabrication and Assembly
Makers’ Marks produces hollow component pieces: users print these, remove support material, mount components, and fasten separated parts with hinges or bosses. M-Marks models have potentially-complex overhangs due to both shelling and inclusion of mounting geometry at arbitrary angles. Thus, fabrication using a 3D printer that can lay down a removable support material is preferable. While most such machines are still limited to the professional market, makerclass printers with multiple extruders are already available, e.g., the Makerbot Replicator 2X. Machines using alternative technologies, like sintering powders or curing liquids, may also be compatible with the generated shapes.
LIMITATIONS AND FUTURE WORK
Makers’ Marks has several important limitations. First, 3D scanning only captures surface geometry. Internal geome try is invisible to the scanner—instead, we rely on simple shelling to create objects with space for mounting additional components. While some of our library parts, e.g., the RPi, sit entirely inside a printed object, their location has to be in dicated on the outside. 3D scanning also requires some user expertise for cleaning meshes: this hurdle is outside our scope and will likely improve with scanning software.
EXAMPLE OBJECTS
To validate our tool, we created several functional, interactive objects using M-Marks. We scanned these on a NextEngine 3D scanner and printed them on a Stratasys uPrint SE Plus.
Adhering stickers to an object’s surface has limited precision as stickers do not fully conform to underlying object geom etry. Thus, indicating precise orientation, like a parting line running orthogonal to a surface, can be challenging. M-Marks requires a parts library. Some suppliers provide 3D models of their parts: these only need additional clearance and mounting metadata. This currently requires measurement and CAD expertise, but is only needed once per part. Future
Figure 6. We create bosses (a) that avoid components. These bosses can be fastened together with threaded inserts and screws. We can also create “lips” (b) that help with alignment along a parting line.
3 http://knowyourmeme.com/memes/ super-bowl-xlix-halftime-shark
107
work could explore enabling broader cross-sections of users to add and contribute to such part libraries, or devise algo rithms to synthesize mounting geometry automatically.
objects with a single photo. In Sketch-Based Interfaces and Modeling Symposium ’10, 17–24. 9. Lee, J., Su, V., Ren, S., and Ishii, H. HandSCAPE: a
vectorizing tape measure for on-site measuring
applications. In CHI ’00, 137–144.
Our vocabulary of marks can also be extended. We currently focus exclusively on component and parting marks for inte grating off-the-shelf components. Future work could investi gate marks that express other attributes—such as surface tex ture. Another potential avenue could explore combining MMarks with other sensing techniques for fabricated objects, e.g., the computer vision-based techniques of Sauron [15] or the acoustic techniques of Acoustruments [6].
10. Lee, J. C., Avrahami, D., Hudson, S. E., Forlizzi, J., Dietz, P. H., and Leigh, D. The Calder toolkit: Wired and wireless components for rapidly prototyping interactive devices. In DIS ’04, 167–175. 11. Lowe, D. G. Method and apparatus for identifying scale invariant features in an image and use of same for locating an object in an image. US Patent 6,711,293, 03 2004.
CONCLUSION
We presented Makers’ Marks, a tool which processes physi cal markup of real-world sculpted designs, adding mounting points for mechanical and electronic components and embed ding knowledge of the fabrication process. Makers’ Marks is informed by the results of a formative design study with 3D design novices. We additionally demonstrated a series of design examples created using Makers’ Marks.
12. Mueller, S., Mohr, T., Guenther, K., Frohnhofen, J., and Baudisch, P. faBrickation: fast 3D printing of functional objects by integrating construction kit building blocks. In CHI ’14, 3827–3834. ´ ost, R., Whiting, E., Lefebvre, S., and 13. Prev Sorkine-Hornung, O. Make it stand: Balancing shapes for 3D fabrication. ACM Trans. Graph. 32, 4 (July 2013), 81:1–81:10.
ACKNOWLEDGMENTS
This material is based on work supported by the NSF un der Grant No. DGE 1106400, a Sloan Fellowship, and the CITRIS Connected Communities Initiative. The authors also thank Evan Savage and Eldon Schoop.
´ 14. Resnick, M., Maloney, J., Monroy-Hernandez, A., Rusk, N., Eastmond, E., Brennan, K., Millner, A., Rosenbaum, E., Silver, J., Silverman, B., et al. Scratch: programming for all. CACM 52, 11 (2009), 60–67.
REFERENCES
1. Fischler, M. A., and Bolles, R. C. Random sample
consensus: A paradigm for model fitting with
applications to image analysis and automated
cartography. CACM 24, 6 (June 1981), 381–395.
15. Savage, V., Chang, C., and Hartmann, B. Sauron: Embedded single-camera sensing of printed physical user interfaces. In UIST ’13, 447–456. 16. Schmidt, R., and Singh, K. Meshmixer: an interface for rapid mesh composition. In ACM SIGGRAPH 2010 Talks, ACM (2010), 6.
2. Follmer, S., Carr, D., Lovell, E., and Ishii, H. CopyCAD: remixing physical objects with copy and paste from the real world. In UIST ’10 Adjunct, 381–382.
` F., Hu, C., and Lipson, H. 17. Song, H., Guimbretiere, ModelCraft: capturing freehand annotations and edits on physical 3D models. In UIST ’06, 13–22.
3. Follmer, S., and Ishii, H. KidCAD: digitally remixing
toys through tangible tools. In CHI ’12, 2401–2410.
4. Gupta, A., Fox, D., Curless, B., and Cohen, M.
Duplotrack: a real-time system for authoring and
guiding duplo block assembly. In UIST’12, 389–402.
18. Villar, N., Scott, J., Hodges, S., Hammil, K., and Miller, C. .NET Gadgeteer: A platform for custom devices. In Pervasive 2012, Lecture Notes in Computer Science (2012).
5. Jacobson, A., Panozzo, D., Glauser, O., Pradalier, C.,
Hilliges, O., and Sorkine-Hornung, O. Tangible and
modular input device for character articulation. In
SIGGRAPH ’14 Emerging Technologies, 24.
19. Weichel, C., Alexander, J., Karnik, A., and Gellersen, H. SPATA: Spatio-tangible tools for fabrication-aware design. In TEI ’15, 189–196.
6. Laput, G., Brockmeyer, E., Hudson, S. E., and Harrison, C. Acoustruments: Passive, acoustically-driven, interactive controls for handheld devices. In CHI ’15, 2161–2170.
20. Weichel, C., Lau, M., and Gellersen, H. Enclosed: a component-centric interface for designing prototype enclosures. In TEI ’13, 215–218. 21. Weichel, C., Lau, M., Kim, D., Villar, N., and Gellersen, H. W. MixFab: a mixed-reality environment for personal fabrication. In CHI ’14, 3855–3864.
7. Lau, M., Ohgawara, A., Mitani, J., and Igarashi, T. Converting 3D furniture models to fabricatable parts and connectors. In ACM Trans. Graph., vol. 30, ACM (2011), 85.
22. Willis, K., Brockmeyer, E., Hudson, S., and Poupyrev, I. Printed optics: 3D printing of embedded optical elements for interactive devices. In UIST ’12, 589–598.
8. Lau, M., Saul, G., Mitani, J., and Igarashi, T.
Modeling-in-context: user design of complementary
108