May 1, 2010 - Windows XP. ⢠Blender 2.49b ... At least if you use Windows, chances are high that Blender uses absolute
Short Check List for Getting Files from Blender into RailSimulator and RailWorks AndiS May 1st, 2010
Introduction This is a reductionist approach at touching the most important bits for the experienced users, cutting out any Blender issue not directly related to the exporter. I use • Windows XP • Blender 2.49b • Python 2.6.2 • Bigex V2.0.157. If something looks different on your computer, it might be worthwhile checking the versions first.
Making Blender use relative paths At least if you use Windows, chances are high that Blender uses absolute paths, which cannot work in our case.
Texturing in Blender You fare best if your texture is in a folder named “textures” which sits besides your Blender project. Be sure to use TGA.
Defining materials for the exporter
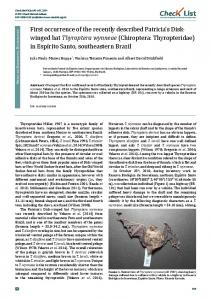
Be sure that we have but one UV Texture.
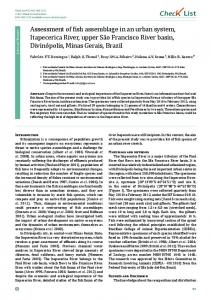
All simple textures require two entries on the Blender texture list. The first defines nothing but the shader name. Having Texture Type at None is fine.
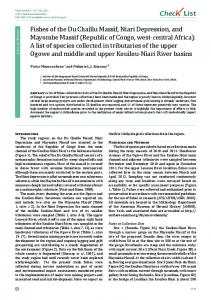
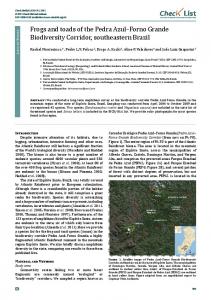
The second one defines the texture filename. Click on the empty entry below the first one (which will be labelled TrDiff or Tex or some other valid short form of a shader name). Now, click the Add New Button. I changed the name of this new texture immediately to Image, but this is just because I can't stand having Blender calling it Tex again. Next, set Texture Type to Image. Then, at the right, click on the icon above the folder symbol and select your TGA from the pop-up list. The important bit here is that you see //textures\WhateverTextureFile.tga. If you see a full (absolute) path, you forgot to set the relative path use at the start.
Exporting Bring up the exporter from the File - Export menu.
Don't worry about all the controls in the GUI. Just click the “Export IGS” button. Contradicting the line above, the “Std IGS Name” button is handy if X.blend should always produce X_exp.IGS. Be sure that either nothing is selected, or exactly those objects are selected which you want to export. Hidden objects don't export.
Creating a blueprint First, convert the TGA to ACE. Then, in either Rail Simulator or Railworks folder create: Source\MyProducerName\MyProduct Source\MyProducerName\MyProduct\textures Copy the IGS to Source\MyProducerName\MyProduct. Copy the ACE to Source\MyProducerName\MyProduct\textures. Start the blueprint editor and navigate to the IGS. Right-click, select “New shape blueprint” and from the dialogue box “Scenery blueprint”. Give it a name, set category to clutter, then save and export. If there is a complaint about the texture file, or if the object shows with the “texture missing” texture, then something went wrong with the path. To find out about it, add .bin to the GeoPcDx file name. Convert with serz.exe, and find texture reference near the start of the file.