This tutorial will explain how to setup UnityJDBC and the MongoDB JDBC driver
in NetBeans. The tutorial assumes that you have already setup MongoDB and ...
Using UnityJDBC and MongoDB JDBC Driver with NetBeans This tutorial will explain how to setup UnityJDBC and the MongoDB JDBC driver in NetBeans. The tutorial assumes that you have already setup MongoDB and configured it to accept connections. This tutorial was written by Rafael Rios and edited by Ramon Lawrence. For more information or help, contact
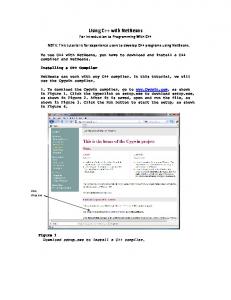
[email protected]. 1) Register the MongoDB JDBC Driver In NetBeans a. Add New JDBC Driver for MongoDB ‐ In the Services menu, right click on Drivers and select New Connection… from the menu.
b. Add the driver files for your New JDBC Driver ‐ Click the Add… button and select the mongo_unityjdbc.jar and mongo‐java‐driver‐2.11.2.jar files.
UnityJDBC and MongoDB JDBC with NetBeans
Page 1
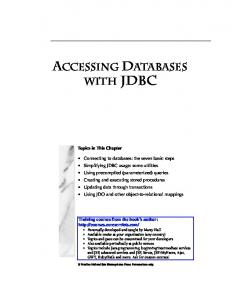
c. Click Find button to get Driver Class name: mongodb.jdbc.MongoDriver. Enter a name for the driver such as “Mongo” and click OK.
d. You will notice that your new driver is in the drivers list.
UnityJDBC and MongoDB JDBC with NetBeans
Page 2
2) Connecting to a MongoDB Source using the JDBC Driver a) In the Services menu, right click on Databases and select New Connection… from the menu.
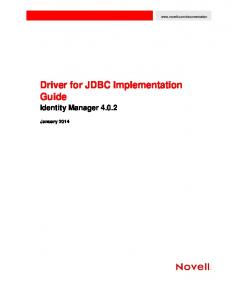
b) Select the Mongo driver, notice that jar files appear automatically. Click Next.
c) Type your MongoDB user name and password. The JDBC URL is of the form: jdbc:mongo://:/ such as jdbc:mongo://localhost/tpch Click on Test Connection to test that the connection is OK. Then click Finish.
UnityJDBC and MongoDB JDBC with NetBeans
Page 3
d) Your Database connection is now ready for use.
3) Creating a JDBC Resource and JDBC Connection Pool a) Start your Server (Glassfish in this case).
b) Type Ctrl + N. Select GlassFish from Categories and JDBC Resource from File Type. Click Next. Select Create New JDBC Connection Pool, enter JNDI Name & Description (optional), and click Next.
UnityJDBC and MongoDB JDBC with NetBeans
Page 4
c) In Properties, click Next.
d) In Choose Database Connection, enter your JDBC Connection Pool Name and select the MongoDB or UnityJDBC database in Extract From Existing Connection drop‐down list. Click Next.
e) In Add Connection Pool Properties, enter mongodb.jdbc.MongoDataSource in Datasource Classname, Description (optional), User, Password, PortNumber, etc. and click Finish. f) These steps will create the file glassfish‐resources.xml under Server Resources in the Projects tab.
UnityJDBC and MongoDB JDBC with NetBeans
Page 5
g) Under GlassFish Resources, you will see a new JDBC Resource and a new Connection Pool created. Note: This can take some time, so you may need to wait a minute and refresh.
UnityJDBC and MongoDB JDBC with NetBeans
Page 6
4) Verifying that you can ping a connection in GlassFish server. a) First Restart Glassfish. After that Start your Admin Console for Glassfish “View Domain Admin Console”.
b) At Glassfish Console Server, select JDBC Connection Pool, double click on your JDBC Connection Pool, and click in Ping option at your right and you must observe at the top.
UnityJDBC and MongoDB JDBC with NetBeans
Page 7