feeds, a user needs to have the Administrator, Accountant/Bookkeeper or.
Banking role assigned. AccountRight Live login details (my.MYOB). AccountRight
Live ...
(-eBook-) Windows Live Mail Help 1-828-668-2992 And Support Guide: Windows Live Mail Help ... personal personal computer
Windows 7 and Windows Vista. Getting Started. Windows Live Movie Maker is a basic video editing application that is avai
Windows 7 and Windows Vista. Getting Started. Windows Live Movie Maker is a
basic video editing application that is available to all users of Windows Vista ...
should have already been provided to you by Ellipse. Please contact us before
beginning, if you do not have this information. 1. Start by opening Windows Mail.
HIGH-SPEED. INTERNET. Connection and. Windows Mail. Set Up for. Windows
Vista. Users. Page 1. Form # PLD 475 01-10. 405-375-0786. 1-800-375-8903.
Note: If you have trouble sending email, please use your. ISP's outgoing mail ...
Windows Mobile will attempt to automatically configure your email settings.
Microsoft Exchange Hosted Filtering. •. Windows Mail (Windows Vista) and
Windows Live Mail Desktop Client. •. Windows Live Hotmail / MSN Hotmail.
updates on helpful products like for example how to purchase Birdie ... CSGO How to download and use FaceI Replay's / De
Page 1. >338+Get Free: 'Windows Live Mail Backup8' Cracked Version.
Feb 24, 2005 ... Installing multiple instances of OpenOffice.org with the same version number. .....
The app-office/openoffice-bin package, if available for your ...
When using your printer, the following safety precautions should always be fol-
lowed. .... USB Port. Use a USB cable to connect the printer to a host computer. 9.
Install Android System Images and Tools (30 min). Create an Android ... Accept the license agreement to download and loc
The Yellow LED will be blinking indicating that the thermostat is ready to be
configured for your home network. STEP 1. On your Windows XP based PC, click
on.
Wireless Network Setup Guide for GovWiFi –. Windows 7 platform (English). •.
Select "Start" > "Control Panel". 1 of 16. Page 2. •. In "Control Panel Home", under
...
Windows Live SkyDrive http://skydrive.live.com. 25 GB of free storage on
Windows Live. With SkyDrive, it's easy to store and share your files and photos
with ...
Whichwindows 7 mail. programis best?. Setting automaticsend receiveinmicrosoft windows live mailfor. Page 2 of 2. window
Page | 1. Last Revised: 3.14.2012. Furman University. Office 365 iPhone Mail
Setup. 1. Open your Safari web browser on your iPhone and navigate to the ...
E-mail Setup for Outlook XP. Outlook XP (2002) is the e-mail client that ships with
Microsoft Office XP (2002). This is another option for users who do not wish to ...
Default. Firmware version. 1.0. Print set (DPOF). Default. Nikon D7000 Setup
Guide. Nikon D7000 Setup Guide. For Nature, Landscape and Travel
Photography.
b k. B. Nikon D3 Setup Guide. Nikon D3 Setup Guide. For Nature, Landscape
and Travel Photography. For Portrait and Wedding Photography. Exposure Mode
.
Shooting Menu Bank. A a10 AF-ON MB-D200. AE/AF-L+Focus Area. Shooting
Menu Bank. B a10 AF-ON MB-D200. AE/AF-L+Focus Area. Menu Reset. Default.
Nikon D300s Setup Guide. Nikon D300s Setup Guide. For Nature, Landscape
and Travel Photography. For Portrait and Wedding Photography. ISO. 200 - 1600
...
This guide is for students who need to edit, compress and upload their videos to
the ... The following tutorial is for Windows Live Movie Maker on. Windows 7 and
...
account in Windows Live Mail using POP. POP is the acronym ... Leave
messages on the server - this keeps a copy of your mail on the server so you can
access ...
Windows Live Mail POP Setup Guide
Windows Live Mail – POP Setup Guide
Page 1 of 8
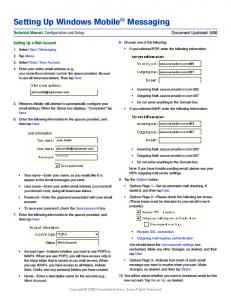
A. Introduction This document shows the step by step instructions on how to configure your NUS email account in Windows Live Mail using POP. POP is the acronym for Post Office Protocol which defines a method for mail retrieval. POP allows you to either:
Leave messages on the server ‐ this keeps a copy of your mail on the server so you can access your mail from any client that connects to the server Remove messages from server ‐ this downloads your mail to the local hard disk where your client resides and deletes the messages from the server. This will clear up your disk space on the server. Note that for this option the messages are not accessible from anywhere else except your local hard disk.
Limitations of POP3:
Messages are not accessible from another client once they are downloaded to the local hard disk, therefore it is ideal when only one workstation is used for mail retrieval. Not able to manage folders other than the Inbox folder Not able to transfer only selected parts of a message (e.g. the text portion of a multimedia mail message)
B. Configure POP on Windows Live Mail 1. Please ensure that you have access to the internet first. Then from Windows Live Mail, click on Tools > Accounts...
Windows Live Mail – POP Setup Guide
Page 2 of 8
2. Click on Add...
3. Select Email Account and click Next.
Windows Live Mail – POP Setup Guide
Page 3 of 8
4. Enter your NUS email address, your NUS email password and your name. Tick on “Manually configure server settings for e‐mail account”. Click Next.
5. Select POP for “My incoming mail server is a ____ server” and enter the following: Incoming server: pop.nus.edu.sg Tick on This server requires a secure connection (SSL) to change the port number to 995. Outgoing server: smtp.nus.edu.sg Tick on This server requires a secure connection (SSL) and change the port number to 587. Tick on My outgoing server requires authentication. Click Next.
Windows Live Mail – POP Setup Guide
Page 4 of 8
6. Click Finish.
Windows Live Mail – POP Setup Guide
Page 5 of 8
7. Select the account which you have just created and click Properties.
8. Click the Servers tab and under Outgoing Mail Server, click on Settings…
Windows Live Mail – POP Setup Guide
Page 6 of 8
9. Select Log on using. Account name: domain\your email UserID For example, if you are a staff, enter nusstf\ccetest1 if you are a student, enter nusstu\a0012345 if you are a visitor, enter nusext\ccev123 Password: your NUS email password Click OK.
10. Click the Advanced tab and under Delivery… You may want to tick on the following options: Leave a copy of messages on server ‐ This keeps a copy of your mail on the server so you can access your mail from any client that connects to the server. Note: If your mailbox on the server is full, you will not be able to receive new emails. Remove from server when deleted from ‘Deleted Items’ – this will remove the copy of your email from the server after its local copy on your computer has been deleted. Click OK.
Windows Live Mail – POP Setup Guide
Page 7 of 8
11. Click Close. 12. You could now start using Windows Live Mail to receive and send emails with your NUS account.