MAKE THE SEASON SPARKLE WITH CORAL TREE CAFÃ'S CATERING ... APPLES, GOAT CHEESE, WATERCRESS, APPLE CIDER VINAIGRETTE. S
Hazari Kebabs. Chicken chargrilled in the Tandoor with a marinade of Cumin, Ginger, Cashew nuts & Cream. Shahjani Pa
Intrusion Alarm Systems | DS7140 Alpha Keypad. DS7140 Alpha Keypad www.
boschsecurity.com. Ordering information. DS7140 Alpha Keypad. Order number
...
Servicing - The user should not attempt to service the appliance beyond that described ..... OS UPDATE PORT - Port used
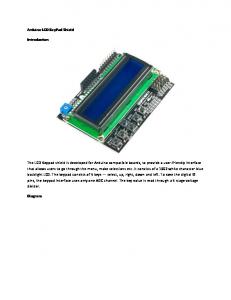
Introduction. The LCD Keypad shield is developed for Arduino compatible boards
, to provide a user-friendly interface that allows users to go through the menu, ...
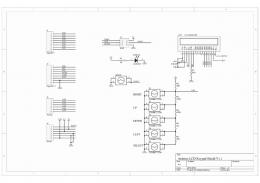
Figure 1: Keypad 4x4. Figure 3: Keypad 4x4 connection schematic. Figure 2:
Keypad 4x4 connected to development system. A far easier way to load data by ...
keypad section on a computer keyboard. ... The PC USB connection provides
communication and power to the USB ... Figure 4 illustrates the USB keypad
block diagram. FIGURE 4: ... The PIC16F1459 device contains a full-speed (12
Mb/s).
Membrane Keypad 16 Key (Matrix 4X4). Feature ... Circuit Rating: 35VDC,
100mA ... The Arduino Keypad library is available from the Arduino Playground.
KEYPAD LIBRARY IN MICROC. ○ The mikroC PRO for PIC provides a library for
working with 4x4 keypad. The library routines can also be used with 4x1, 4x2, ...
4 x 4 Matrix Keypad Encoder IC ... The EDE1144 Keypad Encoder IC is designed
to interface a matrix-type 4 row x 4 .... Figure One: Connection Block Diagram.
Figure 1: Keypad 4x4. Figure 3: Keypad 4x4 connection schematic. Figure 2:
Keypad 4x4 connected to development system. A far easier way to load data by ...
Dec 16, 2011 ... 4x4 Matrix Membrane Keypad (#27899) v1.2 12/16/2011 Page 3 of 5.
Connection Diagrams. Figure 2. For use with the BASIC Stamp example ...
16-11141. When assembling your Skins Game Universal Conversion Kit (34042),
note that the Keypad Harness (H-23445.2) has similar connectors at each end.
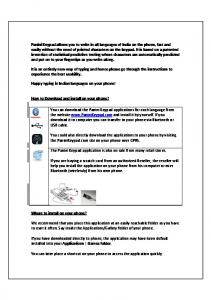
Panini Keypad allows you to write in all languages of India on the phone, fast and
easily without the need of printed characters on the keypad. It is based on a ...
Design Series XTreme Keypad. Features: * 1ir'aridal Hesistant Metal Case. I
Sealed For Indoor or |Dutdoor Applications. I No Moving Parts. I Touch Sensitive
...
Extention 72C/4 minute/each cycle with extention of 3 sec per cycle. Final extention: 72C/10 minutes at the end of PCR-PROGRAM. Soak PCR tubes at 4C or ...
Study of external morphology of cockroach through virtual images/models.
Prescribed Books: 1. 2. Biology Part I, Class Xl, Published by NCERT. Biology
Part II ...
manual. Para ligar o seu equipamento de navegação, mantenha o botão Ligar/
..... Percurso pedestre - um percurso concebido para fazer a viagem a pé.
Sep 11, 1998 - high generation of vehicle miles of travel (Frank and Stone, 1998; Holtzclaw et ...... technology, and business in a diligent quest for excellence. .... family apartments, and 10,000 feet of specialty retail would cause an 18.7 ...
Sep 1, 2012 ... Analog 1 Setup ->. Analog 1 = X.XXXX V ... Dig I/O 1 Setup ->. Digital I/O 1 = 1.
Mode [Digital Input ]. Trg Fnt[0. ] ... SDI-12 Task Option ->. SDI-12 ...
XL SERIES KEYPAD MENU TREE (Page 1 of 3) Stage = X.XX
Scanning...
PtTemp =
Scanning...
XX.XX
Keyboard Operations
Battery= XX.XX Sensor Input Setup->
September 2012 Version 4.44
Stage Setup
->
Stage
[X.XXX ]
Offset [0.00
The ENTER Key has three functions:
]
Stage Units[Feet
]
I. Pressing the ENTER Key while in the "Stage =" or "Pressure =" fields will start making a pressure measurement of these parameters. This provides the user with a current stage and pressure reading.
Averaging Time [001] Datum [0.000] PtTmp Sensor Setup ->
Pt Temp Units[Deg C ]
Counter Setup
Counts
->
[X.XXX
Total Cnt
II. The ENTER Key enables you to open fields that can be modified or changed. These menus have a "[ ]" field in them. For Example, in the "" menu option there are three ouput options; "FLASH Card", "Chart Drive", or "Shaft Encoder". Each of these options can be changed to either "[ON]" or "[OFF]".
]
[X.XX
]
Reset Counters ? Ctr Slp[0.0100
III. The ENTER Key is used to accept edits or changes. For Instance, you have changed the STAGE Scalar from Slope: [+2.3067] to Slope: [0.70309] to change from feet to meters. You press the ENTER Key to accept this change.
I. The CANCEL Key works the same as the ESCAPE Key does on your computer. For example: you are editing a parameter and you decide not to make a change; you can press the CANCEL Key to abandon your edits.
Analog 1 = X.XXXX V Offset [0.000
]
Slope
]
[1.000
A1 Samples [500
]
Range
]
[5.0 V
II. The CANCEL Key also works as a homekey. Meaning, if you are in a sub-menu and wish to return to the upper menu, press the CANCEL Key. This also works if you wish to return to the top menu, the "Stage =" menu.
Differential Md [Off]
Frequecy Setup
->
Frequency = X.XXX Freq Slp[1.0000
The ARROW Keys (
]
Freq Ofst[0.0000 ]
**
Dig I/O 1 Setup
->
Dig I/O 2 Setup
->
I. The and ARROW Keys enable you to scroll from one menu to another. When you reach the bottom screen, the ARROW Key will no longer work. When you are at the top screen, the ARROW Key no longer works. Menus with a "->" on the right side of the display indicate that there are sub-menus associated to the current screen. Use the ARROW Key to access the sub-menus. Use the ARROW Key or CANCEL Key to exit a sub-menu.
Digital I/O 1 = 1 Mode [Digital Input Trg Fnt[0
]
]
Pulse Length [1000 ] WarmUp Delay [250
]
Test Quad Out? Encoder Setup
->
SDI Transparent
Enc Out Src [None
->
II. The and ARROW Keys enable you to scroll through the options within a menu. For example, you want to change the output option from "FLASH Card:[Off]" to "FLASH Card: [On]". You use the and ARROW Keys to make your selection.
]
Enc Iu Val[X.XXXX
]
Enc Iu Slp[0.01000
]
) have four functions:
III. When Editing numerical parameters, the and ARROW Keys also let you increase or decrease the flashing digit by one. They also toggle the "+" and "-" signs.
SDI-12 Test Adrs[0] Send Ack Cmd?
IV. The and ARROW Keys let you move the cursor back and forth across the screen when you are editing a numerical menu such as the slope and offset. The digit or blank space will flash to let you know where the cursor is.
Send ID Cmd? Send Verify Cmd? Send Measure Cmd? Send Data 0 Cmd? Send Extended Cmd? Ext Cmd[XX] Set SDI12 Line High? SDI-12 Task Option
->
SDI-12 Tasks Table
->
->
->
->
. . . Value
2 - 10
[0.00]
Use Tmout Valu [Yes}
Address
[0]
. . . Address
Parameter 1
[1]
. . . Parameter 2 – 10
[1]
Meas Type
[M]
. . . Meas Type 2 – 10
[M]
. . . Scan Task 2 - 10 2 - 10
[0]
ComPort 1
[SDI-12]
. . . ComPort
2 – 10
[SDI-12]
SDI-12 Test Adrs[0]
Slope 1
[1.00]
. . . Slope
2 – 10
[1.00]
H310 Stage [XX.XXX ]
Offset 1
[0.00]
. . . Offset
2 – 10
[0.00]
H310 Units[Ft
H-330 Setup
[0.00]
Scan Task 1
Reset to Defaults
H-310 Setup
Value 1
Timeout Val [0.00]
]
SDI-12 Test Adrs[0] H330 Stage [XXXXXXX] H330 Units [Ft CW
Output Options
->
Logging Options
]
->
Auto Print [Off]
GOES Options
Logging
Source 1
[Date ]
->
. . . Source 25
[Date ]
.NEW File [None]
[On ]
Header 1
[MM/DD/YY]->
. . . Header 25
[MM/DD/YY]->
Data Fmt
Log Rate 1 [HH:MM:SS]->
. . . Log Rate 25[HH:MM:SS]->
Digits 1
->
. . . Digits 25
Col 1 Fn() [Now ]
->
. . . Col 25 Fn()[Now ]
->
Stat Scrn 1[No ]
->
Stat Scrn 25[No ]
->
[Normal]
Report Options ->
->
[X ]
Radio Type [SE-1200]
ST Channel [000]
GOES Mode
[Off]
ST Rate
[HH:MM:SS]
GOES Time
[HH:MM:SS]
ST Offset
[HH:MM:SS]
GOES Adrs
[XXXXXXXX]
ST Baud Rate [300]
GOES Preamble [Short]
ST Window
Self Timed Options
Center Data [No]
->
[X ]
->
->
[15] Sec
ST Data Fmt [SHEF] Data Order
[SCAN]
Data First
[Newest]
Send SHEF Codes [No] Append Bat Value [No] Extra Data Sets [001] ST Data Opts
* Analog 2, 3, & 4 are the same menu structure as Analog 1, but don't include the "Differential Md [Off]" function. ** Dig I/O 2 Setup is the same menu structure as Dig I/O 1 Setup