ECDL Module 4 ... seven modules of the ECDL Syllabus (Version 3.0). ...... When
this formula is copied into cells C7:C12, the formula updates as shown.
ECDL Module 4 Document 354 Version 2
Information Systems EISD
Information Systems Part of the Education & Information Support Division Title:
Excel 2002 (XP) Part 2
Authors:
Rachel Healy and Fiona Strawbridge
Reference:
Doc 354 v2
ECDL:
Module 4 Spreadsheets (Part 2 of 2)
Date:
September 2002
Revisions:
Adapted from: Intermediate Excel 5.0 by Rachel Healy. Updated for Excel 2002 (XP) in August 2002 by Fiona Strawbridge and Tamsin Griffith.
Abstract Microsoft Excel is a spreadsheet application used for manipulating and calculating numerical data. This workbook is aimed at users who have some knowledge of spreadsheets and of the Excel package, and/or have completed the Excel Part 1 course. It has been designed to accompany the Information Systems Excel Part 2 course (see www.ucl.ac.uk/is/training for course details) and it can be used as a self-paced tutorial.
The European Computer Driving Licence (ECDL) Excel Part 2 is the second of two workbooks designed to cover the ECDL Module 4 Spreadsheets syllabus. It is one in a series of workbooks designed to cover the seven modules of the ECDL Syllabus (Version 3.0). For further information, visit the ECDL web pages at www.ucl.ac.uk/is/training/ecdl.htm
Pre-requisites It is assumed in this Workbook that you have the requisite keyboard skills and knowledge of a PC including file management, and that you are familiar with the basic uses or Excel including data entry, simple use of formulae and functions, and formatting. If you are unfamiliar with any of these topics, please consult the other workbooks in the series.
Please Note Excel 2002 can be accessed from UCL Information Systems (IS) PC Workstations running WTS1. It is assumed in this Workbook that you are a registered user (i.e. you have an IS userid and password) using a PC on the Information Systems WTS Service. Microsoft is a registered trademark and Windows is a trademark of Microsoft Corporation. Screen shots re-printed by permission from Microsoft Corporation.
1
WTS is the Windows Terminal Service which provides a Windows 2000 environment.
Spreadsheets
Excel
Contents 1.
Introduction.......................................................................................................................1
2.
Data Management With Lists ..........................................................................................2 2.1 2.2 2.3
3.
To Create a List...........................................................................................................2 Sorting Records in a List.............................................................................................2 Simple Filters ..............................................................................................................5
Subtotals.............................................................................................................................8 Task Three – Subtotals ...........................................................................................................9
4.
The Logical IF Function.................................................................................................10 Task Four – Logical IF .........................................................................................................10
5.
Conditional Formatting..................................................................................................11 Task Five – Conditional Formatting .....................................................................................12
6.
More Formulae – Absolute References.........................................................................13 6.1 Important Points to Remember .................................................................................13 6.2 The Order of Precedence ..........................................................................................13 6.3 Cell Referencing Systems .........................................................................................13 Task Six – Absolute Referencing .........................................................................................16
7.
Working With Names .....................................................................................................17 7.1 Default names ...........................................................................................................17 7.2 To Define a Name Range..........................................................................................17 Task Seven – Using Names ..................................................................................................18
8.
Using Comments .............................................................................................................19 8.1 Creating Comments ..................................................................................................19 8.2 To Display Comments ..............................................................................................19 8.3 To Print Comments ...................................................................................................19 Task Eight – Comments........................................................................................................20
9.
Paste Special ....................................................................................................................21 Task Nine – Paste Special.....................................................................................................22
10. Working with Workbooks..............................................................................................23 10.1 What are Workbooks?...............................................................................................23 10.2 Selecting in a Workbook...........................................................................................24 10.3 Entering Data ............................................................................................................25 Task Ten - Worksheets .........................................................................................................26 10.4 Managing Worksheets ..............................................................................................27 10.5 Moving and Copying in Workbooks.........................................................................30 10.6 Referencing Cells in Different Sheets.......................................................................31 10.7 Consolidating Data held on Different Sheets............................................................31 Task Eleven – More Worksheets ..........................................................................................32
UCL Information Systems
i
Excel
Part 2
11. Templates.........................................................................................................................33 11.1 Creating a Template..................................................................................................33 11.2 To Use a Template ....................................................................................................34 Task Twelve - Templates......................................................................................................35 12. Charts...............................................................................................................................36 12.1 Chart Terms ..............................................................................................................37 12.2 Choosing An Appropriate Chart Type......................................................................38 12.3 Creating Charts using the Chart Wizard ...................................................................39 Task Thirteen – Charting Category Data ..............................................................................44 Task Fourteen – Charting Relationships Between Numerical Data .....................................44 12.4 Changing the Appearance of the Chart.....................................................................45 12.5 Re-sizing Charts & Chart Objects.............................................................................47 12.6 Adding & Removing Data Sets.................................................................................47 Task Fifteen – Amending an Existing Chart ........................................................................48 12.7 Plotting Non-adjacent Cells ......................................................................................49 12.8 Plotting Error Bars ....................................................................................................50 Task Sixteen – Error Bars.....................................................................................................51 12.9 Printing a Chart .........................................................................................................51 Task Seventeen – Printing Charts .........................................................................................53 13. Exercises...........................................................................................................................54 Exercise 1 – Absolute References ........................................................................................54 Exercise 2 – Absolute References ........................................................................................55 Exercise 3 – Absolute References ........................................................................................56 Exercise 4 - Consolidating Data in a Workbook ..................................................................57 Exercise 5 - Revision of Worksheets & Functions ...............................................................58 Exercise 6 - Charts................................................................................................................59 Exercise 7 - Charts................................................................................................................60
ii
UCL Information Systems
Part 2
Excel
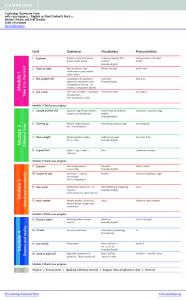
Conventions used in this Workbook The following table outlines the formatting conventions used in this workbook: Commands Commands to input Commands output Menu commands Buttons to press Enter/Return key Keys to press Key combinations Key sequences
Represented as Courier bold Courier regular Arial Narrow bold
[↵] enclosed in square brackets e.g. [Ctrl] or [Shift] square brackets with combined keys linked with plus sign e.g. [Ctrl +C] hold down the Control key and press C Press each key enclosed in brackets. e.g. [→] [→] press right arrow key twice in succession
Toolbar Tips Where possible a toolbar shortcut has been provided, shown in a bubble alongside the relevant text. This button can be used instead of the menu method described in the text.
Toolbar Tip Open
How to Use this Workbook This guide can be used as a reference or tutorial document. To facilitate the learning process, a series of practical tasks are contained within the text. You are recommended to try each of these tasks as you progress through the workbook to assist your learning. For further practice and as a means of self-assessment, a number of additional staged exercises, some with solutions, have been included. These should be attempted where recommended.
Training Files If you wish to attempt the exercises contained in this document and you are not using a training account it is necessary to download the training files used in this workbook from the IS training web site at: http://www.ucl.ac.uk/is/training/exercises.htm - full instructions on how to do this are provided here.
UCL Information Systems
iii
Part 2
Excel
1. Introduction This workbook is aimed at those who have a good understanding of the basic use of Excel for entering data, performing simple calculations and using simple mathematical functions. It also assumes that you know how to move around a worksheet, control worksheet display, and format a worksheet. These topics are all covered in our Excel Part 1 workbook which you may wish to refer to. We start by looking at how best to organise data in list form in a spreadsheet, and examine some of Excel’s data management tools for sorting, filtering and analysing data. We also look at ways of highlighting data which meet specified criteria, using logical functions and conditional formatting. We review the use of formulae which were introduced in Part 1, and look the use of absolute and named referencing systems for identifying individual cells and ranges of cells. The next brief section looks at the use of comments, which can make your spreadsheets easier to understand (and easier for others to use). This is followed by a short section on paste special which offers flexibility when copying information (not just data, but also formulae, formats and comments) within Excel. The next major section looks at multi-worksheet workbooks which can save time and help you organise similar types of information. This is followed by a brief look at Templates. The final section is devoted to the creating of graphs or chart for presenting numeric data in graphical form.
UCL Information Systems
1
Excel
Part 2
2. Data Management With Lists A list is a series of rows that contain similar data. A list can be thought of as a simple database where rows are records and columns fields. Once a list has been created, it is possible to search for certain items, to sort the data and carry out a variety of analyses.
2.1
To Create a List
When creating a list or database there are some simple guidelines which should be followed: • •
Avoid having more than one list in a worksheet. Leave at least one blank row and one column between the list and other data in the worksheet. Create column labels (headings) in the first row and place the data immediately below the headings. Do not leave empty rows or columns in the list.
• •
Excel recognises any list automatically as a database. An example of a list is shown below.
The column headings are the field names.
The rows are the records in the database
Figure 2-1 - An Excel List or Database
2.2
Sorting Records in a List
The records in a database are arranged in the order in which they were entered. It is possible to sort the records in a list into alphabetical, numeric or date order. You may order records in either ascending or descending order as required. To change the order in which the database is sorted, use one of the different sort methods outlined here:
Toolbar Tip Ascending Sort Descending Sort
2
UCL Information Systems
Part 2
Excel
1.
Select any cell in the database.
2.
From the Data menu choose Sort. The Sort dialogue box is displayed (Figure 2-2). The whole list is automatically selected - the column labels are used to identify the fields. It is possible to specify up to three Sort Keys. For each key it is possible to specify either an ascending or a descending sort.
2.2.1
To Sort on One Key
1.
In the Sort dialogue box, click on the down arrow in the Sort By box and select the required field.
2.
Specify either Ascending or Descending and click OK.
Use the Options button to sort by day of week or month of year, rather than alphanumerically.
Figure 2-2 - Sort Dialogue Box
2.2.2
To Sort on Multiple Keys
1.
In the Sort dialogue box, click on the down arrow in the Sort By box and select the required field.
2.
Then select the secondary key by selecting a second column/field label in the first Then By box and specify either Ascending or Descending.
3.
To sort on a third field, enter the field name in the remaining Then By box.
4.
Click OK. The data in the columns/fields are ordered according to Excel’s sort order: Numbers Text Logical values Error values Blanks
UCL Information Systems
3
Excel
Part 2
Primary Sort on Place Secondary Sort on Name
Figure 2-3 - Sort on Place and Name
The figure above shows a secondary key sort, the list is sorted on Place first and then on Name within Place. (Notice how the names are ordered within each place group.) 2.2.3
Sorting into Date Order
Note that if you want to sort on date, and the dates are presented in dd/mm/yy format, Excel will automatically recognise that this is a date, and sort appropriately. If, however, your dates are presented as months or days of the week, Excel may not recognise that these are dates, and you may need to use the Options button to reveal the Sort Options dialogue.
Figure 2-4 - Sort Options Dialogue
Task One – Sorting Data in Lists 1. Open the file club.xls from the R:\training.dir\excelp2 folder. 2. Sort the list in ascending order on the field Name. 3. Now re-sort the list in descending order on the field Place and then by the field Name. 4. Save the file.
4
UCL Information Systems
Part 2
2.3
Excel
Simple Filters
Filters can be created quickly and easily using the AutoFilter. The AutoFilter provides a simple way to find a subset of data in a list. When a list is filtered only those records matching the criteria are displayed. The AutoFilter provides more sophisticated search criteria than are available from within the Data form. 2.3.1
Filter a List Using AutoFilter
1.
Select a cell in the list.
2.
Select the Data menu, Filter and AutoFilter. The AutoFilter adds drop-down arrows directly to the column labels in the list, so you can select the item you want to display.
Drop down arrows appear in the column label cells
Click on a drop down arrow to display the filter options available
Figure 2-5 - AutoFilter
3.
Click on a down arrow to display all the unique items in that field.
4.
Select the item you want to find from the list. Rows containing that item will be displayed, while the others are hidden from view.
2.3.2 1.
To Redisplay All Rows Select the Data menu, Filter and Show All.
Example Click the pull-down list for the Place column and select Exmoor. All clients who live in Exmoor will be displayed. 2.3.3
To use the Custom Filter
1.
Select a cell in the list.
2.
Select the Data menu, Filter and AutoFilter.
3.
Click on the pull-down arrow in the chosen field to display all the unique items in that field.
UCL Information Systems
5
Excel 4.
Part 2 Select [Custom...]. The Custom AutoFilter dialogue box is displayed.
Figure 2-6 - Custom AutoFilter
5.
To enter a criterion, select a condition from the first box and enter a value in the second. In this example, the is greater than condition has been selected in the first box and then the year 1984.
6.
If you want to specify a second set of criteria, select either the And or Or operator and enter the second set of criteria and click OK. In this example, the is less than or condition has been selected in the second box and then the year 1990.
The records which meet these criteria will be displayed as shown below:
Figure 2-7 - Filtered Data
2.3.4
Specifying Criteria Using Wild Cards
Sometimes we may want to filter our data to match more than one specific item. For example, we may want to find people whose surname begins with the letter S. To carry out these filters we need to use wildcards. Those of you familiar with the Find Tool will recognise the wildcards used by Excel. Wildcard * ?
Matches Any character or number of characters Any single character
Example c* c??
matches cat, canary, cheetah, chimpanzee matches only cat
Note: Wildcards can only be used with text searche; do not use them with values.
6
UCL Information Systems
Part 2 2.3.5
Excel Viewing and Editing Filtered Lists
To work with long lists, you may find it easier to freeze areas of the worksheet, for instance, the field names at the top of the list, so that these are always visible. (Window menu, Freeze panes). A filtered list can be edited using the techniques normally used in a worksheet.
Task Two - Filters 1. Add the following records to the club.xls file: Name Hall Caruthers
Place Exmoor Saunton
Date of Birth 10/10/70 08/12/69
Year Joined 1997 1997
Paid to Date 100.00 150.00
Total Due 150.00 150.00
2. Using the Filter tool, list any club member who lives in Coombe Martin. 3. Using the Filter tool, list those records where the members joined in 1984. 4. Using the Filter tool, list those records where the members have paid and the year joined is between 1990 and 1995 (inclusive). 5. Save the file as club1.xls
UCL Information Systems
7
Excel
Part 2
3. Subtotals In Excel Part 1 we learned about the various arithmetic functions which allow you to add, average, find the minimum and maximum etc. of a series of numbers. Sometimes we want this sort of information broken down into groups. For example, in the club membership worksheet we might want to group the data by place and calculate the totals paid to date for each of the places (Woolacombe, Saunton etc.). To calculate subtotals, first you need to sort the list into the groups for which you require subtotals: 1. Sort the data using the column you wish to base your subtotal groups on (we need to sort by Place in this example). 2. From the Data menu choose Subtotals. The Subtotal window appears (Figure 3-2). 3. In the At each change in area select the column you want to group by (Place in this example). 4. In the Use function box choose the arithmetic function to apply (Sum in this case, but you could alternatively choose Average, Count, Max etc.). 5. In the Add subtotal to box, select the columns to Sum, Count etc. (the Total Due column in this case). Figure 3-1 – Club Data for Subtotalling
6. Click OK, and Excel calculates your Subtotals and adds them to the worksheet as shown in Figure 3-3.
Outline area
Figure 3-2 – Subtotals Window Figure 3-3 – Calculated Subtotals
8
UCL Information Systems
Part 2
Excel
7. Click on the – signs in the Outline area to hide the individual rows and show only the subtotals (Figure 3-4).
Figure 3-4 – Showing Subtotals Only
8. Click on the + signs to reveal the individual rows again.
Task Three – Subtotals 1.
Open the club.xls file.
2.
Sort the data into ascending order.
3.
Produce subtotals based on the Paid to Date column.
4.
Now produce subtotals for the Total Due column as well.
5.
Use the – signs in the Outline area to collapse the display so that only the rows containing the subtotals are shown.
6.
Save and close the file.
UCL Information Systems
9
Excel
Part 2
4. The Logical IF Function Excel’s logical IF function is used to check if a cell value satisfies a given criterion. It returns a value of TRUE if the criterion is met, or FALSE if not. You can specify what happens if the result is TRUE, and what happens if the result is FALSE. For example, might want to enter some text into a cell depending on whether the a value in a different cell value meets a specified condition. This can be achieved using the IF() function which has the following form: IF (logical-test, do-this-if-true, do-that-if-false) For example: IF (raining, take-umbrella, take-sunglasses) Note that the do-that-if-false part is optional, so we could simply have: IF (raining, take-umbrella) Using the student module marks data shown below in in Figure 4-1 below (left), a check for a failed test in cell D5 might be placed in cell E5 as follows so that when a student mark is a fail, the text “fail” is displayed. This can be achieved using the following IF statement: =IF(D5