How to configure IBM iAccess Client with OpenText HostExplorer.pdf ...
Recommend Documents
Page 1 of 8. OpenText HostExplorer emulator. Pre-Requisites. The versions specified in this document are not essential,
IBM Personal Communications Emulator ... The computer will need to be restarted at the end of the installation. IBM ...
IBM Personal Communications Emulator. Pre-Requisites. Minimum Blue ... The computer will need to be restarted at the end
collection with Audit and GFI. EventsManager™. This document explains how to
configure and use GFI. EventsManager to collect IBM iSeries (formerly AS/400).
This best practices document describes how to configure Nokia Mobile VPN
Client, when Nokia ... without the policy server (Nokia Security Service Manager).
2.
How to configure a PROFIBUS network with NetTool for PROFIBUS. SCM-7032-
044. Rev 1.20 www.anybus.com. HMS Industrial Networks AB. Page 1 (25).
How to configure an Anybus PROFIBUS Slave module with a Siemens Step7
PLC. SCM-7032-026. Rev 2.1 www.anybus.com. HMS Industrial Networks AB.
6 Oct 2004 ... How to Configure Cisco 2600 Routers ... Routing Protocol Configuration . ....
configuring interfaces up and routing part, which has manual.
Page 1 of 6. How to configure Attachmate. InfoConnect for use with Blue Prism. Introduction. Attachmate produce a number
Jun 10, 2004 ... This document includes configuring interfaces up and routing part, which has
manual for RIP (Routing ... The Cisco Software provides access to four different
command modes. ..... http://www.cisco.com/warp/public/104/25.pdf.
Figure 1: Authentication Service Network Configuration ... This page is used to
configure your Defender Security Server(s). 5. The Protocol option allows you to ...
A Wireless Distribution System (WDS) is the use of wireless repeating and bridging to interconnect Access Points (APs) in an IEEE 802.11 Ethernet network.
May 17, 2017 - and best practices of SAP and OpenText solutions. Seating ... Please check the Agenda Builder on the SAPP
How To Configure. Ham Radio Deluxe. To Upload Logs To. Logbook of The
World. If you need assistance with HRD please visit the. HRD web pages.
May 17, 2017 - Booth: 730. Orange County Convention Center | www.opentext.com/Sapphire ... Customer Engagement through C
How to Configure Adobe® Flex® Builder 3 to Develop Xcelsius 2008 Add-on Components Applies to: Xcelsius 2008 SP1 Adobe Flex Builder 3 . Summary .
Configure the Wireless Network Card . 1. If the IP Address of the computer and the IP Address of the printer are in the same range, open a web browser.
Spam email is a growing problem for today's Internet infrastructure. Besides many ... functions can reduce the amount of email they can send out. In this paper, we put ..... http://apnews1.iwon.com/article/20041114/D86BQ2JO0.html. 173 ...
Rocket Passport PC To Host emulator software 2011 b506. Passport Installation. After obtaining a copy of the installatio
migrating to Microsoft Office 365 ... following your migration to the Microsoft Office
365 (Office 365). .... Select Sign In and the Settings screen will expand.
HOW DO I CONFIGURE MY BLACKBERRY WITH AT&T ... you do not have an
account or you cannot create an account, you will need to use the setup.
small businesses to the supply chains of Fortune 500 companies, ... education help foster a culture of trust to encourag
2) Streaming Media Player and. 3) UHttpProxy IIS extension for Unreal Media
Server. Location: http://www.umediaserver.net/umediaserver/download.html.
There was a problem previewing this document. Retrying... Download. Connect more apps... Try one of the apps below to op
How to configure IBM iAccess Client with OpenText HostExplorer.pdf ...
Page 1 of 12. IBM iAccess with HostExplorer Emulator. iAccess software is used in conjunction with another emulator. In
IBM iAccess with HostExplorer Emulator iAccess software is used in conjunction with another emulator. In this case we will use the OpenText HostExplorer emulator to connect via iAccess to a running mainframe session. The HostExplorer software was formerly known as “IBM Hummingbird” but was acquired by Open Text SA. iAccess is based on the custom DLL file “PCSHLL32.DLL” which is a HLLAPI standard.
Pre-Requisites The following product versions are recommended versions, rather than specific requirements.
Recommended minimum Blue Prism versions: v4.2.59, or v5.0.11 IBM iAccess Client Solutions v1.1.5.1 o NOTE: If using IBM Personal Communications iService Access for Windows v6 then use the method described in the document “How to configure the IBM PComm Mainframe Emulator” instead of this document. OpenText HostExplorer v15.00
iAccess installation iAccess is installed using the installer program found in the Windows Application folder:
Choose whether you need the 32-bit or 64-bit installer depending on your operating system. During the installation you will be prompted to choose whether to install each of the components in turn. The only necessary component for Blue Prism is the 3270 Terminal component. Once installed place a shortcut to the correct launch icon from the Start_Programs folder onto the desktop:
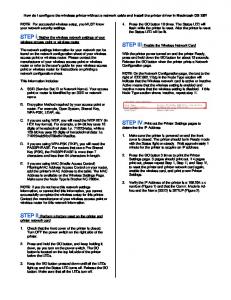
iAccess Configuration Launch the iAccess Client Solutions interface and click on the ‘System Configurations’ to reveal a configuration screen:
Create a new System Configuration:
Set the IP Address to be your localhost’s IP - usually 127.0.0.1:
Use the ‘Verify Connection’ button to ensure that the Telnet Service can be connected to:
OpenText HostExplorer Installation The software is available from this link: http://connectivity.opentext.com/products/terminal-emulation.aspx Desktop Icon Start the HostExplorer software from the desktop icon for Connection Central.
Folder Location The location of the saved session file (.HEP) can vary. Sometimes the files are stored in a central location, other times they are stored in a user’s specific AppData location.
Hummingbird HostExplorer Session Set Up First you need to amend the Terminal settings to have a Session Short Name: Edit -> Options -> Terminal -> API -> Short Session Name
You then need to set up the Session A.
DLL File Location Locate the ehlapi32.DLL file
Add DLL location to the PATH environment variable o Right click Computer -> Properties then click the Advanced System Settings
o o o o
Within the System Properties window, click the Advanced tab (should already be there) then click Environment Variables button. Within the System Variables section scroll down to the Path variable and click Edit Copy the Variable Value to Notepad, then add a semicolon ; to the last variable and include the location of where the ehllapi DLL is stored for Hummingbird. Copy/Paste from Notepad into the Variable Value and click OK.
Blue Prism Configuration The following instructions work only with an open session, i.e. the HostExplorer mainframe session must be running already before attempting to attach using the “Launch” button. The file cannot be launched using this method, meaning that you need to have one Visual Business Object to launch the HostExplorer emulator, and another to connect to the running session.
In Application Modeller specify the “IBM iAccess (EHLLAPI)” connector. This uses the EHLLAPI standard functionality to connect to an existing session file.
Session Identifier is A Application Manager mode must match the bitness of the HostExplorer software (“Embedded” is fine for 32-bit, but 64-bit must be set to “External, 64 bit mode”)
Click the Launch button in Application Modeller to attach to the running session.
Identifying elements in HostExplorer Using the Identify button select the inner window using the Win32 Mode spying highlight, and the left-click to confirm the selection. This will produce the identification grid: