Figure 1: Authentication Service Network Configuration ... This page is used to
configure your Defender Security Server(s). 5. The Protocol option allows you to ...
Webthority HOW TO Configure Alternative Authentication Services Introduction This document describes how to configure the: •
Defender Authentication Service Defender enhances security by enabling two-factor authentication and multi-factor authentication.
•
Windows NT Authentication The Windows NT Server Service uses Microsoft Windows NT usernames and passwords to authenticate Webthority users.
•
Demo Authentication The Demo Service is used to aid in product evaluation and testing.
•
PKI Authentication The PKI Service allows you to authenticate clients using X.509 client-side certificates from vendors such as Baltimore, Entrust, Verisign, Netscape, and Microsoft.
•
Database Authentication The Database Service allows you to perform standard Webthority authentication tasks against Microsoft SQL Server 2000, Oracle and DB2 databases.
•
Quest Single Sign-on for Java Authentication Service The QSJ service provides authentication and authorization through automatic acceptance of internal users (using Active Directory Groups) via Kerberos and the SPNEGO protocol and external users using Active Directory Federated Service.
•
Custom Authentication The Custom authentication service provides authentication by calling configurable command line executables.
Webthority How To Configure Authentication Services
•
SAML Authentication The SAML authentication service allows a third party IDP to be used.
•
Session Management
For information on configuring the LDAP Authentication Service, please refer to the Webthority Installation and Configuration Guide.
2
Webthority How To Configure Authentication Services
Authentication Service Configuration Authentication Services provide access security by verifying a user’s identity before permitting access to protected content. In general, Webthority Authentication Services interact with other Webthority components as follows: 1. A browser issues a request for access to a URL protected by Webthority. 2. The Webthority Proxy Service intercepts the request and checks the content server mappings for that content. 3. If the content is protected, the Proxy Service redirects the request to the appropriate Authentication Service. 4. The Authentication Service presents the appropriate login screen to the user. 5. The user authenticates by supplying the appropriate credentials, in the form of a password, challenge/response, or certificate, etc. 6. Webthority performs an authorization check to determine whether the group the user is a member of is allowed access to the requested content. 7.
Webthority creates a session for the authenticated user.
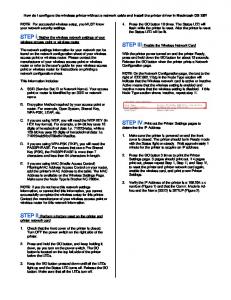
Auth Service Network Configuration Generally, it is recommended that the Authentication Services be placed in the internal network with the Content Servers they are authenticating for. The Proxy Service should be deployed separately and placed in the DMZ network. The exception to this is the PKI Authentication Service, which must be installed on the service network along with the Proxy Service. This is because the PKI Authentication Service needs to establish a trust relationship with the client, which cannot be achieved through any intermediate machine, including the Proxy Service.
3
Webthority How To Configure Authentication Services
Proxying Authentication Services
Figure 1: Authentication Service Network Configuration
4
Webthority How To Configure Authentication Services
Defender Authentication This section describes how to configure the Defender Authentication Service.
Configuring Defender Authentication From the Webthority Administration console, select the Defender Authentication Service name in the folder structure of the registered host running your Defender Authentication Service.
Figure 2: Defender Authentication Service General tab
1. On the General tab, select Proxy for this service. 2. From the drop down list, select the Proxy Server configured previously.
5
Webthority How To Configure Authentication Services
3. Select the Server tab.
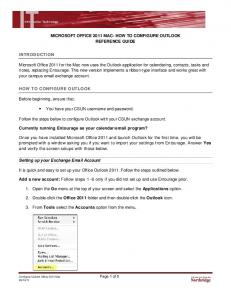
Figure 3: Defender Authentication Service Server tab
4. This page is used to configure your Defender Security Server(s). 5. The Protocol option allows you to select either Defender or Radius. By default this will be set to Radius, which is the correct setting for use with the Defender 5 Radius Agent.
Defender should only be selected if the legacy Defender Agent is configured within Defender (Radius Agent is recommended). 6. Complete the Primary DSS and optional Secondary DSS settings as shown in the example above. Primary DSS: DNS or IP address of your primary DSS server. Primary DSS Port: Port configured on the Defender Access Node (default 1812). Primary agent shared secret: Shared secret configured on the Defender Access Node. 7. Click Apply. 6
Webthority How To Configure Authentication Services
8. Select the Groups tab. If the Radius protocol was selected in the previous step, the Defender Authorization Groups page is displayed.
Figure 4: Authentication Service Groups tab
The List Groups button is not enabled. 9. Select Add and enter the AD Group that users must belong to for authorization.
Figure 5: Authentication Service Authorization Groups
7
Webthority How To Configure Authentication Services
The group entered must exist in AD and be configured on a Defender Radius Payload using attribute 26 Vendor Specific (Groups) and setting Vendor Type 10. Refer to Configuring the Defender RADIUS Payload. 10. If the legacy Defender protocol was selected in the previous step, the Defender Authorization Groups page is displayed:
Figure 6: Authentication Service Authorization Groups
The List Groups button is enabled. 9. Select List Groups.
Figure 7: Confirm Refresh dialog
8
Webthority How To Configure Authentication Services
10. Select Yes to continue.
Figure 8: Authorization Groups Access Categories (for legacy Defender Agent)
11. A list of access categories is displayed. 12. Check the Enabled checkbox for access categories A and E. These categories are required if you are using the legacy Defender Agent. These categories must also be selected on the Token Policy configured in your Defender environment, refer to Configuring the Defender Token Policy. 13. Click Apply.
Creating a New Defender Access Node A Defender Access Node must be configured to allow authentication before the Webthority Defender Authentication Service can authenticate users. This guide assumes that a currently configured Defender system is in use and only details the steps required to allow authentication from Webthority. 1. In Active Directory Users & Computers (ADUC), expand the Defender OU and right click Access Nodes.
9
Webthority How To Configure Authentication Services
2. Select New, Defender Access Node to start the Access Node Wizard.
Figure 9: Defender Access Node
3. Enter a name for this Access Node and provide a description if required. Select Next to continue.
Figure 10: Defender Access Node
4. Accept the default settings for Node Type and User ID. 5. Select Next to continue.
10
Webthority How To Configure Authentication Services
Figure 11: Defender Access Node
6. Enter the IP Address or DNS Name of the server that hosts the Webthority Defender Authentication Service. 7. Enter the Port number (default 1812). This must match the port configured for the Webthority Defender Authentication Service on the Server tab). 8. Ensure that the Subnet Mask is set to 255.255.255.255. 9. Enter the Shared Secret used for this connection. This must match the Primary (or Secondary) Agent shared secret configured for the Webthority Defender Authentication Service). 10. Select Next to continue:
Figure 12: Defender Access Node
11. Select Finish. The new Access Node is displayed in ADUC, Access Nodes folder.
11
Webthority How To Configure Authentication Services
12. Double-click or right-click, then select Properties to display the new Webthority Access Node properties.
Figure 13: Defender – Webthority Properties
13. Select Assign to assign this Access Node to your Defender Security Server. 14. Select the Members tab.
Figure 14: Defender – Webthority Properties - Members
15. Select Add to add the required users or groups to this Access Node. In this example, a group called Defender Authenticated Users has been added. 16. Select the Policy tab. 12
Webthority How To Configure Authentication Services
Figure 15: Defender – Webthority Properties - Policy
17. Click Select.. and assign the required Token Policy to this Access Node. 18. Select OK to save and close the dialog.
13
Webthority How To Configure Authentication Services
Configuring the Defender RADIUS Payload If you have selected the Radius protocol option within the Defender Authentication Service configuration, you will need to configure a Radius Payload for the authorized AD security group(s). 1. In Active Directory Users & Computers (ADUC), expand the Defender OU and right-click RADIUS Payload. 2. Select New, Defender RADIUS Payload to start the new Defender RADIUS Payload wizard.
Figure 16: Defender – Radius Payload
3. Enter a name for this Radius Payload object and, if required, provide a description. Select Next to continue.
Figure 17: Defender – Radius Payload
14
Webthority How To Configure Authentication Services
4. Select Add to display the RADIUS Payload Attributes dialog. 5. From the drop down listing, select 26: Vendor-Specific (Groups). Ensure the Return all groups to which user belongs option is checked.
Figure 18: Defender – Radius Payload
6. Set the Vendor Type to 10. 7. Select OK.
Figure 19: Defender – Radius Payload
8. Select Next and then Finish to complete the procedure. 9. The Payload now needs to be assigned to the Access Node used by Webthority.
15
Webthority How To Configure Authentication Services
Figure 20: Defender – Radius Payload
10. Click Select. 11. Click the required Radius Payload, then click OK. 12. Click OK to finish.
16
Webthority How To Configure Authentication Services
Configuring the Defender Token Policy If you selected the legacy Defender protocol option during the Defender Authentication Service configuration, the Defender Token Policy that your users will use must be configured for the corresponding Access Categories as configured on the Groups tab for both the Defender Authentication Service and its corresponding Web Role. The example below shows the configuration setting on a Defender Token Policy.
Figure 21: Defender Token Properties
17
Webthority How To Configure Authentication Services
Windows NT Authentication Introduction Webthority supports the use of Windows NT authentication on Windows NT Servers. The features of Windows NT authentication include: •
An end user needs to provide only a username and password to authenticate.
•
Where more than one authentication domain exists, the user can select the domain name from a menu of available domain names.
•
Users can exist in both local and global groups.
•
The Authentication Service can accept password change requests from the Webthority system and can effect the change.
•
The Authentication Service can determine whether a user’s account has expired in the security database and can process the user in accordance with the rules of the NT system.
•
The Authentication Service can determine whether a user’s account has been locked or disabled and can process the user in accordance with the rules of the NT system.
•
The Authentication Service can retrieve the user’s group information after the user has been successfully authenticated to the mechanism.
•
All relevant system messages originating at the authentication mechanism are displayed to the end user.
•
The logging of error messages or other responses to authentication attempts can be customized by the administrator through the administration console.
18
Webthority How To Configure Authentication Services
Configuring Windows NT Authentication Click the name of the Windows NT Authentication Service in the left side directory tree to configure Windows NT authentication. The General tab displays Authentication Service configuration information and allows you to configure a proxy for this service.
Figure 22: Windows NT General Tab
The parameters in the Windows NT General tab are shown in Table 1.
19
Webthority How To Configure Authentication Services Table 1: Windows NT General Tab Entries FIELD
DESCRIPTION
Service name
This field contains the name given to the Windows NT Authentication Service during the Webthority installation. The name is read-only and cannot be changed here.
Service URL
This field contains the URL defined for the Windows NT Authentication Service during the Webthority installation. This field is read-only and cannot be changed here.
Proxy for this service
Choose from this listbox the Proxy Service through which you want to authenticate users with the Windows NT Authentication Service. The choices are all the Proxy Services configured for this Webthority system. You must specify a Proxy Service for this Authentication Service. The default is None. This Proxy Service may be different from the one used to proxy protected content.
Version
This field contains the version number of this Authentication Service.
20
Webthority How To Configure Authentication Services
Configuring Windows NT Groups The Windows NT Groups tab allows you to make user groups available for use in Web Roles. When you define a Web Role protected by the Windows NT Authentication Service, the groups defined here will be listed on the Web Role’s Groups tab. Click the Groups tab to configure Windows NT groups.
Figure 23: Windows NT Groups Tab
The configurable parameters in the Windows NT Groups tab are described in Table 2.
21
Webthority How To Configure Authentication Services Table 2: Windows NT Groups Tab Entries FIELD
DESCRIPTION Click the List Groups button to update the list to include all groups currently configured in the Windows NT. Clicking on the header toggles the up/down arrow to arrange the list of groups in ascending or descending alphabetic order. The groups the service can retrieve are: • •
Groups Available for Web Role Use
Enabled
List Groups
Add Remove
Select All
• •
local groups on the server on which the service is installed global groups in the domain in which the service's server is registered local groups on Primary Domain Controllers (PDCs) trusted by the service's PDC global groups in domains trusted by the service's PDC.
Local groups are shown as SERVER_NAME\Group_name. Global groups are shown as DOMAIN_NAME\Group_Name. The service will only be able to retrieve group information from other domains if its local domain controllers can resolve the NetBIOS names of the domain controllers in the trusted domains. Refer to Microsoft's documentation for further information. Check the check box associated with each group name that you want to enable for use in Web Roles. Clicking on the header toggles the up/down arrow to arrange the groups in checked first or unchecked first order. Click this button to update the Groups Available for Web Role Use list to include all currently configured groups. Clicking on the List Groups button after selecting groups to use with Web Roles will leave your selections intact unless the group has been deleted in the interim. A warning appears reminding you that the current list will be replaced by the updated list. You will be able to manually add or remove groups from the Available group list table. Click this button to create a new entry in the Available group list table. Click in an entry in the Available group list table, then click this button to remove the whole entry. Click to make all groups available for use in Web Roles.
22
Webthority How To Configure Authentication Services
Configuring Personalization Information The Personalization Information tab allows you to specify the personalization information that will be retrieved when the user authenticates. The Windows NT Authentication Service can retrieve the contents of the Windows NT USER_INFO_3 structure for the authenticated user. See the online help for the Windows NT Personalization Information tab for further details.
Session Management Refer to Session Management.
Logging Configuration Refer to Configuring Logging.
23
Webthority How To Configure Authentication Services
Demo Authentication Introduction Webthority supports the use of Demo authentication on Windows and Linux platforms. Demo authentication provides authentication using its own database of users and groups. Demo authentication is provided with the evaluation software, supports up to ten users, and is primarily used to assist the product evaluation process and to test the initial Webthority installation. Features of the Demo authentication system include: •
the mechanism requires only a username and password as credentials for authentication
•
a license key is not required
•
the logging of error messages and other responses to authentication attempts can be customized by the administrator through the administration console.
24
Webthority How To Configure Authentication Services
Configuring Demo Authentication Click the name of the Demo Authentication Service in the left side directory tree to configure Demo authentication. The General tab displays the Authentication Service configuration information and allows you to configure a proxy for this Service.
Figure 24: Demo General Tab
25
Webthority How To Configure Authentication Services
The parameters in the Demo General tab are described in Table 3. Table 3: Demo General Tab Entries FIELD
DESCRIPTION
Service name
This field contains the name given to the Demo authentication service during the Webthority installation. The name is read-only and cannot be changed here.
Service URL
This field contains the URL defined for the Demo authentication service during the Webthority installation. This field is read-only and cannot be changed here.
Proxy for this service
Choose from this listbox the Proxy Service through which you want to authenticate users with the Demo Authentication Service. The choices are all the Proxy Services configured for this Webthority system. You must specify a Proxy Service for this Authentication Service. The default is None. This Proxy Service may be different from the one used to proxy protected content.
Version
Admin URL
This field contains the version number of this Authentication Service. This field contains the URL required to access the Demo Service administration console: http://localhost:8553/demo/Admin where 8553 is the port on which your Authentication Service is configured.
26
Webthority How To Configure Authentication Services
Configuring Demo Groups The Demo Groups tab allows you to make user groups available for use in Web Roles. When you define a Web Role protected by the Demo Authentication Service, the groups defined here will be listed on the Web Role’s Groups tab. You can create groups and users for the Demo Service using the Demo Service administration console as described under Adding Users and Groups to the Demo System. Click the Groups tab to configure Demo groups.
Figure 25: Demo Groups Tab
The configurable parameters in the Demo Groups tab are described in Table 4.
27
Webthority How To Configure Authentication Services Table 4: Demo Groups Tab Entries FIELD
DESCRIPTION
Available group list
This table contains a list of all the groups configured for Demo authentication.
Groups Available for Web Role Use
Enabled
List Groups
This table contains a list of all the groups configured for the Demo Authentication Service. Click the List Groups button to update the list. You will be able to manually add or remove groups from the Available group list table. Clicking on the header toggles the up/down arrow to arrange the groups in ascending or descending alphabetic order. Check the checkbox(es) for each group you want to enable for use by a Web Role. Clicking on the header toggles the up/down arrow to arrange the groups in checked first or unchecked first order. Click this button to update the list of groups in the Available group list table to include all currently configured groups. A warning appears reminding you that the current list will be replaced by the updated list. You will be able to manually add or remove groups from the Available group list table.
Add
Click this button to create a new entry in the Available group list table.
Remove
Click in an entry in the Available group list table, then click this button to remove the whole entry.
Select All
Click to make all groups available for use in Web Roles.
Clear All
Click to make all groups unavailable for use in Web Roles.
28
Webthority How To Configure Authentication Services
Configuring Demo Personalization Information The Personalization Information tab allows you to specify the personalization information that will be retrieved from the database when the user authenticates. The Demo Authentication Service can retrieve information about the authenticated user defined on the New User screen for the Demo Service administration utility. The Demo Service administration utility is described under Adding Users and Groups to the Demo System. See the online help for the Demo Personalization Information tab for further details.
Session Management Refer to Session Management.
Logging Configuration Refer to Configuring Logging.
29
Webthority How To Configure Authentication Services
Adding Users and Groups to the Demo System To add users and groups to the Demo Authentication Service database, perform the following procedure. 1. Use your browser to add a new user to the Demo authentication system by connecting to http://localhost:8553/demo/Admin (where 8553 is the port on which the Authentication Service is configured) and entering the following information in the Demo Login screen.
Figure 26: Demo Login Screen
2. Type the username admin (the username is case-sensitive). 3. Type the password webthority (the password is case-sensitive and will not echo on the screen). 4. To change your password, check the Change password box, then click OK. You will now be prompted to change the password.
Figure 27: Demo Change Password Screen
5. Re-type the username and password, then type a new password in the New Password and Confirm Password fields and click OK.
30
Webthority How To Configure Authentication Services
Figure 28: Demo – User and Group Accounts
6. Click OK. The Demo Admin Main Menu is displayed. 7. To add a new group, click Add New Group to open the New Group screen.
Figure 29: Demo – New Group
8. Type a Name for the new group and add a Comment, if required. Click Commit. 31
Webthority How To Configure Authentication Services
9. Click Add New User to open the New User screen.
Figure 30: Demo – New User
10. Type the Name of your user, add a Comment if required. 11. Type the user’s password in the Password and Confirm Password fields. 12. Type the date that the user’s account will expire in the Account Expiry Date field. Ensure that the date is entered in the format shown. This field is optional. 13. Set the Password Expired check box and Account Disabled check box as required. 14. Click the check box next to each group you want the user to belong to. 15. The remaining fields are used to define personalization information for the user which can be retrieved when the user authenticates. Complete these fields as required. The contents of the Name and Comment field are also available as personalization information. 16. Click Commit. The new user is added to the Demo database. 32
Webthority How To Configure Authentication Services
PKI Authentication Introduction Webthority supports the use of PKI authentication on Windows and Linux platforms. The Webthority PKI Authentication Service is only accessible via an SSL connection to the server. The Authentication Service allows SSL to authenticate the client. SSL also provides a secure encrypted channel through which to support message integrity. The client is authenticated by the Web server based on a digital certificate which the client is prompted for when requesting a connection. The user’s certificate is typically stored either directly on their desktop or on a smart card. The server verifies the integrity of the certificate and makes sure that it was issued and signed by a Certificate Authority (CA) that it trusts. No special Webthority configuration is required to support the storage of user certificates on smartcards. The smartcard and reader will present the certificate stored on the card to the web browser. When the client certificate has been authenticated, the request is passed to the Authentication Service. The Authentication Service checks the certificate against its Certificate Revocation List. If the certificate is valid, the username is extracted from the certificate. Optionally, the certificate subject can be mapped to a user account in an LDAP directory. The authorization of the user is then based on membership of groups obtained from the certificate and/or the LDAP database.
Installation Considerations When installing the PKI Authentication Service, keep the following points in mind: •
The PKI Authentication Service must be installed on the same service network as the Proxy Service. This is because the PKI Service needs to establish a trust relationship with the clients and cannot do so through an intermediary machine. This requirement also precludes the proxying of the PKI Authentication Service.
•
The PKI Authentication Service requires its own port. The default port number is 8443. If more than one PKI Authentication Service is installed, the default port number, 8443, is automatically incremented by 1 for each additional PKI Authentication Service. If you need to change the port number for the PKI Authentication Service, please contact Customer Support. 33
Webthority How To Configure Authentication Services
Group and Personalization Information The group information and personalization information for the PKI Authentication Service can be retrieved from certificates or from an LDAP database or both. This information is defined on the Certificate Data tab and/or LDAP Data tab. To enable this optional feature, you must enable the Proxy Service to pass personalization information to the Web server when a request for protected content is made. To do this, select the PI check box for the protected content on the Content Server Mappings tab.
Configuring PKI Authentication Click the name of the PKI Authentication Service in the left side directory tree to configure PKI authentication. The General tab displays Authentication Service configuration information.
Figure 31: PKI General Tab
The parameters in the PKI General tab are described in Table 5.
34
Webthority How To Configure Authentication Services Table 5: PKI General Tab Entries FIELD
Retrieve group and personalization information from certificates
Retrieve group and personalization information from LDAP
DESCRIPTION Check this check box to elect to retrieve group and personalization information from certificates as configured in the Certificate Data tab. When this check box is unchecked, the Certificate Data tab is greyed out. This check box is checked by default. Note: The Authentication Service can obtain group and personalization information from the LDAP database or certificates or both. Using neither is not an option. If you cannot uncheck this check box, it is because the Retrieve group and personalization information from LDAP check box is unchecked. Check this check box to elect to retrieve group and personalization information from an LDAP database. When this check box is unchecked, the LDAP Data, LDAP Server, and LDAP Login tabs are greyed out. This check box is unchecked by default. Note: The Authentication Service can obtain group and personalization information from the LDAP database or certificates or both. Using neither is not an option. If you cannot uncheck this check box, it is because the Retrieve group and personalization information from certificates check box is unchecked.
Service name
This field contains the name given to the PKI Authentication Service during the Webthority installation. The name is read-only and cannot be changed here.
Service URL
This field contains the URL defined for the PKI Authentication Service during the Webthority installation. This field is read-only and cannot be changed here.
Service Version
This field contains the version number of this Authentication Service.
35
Webthority How To Configure Authentication Services
Configuring PKI Certificates To configure PKI certificates, click the Certificate Data tab.
These settings are required only if the Retrieve group and personalization information from certificates check box is checked in the PKI General tab.
Figure 32: PKI Certificate Data Tab
The configurable parameters in the Certificate Data tab are described in Table 6.
36
Webthority How To Configure Authentication Services Table 6: PKI Certificate Data Tab Entries FIELD
DESCRIPTION
Certificate fields to use as groups Certificate Fields
Click Add below this table to create a new entry, then select one of the defined certificate fields, or type the name of your own certificate field which contains the value you want to use as a Web role group. Standard certificate fields are: CLIENT_CERT_SUBJECT_CN: Common Name of certificate owner. CLIENT_CERT_SUBJECT_OU: Organizational Unit of certificate owner. CLIENT_CERT_SUBJECT_O: Organization (company) of certificate owner. CLIENT_CERT_SUBJECT_C: Country of certificate owner. CLIENT_CERT_SUBJECT_ST: State (or province) of certificate owner. CLIENT_CERT_SUBJECT_E: Email address of certificate owner. CLIENT_CERT_SUBJECT_DN: Distinguished Name of certificate owner. CLIENT_CERT_SUBJECT_L: Locality (city, town, or other geographical location) of certificate owner. CLIENT_CERT_ISSUER_CN: Common Name of certificate issuer. CLIENT_CERT_ISSUER_OU: Organizational Unit of certificate issuer. CLIENT_CERT_ISSUER_O: Organization (company) of certificate issuer. CLIENT_CERT_ISSUER_C: Country of certificate issuer. CLIENT_CERT_ISSUER_ST: State (or province) of certificate issuer. CLIENT_CERT_ISSUER_E: Email address of certificate issuer. CLIENT_CERT_ISSUER_DN: Distinguished Name of certificate issuer. CLIENT_CERT_ISSUER_L: Locality (city, town, or other geographical location) of certificate issuer.
Authorized Group values Authorized Values
Click Add below this table to create a new entry, then type the value contained in the corresponding Certificate Field entry.
Enabled
Click the check box(es) corresponding to the information from the certificate that you wish to include in the group for Web Role use. Clicking on the header toggles the up/down arrow to arrange the groups in checked first or unchecked first order.
37
Webthority How To Configure Authentication Services
Personalization Information Header Variable Name Click Add below this table to create a new entry, then type the item name that is used by the protected content. Click the header to toggle the up/down arrow to arrange the header variable names in ascending or descending order. Header Variable Data
Select one of the defined PKI certificate fields, or type the name of your own certificate field. The corresponding data in the certificate for the authenticated user can be used by your software to personalize the Web content they see. Standard certificate fields are the same as those available for the Certificate Fields listbox.
Add
Click Add below the appropriate table to create a new entry.
Remove
Click in an entry in the appropriate table, then click Remove below the table to remove the whole entry.
38
Webthority How To Configure Authentication Services
Configuring Certificate Trust and Revocation To configure certificate authentication and revocation, click the Trust and Revocation tab.
Figure 33: PKI Trust and Revocation Tab
The configurable parameters in the Trust and Revocation tab are described in Table 7.
39
Webthority How To Configure Authentication Services Table 7: PKI Trust and Revocation Tab Entries FIELD
DESCRIPTION
Certificate Revocation Lists Get updated CRLs from these URLs every __ minutes
Type the size of the interval (in minutes) at which you want to update CRLs from the URLs in the Certificate Revocation List URLs table. The default is 1440 minutes (24 hours).
Certificate Revocation List URLs
Click Add below the Certificate Revocation Lists table to create a new entry, then type the location of a Certificate Revocation List. Locations can be entered as file, http or LDAP URLs. If no URLs are entered the revocation status of user certificates cannot be checked.
Trusted Certificate Authorities Trusted Certificate Authorities Click Add below the Trusted Certificate Authorities table to create a new entry, then type the location of the public certificate of a CRL publisher. Locations can be entered as file, http or LDAP URLs. The CRL Publisher certificates are required to verify the integrity of the CRLs before they are accepted and to verify the integrity of user certificates during authentication. Add
Click Add below the appropriate table to create a new entry.
Remove
Click in an entry in the appropriate table, then click Remove below the table to remove the whole entry.
40
Webthority How To Configure Authentication Services
Configuring the LDAP Database To configure the LDAP database for PKI authentication, click the LDAP Data tab.
These settings are required only if the Retrieve group and personalization information from LDAP check box is checked in the General tab.
Figure 34: PKI LDAP Data Tab
The configurable parameters in the LDAP Data tab are described in Table 8.
41
Webthority How To Configure Authentication Services
Table 8: PKI LDAP Data Tab Entries
FIELD
DESCRIPTION
Group Search Root (DN)
Type the Distinguished Name (DN) of the branch point in the LDAP directory from which to start the search for groups the user may be a member of.
Available group list Groups Available for Web Role Use
Click the List Groups button to update this list to include all LDAP groups that are currently available for use in Web Roles.
Enabled
Check the check box(es) for each group you want to enable for use by a Web Role. Clicking on the header toggles the up/down arrow to arrange the groups in checked first or unchecked first order.
List Groups
Click this button to update the Available group list table to contain all currently configured groups. Clicking on the List Groups button will replace your current list with an updated list. You will be prompted before the list is updated. You do not need, and will be unable to manually add or remove groups from the Available group list table. This feature is not available if you are using PKI certificate fields as group names for the PKI Authentication Service.
42
Webthority How To Configure Authentication Services
Configuring the LDAP Server To configure the LDAP Server for PKI authentication, click the LDAP Server tab.
These settings are required only if the Retrieve group and personalization information from LDAP check box is checked in the General tab.
Figure 35: PKI LDAP Server Tab
The configurable parameters in the LDAP Server tab are described in Table 9.
43
Webthority How To Configure Authentication Services Table 9: PKI LDAP Server Tab Entries FIELD
DESCRIPTION
LDAP Server DNS name
Type the fully-qualified DNS name of the LDAP Server which you will be using for PKI authentication. Select from this listbox the type of LDAP Server you are using with this Authentication Service. The choices include:
LDAP Server type
• • • • •
MS Active Directory Netscape Directory Server Novell Directory Services Oracle 8i Directory IBM SecureWay Directory. The default is MS Active Directory.
LDAP Server port number
Type the port on which you will connect to the LDAP Server. The default is port 389.
Use SSL for LDAP port
If you are using an SSL connection to the LDAP Server, check this check box. If this check box is checked, the PKI Authentication Service will automatically attempt to connect to the LDAP Server using SSL.
LDAP version
Select the version of LDAP you will be using for PKI authentication. The choices are 3 and 2. The default is version 3.
Administrator name
Type the username for the LDAP Server administrator.
Administrator password
Type the administrator’s password in this field. The password is not echoed on the screen.
44
Webthority How To Configure Authentication Services
Configuring the LDAP Login To configure the LDAP Login, click the LDAP Login tab.
These settings are required only if the Retrieve group and personalization information from LDAP check box is checked in the General tab.
Figure 36: PKI LDAP Login Tab
The configurable parameters in the LDAP Login tab are described in Table 10.
45
Webthority How To Configure Authentication Services Table 10: PKI LDAP Login Tab Entries FIELD
DESCRIPTION
Key ID
Click Add below the Keys table to create a new entry, then type the attribute you want the service to use to identify the user. We recommend that you use an attribute that uniquely identifies the user. By default, the uid attribute on Netscape Directory Server and the cn attribute on the other LDAP databases are unique for each user, so we recommend that you use these attributes. You can enter more than one attribute, but be aware that if the service finds more than one user with any of these attributes, the authentication will fail.
Base DNs
Click Add below the Base DNs table to create a new entry, then type the LDAP Base Distinguished Name (DN) of the location in the LDAP database where users are defined. This provides a start point in the LDAP database for the service to search for the user who has requested authentication. You can enter more than one base DN, but the search may take longer.
Add
Click Add below the appropriate table to create a new entry.
Remove
Click in an entry in the appropriate table, then click Remove below the table to remove the whole entry.
46
Webthority How To Configure Authentication Services
Configuring the LDAP Personalization Information The Personalization Information tab allows you to specify the personalization information that will be retrieved from LDAP when the user authenticates. See the online help for the PKI LDAP Personalization Information tab for further details.
Session Management Refer to Session Management.
Logging Configuration Refer to Configuring Logging.
47
Webthority How To Configure Authentication Services
Database Authentication Introduction Webthority supports the use of SQL Database authentication on Windows and Linux platforms. The Database Authentication Service allows you to perform standard Webthority authentication tasks against a variety of customer databases, including Microsoft SQL Server and Oracle Server.
Configuring Database Authentication Click the name of the Database Authentication Service in the left side directory tree to configure Database authentication. The General tab shows the Authentication Service configuration information and allows you to configure a proxy for the Service.
Figure 37: Database General Tab
48
Webthority How To Configure Authentication Services
The parameters in the Database General tab are described in Table 11. Table 11: Database General Tab Entries FIELD
DESCRIPTION
Service name
This field contains the name given to the Database Authentication Service during the Webthority installation. The name is read-only and cannot be changed here.
Service URL
This field contains the URL defined for the Database Authentication Service during the Webthority installation. This field is read-only and cannot be changed here.
Proxy for this service
Choose from this listbox the Proxy Service through which you want to authenticate users with the Database Authentication Service. The choices are all the Proxy Services configured for this Webthority system. You must specify a Proxy Service for this Authentication Service. The default is None. This Proxy Service may be different from the one used to proxy protected content.
Version
This field contains the version number of this Authentication Service.
49
Webthority How To Configure Authentication Services
Configuring Database Groups The Database Groups tab allows you to make user access categories available for use in Web Roles. When you define a Web Role protected by the Database Authentication Service, the access categories defined here will be listed on the Web Role’s Groups tab. To configure access categories for Database authentication, click the Groups tab.
Figure 38: Database Groups Tab
50
Webthority How To Configure Authentication Services
The configurable parameters in the Database Groups tab are described in Table 12. Table 12: Database Groups Tab Entries FIELD
DESCRIPTION
Available groups list
This table contains a list of all access categories configured for this Database Authentication Service.
Groups Available for Web Role Use
Click the List Groups button to update this list to include all currently configured access categories for the Database Authentication Service. Click the header to toggle the up/down arrow to arrange the access categories in ascending or descending alphabetic order.
Enabled
Check the check box(es) corresponding to the access categories you want to enable for Web Role use. Clicking on the header toggles the up/down arrow to arrange the access categories in checked first or unchecked first order.
Add
Click this button to create a new entry in the Available group list table.
Remove
Click in an entry in the Available group list table, then click this button to remove the whole entry.
List Groups
Click this button to update the list in the Available groups list table to include all currently configured access categories. You will be able to manually add or remove groups from the Available groups list table.
Select All
Click this button to select all access categories in the Available groups list table.
Clear All
Click this button to de-select all access categories in the Available groups list table.
51
Webthority How To Configure Authentication Services
Configuring Database Connections To configure database connections, click the Database Connection tab.
Figure 39: Database Connection Information Tab
The configurable parameters in the Database Connection tab are described in Table 13. For further details, refer to the online help.
52
Webthority How To Configure Authentication Services Table 13: Database Connection Information Tab Entries FIELD
DESCRIPTION
Database JDBC driver
Type the name of the driver that the Database Authentication Service will use to connect to the database. This must be the name supplied by the vendor of the driver.
Database file/URL
Type the URL that the Database Authentication Service uses to connect to the database. The driver vendor may provide instructions for this.
Connection start timeout (seconds)
Type the time (in seconds) that the Database Authentication Service is allowed to establish a connection with the database. If the service is unable to establish a connection with the database within this time, a timeout message is sent to the log file. The default is 10 seconds.
Administrator name
Type the ID used to log in to the database as administrator.
Password
Type the password for the database administrator. The password is not echoed on the screen.
53
Webthority How To Configure Authentication Services
Configuring Statement Sets To configure Database statement sets, click the Statement Set tab.
Figure 40: Authentication and Access Statement Tasks Tab
The configurable parameters in the Authentication and Access Statement Set tab are described in Table 14. For further details, refer to the online help.
54
Webthority How To Configure Authentication Services Table 14: Authentication and Statement Set Tab Entries FIELD
DESCRIPTION Type the SQL statement, procedure name, or connect statement that will enable the Database Authentication Service to authenticate users on your database. A sample SQL statement:
Authenticate user
select myuser from system.jdbcusers where upper(myuser) = upper(%name%) and upper(mypassword) = upper(%passwd%) A sample procedure name call:
call sp-auth-user %name% %passwd% The connect statement: connect %name% %passwd% Type the SQL statement, procedure name, or vendor return code that will enable the Database Authentication Service to establish whether an account is locked or disabled in your database. A sample SQL statement: Account locked/disabled
select mystatus from system.jdbcusers where upper(myuser) = upper(%name%) and upper(mystatus) = upper(‘LOCKED”) A sample procedure call:
call sp-check-lock %name% The return code (required when using Oracle with a connect statement): 28000
55
Webthority How To Configure Authentication Services Type the SQL statement, procedure name, or vendor return code to enable the Database Authentication Service to establish whether a database password has expired.
Password expired
A sample SQL statement: select mystatus from system.jdbcusers where upper(myuser) = upper(%name%) and upper(mystatus) = upper('EXPIRED') A sample procedure call:
call sp-check-expired %name% The return code (required when using Oracle with a connect statement): 28001 Type the SQL statement or procedure call to enable the Database Authentication Service to retrieve user information from the database. Get user’s groups
A sample SQL statement:
select mygroup from system.jdbcgroups where upper(myuser) = upper(%name%) A sample procedure call:
call sp-get-groups %name%
Change Password
Type the SQL statement or procedure call to enable the Database Authentication Service to change user passwords on the database.
56
Webthority How To Configure Authentication Services
Configuring Personalization Information The Personalization Information tab allows you to specify the personalization information that will be retrieved when the user authenticates. The Database Authentication Service can retrieve information about the authenticated user using an SQL statement or procedure call. See the online help for the Database Personalization Information tab for further details.
Session Management Refer to Session Management.
Logging Configuration Refer to Configuring Logging.
57
Webthority How To Configure Authentication Services
Quest Single Sign-on for Java Authentication Service Introduction Webthority supports the use of Quest Single Sign-on for Java (QSJ) authentication on Windows platforms. The QSJ service provides authentication and authorization through automatic acceptance of internal users (using Active Directory Groups) via Kerberos and the SPNEGO protocol and external users using Active Directory Federated Services. Features of the QSJ authentication system include: •
authorization of users through Active Directory group membership
•
the logging of error messages and other responses to authentication attempts can be customized by the administrator through the administration console.
58
Webthority How To Configure Authentication Services
Configuring QSJ Authentication Click the name of the QSJ Authentication Service in the left side directory tree to configure QSJ authentication. The General tab displays the Authentication Service configuration information and allows you to configure a proxy for this Service.
Figure 41: QSJ General Tab
59
Webthority How To Configure Authentication Services
The parameters in the QSJ General tab are described in Table 15. FIELD
DESCRIPTION
Service name
This field displays the name specified for the QSJ Authentication Service during the Webthority installation. This field is read-only and cannot be changed here.
Service URL
This field displays the URL of the QSJ Authentication Service as defined during the Webthority installation. This field is read-only and cannot be changed here. Select the Proxy Service through which you want to authenticate users with the QSJ Authentication Service. The choices are all the Proxy Services configured for this Webthority system. You must specify a Proxy Service for this Authentication Service.
Proxy for this service
The default is None. This Proxy Service may be different from the one used to proxy protected content.
Version
This field contains the version number of this Authentication Service.
Configuring QSJ Authentication Service Groups The Quest Single Sign-on for Java Groups tab allows you to make user groups available for use in Web Roles. When you define a Web Role protected by the Quest Single Sign-on for Java Authentication Service, the groups defined here will be listed on the Web Role’s Groups tab.
60
Webthority How To Configure Authentication Services
Click the Groups tab to configure QSJ groups.
Figure 42: QSJ Authentication Groups Tab
61
Webthority How To Configure Authentication Services
The configurable parameters in the QSJ Authentication Groups tab are described in Table 16. Table 16: QSJ Authentication Groups Tab Entries FIELD
DESCRIPTION
Available Group List
This table contains a list of all the groups configured for QSJ authentication
Groups Available for Web Role Use
Enabled
This table contains a list of all the groups configured for the QSJ Authentication Service. Click List Groups to update the list. You can manually add or remove groups from the Available group list table. To arrange the groups in ascending or descending alphabetic order, click on the header to toggle the up/down arrow. Check the box(es) for each group you want to make available for Web Role use. To arrange the groups in checked first or unchecked first order, click the header to toggle the up/down arrow.
Add
Click to create a new entry in the Available group list table.
Remove
Click in an entry in the Available group list table, then click Remove to remove the whole entry.
62
Webthority How To Configure Authentication Services
Configuring QSJ Authentication Mode and Parameters The QSJ Authentication tab allows you to configure the mode of authentication used by the QSJ Service, and the required parameters for that mode. Webthority supports authentication using Windows Intranet SSO using Kerberos QSJ (Kerberos) filter, as well as the Active Directory Federated Services (ADFS) filter. Click the Authentication tab to configure QSJ authentication mode and parameters.
Figure 43: QSJ Authentication Tab
63
Webthority How To Configure Authentication Services
The configurable parameters in the QSJ Authentication tab are described in Table 17. For further details and examples, refer to the online help. Table 17: QSJ Authentication Tab Entries FIELD
DESCRIPTION
Authentication Mode
Select either Kerberos (Windows Intranet SSO) or ADFS (Active Directory Federation Services) mode.
Kerberos Service Account
Type the name of the Kerberos service account that QSJ will use. This is the idm.princ QSJ parameter. If the agent is proxied, this should match the proxy's FQDN.
Kerberos Domain
Type the name of the Active Directory domain to be used for authentication. This is the idm.realm QSJ parameter.
Kerberos Keytab File / Password
Select Use keytab file or Use plaintext password. If using a keytab file, type the location of file containing the keytab that Kerberos will use for user to service authentication. This is the idm.keytab parameter. If using a password, type the password for the QSJ account. This is the idm.password parameter.
ADFS Federation Server URL
Type the URL of the resource federation server. This is the fsProxy QSJ parameter.
ADFS Federation Server Token-Signing Certificate File
Type the location of the resource federation server’s Base64 encoded token-signing certificate. This is required unless the acceptTokenCert parameter is specified in the Advanced tab (not recommended).
64
Webthority How To Configure Authentication Services
Configuring QSJ Authentication Parameters The QSJ Advanced tab allows you to specify any other QSJ initialization parameters not configured on the Authentication tab. For details on available initialization parameters, consult your QSJ documentation. Click the Advanced tab to configure the QSJ Authentication Service’s extra initialization parameters.
Figure 44: QSJ Advanced Parameters Tab The configurable parameters in the QSJ Advanced Parameters tab are described in Table 18. Table 18: QSJ Advanced Parameters Tab Entries FIELD
DESCRIPTION
Name
The name of the QSJ parameter you wish to assign a value to (e.g. idm.allowFallback).
Value
The value you wish to assign to the QSJ parameter specified in the Name column.(e.g. true).
65
Webthority How To Configure Authentication Services
Configuring QSJ Personalization Information The Personalization Information tab allows you to specify the personalization information that will be retrieved when the user authenticates. See online help for the QSJ Personalization Information tab for further details.
Session Management Refer to Session Management.
Logging Configuration Refer to Configuring Logging.
66
Webthority How To Configure Authentication Services
Custom Authentication Introduction Webthority supports the use of Custom authentication on Windows platforms. Custom authentication provides authentication by calling configurable command line executables. Features of the Custom authentication system include: •
calling of arbitrary executables to perform authentication
•
the logging of error messages and other responses to authentication attempts can be customized by the administrator through the administration console.
Configuring Custom Authentication Click the name of the Custom Authentication Service in the left side directory tree to configure Custom authentication. The General tab displays the Authentication Service configuration information and allows you to configure a proxy for this Service.
Figure 45: Custom General Information Tab
67
Webthority How To Configure Authentication Services
The parameters in the Custom General Information tab are described in Table 19. Table 19: Custom General Information Tab Entries FIELD
DESCRIPTION
Service name
This field contains the name given to the Custom authentication service during the Webthority installation. The name is read-only and cannot be changed here.
Service URL
This field contains the URL defined for the Custom authentication service during the Webthority installation. This field is read-only and cannot be changed here. From this listbox, choose the Proxy Service through which you want to authenticate users with the Custom Authentication Service. The choices are all the Proxy Services configured for this Webthority system.
Proxy for this service
You must specify a Proxy Service for this Authentication Service. The default is None. This Proxy Service may be different from the one used to proxy protected content.
Version
This field contains the version number of this Authentication Service.
Configuring Custom Groups The Custom Groups tab allows you to make user groups available for use in Web Roles. When you define a Web Role protected by the Custom Authentication Service, the groups defined here will be listed on the Web Role’s Groups tab.
68
Webthority How To Configure Authentication Services
Click the Groups tab to configure Custom groups.
Figure 46: Authorization Groups Information Tab
The configurable parameters in the Custom Authorization Groups Information tab are described in Table 20.
69
Webthority How To Configure Authentication Services Table 20: Custom Authorization Groups Information Tab Entries FIELD
DESCRIPTION
Available Group List
This table contains a list of all the groups configured for Custom authentication. This table contains a list of all the groups configured for the Custom Authentication Service.
Groups Available for Web Role Use
Enabled
Click List Groups to update the list. You can manually add or remove groups from the Available group list table. To arrange the groups in ascending or descending alphabetic order, click on the header to toggle the up/down arrow. Check the box(es) for each group you want to make available for Web Role use. To arrange the groups in checked first or unchecked first order, click the header to toggle the up/down arrow.
List Groups
Click this button to update the list of groups in the Available group list table to include all currently configured groups. A warning appears reminding you that the current list will be replaced by the updated list. You will be able to manually add or remove groups from the Available group list table.
Add
Click to create a new entry in the Available group list table.
Remove
Click in an entry in the Available group list table, then click Remove to remove the whole entry.
Select All
Click to make all groups available for use in Web Roles.
Clear All
Click to make all groups unavailable for use in Web Roles.
70
Webthority How To Configure Authentication Services
Configuring Custom Commands The Commands tab allows you to enter the commands that enable the Custom Authentication Service to perform authentication and access tasks. See Custom Service Command Syntax for details of the syntax you must use. To configure Custom commands, click the Custom Commands tab.
Figure 47: Custom Authentication and Access Commands Tab
The configurable parameters in the Custom Authentication and Access Commands tab are described in Table 21. All fields are mandatory, except for the Account locked/disabled and Password expired fields. Return codes are used by the Custom Authentication Service for status changes, for example command lines, return codes and other details, refer to the Webthority Online Help.
71
Webthority How To Configure Authentication Services Table 21: Custom Authentication and Access Commands Tab Entries FIELD
DESCRIPTION
Authentication User
The command that will enable the Custom Authentication Service to authenticate users.
Account locked/disabled
The command that will enable the Custom Authentication Service to establish whether an account is locked or disabled.
Password expired
The command that will enable the Custom Authentication Service to establish whether a password has expired.
Get user’s groups
The command that will enable the Custom Authentication Service to retrieve user group information for this user.
Get groups
The command that will enable the Custom Authentication Service to retrieve group information for all groups that are relevant to Webthority.
Change password
The command that will enable the Custom Authentication Service to change user passwords.
72
Webthority How To Configure Authentication Services
Configuring Custom Personalization Information The Personalization Information tab allows you to specify the personalization information that will be retrieved when the user authenticates. See the online help for the Custom Personalization Information tab.
Custom Service Statement Syntax In each field on the Commands tab and the Personalization Information tab for the Custom Authentication Service, you need to enter the command required to perform the task. Variable Names Webthority provides three user variables which you can use as command line parameters in your commands to perform the required task for the authenticated user. The user's details will be substituted for the variables. The variables are:
%name% %passwd% %newpasswd% The user's details will be substituted into the command whenever these variables occur. For example, if your command includes a %name% variable, the authenticated user's name will be substituted for %name% in the command. The user's details will be substituted into the command whenever these variables occur. For example, if your command includes a %name% variable, the authenticated user's name will be substituted for %name% in the command. Most commands will use the %name% variable. You must include the percentage (%) symbol before and after as shown. An example of a statement which could be used in the Change password field on the Commands tab is:
changepassword.exe /user:%name% %passwd% %newpasswd% 73
Webthority How To Configure Authentication Services
Sensitive characters (anything other than letters, numbers, and the underscore ("_") character) are encoded as %xx, where xx is the hexadecimal ASCII value of the character. For example, if a user provides a password of "pass.word", "pass%2Eword" will be substituted for %passwd% in the command. Syntax The commands should consist of a full path to the required program, followed by any command line parameters, using variable names where appropriate.
Session Management Refer to Session Management.
Logging Configuration Refer to Configuring Logging
74
Webthority How To Configure Authentication Services
SAML Authentication Introduction Webthority supports the use of SAML security tokens for authentication and authorization. The SAML service allows you to perform Webthority authentication against various Identity Provider Services that support SAML 2.0 protocol.
Configuring SAML Authentication Click the name of the SAML Authentication Service in the left side directory tree to configure SAML authentication. The General tab displays the Authentication Service configuration information and allows you to configure a proxy for this Service.
75
Webthority How To Configure Authentication Services
Figure 48: SAML Authentication - General tab
The parameters in the SAML General tab are described in Table 22.
76
Webthority How To Configure Authentication Services Table 22: SAML General Tab Entries FIELD
DESCRIPTION
Service name
This field displays the name specified for the SAML Authentication Service during the Webthority installation. This field is read-only and cannot be changed here.
Service URL
This field displays the URL of the SAML Authentication Service as defined during the Webthority installation. This field is read-only and cannot be changed here.
Proxy for this service
Select the Proxy Service through which you want to authenticate users with the SAML Authentication Service. The choices are all the Proxy Services configured for this Webthority system. You must specify a Proxy Service for this Authentication Service. The default is None. This Proxy Service may be different from the one used to proxy protected content.
Version
This field contains the version number of this Authentication Service.
Configuring SAML Authentication Service Groups The Groups tab allows you to make user groups available for use in Web Roles. When you define a Web Role protected by the SAML Authentication Service, the groups defined here will be listed on the Web Role’s Groups tab.
77
Webthority How To Configure Authentication Services
Click the Groups tab to configure SAML groups.
Figure 49: SAML Authentication Groups tab
The configurable parameters in the SAML Authentication Groups tab are described in Table 23.
78
Webthority How To Configure Authentication Services Table 23: SAML Authentication Groups tab entries FIELD
DESCRIPTION
Groups Available for Web Role This table contains a list of all the groups configured for the Use SAML Authentication Service. You can manually add or remove groups by using the Add or Remove buttons. To arrange the groups in ascending or descending alphabetic order, click on the header to toggle the up/down arrow. Enabled
Check the box(es) for each group you want to make available for Web Role use. To arrange the groups in checked first or unchecked first order, click the header to toggle the up/down arrow.
Add
Click to create a new entry in the Available group list table.
Remove
Click in an entry in the Available group list table, then click Remove to remove the whole entry.
The built-in group All Authenticated Users cannot be removed, and if it is enabled, all other groups in the list will be enabled automatically. 1. Select the group of groups that your users must belong to for successful authentication. 2. Click Apply.
79
Webthority How To Configure Authentication Services
Configuring SAML Authentication Parameters The SAML Authentication tab allows you to configure the required parameters used in authentication. Click the Authentication tab to configure SAML authentication parameters.
Figure 50: SAML Authentication tab
The configurable parameters in the SAML Authentication tab are described in Table 24.
80
Webthority How To Configure Authentication Services Table 24: SAML Authentication tab entries FIELD
DESCRIPTION
IdP Service URL
URL of the Identity Provider Service.
IdP Certificate
IdP Service Public Certificate status. It displays the date and time when the certificate was loaded.
Load Certificate ...
Button used to load the IdP Service Public Certificate. Note: The certificate must be in PEM format.
Groups Attributes
A comma separated list of SAML Assertion Attribute names that hold user groups or claims.
SP Identifier
Name of this Service Provider, used in SAML Request.
Export Metadata ...
Export the metadata of this Service Provider in XML format.
1. In the IdP Service URL field, enter the URL of your Identity Provider Service. 2. Select Load Certificate ....
Figure 51: SAML Authentication - Load Certificate
The certificate must be in PEM format. 3. Locate the IdP Service Public Certificate, then click Open.
81
Webthority How To Configure Authentication Services
4. If required, in the Groups Attributes field, enter a comma separated list of SAML Assertion Attribute names that hold user groups or claims.
This is the attribute name within the SAML Assertion that the IdP will use to send the users group membership. 5. In the SP Identifier field, enter the name that you want this Service Provider to use. 6. Select Export Metadata ... to export the metadata of this Service provider in XML format. The XML file can be given to the IdP (if it supports Metadata) to identify Webthority as a Service Provider.
Figure 52: SAML Authentication - Export Metadata
7. Click Save. 8. Click Apply.
82
Webthority How To Configure Authentication Services
Configuring SAML Personalization Information The Personalization Information tab allows you to specify the personalization information that will be retrieved when the user authenticates. See the online help for the SAML Personalization Information tab for further information.
Session Management Refer to Session Management.
Logging Configuration Refer to Configuring Logging
83
Webthority How To Configure Authentication Services
Session Management All authentication services have an identical Sessions tab. This tab allows you to configure optional parameters for managing sessions. You can specify: •
the duration of a session
•
whether a session should timeout following a specified period of inactivity
•
if the user should be issued with a warning before a session is ended
•
the time periods during which a session can be activated.
Configuring Session Options To configure session options, click the Sessions tab for your Authentication Service.
Figure 53: Sessions Tab
84
Webthority How To Configure Authentication Services
The configurable parameters in the Sessions tab are described in Table 26. Table 25: Sessions Tab FIELD
DESCRIPTION
Session timeout (minutes)
Type the length of time (in minutes) that you want a session to be valid. After this time elapses, users will need to log in again and re-authenticate. The default is 120 (two hours). The session timeout value must be greater than the inactivity timeout value (see below).
Warn user nn minutes before timeout
Check this box to warn the user that their session is about to timeout, and specify the number of minutes before session timeout that this warning will be displayed.
Inactivity timeout (minutes)
Type the length of time (in minutes) that you want to allow a session to be idle. After this interval of inactivity, the user will need to log in again and re-authenticate. The default is 10 minutes. The inactivity timeout value must be less than the session timeout value.
Warn user nn minutes before timeout
Check this box to warn the user that their session is about to timeout, and specify the number of minutes before inactivity timeout that this warning will be displayed
Only allow sessions at Check the box to limit session activity to specific times. these Click Add to enter the day(s) and times. times Apply - check the box to apply these time settings. Day(s) - click in this field and select the required day(s) from the dropdown list. From - click in this field to specify the start time. Until - click in this field to specify the end time.
85
Webthority How To Configure Authentication Services
Configuring Logging The Logging tab allows you to control the type of information that is recorded in the Webthority log file for each Authentication Service. Click the Logging tab to configure logging functions.
Figure 54: Logging Tab
86
Webthority How To Configure Authentication Services
The configurable parameters in the Logging tab are described in Table 27. Table 26: Logging Tab Entries
FIELD
DESCRIPTION Select the required check boxes from the following list:
Logging options
• Authorization - every attempted authentication to Webthority (whether successful or unsuccessful) is logged. • Info - shows the status of various Webthority operations. Info messages provide additional information to that contained in Authorization messages as they include the reason the authentication was successful or unsuccessful. • Access - every successful attempt to access Webthorityprotected content is logged. If a requested page contains multiple objects, each object creates an Access message. • Warnings - all messages of Warning severity are logged. • Errors - all Error messages are logged. • Debug - all activity, including error messages, authentication attempts, and access attempts are logged. This option is primarily for use by Customer Support personnel. Take care if you use it as a large amount of information can be generated very quickly.
© 2012 Quest Software, Inc. ALL RIGHTS RESERVED. Quest, Quest Software, the Quest Software logo and Webthority are trademarks and registered trademarks of Quest Software, Inc. in the United States of America and other countries. Other trademarks and registered trademarks are property of their respective owners.
87