This is to certify that the thesis entitled, “Implementation of Web-Server Using
Altera ... FPGA Development Kit “submitted by Anupam Pal and Sahil Sharma in
...
1
Implementation of Web-Server Using Altera DE2-70 FPGA Development Kit A THESIS SUBMITTED IN PARTIAL FULFILLMENT OF THE REQUIREMENT OF FOR THE DEGREE IN Bachelor of Technology In Electronics and Communication Engineering By
Sahil Sharma Roll no. 10609026 Anupam pal Roll No. 10609027
Department of Electronics and Communication Engineering National Institute of Technology Rourkela 2010
2
NATIONAL INSTITUTE OF TECHNOLOGY ROURKELA
CERTIFICATE This is to certify that the thesis entitled, “Implementation of Web-Server Using Altera DE2-70
FPGA Development Kit “submitted by Anupam Pal and Sahil Sharma in partial fulfillment of the requirements for the award of Bachelor of Technology Degree in Electronics and communication at National Institute of Technology, Rourkela (Deemed University), is an authentic work carried out by them under my supervision.
To the best of my knowledge the matter embodied in the thesis has not been submitted to any University/Institute for the award of any Degree or Diploma.
Date:
Prof. S.K. Patra Department of Electronics And Communication Engineering National Institute of Technology Rourkela-769008
3
ACKNOWLEDGEMENT
I avail this opportunity to extent my hearty indebtedness to my guide “Prof. S.K. Patra”, Electronics And Communication Engineering Department, for his valuable guidance, constant encouragement and kind help at different stages for the execution of this dissertation work. I want to thank all my teachers Prof. G.S. Rath, Prof. K. K. Mahapatra, And Prof. S. Meher for providing a solid background for my studies. They have been great sources of inspiration to me and I thank them from the bottom of my heart.
Submitted By: Anupam Pal and Sahil Sharma Roll No. 10609027, 10609026 Electronics and Communication Engineering National Institute of Technology, Rourkela-769008
4
Contents SI. No.
Topic
Page No.
1.
Chapter 1: Introduction
5-12
2.
Chapter 2: Literature review
13-14
3.
Chapter 3: Methodology and problem formulation
15-30
4.
Chapter 4: Result and Discussions
31-32
5.
References
33-34
5
ABSTRACT
A web server is a computer program that delivers (serves) content, such as web pages, to the Clients. A field-programmable gate array (FPGA) is an integrated circuit designed to be Configured by the customer or designer. We are aiming at implementing a web server using the FPGA development board (DE 270). Implementation of web server can be done by first instantiating a Nios II system in the board. Nios II system can be build around the altera’s Nios II processor using the SOPC builder tool of the quartus II CAD tool. The SOPC builder tool generates the VHDL code of the defined system. The developed code can be configured in the FPGA board to instantiate the system. After implementing the Nios II system, an application program can be run in the system to implement the web server.
6
INTRODUCTION CHAPTER 1
7
Introduction: FPGA & Altera’s DE270 FPGA Development Board A field-programmable gate array (FPGA) is an integrated circuit designed to be configured by the customer or designer after manufacturing ,hence called field-programmable. The FPGA configuration is generally specified using a hardware description language(HDL). FPGAs can be used to implement any logical function. The ability to update the functionality after shipping, partial re-configuration of the portion of the design and the low non-recurring engineering costs r offer advantages for many applications. FPGAs contain programmable logic components called logic blocks, and a hierarchy of reconfigurable interconnects that allow the blocks to be
wired. Logic blocks can be configured to perform
complex combinational functions, or merely simple logic gates like AND and XOR. In most FPGAs, the logic blocks also include memory elements, which may be simple flip-flops or more complete blocks of memory.
The DE2-70 board features a powerful Cyclone R
II FPGA chip. All important components on the board
are connected to the pins of this chip, allowing the user to configure the connection between the various components as desired. For simple experiments, the DE2 board includes a sufficient number of switches (of both toggle and pushbutton variety), LEDs, and 7-segment displays. For more advanced experiments, there are SRAM, SDRAM, and Flash memory chips. For experiments that require a processor and simple I/O interfaces, it is easy to instantiate Altera’s Nios II processor and use interface standards such as RS-232 and PS/2. For experiments that involve sound or video signals, there are standard connectors provided on the board. For large design projects, it is possible to use the SD memory card. Finally, it is possible to connect other user-designed boards to the DE2-70 board by means of two expansion headers. Software provided with the DE2-70 board features the Quartus II web edition design tools. It also includes a simple monitor program that allows the student to control various parts of the board in an easily understandable manner.
8
Quartus II Quartus II is a CAD system used to implement circuits in an Altera FPGA device. The Quartus II system includes full support for all of the popular methods of entering a description of the
desired circuit into a CAD system. The desired circuit can be entered in block diagram form(schematic) or using hardware description language like VHDL or Verilog.
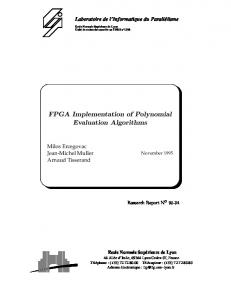
A typical CAD flow is shown as:
Fig 1
9 The CAD flow involves the following steps: Design Entry – the desired circuit is specified either by means of a schematic diagram, or by using a hardware description language, such as Verilog or VHDL. Synthesis – the entered design is synthesized into a circuit that consists of the logic elements (LEs) provided in the FPGA chip Functional Simulation – the synthesized circuit is tested to verify its functional correctness; this simulation does not take into account any timing issues Fitting – the CAD Fitter tool determines the placement of the LEs defined in the netlist into the LEs in an actual FPGA chip; it also chooses routing wires in the chip to make the required connections between specific LEs. Timing Analysis – propagation delays along the various paths in the fitted circuit are analyzed to provide an indication of the expected performance of the circuit. Timing Simulation – the fitted circuit is tested to verify both its functional correctness and timing Programming and Configuration – the designed circuit is implemented in a physical FPGA chip by programming the configuration switches that configure the LEs and establish the required wiring connections.
10 We have used VHDL to enter the design in Quartus II. The entered circuit is compiled to generate the SRAM object file(.sof) needed to configure the FPGA. After compiling the circuit is then simulated to check the functionality of the circuit using a test vector. The simulated circuit is then configured into the FPGA chip to actually implement the circuit.
Programming and Configuring the FPGA Device The FPGA device must be programmed and configured to implement the designed circuit. The required configuration file is generated by the Quartus II Compiler’s Assembler module. Altera’s DE2 board allows the configuration to be done in two different ways, known as JTAG and AS modes. The configuration data is transferred from the host computer (which runs the Quartus II software) to the board by means of a cable that connects a USB port on the host computer to the leftmost USB connector on the board. In the JTAG mode, the configuration data is loaded directly into the FPGA device. The acronym JTAG stands for Joint Test Action Group. This group defined a simple way for testing digital circuits and loading data into them, which became an IEEE standard. If the FPGA is configured in this manner, it will retain its configuration as long as the power remains turned on. The configuration information is lost when the power is turned off. The second possibility is to use the Active Serial (AS) mode. In this case, a configuration device that includes some flash memory is used to store the configuration data. Quartus II software places the configuration data into the configuration device on the DE2 board. Then, this data is loaded into the FPGA upon power-up or reconfiguration. Thus, the FPGA need not be configured by the Quartus II software if the power is turned off and on. The choice between the two modes is made by the RUN/PROG switch on the DE2 board. The RUN position selects the JTAG mode, while the PROG position selects the AS mode.
11
SOPC Builder Altera’s Nios II is a soft processor is defined in a hardware description language. It can be implemented in Altera’s FPGA devices by using the Quartus II CAD system. To implement a useful system it is necessary to add other functional units such as memories, input/output interfaces, timers, and communications interfaces. To facilitate the implementation of such systems, it is useful to have computer-aided-design (CAD) software for implementing a systemon-a-programmable-chip (SOPC). Altera’s SOPC Builder is the software needed for this task.
Altera Debug Client For implementing a particular application, an application program has to loaded and run in the Nios II system. This is done by using a software called altera debug client. Altera debug client, is used to compile, assemble, download and debug programs for Altera’s Nios II processor. The debug client provides functionality that allows the user to: • Examine and modify register and memory contents. • Disassemble the machine code present in any memory region. • Single step through each assembly language instruction in the program. • Set breakpoints that stop the execution of a program when certain instructions are reached or when certain data addresses are accessed. • Set watch expressions and watch their values at different points in the execution of the program.
12 • Examine a graphical view of an instruction trace that records the set of recently executed instructions. • Perform terminal input/output via the JTAG UART component.
13
LITERATURE REVIEW CHAPTER 2
14
Literature Review: FPGA development kits are generally used for basic logic implementations. Previously for web servers, computers were used that used to run some application program. For small purpose web servers, the processing power of a full fledged computer is not used efficiently. By implementing a system on a programmable chip, we are implementing a reduced instruction set computer(RISC). For lesser number of clients, this RISC can be used as a web server by running a particular application program in it. Thus the processing power of the configured Nios II system is efficiently used. This kit can also be programmed to wok as a hardware element like a node or switch in a computer network.
15
METHODOLOGY AND PROBLEM FORMULATION CHAPTER 3
16
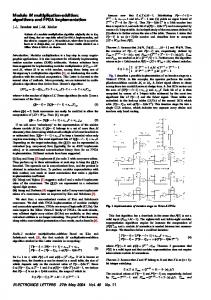
3.1 Nios II System: A Nios II system can be implemented on the DE2 board as shown in
Fig 2
17
The Nios II processor and the interfaces needed to connect to other chips on the DE2 board are implemented in the Cyclone II FPGA chip. These components are interconnected by means of the interconnection network called the Avalon Switch Fabric. The memory blocks in the Cyclone II device can be used to provide an on-chip memory for the Nios II processor. The SRAM, SDRAM and Flash memory chips on the DE2 board are accessed through the appropriate interfaces. Parallel and serial input/output interfaces provide typical I/O ports used in computer systems. A special JTAG UART interface is used to connect to the circuitry that provides a Universal Serial Bus (USB) link to the host computer to which the DE2 board is connected. This circuitry and the associated software is called the USB-Blaster. Another module, called the JTAG Debug module, is provided to allow the host computer to control the Nios II system. It makes it possible to perform operations such as downloading programs into memory, starting and stopping execution, setting breakpoints, and collecting real-time execution trace data. Since all parts of the Nios II system implemented on the FPGA chip are defined by using a hardware description language, a knowledgeable user could write such code to implement any part of the system. This would be an onnerous and time consuming task. Instead, one can use the SOPC Builder to implement a desired system simply by choosing the required components and specifying the parameters needed to make each component fit the overall requirements of the system. In this tutorial, we will illustrate the capability of the SOPC Builder by designing a very simple system. The same approach is used to design large systems.
18
3.2 Design Flow: SOPC builder tool of the Quartus II software is used for implementing the Nios II System. The different specifications for defining the system are as follows: Clock: 50 Mhz, External Device Type: Cyclone II Processor: Nios II/e which is the simplest version of the processor is used for our application. Its specifications used are: RISC 32 bit Performance at 50 mhz: upto 5 DMIPS Logic usage: 600-700 LEs Memory usage: 2 M4ks On Chip Memory: Type : RAM Memory width: 32 bits Total memory size: 4 Kbytes
19 Parallel Input Output(I): Width: 8 bits Direction: input ports only Parallel Input Output(II): Width: 8 bits Direction: output ports only JTAG UART: We wish to connect to a host computer and provide a means for communication between the Nios II system and the host computer. This can be accomplished by instantiating the JTAG UART interface as follows: Write FIFO: Depth: 64 bits Read FIFO: Depth: 64 bits After specifying these components for the Nios II system, the following flow is followed: The base and end addresses of the various components in the designed system can be assigned by the user, but they can also be assigned automatically by the SOPC Builder. We will choose the latter possibility. So, select the command (using the menus at the top of the SOPC Builder window) System > Auto-Assign Base Addresses, which produces the assignment.
20 Having specified all components needed to implement the desired system, it can now be generated. Select the System Generation tab.Turn off Simulation – Create simulator project files, because we will not deal with the simulation of hardware. Click Generate on the bottom of the SOPC Builder window. The generation process produces the messages
displayed
in
the
figure.
When
SYSTEMGENERATION COMPLETED" appears.
Fig 3
the
message
“SUCCESS:
21
3.3 Integration of the Nios II System into a Quartus II Project To complete the hardware design, we have to perform the following: • Instantiate the module generated by the SOPC Builder into the Quartus II project. • Assign the FPGA pins. • Compile the designed circuit. • Program and configure the Cyclone II device on the DE2 board.
3.3.1 Instantiation of the Module Generated by the SOPC Builder: The instantiation of the generated module depends on the design entry method chosen for the overall Quartus II project. We have chosen to use VHDL, but the approach is similar for both Verilog and schematic entry methods. Normally, the Nios II module is likely to be a part of a larger design. However, in the case of our simple design there is no other circuitry needed. All we need to do is instantiate the Nios II system in our top-level VHDL file, and connect inputs and outputs of the parallel I/O ports, as well as the clock and reset inputs, to the appropriate pins on the Cyclone II device. The VHDL entity generated by the SOPC Builder is in the file nios_system.vhd in the directory of the project. The name of the VHDL entity is the same as the system name specified when first using the SOPC Builder.
22 The VHDL code produced by the SOPC is quite large. The portion of code that defines port signals for entity nios_system is shown as:
entity nios_system is port( --1) global signals signal clk : IN STD_LOGIC; signal reset_n : IN STD_LOGIC; --2) LEDs signal out_port_from _the_LEDs : OUT STD_LOGIC_VECTOR(7 DOWN TO 0); signal in_from_the_switches : IN STD_LOGIC_VECTOR(7 DOWN TO 0); ); end entity nios_system;
The 8-bit vector that is the input to the parallel port Switches is called in_port_to_the_Switches. The 8-bit output vector is called out_port_from_the_LEDs. The clock and reset signals are called clk and reset_n, respectively. The reset signal is added automatically by the SOPC Builder; it is called reset_n because it is active low.
23
3.3.2 A top-level VHDL entity that instantiates the Nios II system(for light control circuit): −− Implements a simple Nios II system for the DE2 board. −− Inputs: SW7−0 are parallel port inputs to the Nios II system −− CLOCK_50 is the system clock −− KEY0 is the active-low system reset −− Outputs: LEDG7−0 are parallel port outputs from the Nios II system LIBRARY ieee; USE ieee.std_logic_1164.all; USE ieee.std_logic_arith.all; USE ieee.std_logic_unsigned.all; ENTITY lights IS PORT ( SW : IN STD_LOGIC_VECTOR(7 DOWNTO 0); KEY : IN STD_LOGIC_VECTOR(0 DOWNTO 0); CLOCK_50 : IN STD_LOGIC; LEDG : OUT STD_LOGIC_VECTOR(7 DOWNTO 0) );
24 END lights; ARCHITECTURE Structure OF lights IS COMPONENT nios_system PORT ( clk : IN STD_LOGIC; reset_n : IN STD_LOGIC; out_port_from_the_LEDs : OUT STD_LOGIC_VECTOR (7 DOWNTO 0); in_port_to_the_Switches : IN STD_LOGIC_VECTOR (7 DOWNTO 0) ); END COMPONENT; BEGIN −− Instantiate the Nios II system entity generated by the SOPC Builder NiosII: nios_system PORT MAP (CLOCK_50, KEY(0), LEDG, SW); END Structure;
25
3.3.3 Compiling the generated code along with top level VHDL entity: Add this file and all the *.vhd files produced by the SOPC Builder to your Quartus II project. Also, add the necessary pin assignments on the DE2 board to your project. Pin assignments are made by importing the assignments given in the file called DE2_pin_assignments.csv in the directory DE2_tutorials\design_files, which is included on the CD-ROM that accompanies the DE2 board and can also be found on Altera’s DE2 web pages. Having made the necessary settings compile the code. On compiling this code a SRAM object file(.sof) is generated which is used to program and configure the board.
3.4 Programming and Configuration: Programming and configuring the Cyclone II FPGA in the JTAG programming mode is done as follows: 1. Connect the DE2 board to the host computer by means of a USB cable plugged into the USB-Blaster port. Turn on the power to the DE2 board. Ensure that the RUN/PROG switch is in the RUN position. 2. Select Tools > Programmer 3. If not already chosen by default, select JTAG in the Mode box. Also, if the USB-Blaster is not chosen by default, press the Hardware Setup... button and select the USB-Blaster in the window that pops up.
26 4. The configuration file lights.sof should be listed in the window. If the file is not already listed, then add this file. 5. Click the box under Program/Configure and press start to configure the FPGA.
Fig 4
27
3.5 Running the Application Program: Having configured the required hardware in the FPGA device, it is now necessary to create and execute an application program that performs the desired operation. This can be done by writing the required program either in the Nios II assembly language or in a high-level language such as C. A Nios II assembly-language program that implements the trivial task of light control circuit is shown as: .include "nios_macros.s" .equ Switches, 0x00001800 .equ LEDs, 0x00001810 .global _start _start: movia r2, Switches movia r3, LEDs loop: ldbio r4, 0(r2) stbio r4, 0(r3) br loop
28 The program loads the addresses of the Data registers in the two PIOs into processor registers r2 and r3. It then has an infinite loop that merely transfers the data from the input PIO, Switches, to the output PIO, LEDs. The program includes the assembler directive .include "nios_macros.s" which informs the Assembler to use the Nios II macros that specify how the movia pseudoinstructions can be assembled. The directive .global _start indicates to the Assembler that the label _start is accessible outside the assembled object file. This label is the default label we use to indicate to the Linker program the beginning of the application program. This code is entered into a file lights.s and placed the file into a working directory.
3.6 Altera debug client: Altera provides the monitor software, called Altera Debug Client, for use with the DE2 board. This software provides a simple means for compiling, assembling and downloading of programs into a Nios II system implemented on a DE2 board. It also makes it possible for the user to perform debugging tasks.
29 This software needs to know the characteristics of the designed Nios II system, which are given in the ptf file nios_system.ptf. Click the Nios II >Configure system... menu item to display the Nios II System Configuration window and perform the following steps: 1. Select the USB-Blaster cable from the Cable drop-down list, which is used with DE2 board. 2. Click Browse... to display a file selection window and choose the nios_system.ptf file. Note that this file is in the design directory sopc_builder_tutorial. 3. Click Load. 4. The Altera Debug Client also needs to know where to load the application program. In our case, this is the memory block in the FPGA device. The SOPC Builder assigned the name onchip_memory_0 to this block. 5. Having provided the necessary information, click Ok to confirm the system configuration.
Next, the source file lights.s needs to be specified. Click the Nios II > Configure program... menu item to display the Nios II Program Configuration window and perform the following steps: 1. Click Add... to display a file selection window and choose the lights.s file. Note that this file is in the directory sopc_builder_tutorial\app_software. 2. Click Ok to confirm the program configuration.
30
3.6.1 Compiling and loading the program: After successfully creating a project, the program can be compiled and downloaded onto the DE2 board. There are three different commands that can be used to compile and/or load a program: • Actions > Compile menu item or toolbar button: Compiles the source files into an ELF and SREC file. The generated ELF and SREC files are placed in the project’s directory. • Actions > Load menu item or toolbar button: Loads the compiled SREC file onto the board and begins a debugging session in the Monitor Program. Loading progress messages are displayed in the Info & Errors window. • Actions > Compile & Load menu item or toolbar button: Performs the operations of both compilation and loading.
3.6.2 Running the program: As mentioned at the end of the previous section, the program is paused at its first instruction after it has been loaded. To run the program, click the Actions > Continue menu item or click the toolbar button. The Continue command runs the program until something halts the processor’s execution, such as a breakpoint or a forced user halt.
31
RESULT and DISCUSSIONS CHAPTER 4
32
Result and Discussions: The Nios II system was programmed and configured in the board successfully. This system can now be developed for any desired application. We developed the system for a simple light control system. The system can be developed to be used as web server by edditng the top level VHDL entity and running a suitable application program in the system. This is controlled and monitored by the altera debug client software.
33
References
34
References: [1] www.altera.com › Products › Literature. [2]www.smdp.iitkgp.ernet.in/PDF%5CVLSI_DSP%5CEmbedded_System_Desig
n.pdf. [3] http://www.nioswiki.com/Cyclone_III_-_Nios_II_-_Starter_board
[4] http://www.alteraforum.com/
[5] www.wikipedia.org.in
35