Jul 5, 2016 - This command is used to query module AT version as well as SDK version. Response. [ATSV] OK:
Jul 5, 2016 - For example, if need to input â[â, it should be â\[â instead. 2. Every normal .... 2: PullDown ...
Support Smart Config function (include Android and iOS devices). ⢠SPI , UART, I2C, PWM, GPIO. ⢠Deep Sleep current 10uA, Shutdown current below 5uA.
Jul 8, 2010 - STEP 01 Download and install the Rockchip Driver and AndroidTool from http://files.pine64.org/doc/rock64/t
In this article, I intend to argue that cultural identities fit the term diaspora ... (namely a collective memory and myth about the homeland) refers to those social.
Department of Biological Sciences Southeastern Louisiana University Hammond LA 70402. Department of Biological Sciences, Southeastern Louisiana ...
We propose here one way, called Bootstrap, to do it using computer intensive
techniques ... Originally, the Bootstrap was introduced to compute standard error
of.
Alexandra Zavos and Barbara Biglia and Barbara .... Barbara Biglia draws on her work on women activist narratives on gendered relations ...... Compagna Luna.
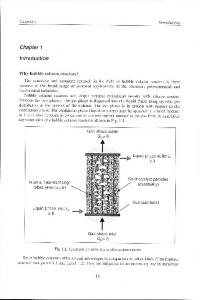
Whyy bubble column reactors? Thee extensive and sustained research in the field of bubble column reactors is there becausee of the broad range of potential ...
This course is intended to prepare students for the paper version of the ... more
advanced Longman Preparation Course for the TOEFL Test: The Paper Test.
Aug 9, 2015 - The use of CRM insTRuMenTs in agRiTouRisM ... agritourism farms from the Opole Province associated in Agricultural Advisory Center (AAC).
rary writers—Miyabe Miyuki, Nonami Asa, Shibata Yoshiki, Kirino Natsuo, and
Matsuo Yumi—critically engage with a variety of social issues and con- ...
NONLINEAR. PROGRAMMING ... degree of philosophical elegance that is hard to dispute, and it often offers an indispensable degree of operational simplicity.
Bromhead, E., Dixon, N. & Ibsen, M.-L., Thomas Telford, pp. 633-640,. 2000. [8] Brabb, E.E. & Harrod, B.L., (eds). Landslides: Extent and economic significance ...
Using a sample of 104 professional tax return preparers, we found no evidence ... A number of studies have used the year-end payment status of the client as.
and sports. Implementation of periodization for sportsmen is not new. ... Strength
training for volleyball requires the knowledge of periodization. Periodization.
To build iPhone & iPod touch applications using Cocoa ... Assignments may be
completed using the iPhone ... The iPhone Developer's Cookbook: Building.
of defining the scope of application of the Ethiopian law on liability for ... 1 E.g., Negist Makonnen et al. v Ethiopian Airlines et al., Addis Ababa High Court Civil.
A brick is defined in BS 3921 as a walling unit with size of 225 mm length, 112.5
mm width and 75 mm height has an actual dimensions of 215 x 102 x 65 mm.
Abraham Otero .... classes. Regression: We try to learn a real function that
assignes to ... If we have built different models (using different techniques, or the
same ...
Textbook. µ Data Structures and Algorithm Analysis in C by Mark Allen Weiss (
2nd ed, 1997). 2. R. Rao, CSE 373 Lecture 1. Today's Lecture. ✦ Course Topics.
Hebana (T.Heb., A .D. 20), the senatus consultum de Cn. Pisone patre (s.c. de.
Pisone, A .D. ..... ratified by the Roman people, that retains the form of a bill
drafted in the ..... cate its legal standards, or it did not apply any, in which case t
6. Connect PADI Serial console to the USB port of PC to power up the IoT Stamp. Follow the Windows, Mac OS X or Linux gu
PADI IoT Stamp Quick Start Guide
Introduction PADI IoT Stamp is a highly integrated, single-chip, low power WiFi controller with built-in antenna. The stamp combines an ARM Cortex M3, integrated Flash and RAM, WLAN MAC, WLAN baseband, RF balun, PA, LNA receiver, saw filter and power management module. Designs for makers with high speed SPI/I2C/UART interfaces for IoT applications with minimum Printed Circuit Board (PCB) area requirement. The PADI IoT Stamp is even smaller than a US stamp size.
High resolution pinout diagram can be downloaded from http://files.pine64.org/doc/PADI/documentation/padi-pinout-diagram.pdf 1
PADI IoT Stamp Quick Start Guide This quick start guide is intended for developers to setup the PADI Serial console (CH340G chipset) connection between PADI IoT Stamp and their PC running Windows, Mac OS X or Linux. Follow the below steps to setup the board 1. Set the Voltage jumper of PADI Serial console to 3V3 2. Connect PADI Serial console GND to IoT Stamp GND 3. Connect PADI Serial console 3V3 to IoT Stamp VDD 4. Connect PADI Serial console RxD to IoT Stamp GA4 (UART2_OUT) 5. Connect PADI Serial console TxD to IoT Stamp GA0 (UART2_IN) 6. Connect PADI Serial console to the USB port of PC to power up the IoT Stamp
Follow the Windows, Mac OS X or Linux guides accordingly to setup the serial terminal.
2
PADI IoT Stamp Quick Start Guide
Windows 1. Download the CH340G USB-Serial Driver and unzip the CH341SER_WIN.zip from http://files.pine64.org/doc/PADI/tools-drivers/CH341SER_WIN.zip This driver supports Windows 98/ME/2000/XP/Vista/7/8/8.1/10/2003/2008/2012 – 32-bit/64-bit 2. Install this driver in your Windows PC accordingly. Note: Windows 10 already has this driver build-in and you may skip the driver installation. 3. Open Windows 10 Settings and locate the Devices setting
4. In Devices setting, locate and click on Device manager
3
PADI IoT Stamp Quick Start Guide 5. Open the Device manager and you should see the USB-SERIAL CH340 (COM5) appear as below if the driver is properly installed. The COM port number might be different depending on your PC setup. Just use the COM port number you see here for the rest of the document when it asks to input the COM port. For ease of explanation, we will use COM5 as an example through out this document.
4
PADI IoT Stamp Quick Start Guide 6. Download serial terminal software such as Putty from http://files.pine64.org/doc/PADI/tools-drivers/putty.zip 7. Unzip the putty.zip and execute PUTTY.EXE 8. Click on Serial option and set Serial line to COM5 and Speed to 38400. If you wish to save this setup, input a Saved Sessions name such as NodeBasic Dev Board and click on Save. To open the terminal click the Open button.
5
PADI IoT Stamp Quick Start Guide 9. Press the Enter key and get access to console command command prompt #. You can input AT Command directly or key in ‘ATS?’ to see the supported AT Commands set. # ATS? # ERROR:command should start with 'A' # [ATS?] Common AT Command: ATSS AT ATS? ATSR ATSV ATSP ATSE ATSY ATSO ATSU ATSG Wi-Fi AT Command: ATPA ATPN ATPH ATPE ATPF ATPG ATPM ATPW ATWD ATWS ATW? ATWQ TCP/IP AT Command: ATP0 ATPS ATPD ATPC ATPT ATPR ATPK ATPP ATPI ATPU ATPL [ATS?] OK
6
PADI IoT Stamp Quick Start Guide
Mac OS X 1. Download the CH340G USB-Serial Driver and unzip the CH341SER_MAC.zip from http://files.pine64.org/doc/PADI/tools-drivers/CH341SER_MAC.zip this driver supports OS X and has been tested working with OS X Yosemite. 2. Install this driver by executing CH34x_install.pkg
3. Install this driver for all users of your computer.
7
PADI IoT Stamp Quick Start Guide
4. Execute the command below to bring up the serial console $ screen /dev/tty.wchusbserial1410 38400
5. You can input AT Command directly or key in ‘ATS?’ to see the supported AT Commands set.
8
PADI IoT Stamp Quick Start Guide
Linux 1. Download the CH340G USB-Serial Driver and unzip the CH341SER_LINUX.zip from http://files.pine64.org/doc/PADI/tools-drivers/CH341SER_LINUX.zip 2. Follow the readme.txt in the package to compile and install the driver. Note: Ubuntu 15.x and above already have this driver build-in and you may skip the driver installation. 3. Install minicom in Ubuntu $ sudo apt-get install minicom
4. Execute minicom $ sudo minicom -s
5. Select serial port setup from the menu and press ‘Enter’ which will give you some options to change.
9
PADI IoT Stamp Quick Start Guide 6. In the serial port setup, choose the right setting for the serial device. Press ‘A’ to navigate to the Serial Device setup, then change the /dev/ttyXXX to /dev/ttyUSB0. Do a ‘lsusb’ and ‘dmesg | grep usb’ to find the actual device name. Next, press ‘E’ to navigate to Bps/Par/Bits. This is the bit rate, parity and stop-bit setting. Set it to 38400 8N1.
7. Hit ‘Escape’ to exit from the serial port setup menu and you will be back at the base minicom setup menu. Select ‘Save setup as dfl’ and hit ‘Enter’ to save the minicom settings as the defaults. Then select exit and hit enter to start up minicom with the new settings. 8. Now you should see anything that is coming in on the UART interface from your board. You should also be able to simply run minicom from a terminal window whenever you want to open the terminal with your board. You can input AT Command directly or key in ‘ATS?’ to see the supported AT Commands set.


![PADI IoT Stamp Datasheet - Pine64 [PDF]](https://m.moam.info/img/260x300/padi-iot-stamp-datasheet-pine64-pdf_648bfb0f098a9e7b3a8b456f.jpg)