jsPsych: A JavaScript library for creating behavioral ... - CiteSeerX
Recommend Documents
Jul 29, 2005 - bear this notice and the full citation on the first page. To copy otherwise, to .... is that the best specification for expert pilot behavior ex- ists in the ...
Mar 8, 2010 - and apply it to the problem of finding client-side code injection .... cally explore the execution space of JavaScript application code. JavaScript ...
We demonstrate our type systems with a formalism of JavaScript, JS0. ...... Javascript Language Reference. http://developer.netscape.com/docs/manuals/js/. 13.
Nov 2, 1999 - lines a simple strategy for physicians to make the Internet a useful tool. Keeping up to date is one ... w
Dart is a new web programming lan- guage designed for performance with a custom VM. Despite the dramatic increase in performance it has not been possible ...
Aug 18, 2010 - Background: Many software packages have been developed to address the need for ... elements and rich analytics integrated within a tree.
Agents can then find the best available services to meet their needs by ..... exclusive. MEDIUM can be SOUND, SYMBOLIC, or VISUAL presentation: ..... implemented with auctions, which provide a bidding protocol whereby buyers and sellers.
Javascript is an interpreted language with a C like syntax. While many people ...
This article focuses on bringing people who already know another programming.
May 20, 2015 - nowadays is one of the most popular web development languages. ... There are two types of workers: shared and dedicated. A dedicated ...
... ROSCOE, JASON C. BOURRET, AND. WILLIAM H. AHEARN ... Address correspondence to Eileen Roscoe, New En- gland Center for Children, 33 Turnpike ...
Technology and Work and Behaviour and Information Technology. Eva Hopma is a Master's student in Industrial Design at the Eindhoven. University of ...... 2008, the 6th International Conference on Pervasive Computing, Sydney, Australia.
Oct 24, 2011 - grams]: Semantics of Programming LanguagesâPro- gram Analysis; K.5.6 ... 1. Introduction. Client-side scripting languages such as JavaScript are ... on the value. 1 https://www.owasp.org/index.php/Top_10_2010-Main ...
Melissa Sommerfeld Gresalfi. The University of ... classroom life (Martin, 2000, 2003; Tate, 1994). In the proposed ... difficulties (Boaler, 1998; Martin, 2000).
Subject Areas: Behavioral Agency Model, Decision Making, Executive Risk ... 1989). Supply chain executives (SCEs) aware of the potentially high, but uncertain.
Apr 7, 2005 - textbooks, syllabuses, training courses, codes of practice, standards, etc. There has ... continue to turn out systems that have had little effective.
Marketing Strategy and Director of the Center for Market Leadership,. Kellogg .... Periodic calls ... tation. EquipmentCo is a capital equipment manufacturer.
with semantics, including and developing small applications within the wiki ... exploit original HTML5 features and finally use an event based programmatic style ...
The idea of creating third space in a library environment is emerging in the ... The
research concluded third space libraries will attract and keep patrons if a.
DSL for multi-touch gestures defined by a context-free grammar. GeForMT features ... syntactical units. PEG.js is used to generate a concrete parser implementa-.
built its digital collection from standard musical repertoire identified as ... project, involving faculty from music, law, and library and information science, and ...
health care system offered âthe best of care, the worst of care.â1 ... Boston, MA 02215 (e-mail [email protected]). ... Residents. Table 1. Structure of Stoneman QI Elective. Method. Objective. Format .... Assessing the utilization of la
Nov 29, 2017 - International Studies report under President Jimmy Carter. (Perkins, 1979) to the ... that are rapidly propelling our field closer to aânew normalâ.
a much broader application range and their syntheses provide additional ... last five years, which use hard templates to create ordered re- plicas, provide ...
effectiveness of this approach a mobile robot control ... new platform of complete mobile robot control system. .... robot foraging behavior using a FPGA custom.
jsPsych: A JavaScript library for creating behavioral ... - CiteSeerX
Mar 28, 2014 - Behav Res (2015) 47:1â12 ... jsPsych's specialty) and back-end (server hosting and interfac- ing with ..... tion is required, and some devices may lack a dedicated ... particular experiment, then the best course of action is to use.
Behav Res (2015) 47:1–12 DOI 10.3758/s13428-014-0458-y
jsPsych: A JavaScript library for creating behavioral experiments in a Web browser Joshua R. de Leeuw
Published online: 28 March 2014 # Psychonomic Society, Inc. 2014
Abstract Online experiments are growing in popularity, and the increasing sophistication of Web technology has made it possible to run complex behavioral experiments online using only a Web browser. Unlike with offline laboratory experiments, however, few tools exist to aid in the development of browser-based experiments. This makes the process of creating an experiment slow and challenging, particularly for researchers who lack a Web development background. This article introduces jsPsych, a JavaScript library for the development of Web-based experiments. jsPsych formalizes a way of describing experiments that is much simpler than writing the entire experiment from scratch. jsPsych then executes these descriptions automatically, handling the flow from one task to another. The jsPsych library is opensource and designed to be expanded by the research community. The project is available online at www.jspsych.org. Keywords Online experiments . JavaScript . Amazon Mechanical Turk Putting an experiment online, particularly when it is coupled with a crowdsourcing marketplace like Amazon’s Mechanical Turk, enables extremely rapid data collection at much lower cost than a comparable experiment in a laboratory environment. Although online experiments will not work for every kind of experiment, some studies produce similar results for laboratory and online experiments across a range of behavioral tests (Buhrmester, Kwang, & Gosling, 2011; Crump, McDonnell, & Gureckis, 2013; Goodman, Cryder, & Cheema, 2013; Paolacci, Chandler, & Ipeirotis, 2010; Zwaan & Pecher, 2012). Although some concerns remain about certain kinds of behavioral experiments, such as J. R. de Leeuw (*) Department of Psychological & Brain Science, Cognitive Science Program, Indiana University, Bloomington, IN, USA e-mail: [email protected]
cognitive-learning and priming paradigms (Crump et al., 2013), the general consensus seems to be that online experiments produce results similar to those of laboratory experiments for many tasks. Given the cost and time savings of online experiments, plus such additional benefits as easy access to a different subject pool demographic than undergraduate college students (Ross, Irani, Silberman, Zaldivar, & Tomlinson, 2010), the popularity of online experiments seems likely to grow over the next several years. In order to conduct an online experiment, researchers must design experiments that either can be downloaded to a subject’s local computer or can be run in a Web browser. There are many options for running experiments in a Web browser: Platforms such as Qualtrics (www.qualtrics.com) and Amazon’s Mechanical Turk (www.mturk.com) have simple templates that can be customized with a point-and-click-style interface. WEXTOR (Reips & Neuhaus, 2002) is an online graphical user interface designed for building Web-based survey-like experiments that offers more flexibility than does something like Mechanical Turk, but the content that can be included is limited by the built-in functionality of the system. Alternatively, experimenters can write their own customized code to achieve designs that may not be possible otherwise. With the increasing sophistication of Web technology, it is now possible to create many different kinds of computer-based behavioral experiments in a Web browser. In particular, the adoption of HTML5 by all of the major Web browsers enables programmatic control over both pixel- and vector-based graphics embedded in a website, allowing rich graphical interactions akin to playing a videogame. However, programming these experiments can be challenging and may require substantial experience in Web development, particularly for more complicated designs. This article introduces an open-source JavaScript library called jsPsych, which accelerates the development process for browser-based experiments. The library contains code to perform a variety of tasks that are common across behavioral
2
experiments, such as displaying a stimulus, getting a response, and measuring response times. It also formalizes a structure for describing experiments, which enables experimenters to create experiment descriptions, and thus the corresponding experiment, by writing only a few lines of code. The library is designed so that experiments can be assembled from different components, called plugins. By providing plugins that can be used in different experimental contexts, jsPsych allows researchers to create custom experiments without generating all of the necessary code from scratch. Since the library is based on a modular architecture, researchers can share and utilize new plugins as they are developed, without any centralized modification to the library. The design of the library is covered in the next section of this article. The main purpose of jsPsych is to control the content that the subject will interact with during the experiment. Note that jsPsych will not handle several other aspects of creating an online experiment: For example, although jsPsych will record all of the data generated by a subject, it will not store the data in a database or other permanent location on the Web server. The experimenter must decide how to handle and implement data storage. (The online documentation contains examples of how to do this, but there are many possible solutions, and jsPsych is agnostic as to which to use.) If jsPsych is used to create an experiment for Mechanical Turk or other crowdsourcing marketplace, numerous steps must be gone through in order to launch the experiment on these platforms (for an excellent primer, see Mason & Suri, 2012). One possibility is to combine jsPsych with something like psiTurk (McDonnell et al., 2012), a framework that handles all of the “back-end” aspects of running an online experiment, such as hosting the experiment on a server and interfacing with Mechanical Turk to get subjects to complete the experiment. jsPsych complements this library nicely. psiTurk can be used to serve a jsPsych-based experiment, simplifying both the front-end (what the subject sees; jsPsych’s specialty) and back-end (server hosting and interfacing with Mechanical Turk, psiTurk’s specialty) aspects of online experiments. Finally, it is worth noting that jsPsych can be used for offline experiments, as well. Websites can be developed and hosted locally on a laboratory computer, which subjects can then complete without ever connecting to the Internet. Since there are very few differences between developing a browser-based experiment for the lab and for an online environment, the same code can be used to run the experiment in both locations, if desired. This may be a particularly useful feature for checking the validity of online experiments against those conducted in the laboratory.
Overview of jsPsych jsPsych is an open-source project hosted, at the time of writing this article, by GitHub. The URL for the project is www.
Behav Res (2015) 47:1–12
jspsych.org. The project website contains all of the source code for the current and previous versions of jsPsych, as well as a wiki containing additional documentation. Extensions or modifications of jsPsych can be integrated into the project through GitHub, enabling the community of users to share code. In the basic workflow of jsPsych, the experimenter generates a description of the experiment, making use of various jsPsych plugins, and then the core jsPsych library is used to execute the experiment in conjunction with the appropriate plugins. The core library provides a set of functions that are necessary across all experiments, but plugins are where the bulk of the action is. Each jsPsych plugin defines a task that a subject might engage in during an experiment. Examples include: reading instructions and pressing a key to continue, categorizing a stimulus and receiving feedback, responding as quickly as possible to a stimulus, and answering a survey question. At the time of writing, 14 plugins were well-tested and well-documented (see Table 1), and an additional 13 plugins either were in earlier stages of development or were not well-documented. The completed plugins can be found in the plugins folder (available at the jsPsych project website), and the plugins that are in development can be found in the dev folder, which is a subfolder of the plugins folder. In describing the process of generating an experiment with jsPsych, I will use two terms: trials and blocks. Trials are the basic unit of jsPsych. Each plugin defines the process of executing a trial. For example, the jspsych-categorize plugin defines a trial consisting of presenting a stimulus to the subject, getting a response, and presenting feedback. All of this functionality is embedded within the plugin, and the experimenter only has to define a small set of parameters to utilize it. To use the jspsych-categorize plugin, the experimenter would define the stimulus, the acceptable responses, and the text used to give feedback. Other plugins have different parameters that are specific to their functionality. A block is a collection of trials that are all defined by the same plugin, and thus all have the same overall structure. A block of categorization trials might involve the successive categorization of a few dozen stimuli, for example. Creating an experiment with jsPsych involves defining a series of blocks and then telling jsPsych to execute the experiment that has been defined. As is shown in the tutorial section of this article, this process is relatively simple, and certainly easier than writing the full program that would provide the equivalent functionality from scratch. Once a description of the experiment is created, the core library handles the execution of the experiment, keeping track of where the user is in the experiment and delegating control to the various plugins when appropriate. Two key goals in the design of jsPsych were modularity and expandability. Both are achieved by using the core + plugin architecture. jsPsych is highly modular; only the core
Behav Res (2015) 47:1–12
3
Table 1 List of jsPsych plugins Plugin File
Description of Trial
jspsych-animation.js
Displays a sequence of images at a specified frame rate. Sequence can be looped for a specified number of times. Timing of subject keyboard responses is recorded. Calls a specified function. This allows the experimenter to insert arbitrary function calls throughout the experiment. Displays an image or HTML object. Subject gives a keyboard response. Feedback is provided about the correctness of the subject’s response. Displays a sequence of images at a specified frame rate. Subject gives a keyboard response. Feedback is provided about the correctness of the subject’s response. Displays a collection of images on the screen that the subject can interact with by clicking and dragging. All of the moves that the subject performs are recorded. Displays an external HTML document (often a consent form). Either a keyboard response or a button press can be used to continue to the next trial. Allows the experimenter to check if conditions are met (such as indicating informed consent) before continuing. Displays a programmatically generated stimulus designed to mimic stimuli used by Palmer (1977) and Goldstone and colleagues (Goldstone, Rogosky, Pevtzow, & Blair, 2005). Gives the option to allow the subject to manipulate the stimulus (for example, to test the subject’s ability to recreate a stimulus that they previously saw). Can optionally display corrective feedback if the stimulus is editable. Displays two stimuli sequentially. Stimuli can be images or HTML objects. Subject responds using the keyboard, and indicates whether the stimuli were the same or different. Same does not necessarily mean identical; a category judgment could be made, for example. Displays two stimuli sequentially. Stimuli can be images or HTML objects. Subject uses a draggable slider that is shown on screen to give a response. Anchor labels for the slider can be specified. Displays an image or HTML object. Subject gives a response using the keyboard. Displays a set of questions with Likert scale responses. Subject uses a draggable slider to respond to the questions. Displays a set of questions with free response text fields. Subject types in answers. Displays HTML formatted text. Variables can be inserted at the moment the text displays (useful for giving overall accuracy feedback, for example). Subject presses a specified key to continue. Displays either an image or HTML object stimulus (X). After a short gap, displays two additional stimuli (A and B). Subject selects which of the two stimuli matches X using the keyboard.
The columns display a list of jsPsych plugins and a brief description of the trial structure that each defines. More information, including a working example for each plugin, is available at the project wiki (https://github.com/jodeleeuw/jsPsych/wiki/List-of-Plugins).
library and plugins that are actually used by an experiment are required to be included in the experiment Web page. Plugins are designed so that they can interact with any other subset of plugins. Creating a new plugin allows jsPsych to be expanded by experienced programmers. Plugins have a very flexible structure, making it possible to create a plugin to define most kinds of trials that an experiment requires. The hope is that as more experiments are created using jsPsych, the library of available plugins becomes large enough that most
experiments can be developed by assembling preexisting plugins and writing only a few dozen lines of code (this is already possible with the currently available plugins for many common types of experiments that psychologists conduct). For a detailed description of how to create a plugin, see this wiki page at the jsPsych project website: https:// github.com/jodeleeuw/jsPsych/wiki/Create-a-Plugin. The use of preexisting plugins is covered in the tutorial part of the article.
4
Features of the core library Although most of the code used to run an experiment will exist in the plugins, the core library is the glue that holds everything together. Besides handling the execution of the experiment, the core library has a few other functions that range from critical (e.g., data storage) to optional. Data storage Whenever a plugin stores data, it should call the writeData() method defined in the core library. This method does two important things. First, it stores the data in memory so that it can be retrieved later by various jsPsych functions. Second, it invokes a function call to indicate that new data has been recorded (see the next section on event related function calls). At any point, the method jsPsych.data() can be called to recover all of the data stored so far. The data is organized as a multilevel array. The top level corresponds to each block of the experiment. The second level corresponds to individual trials. Each second level element is a JavaScript object defined by the plugin that stored the data. Plugins can store arbitrarily defined objects, allowing any kind of data to be stored. The object returned by calling jsPsych.data() can be represented as a JSON (JavaScript object notation) string, enabling relatively simple transfer between jsPsych and other programming languages, such as R, for further data analysis. Data from jsPsych can also be retrieved as commaseparated value (CSV) strings, suitable for importing into spreadsheet or statistical analysis packages. The method jsPsych.dataAsCSV() will return a string containing all of the data in CSV format. Another method, which has limited support (see the Current Limitations section), is to write a CSV file to the hard drive of the computer running jsPsych, by calling the jsPsych.saveCSVdata() method (the tutorial section of this article will give an example of using both of these methods). However, this is not the recommended way to save data. Rather, it is meant to be used as a quick way to check the data during the development process. Ultimately, data should be saved in a database or as a file on the server hosting the experiment. This ensures that the experimenter can access the data, and that they are securely stored. The online documentation gives some pointers on how to accomplish this. Event-related function calls Certain events in the course of an experiment are designed to trigger calls to functions. These functions can be specified by the experimenter, meaning that arbitrary code can execute when these events happen. The four events that trigger a function call are (1) the moment before a trial begins, (2) the moment after a trial ends, (3) the end of the experiment, and (4) the moment that data are recorded. No built-in functionality is associated with these events, and the events can be used (or not used) however the experimenter sees fit. As an example, the event that occurs when data is recorded could be used to permanently store the
Behav Res (2015) 47:1–12
new data in a database, enabling data to be progressively saved while the experiment is being completed. Progress tracking The core library keeps track of how many trials are completed and how many are left in the experiment. Calling jsPsych.progress() returns a JavaScript object with information about the total number of blocks in the experiment, the total number of trials in the experiment, the current trial number (relative both to the whole experiment and to the current block), and what the current block number is. This can be used in a variety of ways. One common use case is to combine the progress information with the event related function call that occurs when a trial ends. A function can be specified that checks the current progress and updates a progress bar on the screen, so that the subject is aware of their approximate position in the experiment. Preloading images For many experiments, it is important to preload image files. This ensures that images will display in the browser as soon as jsPsych attempts to display them, rather than having to wait for them to be downloaded from the server hosting the experiment. To facilitate preloading of images, jsPsych has a built in preloading function: jsPsych.preloadImages(). This function has optional callback function parameters that can be triggered as images load and when all images finish loading. These can be used to display a loading progress screen, and to wait until all images are loaded before beginning the experiment. Interfacing with amazon mechanical turk Since Mechanical Turk is a common way to recruit subjects for online experiments, jsPsych provides some basic functionality to interface with Mechanical Turk. The jsPsych.turkInfo() method returns a JavaScript object containing the Mechanical Turk worker ID, HIT ID, and assignment ID. It also determines whether the page was loaded from Mechanical Turk, which can be useful to prevent unauthorized users from completing the experiment. Keeping track of experiment start time Finally, the core library records the time that the experiment began. This can be useful when determining how long a subject took to get through an experiment. This is particularly useful in an online context, where subjects could get up and leave their computer in the middle of the experiment and return later to complete it. Current limitations jsPsych was initially created as a way of rapidly building relatively simple experiments. Although the complexity of possible experiments is now quite high, there are still some limitations. Because the library is built around the idea of creating an experiment description before executing the experiment, it does very well with static experiments, but has
Behav Res (2015) 47:1–12
few features for dynamically altering the course of the experiment as the subject is engaged. The software has no core library features to handle conditional or looping changes in the experiment structure. One solution, though perhaps not an ideal one, is to create a plugin that implements conditional changes for the specific task. A plugin in the /dev folder, called jspsych-adaptive-category-train, implements a specific category-training protocol in which subjects must reach a certain threshold of performance on a category learning task. It does this by treating the entire training protocol as a single trial, and implementing the conditional logic within the trial structure. Although this works, it is not a particularly elegant or general solution. At the moment, jsPsych is best used in cases in which the structure of the experiment is completely known before the subject begins. There are plans to implement a general set of conditional structures in the core library for the future. Browser compatibility is always a major concern for any Web development project. The core library and most plugins will work in all of the latest versions of the major browsers (Chrome, Firefox, Safari, and Internet Explorer). jsPsych has been tested most thoroughly in Chrome; other browsers may have compatibility issues that haven’t been discovered yet. One feature that is only available in Chrome and Firefox is the ability to write the data to a local text file. If you are planning to use this feature in a laboratory environment, Chrome is the best option. One specific kind of browser compatibility issue worth noting is the use of mobile devices and tablets with Web browsers. The core jsPsych library works with these devices, but specific plugins may need to be used for certain kinds of devices. For example, devices that use touchscreens in lieu of a mouse require different plugins when touch-based interaction is required, and some devices may lack a dedicated keyboard, making certain kinds of user interaction different, such as responding to a stimulus by pressing a key. All of the supported plugins at the time of writing this article were designed for traditional mouse and keyboard interaction, but jsPsych has been used with the iPad in laboratory environments to collect touch-response data. The plugin used for this experiment is jspsych-storybook, located in the /dev folder. It may be a useful example for developing this kind of tool. If one is concerned about browser compatibility issues for a particular experiment, then the best course of action is to use JavaScript’s feature detection capabilities to determine whether the browser is capable of running the experiment. This can be done before the experiment starts, with an error message being displayed if the browser is not compatible. A summary of feature detection is available at http://learn.jquery.com/ code-organization/feature-browser-detection/. Currently, automatic feature detection is not integrated into jsPsych, but it is something that will likely be added in the future.
5
Finally, measuring response times (RTs) with JavaScript has inherent limitations that researchers should be aware of. When responses like pressing a key are generated by the subject, they are treated as events by JavaScript and added to an event-processing queue. The time it takes to processes the event will depend on a number of factors, including which browser the subject is using, how fast their computer is, and the number of other tasks that the computer is executing. Researchers should treat JavaScript-based RT measures with some caution, though certain factors will mitigate these problems: within-subjects RT differences will be more reliable than between-subjects RT differences since within-subjects designs eliminate variability caused by computer hardware and software, and long RTs will be less sensitive to these problems than short RTs because the relative magnitude of the noise caused by the event-driven processing will be less.
Creating an experiment with jsPsych: Eriksen flanker task The rest of this article is a tutorial, covering how to set up a simple experiment using the jsPsych library. I have chosen to use a variation of the Eriksen flanker task (Eriksen & Eriksen, 1974), closely inspired by an article by Kopp and colleagues (Kopp, Mattler, & Rist, 1994). In the Eriksen flanker task, the subject responds to a visual stimulus (e.g., a left-pointing arrow) by pressing a specified key (e.g., the left arrow key). In some trials, incongruent stimuli (e.g., a right-pointing arrow) are presented in the surrounding visual field, flanking the target, whereas in other trials, congruent (or neutral) items are presented. It has been consistently found that incongruent flanking items slow down RTs relative to congruent flankers (Fox, 1995). This experiment is simple enough to serve as an introductory tutorial, and hopefully it will clearly illustrate how to use the jsPsych library to rapidly build experiments. You can try the complete experiment yourself by going to www.jspsych.org/examples/tutorial/. You can also download the completed tutorial, including all of the source code and image files, at www.jspsych.org/examples/tutorial/download/. Some background information that might be necessary to fully understand how the code works is outside the scope of this article. In particular, I will not be covering HTML, CSS, or JavaScript fundamentals. A wealth of freely available online resources can be used to learn the basics of these tools. I will only be covering how to integrate jsPsych with these tools. Step 1 Installing jsPsych For most applications, the Web page containing the experiment will be hosted on a Web server. However, it is just as easy to develop the experiment on a personal computer. Fortunately, in both cases the installation process for jsPsych is
6
the same. In fact, installation is a bit of a misnomer here, since all that needs to happen are the following steps: 1. Go to https://github.com/jodeleeuw/jsPsych/releases or www.jspsych.org and download the latest version of jsPsych. At the time of writing, the latest was version 2.0. You may want to start with that version (available at the first link) to guarantee that the instructions below will work. 2. Put the downloaded files in an easy-to-reference location. For example, if you are developing the experiment in a folder on your personal computer, you might want to create a subfolder called “scripts” that will hold the JavaScript files your experiment needs to work. When jsPsych is loaded on the experiment Web page, the location of the files will be referenced.
Behav Res (2015) 47:1–12
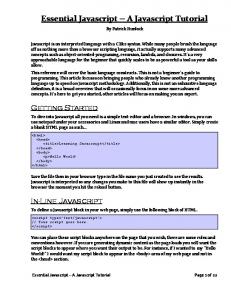
jspsych-palmer library uses Raphael to create an interactive stimulus. This is outside the scope of the tutorial example, but I mention it here to point out the possibility. You can download the images in Fig. 1 at www.jspsych.org/ examples/tutorial/download.html. Create a folder called img in the project folder, and place the four image files inside the img folder. Step 3 Setting up an HMTL page for jsPsych jsPsych works by dynamically manipulating the content of a Web page. To start using jsPsych, only a minimal framework of a Web page is needed. The minimal page to run jsPsych will look something like this:
If you want to follow along and recreate the experiment as I am describing it, you should create a folder on your personal computer to hold all of the files that you will need (I will call this folder the project folder). Within the project folder, create a subfolder called scripts. Place the jsPsych library in the scripts folder; you should see jspsych.js in the scripts folder, and a plugins folder that contains all of the plugins also in the scripts folder. Step 2 Creating stimuli For most experiments, you will need to create the stimuli outside of jsPsych. For this experiment, I have created four images (Fig. 1). In this version of the Eriksen flanker task, subjects must press the arrow key that corresponds to the direction that the middle triangle is pointing. Two stimuli have congruent flankers, and two have incongruent flankers. A note for advanced users: One exciting thing about HTML5 is the possibility of programmatically generating stimuli using