OVERVIEW OF THE ACR MRI ACCREDITATION PHANTOM Geoffrey D. Clarke, Ph.D. University of Texas Southwestern Medical Center at Dallas email:
[email protected] ˝ INTRODUCTION ˝ ˝ The ACR magnetic resonance accreditation phantom (ACR MRAP) has been designed to examine a broad range of instrument parameters. These include: • Geometric Distortion • Spatial Resolution • Slice thickness and position • Interslice Gap • Estimate of Image Bandwidth • Low Contrast Detectability • Image Uniformity • Signal-to-Noise Ratio (SNR) • Physical and Electronic Slice Offset • Landmark This document contains phantom specifications and materials and a brief description of image analysis. For a more complete description of the ACR MRI Accreditation Phantom, you may order the publication, Phantom Test Guidance for the ACR MRI Accreditation Program, from the American College of Radiology.
PHANTOM SPECIFICATIONS The ACR MRI accreditation phantom is constructed of acrylate plastic, glass, and silicone rubber. Ferromagnetic materials have been excluded. The unit is a cylinder 20.4cm in diameter by 16.5cm in length. Internal dimensions are 19.0 cm diameter by 15.0 cm in length. The compact design allows placement in axial coronal, or sagittal orientation in almost all MRI head coils. Thus, tests can be conducted in all three major planes. There is a reference line down one side of the phantom. The phantom is filled with 10 millimolar (mmol) nickel chloride solution containing sodium chloride (45 mmol) to simulate biological conductivity. The contrast vial contains 20 mmol nickel chloride and 15 mmol sodium chloride solution providing
GEOFFREY D. CLARKE
1
MRI PHANTOMS & QA TESTING
a difference in T1 and T2 values. Actual values will depend on the field strength in use and the temperature of the phantom. The resolution insert on one end of the phantom consists of three matrices of holes in an 11mm thick bar. Hole diameters are 1.1mm, 1.00mm, and 0.9mm. The spaces between the holes are equal to the respective hole diameters. This insert is used to test limiting in-plane spatial resolution. Two counter-descending wedges are found at this end of the phantom. They each contain a 1 cm slit. The wedges form two ramps of test solution which descend at a 1:10 ratio to permit accurate measurement of slice thickness. The grid insert toward the center of the phantom is a 10 by 10 array of squares 144 mm on a side and 10 mm thick. It is used for placing the diagonal lines in the geometric distortion tests. The nominal interior diameter of the phantom is 190 mm
GEOFFREY D. CLARKE
2
MRI PHANTOMS & QA TESTING
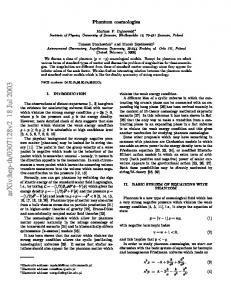
Low Contrast Disks
45 wedges
100 mm
Array of Squares
15 cm
Resolution Insert
45 wedges
19 cm Figure 1. Saggital localizer view of ACR MRI Accreditaion Phantom with several prominent landmarks labeled. Four low-density contrast disks are located on the far end of the phantom. They consist of thin sheets of polycarbonate plastic 0.002, 0.004, 0.006, and 0.008 inch in thickness. Holes of different diameters have been cut into the disks. Partial volume contributions of both the fill solution and these membranes produce slight variations in signal strength which may be used to visually assess the scanner’s ability to distinguish low contrast objects. Two sets of paired 45o wedges are located on the top and bottom of the phantom. Each pair is 2 cm in length with the center of intersections at 1 cm from either end. The distance between the intersection points of the paired wedges is 100mm (see Figure 1). The wedges are used to precisely measure physical and electronic slice offsets. The paired wedges can also be used to evaluate small interslice gaps.
GEOFFREY D. CLARKE
3
MRI PHANTOMS & QA TESTING
IMAGING PROTOCOLS ˝ ˝ • 1. Saggital Localizer: TR = 200 ms, TE = 20 ms, 256x256 matrix, 25 cm FOV, 10 mm slice thickness, NSA=1, single saggital slice (52 seconds). Landmark on the center reference line. • 2. T1 Weighted Multislice Study: TR = 500 ms, TE = 20 ms, 256x256 matrix, 25 cm FOV, 12 slices, 5 mm slice thickness with 5 mm gap in between, NSA=1(2.2 minutes). Begin at center of front set of wedges as seen in localizer. • 3. T2 Weighted Multislice Multiecho Study: TR = 2000 ms, TE1 = 20 ms, TE2 = 80 ms, 256x256 matrix, 25 cm FOV, 12 slices, 5 mm slice thickness with 5 mm gap in between, NSA=1(8.5 minutes). Begin at center of front set of wedges as seen in localizer. Deviations from imaging protocols: Some MRI systems, particularly older ones, will not be capable of performing the scans as indicated above. In such cases the ACR allows the applicants to submit images acquired using their standard imaging protocols.
GEOFFREY D. CLARKE
4
MRI PHANTOMS & QA TESTING
12 11 10 9 8 7 6 5 4 3 2 1
Figure 2. Saggital localizer image with slice positions for axial T1-weighted and T2-weighted images. The white arrow along right-hand side indicates distance between 45 degree wedge crossings for length of phantom measurement.
Image Analysis Bandwidth/Chemical Shift The chemical shift insert is composed of square structures, one containing 10mmol nickel chloride solution and the other vegetable fat . These square structures are arranged catty corner but will appear shifted toward or away from each other, depending on the direction of the chemical shift. Bandwidth (BW) can be assessed by measuring the chemical shift in millimeters, dividing the FOV by this and multiplying the result by 3.5 ppm of the magnet’s operating frequency. Landmark ˝ ˝ Landmark accuracy can be checked by examining the bars in the first slice. If they are of equal length and if the acquisition was started from the center of the first set of paired wedges (see saggital localizer) landmark is correct. ˝ GEOFFREY D. CLARKE
5
MRI PHANTOMS & QA TESTING
GEOFFREY D. CLARKE
6
MRI PHANTOMS & QA TESTING
Slice Thickness The center insert in slice #1 should be used to measure slice thickness. The two slits in the large wedges ascend and descend at a 1 to 10 rate. A slice taken through these wedges will show lines of signal where the slit (filled with solution) is encountered. Measuring the length of these bright lines in millimeters, averaging (to remove errors from slight misalignment of the phantom), and dividing by 10 will give the slice thickness. The edges of the signal region fade to black, and the distance measurement should be made from a point of halfmaximum signal on each end of each wedge. Resolution The resolution portion of the phantom contains three matrices of holes with spacings of 1.1mm, 1 .0 mm, and 0.9mm. The spaces between the holes are the same distance as the respective hole diameter. The holes are offset slightly to account for positioning differences. Slice #1 (5mm,25cm FOV, 256x256 matrix) should show individual 1.1mm and 1.0 mm holes but only a blur for the 0.9 mm sets. A magnified image, carefully adjusted for window and level to resolve the smallest part of the resolution pattern, should evaluated. This test should be run without any data shaping filters (e.g., Fermi, Hanning, Hamming, etc.).
Figure 3. Image of Slice #5 with array of squares. Grey arrows indicate the positions of the measurements for determinig percent geometric distortion.
˝
GEOFFREY D. CLARKE
7
MRI PHANTOMS & QA TESTING
Geometric Distortion: Visual inspection is often sufficient to detect severe warping or stretching of the grid of squares (Image #3). The distance calculation function on the console should be used to verify that the inner diameter of the phantom is accurately measured. The inner diameter of the phantom is 190mm. Total distance across, from top to bottom, and along each diagonal should be 190 mm. An angle along the side of the grid should read 90 degrees. Measurement directly on film can be used to detect geometric distortion in the matrix or laser camera. Horizontal, vertical, and diagonal measurements across the phantom diameter should give the same result N Figure 4.
N
SIGNAL N
N
Image of Slice #7 used for signal-to-noise measurements. Signal is obtained from mean value of large circular ROI. Maximum and minimum signal values should also be obtained from within this ROI. Noise is obtained from the standard deviation of the signal in the background ROI’s, depicted by the ellipses marked “N”. Noise ROI’s should be placed above, below, to the right and to the left of the phantom image.
Signal-to-Noise The first few slices of acquisition #2 contain a small circle from the vial of 20 mmol nickel chloride solution. A region of interest (ROI) of approximately 2.5 cm2 is placed on the circle and the average pixel value is recorded (Figure 3). Outside the phantom image (where no signal should be generated) the average pixel value in the corners is recorded in four ROI’s of 15-20 cm2 (background). The standard deviation of this value is also taken as it reflects the noise inherent in the system. The solution value minus the average of the background value is a measure of signal. This is divided by the average of the standard deviation of the background to yield SNR. A similar analysis should be conducted on the T2weighted echo in acquisition #3. Radio Frequency (RF) Uniformity
GEOFFREY D. CLARKE
8
MRI PHANTOMS & QA TESTING
RF uniformity can be assessed by analyzing slice #7 (Figure 4), taken from the flood section of the phantom. Over the center ROI of the image (approximately 210 cm2) determine the SNR using the same technique as described for slice #1. With the windows width turned down to minimum value determine the brightest and darkest 1 cm2 areas within the center ROI by varying the level. Record the SNR for these 1 cm2 areas. Subtracting each from the average SNR and dividing by the average SNR gives the percent peak-to-peak variation in signal across the flood image.
Figure. 5
Slice #8
Slice #9
Wedge length difference
Slice #10
Four slices with low-contrast detectibility inserts. More of the sets of three holes are visualized as one goes from slice #8 to slice #11. Note that in slice #11 the wedge length difference is used to indicate slice position offsets.
Slice #11
Interslice Gap Interslice gap can be checked by comparing the "bars" from the small paired wedges on each end of the phantom. The wedges are each 2cm long, set at an angle of 45o, and are separated by 100mm. By starting the multi-slice at the center of the first set of wedges, the bars will appear equal in that slice. If this is not true there may be an error in the internal landmarking system of the MRI scanner. Eleven slices at 5 mm skip 5 mm should move 100 mm which is the distance to the center of the second wedges. This image of slice #11 (Fig. 5), should also have equal bars. The difference divided by two is the error in the total of these slices expressed in mm. Thus, if slice thickness is correct and the overall distance shift is correct, interslice gap must also be accurate. Low Contrast Detectability
GEOFFREY D. CLARKE
9
MRI PHANTOMS & QA TESTING
The thin polycarbonate membranes in the low contrast inserts displace a small amount of fill solution, reducing signal in proportion to their thickness. When imaged with a relatively thick slice (5 mm) partial voluming yields differences in signals between areas where the membrane exists and where the are holes in it. Four variations in thickness produce a contrast range from 2% to 8%. MRI PHANTOM AND QA TEST REFERENCES Rice SO. Mathematical analysis of random noise. (Parts 1 & 2) Bell Sys Tech J 1944; 24:46156. Rice SO. Mathematical analysis of random noise.(Parts 3 & 4) Bell Sys Tech J 1945; 25:282332. Hoult DI, Richards RE. The signal-to-noise in the nuclear magnetic resonance experiment. J Magn Reson 1976; 24:71-85. Hoult DI, Lauterbur PC. Signal-to-noise in nuclear magnetic resonance zeugmatography. J Magn Reson 34:425-433. Edelstein WA, Bottomley PA, Pfeifer LM. A signal-to-noise calibration procedure for NMR imaging systems. Med Phys 1984; 11:180-185. Henkelman RM. Measurement of signal intensities in the presence of noise in MR images. Med Phys 1985; 12:232-233. Maudsley AA. Sensitivity in Fourier imaging. J Magn Reson 1986; 68:363-366. Hendrick RE. Sampling time effects on signal-to-noise and contrast-to-noise ratios in spin-echo MRI. Magn Reson Imag 1987; 5:31-37. Kraft KA, Fatouros PP, Clarke GD, Kishore PRS. An MRI phantom material for quantitative relaxometry. Magn Reson Med 1987; 5:555-562. Selikson M, Fearon T. Averaging error in NMR slice profile measurements. Magn Reson Med 1988; 7:280-284. Kaufman L, Kramer DM, Crooks LE, Ortendahl DA. Measuring signal-to-noise ratios in MR imaging. Radiology 1989; 173:265-267. Parker DL, Gullberg GT. Signal-to-noise efficiency in magnetic resonance imaging. Med Phys 1990; 17:250-257. Price RR, Axel L, Morgan T, Newman R, Perman W, Schneiders N, Selikson M, Wood ML, Thomas SR. Quality assurance methods and phantoms for magnetic resonance imaging. AAPM Report #28. Med Phys 1990; 17(2):287-295. Och JG, Clarke GD, Sobol WT, Rosen CW, Mun SK. Acceptance testing of magnetic resonance imaging systems: Report of AAPM nuclear magnetic resonance task group #6. Med Phys 1992; 19(1):217-227. Bakker CJG, Moerland MA, Bhagwandien R, Beersma R. Analysis of machine-dependent and object–induced geometric distortion in 2dft mr imaging. Magn Reson Imag 1992; 10:597608. Frayne R, Holdsworth DW, Gowman LM, Rickey DW, Drangova M, Fenster A, Rutt BK. Computer-controlled flow simulator for mr flow studies. J Magn Reson Imag 1992; 2:605. McGibney G, Smith MR. An unbiased signal-to-noise ratio measure for magnetic resonance images. Med Phys 1993; 20:1077-1078. Hyde RJ, Ellis JH, Gardner EA, Zhang Y, Carson PL. MRI scanner variability studies using a semi-automated analysis system. Magn Reson Imag 1994; 12(7):1089-1097 Gudbjartsson H, Patz S. The Rician distribution of noisy mri data. Magn Reson Med 1995; 34:910-914.
GEOFFREY D. CLARKE TESTING
10
MRI PHANTOMS & QA