Expectations for the Project Proposal Document and the Design Review ................
. 3 ..... Design for Computer and Electrical Engineers by J. Eric Salt and Robert
Rothery ... Click here for some sample outlines of parts of project proposals.
ECE496Y
Project Proposal Guidelines
PROJECT PROPOSAL GUIDELINES Table of Contents Overview ............................................................................................................................. 2 Project Proposal Introduction ............................................................................................. 2 Expectations for the Project Proposal Document and the Design Review ................. 3 Resources .................................................................................................................... 3 Example Project Proposals ......................................................................................... 3 Proposal Parts and Document Evolution ............................................................................ 3 Submission Dates, Times, Places.................................................................................... 5 Document Format & Section Details .................................................................................. 5 The Test Document ......................................................................................................... 5 The Body......................................................................................................................... 6 Background and Motivation ....................................................................................... 6 Project Goal ................................................................................................................ 6 Project Requirements .................................................................................................. 6 Validation and Acceptance Tests ................................................................................ 6 Possible Solutions and Design Alternatives ............................................................... 6 Assessment of Proposed Solution ............................................................................... 7 Describing an Initial Technical Design....................................................................... 7 Work Plan ................................................................................................................... 7 Appendix A: Student-supervisor agreement form ...................................................... 8 Appendix B: Draft B Evaluation Form (Completed by the Engineering Communication Centre) .............................................................................................. 8 Appendix C: Report Attribution Table ....................................................................... 8 Details of Parts of the Proposal Body ................................................................................. 8 Background and Motivation ....................................................................................... 8 Project Goal ................................................................................................................ 9 Project Requirements .................................................................................................. 9 Validation and Acceptance Tests .............................................................................. 12 Technical Design .......................................................................................................... 13 Possible Solutions and Design Alternatives ............................................................. 13 Assessment of Proposed Solution ............................................................................. 13 Describing an Initial Technical Design .................................................................... 13 System-level Overview .............................................................................................. 14 Module-level Descriptions ........................................................................................ 14 Work Plan ..................................................................................................................... 14 A Work Breakdown Structure (WBS) ........................................................................ 14 Financial Plan............................................................................................................ 17 Feasibility Assessment .............................................................................................. 18
Updated June , 2012
1
ECE496Y
Project Proposal Guidelines
Overview For probably the first time in your undergraduate program, you are required to propose a larger project and to carry it out to completion. In teams of two to four students, you will be working on the common project but individual team members will be required to take on responsibilities for specific work for which each will be held accountable. Interaction, collaboration and assistance are allowed and expected, but each person will receive an individual mark for his/her work performed in the project. The first step in this process is the project proposal.
Project Proposal Introduction The Project Proposal is a team document that is much like the PR/PMP (Project Requirement/Project Management Plan), the CDS (Conceptual Design Specification) and some of the FDS (Final Design Specification) you did in first year, all rolled together. It provides the following: background/motivation, goal, project requirements alternate design solutions, justification for your choice of solution (the “design”), a breakdown of the design into parts (modules) a set of system tests to prove the final outcome will meet the goal and a plan (budget and timeline) to execute the design and tests by the end of March. Some of what you were asked for in first year (client analysis for example) are not explicitly asked for here. You are expected, however, to provide enough reasoned information so that both your supervisor and administrator can understand what you are doing, why you are doing it and the approach you will be taking. Using this information your supervisor and administrator should be able to understand the project well enough that we can help you to detect any serious issues and to address them during or prior to the design review meeting. A good project proposal takes time to develop and involves the entire team, the supervisor, and the administrator, and you will probably find that it is not easy to generate this document. A popular misconception is that 'all this writing' takes one away from the 'real' design. In truth, producing this document will force you to work on your ‘real’ design all along, only at the most abstract, highly-efficient system level which is often quite unfamiliar for most students and new engineers.
Updated June , 2012
2
ECE496Y
Project Proposal Guidelines
Get as much help as you can from your supervisor. Remember, however, that it is ultimately your project and that you, not your supervisor, are accountable for it. It may be helpful to think of your team as a consulting firm with your supervisor as the ‘expert client’ who has a good understanding of the problem and the background, and your administrator as your manager who is monitoring your team’s progress and performance.
Expectations for the Project Proposal Document and the Design Review o background research complete o a proposal for a system design which will be defended and discussed by your team o not a final detailed design, although the approach for detailed design should be understood o understanding of possibilities and alternatives It is fully understood that the final design could differ from this proposal as the details are worked out and certain approaches prove problematic.
Resources ECE298 Course Notes (ECE298 was a course in system design, replaced in part by ECE297), Chapter 3 Design for Computer and Electrical Engineers by J. Eric Salt and Robert Rothery (available on a short loan basis in the Engineering Library) Designing Engineers, McCahan, Anderson, Weiss, Kortshot, Woodhouse (draft version is available through Wiley; to be published 2013) Other design books and materials
Example Project Proposals Click here for some sample outlines of parts of project proposals. These examples are drawn from past student reports and the format when they were generated is different than it is now. They do illustrate how the general guidelines can be applied to a variety of design projects. Some details are omitted from the examples. You should NOT blindly copy the examples, but use them to help your own thoughts as how to best describe your project.
Proposal Parts and Document Evolution Note the following dependencies diagram. The links and flow should be established by your document:
Updated June , 2012
3
ECE496Y
Project Proposal Guidelines
Stakeholders, operating environment, etc.
Background & motivation
Goal
Requirements
Possible Solutions System Tests Selected Solution
Modules in Solution
Work Plan
Risks Later you will use the work plan to track your progress and changes, and you will ultimately prove your design by showing it passes the system tests
The expectation is that you will develop all your deliverables iteratively. This will be done explicitly for the Project Proposal Documents. You will submit two drafts (A and B) for evaluation before the final submission; only the final submission will be marked. The drafts give opportunity for you to submit work, get feedback and improve the final deliverable; while there is no mark for specific content being there or being complete, the drafts must be submitted. Draft A is submitted early and will be evaluated by your administrator. Draft B is submitted before Draft A is returned, and this second draft is evaluated by the Engineering Communication people (ECC). The final version is marked by your administrator. The following table gives areas you might want to target for Drafts A and B, and what sections are expected for the final draft. (Every submission should have a cover page. You can determine when you want to include executive summary, table of contents, conclusion, and references.) Notes on the sections follow.
Updated June , 2012
4
ECE496Y
Project Proposal Guidelines
Section Project Background Background and Motivation Test Document (Embedded – separate cover page) Project Goal Project Requirements Validation and Acceptance Tests Technical Design Possible Solutions and Design Alternatives Assessment of Proposed Design System-level overview Module-level descriptions Work Plan Gantt chart or similar (with work breakdown structure) Financial plan Feasibility Assessment (resources, risks)
Draft A (Evaluated by Administrator)
Draft B (Evaluated by ECC)
Final Draft (Marked by Administrator)
X
X
X
X X X
X X X
X X X
X
X X
X X X X
X X X
X X X
X
Appendices Appendix A: Student-supervisor agreement form Appendix B: Draft B Evaluation Form (completed by ECC) Appendix C: Report Attribution Table Appendix D,E,etc.: Authors’ appendices
X X X X
Submission Dates, Times, Places For submission dates/times/places for drafts and final documents, see the master schedule. Note that not all submissions go to the same place!
Document Format & Section Details See the Document Guidelines for overall information on document format and content. The following provides brief details on each section of the document not covered in the general guide.
The Test Document The Goal, the Requirements and the Validation and Acceptance Tests constitute a separate subsection that will be maintained as the project evolves. You should have a separate cover page for the test document but embed it in your proposal document, then separate it out afterwards. You will bring it to the Design Review and the December meeting, and a copy will be submitted with the Progress Report and the Final Report.
Updated June , 2012
5
ECE496Y
Project Proposal Guidelines
The Body In the body you will give the background for the project, the project goal, the project requirements, alternative and the selected design for the project and overview technical details of that selected design. Background and Motivation
Describe background for about for the level of an engineer entering 3rd year. Research is expected to support claims.
Background should be enough to support the description of the goal and the discussion on alternative solutions
Motivation can be that it is an interesting exercise in technology, an alternate way of implementing an existing technology or have some practical, novel place in what is available.
Project Goal
The project goal is a solution-independent statement that summarizes what your design project is to achieve. If you are doing a “proof of concept” or “scaled-down version” or similar, say so here! Project Requirements
Provide a list of solution-independent target project requirements which will be used to evaluate the success of your project. There are three divisions: Functional requirements [must-have to fill goal] Constraints [legislated or client-enforced] Objectives [nice to have. Traded off against cost, time, other objectives] Note: All must be testable. If you can’t write a test, further decomposition or specification is needed. Set a project scope (functionality) that is doable in the time you have. Remember about integration, testing, deliverables and the effects of loading of other courses. See the detailed section on requirements for information about research projects and software projects involving incremental development. Validation and Acceptance Tests
Every requirement must have at least one associated test to confirm it works. One test may cover several requirements. There are usually additional tests specified to validate that the goal has been satisfied. Possible Solutions and Design Alternatives
Describe design alternatives, comparing with the design you choose. Develop these alternatives before you select one. Updated June , 2012
6
ECE496Y
Project Proposal Guidelines
DO NOT ESTABLISH A DESIGN CHOICE, AND THEN THINK ABOUT ALTERNATIVES JUST TO GET THIS DOCUMENT DONE. Assessment of Proposed Solution
Comment about the strengths, weaknesses, and trade-offs made in the proposed solution. What reasons led you to choose this solution over some of the others you explored? This section does not need to be long, but ensures that you can provide some justification for your design decisions to date.
Describing an Initial Technical Design
This should describe how the system works, break the system into modules and describe the modules including inputs and outputs. A system block diagram is almost always included, with labels on the modules and the interconnections. Indicate which modules you are purchasing and which you are designing. Work Plan
Here are the key elements of a work plan:
A Gantt chart or other type of plan that indicates a schedule of delivery of parts of your project. Typically this will include a work breakdown structure in the tasks. A financial plan A Feasibility Assessment
Notes: One person and only one person must be assigned responsibility for each task The chart must be readable in all versions submitted. The tasks must not be open-ended. It must be clear when they are finished. So “Research Microprocessors” is not enough. “Select Microprocessor” would be a correct alternative, since this is closed with the decision “We are using microprocessor xxx”. The financial plan should include everything that would normally cost money, excepting your time, even if parts and facilities are provided for “free” but are normally charged out. The financial plan should also include income, including student $100 contributions and anticipated other income. The feasibility assessment should outline the available skill set of the team appropriate to the project, resources available that you will use and a risk assessment and how the risk might be handled.
Updated June , 2012
7
ECE496Y
Project Proposal Guidelines
Appendix A: Student-supervisor agreement form
The agreement is available in Word or PDF format (click on either format to download file). The agreement must be signed by your team and your supervisor, and must be included in the hard copy of the final Project Proposal draft. It is not required for the electronic copy. Appendix B: Draft B Evaluation Form (Completed by the Engineering Communication Centre)
Draft B of the Project Proposal will not be graded, but will be reviewed and discussed in a meeting between your team and a member of the Engineering Communication Centre (ECP) to provide you feedback for preparing the final draft. See schedules/deadlines for information. The evaluation form for Draft B is used to keep track of feedback given to students by tutors in the ECC. The tutor will fill out and return the evaluation form to you at the end of your workshop session. You will then append the completed form as Appendix B of your final Project Proposal draft, allowing the administrator and your supervisor(s) to get a sense of the issues that were – or were not – discussed.
Appendix C: Report Attribution Table
The report attribution table summarizes the contribution of each team member to the project proposal. It is available in Word or PDF format. Complete the table, showing the initials of each team member in a separate column, and using the abbreviations shown. This sheet must be signed by all team members. ====================================================
Details of Parts of the Proposal Body This section is included to provide further detail and description for those looking for additional guidance or example.
Background and Motivation This section is aimed at demonstrating your team’s understanding of the technical problem and ‘the big picture’. Provide a background (at about the level of an engineer entering 3rd year), context [Design Notes, chapter 4] and motivation for your project. A good project is not following a recipe; what makes your project different than what is available? (Note that if the implementation of an existing product is not obvious and is not available, or can be done in an alternate way, then implementing would still make a reasonable project.)
Updated June , 2012
8
ECE496Y
Project Proposal Guidelines
The work may just be an interesting exercise in technology, or may have direct or indirect practical application. It could improve reliability, cost, or ease of use over available technology. It may deal with some interesting challenges. Understanding the problem in the context of the bigger picture requires that you do a literature search, and you should be prepared to put in enough time to build your case. Provide relevant references to original sources of information. References to webpages (like Wikipedia) are generally inadequate, unless they can be justified (e.g. datasheet for components). Wherever possible, reference original sources such as journals, books, and technical standards, and provide complete information in a standard format (Refer to examples from IEEE on the course website.) Previous Background Work (if applicable) Many uncertainties about risks are answered in the course of working on a problem. In this respect, teams that have actively worked on their project over the summer have a key advantage, and so should briefly highlight some of the key challenges they have already overcome. Evidence here provides strong support of the feasibility of the remainder of the project. These teams can include some of their previous work as an attachment in the appendix.
Project Goal The project goal is a statement that summarizes what your design project is to achieve. It can be general and non-technical but should give direction to the entire project. It is NOT just the statement your supervisor used to describe the project. Refer to [Design, Section 3.2] to find both good and bad examples of project goal statements. Two key points are to focus on the desired result, not the solution or implementation, and to establish some criteria for which the success of the project can be evaluated. Design projects can take many forms. There are those that have hard functional goals but the details of the methodology are left undefined. An example of this type is the building of a microprocessor simulator. Another type, common to research-oriented projects, is a feasibility study or experiment where the result of the study is not known; however the setup of the study is a hard functional goal. Such projects may be somewhat harder to define but must meet the same requirements for verifiable project goals. One aid in these cases is to think of what has to be specified to guarantee that another team could exactly duplicate the experiment.
Project Requirements Provide a list of target project requirements which will be used to evaluate the success of your project. Project requirements can be divided into three categories [Design Notes, Section 5.2]: Functional requirements [must-have to fill goal] Constraints [legislated or client-enforced] Objectives [nice to have. Traded off against cost, time, other objectives]
Updated June , 2012
9
ECE496Y
Project Proposal Guidelines
Functional requirements and constraints should be clearly worded in pass/fail terms and in a way that can be verified, which implies a corresponding set of verification tests will be needed as discussed in the next section. Project objectives, unlike functional requirements and constraints, are not intended to be pass/fail in nature, but are used to indicate the desirable aspects of the final design. The number of requirements depends largely on the project, but at this early stage, the list should not be very long, but enough to capture the essence of your project. The point is to be complete, but not to constrain your design unnecessarily. Use the Requirements Checklist in [Design Notes, Section 5.4] to guide you. Here is an example table where the categories of requirements are combined:
Project Requirement
Description
Output: 10.0 +/- .2 V, Functional requirement: output specification of max. current 10A. power supply Size: maximum 10 cm x 10 cm x 2 cm
Constraint: This is the size of the available space in the target vehicle
Manufactured cost (in thousands): $250 or less
Constraint: A higher cost will make the item unprofitable through reduced sales.
Minimize weight
Objective: the lower the significant below 100 grams)
better
(weight
not
Notes on requirements:
Requirements should be free of implementation details. (e.g. Yes: ‘The unit shall determine the highest frequency component in the signal’. No: ‘The unit shall have an A/D converter and microcontroller ,which determines the highest frequency component in the signal.’) [Design Notes, Section 5.4]. Take care to phrase functional requirements and constraints in a way that can be verified (e.g. 'it must be yellow' or 'it must weigh less than 1 kg'). There are some common words/phrases that are often used but which should be avoided. Some examples and ways of circumventing the problems associated with the use of these words/phrases can be found here. Some parameters can be in multiple categories. For example, you may have a maximum allowable weight of 1 kilogram, a function, and an objective of low weight. Each requirement must clearly support the original project goal, or you must show this connection. Some requirements may not directly relate to the final result but may be necessary for testing or other intermediate goals (e.g. ‘create a user interface to monitor and modify
Updated June , 2012
10
ECE496Y
Project Proposal Guidelines
the state of the state machine.'). See [Design Notes, Section 5.4] for both good and bad examples.
For Research Projects: If you are doing a research project, determining the project requirements may be more difficult. Consider the following questions with the help of your supervisor:
What would we need to specify in order to get a research grant?
What would we need to specify in order that someone else could repeat this research and get the same results? This is a key requirement for publishing research.
For example, a recent project (an award winner!) involved forming optical light channels in plastic using a focused laser to change the refractive index of a path through the plastic. Some of the requirements for this project would concern -
the types of plastic(s) that would be investigated for this use
-
the type of laser(s), power setting(s) and focus setting(s) that would be investigated
-
the other equipment that would be needed, including the equipment used to test the success of the methods used.
-
The types of experiments and test results required to characterize the performance of the fabricated devices.
Clearly, because it is a research project, all of the answers are not known, including how successful the effort will be. However, even negative results are important in research and still indicate a successful project. Also, very important in research will be the risk strategies which you will start to develop in this document. What would you do if the initial plastic selected did not work?
For software projects (and similar-minded projects): Evolutionary development methods are acceptable, including agile programming methods, BUT we still expect you to produce a target for your year’s work. Your Gantt chart, or equivalent, can show your expected cyclical deliveries of progressive deliveries of features. What is unacceptable is anything that can be interpreted as “we will work in an evolutionary manner, delivering whatever is ready come March.”
Setting an Appropriate Scope for your Project One of the major challenges when setting the project goal and requirements in the early stages of a project is in establishing an appropriate scope for the project. A common mistake is to be too ambitious and to set a scope that is too broad initially, and to be forced to repeatedly redefine the project until the final result has only a small resemblance to the initial proposal. On the other hand, setting a scope that is too limited will affect your evaluation if the project is considered too easy or trivial (e.g. setting up a simple web site). Be realistic: your design project is one of five courses in each semester. As such, each student is expected to spend about a full day a week on it. For team of three, this represents about 500 hours of work over the school year. In industry, this
Updated June , 2012
11
ECE496Y
Project Proposal Guidelines
would translate to an effort of about 3 person-months. What can you realistically expect that your team will accomplish in the given time, with the given resources? Set out a clear scope for your project. Point out the team's key contributions to the final result, and then take advantage of outside resources for the rest. There is no need to implement everything from scratch. Utilize existing resources off the web, commercial software and hardware, resources provided by your supervisor, the Design Centre, etc. to look after aspects of your project that lie beyond the scope of your own work. However, you must make clear what work is yours (original) and what work is borrowed (and to properly acknowledge or reference that work). You should also explicitly state what parts of the final system actually lie outside your project. For instance, if you are designing the controller for an airplane, you should state that testing your controller in a real airplane is outside the scope of your project and that you plan to use a commercial flight simulator instead for testing and the final demonstration. A note concerning research projects: Research projects are, by their nature, less likely to follow a specific path. The “project” in the research is the process, not the result. For example, consider the team in a previous year that investigated the use of lasers to produce optical pathways in plastic. Their project proposal outlined their initial approach to the problem: The equipment they would use, the constraints they had, the preparation of the samples, the sources of errors and the techniques they would use to discover and to minimize this errors. Over the year the experiments were adapted as they found new information and as they refined and altered their techniques. These changes were expected, but they could be done only because they had a good initial grasp on the problem and potential methods of attacking it. Eventually this team found some very important results, but they were evaluated on the process they used, independent of their success in the experiments. Research project teams should work closely with their supervisors to first define a clear research question (embedded in the project goal), then draw up a plan on how to carry out the investigation, and provide clear, verifiable requirements for each phase of the investigation that can be used to confirm the team's progress. In this way, it is possible to successfully achieve the project goal in a research project even if no clear answer is found to the original research question.
Validation and Acceptance Tests In this section, describe how you would validate your final design and prove that it satisfies the project goal and requirements [Design Notes, Chapter 13]. Consider how you would demonstrate your successful project at the final Design Fair. Alternatively, if you were the paying client, describe the tests you would perform to qualify this product before buying this product. Provide details where possible, including the test equipment, diagnostic software, special arrangements, or test “jigs” that might be required. If you will be doing statistical measures, indicate the number of samples you will test. The point here is to keep your end goal in mind right from the start of the project.
Updated June , 2012
12
ECE496Y
Project Proposal Guidelines
Technical Design Possible Solutions and Design Alternatives In this section, you explore and discuss different possible solutions and design alternatives. Exploring possibilities is often neglected by designers eager to start on the first idea that comes to mind. Often, however, the first solution isn’t the best. For instance, you may have in mind an implementation using a keyboard, but when you work back to the requirements you may realize that it is only the user control aspect that is required, and thus you can do it all from the attached personal computer. The key to designing is coming up with alternatives, and it is in exploring alternatives that you come to appreciate the inevitable design trade-offs that you will face. DO NOT ESTABLISH A DESIGN CHOICE, AND THEN THINK ABOUT ALTERNATIVES JUST TO GET THIS DOCUMENT DONE. Some alternatives may differ only in small variations in implementation, others may be quite different. You should provide enough of an evaluation of each choice to justify your selection of the proposed solution. Provide a preliminary assessment of the different design alternatives in terms of the project goal and requirements you've laid out. Create a comparison table if necessary [See Design Notes, Chapter 9 for more ideas]. You may find that this section and the next naturally collapse into a single section, or that you wish to keep them separate.
Assessment of Proposed Solution Comment about the strengths, weaknesses, and trade-offs made in the proposed solution. What reasons led you to choose this solution over some of the others you explored? This section does not need to be long, but ensures that you can provide some justification for your design decisions to date.
Describing an Initial Technical Design Once you have explored a few design alternatives and their associated trade-offs, you can proceed to propose an initial technical design based on your best design ideas. Do not rush into this stage; even in the final draft of your Project Proposal, you can make the proposed design suitably open to give you the flexibility to define uncertain aspects later. The key is to begin breaking down the overall design into smaller modules and design tasks in order to develop an initial work plan. There are numerous examples of technical design descriptions in Chapter 5 of the book, 'Design for Electrical and Computer Engineers' by R.M. Ford, and C.S. Coulston, McGraw Hill, 2005. The book is available on short term loan at the Engineering Library.
Updated June , 2012
13
ECE496Y
Project Proposal Guidelines
System-level Overview Begin by summarizing the entire design at the highest level. You may, for instance, explain the principle of operation, the algorithm, or the process flow or stages of an investigation of a more research-oriented project. Make clear if the approach chosen is based on existing, well established technology or innovative ideas. If your approach is based on existing work, you do not need to provide a detailed explanation; simply point out the approach you wish to use and back it up with a relevant reference. Provide a System Block Diagram that breaks down the overall design into its key modules or blocks. Label all inputs and outputs of each module. Modules should have single purpose, be easily described, and should represent a unit that can be designed separately and assigned to an individual team member. [see Design Notes: Section 6.2 Block Diagrams] [see Salt & Rothery, Section 4.4 Block Diagram Basics] [Ford & Coulston, Chapter 5]. Also see Design Notes, Section 5.5 UML2 for ideas on a variety of different diagrams (e.g. state machine, interaction diagrams) you can use to best represent the operation of your system design and/or its modules.
Module-level Descriptions Describe or define each module in the system block diagram. Provide enough detail that it is clear how they work with each other in the system. You should also make clear any module requirements where the module affects the adherence of the system to the overall requirements. Also define the inputs and outputs of each module (e.g., RS-232 protocol) [see Ford & Coulston, Chapter 5] [see Salt & Rothery, Section 4.5, and Section A.4.7 for examples].
Work Plan This section focuses on managing your project. How do you plan to divide up and schedule the work, and how can you adapt your project and/or work plan if you run into difficulties? Here are the key elements of a work plan:
A work breakdown structure (WBS) A Gantt chart or plan that indicates a schedule of delivery of parts of your project A financial plan A Feasibility Assessment
These elements are described in the sections that follow.
A Work Breakdown Structure (WBS) A Work Breakdown Structure (WBS) is a hierarchical representation of all the tasks that must be accomplished to complete a design project. It need not be included by itself, but must appear as the task list in the Gantt chart.
Updated June , 2012
14
ECE496Y
Project Proposal Guidelines
Example: WBS for weekly lawn maintenance Task #
Task
Jack
o Cut Grass o Cut front lawn o Cut back lawn o Cut sides o Trim Edges 4 o Trim property boundaries 5 o Trim around garden 6 o Trim around trees o Trim Bushes 7 o Prune side hedges 8 o Prune back hedge R = Responsible, A = Assisting 1 2 3
Jane
John
R R R R R R R
A
R
The above example illustrates the decomposition of work into manageable elements, each of which could be performed by an individual and each of which can be traced to a measurable completion in support of completing the overall job. Note that there is no overlap or duplication of activities. WBS Checklist: o Assign the responsibility of a task to only one person. This does not mean you cannot assist one another. In the end, however, each student is responsible for reporting a clear set of tasks and for showing a clear individual contribution to the project. The person responsible for a task should be the dominant contributor. Break down the task if it is too large for one person to complete, and reassign tasks if necessary. Tasks should take 1-2 weeks of time during the term (assuming that all your courses are equally loading). o Each task should have both a number and a description for readability and for easy referencing in the Gantt chart and in future reports. o Ensure each task has a clear starting point and end point o Every task MUST have a verifiable/measurable result. So “Research Microprocessors” is not enough. “Select Microprocessor” would be a correct alternative, since this is closed with the decision “We are using microprocessor xxx”. Creating “testing” as a separate task is NOT acceptable. If “create the communications software” does not include test of the software (perhaps using test data) then it is not a well-formed task.
Updated June , 2012
15
ECE496Y
Project Proposal Guidelines
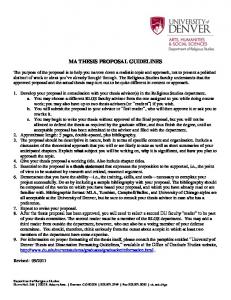
Gantt Chart The Gantt Chart presents a scheduling of the tasks in a WBS [Design Notes, Section 10.3]. Continuing with the Lawn maintenance example, below are two sample Gantt charts that illustrate the effect of the number of people on the scheduling of tasks Perform Weekly Lawn Maintenance Cut Grass Cut front lawn Cut back lawn Cut sides Trim Edges Trim property boundaries Trim around garden Trim around trees Trim Bushes Prune side hedges Prune back hedge
Figure 2: Gantt Chart if one person does the Lawn Maintenance. Perform Weekly Lawn Maintenance Cut Grass Cut front lawn Cut back lawn Cut sides Trim Edges Trim property boundaries Trim around garden Trim around trees Trim Bushes Prune side hedges Prune back hedge
Figure 3: Gantt Chart if three people do the same Lawn Maintenance with their own set of equipment. Note that ‘Trim Edges’ cannot be done until the grass has been cut and that having a team of three does not cut the time required by a factor of three in due to the logical dependencies. The work elements are logically sequenced in time. Some work may be concurrent. Each task generally has predecessor task(s) and successor task(s). To create your Gantt chart, a sample template using Microsoft Excel can be found here. You can also use a standard scheduling software program such as Microsoft Project Manager (available in the ECS Windows facilities). Gantt chart Checklist: o For readability, fit your Gantt chart onto a single page. If there are too many tasks on the WBS to fit onto a single sheet, include only the most important and/or combine related tasks into a single item. o Label each task on the Gantt chart with the person that is responsible. Alternatively, you can use a different bar PATTERN for each person. Do NOT use different colours as they are hard to distinguish in black in white printouts. o Apart from holidays, there typically should be no gaps or 'dead time' for any team member where others are working. Updated June , 2012
16
ECE496Y
Project Proposal Guidelines
o Every element should have allowance for setup, testing and rework. This is particularly true of the system integration, where modules may need revamping when they don’t “fit” together. o Avoid cluttering up the Gantt chart with tasks relating to the course deliverables (documents, posters, presentations). Writing reports and giving presentations are understood to be part of your work. If you wish to point these out, you can simply mark the due dates down as milestones. Is the work duration longer than 3 weeks? If so, the task should probably be broken down into smaller tasks. Generally, smaller duration tasks are more easily measurable and controllable. Long duration tasks tend to “hide” progress or worse “lack of progress”. Alternatives to a Gantt chart are acceptable, provided they show a clear path to project completion with measurable, dated module delivery points. It is expected that things will change. Order of execution may change; tasks may be done faster or slower than first expected; technical problems and their solutions will alter things. However, the Gantt chart should show that you have thought about every step in the proposed process, and have come to realistic (although initial) determinations of time and effort of these steps.
Financial Plan This section documents the costs of the project, which can include parts, computer hardware, software licenses, rental costs, etc. The Financial Plan consists of a budget table and an explanation of contingency arrangements if the necessary funding for the project is not acquired. You need not include your time, but should include “free” items that would cost money in industry, budgeted at $0. Budget Table All budgets should be prepared in accordance with the following set of rules: 1. Each student is required to cover at least the first $100 of expenses from their design project. Apart from help from their supervisors, the department also has a special budget to support students with purchases towards their design projects. The budget is limited, but all teams can apply and funding will be awarded based on the strength of your justification for funding. Any rewarded money will not be available until considerably later in the project, so you or your supervisor will have to purchase the items. Make sure you have a contingency plan in place in case you do not receive funding. 2. List as separate items the expected amount contributed by the students, the supervisor, and the industrial sponsor (if applicable). 3. Determine the amount requested from the Design Centre: subtract the net cost from the net contributions. 4. Flag those components/assemblies that you or a team member wishes to keep at the conclusion of the course. These items should be put in as $0.
Updated June , 2012
17
ECE496Y
Project Proposal Guidelines
5. Identify the items of higher priority and give a short explanation regarding your contingency arrangements in case you are not successful in receiving the funds or receive only partial support (see below). Example: "Priority 1) GPS Receiver: we propose to create logic that represents the signal coming from the GPS receiver in case we are not able to obtain funds to purchase the GPS receiver. This will require the following changes to our Technical Solution, Work Plan, and Financial Plan ..."
Note: o A suitable format for the budget request is shown here o The process for actually requesting funding from the Design Centre is separate from this report. Students should refer to the Budgets and Funding Requests page found on the course website for detailed instructions (see Development Particulars>Budget & Funding). o For services from a technician or contractor, you should provide a cost breakdown and detailed work plan submitted by the contractor.
Feasibility Assessment This section is meant to help your team, supervisor, and administrator assess the feasibility of your proposed project. This is not a marketing exercise: try to provide a fair and honest assessment of your proposal, balancing both its strengths and weaknesses. There is nothing wrong with identifying major deficiencies in your project; in some businesses, fewer than one in ten projects results in a commercially viable product. Identifying weaknesses and putting together a plan to address those weaknesses early on is a crucial part of the design process. It also helps your supervisor and administrator in their roles as effective mentors and guides. Here are some of the key issues you should address in this section. Be brief - a sentence or two is probably enough to cover each issue. Also, these issues do not need to be addressed in any particular order and may be combined or reorganized to flow logically: Skills and resources: What are the key skills, knowledge and resources you need for this project? What portions have you already acquired and what portions are currently lacking? How do you plan to obtain what you still need? Examples: o From the web: free or open source software, technical standards, expert forums o From your supervisor: graduate researchers, lab space and equipment, etc.
Updated June , 2012
18
ECE496Y
Project Proposal Guidelines o From the Design Centre (SFB520): facilities for making and soldering printed circuit boards, used hardware from past design projects, computers, test equipment, etc.
Risk Assessment: In this section, describe the risks that the project could face (risk identification) and how you plan to deal with them (risk mitigation). An example of a risk would be that a particular component you envision might prove impossible to implement, and a corresponding risk mitigation strategy would be attempting to prototype the riskiest portion of your project as a feasibility assessment of the whole project. This would be coupled with a ‘fall-back’ plan as to what you would do should this prototype fail. Merely, stating that risks will not occur, or that risks will be mitigated by working harder does NOT constitute back-up plan! This section should not be very long and you should focus on one or two real risks to your project (most likely technical risks but there could be others as well). Minor risks that will cause little disruption in schedule do not need to be addressed. Note that something that is technically challenging (or difficult to implement) may not necessarily be a significant risk to the project, if its failure does not affect the overall project goals or requirements (for example, the task may relate to a project objective for an additional feature, rather than a core requirement). Note: when addressing risks, focus on the most likely ones that are specific to your project. Some students ponder the risks of having a team member drop out of school, or losing all their work due to a computer crash. Such discussions aren't particularly helpful in planning your project. A more specific and effective series of questions might be
What happens to other components and to the project if component X that I’ve designed for my system fails to meet specifications or takes significantly longer to develop?
Can I change the specifications, demonstrate a lower performance system, or remove some features of my final design and still maintain the essential aspects of my project?
What if our initial plan to build a real prototype proves unfeasible? Could we demonstrate our design or part of our design using a computer model instead? What would the limitations of this computer model-based prototype be? How would the project goal, requirements, and scope be modified to ensure that the new, redefined, project remains challenging?
The key idea is to think of ways that you can modify the scope of your project so that you can show some partial success in realizing your Project Proposal by the end of the school year. More information and additional examples in [Design Notes, Chapter 11]. Risk in Research Projects: Often, a research project will have above-average risk and this section may need to be longer. If the ‘Technical Design’ section describes your intended initial strategy, this section should describe alternate directions that will be Updated June , 2012
19
ECE496Y
Project Proposal Guidelines
taken if experimental results indicate that the initial strategy is no longer what should be done. Here, the ‘risk’ is that the experimental result or some intermediate result not be as expected (and the probability of this could be high) and the mitigation is the determination of an the alternate goal or an alternate route to the original goal.
Updated June , 2012
20