Simple Machines Design Project Project Guide
Freetal i g i D pler! Sam
Table of Contents Simple Machines Design Project Digital Sample Project Guide Project Guide: Table of Contents Teacher Background Information
Design Project: Simple Machines Materials and Preparation Session 2 Session 3 Assessments Teacher Masters Visual Pack I Wonder Circle
More about Science Companion
Module Components Full Curriculum List Science Companion Unique Features Online Pilots Professional Development Contact Us! Turn to the next page to learn how to use this Digital Sampler.
Simple Machines Design Project - Sample Project Guide
2011 Edition, Release 1.0.1210Copyright © 2010 Chicago Science Group. All Rights Reserved. Except as permitted under the United States Copyright Act, no part of this publication may be reproduced or distributed in any form or by any means or stored in a database or retrieval system without the prior written permission of the publisher. This publication is provided under a license agreement. (See www. sciencecompanion.com/terms-of-use.) Access and use are limited by the terms of that agreement. SCIENCE COMPANION®, EXPLORAGEAR®, the CROSSHATCH Design™ and the WHEEL Design® are trademarks of Chicago Science Group and Chicago Educational Publishing, LLC. www.sciencecompanion.com Chicago Educational Publishing Company, LLC.
Navigation..... How To Use This Sampler If you are using Adobe Acrobat or the Adobe Acrobat Reader, you’ll have an easier time with navigation if you give yourself a “Previous View” button. This tool works like a Back button, and will allow you to retrace your jumps within the file so you don’t get lost.
Previous View button on Page Navigation toolbar.
Any text in blue is a link. Clicking blue text will take you to another page of the sample. Enjoy your digital experience! Science Companion
www.sciencecompanion.com
Project Guide The Engineering Design Project Series was developed to support compatible modules by allowing students to design and/or build animal homes, tools, machines, and designs of their own creation. Taking between 4-6 sessions, the projects strengthen skills and ideas about choosing materials, using tools, working with the limitations of materials, solving problems and overall project design. Project Guide shows teachers how to integrate technology and design skills in a hands-on,
inquiry format for their students. Through a series of sessions, students develop strong process and design skills. The Project Guide brings teachers up to speed for the science content with the design project through “Teacher Background Information” and in-context session notes. Teachers can feel comfortable with leading the class—whether they have a long history of teaching science and engineering or not. Each Project Guide focuses on a Big Idea. Through a series of different experiences and discussions over 4-6 sessions, students develop a deep understanding of the Big Idea by designing a project to demonstrate their understanding.
Sessions follow a consistent sequence. Engage – In this section of a session, the teacher introduces the topic. The goal is to
briefly generate interest, activate prior knowledge, or link the day’s activities to what has come before.
Explore – This is often (but not always) and hands-on exploration conducted in small groups.
Reflect and Discuss – In this important section, the teacher and students discuss what they observed, share ideas and data, and reflect on the day’s activities. This portion of session brings the class back to the Big Idea.
You’ll find that while the session format is very consistent, students explore science content, engineering principles and the process of “doing science” in a large variety of ways.
You’ll also find that students LOVE the mix of active, hands-on, minds-on science.
www.sciencecompanion.com
Table of Contents Project Guide Overview Philosophy and Introduction. . . . . . . . . . . . . . . . . . . . . . . . . . . . . . . . . . . . . 6 Teacher Background Information. . . . . . . . . . . . . . . . . . . . . . . . . . . . . . . . . 8 Science Library and Web Links. . . . . . . . . . . . . . . . . . . . . . . . . . . . . . . . . . 14 Materials. . . . . . . . . . . . . . . . . . . . . . . . . . . . . . . . . . . . . . . . . . . . . . . . . . . . . . . 16
Simple Machines Design Project A Quick Look. . . . . . . . . . . . . . . . . . . . . . . . . . . . . . . . . . . . . . . . . . . . . . . . . . . 18 Session 1: Exploring Simple Machines. . . . . . . . . . . . . . . . . . . . . . . . . . . 24 Session 2: Simple Machine Walk. . . . . . . . . . . . . . . . . . . . . . . . . . . . . . . . . 27 Session 3: Designing Machines. . . . . . . . . . . . . . . . . . . . . . . . . . . . . . . . . . 29 Session 4: Building Machines. . . . . . . . . . . . . . . . . . . . . . . . . . . . . . . . . . . . 32 Session 5: Demonstrating Machines. . . . . . . . . . . . . . . . . . . . . . . . . . . . . 34
Assessments, Teacher Masters, Visuals Assessment: Simple Machines Rubric Teacher Masters Visuals: Simple Machines in Our World
Some portions of the design project are not included in this sample. Any text in blue is a link. Clicking blue text will take you to another page of the design project.
SIMPLE MACHINES DESIGN PROJECT
|
Table of Contents
|
5
Teach e r Bac kgro und Inf o r mat ion
Teacher Background Information Introduction Humans have been making and using machines for a long, long time. We create these machines to help us to survive and do our work. We use these machines every day and in all aspects of our lives. In this project, students will learn how very simple machines can be utilized to make our work easier.
Machines When we do work, we must expend energy. To conserve our energy and make our work easier, humans have invented a wide variety of machines. Machines are simply devices that help us to apply forces and do work. Some machines, such as power saws, tractors, or cars are complicated and have many moving parts. For thousands of years, we have also used many simple machines to help us do our work. Simple machines are devices that change the force we can exert on an object. They allow us to lift heavier objects or pull things with more force than we could without the simple machine. Simple machines often have only one or even no moving parts. The six simple machines that your students will explore in this project are:
8
|
•
Levers
•
Inclined planes
•
Wedges
•
Screws
•
Wheels and axles
•
Pulleys
SIMPLE MACHINES DESIGN PROJECT
|
Teacher Background Information
T each er B ac kgro und I nf or mat io n
Lever A lever is a bar that rests on a support called a fulcrum. When force is applied to one end of the lever it pivots around the fulcrum and is able to lift an object. When the fulcrum is moved closer to an object, the object is easier to lift, but cannot be lifted as high. When the fulcrum is moved farther away from an object, the object is more difficult to lift, but it can be lifted higher.
lever
fulcrum
Inclined Plane The inclined plane is a very simple machine with no moving parts. It is a sloping surface with one raised end. The more gentle the slope of an inclined plane, the easier it will be to slide or roll the object. A ramp is a common type of inclined plane. Furniture movers use ramps because it is easier to slide or roll a heavy box up a ramp than to lift it up into a truck.
Wedge A wedge is like an inclined plane, but instead of helping move objects to a higher point, a wedge helps to cut objects apart or hold them together. Knives and axes are common wedges used to cut objects apart, while a door stop is a wedge used to hold objects together. The sharper the edge of a wedge, the easier it is to drive in or under an object.
SIMPLE MACHINES DESIGN PROJECT
|
Teacher Background Information
|
9
Screw A screw is a rod with a helical thread (groove) around its outside surface. There is often another matching piece with a hole threaded on the inside. The rod moves through this hole as it is turned. A nut and bolt is an example. Screws have many purposes including fastening objects together (wood or metal screws), making holes in the objects (drill bits), or squeezing things together (a vise). A wood screw is a combination of a screw (the threaded body) and a wedge (the sharp point).
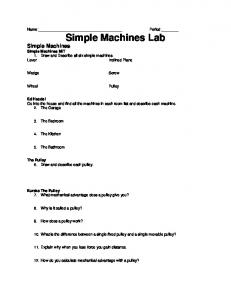
Wheel and Axle Wheels and axles are used on many devices. On a bicycle, for example, the wheel is connected to the axle and the axle is connected to the frame. On a car, the steering wheel, which the driver turns, is connected to an axle which turns machinery inside the front of the car. Some wheels and axles move together as one piece and act as simple machines. If you apply a turning force on the outside of the wheel, then there is a much greater force applied to turning the axle. An example of this type of wheel and axle is a water wheel. With a water wheel, the water pushes on the wheel and the wheel exerts a much greater force on the axle.
Water Wheel
10
|
SIMPLE MACHINES DESIGN PROJECT
|
Teacher Background Information
Other types of wheels and axles are common and useful, but they are not quite simple machines. Wheels, such as those on a skateboard, do not apply a force to the skateboard. Instead they help the skateboard to move because they cut down on friction. Friction is a force that acts to resist the motion of objects that touch one another. Since a wheel rolls along the surface (as opposed to sliding), there is very little force opposing its motion. The distinction between the use of a wheel and axle as a simple machine to change force and the use of a wheel to reduce friction is not an important one for the children to make. The main point is that a wheel and axle is very useful, both to change force and to reduce friction.
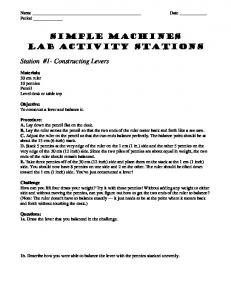
Pulley A pulley is a special type of wheel and axle. It is a small wheel with a groove in the rim. A heavy object can be lifted by a rope or belt that moves within the rim and is attached to the object. Several pulleys can be combined to greatly reduce the force needed to lift a weight. A common type of pulley is a single pulley. A single pulley can be set up as a fixed pulley or a moveable pulley (See illustrations, below.) With a fixed pulley, below left, the only advantage is that you pull down to raise the load, which is much easier than pulling upwards. The force applied is the same as the weight of the load. With a movable pulley the force applied to the rope is only half of the weight of the load, but the rope must be pulled upward. (The illustration, below right, shows a combination of a fixed and movable pulley.) That is why, as shown, the two types are often combined, so that the force required is only half and the pull is downward.
Fixed Pulley
Moveable Pulley
SIMPLE MACHINES DESIGN PROJECT
|
Teacher Background Information
|
11
Work Work means many things to many different people, but in science work has a very special meaning. In science, work occurs when a force acts to move an object. For example, when you lift a box off the ground, you are doing work. You are using a force (the pull of your arm muscles) to move an object (the box). By contrast, if you have lifted the box and are holding it at waist height, you are not doing work. Even though your arm muscles are straining, since the box is not moving, no work is being done. The amount of work done in a given activity depends on the amount of force as well as the distance that the object moves. For example, it takes more work to lift a 10 kg box to one’s waist than to lift a 5 kg box to one’s waist. Similarly, it takes more work to lift a 10 kg box from the floor over one’s head than it takes to lift that same box waist high.
Work and Simple Machines We can lift a 100 kg box using only a 20 kg force by using a long lever. But to raise the box 10 cm we have to move the other end of the lever by 50 cm. With the lever, the force you must apply is less, but the distance over which you must apply it is greater. The work done is the same, but you can move the box with much less force. Simple machines don’t gain us energy, but they allow us to do things with our own energy, which we could not do otherwise. If there is no friction in the simple machine, the work (and energy) applied to the simple machine is the same as the work (and energy) accomplished by the machine. If there is friction, such as in a pulley system, some energy is lost.
12
|
SIMPLE MACHINES DESIGN PROJECT
| Teacher Background Information
SIMPLE MACHINES DESIGN PROJECT
|
Teacher Background Information
|
13
S I M P L E M A C HIN E S DESIGN PROJECT
Simple Machines Design Project A Quick Look Overview
Big Idea
Students learn about the six types of simple machines and how they make our tasks easier. They apply their knowledge of simple machines to design machines that utilize at least two simple machines. They plan and draw pictures of their designs, build their machines, and then demonstrate them for the class.
Simple machines make many tasks easier. They can be used by themselves or in combination with other simple machines.
Process Skills • Classifying • Creating and using models
• Planning a process • Reasoning
Technology/Design Skills • Designing or building
• Choosing materials
Key Notes • The activities for this project will take at least two weeks and, depending on student interest and the complexity of their projects, could last longer.
• This project is comprised of multiple sessions. Review the entire project before teaching the first session.
• If you think you’ll need students to bring any materials in from home for their simple machines design projects, send home the Teacher Master “Request for Materials” a week prior to starting the project.
• For more information about the science content in this project, see the Teacher Background Information on pages 8-12.
• Using tools • Working with the limitations of materials
• Solving problems
18
|
SIMPLE MACHINES DESIGN PROJECT
Standards and Benchmarks While designing, building, and demonstrating their machines, students develop Science and Technology Standard E (Abilities of Technological Design): “Identify a simple problem…Propose a solution…make proposals to build something or get something to work better…Implement proposed solutions…Evaluate a product or design…Communicate a problem, design, and solution.”
Notes
They also focus on The Human Organism Benchmark 6A (Human Identity): “Human beings have made tools and machines to sense and do things.” They also address The Habits of Mind Benchmarks 12C and 12D (Manipulation and Observation and Communication Skills): “Choose appropriate common materials for making simple mechanical constructions;” and “Make sketches and diagrams to aid in explaining procedures and ideas.” Rubric: Simple Machines
Project Goals 1. Learn about the six types of simple machines. 2. Learn that simple machines make it easier to do tasks. 3. Design, build, and demonstrate a machine that solves a problem, and that incorporates at least two simple machines.
Assessment Options Consider using the Simple Machines Rubric to assess the students after Session 2. Use the Planning and Implementing a Design: Checklist and Self-Assessment after the completion of Session 5.
Checklist: Planning and Implementing a Design Self-Assessment: Planning and Implementing a Design
SIMPLE MACHINES DESIGN PROJECT
|
19
Materials Item
Quantity
Notes
Bolts
4 per station
For screw station. (Session 1) For machine designs. (Sessions 3, 4, and 5)
Clay
1 package
For wheel and axle station. (Session 1) For machine designs. (Sessions 3, 4, and 5)
Dowels, small
2 per station
For pulley and wheel and axle stations. (Session 1) For machine designs. (Sessions 3, 4, and 5)
Dowels, large
2 per station
For pulley and wheel and axle stations. (Session 1) For machine designs. (Sessions 3, 4, and 5)
Pulleys
2 per station
For pulley station. (Session 1)
Pulley cord
1 roll to cut up
For pulley station. (Session 1) For machine designs. (Sessions 3, 4, and 5)
Nuts
4 per station
For screw station. (Session 1) For machine designs. (Sessions 3, 4, and 5)
Screwdriver, Phillips
2 per station
For wheel and axle station. (Session 1) For machine designs. (Sessions 3, 4, and 5)
Screws
1 package
For machine designs. (Sessions 3, 4, and 5)
Spools
8 per station
For pulley station. (Session 1) For machine designs. (Sessions 3, 4, and 5)
Bags, grocery size
1 per pair
For machine designs. (Sessions 3, 4, and 5)
Binders, 3-ring
3 per station
For lever station. (Session 1) For machine designs. (Sessions 3, 4, and 5)
Boxes, large, 30 cm (12 in) tall
1 per pair
For machine designs. (Sessions 3, 4, and 5)
ExploraGear
Classroom Supplies
20
Boxes, small, shoebox size
Several
For machine designs. (Sessions 3, 4, and 5)
Books
5 per station
For lever station. (Session 1)
Cardboard, large, 50 cm x 15 cm (20 in x 6 in )
1 per station
For inclined plane station. (Session 1)
Cardboard, small, 15 cm x 15 cm (6 in x 6 in)
2 per station
For wedge station. (Session 1)
Cardboard, small, 15 cm x 15 cm (6 in x 6 in)
8 per station
For screw station. (Session 1)
Chop sticks
2 pairs per station
For lever station. (Session 1)
Erasers
3 per station
For lever station. (Session 1) For machine design. (Sessions 3, 4, and 5)
Hole punch, single hole
1 per station
To punch holes in cardboard pieces at screw station. (Session 1)
Meter sticks
2 per station
For lever station. (Session 1) For machine designs. (Sessions 3, 4, and 5)
Paper, 8 1/2” x 11”
Several sheets per station
For wedge station. (Session 1)
|
SIMPLE MACHINES DESIGN PROJECT
Item
Quantity
Notes
Paper, 8 ½ x 11
Several sheets per pair
For machine design. (Sessions 3, 4, and 5)
Pencils
4 per station
For lever station. (Session 1) For machine designs. (Sessions 3, 4, and 5)
Push pins
Several per station
For wedge station. (Session 1)
Rubber bands
Several
For machine designs. (Sessions 3, 4, and 5)
Ruler
4 per station
For lever station. (Session 1) For machine designs. (Sessions 3, 4, and 5)
Scissors
4 per station 1 per station
For wedge station. (Session 1) For pulley station. (Session 1)
Skewers, wooden
Several
For machine designs. (Sessions 3, 4, and 5)
Staplers
3
For wheel and axle and pulley stations. (Session 1) For machine designs. (Sessions 3, 4, and 5)
String
1 roll
For inclined plane, wheel and axle, and pulley stations. (Session 1) For machine designs. (Sessions 3, 4, and 5)
Classroom Supplies (continued)
Tape
2 rolls
For machine designs. (Sessions 3, 4, and 5)
Tongs
1 per station
For lever station. (Session 1)
Toy truck
1 per station
For inclined plane station. (Session 1)
Twist ties
Several per pair
For machine designs. (Sessions 3, 4, and 5)
Curriculum Items Book: How Do You Lift a Lion?* Overhead Transparencies: “Levers,” “Inclined Planes,” “Wedges,” “Screws,” “Wheels and Axles,” and “Pulleys” Teacher Master “Request for Materials” (Session 1) Teacher Master “Simple Machine Stations” (Session 1) Teacher Master “Simple Machine Uses” (Session 1) Teacher Master “Simple Machine Walk—Student” (Session 2) Teacher Master “Simple Machine Walk—Teacher” (Session 2) Teacher Master “Machine Criteria” (Session 3) Teacher Master “Machine Sketch and Materials” (Sessions 3 and 4) Teacher Master “Simple Machine Ideas” (Sessions 3 and 4) Rubric: Simple Machines (optional) Checklist: Planning and Implementing a Design (optional) Self-Assessment: Planning and Implementing a Design (optional)
* If this book is not available, you will receive a substitute that is appropriate for this session.
SIMPLE MACHINES DESIGN PROJECT
|
21
Notes
Preparation Session 1 q Read the Teacher Master “Simple Machine Stations” to find out what materials you need to gather to set up the stations for the exploration and for examples of the simple machine setups.
q Set up the simple machines stations. At each station, have the following materials available for the sensory observation.
• Lever—a ruler and a pencil. • Inclined plane—a ½ m long piece of cardboard. • Wedge—a pair of scissors and a push pin. • Screw—a nut and bolt. • Wheel and axle—Tie one end of a 2 m piece of string to
one of the staplers. Tie the other end of the string to the shaft of a screwdriver. Wrap the string around the shaft of the screwdriver a few times (like a yo-yo) until it is taut.
• Pulley—two pulleys, a 1 m piece of string tied to another
stapler, a 2 m piece of pulley cord tied to the third stapler.
q Create labels with the names of each type of simple machine: lever, inclined plane, wedge, screw, wheel and axle, and pulley.
q Make forty-eight copies of the Teacher Master “Simple Machine Uses.” Give one to each group, and place the rest at each simple machine station.
Session 2 q Review the Teacher Master “Simple Machine Walk—Teacher” to become familiar with examples of simple machines in the classroom and around the school. Decide what, if any, simple machines you want to “seed” the classroom with.
q Make one copy of the Teacher Master “Simple Machine Walk—Student” for each student.
Session 3 q Make one copy of the Teacher Master “Machine Criteria” and the Teacher Master “Machine Sketch and Materials” for each pair.
q Look over the Teacher Master “Simple Machine Ideas” to see examples of the types of machines the students might create.
q Set up the machine design materials at the supply station.
22
|
SIMPLE MACHINES DESIGN PROJECT
Session 4 q Set up the machine building materials at the supply station.
Notes
q Create a designated place in the classroom where students can store their machines after building them.
Vocabulary axle ���������������������������������� The rod which is connected to a wheel and on which the wheel turns. force �������������������������������� A push or a pull on an object. friction ���������������������������� A force that resists motion when two surfaces touch each other. fulcrum �������������������������� The fixed point around which a lever pivots. inclined plane ������������ A surface, such as a ramp, with one end
higher than the other. lever �������������������������������� A bar that can rest on and pivot around a support called a fulcrum. machine ������������������������ A tool that makes it easier to do work. pulley ������������������������������ A small wheel with a groove in the rim that turns on an axle. A rope or belt moves within the groove. screw ������������������������������ A rod with a thread (small ridge) that winds with a gentle slope around the outside. simple machine ���������� A tool with one or no moving parts that changes the force (either in amount or in direction) acting on an object. wedge ���������������������������� An object that moves to split things apart or hold them together. wheel ������������������������������ A round object that is connected to an axle.
SIMPLE MACHINES DESIGN PROJECT
|
23
Session 2—Simple Machine Walk Engage Introductory Discussion
Notes
Sessions 1, 4 and 5 are not included in this sample.
Students look at and discuss photographs of simple machines used in everyday life. Then they go on a “Simple Machine Walk” in the classroom and around the school to search for more examples. 1. Show common examples of simple machines by displaying the photographs on the following visuals:
• Levers • Inclined planes • Wedges • Screws • Wheels and axles • Pulleys 2. While showing the photographs, discuss the way these simple machines work as well as some of their uses. Ask for volunteers to describe how they have used some of these simple machines. 3. Prepare the class to go on a “Simple Machine Walk.” During this walk students will search the classroom and the school grounds for simple machines.
Teacher Note: Review the Teacher Master “Simple Machine Walk— Teacher” for examples of a wide variety of simple machines in the classroom and around the school.
Overhead Transparencies: “Levers,” “Inclined Planes,” “Wedges,” “Screws,” Wheels and Axles,” and “Pulleys”
Teacher Master 6
SIMPLE MACHINES DESIGN PROJECT
|
Session 2
|
Simple Machine Walk
|
27
Notes
4. Hand out a copy of the Teacher Master “Simple Machine Walk—Student” to each student. Explain that during the walk, they should record any levers, inclined planes, wedges, screws, wheels and axles, and pulleys they see.
Explore Begin the search for simple machines. Start in the classroom. Then take the class into the hallway, outside on the playground, and into the parking lot. If possible, arrange to get a guided tour of the school custodian’s shop. When finished, return to the classroom.
Reflect and Discuss 1. Ask for volunteers to describe the simple machines they observed and recorded during the walk. 2. Have a discussion about the simple machines the class found. Ask some of the following questions: Teacher Master 5
Big Idea Simple machines make many tasks easier. They can be used by themselves or in combination with other simple machines.
28
|
• What type of simple machine did they see the most of? • What type of simple machine did they see the least of? • Were there any simple machines that were hard to classify? (Some devices, such as a staple puller, a scissors, and a can opener include more than one type of simple machine.)
3. Encourage students to share anything else they noticed or learned about simple machines during the walk.
SIMPLE MACHINES DESIGN PROJECT
|
Session 2
|
Simple Machine Walk
Session 3—Designing Machines
Notes
Engage Introductory Discussion
Sessions 1, 4 and 5 are not included in this sample.
Students learn about the simple machine design project and review the types of simple machines. 1. Explain that over the next several sessions, students will design, build, and demonstrate a machine that uses simple machines. Discuss some of the following details of the project:
• Today the class will use what they have learned about simple machines to design a machine of their own.
• Students will divide into pairs and decide on the materials they want to use for their machines. Then they will sketch and write about their designs.
• In the next session, they will build a machine based on their designs.
• In the final session, they will demonstrate their machines to the class.
2. Before moving on to the design project, ask for volunteers to describe the following six simple machines and give at least one example:
• Lever: A bar that rests on and pivots around a point called
the fulcrum. Examples: Teeter-totter, stapler, tongs, clothes pin.
• Inclined plane: A surface with one end higher than
the other. Examples: stairway, escalator, mountain road, loading ramp.
• Wedge: An object that moves to split things apart or hold them together. Examples: door stop, knife, axe, nail.
• Screw: A rod with a thread that winds around the outside with a gentle slope. Examples: wood screw, drill bit, cork screw, nut and bolt.
• Wheel and axle: A round object connected to an axle. Examples: screwdriver, bicycle wheels, car wheels.
• Pulley: A small wheel with a groove in the rim that turns on an axle. Examples: sailboat pulley, flag pole pulley, clothes line pulley.
SIMPLE MACHINES DESIGN PROJECT
|
Session 3
|
Designing Machines
|
29
Notes
Explore Students learn some basic aspects of the design process. Then they look through materials and sketch out their designs. 1. Briefly discuss the evolutionary nature of the design process with the class. Point out the following:
• A first design is the beginning of the process. Designers
often make changes along the way as they develop their ideas.
• Designers may end up building something that is completely different from their original idea.
• Designers may experience frustration as they try to make an idea work. This is a natural part of the design process.
2. Divide the class into pairs and hand out a copy of the Teacher Master “Machine Criteria” to each pair. Read through the following machine criteria with the class:
• The machines must include at least two simple machines in their design.
• The machines must be able to move a 50 g (about 2 oz)
rock a horizontal distance of at least 50 cm (about 1½ ft).
• The machines must be able to move the same rock a vertical distance of at least 30 cm (about 1 ft).
• The machines must be built only with materials supplied in the classroom.
Teacher Master 7
3. Let the partners examine the materials at the supply station before creating their designs.
• Explain that they don’t need to collect materials right now. They will design the machines today, but won’t begin building them until the next session.
• Allow the students to look at, feel, and play with any of
the materials. While looking through them they should be thinking and talking with their partners about how they will use them to satisfy the project criteria.
Teacher Note: Allow ample time for the students to explore the materials before making their designs. This minimizes extra time involved in re-designs.
30
|
SIMPLE MACHINES DESIGN PROJECT
|
Session 3
|
Designing Machines
4. Hand out a copy of Teacher Master “Machine Sketch and Materials” to each pair. Work with students to make sure they record the following information about their designs:
Notes
• A brief description of each simple machine • A list of materials required to build each simple machine • A description of the way the simple machines will work together to satisfy the design criteria
• A labeled sketch of the machine 5. Have the Teacher Master “Simple Machine Ideas” available to hand out to each pair. This teacher master includes examples of simple machines that can be built using common materials.
Reflect and Discuss Sharing 1. If any students are having difficulty with their designs, give them the opportunity to get feedback from you and the rest of the class by sharing their problems and questions. 2. Encourage the students to share their designs with their classmates. Emphasize that these are initial plans and that these plans may change once they start building their machines.
Teacher Masters 8-10
Big Idea Simple machines make many tasks easier. They can be used by themselves or in combination with other simple machines.
Sessions 1, 4 and 5 are not included in this sample.
SIMPLE MACHINES DESIGN PROJECT
|
Session 3
|
Designing Machines
|
31
Simple Machines Design Project Assessments/Teacher Masters/Visual Packet
Simple Machines Design Project Assessments/Teacher Masters/ Visual Pack: Table of Contents Assessments Simple Machines Rubric. . . . . . . . . . . . . . . . . . . . . . . . . . . . . . . . . . . . . . . . . . . . . . . . . . . . . . . . . . . . . . . . . . . . 1 Planning and Implementing a Design: Checklist . . . . . . . . . . . . . . . . . . . . . . . . . . . . . . . . . . . . . . . . . . . . 2 Planning and Implementing a Design: Self-Assessment. . . . . . . . . . . . . . . . . . . . . . . . . . . . . . . . . . . . . 3
Teacher Masters Request for Materials. . . . . . . . . . . . . . . . . . . . . . . . . . . . . . . . . . . . . . . . . . . . . . . . . . . . . . . . . . . . . . . . . . . . . . .1 Simple Machine Stations. . . . . . . . . . . . . . . . . . . . . . . . . . . . . . . . . . . . . . . . . . . . . . . . . . . . . . . . . . . . . . . . . 2-3 Simple Machine Uses . . . . . . . . . . . . . . . . . . . . . . . . . . . . . . . . . . . . . . . . . . . . . . . . . . . . . . . . . . . . . . . . . . . . . . 4 Simple Machine Walk—Student. . . . . . . . . . . . . . . . . . . . . . . . . . . . . . . . . . . . . . . . . . . . . . . . . . . . . . . . . . . . 5 Simple Machine Walk—Teacher . . . . . . . . . . . . . . . . . . . . . . . . . . . . . . . . . . . . . . . . . . . . . . . . . . . . . . . . . . . . 6 Machine Criteria. . . . . . . . . . . . . . . . . . . . . . . . . . . . . . . . . . . . . . . . . . . . . . . . . . . . . . . . . . . . . . . . . . . . . . . . . . . 7 Machine Sketch and Materials. . . . . . . . . . . . . . . . . . . . . . . . . . . . . . . . . . . . . . . . . . . . . . . . . . . . . . . . . . . . . . 8 Simple Machine Ideas. . . . . . . . . . . . . . . . . . . . . . . . . . . . . . . . . . . . . . . . . . . . . . . . . . . . . . . . . . . . . . . . . . . 9-10
Visual Pack Levers . . . . . . . . . . . . . . . . . . . . . . . . . . . . . . . . . . . . . . . . . . . . . . . . . . . . . . . . . . . . . . . . . . . . . . . . . . . . . . . . . . . . 1 Inclined Planes. . . . . . . . . . . . . . . . . . . . . . . . . . . . . . . . . . . . . . . . . . . . . . . . . . . . . . . . . . . . . . . . . . . . . . . . . . . . . 2 Wedges. . . . . . . . . . . . . . . . . . . . . . . . . . . . . . . . . . . . . . . . . . . . . . . . . . . . . . . . . . . . . . . . . . . . . . . . . . . . . . . . . . . . 3 Screws . . . . . . . . . . . . . . . . . . . . . . . . . . . . . . . . . . . . . . . . . . . . . . . . . . . . . . . . . . . . . . . . . . . . . . . . . . . . . . . . . . . . 4 Wheels and Axles. . . . . . . . . . . . . . . . . . . . . . . . . . . . . . . . . . . . . . . . . . . . . . . . . . . . . . . . . . . . . . . . . . . . . . . . . . 5 Pulleys . . . . . . . . . . . . . . . . . . . . . . . . . . . . . . . . . . . . . . . . . . . . . . . . . . . . . . . . . . . . . . . . . . . . . . . . . . . . . . . . . . . . 6
2011 Edition Copyright © 2010 Chicago Science Group. All Rights Reserved Printed in the United States of America. Except as permitted under the United States Copyright Act, no part of this publication may be reproduced or distributed in any form or by any means or stored in a database or retrieval system without the prior written permission of the publisher. SCIENCE COMPANION®, EXPLORAGEAR®, the CROSSHATCH Design™ and the WHEEL Design® are trademarks of Chicago Science Group and Chicago Educational Publishing Company, LLC. ISBN 10: 1-59192-557-6 ISBN 13: 978-1-59192-557-6 1 2 3 4 5 6 7 8 9 10-Cenveo, 0810 www.sciencecompanion.com
Chicago Educational Publishing Company, LLC
Simple Machines Design Project Assessments/Teacher Masters/Visual Pack: Table of Contents
Rubric: Simple Machines
4 - Exceeds Expectations Explores content beyond the level presented in the lessons.
3 - Secure (Meets Expectations)
Criterion A
Criterion B
There are six types of simple machines: lever, inclined plane, wedge, screw, wheel and axle, and pulley.
The six simple machines make it easier to do our tasks.
Understands at a secure level (see box below) how to recognize the six types of simple machines and shows interest in looking for ways they are used in everyday situations.
Understands at a secure level (see box below) and can apply their understanding to demonstrate and explain how combinations of two or more simple machines make it easier for us to do our tasks.
Can recognize the six types of simple machines.
Can demonstrate or explain how all six simple machines make it easier for us to do our tasks.
Recognizes some but not all of the six simple machines.
Knows that, in general, simple machines make it easier to do tasks, but is unable to explain how all six simple machines make it easier for us to do our tasks.
Is unable to recognize any of the simple machines.
Doesn’t know that simple machines make it easier for us to do our tasks.
Understands content at the level presented in the lessons and does not exhibit misconceptions.
2 - Developing (Approaches Expectations) Shows an increasing competency with lesson content.
1 - Beginning Has no previous knowledge of lesson content.
Rubric: Simple Machines
Simple Machines: Assessment 1
Name:
Date:
Simple Machine Walk—Student List examples of the following simple machines that you see on the walk:
Levers:
Inclined Planes:
Wedges:
Screws:
Wheels and Axles:
Pulleys:
Simple Machine Walk—Student (Session 2)
Simple Machines Teacher Master 5
Simple Machine Walk—Teacher Simple Machine
Simple Machine Examples
Classroom
Levers—light switch, staple puller, stapler, door, binder clip, scissors, clip board, clothespin*, can opener*, bottle opener*, tongs* Wedges—staple puller (sharp edge), knife, fork, can opener (sharp disks), door stop Screws—screws attaching various objects in classroom (desk, light switch plate, bulletin board), cork screw, bottle with screw cap Wheels and Axles—door knob, pencil sharpener, tape dispenser, overhead projector, screwdriver, bottom of chair Pulleys—shoelace eyelets, blinds
Hallways
Levers—fire extinguisher, light switch, lever on drinking fountain Inclined planes—stairway, wheel chair ramp Screws—screws attaching various objects in hallways (art, drinking fountain, overhead light)
Playground
Inclined planes—slide, ladder to slide, school roof Screws—screws attaching various objects on playground (play structure, basketball hoop, tetherball pole) Pulleys—flag pole
Parking lot (mainly on cars)
Levers—gear shift, blinker, door handle, window switch Inclined planes—road, driveway, stairs, wheel chair curb access Screws—screws or bolts attaching various objects (car license plate, bike rack, light poles) Wheels and Axles—steering wheel, car wheel and axle
Custodian’s shop**
Levers—hammer, crow bar, pliers, clippers Wedges—ax, clippers (sharp edge), chisel Screws—various screws and bolts, clamp, vice, drill bit Wheels and Axles—drill, skill saw Pulleys—various pulleys
*Teacher Note: “Seed” the classroom with these and other items from home. **Teacher Note: If you’re unable to visit the custodian’s shop, you may want to “seed” the classroom with some of the examples listed there.
Simple Machine Walk—Teacher (Session 2)
Simple Machines Teacher Master 6
Machine Criteria The machine the partners design, build, and demonstrate must satisfy the following criteria:
1. It must include at least two simple machines in its design. 2. It must be able to move a 50 gram (about 2 oz) rock a horizontal distance of at least 50 cm (about 1 ½ feet). 3. It must be able to move the same rock a horizontal distance of at least 30 cm meter (about 1 foot). 4. It must be built only from materials supplied in the classroom.
Machine Criteria (Session 3)
Simple Machines Teacher Master 7
Name:
Date:
Machine Sketch and Materials Describe each simple machine:
List the materials required to build each simple machine:
Describe how the simple machines will work together:
Draw and label a sketch of your machine:
Machine Sketch and Materials (Session 3)
Simple Machines Teacher Master 8
Simple Machine Ideas Simple Machine
Description
Lever
A lever made of 2 rulers that are attached by rubber bands. A fulcrum made of an eraser that is squeezed between the rulers.
Inclined Plane
A ramp made of pieces of stapled cardboard or paper that is taped to or resting on top of a cardboard box.
Pulley
A wooden spool and a dowel rod attached between two holes in a box. The assembly is attached to the top of a cardboard box (with screws or tape).
Wheel and Axle
One end of a string tied onto the shaft of a screwdriver and then wrapped around the shaft a few times to tighten it (like a yo-yo). The other end tied to the rock. Then lift the rock by turning the screwdriver handle.
Simple Machine Ideas (Session 3), page 1 of 2
Example
Simple Machines Teacher Master 9
Simple Machine Ideas Simple Machine
Description
Wheel and Axle
Single axle cart: Spherical wheels formed from play dough or clay. An axle made of a piece of pencil and then attached to a piece of paper that is looped around the axle and stapled together.
Wheel and Axle
Double axle cart: Spherical wheels formed from play dough or clay. Axles made of wooden skewers. Each axle is attached to a cardboard board frame with wire or twist ties.
Simple Machine Ideas (Session 3), page 2 of 2
Example
Simple Machines Teacher Master 10
Levers
Overhead Transparency: Levers (Session 2) Simple Machines Visual 1
2011 Edition. Copyright © 2010 Chicago Sc ence Group. All Rights Reserved. www.sc encecompanion.com
Inclined Planes
Overhead Transparency: Inclined Planes (Session 2) Simple Machines Visual 2
2011 Edition. Copyright © 2010 Chicago Sc ence Group. All Rights Reserved. www.sc encecompanion.com
Wedges
Overhead Transparency: Wedges (Session 2) Simple Machines Visual 3
2011 Edition. Copyright © 2010 Chicago Sc ence Group. All Rights Reserved. www.sc encecompanion.com
Screws
Overhead Transparency: Screws (Session 2) Simple Machines Visual 4
2011 Edition. Copyright © 2010 Chicago Sc ence Group. All Rights Reserved. www.sc encecompanion.com
Wheels and Axles
Overhead Transparency: Wheels and Axles (Session 2) Simple Machines Visual 5
2011 Edition. Copyright © 2010 Chicago Sc ence Group. All Rights Reserved. www.sc encecompanion.com
Pulleys
Overhead Transparency: Pulleys (Session 2) Simple Machines Visual 6
2011 Edition. Copyright © 2010 Chicago Sc ence Group. All Rights Reserved. www.sc encecompanion.com
®
Doing Science
ITThhininkk
I RReeccoorrdd
I I W Woon ndde e
rr
rr e v o e ssccov D Di
I
n panio ” m o C ce der Scien e “I Won ents th tud uses elp s they h o t Circle ct on how tists!) refle her scien . ot (and o science d
“I Wonder” Circle
y Trry IT
veve
D i g Doing S i c Science
I O I bs O b s eerr
I Wonder: notice, ask questions, state problems I Think: consider, gather information, predict I Try: experiment, model, test ideas, repeat I Observe: watch, examine, measure I Record: record data, organize, describe, classify, graph, draw I Discover: look for patterns, interpret, reflect, conclude, communicate discoveries
2011 Edition. Copyright © 2004 Chicago Science Group. All rights reserved. Except as permitted under the United States Copyright Act no part of this publication may be reproduced or distributed in any form or by any means or stored in a database or retrieval system without the prior written permission of the publisher. www.sciencecompanion.com Chicago Educational Publishing Company LLC
I Wonder...
What’s in Science Companion? For the Teacher
Teaching and Assessment Teacher Lesson Manual
Assessment Book
Student Notebook Teacher Guide
Great Classroom Support
Reference Materials
• Teacher Reference Materials • Lesson O
Teacher Masters
www.sciencecompanion.com
Visual Aids
• Transparencies and Posters • I Wonder Circle® Poster in English & Spanish
I Discover...
What’s in Science Companion? For the Student:
Classroom Supplies
Student Science Notebook
Exploragear® Kit
Student Reference Book
Trade Books
English & Spanish
Great Curriculum Support
ulum le c i r Cur vailab a d now rint an in p gital! di
(Levels 4-6)
(Levels K-3)
www.sciencecompanion.com
PreK-6 Inquiry Science Curriculum
Motion
While deciding what makes a solid a solid, watching water disappear from an open cup, or comparing various liquids, children find the value in asking questions and probing the world around them for meaningful answers.
Life Science
Through activities that engage children’s bodies and minds, children move their own bodies in various ways to learn about motion, as well as build ramps, roll toy cars, drop and crash marbles, slide pennies and shoes, and even fly paper airplanes.
Life Cycles
From watching a pea sprout to feeding apples to butterflies, children closely study four organisms, including humans, to observe the remarkable growth and change that living things experience during their life spans.
Early Chilhood
Solids, Liquids, and Gases
Earth Science
Physical Science
From collecting animal tracks to dissecting flowers, children deepen their understanding of what makes something alive as well as exploring the similarities and differences among
Physical Science
living things.
Collecting and Examining Life
Early Science Explorations
Weather
Physical Science
Life Science
Through experiments with prisms, mirrors, bubbles, water, sunlight, and flashlights, children bring rainbow effects into their classroom and onto the playground. They also mix colors to observe that colored light produces different results than mixing pigmented paints, dough, or water.
Magnets
Earth Science
Rainbows, Color, and Light
Rocks
Earth Science
Early Chilhood
Inspiring students to explore their world.
Soils
From making a collage of the leaves and seeds they find to constructing a lever from rocks and wood, children are introduced to the wonders of science and scientific exploration. Contains 7 studies in one book: Growing and Changing; Class Pet; Collections from Nature; Constructions; Dirt, Sand and Water; Sky and Weather; and My Body. One day students learn to use a thermometer to record temperature, another day they measure rainfall or investigate the nature of ice. Throughout the year, students use their senses as well as scientific tools to discover that weather is a dynamic part of nature.
From testing what sort of everyday objects are attracted to magnets to comparing the strength of different magnets, children deepen their observation skills while learning about the nature of magnets.
One day children examine fossils, another day they might test minerals. As children collect, examine, describe, and experiment with rocks, minerals and fossils, they hone their observation skills and begin to unravel the puzzle of what rocks are and how they are formed. From closely observing soil components and their properties to discovering the importance of earthworms, children use their senses of sight, smell, and touch to explore the wonders of soil.
www.sciencecompanion.com 888.352.0660
Earth’s Changing Surface
Life Science
From building river models that explore erosion and deposition to touring the school grounds looking for evidence of the earth’s changing surface, students use hands-on investigations to discover the dynamic nature of the earth’s surface.
Human Body in Motion
Physical Science
By modeling how muscles move bones, testing reflexes, and measuring the effects of exercise on breathing and heart rate, students begin to appreciate the interactions between body parts and recognize the importance of protecting them by making healthy choices.
Watery Earth
Matter
Energy
Whether watching light “bend” a pencil in water or building a periscope, the combination of hands-on, multisensory learning enables children to understand what light is, how it behaves, and why it makes sight possible.
One day children chart the moon’s cycles, another day they might make a scale model of our solar system. By observing the world around them, they address questions such as “Why are there seasons?” and “Why does the moon appear to change shape?” Whether following a drop of water through the water cycle, measuring their own water usage, or exploring how filters clean dirty water, students are encouraged to use what they learn to have a positive impact on water resources. With challenges like exploring what they can learn about an unknown substance called “Whatzit,” students experience the excitement of scientific discovery and gain an appreciation of the scientific method used by professional scientists. Whether testing the efficiency of light bulbs, exploring heat conduction, or designing an imaginary invention demonstrating the transfer of energy, students discover that energy is at the root of all change occurring in the world around them.
Force and Motion
By demonstrating and explaining ways that forces cause actions and reactions, as well as gaining a deeper understanding of basic forces such as friction and gravity, students discover the many ways that forces affect the motion of objects around them.
Building Skills
Physical Science
Earth Science
By watching composting worms create soil, to modeling the nutrient cycle, students have the opportunity to investigate the organisms that carry out the process of decomposition and recycle nutrients in an ecosystem.
Earth Science
Nature’s Recyclers
Our Solar System
Earth Science
Life Science
Whether exploring static charges, figuring out how to get a light bulb to light, or testing the conductivity of everyday objects, students experience firsthand the excitement of electricity and scientific discovery.
Physical Science
Electrical Circuits
Light
Physical Science
Physical Science
From going on a nature walk to dissecting owl pellets, children are asked to think about how organisms (plants, animals, fungi, and microscopic living things) survive in the places they live, and how they interact with other living things.
Science Skill Builders
With 21 lessons spanning the breadth and depth of science skills, students develop a core understanding of using tools in science, scientific testing, observation skills, and the importance of analysis and conclusions.
Design Projects
Animal Homes, Human Tools, Simple Machines, Moving Systems, Electrical Circuits, Human Systems. The design project series was developed to support compatible modules by allowing students to design and/or build animal homes, tools, machines, and designs of their own creation. Taking between 4-6 sessions, the projects strengthen skills and ideas about choosing materials, using tools, working with the limitations of materials, solving problems, and overall project design.
Technology
Life Science
Habitats
www.sciencecompanion.com
Unique Features... Program Features
FOSS
Prepares students to do inquiry-based science Hardback, colorful, content-rich student reference materials for upper elementary students Bound student science notebooks to foster student literacy and reading skills Parallels in instructional design to Everyday Mathematics® Variety of assessment strategies
P P
A variety of pilot options to fit the interests and needs of districts Correlations to local and state science standards Teacher must gather minimal teacher supplied items Early Childhood activity-based modules available Unique content offered to meet standards Children develop science habits of mind in addition to content knowledge Engaging activities nourish children’s curiosity Supports teachers in reaching Big Ideas Full curriculum available digitally
P P
(K Only)
P
Science Companion
P P P P P P P P P P P P P P
STC
Lesson O introduces students to the scientific method through the “I Wonder” Circle Student Reference Books The original Student Science Notebooks Developed by the creators of Everyday Mathematics® Teacher-friendly formative and summative assessment strategies Several no-cost pilot options, including an innovative online pilot program Correlated to state standards with customized local standard correlations available upon request ExploraGear and Supplemental Classroom Supplies available
P
P
Modules developed specifically for PreK-K available
Light and Rainbows, Color, and Light modules available “I Wonder” Circle integrates modules as tool for student reflection Engaging, hands-on activities focused on Big Ideas Reflective Discussions help children integrate their experience and build science knowledge Hyperlinked teacher materials (iTLM’s) & digital student materials build affordable access
P
www.sciencecompanion.com
A New Way to Pilot... An Innovative Free Online Pilot Program! We know that both time and financial resources are limited for school districts these days. So, we are delighted to introduce an exciting new digital opportunity for you to try Science Companion materials at no cost, at a scale that is easily manageable. And it’s high tech, too!
Come to our Online Pilot Website and find: • Sample lessons from eight of our modules. • Conversation and support from content and teaching experts. • Free digital teacher materials and student resources. • Directions on how to order ‘lending library’ for kit materials. • A pilot that will give you a rich taste of inquiry science but requires no more than a handful of classroom sessions.
“I think this is an awesome resource for doing science.”
Field Test Teacher
There are a limited number of online pilots available, so contact us now to find out how you can explore Science Companion at your pace, for free. (And, of course, we have traditional pilots available too. Just ask!)
www.sciencecompanion.com
888-352-0660
[email protected]
Professional Development Succeed with Science Companion
Inquiry-based learning in science is exciting, effective, and evocative. It also can be challenging. We can help you take the mystery out of inquiry!
Philosophy
A half-day session introducing the methodology, pedagogy, and best practices of Science Companion.
Implementation
Building from specific modules your district is using, a hands-on exploration of how to best implement Science Companion in your classrooms.
Designed by the University of Chicago’s Center for Elementary Math & Science Education.
Assessment and Science
Participants
Formative and summative assessment can work together to strengthen teaching and test scores!
Teachers and administrators in districts using Science Companion.
Coming from Everyday Math
Length
Science Companion was developed by the same researchers who developed Everyday Mathematics, and many of the same pedagogical tools are used. Making the jump to Science Companion is easy!
Train the Trainers
Build a community of Science Companion experts in your district or intermediate unit.
It’s in the Bag!
Fully customizable workshops to meet your needs. Contact us to learn how we can best help you!
Mix and Match to your needs to build a half day or full day session.
Continuing Education
CEU’s available, please ask us about we can work with you to arrange credits.
Cost
Ask your rep for more information!
The spirit of inquiry. An invitation to curiosity. The tools for success.
Contact Us! Get a Full Curriculum Sample Check out a Pilot Program Get a Custom Scope & Sequence Find your Sales Rep Phone/Fax: 888-352-0660 8400 Woodbriar Drive Sarasota, FL 34238
link r e eith re k c Cli or mo n! f tio a m info
[email protected] www.sciencecompanion.com
The spirit of inquiry. An invitation into curiosity.
The tools for success.