Aug 27, 1998 - Hold Timer to use the word Duration instead of Timer. It sounded better to me. ⢠Minor editing of spelling and grammar. Figured out a kludge to ...
A GIGABIT LOCAL ATM TESTBED FOR MULTIMEDIA APPLICATIONS
System Architecture Document for
GIGABIT SWITCHING TECHNOLOGY
Version 3.5 Technical Report ARL-94-11 August 27, 1998
by: Jonathan S. Turner ARL Staff ANG Staff
Document prepared by: Zubin D. Dittia J. Andrew Fingerhut
Department of Computer Science
System Architecture Document 1 INTRODUCTION ..................................................................................................4 2 OVERVIEW OF THE ARPA PROJECT...............................................................4 3 SWITCH DESIGN..................................................................................................5 3.1 Introduction..................................................................................................5 3.2 Basic Operation............................................................................................7 3.3 Resequencing Options .................................................................................11 3.4 Configuring the Network to Avoid Blocking ..............................................13 4 PROTOTYPE SWITCH CONFIGURATION .......................................................13 5 TESTBED OVERVIEW.........................................................................................15 6 CELL FORMATS...................................................................................................15 6.1 External Data Cell Format ...........................................................................15 6.2 I/O and Recycling Data Cell Format ...........................................................19 6.3 Internal Data Cell Format ............................................................................20 6.4 Control Cell Format .....................................................................................24 7 CONTROL TABLES AND REGISTERS..............................................................29 7.1 Virtual Path/Circuit Translation Tables .......................................................30 7.2 Maintenance Registers .................................................................................32 7.2.1 IPP Maintenance Register Fields ......................................................32 7.2.2 OPP Maintenance Register Fields ....................................................39 8 PORT PROCESSOR DESIGN...............................................................................45 8.1 Overview......................................................................................................45 8.2 Input Port Processor Design.........................................................................47 8.2.1 Link Enabling and Disabling Circuitry.............................................48 8.2.2 Receive Framer (rframer) .................................................................50 8.2.3 Cell Store (cstr) .................................................................................51 8.2.4 Receive Buffer (rcb) .........................................................................51 8.2.5 Maintenance Register (mreg)............................................................52 8.2.6 Recycling Buffer (cycb)....................................................................53 8.2.7 Receive Circuit (rcv).........................................................................54 8.2.8 Virtual Circuit Translation Table Control Circuit (vxtc)..................55 8.2.9 Virtual Circuit Translation Table (vxt) .............................................56 8.2.10 Reformatter (rfmt)...........................................................................56 8.3 Output Port Processor Design......................................................................59 8.3.1 Reformatter (rfmt).............................................................................59 8.3.2 Resequencer (reseq) ..........................................................................61 8.3.3 Transmit Circuit (xmit) .....................................................................62 8.3.4 Maintenance Register (mreg)............................................................62 8.3.5 Block Discard Controller (bdc).........................................................63 8.3.6 Transmit Buffer (xmb)......................................................................67 8.3.7 Transmit Framer (xframer) ...............................................................68 8.3.8 Cell Store (cstr) .................................................................................68 9 SWITCH ELEMENT DESIGN..............................................................................68 9.1 Data Paths and Grants..................................................................................69 9.2 Behavior of Switching Fabric ......................................................................69 9.3 Switch Element Interconnection and Option Pins .......................................70 9.4 Behavior of Switch Element Chips..............................................................73
ii
iii
Gigabit Switching Technology
9.5 Behavior of Major Circuits in the Switch Element Chip.............................74 9.5.1 Distribution Circuit (dstc) .................................................................74 9.5.2 Input Crossbar and Grant Generation Circuit (ixbar, ggc) ...............75 9.5.3 Shared Buffer and Control Circuit....................................................75 9.5.4 Output Crossbar ................................................................................75 9.5.5 Header Modification Circuit (hmc) ..................................................75 9.6 Parity Checking............................................................................................76 9.7 Deskewing the Signals Sent Between Chips ...............................................76 9.8 System Reset................................................................................................77 9.9 Other Signals Sent to All Chips ...................................................................78 10 OPERATIONAL SCENARIOS ...........................................................................79 10.1 Testing........................................................................................................79 10.2 Setting Up, Modifying, and Removing Connections.................................82 10.2.1 Setting up a point to point connection ............................................83 10.2.2 Adding endpoints to create a point to multipoint connection .........83 10.2.3 Removing endpoints from a point to multipoint connection, and transitional time stamping 83 10.2.4 Removing a point to point connection ............................................84 10.2.5 Multipoint to Multipoint Connections ............................................84 10.3 Monitoring Statistics and Error Conditions ...............................................84 10.4 Switch Reset and Initialization ..................................................................84 11 Known Problems and Possibly Surprising Features .............................................84 11 REFERENCES .....................................................................................................86
System Architecture Document
4
1 INTRODUCTION This document details the design specifications for a high speed multicast virtual circuit switch being developed at Washington University. A prototype implementation of this switching fabric forms an important component of a bigger project, whose goal is the investigation and development of two key gigabit technologies: • Multirate gigabit switching, and • Host network interfacing for high bandwidth distributed and multimedia applications. The project itself is funded by ARPA, and work related to the project is being done by faculty, staff, and students from the Applied Research Laboratory (ARL) and the Advanced Networks Group (ANG), both of which are groups in the Department of Computer Science at Washington University. The innovative aspects of the switch architecture described in this document include: a novel cell recycling architecture, a nonblocking design that is asymptotically optimal in both the switching network complexity and in the amount of memory required for multicast address translation, which supports fast (constant time) addition and deletion of endpoints to a multicast connection. As one of the ARPA project deliverables, three prototype switches built using this design will be used to form a local ATM test bed that will interconnect a number of workstations. The primary purpose of this report is to serve as a comprehensive and detailed reference guide for hardware and software engineers working to put together both the prototype switch and the LAN test bed. Other interested parties may also find parts of the document useful for reference purposes, or for an overview of the project. This document has been structured so as to allow for clarity as well as completeness. A top-down approach has been chosen for presentation, with initial sections of the document giving a broad overview of the ARPA project, the switch design, and the test bed overview, while later sections focus on detailed descriptions and implementation specifics for various functional units. The material outlined in this document is the result of a series of meetings jointly organized by ARL and ANG with a view to arriving at a complete specification of the system architecture. It is possible that some of the ideas or designs presented here may change over time, as the prototype implementations take shape, and as more experience is acquired. It is anticipated that the document will evolve in parallel with work on the project, so readers wanting to use it for reference should acquire the latest version of the document.
2 OVERVIEW OF THE ARPA PROJECT The gigabit switching technology that will be used is based on a novel nonblocking cell-recycling architecture. An important aspect of this architecture is that it provides extremely efficient support for multicast, which is crucial for a number of key applications, including teleconferencing, multiparticipant collaboration, distributed computing, video distribution, etc. The architecture is optimal in switching network complexity, memory requirements for multicast address translation, and in the amount of effort required for multicast connection modification. Furthermore, it is capable of supporting multirate access between the network and hosts. In particular, it will support link rates of 155 Mbps, 620 Mbps, 1.2 Gbps, and 2.4 Gbps. The external cell format follows the ATM standard. The switching system can easily be used in both LAN and WAN environments with minimum modification. The host network interface that will be developed uses an ATM interconnect within the host to serve as the high speed equivalent of an I/O bus. The interconnect itself has a daisy-chained topology, and is constructed using a number of ATM port interconnect controllers (APICs), each of which interfaces to one or more devices within the host. The interface design will allow sustained data transfer rates of up to 1.2 Gbps to various devices within the host, including display, memory, disk, etc. One of the design objectives is to provide easy and efficient interfacing to different host platforms and devices. This will ensure that minimum modifications to the operating system will be required, and both existing and new network protocols can be used.
5
Gigabit Switching Technology The project has been divided into five tasks: 1. Designing and prototyping of the recycling switch fabric and its port processors and link interfaces. 2. Development of signalling software for use with the switch; this will include signalling for the user-network interface, as well as signalling between entities within the network. 3. Design and prototyping of the ATM port interconnect controller (APIC), and interfacing it to the host memory and the workstation display. 4. Extending the operating system to incorporate device drivers for managing devices with back end interfaces to the ATM interconnect, and modifications to the TCP/IP protocol implementation to allow high speed but transparent operation over the new host network interface. 5. Creation of an ATM LAN test bed comprising three switches, and a number of multimedia workstations and multimedia file (image and/or document) servers. 6. Development of example applications and experimental studies. This will include using an n-body benchmark application and a multiparticipant collaborative application to investigate hardware and application performance issues.
As mentioned earlier, our primary concern in this document is with the first task, viz., design and prototyping of the switch fabric and related chips. The overall project is slated for completion in 1996, but most of the work related to task 1 has to be completed by the end of 1995.
3 SWITCH DESIGN 3.1 Introduction Multicast virtual circuit networks support communication paths from a sender to an arbitrary number of receivers, as illustrated in Figure 1. As shown, multicast virtual circuits induce a tree in a network connecting a sender to one or more receivers. Switching systems participating in the virtual circuit replicate received cells, using virtual circuit identifiers in the cell headers to access control information stored in the switching system’s internal control tables. This information is then used to identify the outputs to which the cells should be sent and to relabel the copies before forwarding them on to other switching systems. Figure 2 illustrates the function of a multicast virtual circuit switch in more detail. The switch includes control information, shown here as a table, which for each incoming virtual circuit provides a list of outputs and outgoing virtual circuit identifiers. For a cell received on input link i and virtual circuit z, the switch forwards copies to outputs j1, j2, ... after relabeling them with new virtual circuit identifiers, y1, y2, ... Notice that if the switch has n inputs and outputs and each output supports up to m virtual circuits, one can describe any collection of multicast virtual circuits with mn words of memory. One simply provides for each (output,VCI) pair, the identity of the (input,VCI) pair from which it is to receive cells. Unfortunately, this method of defining a set of multicast connections is not particularly helpful in switching, as it does not give one an efficient way to map (input,VCI) pairs to the desired list of (output,VCI) pairs. Existing virtual circuit switch architectures describe multicast virtual circuits in different ways, which while suitable for switching, use far more than mn words of memory. The broadcast packet switch [Turner-88b,Turner-88c], for example, requires mn2/2 words of memory under worst-case conditions. Moreover, the time required to update a multicast connection grows with the size of the connection. Other architectures require even greater amounts of memory. For example, Lee’s multicast switching system [Lee-88] requires mn 3 ⁄ 2 words of memory under worst-case conditions. The multicast switch architecture described here has O ( n log n ) hardware complexity and it is nonblocking, in the sense that it is always possible to accommodate a new multicast connection or augment an existing one, so long as the required bandwidth is available at the external links. It requires less than 2mn words of memory for multicast
System Architecture Document
6
Figure 1: Multicast Virtual Circuit Switching
Figure 2: Multicast Switch Functionality address translation. Moreover, the overhead for establishing or modifying a multicast connection is independent of the size of the connection or the switching network.
7
Gigabit Switching Technology
Figure 3: Multicasting by Recycling Cells
3.2 Basic Operation The basic principle behind the recycling architecture is illustrated in Figure 3. To implement a multicast connection, a binary tree is constructed with the source switch port at its root and the destination switch ports at its leaves. Internal nodes represent switch ports acting as relay points, which accept cells from the switch, but then recycle them back into the switch after relabeling the cells with a new destination pair identifying the next two switch ports to which they should be sent. There are many possibilities for constructing the switching network. A Benes network, in which the switches in the first half of the network distribute cells randomly in order to balance the load evenly, and in which local buffers are used to resolve contention, provides the lowest cost solution known. Figure 4 illustrates a 16 port network of binary switch elements in which two cells with two destinations each are forwarded from inputs to outputs. Note that cells are copied at the latest possible point in the network and this point is easily determined by bit-wise consideration of the destination addresses. This scheme can easily be extended to networks constructed from larger switch elements. It can be shown that given any collection of virtual circuits, the load placed on any of the switching network’s internal links is at most equal to the load on the most heavily loaded external port. In other words, there is no collection of virtual circuits that can be handled by the external links that cannot also be handled by the network. That is, this network is nonblocking. Other switching networks, suitably extended to provide the copy-by-two function, can also be used in the recycling architecture. ˆ
The lower part of Figure 3 details the hardware associated with each port of the switching system. The resequencer is responsible for restoring proper ordering of cells on output from the network, and also to ensure that additions or deletions of endpoints to multicast connections do not change the proper cell ordering. The resequencing buffer is labeled RSQ in Figure 3. Given a virtual circuit identifier, obtained from a cell’s header, the Virtual Circuit Translation Table (VXT) provides two (output,VCI) pairs that are added to the cell header plus two additional bits that indicate, for each pair, whether it is to be recirculated another time, or not. The Receive Buffer (RCB) holds cells that are waiting to enter the switching network, while the Transmit Buffer (XMB) holds cells waiting to be transmitted on the outgoing link.
8
System Architecture Document
ˆ
Figure 4: Benes Network with Copy-Twice Routing Figure 5 illustrates the resequencing operation. Cells entering the network pass through a Time Stamp Circuit
Figure 5: Resequencing Concept (TSC), which records the time the cell enters the network in its header (the TSCs are all driven from a common clock). On output, the cell is placed in a resequencing buffer which is managed by a Resequencing Buffer Controller (RBC). When a cell leaves the switch and enters the resequencing buffer, the RBC computes its age from the time of entry and the current time. It also keeps track of the age of all cells stored in the buffer and allows cells to leave the buffer in oldest-first order. If the oldest cell is not “old enough”, no cell is output. The purpose of this is to allow cells that require an unusually long time to pass through the switching network to catch up with cells that have already reached the output buffer.
9
Gigabit Switching Technology Figure 6 shows the organization of the resequencing buffer and buffer controller. The buffer is organized as
Figure 6: Resequencing Buffer Organization a set of slots, with each slot being big enough to hold a single ATM cell. The controller is organized similarly, with a control slot for each buffer slot. Each control slot contains two pieces of information, a slot number which specifies the buffer slot it is associated with and the age of the cell (if any) stored in that slot. The selector, at the right, selects the oldest cell during output operations, compares that cell’s age to a given age threshold, and if appropriate, forwards the cell’s slot number to the buffer which then forwards the cell to the downstream circuitry. The grant signal is asserted by the downstream circuit if it is prepared to receive a cell; this provides a simple form of flow control. During input operations, the selector selects any idle control slot, inserts the age of the arriving cell into that slot, and passes the slot number to the buffer, which places the arriving cell in the specified slot. We analyze the resequencer depth requirements in Section 3.3. Figure 7 illustrates the operation of the multicast switch in more detail. In this example, a multicast connection delivers cells from input a to outputs b, c, d and e, using ports x and y as relay points. In the lower part of the diagram, the implementation of the connection is shown in an ‘unrolled’ form, to clarify the flow of cells through the system. It should be understood however, that this is purely illustrative. There is in fact just one switching network, not three, and cells are simply sent through it multiple times in order to reach all the destinations. In the example, cells entering at input a with VCI i, are forwarded to output e, VCI k and output x, VCI j. At x, the cell is recycled, with VCI j used to select a new table entry from x’s VXT. The resulting information causes the cell to be forwarded to output b, VCI n and output y, VCI m. At y, the cell is recycled again, with the resulting copies delivered to c and d. Although it is not shown in the figure, the table entries contain one bit for each copy, indicating whether that copy should recycle or go out to the link. We can also construct multicast connections to which multiple input ports can send cells. One simply sets up the virtual circuit tables of each of the source input ports so that they forward cells to the port at the root of the tree, which then recycles them along the tree. Of course, the total traffic from all the source ports must be limited to the total bandwidth allocated to the connection. In a connection where a port is both a source and a destination, we often do not want to send to a source a copy of a cell that it sent in the first place (although we do want the other participants to receive it). This is easily accomplished by including the identity of the original source port in the cell and checking this at the destination in order to discard unwanted copies. To add an endpoint to a multicast connection, some rearrangement of the connection is needed. This is illustrated in Figure 8. Let d be the output that is to be added to a connection, let c be an output closest to the root of the
System Architecture Document
10
Figure 7: Example of Multicast Connection
Figure 8: Adding an Endpoint to a Connection tree and let a be its parent. Select a switch port x with a minimum amount of recycling traffic. Enter c and d in an unused VXT entry at x and then replace c with x in a’s VXT entry. These changes have the effect of inserting x into the tree, with children c and d, as illustrated in the figure. Dropping an endpoint is similar, as illustrated in Figure 9. Let c be the output to be removed from a connection and let d be its sibling in the tree, x be its parent and a its grandparent. In a’s VXT entry, replace x with d. If the output to be removed has no grandparent but its sibling has children, replace the parent’s VXT entry with the sibling’s children. For example, in Figure 9, if b were the output to be deleted, we would copy x’s VXT entry to a, effectively removing x from the connection. If the output to be removed has no grandparent and its sibling has no children, then we simply drop the output to be removed from its parent’s VXT entry, and the connection reverts to a simple point-to-
11
Gigabit Switching Technology
Figure 9: Dropping an Endpoint point connection. For example, in the bottom part of Figure 9, if b were to be dropped from this connection, we would be left with the point-to-point connection from a to d.
3.3 Resequencing Options There are two main options for resequencing in the recycling architecture. We could either resequence cells after every pass through the fabric (this is our preferred approach for the prototype design), or we could do the resequencing only after the last pass i.e., when cells are ready to leave the switch. We consider first this latter option. When we resequence only in the last pass, the resequencing buffer must be dimensioned to delay cells long enough so that slow cells have a chance to catch up with fast cells. That is, the resequencing buffer must be at least as large as the largest variation expected in the delay of cells through the system, when they recycle the maximum number of times. Since, both the total delay and the delay variation can change over time, the most practical approach appears to be to dimension the buffer to be equal to the maximum delay that would be expected under the heaviest loading conditions. A naive analysis reveals how the delay grows with n, the number of inputs and outputs to the system. Let µ and σ be the mean and standard deviation of the delay in each stage of the switching network. Let µt and σt be the mean and standard deviation for cells passing through the network the maximum number of times. Let r be the number of stages of switching that these cells pass through, altogether. Then µ t = rµ , and if the delays in each stage are independent (often a reasonable approximation), then σ t =
rσ . A reasonable engineering rule is to select the resequencer
depth equal to the mean delay plus some number h of standard deviations past the mean. This gives a resequencer depth ˆ
of µ t + hσ t = rµ + h rσ . Consequently, the depth grows in proportion to r and for a Benes network, r = ( 2log d n – 1 )log 2 F , where F is the maximum fanout. For d = 2 and F = n, this is too much if we are to obtain an overall system cost that grows in proportion to nlog n. If we follow the other approach of resequencing cells after every pass rather than waiting until the cells exit, it can be shown that it is possible to obtain the desired complexity. This raises a new issue however, in that when we modify a connection, we potentially change the depth of the tree. This means that cells take a different number of passes through the network and introduces the possibility of cells getting out of sequence (even though they are correctly sequenced on each pass). When an endpoint is added to a connection its new sibling becomes repositioned in the tree and its cells experience a longer delay, because of the additional pass through the network. Consequently, there is a momentary gap in the flow of cells to the output, but the ordering of the cells is unaffected. However, when an endpoint is removed from a connection, outputs immediately following the cut point, are moved closer to the root of the tree
12
System Architecture Document
Figure 10: Maintaining Sequence During Transitions and so the cells being sent to them experience a shorter delay and are at risk of being mis-sequenced with cells that left the cut point just before the change. To prevent cells from being delivered out of order, the resequencer must provide an extra delay for cells forwarded immediately after the cut occurs. Let T be the maximum delay we expect to see in one pass through the network ˆ
(equal to ( 2 ( log d n ) – 1 )µ + 2 ( log d n ) – 1 hσ for the Benes network). Let τ be the moment when the VXT at the cut point is changed and let R be a new register included in the time-stamping circuit of every input port processor. Assume the clock used for time stamping is incremented once for every operational cycle of the system (one cell time) and assume also that the time stamp field of the cell and the register R include an extra low order bit that can be used to represent a “half-step.” Normally, cells are time stamped with the current time value. We modify this process for the affected virtual circuit in the time period immediately following the change in the following way. At time τ, the register R is set equal to τ + T. After that time, cells in the affected virtual circuit are time stamped with either the current time or the value of R, whichever is larger. If R is chosen, we also add 1/2 to R. This process compresses the time stamps in the period of length 2T following the transition into the time period [τ + T, τ + 2T] (see Figure 10). This ensures that cells immediately following the transition are delayed for an extra time period in the resequencer, giving cells that entered just before the transition time to catch up and get placed in the proper sequence. The time stamping process returns to normal no later than 2T cycles following the transition. A consequence of this is that two consecutive deletions of endpoints should be separated by at least 2T cycles. These same ideas can be generalized to allow resequencing after every p passes for some p. Letting z = ( 2log d n ) – 1 and F be the maximum fanout, we obtain a resequencer depth of µz ( 1 + p ) + ( 1 +
p )hσ z
and a maximum delay of ˙ µz lgF + hσ z (lg F) ⁄
p
The table in Figure 11 compares per pass resequencing (p=1) to the case where we resequence only on exit (p = lg F) when µ = 3, σ = 2, h = 10 and F = n. In the table, r is the number of stages in a worst-case path. The expression given in the column labeled multipass gives the depth and delay (in cell times) for the resequence-on-exit case. For the largest system, the per pass resequencing delay is 1184 cell times, or under 700 µs for a system configured to support external link speeds of 620 Mb/s. To put things in perspective, this is less than the delay in many existing digital tele-
13
Gigabit Switching Technology
per pass reseq n
r
multipass
r
depth
max delay
rµ + h rσ
8
3
1.4
46
69
9 + 28 = 37
64
18
4.2
88
264
54 + 84 = 138
512
45
6.7
120
540
135 + 134 = 269
4096
84
9.2
148
888
252 + 184 = 436
32K
135
11.6
174
1305
405 + 232 = 637
Figure 11: Comparison of Per Pass Resequencing and Resequence on Exit phone switches, so even the largest value in the table is quite reasonable. The resequencer depth in the largest case is getting fairly large, although it’s arguably still acceptable, since the transmit buffer of the output port is likely to be at least as large. We’ll introduce mechanisms in the next section which can improve both of these cases, but the point to be made here is that even without further refinements, excellent performance is possible. For the purposes of the prototype switch, we use a resequencer depth of 80 cell slots. This ensures that the probability of mis-sequenced cells appearing on an output link is vanishingly small.
3.4 Configuring the Network to Avoid Blocking The recycling architecture can be configured so that it never blocks a new connection request if the network’s internal bandwidth is sufficiently higher than the total bandwidth of the external links. It can be shown that the necessary speed advantage is modest, making the recycling architecture practically useful. In the following discussion, we use normalized bandwidths; this normalization is achieved by defining the bandwidth of one of the switch’s internal data paths to be 1, and expressing all other bandwidths relative to this. Let γ be the total bandwidth of the external links, and let B be the maximum data rate for any single connection. Also, let n be the number of inputs and outputs of the network. Then it can be shown [Turner-93a] that if 2γ ⁄ n + B ≤ 1 , a new connection can never block because of insufficient port bandwidth. Furthermore, if δ is the fraction of exiting traffic that belongs to multipoint connections, it is sufficient to have ( 1 + δ )γ ⁄ n + B ≤ 1 to ensure nonblocking behavior. If we let B = c γ / n (i.e., B = c times the average link rate) then this condition holds when the speed advantage (n/γ) is greater than or equal to 1 + δ + c. So, when δ = c = 1 (the worst-case condition), we require a 3:1 speed advantage. If δ = c = 1/2, a 2:1 speed advantage suffices. In the prototype design, we have chosen a speed advantage slightly larger than 2:1.
4 PROTOTYPE SWITCH CONFIGURATION The recycling architecture described in the previous section can be used to implement very large switching systems with a modest cost per port. In this section, we outline the design of such a system. The prototype switch will be built around this system; many of the later sections of this document focus on its design specifications in detail. Figure 12 is a schematic of the configuration that will be used in the prototype switch. Because of clock speed limitations and the number of pins that a single chip may have, an 8 × 8 switch element cannot be built on a single chip with current technology. Although a bit-sliced structure for the switch elements, with one control chip and k data chips for each switch element, would enable us to construct a switch element with more ports, we have chosen not to follow this approach for the prototype design. Instead, four identical chips operating in parallel implement one 8 × 8 switch element. Each of the four chips receives one fourth of the data of each cell. Each chip also receives an identical copy
14
System Architecture Document
Figure 12: Prototype Switch Configuration of the routing information for each cell. All four chips make identical routing choices simultaneously, so that the outputs of the four chips can be used to reconstruct the original cell. This choice was made to reduce the number of different chip types and the required design effort. The input and output transmission interfaces (ITI and OTI in the figure) are responsible for interfacing to SOat 155 Mbps or 620 Mbps, and to G-link at 1.2 or 2.4 Gbps. The switch itself is organized as a single eight port switch element, implemented with four identical chips operating in parallel. Each port of each chip has a 12-bit wide data paths (four of these are for control, and the remaining eight are data bits; the reason for using this 12-bit wide data path will become apparent later when we describe the internal cell formats). All four chips combined can support a data rate of 3.2 Gbps on each of the eight ports. This is 4/3 times the maximum data rate on a link (2.4 Gbps), thus providing a speed advantage. We seek to constrain the load on the switch ports to no more than 75% to minimize queueing delay and cell loss. For a 620 Mbps link, this leaves 3/4 of the switch bandwidth available for recycling. This scheme can easily be seen to apply for 1.2 Gbps links too; in this case, half of the switch bandwidth would be available for recycling.
NET
The switch organization shown in the figure does not include a control processor. This is because the switch will be controlled remotely. Each port in the system can be optionally configured to send or receive control cells from a remote controlling process. These control cells can be used to access various control registers in the port processor chip, as well as modify the virtual circuit translation tables (VXTs), thus allowing for creation, deletion, and modification of connections. Since most of the connection setup delay is due to software in the control processor, the extra delay introduced by usage of a remote controlling process (rather than a local one) is insignificant. ˆ
The counterpart in the prototype design of the 2 × 2 switch elements used in the Benes network in Figure 4 is the single 8 × 8 switch element comprising all of the four parallel switching planes shown in Figure 12. Each such plane of the switch element resides on a single chip, and internally consists of input and output crossbars with intermediate buffers. The copying occurs in the output crossbar. The motivating factor used to select this design for the switching element in preference to a single crossbar is the reduced circuitry that results on the chip. Notice that for a switch with more than eight ports, multiple eight port switch elements would have to be interconnected in a fashion similar to the Benes network in Figure 4. Although the design of the chips permit such interconnection, construction of such a larger switch is not part of the proposed prototype implementation. ˆ
15
Gigabit Switching Technology
CP Project Zeus Network
WS UNI
ATM Network
WS WS
WS
WS
WS WS WS NNI Figure 13: Planned Testbed Configuration
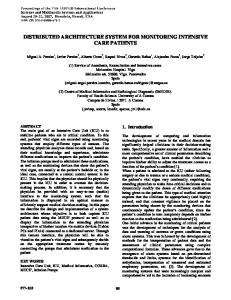
5 TESTBED OVERVIEW Figure 13 shows the configuration of the ATM LAN test bed that is to be constructed using three of the prototype switches (shown in the figure as circles). Eight workstations (WS) will be interfaced to the switches as shown, each over 620 Mbps SONET. The control processor (CP), which is remote from the switches, can be connected to one of the switches through a link at either 155 or 620 Mbps. The test bed will also connect to the Project Zeus network through a 620 Mbps SONET link. For each prototype switch, it is possible to configure any of the input ports as a control port (this is done by means of physical DIP switches that reside on the board). On such ports, a special VPI-VCI combination serves as a dedicated “control” virtual circuit. Control cells (from the control processor) intended for a particular switch must arrive on this dedicated virtual circuit for them to be valid. In addition to these dedicated connections, the CP also sets up dedicated virtual circuits between each workstation and the CP; these are used for exchange of signalling messages between the workstations and the CP.
6 CELL FORMATS 6.1 External Data Cell Format The external data cell format used in the prototype follows the ATM standard. Each ATM cell is 53 bytes long, and carries a 48 byte payload. There are two distinct ATM cell formats: the UNI (User Network Interface) format is used between hosts that are end-points of connections and the first switch encountered in the ATM network; the NNI (Network Network Interface) format is used between pairs of switching nodes within the ATM network. The two interfaces are shown in Figure 13. The only difference between the cell formats for these interfaces is that the first four bits of the
16
System Architecture Document
8 0
GFC
1
VPI[3:0]
2
1
VCI
3 4
8 0
VPI[7:4]
5 PT
VPI[11:4] VPI[3:0]
2
VCI
3
CLP
HEC
CLP
HEC
4
0
5 PT
0
Payload
Payload
48
47
48
47
UNI Format
NNI Format
Figure 14: ATM Cell Format cell form a GFC field in the UNI format, while they are part of the VPI field in the NNI format (i.e., the VPI field is longer by four bits in the NNI format). Referring to Figure 14, the various header fields have the following interpretation (comments that have special relevance to our prototype design have been italicized): GFC – Generic Flow Control: This 4-bit field is used for carrying local flow control information between an end host and the first ATM switching node to which it is directly connected (it is not carried through end-to-end). This
field is ignored in our design. VPI
– Virtual Path Identifier: The ATM standard supports two types of connections (see Figure 15). In virtual path connections, the VCI field is preserved end-to-end, and only the VPI field contents are used by the network to route cells. On the other hand, in virtual circuit connections, both the VCI and the VPI fields are used to route cells, and so neither is preserved end-to-end. Although the NNI cell format supports a 12 bit VPI in the standard, we use only the low-order 8 bits in the prototype.
VCI – Virtual Circuit Identifier: As mentioned earlier, the VCI field is used (along with VPI) for routing cells in a vir-
tual circuit connection. In virtual path connections, it is preserved end-to-end, and can therefore be used by end hosts to demultiplex different cell streams routed on the same virtual path. The ATM standard provides for a 16 bit VCI, but not all VCI values are supported for virtual circuit connections. CLP – Cell Loss Priority: This 1-bit field is used to indicate low priority cells. The source may set this bit to 0 or 1. If
the bit is 1, switches along the connection path know that the cell is of low priority, and preferentially discard such cells if the network is encountering congestion. PT – Payload Type: This three bit field, along with some of the other fields in the ATM cell header, determines the cell
type. The table in Figure 16 lists the values of various fields and the corresponding cell types. These are as per the ITU recommendation; the ATM forum deviates slightly by making all PT bits and the CLP bit of metasignalling and general broadcast cells available for use at the ATM layer. The table also lists the action that the prototype switch will take when it receives a cell of each type. For those types that are discarded (except unassigned cells), the switch will set an internal error flag in its maintenance register to remember that such a cell was discarded, and store the header of the most recent one discarded. Unassigned cells are discarded, but no error flag is set, because such cells are likely to be very common under normal operation. A description of each of the defined cell types follows: • Unassigned cells do not carry any useful data. They characterize available positions, i.e. unused bandwidth, in the cell stream at the ATM layer. These are to be distinguished from IDLE cells, which are used for stuffing unused bandwidth at the physical (PHY) layer, but are not passed to the ATM layer. Unassigned
17
Gigabit Switching Technology vci 2
B
B2
vci 1 A1 vci 3 C1
vpi 3
B1
VIRTUAL PATH (VP) CONNECTION
A2 C2
ATM
Cell
vci 3
Pipe
vci 1
C1 C2 A2 A1 B2 B1
vci 2
A1 A2
vci 1 B1 vci 2 C1
A
B2 C2
Cells arrive on different VCIs within the same VPI, allowing the source to be discriminated.
vpi 9
vci 3
B2
B
B1 vci C1 A1 C2 A2
ATM
vci 1 A1 A2 B1 C2 C1
B2
vpi 7
VIRTUAL CHANNEL (VC) CONNECTION
12
vci 11
A
C
Cell
Pipe
vci 4 A2
vci 7
vci 1
C1 C2 B2 B1 A1
C
Cells arrive on the same VCI and VPI, preventing source discrimination without higher level (payload-based) information.
Figure 15: Virtual Path and Virtual Channel Connections cells, in contrast, are visible at the ATM layer. The distinction between these two types of cells is made based on the CLP bit; as shown in the table, this bit is 0 for unassigned cells. • Meta-signalling cells are used for negotiation of which VCI will be used for signalling, and for assignment of other resources used in signalling. • General broadcast signalling cells carry information that is to be broadcast to all terminals at the UNI. • Point-to-point signalling cells are used to carry signalling messages between two end-points, both of which can either be end-hosts (at the UNI) or switching nodes. • The segment and end-to-end OAM flow F4 cells carry operations and maintenance (OAM) information for a particular virtual path, as identified by the VPI field. Notice that the VCI field is used to distinguish these cells from other cells using the same virtual path. • The segment and end-to-end OAM flow F5 cells carry OAM information for a particular virtual channel, as identified by the VCI and VPI fields. Notice that the PT bits are used to distinguish these cells from other cells on the same virtual channel. • Resource management cells carry resource management information for a particular virtual path or channel. As yet, the content or use of these cells has not been specified.
System Architecture Document
18
• Most cells fall into the category of user data cells. The C bit in the PT is used as an indication of congestion in the network. It is initialized to zero by the source, and it gets set to 1 within the network if there is some indication of congestion. Higher layers at the destination can examine the bit and take necessary action (such as sending a source quench packet). The U bit is used at the ATM adaptation layer; in AAL-5, it marks the last cell in an AAL frame. In the prototype design, meta-signalling, general broadcast, point-to-point signalling, end-to-end F5, and resource management cells are merely propagated unchanged (except for normal VCI translation, as for user data cells) and without interpretation by the switches. Note that normal VCI translation means that such cells may be discarded by the virtual circuit translation table. Unassigned cells are discarded "quietly" (with no error indication) by the receive framer. All F4 cells and segment F5 cells are discarded by the receive framer, and cause an error to be flagged. Cells received that do not match any of the patterns mentioned in Figure 16 are propagated. Finally, and most importantly, we need a special format for the control cells from the remote CP (control processor). User data cells with VPI = 0 and VCI = 32 decimal are used for this purpose. HEC – Header Error Check: The header error check is an 8 bit CRC that is computed only over the header fields. The 8 2 CRC computation is based on the polynomial: x + x + x + 1.
19
Gigabit Switching Technology
Cell Type
VPI
VCI
PT
CLP
Action
Unassigned Cells
0
0
X X X
0
discard
Meta-Signalling Cells
0
1
0 X 0
Y
propagate
General Broadcast Cells
0
2
0 X X
Y
propagate
Point-to-point Signalling Cells
0
5
0 X X
Y
propagate
Segment OAM F4 Flow Cells
X
3
0 X 0
X
discard
End-to-end OAM F4 Flow Cells
X
4
0 X 0
X
discard
Segment OAM F5 Flow Cells
X
≠0
1 0 0
X
discard
End-to-end OAM F5 Flow Cells
X
≠0
1 0 1
X
propagate
Resource Management Cells
X
≠0
1 1 0
X
propagate
GBN Switch Control Cells
0
32 decimal
X X X
X
propagate if CTRL_EN option pin enabled
User Data Cells
X
> 21 decimal
0 C U
L
propagate
any cell not matching a pattern above C: U: L: X: Y:
propagate
Congestion experienced indication bit. If this bit is 1, it indicates that this is the last cell of an AAL-5 frame. Cell Loss Priority bit. Any value. Bit is set to 0 by originating entity, but network may change value. Figure 16: ATM cell header fields for different cell types, by ITU.
6.2 I/O and Recycling Data Cell Format When a data cell enters an IPP, either from the incoming link or recycled from an OPP, it is stored in an intermediate format until it is sent to a switch element. Data cells are also stored in this format in any OPP they go through. This format is shown in Figure 17. All of these fields are explained in Section 6.3. The STG, D, and BI fields are shaded (see Section 6.3 for a definition of these fields, or any of the other fields in Figure 17). This indicates that they need only be defined for cells that are recycling. These fields are undefined for new data cells that have just arrived on the incoming link, and their values are ignored for data cells leaving on an outgoing link. This format is called the I/O data cell format if the STG, D, and BI field values are undefined, or the recycling data cell format if they are defined. The LINK_INFO, DIR, UD, and SCH fields are marked with diagonal lines (see Section 8.3.1 for a definition of these fields). All of these fields except LINK_INFO will be filled in for recycled data cells by the OPP chip, but the first version of the IPP chip will ignore these fields. They are only necessary for a planned future version of the IPP chip that supports several reliable multicast features. The LINK_INFO field will be filled in for link-bound cells by the OPP chip, but the first version of the IPP chip fills them in as four additional bits of the STG field. The second version of the IPP
20
System Architecture Document
0
4
12
1
4
1
4
2
3
1
LINK_INFO
STG
D
——
DIR
——
UD1,2
——
BI 1
——
1
1
2
SCH
VXI
PT
CLP
3
4
24
3
1
1
4 5 6 7 8 Payload
9
12
10 11 12 13 14
Figure 17: I/O and Recycling Data Cell Format chip will fill them in with values that are not yet defined. They are optionally passed from the switch to the outgoing link interfaces, so that link interfaces that implement their own priority-based queueing schemes may use them. In all figures showing cell formats, the bits of values are placed most significant bit to least significant bit, left to right. For fields covering multiple lines in the figure (like the payload in Figure 17, or the time stamp (TS) field in Figure 18), the most significant bits are placed in the top line, continuing down to the least significant bits in the bottom line.
6.3 Internal Data Cell Format When a data cell enters the IPP, many of its fields get interpreted, and a VXT table lookup yields output port numbers to which the cell will be forwarded (either for output or for being recycled). This and some other information, along with the cell payload itself, are then encapsulated by the IPP in a new type of cell, the format for which is shown in Figure 18. This cell format is called the internal data cell format. Note that the format has fifteen 36-bit words. It is sent to the four parallel switch planes in 16 clock ticks. The extra tick is desirable for several reasons: it allows a little more time for the switch elements to complete their tasks, it leaves a guard time between cell times, and it makes the cell time equal to 4 times 4 clock ticks, which is useful in the port processors because the cell store memories can be accessed 4 times per cell time, each time using 4 clock ticks (see Section 8.2). The first four bit-columns of the cell contain control information that is used by the switch elements to route the cell through the fabric; these are called control columns. The remaining 32 bit-columns contain, in addition to the original cell payload, control information that needs to be interpreted only by the port processors. All four of the switching planes need to have access to the four control columns, so they are forwarded by the IPP to all four planes. The remaining 32 bit-columns are divided up, eight per plane. Hence, each switching plane receives data on 12 pins per port. All four switching planes are designed to behave identically (since they all receive the same four control columns), so the switching of the cell through the four planes is fully synchronous, and the cell emerges from the switch fabric (possibly after having been copied to multiple output ports) and is received by the OPP in precisely the same format as it entered, and over a period of 16 clock ticks. Once it enters the OPP, it gets converted back to the I/O or recycling data cell format. The various fields in the internal data cell format have the following interpretation: BI
– Busy/Idle cell: This 1-bit field is used to distinguish between idle cell slots and busy (i.e., data or control) cell slots. It is 0 for an idle cell slot and 1 for a busy cell slot.
RC
– Routing Control: When these three bits are all 0 (i.e., RC = 000), then the IADR field (see below) precisely enu-
21
Gigabit Switching Technology
1
3
4
12
1
2
1 1 1
4
2
3
1
0 BI
RC
LINK_INFO
STG
D
CYC1,2
CS BR DIR
SCH
UD1,2
PT
CLP
1
1
VXI1
BDI1
1
2
VXI2
BDI2
1
3
24
8
4 5 6
— IADR
7 8 Payload
9
12
10 11
Reserved
12 13
TS
14
Figure 18: Internal Data Cell Format merates a specific path through the switching fabric. In all other cases, the IADR field specifies two output port numbers, and the RC bits are used to determine whether the cell should be routed to only one of these ports, or to both, or to the entire range of output port numbers falling in between (and including) the two ports. If we call the first port number in the IADR field PORT1, and the second one PORT2, then the three RC bits have the following encodings:
RC = 000
Specific path through switching fabric.
RC = 010
Route cell only to output port number PORT1.
RC = 001
Route cell only to output port number PORT2.
RC = 011
Route cell to the two output port numbers PORT1 and PORT2.
RC = 111
Route cell to all port numbers falling in the range from PORT1 up to PORT2, inclusive. Note: PORT1 must be less than or equal to PORT2.
Note that when the multipoint connection tree (see Figure 3) is a full binary tree, the RC field has a value of 011. When we have a point-to-point connection, or if one of the internal nodes of the multipoint connection tree has only one child, the RC field may take on the value 010 or 001. The last entry in the above table (RC = 111) has been provided to allow the construction of multicast connection trees with larger branching factors, reducing the required speed advantage and the delay due to recycling. The reason for the restriction that PORT1 must be less than or equal to PORT2 is that it makes the specification and implementation of this feature in the SE chips simpler. There is no restriction on the relative values of PORT1 and PORT2 for cells with other RC values. They may be equal, and in the case of RC=011 cells, this causes two copies of the cell to appear at the same output port, one at a time. They can be distinguished because one copy has RC=010 when arriving at the OPP chip, and the other has RC=001. D
– Data Cell: This 1-bit field is used to distinguish between data and control cells. It is 1 for a data cell, and 0 for a control cell.
CYC1,CYC2 – Recycle Cell: These two bits are used to identify which copies of the cells will be recycled. If RC is 010
System Architecture Document
22
or 011, then CYC1 controls whether the copy sent to output port processor number PORT1 is recycled or sent to the outgoing link attached to the OPP (1=recycle, 0=send out on the link). If RC is 001 or 011, then CYC2 controls whether the copy sent to output port processor number PORT2 is recycled or sent to the outgoing link. If RC is 000, then CYC1 controls whether the single copy is recycled. If RC is 111, then CYC1 controls whether all copies are recycled (there is no way for some to recycle, and some not to recycle). CS
– Continuous Stream: At connection setup time, end-applications specify whether the cell stream on the virtual circuit contains continuous or discrete media. Continuous media connections are those in which the data rate is either constant, or has low variance over time (e.g., many video and voice encodings). Discrete media connections have higher variance in their data rates, and are often described as “bursty”. The type of connection is recorded by the CP in the VXT tables in appropriate IPPs. When a cell gets translated by an IPP to the internal format, the CS bit field gets a value of 1 if the connection carries continuous media traffic, and 0 if it carries discrete media. Further down the line, an OPP will use this information to direct traffic into one of two FIFO buffers. The real-time requirements of continuous stream data then dictate that cells in the continuous stream buffer get priority over cells in the discrete stream buffer. Moreover, since continuous media traffic is typically non-bursty, we can afford to make the continuous stream buffer much smaller than its discrete counterpart. Further details can be found in Section 8.2.8 and Section 8.3.6.
BR
- Bypass Resequencer: When this bit is 0, the cell is time stamped and resequenced normally, as described in Section 3.2, Section 3.3, and Section 8.3.2. When this bit is 1, the cell is time stamped normally, but the resequencer ignores the time stamp and always assigns the cell an age equal to the age threshold of the resequencer. In the absence of other cells already in the resequencer with the same age, such cells will leave the resequencer within one cell time. This feature is intended to provide the minimum propagation delay through the entire switch that can be achieved. It may be useful if the receiver does not require cells to arrive in the same order that they were sent. The switch can still guarantee that the cells will arrive in the order sent, for connections with BR=1, if all cells follow the same path through the switching fabric, and if the interval between consecutive cells in the connection is large enough. The first requirement can easily be met by choosing to use RC=000 for all cells in the connection. The second requirement occurs because the current implementation of the switch element chips can misorder two cells in the same connection if they arrive within 8 cell times of each other. The sequence of the cells is guaranteed to be correct if every cell arrives at least 8 cell times after the previous cell in the connection.
IADR
TS
– Internal Address: If RC is 000, then this 30-bit field specifies a fixed path through the switching network. As the cell is guided along this specific path, each successive switching element uses the first three bits of the IADR field to select one of its 8 output ports, and then discards these three bits and shifts the remaining bits up by one row (so that the downstream switch element can again use the first three bits to select an output port). When RC is not 000, the IADR field contains two “nibble” interleaved output port numbers, which have been referred to earlier as PORT1 and PORT2. See the description of the RC field above for the interpretation and use of these two port identifiers. Here a “nibble” means a group of 3 bits. For details on the exact placement of bits in this field, see the description of the EADR field in Section 6.4 and the conversion of the EADR field to the IADR field in Section 8.2.10.
– Timestamp: This field is used to indicate to the OPP the time at which the cell entered the switch fabric, and it is filled in by the IPP just before the cell enters the switch fabric. Recall that the OPP needs this information for doing resequencing (see Sections 3.2 and 3.3). Under normal circumstances, the high-order 11 bits of the TS are derived from the local cell clock, and the lowest order bit is zero. When transitional time stamping is turned on, the time stamp is set to a value larger than the current time, and the lowest order bit corresponds to the half-step bit that is used to prevent the cell resequencer from misordering cells when one of the internal nodes in a connection tree is dropped (see Section 3.3). See Section 8.2.10 for more implementation details on transitional time stamping.
STG
– Source Trunk Group: The source trunk group field contains the 12-bit trunk group identifier of the IPP where the cell first arrived from an external link. To understand the need for this field, we need to look at the way multipoint-to-multipoint connections would be handled (these connections have the property that there could be multiple endpoints sending into the connection, and each endpoint receives cells sent by every other endpoint on the connection). Figure 19 shows a connection tree for such a connection. When two or more of the
23
Gigabit Switching Technology
Sources
A
A
B
B
C
C
Sinks
D D E
E
Figure 19: Connection Tree for Multipoint-to-Multipoint Connection endpoints belonging to the connection interface to ports on the same switch, cells from all of these ports are first sent to a common distribution port (corresponding to an internal node in the connection tree). From there, the routing and copying proceeds normally to all the endpoints in the connection. However, it is often necessary that the source of a particular cell does not receive a copy of that cell; it should only receive copies of cells from other endpoints. A simple way to enforce this is to let the OPP discard a cell if it is found to have originated from the same port (i.e., the IPP and the OPP have the same port number). The OPP has no way of knowing where the cell originated unless this information is encapsulated within the cell itself; this explains the need for the STG field. When the UD bit (see below) is set, a cell arriving at an OPP whose trunk group identifier matches the STG field is discarded. See Section 10.2.5 for a discussion about why these numbers are called “trunk group identifiers” instead of “port identifiers”. UD1,UD2
PT
– Upstream Discard: If the appropriate one of these two bits is set, a copy of the cell will not be sent to the originating endpoint in a multipoint-to-multipoint connection (see the discussion of the STG field above for more details). It would be a good idea for the CP to set the upstream discard bits for all connections (multipoint or point-to-point) except those in which “echo” cells are explicitly requested. Although the name "upstream discard" is perhaps too well entrenched in the documentation, VHDL code for the chips, and source code for the control software, it might help to think of this field with the more descriptive name "suppress echo".
– Payload Type: This field contains a copy of the PT field from the original ATM cell.
CLP
– Cell Loss Priority: This bit is a copy of the CLP bit value from the original ATM cell. It may be set by an IPP if the VXT table entry for the virtual path/channel on which the cell arrives has its Set CLP (SC) bit equal to 1 (refer to Section 7.1 for a description of the SC bit).
VXI1, VXI2
– Virtual Path/Circuit Identifier: Each of these fields is three bytes in length; the first byte is the eight least significant bits of a VPI, and the next two bytes contain a VCI. If RC is 000, 010, or 111 when the cell reaches an OPP, the OPP uses the contents of the VXI1 field to fill in the VXI field in the I/O or recycling data cell format (Figure 17), as appropriate. If RC is 001, the VXI2 field is used instead. The OPP’s should never receive a cell with RC=011 (i.e., this would be a sign of a malfunctioning switch element chip, or some other hardware fault). If the cell is to be recycled, this VXI value is used by the IPP to perform a VXT lookup on the cell. If the cell is to be sent out on the link, this VXI value is placed in the header of the outgoing ATM cell.
BDI1, BDI2 – Block Discard Index: These fields can be other than 0 only when the connection to which the cell belongs is using AAL 5 at the adaptation layer. In AAL 5, a large transport level frame is split into a number of 48 byte chunks that are used to fill in the ATM cell payload before transmission. The last cell containing data from the frame may contain fewer than 48 bytes of real data, and it is marked by setting the U bit in the PT field of the cell (see Figure 16). Typically, if even one cell in an AAL 5 frame is lost or corrupted, the entire frame would
be discarded (and possibly retransmitted). Hence, if the switch finds it necessary to discard a cell belonging to an AAL-5 frame, it can optimize by discarding all remaining cells within that frame except the last one. Since a cell would be discarded during times of congestion, discarding all of these cells may help reduce the
System Architecture Document
24
congestion further. See Section 8.3.5 for more details on the exact congestion control method used. The BDI field, when not 0, contains a tag that is used to differentiate connections using this feature. Since the field is 8 bits long, it follows that we can have no more than 255 such connections. Note that it is the job of the CP to assign a non-zero BDI for some connections. If RC is 000, 010, or 111 when the cell reaches an OPP, the OPP uses BDI1 as the BDI value for the cell. If RC is 001, then BDI2 is used instead. Payload: The payload from the original ATM cell gets carried over into this field in the internal format. Parity: Although it has not been shown in the figure, one horizontal parity bit is generated by the IPP for each of the four switching planes. The parity is odd, and it is computed horizontally, i.e., one parity bit is generated for every 12 bits (4 control + 8 data) passed to a switch element. Thus, in one clock tick, the IPP would need to generate 4 parity bits in all. See Section 9.6 for further details.
6.4 Control Cell Format Control cells from the remote CP arrive at the appropriately configured input port of a switch on a virtual circuit with VPI = 0 and VCI = 32 decimal. It is not yet certain whether the ATM interface hardware in the CP will allow us to send such cells, so the method that the switch uses to recognize control cells may change. However, the rest of this section is written under the assumption that cells with VPI = 0 and VCI = 32 may be sent. If the CP is attached by a direct link to a switch it is controlling, then the CP sends a cell with VPI/VCI equal to 0/32. If the CP controls a switch to which it has no direct link, then it creates a connection through an intermediate switch to the desired switch. If the intermediate switch is also a Washington University gigabit switch, then this connection has a VPI/VCI other than 0/32, so the intermediate switch propagates the cells as normal data cells. In general, there could be several intermediate switches in a path to the switch at which the control cell will perform its operation. The last such intermediate switch is set up by the CP to translate the incoming cells to VPI=0, VCI=32 on the link to the desired switch. Thus, only the last switch on the path interprets the cell as a control cell. The cell format as interpreted by an IPP on the target switch is illustrated in the left part of Figure 20. Once the actions specified in the control cell have been performed, the results (if any) are encapsulated in a similar control cell, shown in the right part of Figure 20, by the appropriate OPP and returned to the CP. The RHDR field in a CP to switch control cell is used to fill in the ATM cell header of the corresponding switch to CP control cell. In this way, the CP can ensure that the returning control cell gets routed correctly. When an external control cell enters an IPP, it gets converted to a 36-bit format analogous to the internal data cell format. This format is shown in Figure 21. Notice that the four control columns carry information in the same format as the corresponding columns of an internal data cell. The D, CYC1, CYC2, CS, and BR fields are also in the same positions as in the internal data cell format. As before, the internal cell format gets converted to the corresponding external format in the OPP before being sent out on the link. A description of the various fields in the control cell formats (both internal and external) follows. Fields that have already been described either as part of the ATM cell header format, or as part of the internal data cell format, are not described again. Throughout the rest of this section, we refer to control cells from the CP to the switch as incoming control cells, and those from the switch to the CP as outgoing control cells. OPC
– Operation Code: On an incoming control cell, the opcode is a command to the target port processor (the COF field is used to address a particular port processor, see below). Each port processor chip contains a number of status and command registers that can be read from or written to; these jointly comprise what is called the maintenance register. Each port processor also contains a VXT (virtual circuit translation table), as well as a number of error flags. The command specified by the opcode can be used to initiate a hardware reset of all chips comprising the switch, clear all error flags in all chips, or read or modify maintenance register fields or VXT table entries. The various opcodes that have been defined are listed in Figure 22. The mnemonics in the second column of the table will henceforth be used to identify the opcode specified in a control cell. Subsequent sections of the document elucidate the semantics of each of these opcodes.
25
Gigabit Switching Technology
8 0
GFC
1
VPI[3:0]=0
2
8
VPI[7:4]=0
VCI=32 decimal
3
PT
5
0
GFC
1
VPI[3:0]
2
VPI[7:4]
VCI
3
CLP
5 PT
CLP
4
HEC
4
HEC
0
OPC
1
0
OPC
1
1
COF
1
1
COF
1
——
2
——
2
RVAL
1
RVAL
1
FIELD
3
——
12
RHDR
4
LT
4
INFO
16
CMDATA
4
2
2 3 4
3 4 5
5 6
FIELD
3
6 7
7 8
LINK_INFO
——
BR
1
9
BI
RC
D CYC
CS
1
10
BI
RC
D CYC
CS
1
11
BI
RC
D CYC
CS
1
8
12 EADR1
4
EADR2
4
15 16 19
19
20
20 EADR3
4
23
23
24
24 RHDR
4
27
27
28
28 INFO
16
43
43
44
44 CMDATA
47
4 47
External Control Cell CP to Switch
External Control Cell Switch to CP
Figure 20: External Control Cell Formats EADR1, EADR2, EADR3 - External Routing Addresses: Most control cell operations require access to the maintenance
register or a VXT entry in one of the port processors. As can be seen in Figure 23(a), it is possible for a control cell to reach any port processor chip by recycling it at least once. However, if the CP needs to test a particular
26
System Architecture Document
1
3
8
8
1
2
1 1
10
1
0 BI
RC
OPC
COF
D
CYC1,2
CS BR
——
BI
RVAL
1 2
LINK_INFO
——
1
FIELD
1
BI,RC,D,CYC,CS1 BI,RC,D,CYC,CS2 BI,RC,D,CYC,CS3
1
3
EADR1
1
4
EADR2
1
5
EADR3
1
RHDR
1
LT
1
INFO
4
CMDATA
1
——
2
6
— IADR
7 8 9 10 11
Reserved
12 13
TS
14
Figure 21: Internal Control Cell Format Remote CP
Remote CP
0
0
0
0
1
1
1
1
2
2
2
2
3
3
3
3
4
4
4
4
5
5
5
5
6
6
6
6
7
7
7
7
(a) Accessing IPP #3 or OPP #3.
(b) Routing from IPP #3 to OPP #6.
Figure 23: Routing a Control Cell path through the switch fabric, we must be able to make the cell pass through an IPP of our choice, and then get routed to an OPP of our choice. As can be seen from Figure 23(b), we can do this in the general case if control cells can be recycled at least twice (in other words, it can traverse the switch fabric at least three times). Note that once we can make a control cell move from a specific IPP to a specific OPP, we can select the exact path through the switching fabric, by setting the RC field to 000 (see Section 6.3), and the IADR field to the appropriate value.
27
Gigabit Switching Technology
Opcode
Command
Description
0
NOP
No operation (used for cells that test switch operation and internal paths)
F0 (hex)
RST
Hard reset of all chips. The opcode is F0 instead of 1 so that a single bit error in a NOP control cell does not transform it into a RST.
2
CLRERR
Clear all error flags in all chips
3
RDVPXT
Read virtual path table entry from VXT (everything except CC field)
4
RDVCXT
Read virtual circuit table entry from VXT (everything except CC field)
5
RDVPXTCC
Read cell counter (CC) from virtual path table
6
RDVCXTCC
Read cell counter (CC) from virtual circuit table
7
WRVPXT
Write virtual path table entry into VXT (does not write CC field)
8
WRVCXT
Write virtual circuit table entry into VXT (does not write CC field)
9
WRVPXTTR
Write virtual path table entry into VXT and start transitional time stamping
10
WRVCXTTR
Write virtual circuit table entry into VXT and start transitional time stamping
11
WRVPXTCC
Write cell counter (CC) to virtual path table (for testing only)
12
WRVCXTCC
Write cell counter (CC) to virtual circuit table (for testing only)
13
ERRORS
Return a cell only if error conditions exist (due to a mistake in the IPP and OPP chip implementations, such cells should have FIELD=0, or else the fields read and returned may not be the desired error flags).
14
RDMR
Read maintenance register field
15
WRMR
Write maintenance register field
Figure 22: Control Cell Opcodes To allow for three traversals through the switch fabric, the control cell format has three sets of the six fields BI, RC, D, CYC, CS, and EADR (note that CYC here refers to a 2 bit value that is CYC1 followed by CYC2). Each of these fields has a numeric index that identifies the set to which it belongs. The set of fields with index 1 are used to fill in the corresponding fields in the internal control cell format during the first pass through the switch; on the second pass (if any), the fields with index 2 are used, and on the third pass (if any), the fields with index 3 are used. The BR bit used in the first row of the internal control cell format is always copied from the BR bit in the third row, for every pass. The BR bit in the third row of the internal control cell format is in turn copied from the BR bit of the CP to switch external control cell format. Since the RC and IADR fields in the four control columns are precisely those used by the switching fabric to route cells, the CP has the capability of choosing a precise route through the fabric for its control cells. The format of the EADR fields in the external control cell format is shown in Figure 24. In this figure, each box represents one bit, bit 31 is the most significant bit, and bit 0 is the least significant bit. The fields are 32 bits long, but bits 16 and 0 are ignored by the switch. If there are two port numbers to specify (i.e., this cell is not to be routed on a specific path), then the first port number should be placed in the most significant half of the 32 bits, and the second port number should be placed in the least significant half. No matter how many bits it takes to specify a port number, the first one should be placed in the EADR field as far left as possible, subject to the restriction that its last (i.e., least significant) bit is in one of the following bit positions: 29, 26,
28
System Architecture Document
PORT1
31
30
29
28
27
26
25
24
23 22
PORT2
15
14
13
12
11
10
9
8
7
6
21
20
19
18
17
16
5
4
3
2
1
0
Figure 24: EADR Field Format 23, 20, 17. The second port number should be placed in the corresponding position in the second half of the field, i.e., such that its last bit position is one of: 13, 10, 7, 4, 1. For example, for a switch with 8 ports, port numbers contain 3 bits each. The first port number should be placed in bits 31..29, and the second should be placed in bits 15..13. For a switch with 32 ports, port numbers contain 5 bits each. The first port number should be placed in bits 30..26, and the second should be placed in bits 14..10. All other bits are ignored by the switch. If the EADR field is used to specify a specific path through the switch, then it contains a sequence of three bit switch element output port numbers. The first number is in bits 31..29, but the second is in bits 15..13. The third is in bits 28..26, and the fourth is in bits 12..10, etc. Each odd numbered port number is in the next three bits of the most significant half of the field, and the immediately following even numbered port number is in the corresponding position in the least significant half of the field. For example, for a switch with 8 ports, only a single switch element output port number is needed, and it is stored in bits 31..29. For a 32 port switch, there are three stages of switch elements, so three switch element output port numbers are needed. The first is in bits 31..29, the second is in bits 15..13, and the third is in bits 28..26. All other bits of the EADR field are ignored by the switch. The formats for the two port and specific path EADR fields were chosen to make the hardware that converts the EADR field to the IADR field (in the IPP chips, see Section 8.2.10), and the hardware that interprets the IADR field (in the switch element chips), simple. RHDR
– Return Header: The return header field is 4 bytes long, and it contains the ATM cell header that is to be used in a control cell returning to the CP (except for the HEC, which is generated by the OPP). As was mentioned earlier, this feature enables the CP to ensure that a returning control cell is correctly routed to its destination (the CP).
COF – Control Offset: Although the three EADR fields (along with other fields comprising the three sets described earlier) permit the CP to select which port processors a control cell will visit, these fields by themselves cannot be used to isolate the point at which the control operation is performed. The COF field overcomes this deficiency. A control cell that performs a reset (RST) or clear error (CLRERR) operation is interpreted by the first IPP chip that it reaches, regardless of the COF value. For all other operation codes, however, every OPP chip that the control cell recycles out of, and every IPP chip that the control cell recycles into, may interpret the control cell. Control cells cannot be interpreted when newly arrived on a link to an IPP, or when leaving on a link from an OPP.
At every point along the path visited by a control cell where it may be interpreted, the COF field is examined. If COF=0, the operation is performed, otherwise the component simply propagates the cell without performing any operation. In any case, the value in the COF field is decremented before propagating the cell. Consider, for example, the scenario shown in Figure 23(a). Let the target port processor be IPP-3. In that case, the CP would set the COF field to 1 in the control cell sent. When the cell reaches IPP-0, it is newly arrived on the link, so IPP-0 cannot interpret the cell, and it does not decrement the COF field. In OPP-3, the cell is recycled out, so the control cell may be interpreted there. It is not interpreted in OPP-3, because the COF field is 1, but the COF field is decremented before OPP-3 recycles the cell to IPP-3. Thus, the cell would recycle into IPP-3 with its COF field equal to zero; this would indicate to IPP-3 that it is the target of the control operation. After performing this operation, IPP-3 would decrement the COF field (so the new value is FF hex) and forward the cell to the next downstream port processor (OPP-0). OPP-0 cannot interpret the cell, because it is destined for the link. The cell would then follow the rest of the path to the CP without further incident. In general, if the CP wishes to perform an operation in an arbitrary IPP (even the one that originally receives the control cell), it should set the COF field to 1 and cause the cell to be recycled through the corresponding
29
Gigabit Switching Technology OPP,
and then be sent to the OPP that is on a path back to the CP. If the CP wishes to perform an operation in an arbitrary OPP (even the one that sends the reply control cell back to the CP), it should set the COF field to 0 and cause the cell to be recycled through that OPP, and then be sent to the OPP that is on a path back to the CP. FIELD: These three bytes specify the target table entry (in case of a VXT related control operation) or maintenance register field (in case of a maintenance register related control operation) for the action specified by the OPC field. For a VXT operation that accesses a virtual path entry, the VPI should be placed in the first byte of FIELD, most significant bit first. For accessing a virtual circuit entry, the VCI should be placed in the last two bytes of FIELD, most significant bit first. Note that while only one of these values needs to be given for most VXT access operations, both must be given when starting transitional time stamping on a virtual circuit (OPC = WRVCXTTR).
For a maintenance register operation, the field number of the maintenance register field should be placed into this field, most significant bit first (see Section 7.2 for the field numbers that may be used). All three bytes of this field are significant to the hardware for maintenance register operations. INFO: The INFO field contains up to 16 bytes of information. For control cells that read information, the incoming value
of this field is ignored by the switch, and it is overwritten with the values read when the read operation is performed. For control cells that write information, the incoming value of INFO contains the information to write, and at the point the write is performed, a read is performed immediately afterwards to verify the values written. The format of these 16 bytes depends on the target of the read or write operation. See Section 7.1 for the formats for VXT entries, and Section 7.2 for the formats for maintenance register fields. CMDATA – Connection Management Data: The CMDATA field is not interpreted by the switch hardware; it is reserved for use by the software running on the CP. The switch does not modify this field as the control cell passes through it, and returns CMDATA in the control cell sent back to the CP. This feature can be used by the CP, for
example, to associate control cells it receives with the appropriate control cells it had issued earlier. The exact interpretation of the contents of the field is left to the software designer. LT – Local Time: This field is not present for incoming control cells. For an outgoing control cell, it contains the local
(switch) cell clock value at the time the specified control operation was performed. This can be used by the to compute traffic statistics.
CP RVAL
- Return Value: For incoming control cells, the CP should set this field to control cell, it contains one of the values in Figure 25.
RVAL
Mnemonic
NOT_PROCESSED.
For an outgoing
Description
0
SUCCESS
Operation successful
1
NOT_PROCESSED
Control cell not processed - COF never reached 0
2
BAD_OPCODE
Invalid OPC - either undefined, or a VXT operation attempted at an OPP
3
BAD_FIELD
Invalid FIELD - either an undefined maintenance register field number (Section 7.2), or a VXT out of range (Section 8.2.8)
Figure 25: Control Cell Return Values
7 CONTROL TABLES AND REGISTERS Most control cell opcodes specify an operation on the virtual path/circuit table in an IPP, or on the maintenance register in an IPP or OPP. In this section, the contents of these VXT entries and maintenance registers are described. The actual semantics of the opcodes, as well as a discussion on the use of VXT entries and maintenance register fields, is deferred to later sections.
30
System Architecture Document
These are both identically formatted 18 byte entries. Virtual Path Table
Bounds Register
Virtual Circuit Table
Figure 26: VXT Table Organization 0
16
1
3
1
2
--
BI
RC
D
CYC1,2
1
1
2
1 1 1 1
CS UD1,2 SC VPT RCO BR
EADR
2 --
1 1
2
VXI1
BDI1
1
3
VXI2
BDI2
1
24
8
0 1
--
3
CC
1
2 3
32
Figure 27: INFO Field Formats Used to Read/Write VXT Entries
7.1 Virtual Path/Circuit Translation Tables Each input port processor chip contains a VXT, and each is organized as a contiguous array of 1024 entries. Each entry is 18 bytes long. Each VXT is split into two parts using a bounds register, as shown in Figure 26. We refer to these two parts by the names virtual path table and virtual circuit table. The bounds register itself can be modified since it forms a part of the IPP’s maintenance register (see the VP Count field in Section 7.2.1). Although the two tables comprising a VXT are named differently, entries in both these tables are identically formatted. The fields within a VXT entry are shown in two parts in Figure 27. The top part shows the contents of the INFO field returned to the CP as a result of reading the main part of a VXT entry (RDVPXT or RDVCXT). This format is also used by the CP when writing a VXT entry (using one of the opcodes WRVPXT, WRVCXT, WRVPXTTR, or WRVCXTTR).
31
Gigabit Switching Technology
The bottom part of Figure 27 shows the contents of the INFO field returned to the CP as a result of reading the cell counter (CC) portion of a VXT entry (RDVPXTCC or RDVCXTCC), and it is also used by the CP to write a cell counter (WRVPXTCC or WRVCXTCC). The EADR, BI, RC, D, CYC1, CYC2, CS, and BR fields of the table entry are used to fill in the corresponding fields in the four control columns and the first row of the internal data cell format. The VXI1, VXI2, UD1, UD2, BDI1, and BDI2 fields are also copied from the VXT entry into the appropriate places in the internal data cell format. Note that control cells never make use of the information in the VXT entries, since all routing information is contained within the cell itself. The remaining fields in the VXT entries have the following interpretation: BI
– Busy/Idle: This is similar to the busy/idle bit of the internal cell formats, but it has a slightly different interpretation in a VXT entry. If this bit is 0 for an entry accessed by a data cell, then the IPP discards the data cell immediately. If this bit is 1, the IPP propagates the cell normally. This can be used by the CP to indicate which connections are “on”, and which are “off”. The default value of this field after a reset is 0. The default value for all other fields (except the Cell Count below) is thus unimportant.
SC
– Set CLP: The SC bit, when set, is interpreted by the IPP as a directive to set the CLP bit for all cells on the connection, thereby forcing a low priority connection, regardless of the CLP bits in cells that the source sends. This provides a way of enforcing the priority of cells within a connection that was set up as a low priority connection.
VPT – Virtual Path Termination: When a new cell is received, the IPP first performs a lookup in the virtual path table using the cell’s VPI field as an index into the table. For a virtual path, the VPT bit in the table would be 0, so no further table lookups are performed. The CP sets the VPT bit if the virtual path terminates at that switch. In other words, if the VPT bit is set, the connection is a virtual channel, and the IPP needs to do another table lookup. This time the lookup is done on the virtual circuit table, using the cell’s VCI field as an index into the
table. Notice that the scheme outlined above does not permit two virtual channels traversing the same network link to have different VPIs, but the same VCI. At first this may appear overly restrictive, but a closer inspection reveals that we don’t lose much in the process. A simple way to see this is to think of a scenario where the same VPI value is used for all virtual channels on a link; only their VCI values would differ. This would entail setting the VPT bit in the virtual path table for the chosen VPI, so that each virtual channel is routed solely based on the VCI value (with the VPI value only serving as an indication that the connection is a virtual channel and not a virtual path). Generalizing, even if we were to allow different virtual channels sharing a link to have different VPI values, we would only have to ensure that none of them share the same VCI value, and this checking can be done by the CP at connection setup time. Allowing for this may not be a good idea however; it results in wasted space in the virtual path table (because the rest of the contents of an entry in the table are ignored if the VPT bit is set). But there are some cases in which it may not be possible to avoid using multiple VPI’s for virtual channels on the same link – as an example, if we make use of the ATM forum recommendation that the VPI and VCI values on a particular network link be the same in both directions for a bidirectional connection, and if two neighboring switches are unable to agree on a single VPI value for all virtual channels, then a search would have to be performed by the two CP’s at connection setup time to determine a suitable VPI-VCI pair. RCO
CC
- Recycling Cells Only: Without this bit, it is possible for new cells arriving on the link to “masquerade” as recycled cells in a multipoint connection. For example, in the multipoint connection of Figure 7, cells that arrive on the link at input port a and are copied to output port x will recycle to input port x and access table entry j in the virtual path/circuit table there. Unless there is some way of preventing it, a new data cell arriving at input port x could also access table entry j, and from that point on it would be treated as a normal cell within the multipoint connection. If the RCO bit is 1, only recycled cells are allowed to use the table entry; new cells from the link attempting to do so are discarded. If the RCO bit is 0, both recycled and new cells may use the table entry (although the CP can prevent recycled cells from using it by not sending recycled data cells to that port with that VPI/VCI).
– Cell Count: This is a 32-bit counter that is incremented each time a new cell arrives on the connection. The CP could use this counter to measure per-connection traffic, perhaps for billing purposes, or for statistics collection. Note that the CP would have to issue a RDVPXTCC or RDVCXTCC control cell to read the appropriate VXT
System Architecture Document
32
entry if it wants to access this counter. This value may be written by the CP, but it need only do so for testing the hardware. The default value of this field after a reset is 0. For VXT related control opcodes (RDVPXT, RDVCXT, RDVPXTCC, RDVCXTCC, WRVPXT, WRVCXT, WRVPXTTR, WRVCXTTR, WRVPXTCC, and WRVCXTCC), the FIELD field in the control cell is an index into the appropriate (virtual path or virtual circuit) table. For a virtual path operation, the first byte of FIELD specifies the VPI. For a virtual circuit operation, the last two bytes of FIELD specify the VCI. The operation for writing a virtual circuit entry and turn on transitional time stamping (WRVCXTTR) is a special case, in which both a VPI and VCI must be specified in the FIELD field of the control cell.
7.2 Maintenance Registers On every chip, there are a number of command registers that control how the chip behaves, and a number of status registers that can be read by a controlling process, and which describe the current state of the chip. Typically, a chip has a maintenance register only if its behavior can be made to change under program control. The switch elements in the prototype design are “dumb” in this respect; they merely route cells in a fixed way based on cell contents and a few signal pins, and they cannot be programmed to behave differently (they have no “memory”). The port processor chips, however, can be configured using control cells from the remote CP, which is the controlling entity. In this section, we list the various fields comprising the maintenance register for both the IPP and the OPP chips. We also describe the way in which control cells can be used to read or modify these fields. Although we briefly describe the use of the fields here, their use is described more precisely in Section 8. Each maintenance register field is described as follows: Field Number: This is the value to be used in the FIELD field of a control cell to identify the specified maintenance register field as the target of the control operation. Length: Length of the field, in bytes. CP
Access: Operations that the CP may perform on the field using control cells. Read only, Read/Write, or Read/Test Write. As far as the hardware is concerned, Read/Write and Read/Test Write are identical. They are distinguished here only to note that under normal operation, the CP need never write into a Read/Test Write field. The Write access for such fields is provided only for the purpose of testing the hardware.
Subfields: The subfields of the field, if any, are listed. For most fields, subfields cannot be independently addressed by a control operation; all subfields in a field must be read or written together. However, the Hardware Status and Error Information fields can be addressed as a group (for efficient reading), and the subfields can be addressed individually (so that the CP may turn off one error flag without inadvertently turning off others). INFO
Format: When the CP reads a field, the result is returned in the 16 byte INFO field of the control cell sent back from the switch to the CP. The INFO format shows where the subfields are located within these 16 bytes. The same format must be used by the CP for writing a field. All subfields are placed in the given locations with the most significant bit on the left, and least significant bit on the right. In some cases, there is extra data present in the result of a read operation. Such locations within the INFO field are ignored by the switch for write operations.
Description: A description of the field and its subfields (if any). This may include some mention of its use. Default Value: The value of the field immediately following a chip reset. PP
Access: How different parts of the port processor chip may access the field.
7.2.1
IPP Maintenance Register Fields
The IPP maintenance register fields are: Read Only Chip Information: FIELD NUMBER:
1.
33
Gigabit Switching Technology LENGTH:
7 bytes.
CP ACCESS:
Read/Test Write for Time, Read Only for Chip Type/Version and Link Type.
SUBFIELDS:
Time: first 4 bytes. Chip Type/Version: next 2 bytes. Link Type: next 1 byte. INFO FORMAT:
32 Time Chip Type/Version Link Type 16 8 --
--
1 1 2
DESCRIPTION:
The IPP has an internal cell clock that is incremented once every cell time (i.e., once every 16 clock ticks). The value of Time reflects the current contents of the cell clock counter. Part of this cell clock is also used to fill in the time stamp (TS) field in the internal cell formats.
The Chip Type/Version information is hard wired into the chip at fabrication time. The first byte is the chip type. This is 0 for IPP chips, and 1 for OPP chips. The second byte is the version number of this chip. For the first fabrication of these chips, this value will be 1. Other values may be defined later if signicant design changes are made in later fabrication runs. There are four pins on each IPP chip connected to the input transmission interface (ITI) chip that designate the type of transmission interface or link. For example, these four bits could be used by the CP to determine the speed of the link attached to the IPP. The values appearing on these pins can be read by the CP by reading the least significant 4 bits of the Link Type subfield. Writing this field has no effect. This value should not change during the operation of the switch, but may change from one power up time to the next. See the link interface specification document [RF-94a] for the values that this field may take. DEFAULT VALUE:
Time = 0. The Chip Type/Version is hard wired into the chip, and cannot be written, not even for testing purposes. Link Type merely reflects the values of the four signal pins of the IPP, and cannot be written.
PP ACCESS:
Time is incremented by cell clock circuitry, and read by RFMT (for time stamping cells), MREG, and VXTC (the last two circuits read the time to place its value in the local time (LT) field of control cells that they process). The IPP makes no access to the Chip Type/Version field or the Link Type field. They are present solely for the benefit of the CP.
Configuration Information: FIELD NUMBER: LENGTH:
2.
16 bytes.
CP ACCESS:
Read/Write.
SUBFIELDS:
Trunk Group Identifier: first 2 bytes. TS Offset: next 1 byte. RCB
Discard Threshold: next 1 byte.
RCB
Discard Hold Duration: next 2 bytes.
VP
Count: next 1 byte.
34
System Architecture Document Report Errors: bit 3 of byte after VP Count. Software Link Enable: bit 2 of byte after VP Count. Recycling Link Enable: bit 1 of byte after VP Count. Set Software Link Enable: bit 0 of byte after VP Count. Hardware Re-enable Time: next 4 bytes. Software Carrier Loss Time: next 4 bytes. INFO FORMAT:
4
1 1 1 1
--
Report Errors Software Link Enable Recycling Link Enable Set Software Link Enable
16 8 8 Trunk Group Identifier TS Offset RCB Discard Th. RCB Disc. Hold Duration VP Count see below Hardware Re-enable Time Software Carrier Loss Time 32
1 1 1 1
1
DESCRIPTION:
All of these subfields may be set by the CP during initialization. The default values chosen are intended to be useful, except for the Trunk Group Identifier subfield, which is not useful if all IPP chips have the same value for it. If the CP desires to change the values of all these subfields for all IPP’s after a reset, it can do so by sending a single write control cell that copies itself to all output ports (using the copy to a range feature), recycles, and then writes this field. Note that this would give the same values for these subfields to all IPP chips. A similar technique can be used for reading or writing a field in many IPP chips by sending only one control cell.
The Trunk Group Identifier (TGI) is placed in the Source Trunk Group (STG) field of all data cells arriving on the link attached to this IPP. It may be useful for the CP to assign the same value to this field for multiple IPP’s. See Section Section 10.2.5 for an example. Note that the first version of the IPP chip was fabricated when this field and the STG field was specified to be 16 bits (it included what is now called the the LINK_INFO field), and the IPP reformatter fills in the 12 bit STG field and the 4 bit LINK_INFO internal data cell fields from the Trunk Group Identifier. The next version of the IPP chip will only have a 12 bit Trunk Group Identifier, and will specify some method of filling in the LINK_INFO field on a per-connection basis, and perhaps differently for different cells within a connection. The TS Offset is used by the time stamping circuitry in the reformatter when the IPP is in a transition phase immediately following the deletion of an endpoint (i.e., for a short period after the CP issues a WRVPXTTR or WRVCXTTR control cell). Its value is set by the CP during initialization. Further algorithmic details of its use can be found in Section 8.2.10. The IPP contains a receive buffer (RCB) into which newly arrived cells are placed. Under light loads, this buffer (and most others in the switch) will contain at most a few cells. However, it is possible under heavy loading conditions for the buffer to become full. When the RCB contains a number of cells that is larger than the RCB Discard Threshold, the RCB is considered congested, and the RCB and VXTC discard certain types of lower priority cells in an effort to clear this congestion (see Sections 8.2.4 and 8.2.8 for details). To prevent the congestion condition from turning on and off rapidly (e.g.,
35
Gigabit Switching Technology if the RCB occupancy “jittered” around the RCB Discard Threshold), the VXTC turns on a timer that lasts for a number of cell times equal to the RCB Discard Hold Duration when the RCB is congested, and continues discarding certain kinds of cells until the RCB occupancy is below the threshold and the timer has expired. The VP Count field contains the largest index in the VXT that contains a virtual path entry. That is, entries 0 through VP Count, inclusive, contain virtual path entries, and entries (VP Count + 1) through 1023, inclusive, contain virtual circuit entries. This field serves as the bounds register mentioned in Section 7.1. (A more accurate name for this field would have been MaxVP, but it’s too late to change that now.) VXT
The Report Errors field controls whether the IPP maintenance register responds to control cells with an opcode of ERRORS, or discards them (1 = respond only if there are errors, 0 = always discard). It may be useful to set this field to 0 for switch ports that are not attached to links, although Parity Error could still occur for ports dedicated to recycling traffic. The Software Link Enable field controls whether the RFRAMER allows new data cells from the link through to the rest of the IPP (1 = allow link data cells through, 0 = discard all link data cells). It may be useful for the CP to set this field to 0 when a human operator suspects that the VXT entries of a particular IPP may contain bad values. The suspect VXT entries may be read at a leisurely pace while new data cells are being discarded. Similarly, the Recycling Link Enable field controls whether the MREG allows data cells that have been recycled from the corresponding OPP through to the rest of the IPP (1 = allow recycling data cells through, 0 = discard all recycling data cells). The Hardware Re-enable Time serves two similar purposes. First, when a hardware reset occurs, the RFRAMER discards all new cells (data and control) for a number of internal cell times (as opposed to link cell times) equal to this value. Of course, since a reset is occurring, only the default value can be used for this purpose. This discarding is done to give the chips in the switch enough time to complete hardware initialization actions. During normal operation after a reset, this value is used to control how long (in internal cell times) the hardware carrier must be continuously present before allowing cells through (by setting the Hardware Link Enable field to 1). Without this delay, it is likely that when plugging a cable into or pulling a cable out of the switch, the carrier will be “bouncy”, i.e., it will go on and off rapidly before settling to a stable value. During this time, any cells received will likely be garbage, rather than cells intended by the sender. See Section 8.2.1 for a description of the Software Carrier Loss Time and Set Software Link Enable fields. Note that the feature that these fields were meant to configure does not work correctly in IPP version 1. DEFAULT VALUE:
Trunk Group Identifier = 0. TS Offset = 128 (this was the originally planned size of the resequencing buffer, but after the IPP version 1 was fabricated, this size was reduced to 80). RCB Discard Threshold = 32 (size of the RCB). RCB Discard Hold Duration = 0. VP Count = 255 (this is the maximum size of the virtual path table, since only 8 bits of the VPI are used). Report Errors = 1. Software Link Enable = 0. Recycling Link Enable = 1. Set Software Link Enable = 0. Software Carrier Loss Time = 0. The Hardware Re-enable Time is a special case. It has three different default values. The MREG chooses which value to load at reset time by examining option pins of the chip called QUIK_TEST. If QUIK_TEST=00, then the Hardware Re-enable Time is assigned a value of 2^20 cell times (this is about 0.14 seconds when the clock speed is 120 MHz). This is the desired value for normal operation of the switch. If QUICK_TEST=01, the Hardware Re-enable Time is assigned a value of 256 cell times. This is the shortest possible time in which every block on the IPP chip will be ready to receive cells (the VXTC clears out 4 of its 1024 table entries per cell time immediately after reset), and this option is intended for post-fabrication testing of the IPP chips. If QUICK_TEST=10 or 11, the Hardware Re-enable Time is assigned a value of 32 cell times. This value is intended for functional testing by simulation only, to reduce the simulation time. In this case, the VXTC will start accepting cells after clearing as many table entries as possible in 32 cell times; it will not clear all 1024 table entries before accepting cells.
36
System Architecture Document PP ACCESS:
Trunk Group Identifier and TS Offset read by RFMT. RCB Discard Threshold read by RCB. RCB Discard Hold Duration and VP Count read by VXTC. Report Errors, Recycling Link Enable, and Set Software Link Enable read by MREG. Software Link Enable, Hardware Re-enable Time, and Software Carrier Loss Time read by RFRAMER.
Hardware Status and Error Information: FIELD NUMBER: LENGTH:
3.
8 bytes (but see below).
CP ACCESS:
Read/Write. The subfields marked with field numbers below may also be accessed Read/Write individually.
SUBFIELDS:
Hardware Link Enable: bit 6 of the first byte. Hardware Reset: bit 5 of the first byte (field number 6). Link Was Disabled: bit 4 of the first byte (field number 7). Parity Error: bit 3 of the first byte (field number 8). VXI
Out Of Range: bit 2 of the first byte (field number 9).
Bad Control Cell: bit 1 of the first byte (field number 10). Bad ATM Signaling Cell: bit 0 of the first byte (field number 11). VXI
Out Of Range Header: next 3 bytes.
Bad ATM Signaling Cell Header: next 4 bytes. INFO FORMAT:
8 24 see below VXI Out Of Range Header Bad ATM Signaling Cell Header Trunk Group Identifier --32
Chip ID = 0 Hardware Link Enable Hardware Reset Link Was Disabled Parity Error VXI Out Of Range Bad Control Cell Bad ATM Signaling Cell
1 1 1 1 1 1 1 1
DESCRIPTION:
1 1 1 1
See below for explanation of the shaded fields.
1
This field may be read and written as a group by the CP, but the error flag bits also have individual field numbers given above. This is not useful for reading those fields, but it is useful for writing. Without the capability to turn off an individual error flag, it may happen that the CP sees one of the error flags set and wants to clear it. If it sends a control cell to write over all of the error flags with zeros, then a different error may occur between the time that the error flags were read and then written. Such an error would go unnoticed by the CP. If the CP has the capability to address an individual flag, it can turn it off without turning off the others. The INFO field format for writing an individual error flag is the same as above, except that the MREG ignores all bits except the one in the position corresponding to the desired subfield. The INFO field format for reading an individual error flag is the same as above, except that all bits except the one in the desired position are undefined.
37
Gigabit Switching Technology The hardware may happen to set all of the bits as shown above, but the CP should not expect this. If the maintenance register receives an ERRORS control cell that is destined for it (i.e., COF=0) and the Report Errors subfield of the Configuration Information field is 1, then the maintenance register checks the error flag bits. If any of them are equal to 1, then the INFO field of the control cell is overwritten in the format shown above. If all of them are 0, then the ERRORS control cell is discarded, and no reply is sent to the CP. The Hardware Link Enable and Chip ID bits are not included in this check, but the remaining one bit fields are included. If a reply is returned, the maintenance register also fills in the shaded fields above, the Trunk Group Identifier and Chip ID. This is useful to identify the IPP from which the cell was returned, although it may not uniquely identify it, since the Trunk Group Identifier may be the same for several IPP chips (see Section 10.2.5). It does help to narrow down the possible sources of the reply. The reason for this feature is that we expect the CP to send out ERRORS control cells that are copied to all IPP chips in the switch. Only those IPP’s that have error flags set will reply, and it is desirable that the CP has a way to identify which IPP may have sent a reply. Note that the Trunk Group Identifier will never change as the result of writing this field; it may only be changed by writing the Configuration Information field. The Hardware Link Enable is 1 if the RFRAMER detects that the incoming link is currently up, and 0 if it is down (to be completely accurate, it is 1 if the link has been up continuously for a number of internal cell times at least as large as the Hardware Re-enable Time). It is different from the other subfields; while it is possible for the CP to write this field, its value is overwritten by the RFRAMER on every cell time. Its value need only be written for testing purposes. If the switch performs a hardware reset (this happens when someone presses the reset button on the switch, for example), it is desirable that the CP be able to detect this condition. The Hardware Reset field is set to 1 during a hardware reset of the IPP chip. The CP can read the field to determine if a reset has occurred, and it may clear the bit so that the next reset may be detected. See Section 10.4 for more information on a hardware reset of the switch. The Link Was Disabled field is set to 1 if the carrier for the incoming link is ever lost. It does not change if carrier returns. This allows the CP to detect that carrier was lost on a port (for example, by someone bumping the switch physically, or disconnecting a cable) without having to frequently read the Hardware Link Enable field. There is a single parity bit on the data sent from the OPP to the corresponding IPP on the recycling path. If the parity bit received is ever incorrect, Parity Error is set to 1. If the VPI or VCI of a data cell is ever out of range (see Section 8.2.8), the VXI Out Of Range field is set to 1. The VPI and VCI of the data cell are placed in the VXI Out of Range Header field. They are placed in this field in the same format that the VXI field of the internal data cell format is filled in. There is a physical toggle switch (called CTRL_EN) for each IPP chip that determines whether it should allow control cells into the switch. This can be used to prevent any computer except the CP from controlling the switch. If the toggle switch is set to discard control cells, then the Bad Control Cell field is set to 1 if a control cell arrives on the link. No other record is made of such cells. In particular, the header of such cells are not recorded anywhere, as they are for bad signaling cells, because bad control cells always have the same VPI and VCI fields. The prototype does not handle all types of ATM signaling cells defined in the current standard (see Section 6.1 for a list). The RFRAMER sets the Bad ATM Signaling Cell field if it detects and discards such a cell, and it puts the first four bytes of the header into the Bad ATM Signaling Cell Header field. Note that even though unassigned cells are discarded by the RFRAMER, the RFRAMER does not set the Bad ATM Signaling Cell field for such cells, since unassigned cells could be common. DEFAULT VALUE:
Hardware Link Enable = 0 (see the notes on what happens during a hardware reset in Section 8.2.1). Hardware Reset = 1. All error indication bit fields (except Hardware Reset) = 0. All header subfields: unspecified (and unimportant).
38
System Architecture Document
PP ACCESS: Hardware Link Enable written by the RFRAMER on every cell time. Hardware Reset set to 1 during a reset. Link Was Disabled written by RFRAMER. Parity Error written by MREG. VXI Out Of Range and VXI Out Of Range Header written by VXTC. Bad Control Cell, Bad ATM Signaling Cell, and Bad ATM Signaling Cell Header written by RFRAMER. All error indication bits (but not Hardware Reset) cleared by MREG when the global clear error signal CLRERR is asserted.
Statistics-A: FIELD NUMBER: LENGTH:
4.
12 bytes.
CP ACCESS:
Read/Test Write.
SUBFIELDS:
Receive Cell Counter: first 4 bytes. Recycling Cell Counter: next 4 bytes. VXT CS0
Discard Counter: next 4 bytes.
INFO FORMAT:
32 Receive Cell Counter Recycling Cell Counter VXT CS0 Discard Counter --
1 1 1 1
DESCRIPTION: All subfields of this field (as well as those of the Statistics-B field, see below) reflect values of
on-chip counters that maintain various statistics. The Receive Cell Counter field contains a count of all cells received on the input link by the IPP that were not unassigned cells, and that had a correct HEC byte in the header. The Bad HEC Counter field, described below, counts cells with HEC errors. Note that the Receive Cell Counter also counts cells discarded by the RFRAMER (even though they had a correct HEC), such as control cells received and discarded because they were not enabled for this IPP chip, and bad ATM signaling cells (see Figure 16). The Recycling Cell Counter field contains the number of cells that have been received by the MREG. Note that all cells received by the IPP from the OPP on the recycling path are counted, even if they are discarded by the MREG, regardless of the reason for the discard. These statistics track “normal” operation of the IPP. VXT CS0 Discard Counter holds the number of discrete stream (CS=0) VXTC due to congestion in the receive buffer (see Section 8.2.8).
The
cells discarded in the
For any counter value, the CP can compute the number of such cells in a particular time interval by reading the counter at the beginning and end of the interval, and taking the difference of the counter values. DEFAULT VALUE:
0 for all counters.
PP ACCESS: Receive Cell Counter incremented by RFRAMER. VXT CS0 Discard Counter incremented by VXTC.
Statistics-B: FIELD NUMBER: LENGTH:
5.
16 bytes.
CP ACCESS:
Read/Test Write.
Recycling Cell Counter incremented by MREG.
39
Gigabit Switching Technology SUBFIELDS: RCB CLP=0
Overflow Counter: first 4 bytes.
RCB CLP=1
Overflow Counter: next 4 bytes.
CYCB
Discard Counter: next 4 bytes.
Bad HEC Counter: next 4 bytes. INFO FORMAT:
32 Overflow Counter RCB CLP1 Overflow Counter CYCB Discard Counter Bad HEC Counter RCB CLP0
1 1 1 1
DESCRIPTION:
The RCB CLP0 Overflow Counter contains the number of high priority (CLP=0) cells that have been discarded by the RCB, which occurs when the RCB is full. The RCB CLP1 Overflow Counter contains the number of low priority (CLP=1) cells that have been discarded, which occurs when the RCB is full, but also when its occupancy is over the RCB Discard Threshold. The CYCB Discard Counter contains the number of cells discarded because the recycling buffer was full. These statistics measure congestion in the IPP. Cells received by the IPP are subjected to a header error check based on the CRC contained in the HEC field; the Bad HEC Counter contains the number of cells with bad headers that have been detected and discarded. HEC errors should be rare under normal operation.
DEFAULT VALUE:
0 for all counters.
PP ACCESS: RCB CLP0 Overflow Counter and RCB CLP1 Overflow Counter incremented by RCB. CYCB Discard Counter incremented by MREG. Bad HEC Counter incremented by RFRAMER.
7.2.2
OPP Maintenance Register Fields
The OPP maintenance register contains the following fields: Read Only Chip Information: FIELD NUMBER: LENGTH:
12.
6 bytes.
CP ACCESS:
Read/Test Write for Time, Read Only for Chip Type/Version.
SUBFIELDS:
Time: first 4 bytes. Chip Type/Version: next 2 bytes. INFO FORMAT:
32 Time Chip Type/Version 16
DESCRIPTION:
---
1 1 2
The value of Time reflects the current contents of the cell clock counter on the OPP. The Chip Type/Version field contains the chip type and version number information. See the description of
40
System Architecture Document the corresponding field in the IPP maintenance register for more details. DEFAULT VALUE:
Time = 0. The Chip Type/Version is hard wired into the chip, and cannot be written, not even for testing purposes.
PP ACCESS: Time incremented by cell clock circuitry, read by RESEQ to compute the age of cells coming from the switch, and read by MREG to place in the LT field of control cells that it processes. The OPP makes
no access to the Chip Type/Version field. to do: Document how Time can be changed by the TIME_SYNC input pin, the reason, and the "format" of the input signal. If a TIME_SYNC-induced write would normally occur during a particular cell time, but a control cell that writes Time is processed during that same cell time, the control cell takes priority. Configuration Information: FIELD NUMBER: LENGTH:
13.
12 bytes.
CP ACCESS:
Read/Write.
SUBFIELDS:
Trunk Group Identifier: least significant 12 bits of first 2 bytes. Resequencer Offset: next 1 byte. Reliable Multicast: bit 1 of next byte. Report Errors: bit 0 of the same byte. XMB CS0
Buffer Size: next 2 bytes.
XMB CS0
Congestion Threshold: next 2 bytes.
XMB CS0 EPDH XMB CS0
Threshold: next 2 bytes.
Near Empty Threshold: next 2 bytes. 12
8
Trunk Group Identifier
Reseq. Offset
6
1 1 Reliable Multicast Report Errors
4 --
--
INFO FORMAT:
8 see below XMB CS0 Buffer Size XMB CS0 Cong. Threshold XMB CS0 EPDH Thr. XMB CS0 Near Empty Thr. -32
1 1 1 1
1
DESCRIPTION: If the STG field of an incoming data cell matches the value of the OPP’s Trunk Group Identifier,
the data cell is going out on the link (i.e., it is not to be recycled), and the appropriate upstream discard bit of the cell is set (UD1 or UD2), then the cell should be discarded. This is useful for establishing multipoint to multipoint connections. See Section 10.2.5 for an example.
41
Gigabit Switching Technology The Resequencer Offset contains the age threshold that is used by the resequencing buffer circuitry to determine when a cell is ready to leave the buffer. The CP should set the value of this field during software initialization to an estimate of the maximum time a cell could spend within the switching fabric. It should not be set to the value 255, as this could cause functional problems in the resequencer with certain unusual sequences of incoming cells. Any value in the range 0 to 254 is safe functionally, although the extremely small or large values are not recommended for good performance. Values that are too small will cause all cells that do not have the bypass resequencer (BR) bit on to be discarded for being too old, including control cells. This would not be too horrible, except that it is difficult to turn on the BR bit of control cells, so if the Resequencer Offset is made too small, it is difficult to make it larger again. See Section 11 for more details. The Reliable Multicast field has a small but significant effect on the behavior of the OPP RFMT. See Section 8.3.1 for more details. The Report Errors field controls whether the OPP maintenance register responds to control cells with an opcode of ERRORS, or discards them (1 = respond only if there are errors, 0 = always discard). It may be useful to set this field to 0 for switch ports that are unused. The OPP contains a transmit buffer (XMB) into which cells that are ready for output on the link are placed. This buffer is logically divided into two separate parts, one part for continuous stream traffic (CS=1) and one part for discrete stream traffic (CS=0). The XMB CS0 Buffer Size field specifies the desired number of cells for the discrete stream part of the buffer. All remaining cell slots are for continuous stream cells. Note that this is a desired value only, and if it is changed during operation of the switch, it may take some time for cells in the part of the buffer that was reduced in size to leave and free up space now desired for the other part (but this time is likely to be on the order of a few hundred switch cell times at most - probably shorter than the time required for the CP to prepare a control cell and send it). When the occupancy of the discrete stream part of the XMB buffer exceeds the value contained in the Congestion Threshold field, all discrete stream cells attempting to enter that part of the buffer that are low priority (CLP=1) are discarded. XMB CS0
See Section 8.3.5 for an explanation of the XMB CS0 EPDH Threshold and the XMB CS0 Near Empty Threshold. The first version of the OPP chip will only store the least significant 8 bits of the four XMB CS0 fields. For write control cells, the most significant 8 bits of each of these fields is ignored, and for read control cells (or the verifying read operation performed by write control cells), the MREG will always fill the most significant 8 bits with 0. Since future versions of this chip may consider more bits of these fields significant, it is recommended that control software always fill these ignored bits with 0 for write operations. DEFAULT VALUE: Trunk Group Identifier = 0. Resequencer Offset = 60. From the table in Figure
11, this value should be large enough to guarantee that cells in a 512 port, 5 stage switch are very rarely resequenced incorrectly. It is also probably sufficient for a 4096 port switch, but larger is questionable. It is overkill for an eight port switch; the CP could reduce this value during initialization for switches with few ports. Reliable Multicast = 0. Report Errors = 1. XMB CS0 Buffer Size = XMB CS0 Congestion Threshold = 134 (leaving 166 - 134 = 32 cells for CS=1 queue in XMB). XMB CS0 EPDH Threshold = 67 (half of XMB CS0 Buffer Size). XMB CS0 Near Empty Threshold = 10.
PP ACCESS: Trunk Group Identifier read by RFMT. Resequencer Offset read by RESEQ. Reliable Multicast read by RFMT. Report Errors read by MREG. XMB CS0 Buffer Size and XMB CS0 Congestion Threshold read by XMB. XMB CS0 EPDH Threshold and XMB CS0 Near Empty Threshold read by BDC.
Hardware Status and Error Information: FIELD NUMBER: LENGTH:
14.
1 byte (but see below).
42
System Architecture Document CP ACCESS:
Read/Write. The subfields marked with field numbers below may also be accessed Read/Write individually.
SUBFIELDS:
Hardware Reset: bit 4 of the first byte (field number 17). Parity Error Plane 3: bit 3 of the first byte (field number 18). Parity Error Plane 2: bit 2 of the first byte (field number 19). Parity Error Plane 1: bit 1 of the first byte (field number 20). Parity Error Plane 0: bit 0 of the first byte (field number 21). INFO FORMAT:
8 see below
4 --
12
8 --
Trunk Group Identifier
--
1 3
32 1 1 1 1 1 Hardware Reset Parity Error Plane 3 Parity Error Plane 2 Parity Error Plane 1 Parity Error Plane 0
2
--
Chip ID = 1
1
See below for explanation of the shaded fields.
1
DESCRIPTION: Just as for the IPP Hardware Status and Error Information field, this field has several error flags
that may be accessed individually. See the description there for more information. For ERRORS control cells processed by the OPP chip, a reply is sent only if Report Errors is 1, and one of the one bit subfields above is equal to 1 (Chip ID is not checked for this, of course). As for the IPP chip, the shaded fields in the figure above are filled in for replies to an ERROR control cell. See the description there for motivation. The Hardware Reset field is similar to the IPP Hardware Reset maintenance register field. If one of the Parity Error Plane bits is 1, it is an indication that a parity error was detected in a cell received from one of the four switching fabric planes. If a parity error has been detected on the portion of a cell received from plane i, then the field Parity Error Plane i is set to 1. Cells are not discarded because of a detected parity error. DEFAULT VALUE:
Hardware Reset = 1. All parity error flags = 0.
PP ACCESS: Hardware Reset set to 1 during a reset. All parity error flags written by RFMT, and cleared by MREG
when the global clear error signal is asserted (Hardware Reset is not changed when this signal is asserted). Statistics-A: FIELD NUMBER: LENGTH:
15.
8 bytes.
CP ACCESS: SUBFIELDS:
Read/Test Write.
43
Gigabit Switching Technology Transmit Cell Counter: first 4 bytes. Recycling Cell Counter: next 4 bytes. INFO FORMAT:
32 Transmit Cell Counter Recycling Cell Counter
1 1
--
2
DESCRIPTION:
As in the case of the IPP maintenance register, all subfields of this field (and those of the Statistics-B field below) contain values useful for gathering statistics. The Transmit Cell Counter contains the number of cells that have been output by the OPP to the link interface (not counting "filler" unassigned cell slots that might be generated when no real cell is available for transmission, which is done for some kinds of link interfaces). The Recycling Cell Counter contains the number of cells that have been recycled to the corresponding IPP.
DEFAULT VALUE:
0 for all counters.
PP ACCESS: Transmit Cell Counter incremented by XFRAMER. Recycling Cell Counter incremented by MREG.
Statistics-B: FIELD NUMBER: LENGTH:
16.
16 bytes.
CP ACCESS:
Read/Test Write.
SUBFIELDS: XMB CS0
Overflow Counter: first 4 bytes.
XMB CS1
Overflow Counter: next 4 bytes.
Too Late Discard Counter: next 4 bytes. Resequencer Overflow Counter: next 4 bytes. INFO FORMAT:
32 Overflow Counter XMB CS1 Overflow Counter Too Late Discard Counter Resequencer Overflow Counter XMB CS0
1 1 1 1
DESCRIPTION:
The XMB CS0 Overflow Counter contains the number of discrete stream (CS=0) cells that had to be discarded because the CS0 buffer in the XMB overflowed (see Section 8.3 for more discussion of the CS0 and CS1 buffers). The XMB CS1 Overflow Counter is analogous, but it applies to continuous stream cells. When the OPP receives a cell from the switch, it may have been delayed in the switch for more cell times than the value of the Resequencer Offset. It is possible that cells arriving after this one in the same connection have already left the resequencer, so the late cell will be discarded (whether it is a data or control cell). The Too Late Discard Counter contains the number of such cells dropped. If this happens too often, it is a sign that the value chosen for the Resequencer Offset is too small. There is no flow control from the OPP’s back to the switching fabric, so cells may arrive at the reformatter in an OPP when that OPP’s resequencer is full, and be discarded. Such cells are counted by the Resequencer Overflow Counter.
44
System Architecture Document DEFAULT VALUE:
0 for all counters.
PP ACCESS: XMB CS0
Overflow Counter and XMB CS1 Overflow Counter incremented by BDC. Too Late Discard Counter and Resequencer Overflow Counter incremented by RESEQ.
BDC Control: FIELD NUMBER: LENGTH:
22.
16 bytes.
CP ACCESS:
Read/Write.
SUBFIELDS:
Block Discard Operation: second byte (first byte unused). BDI
to Operate: next 1 byte.
Block Discard State to Write: next 1 byte. next 2 bytes unused. BDI
Read: next 1 byte.
Block Discard State Read: next 1 byte. INFO FORMAT:
8 --
8 BD Op. ---
8
8
BDI to Op.
BD State to Write
BDI Read
BD State Read
1 1 2
32 DESCRIPTION: When a connection uses the block discard feature implemented in the BDC, it may leave the BDC entry indexed by the connection’s block discard index (BDI) in a state that would cause the first packet of a new connection that reused this BDI to be discarded, even if no congestion existed at that
time. While this situation would correct itself after the first packet, it is desirable to give a new connection a fighting chance to start out with as favorable treatment as possible. The CP may overwrite the state of any entry in the BDC’s table by writing a Block Discard Operation value of 1, indicating that the BDC should perform a write operation followed by a verifying read, the desired BDI in the BDI to Operate field, and new state bits into the Block Discard State to Write field. There are 11 signals from the maintenance register to the BDC in the OPP chip that carry these values (1 for operation, 8 for BDI, and 2 for state), and these change once every cell time. They reflect the current contents of these fields in the maintenance register. In any cell time when the maintenance register receives a control cell writing this field, it puts the values in the control cell on these signals for one cell time, and the BDC will perform the desired operation in its table, in addition to any that might be required due to its normal processing of cells that pass through it (if both such writes are to the same table entry, the order in which they are executed is unimportant). In any cell time when the maintenance register does not receive a control cell writing this field, it clears the operation signal to 0, indicating that the BDC should perform a read. Note that this behavior is a bit different than all other existing maintenance register fields. Every cell time the BDC either performs a read or a write operation on some BDI value. One write is performed by the BDC for each control cell with opcode WRMR and field 22 that the maintenance register processes. If no write is performed, a read is performed on the BDI value received from the maintenance register (from the BDI to Operate field). This BDI value is then sent back along with the 2 bit state read from the BDC’s table (these values are all 0’s if a write was performed by the BDC in that cell time). Once every cell time, the maintenance register copies these two values into the BDI
45
Gigabit Switching Technology Read and Block Discard State Read fields. The least significant bit of both Block Discard State fields indicates the propagate/discard state of the connection - 0 is propagate, 1 is discard. The next least significant bit of these fields indicates whether the last cell received at the BDC for that connection was the last cell of its AAL5 frame - 1 for yes, 0 for no - and thus whether the next cell received should be treated as if it is the first cell of its AAL5 frame. Thus 00 is the initial state for all connections. If the
CP wants to return a connection to its initial state, it should send a control cell with opcode WRMR and field 22 destined for the desired OPP chip. The Block Discard Operation field should be 1 for write, the BDI to Operate field should contain the desired BDI value, and the Block Discard State
to Write field should contain 00 in the least significant bits (it may as well make all 8 bits equal to 0, for possible future expansion of the number of bits of block discard state maintained per connection). The values placed in the BDI Read and Block Discard State Read fields is not very important. Whatever values are in the write control cell will be temporarily placed in the maintenance register’s internal flip-flops, and returned in the verifying read operation of the WRMR control cell, but then those values will be overwritten with the values from the BDC within a cell time. The only purpose for this temporary writing is for testing purposes. If the CP also wants to verify whether the BDC’s memory and control logic is working completely correctly, it may later send a control cell with opcode RDMR, field 22, destined for the same OPP chip, with a Block Discard Operation field of 0 for read. Within 2 or 3 cell times after the WRMR control cell was processed, the values in the BDI Read and Block Discard State Read fields should reflect the contents of the appropriate table entry in the BDC. Only a CP that was testing that OPP chip for hardware faults would do this, though. In the first version of the OPP chip, only the least significant bit of the Block Discard Operation subfield is actually stored in the chip, and only the least significant two bits of the Block Discard State subfield. Other bits of those subfields will be ignored by the first version of the chip for write operations, and will be undefined for the value returned to the CP by read operations. DEFAULT VALUE: PP ACCESS: BDI
0 for all subfields.
and New State read by BDC, and written by MREG once during every cell time.
8 PORT PROCESSOR DESIGN 8.1 Overview Until now, we have been making the assumption that the input and output port processors are implemented as two separate chips. This is because of the area available for circuitry on a single chip. If that were not a restriction, there is no other reason why the functions of both the IPP and the OPP could not have been implemented on a single chip. This section focuses on the design of the port processor chips.
46
System Architecture Document Input Side (IPP) RCB RFRAMER
SYNC
RCV
VXT
from link
to switch CYCB
MREG RESEQ
XMB
to link XFRAMER
from switch
XMIT
Output Side (OPP) Figure 28: Port processor organization Figure 28 is a schematic showing the internal functional units that comprise the input and output port processors put together. In the two chip prototype implementation, the circuitry in the top half of the figure will be placed in the IPP chip, and that in the bottom half will be placed in the OPP chip. The recycling buffer (CYCB) will be placed in the IPP chip, and the maintenance register (MREG) will be in both the IPP and OPP chips. Cells arriving from the link interface arrive on a 32 bit wide data path in the typical case; however, this depends on the specific chip set being used for the link interface. The receive framer (RFRAMER) is responsible for separating the cells (cell delineation), and for performing header error check on the cell header. In the OPP, the transmit framer circuitry (XFRAMER) generates the HEC, and sends cells to the link interface. The receive synchronizer (SYNC) and the transmit buffer (XMB) are used to convert between the internal and external clock rates. More detail on the transmit buffer is given below. The receive buffer (RCB) buffers cells waiting to enter the switch. The switch provides a grant signal when it is ready to receive a cell. If the RCB fills up, it discards incoming cells. If the number of cells in the RCB goes over an adjustable threshold value, then discrete stream (CS=0) cells arriving at the VXT are discarded for a short duration to help ease the congestion. The receive circuit RCV is responsible for merging new cells from the input link and recycled cells from the recycling buffer (CYCB) and passing them on to the VXT. The virtual path/circuit translation table (VXT) looks up the virtual path identifier, and possibly the virtual circuit identifier, of all incoming data cells. This lookup provides two output ports, and the cell will be sent to either one port, both ports, or all ports between these two, inclusive. A new VPI and VCI is given to the cell (two sets are given if exactly two copies are to be made of the cell). It also specifies whether each copy should be recycled when it reaches the appropriate OPP, and other information about the connection that is discussed in the next two subsections. The VXT also performs all read and write operations on its table entries that are requested by control cells. Cells are given a time stamp from the Time maintenance register field immediately before they are sent to the switch. The resequencer (RESEQ) receives cells from the switch and holds them in a buffer. It keeps track of the age of each cell, which is the current time minus the time stamp stored in the cell. When cells are “old enough”, as specified by the Resequencer Offset maintenance register field (see Section 7.2.2), they are sent to the transmit circuit (XMIT) in oldest first order.
47
from link
Gigabit Switching Technology
RFMT
RFRAMER Cell Store
grant
VXI,CLP CCD,INFO LT,RVAL
RCB RCV
to switch elem.
grant
VXTC
VXI,CLP CCD,IPP_PTR grant CYCB VXI,CLP,CCD IPP_PTR,INFO
grant
MREG from OPP
Figure 29: IPP Physical Organization The transmit circuit XMIT has a dual role to the RCV circuit; it identifies those cells that should be recycled by examining the CYC bit. The transmit circuit sends CYC=1 cells to the maintenance register and CYC=0 cells to the transmit buffer (XMB). The maintenance register MREG maintains status values, error flags, and adjustable parameters for modifying the behavior of the port processor. It also processes control cells that access these values. In the prototype, this is only done for cells that pass through the recycling path. This simplifies the circuitry handling control cells. It sends cells to the recycling buffer (CYCB), which has a capacity of 16 cells. The XMB is organized as two separate buffers, one reserved for continuous media traffic, and the other for discrete media traffic. Continuous media data typically has real time constraints, so it should be delivered as soon as possible. By separating the two FIFO buffers, we can ensure that the continuous media data suffers minimum latency by preferentially transmitting data from the continuous media buffer rather than from the discrete media buffer. Note that the distinction between connections carrying discrete media and those carrying continuous media is made based on the value of the CS bit in the VXT tables (this value is carried through to the OPP in the internal cell format). The CP might choose to set this bit based on the ratio of the peak and average bandwidth requirements quoted by the application at connection setup time, for example. Typically, continuous media traffic is not very bursty, whereas discrete media traffic can be very bursty. This observation allows us to use a much smaller buffer for the continuous media FIFO. The prototype has a 256 cell FIFO for discrete media traffic, and a FIFO holding about 100 cells for continuous media traffic. These sizes are defaults after a reset, and the total of about 350 cell slots can be divided arbitrarily between discrete and continuous media cells by writing a maintenance register field (see the description of XMB CS0 Buffer Size in Section 7.2.2).
8.2 Input Port Processor Design This section covers the design of the input port processors in more detail. The descriptions here are intended to be detailed enough for hardware designers to write VHDL code specifying the behavior of the circuits. Figure 29 shows a more detailed picture of the IPP chip implementation. The most important change from Figure 28 is the addition of a cell store (CSTR). This is a memory that holds the contents of the cell while it is in the IPP. Part of the header and control information of the cell is passed through the rest of the IPP, along with a pointer to the rest of the cell’s data within the
48
System Architecture Document
cell store. The information passed through the “control path” of the IPP is much smaller than the full size of the cell. This design was chosen to reduce the power requirements of the chip. If the full cell contents were passed from one component to the next at the desired clock speed, there would be many transitions in signal levels on many internal data paths, leading to higher power requirements for CMOS technology. The synchronizer (SYNC) circuitry is incorporated into the cell store. In the description of the various blocks, frequent references are made to maintenance register fields (Section 7.2.1), fields of control cells (Section 6.4), and fields of the internal cell formats (Section 6.3). Figure 30 shows all possible values that the control code (CCD) field in the control path may take, and their
Value
Command
Description
0
IDLE
Idle cell
1
NEWDATA
New data cell (i.e., one that came from the link)
2
CYCDATA
Recycled data cell
3
RDVPXT
Read virtual path table entry from VXT (everything except CC field)
4
RDVCXT
Read virtual circuit table entry from VXT (everything except CC field)
5
RDVPXTCC
Read cell counter (CC) from virtual path table
6
RDVCXTCC
Read cell counter (CC) from virtual circuit table
7
WRVPXT
Write virtual path table entry into VXT (does not write CC field)
8
WRVCXT
Write virtual circuit table entry into VXT (does not write CC field)
9
WRVPXTTR
Write virtual path table entry into VXT and start transitional time stamping
10
WRVCXTTR
Write virtual circuit table entry into VXT and start transitional time stamping
11
WRVPXTCC
Write cell counter (CC) to virtual path table (for testing only)
12
WRVCXTCC
Write cell counter (CC) to virtual circuit table (for testing only)
13
CYCCTL
A recycled control cell for which no operation should be performed by the VXT (e.g., one that has COF≠0, or one that was handled in the MREG)
14
NEWCTL
A new control cell that has arrived on the incoming link
Figure 30: CCD Field Values meanings. Most of these values are copied from the control cell opcode table (Figure 22).
8.2.1
Link Enabling and Disabling Circuitry
This circuitry is part of the RFRAMER, but most of it operates independently of the other functions of the RFRAMER, so we describe it separately. Part of the receive framer monitors the state of the incoming link. There is a signal sent from the input transmission interface (ITI, see Figure 12) chips to the IPP indicating whether the link is “up” or “down” (see the link interface specification [RF-94a]). The link is up if data is being sent to the ITI from the sending OTI at the other end of the
49
Gigabit Switching Technology
cable (located inside of a workstation or another switch). The link may be down for several reasons: the sending OTI is off or not working properly, the cable into the ITI has been unplugged or bumped, or the ITI is off. During the time that the link is down, we do not want the RFRAMER to send any cells to the rest of the IPP (neither data nor control cells), since such cells would contain random data, not data intended by any sender. Also, when the link comes back up, we desire a delay before the RFRAMER starts receiving cells, because the link may be going up and down very rapidly (e.g., when a cable is being plugged in and adjusted). The length of this delay is stored in the Hardware Re-enable Time field of the maintenance register, in cell times (as measured by the internal 120 MHz clock, where a cell time is 16 clock periods). In addition to hardware reasons for disabling the link, there may be times when it is useful to disable the processing of data cells at a port because a human operator suspects that the virtual circuit translation tables contain bad entries. Data cell processing can be disabled by setting the Software Link Enable field to 0. Control cells are not affected by this. When carrier on the link is lost for a sufficiently long time (e.g., 5 seconds), it is possible that this is caused by someone unplugging one cable from the port, and then plugging in a different cable with a different source. It may be useful for the Software Link Enable to be set to 0 automatically under these conditions, so that data cells are discarded while the CP checks if the cable plugged in has the same source or a different source. This could be used to automatically monitor the topology of the network. If the carrier is lost for more cell times than the Software Carrier Loss Time (as measured by the internal 120 MHz clock), then the hardware sets the Software Link Enable field to the value of the Set Software Link Enable field. The behavior described can be enabled by placing 0 in the Set Software Link Enable field. This mechanism can be turned off completely by setting the Software Carrier Loss Time to 0. Note that while this feature appears to be correctly implemented in the receive framer of IPP version 1, the maintenance register in that chip does not change the value of the Software Link Enable field to the value stored in the Set Software Link Enable field. Another function performed by the link enabling/disabling circuitry is preventing cells from entering the switch during a hardware reset. It takes time for some circuits (e.g., the cell stores and virtual circuit translation tables) to initialize themselves after the global reset signal is no longer asserted, and they are not prepared to accept cells during this time. The duration of this time is controlled by the default value of the Hardware Re-enable Time field (it must be the default time, because this occurs immediately after a reset). Now we present a simple state machine that implements the desired behavior. A picture of the state machine is shown in Figure 31. The link enabling/disabling circuitry contains two timers: the Hardware Timer and the Software Timer. Each is 32 bits long, and is decremented once per internal cell time when it is not 0. The Hardware Timer is used to implement the “debouncing” behavior of the Hardware Link Enable field, and the Software Timer is used to implement the behavior for disabling data cells when the carrier is lost for too long. Normally, when the carrier is present, the state machine is in the Link Enabled state. If carrier is ever lost, the state machine changes to the No Carrier state. It also starts the Software Timer by assigning it the value in the Software Carrier Loss Time field, and signals the MREG so that it sets the Link Was Disabled field to 1. The only way to leave the No Carrier state is for the carrier to be regained. When this happens, the state machine goes to the Wait to Enable state, and the Hardware Timer is started by assigning it the value in the Hardware Re-enable Timer field. There are two possible transitions from the Wait to Enable state. If carrier is lost again, the state machine returns to the No Carrier state. However, if the Hardware Timer expires while in the Wait to Enable state, the carrier has been present for long enough to be considered stable, and the state machine goes to the Link Enabled state. This is the time when the Software Link Enable field should be assigned the “default” value from the Set Software Link Enable field, if it has been sufficiently long since the last time the state machine was in the Link Enabled state. If the Software Carrier Loss Time is 0, then this feature is disabled. Therefore, in order to perform the assignment Software Link Enable becomes Set Software Link Enable, the Software Timer must have expired (i.e., it is equal to 0) and the Software Carrier Loss Time must be greater than 0.
50
System Architecture Document
Link Enabled Hardware Timer expires If Software Timer = 0 and Software Carrier Loss Time > 0, then signal MREG to set Software Link Enable to "default"
Carrier lost
Carrier lost
Wait to Enable
Set Software Timer to Software Carrier Loss Time and set Link Was Disabled
No Carrier
Carrier regained Set Hardware Timer to Hardware Re-enable Time
Figure 31: Link Enabling/Disabling State Machine While the global reset signal is asserted, all fields are set to their default values, the Software Timer is set to 0, and the Hardware Timer is set to the Hardware Re-enable Time field and held there. The state machine is forced to the “Wait to Enable” state. After the reset signal is no longer asserted, the Hardware Timer is allowed to decrement, and the state machine is allowed to run normally. This implements the desired behavior after a reset of not allowing any cells through until after other circuits have initialized themselves. Every internal clock cell time, the MREG sets the Hardware Link Enable field to 1 if the state machine is in the Link Enabled state, and otherwise to 0.
8.2.2
Receive Framer (RFRAMER)
The RFRAMER runs on a clock driven by the link interface. It receives cells in a format to be determined by the input transmission interface (ITI) chip(s) that we choose to support (see the link interface specification [RF-94a]). There may be several such formats, and multiple components to the RFRAMER, one for each kind of ITI interface supported. The RFRAMER monitors the Hardware Link Enable and Software Link Enable fields of the maintenance register (it might even get the Hardware Link Enable value directly from the link enabling/disabling circuitry directly, since no clock boundaries need to be crossed). When Hardware Link Enable is 0, any cells received by the RFRAMER are discarded, with no record kept. When Hardware Link Enable is 1, the RFRAMER performs a CRC computation on the first four bytes of the ATM header, and compares it to the HEC field of the header. If the values do not match, then the cell is discarded and the RFRAMER increments the Bad HEC Counter field of the maintenance register. If the values match, then the cell is checked to see if it is one of the types in the ATM standard that is not handled by the prototype (see discussion of PT field in Section 6.1). If it is an unassigned cell, the RFRAMER discards it without recording the event, since these cells could be common. If the cell is one of the other types to be discarded, that is a sign of an error in the software at the sender on the other end of the link (at least in our test bed network). The RFRAMER sets the Bad ATM Signaling Cell field of the maintenance register to 1, stores the first four bytes of the cell header in the Bad ATM Signaling Cell Header field, and discards the cell. If the cell is a control cell (VPI=0, VCI=32 decimal) and the DIP switch called CP Enable on the IPP is set to discard control cells, then the RFRAMER discards the control cell and sets the Bad Control Cell field to 1.
51
Gigabit Switching Technology
If the cell has passed all of the conditions above, and it is not a control cell, but the Software Link Enable field is 0, then the data cell is discarded, with no record kept. The only other special condition that must be checked by the RFRAMER is whether the cell is a control cell (VPI=0, VCI=32 decimal) with an operation code requesting a hard reset of all chips (OPC=RST, see Figure 22) or clearing all error flags on all chips (OPC=CLRERR). Note that these operations should be performed regardless of the value of the COF field (i.e., it need not be 0). A reset is desirable when it is suspected that some component of some chip is not behaving properly, perhaps damaging or dropping cells without good cause. Thus reset control cells should be recognized, and the reset initiated, from a component that is located as early as possible in the cell path, i.e., the RFRAMER. Otherwise, the control cell requesting the reset would be subject to bad treatment by the offending hardware. CLRERR control cells are handled by the RFRAMER because performing the operation must assert a signal that is distributed to all chips in the switch, just as a reset operation does. Individual error flags can be cleared by writing the appropriate maintenance register fields. After performing either a RST or CLRERR operation, the RFRAMER should replace the RVAL field with SUCCESS (Figure 25) and send the cell to the cell store. Note that a RST control cell will be erased from the IPP when the reset operation is successfully initiated, but if a hardware design or chip fabrication error causes the reset to be performed improperly, it is desirable that the hardware at least attempt to send a reply back to the CP to notify it. If the cell is not discarded, then its contents are sent to the cell store in the I/O cell storage format (Figure 17). The least significant 8 bits of the VPI and all of the VCI form the VXI field. It also sends a busy/idle bit, and a bit indicating whether the cell is a control cell or data cell. This sending must be done carefully, since the RFRAMER runs on a different clock than most of the IPP components. The RFRAMER signals the maintenance regsiter to increment the Receive Cell Counter field. All RFRAMER blocks also monitor a pin on the IPP chip, which for one IPP chip will be attached to a circuit with a push button, and for the rest will be tied to the “button not pushed” logic level. The one chip that is attached to the push button circuitry will monitor this pin, and when the button is pushed, the RFRAMER will initiate a hardware reset, just as if a control cell with opcode RST were received. The signal on this pin may be debounced by the RFRAMER.
8.2.3
Cell Store (CSTR)
The cell store runs on the clock driven by the link interface, and the 121 MHz clock that most of the IPP components use. It receives a cell in the I/O cell storage format (Figure 17) from the RFRAMER, and synchronizes the arrival of the cell with the internal switch clock. If there is a free cell slot in the cell store, the cell is stored and a pointer value (IPP_PTR) containing the cell’s address is sent to the receive buffer (RCB). The VXI and CLP are extracted from the cell, and a CCD of IDLE, NEWDATA, or NEWCTL is generated and sent with IPP_PTR. The CSTR also handles requests to store new cells from the maintenance register (MREG), requests to read cells from the reformatter (VXTC), and requests to discard cells from the receive buffer (RCB). One of each of these requests could all occur within one internal cell time. The cell store can hold up to 64 cells. It is important that it be able to hold at least as many cells as the total of the receive buffer, recycling buffer, and the rest of the blocks in the control path of the chip. If this were not the case, then new cells arriving from the link or recycling port would have to be discarded without regard for any of their contents. It is better to choose which cells to discard after their contents have been examined to determine their priority relative to other cells (e.g., the values of the CLP and/or CS bits).
8.2.4
Receive Buffer (RCB)
The receive buffer is a FIFO queue holding control information for up to 32 cells. With the fields VXI, CLP, CCD, and IPP_PTR (6 bits), the control path at this point in the IPP is 35 bits wide.
System Architecture Document
52
The receive buffer receives these fields from the cell store once every cell time. If the CCD of the received cell is IDLE, it is not stored. If the CLP of the cell is 0 (high priority), then the cell is stored in the buffer if it is not full. If it is full, the cell is discarded by signaling the maintenance register to increment the RCB CLP0 Overflow Counter field, and notifying the cell store to discard the cell in location IPP_PTR. If the CLP of the cell is 1 (low priority), then the cell is stored in the buffer if its occupancy is no more than the value in the RCB Discard Threshold maintenance register field and the buffer is not full. Otherwise, the cell is discarded by signaling the maintenance register to increment the RCB CLP1 Overflow Counter field, and notifying the cell store to discard the cell in location IPP_PTR.
VXT
Whenever the buffer occupancy is above the RCB Discard Threshold, the CONGESTED_RCB signal, sent to the control, is asserted.
In this design, the cells traveling through the recycling path have priority over the new cells arriving on the link. Therefore, the recycling buffer (CYCB) sends a grant signal to the receive buffer, indicating whether the receive buffer may send a cell to the receive circuit (RCV) on this cell time.
8.2.5
Maintenance Register (MREG)
During each cell time, the maintenance register (MREG) either receives a data or control cell from the corresponding OPP, or it receives no cell. If it receives any cell, as indicated by the assertion of a busy/idle (BI) bit during the same word as the start of cell (SOC) signal is asserted, it increments the Recycling Cell Counter field. The cell is received on 32 signal pins in either the recycling cell format for data cells (Figure 17), or the internal control cell format for control cells (Figure 21). There is also a parity signal that computes odd parity over these pins. That is, the parity signal is equal to the exclusive or of the 32 signal pins, inverted. This has the useful property that if all signal pins are 0, then the correct parity is 1. If all pins plus the parity become stuck at 0, this is a parity error. The maintenance register checks the parity of the incoming cell. If it is incorrect, the Parity Error field is set to 1. The cell is still processed, however. If the maintenance register receives a data cell, as determined by the data (D) field, it is kept if possible. It is not possible to keep it if the data FIFO of the recycling buffer is full, and this condition is indicated by a signal DATA_FULL_CYCB sent from the recycling buffer to the maintenance register. The cell should be discarded if the maintenance register field Recycling Link Enable is 0. If either of these conditions is true, the data cell is not placed in the cell store, and a CCD value of IDLE is sent to the recycling buffer. If neither of these conditions is true, the maintenance register sends the cell’s data to the cell store, and receives a pointer IPP_PTR back. The VXI and CLP fields of the data cell are extracted and sent to the recycling buffer (CYCB). A CCD value of CYCDATA and the IPP_PTR are also sent. If the maintenance register receives a control cell, it is always processed, whether it can be propagated or not. The processing of a control cell is described below. If the control FIFO in the recycling buffer is full, indicated by a signal CONTROL_FULL_CYCB sent from the recyling buffer to the maintenance register, the processed cell is not sent to the cell store, and a CCD value of IDLE is sent to the recycling buffer. Otherwise, the IPP_PTR value from the cell store and the fields VXI, CCD, and INFO described below are sent to the recycling buffer. The CLP value sent is always 0 (high priority) for a control cell. For all control cells received by the maintenance register, the COF field value of the processed cell is one less than the value received. All fields in the processed control cell are the same as the incoming control cell unless it is explicitly stated that the processed control cell has a different value for that field. In particular, the following fields should not change: OPC, FIELD, RHDR, and CMDATA. If the maintenance register receives a control cell with COF field not equal to 0, then the control cell is not destined for this IPP chip. The CCD of the processed cell is CYCCTL. Thus this cell will not perform any operation on the VXT if it arrives there. The only change made to the cell is to decrement the COF field. The VXI and INFO values sent to the recycling buffer are unimportant.
53
Gigabit Switching Technology
If the maintenance register receives a control cell with COF field equal to 0, then the control cell’s operation should be performed in this IPP’s VXT, if the operation is one that reads or writes a VXT entry (operation codes 3 through 12 in Figure 22), otherwise the operation should be performed in the maintenance register. If the operation is one that should be performed at the VXT, then the FIELD field of the cell specifies the VPI or VCI entry that should be accessed. The maintenance register extracts this field from the control cell and sends it to the recycling buffer as the VXI value in the control path. The INFO field of the control cell is extracted and sent to the recycling buffer. This field is used for VXT write operations. The CCD of the processed cell is the OPC of the received cell. The only change made to the cell at this point is to decrement the COF field. The reformatter (RFMT) makes any changes necessary to the cell it receives from the cell store to complete the VXT operation. If the operation is one that should be performed in the maintenance register, it is done. The FIELD field is extracted from the incoming cell to determine which maintenance register field to operate on. For read operations (RDMR), the INFO field of the processed cell is overwritten with the contents of the maintenance register field. For write operations (WRMR), the information to write to the field comes from the INFO field of the control cell. If a write is attempted on a read only maintenance register field, no write occurs. For all write operations, a verifying read is done immediately afterwards, with the result placed in the INFO field of the processed cell, just as for a normal read operation. For a report errors operation (ERRORS), a cell is only sent out if the Report Errors maintenance register field is 1 and at least one of the error bits of the Hardware Status and Error Information is 1 (see the description of that group of fields for a list of exactly which error flags are included, and which are not), otherwise the cell is discarded. If these conditions hold, the INFO field of the processed cell is described in the Hardware Status and Error Information documentation in Section 7.2.1. The local time (LT) field of the processed cell is set to the current time (i.e., the value in the Time maintenance register field). The CCD of the processed cell is CYCCTL. If the operation is successful, the return value (RVAL) of the processed cell is SUCCESS. The VXI and INFO values sent to the recycling buffer are unimportant. If the opcode is not one defined in Figure 22, then a return value of BAD_OPCODE is put in RVAL. If the opcode is RDMR or WRMR, but the FIELD value does not correspond to any field in the IPP maintenance register, then a return value of BAD_FIELD is put in RVAL. The local time value is the same as for successful control cells, and CCD is CYCCTL. The VXI and INFO values sent to the recycling buffer are unimportant. In an effort to ensure that the specification of the MREG is unambiguous, Figure 32 presents a summary of its behavior. Any field name within the internal control cell format with a prime (’) after its name refers to the value of this field in the control cell sent out of the MREG. Any field name without a prime after its name refers to the value of this field in the received control cell. Any field name with a double prime (’’) after its name refers to a value that is sent to the recycling buffer.
8.2.6
Recycling Buffer (CYCB)
The recycling buffer is a pair of FIFO queues. The data buffer can store control information (VXI, CLP, and IPP_PTR) for 16 data cells. The control buffer can store control information (all of the previous plus CCD and the 16 byte INFO field) for two control cells. These buffers are separate because the INFO field, needed for control cells that write a VXT entry, is so large. The number of control cells passing through the switch will be much smaller than the number of data cells, under normal operation, so we do not need the capability to store as many of them. If the data buffer can accept a cell, the recycling buffer asserts a signal DATA_GRANT_CYCB sent to the maintenance register. If the control buffer can accept a cell, it asserts a signal CONTROL_GRANT_CYCB. A CCD is received every cell time. If it is IDLE, no cell is placed in either buffer. If it is CYCDATA, then the VXI, CLP, and IPP_PTR values received are stored in the data buffer if it is not full. If it is CYCCTL or one of the VXT operation codes (Figure 30), the VXI, CLP, IPP_PTR, CCD, and INFO values received are stored in the control buffer if it is not full. No arriving CCD should ever have the values NEWDATA or NEWCTL. No arriving cell should ever be destined for a full buffer.
54
System Architecture Document
Condition
Action
D=1
Recycling Link Enable=1
CCD’’=CYCDATA, VXI’’=VXI, CLP’’=CLP, INFO’’=d
and...
Recycling Link Enable=0
discard cell, CCD’’=IDLE
COF≠0
no other change
OPC=NOP
RVAL’=SUCCESS
Report Errors = 1 and at least one error flag is 1
OPC= ERRORS
and... otherwise D=0
and...
COF=0
and...
OPC=RDMR FIELD
or
is valid
RVAL’=SUCCESS INFO’=contents of COF ’= COF-1, CCD’’= CYCCTL, VXI’’=d, CLP’’=d, INFO’’=d,
and...
OPC=WRMR
and... otherwise OPC
discard cell, CCD’’=IDLE (this is an exception to CCD’’=CYCCTL) LT’ =
Time and...
RVAL’=SUCCESS if OPC=WRMR then
write appropriate maintenance register field with contents of INFO end if INFO’=contents of appropriate maintenance register field RVAL’=BAD_FIELD
invalid
OPC is a VXT operation (i.e., in range 3 through 12, inclusive)
Hardware Status and Error Information field, plus ChipID and Trunk Group Identifier
RVAL’=BAD_OPCODE COF ’= COF-1
CCD’’=OPC, VXI’’=FIELD, INFO’’=INFO
and...
Figure 32: Summary of IPP Maintenance Register Behavior on Data and Control Cells On every cell time, the recycling buffer may receive a grant signal from the VXT. If so, and the control buffer is not empty, the first control cell is removed and sent to the receive circuit. If a grant is received, the control buffer is empty, but the data buffer is not empty, the first data cell is removed and sent to the receive circuit (a CCD value of CYCDATA must be sent with the other fields). If a grant is received and both buffers are empty, a grant is sent to the receive buffer. If no grant signal is received, a CCD value of IDLE is sent, and no grant is sent to the receive buffer.
8.2.7
Receive Circuit (RCV)
During each cell time, the receive circuit receives control information of a cell from either the receive buffer, the recycling buffer, or neither, but not both. It was originally intended that the receive circuit be able to receive cells from both of those buffers simultaneously, but this could cause access operations to the VXT to occur so quickly that its design would be too difficult. Here is a description of what the received values should be. However, the receive circuit does not verify that these conditions are true; it passes on the values received unmodified. All cells coming from the receive buffer should have one of the CCD values IDLE, NEWDATA, or NEWCTL. Note that control cells must recycle at least once before they may access the VXT. All cells coming from the recycling buffer should have one of the CCD values IDLE, CYCDATA, CYCCTL, or one of the VXT access operation codes. The values of the other fields depend on the type of cell, as explained in the behavioral definition of the maintenance register and recycling buffer above.
55
Gigabit Switching Technology
At least one of the CCD values received should be IDLE. If the CCD value from the recycling buffer is not IDLE, then that value and the other control fields from the recycling buffer are sent to the VXT. If the CCD value from the receive buffer is not IDLE, then that value and the other control fields from the receive buffer are sent to the VXT.
8.2.8
Virtual Circuit Translation Table Control Circuit (VXTC)
The VXTC receives cells from the receive circuit. It accesses the VXT for all data cells (to get routing information) and for control cells performing VXT read or write operations. The VXTC also decides whether cells should be discarded due to congestion in the receive buffer (RCB). Cells that are not discarded are passed on to the RFMT. When the RFMT is prepared to receive a cell, it sends a grant to the VXTC. If the VXTC has a cell ready, it sends control information for that cell to the RFMT and a pointer (IPP_PTR) to the cell store, otherwise it sends a CCD of IDLE to the RFMT. When the VXTC has room to receive a cell, it sends a grant to the CYCB. When the VXTC receives a data cell (CCD is either NEWDATA or CYCDATA), it checks the VPI of the cell (only the least significant 8 bits of the VPI are used by the switch) to see if it is in the range 0 to VP Count, inclusive, where VP Count is a maintenance register field. If not, the VXI is out of range. The VXI Out Of Range maintenance register field is set to 1, and the VXI of the cell is placed in the VXI Out Of Range Header field. If the VPI is in range, then the VXT entry with index equal to the VPI value is read. If the virtual path termination (VPT) bit of this entry is equal to 0, then this cell is in a virtual path that does not end at this switch. The VCI value in the cell is propagated, and any VCI value is considered to be in the proper range. No additional VXT entry is read. If the VPT bit of the entry read is equal to 1, then this cell should be routed based on the value of its VCI. The VCI of the cell is checked to see if it is in the range 0 to (1022 - VP Count), inclusive (the VXT has 1024 entries). If not, then the VCI is out of range, and the cell is handled exactly as if the VPI were out of range, as described above. If the VCI is in range, then entry (1023 - VCI) of the VXT is read. We index VCI’s from the “bottom” of the table, using index (1023-VCI), instead of from the “middle” of the table, using index (VP Count + 1 + VCI). This is done so that if the VP Count value is changed during operation of the switch, the VCI entries left remain in the same places. The VXT returns the appropriate entry (either VPI or VCI), including the cell count (CC), to the VXTC. If the busy/idle (BI) bit of this entry is equal to 0, then this VXI has not been set up by the CP as a connection. If the recycling cells only (RCO) bit of this entry is equal to 1, and the cell is new from the link (CCD=NEWDATA), then this cell should be discarded, since the VXI may only be used by recycling cells. The data cell should be discarded immediately. No record is kept of such cells.
VXT
If BI=1, and either RCO=0 or CCD=CYCDATA, the VXTC increments the CC and writes this value back into the entry (the CC value can be written independently of the rest of the table entry).
The CS bit is used to determine whether the data cell is kept or discarded. Continuous stream (CS=1) cells are treated with higher priority, and are not discarded by the VXTC. Discrete stream (CS=0) cells are treated with lower priority. They are discarded if the receive buffer is congested. The receive buffer sends a signal CONGESTED_RCB to the VXTC. When this signal is asserted, the VXTC starts a timer with an initial value from the RCB Discard Hold Duration maintenance register field. This timer decreases once per cell time, until it reaches 0, and then it remains 0. When the timer is not 0, discrete stream cells are discarded. This timer’s value is set to 0 after a reset. The VXTC signals the maintenance register to increment the VXT CS0 Discard Counter field for each such discarded cell. The CLP bit of the outgoing data cell is equal to the logical or of the incoming CLP and the Set CLP (SC) bit from the VXT entry. All fields in the VXT entry except SC, VPT, and CC are sent to the RFMT in the format shown in the top part of Figure 27. These fields are not listed explicitly on the line from the VXT to the RFMT in Figure 29. They comprise the INFO field sent for data cells. When VPT=0, the VCI portions of the VXI1 and VXI2 fields should be filled
System Architecture Document
56
in from the VCI of the incoming cell, not from the VXT entry. VPT=0 cells are part of a virtual path that does not terminate at this switch, and the incoming VCI should be propagated. When the VXTC receives a control cell with CCD=CYCCTL, it performs no operation and passes on any other control information it receives for the cell unmodified. When the VXTC receives a control cell that accesses the VXT (i.e., CCD is one of the VXT access operations in Figure 22), the VXTC checks its VPI or VCI value to see if it is in the proper range. The FIELD field contains a VPI and VCI, but note that only one of these values is used by the VXTC, depending on whether the operation code specifies a virtual path or virtual channel. Whichever part is used is subjected to a range check, just as the VXI of data cells are. However, if the value is out of range, the control cell is not discarded. Instead, the RVAL field of the outgoing cell is set to BAD_FIELD (Figure 25). Such a cell is a sign of an error in the CP software. If there is no range violation, and the operation code is one of the VXT write operations, the INFO field in the control path is written into the appropriate VXT entry. Note that the cell counter (CC) field of the VXT entries need only be written for testing purposes. If the write operation is one that specifies that transitional time stamping should start, then the transitional time stamping is done in the RFMT (see Section 8.2.10). If there is no range violation, then the appropriate VXT entry is read for either a VXT read or write operation (if it is a write operation, the read is performed after the write has completed). A read is done after a write so the CP can quickly verify the values written. The values read are sent as the INFO field value to the RFMT, in one of the two formats of Figure 27. The value in the Time maintenance register field is sent as the LT field, and the RVAL field sent is SUCCESS (Figure 25). In all cases, the pointer (IPP_PTR) field is extracted from the control information and sent to the cell store.
8.2.9
Virtual Circuit Translation Table (VXT)
The virtual circuit translation table (VXT) is a memory of 1024 identically formatted entries, split into a virtual path and a virtual circuit table by a bounds register VP Count (see Section 7.1). For each entry, the cell counter (CC) field can be written independently of the rest of the fields. This is because for a control cell that writes a VXT entry, we only have enough room in the INFO field for 16 bytes. All but the CC field takes 14 bytes. Also, the CP can keep track of the last CC value read from each entry, and compute differences to find the number of cells that have used the entry since the last time the CC was read. The CC value need only be written by the CP for testing purposes. Normally, the CC value of a connection just established by the CP is not 0, except after a reset. Another reason for independent write control of the CC field is that the VXT control reads that field, increments its value, and writes it back into the VXT entry (to count data cells within a connection). If the CC could not be written independently, then it must also write back the rest of the fields exactly as they were read. In one cell time, the maximum number of accesses from the VXT control is 4. After a hardware reset, the BI field and the CC field of all VXT entries should be set to 0. Since the rest of the entry is never used when BI=0, the values in the other fields are unimportant.
8.2.10 Reformatter (RFMT) During cell times that the reformatter (RFMT) does not receive a grant signal from the switch, it sends a synchronization cell. If it does receive a grant, and the VXT control circuit (VXTC) sends it a non-idle cell, the reformatter combines the information received from the VXTC with the rest of the cell data received from the cell store and sends the complete cell to the switch in either the internal data cell format (Figure 18) or the internal control cell format (Figure 21). Four parity bit-columns are also generated and sent.
57
Gigabit Switching Technology
If the CCD value received is NEWDATA, the reformatter fills in all fields of the internal data cell format except the time stamp (TS), the source trunk group (STG), the payload type (PT), and the payload from the information received from the VXTC. The source trunk group is filled in from the Trunk Group Identifier maintenance register field. The payload type and payload are filled in by information from the cell store. See below for the time stamp, and how to convert the EADR field from the VXTC into the IADR field placed in the cell. If the CCD value received is CYCDATA, the reformatter does exactly the same as for NEWDATA cells, except the source trunk group comes from the cell store, not the maintenance register. This is because the source trunk group of a cell should always be the value of the Trunk Group Identifier of the IPP at which the cell first arrived. If the CCD value received is NEWCTL, the reformatter must take all of the fields of the external control cell format from the payload of the cell received from the cell store, and rearrange them into the internal control cell format (the value placed in LT is unimportant). Then it treats the cell as a CYCCTL cell (see below), except that no information from the VXTC is used to fill in cell fields. If the CCD value received is one of the VXT access operations, or CYCCTL, the reformatter copies the cell from the cell store into the internal control cell format. If CCD was one of the VXT access operations, the INFO field (containing the result of the VXT access operation), LT field (containing the time at which the operation was performed), and RVAL field (containing the success/fail status of the VXT operation) are overwritten by the values received from the VXTC. If CCD was a VXT write, and start transitional time stamping (i.e., OPC=WRVPXTTR or WRVCXTTR), then the reformatter must initiate transitional time stamping for that VXT. See the end of this section for how this is done. For all control cells, the reformatter must take the EADR1 and BI,RC,D,CYC,CS1 fields and use their values to fill in the BI, RC, IADR, D, CYC, and CS fields of the internal control cell format. The time stamp is filled in from the Time maintenance register. After that, the EADR2 and BI,RC,D,CYC,CS2 fields are copied over the values previously in EADR1 and BI,RC,D,CYC,CS1, and the EADR3 and BI,RC,D,CYC,CS3 fields are copied over the values previously in EADR2 and BI,RC,D,CYC,CS2. The BI bit of the BI,RC,D,CYC,CS3 field should be overwritten with 0. This is to prevent the possibility of a control cell recycling forever through the switch (overwriting with 0 gives this effect because a cell with BI=0 is an idle cell). For data cells, the EADR field received from the VXTC is used to fill in the IADR field of the outgoing cell. For control cells the EADR1 field from the cell store is used for this purpose. Refer to Figure 24 for how to fill in the EADR field. Bits 31..29 are placed in the top row of the IADR field, 15..13 in the second row, 28..26 in the third row, 12..10 in the fourth row, 25..23 in the fifth row, 9..7 in the sixth row, 22..20 in the seventh row, 6..4 in the eighth row, 19..17 in the ninth row, and 3..1 in the tenth row. The value placed in the Reserved field is unimportant. The reformatter is responsible for filling in the time stamp (TS) field in the four control columns. For all control cells and most data cells, the value placed in the time stamp field is the low order 11 bits of the Time maintenance register field, appended with a least significant bit of 0. In Section 3.3, it was noted that when we resequence the cells on every pass through the switch, then we must be careful when deleting a destination from a multipoint connection. For a duration of up to T cell times, we must make the time stamp of cells at the “cut point” of the multicast tree larger, so that they do not overtake cells sent immediately before the deletion of the destination. To guarantee that the time stamp values eventually return to the normal time, the transitional time stamps are incremented by half steps, instead of full steps. In the prototype, transitional time stamping may be performed for at most one connection per IPP at one time. In principle, it could be performed for an arbitrary subset of connections at each IPP, but this would require too much additional circuitry in each VXT entry. The reformatter implements the transitional time stamping by keeping the following state: a one bit transitional time stamping on (TTON) field (0=off, 1=on, default value after a reset=0), a 3 byte VXI value (TTVXI) for which transitional time stamping is done, a 1 bit virtual path/virtual circuit indicator (TTVC), and a 12 bit transitional time stamp value (TTTIME)
System Architecture Document
58
When the reformatter receives a data cell (D=1) and transitional time stamping is on (TTON=1), it compares some or all of the incoming VPI/VCI (as opposed to the translated values obtained from the VXT) to the value stored in TTVXI. It should compare the incoming VPI/VCI to the value stored, because there can be two translated VXI values in the data cell, and neither of them uniquely identifies the connection to which the cell belongs (it requires an outoing VXI and the outgoing port number to uniquely identify a connection within the IPP). The incoming VPI/VCI of the cell is obtained from the VXTC. If TTVC=0, then the connection for which transitional time stamping is being performed is a virtual path connection, and all cells in the virtual path should be assigned transitional time stamps. Thus, any cell whose incoming VPI matches the VPI portion of the TTVXI value should be transitionally time stamped, regardless of the VCI value of the cell. If TTVC=1, then the connection for which transitional time stamping is being performed is a virtual circuit connection, and only cells whose incoming VPI and VCI both match the TTVXI value should be transitionally time stamped. For purposes of the time stamp circuitry, define the “true time” to be the value in the 32 bit Time maintenance register field, appended with a “.0”. That is, the true time is always an integer. The “transitional time” is the value in the TTTIME register, with a “binary point” between the last two bits. Note that the true time is always incremented by a value of 1 at each cell time, but the transitional time may be incremented in steps of 1/2 (0.1 in binary). If the cell should be normally time stamped, then the low order 12 bits of the true time are placed in the TS field of the internal cell format (note that the least significant bit of the TS field of such cells is always 0). All control cells should be time stamped normally. If the cell should be transitionally time stamped, then the 12-bit transitional time, TTTIME, is placed in the TS field. Then the TTTIME value is incremented by 1 half step, i.e., add the binary value 0.1. When transitional time stamping is initiated, TTTIME is initialized to be the sum of the true time and the TSOffset value. The true time advances one unit per cell time, while TTTIME advances by either 0 or 1/2 each cell time. Thus the TTTIME will eventually be no larger than the true time. At that point, transitional time stamping should be turned off (i.e., set TTON=0). Normally, we would do this comparison in hardware by using a comparitor to check the condition TTTIME ≤ true time. However, because the time values can “wrap around”, this condition might be true as soon as transitional time stamping is started (this happens when Time+TSOffset ≥ 232). A condition to turn off transitional time stamping that is easy to implement in hardware is to compare the most significant 11 bits of TTTIME with the least significant 11 bits of Time. If they are equal, then transitional time stamping should be turned off (i.e., set TTON=0) at the end of the cell time. These values must always be equal eventually, because TTTIME increases by either 0 or 1/2 each cell time. If the TSOffset value is 128, then it takes 256 cell times for transitional time stamping to be complete for a connection after it has been initiated. At 120 MHz, this is about 34 µs. We now explain how transitional time stamping is initiated. If the reformatter receives a control cell (D=0) with an operation code of WRVPXTTR or WRVCXTTR, then transitional time stamping should be initiated. TTON is set to 1. The contents of the FIELD field of the control cell are copied into the TTVXI register. If the operation code is WRVPXTTR, then transitional time stamping is to be performed for all cells whose VPI’s match the VPI part of the TTVXI register. This is recorded by setting TTVC=0. If the operation code is WRVCXTTR, then it is assumed that transitional time stamping is only to be performed for cells whose VPI and VCI values match both the corresponding values in the TTVXI register. This is recorded by setting TTVC=1.
59
Gigabit Switching Technology
Figure 33: OPP Physical Organization The TTTIME register is set to the Time maintenance register field plus the TSOffset value (note that each of these summands is treated as an integer, with an appended “.0”). The reformatter is also responsible for generating four parity bits. For details, see Section 9.
8.3 Output Port Processor Design This section covers the design of the output port processors in more detail. Figure 33 shows a more detailed picture of the OPP chip implementation. As for the IPP, the most important change from Figure 28 is the addition of a cell store. Its function and the reason for choosing this design are similar to that for the IPP. In the description of the various blocks, frequent references are made to maintenance register fields (Section 7.2.2), fields of control cells (Section 6.4), and fields of the internal cell formats (Section 6.3).
8.3.1
Reformatter (RFMT)
The reformatter receives cells from the four planes of the switching fabric, checks the parity bits of each plane independently, combines the four planes of cell data, moves various cell fields around (depending on the type of cell), and passes on control information to the resequencer, and reformatted cell contents to the cell store. The reformatter receives all four control columns and all 32 data columns of a cell in either the internal control cell format or the internal data cell format. It also receives four parity bits, and checks them against parity values generated from the cell received (see Section 9 for how parity is checked). If bit i of the parity is incorrect, then bit i of the Parity Error Port Flags maintenance register field is set to 1. Regardless of whether there was a parity error, the cell is reformatted if it is not an idle cell. Data cells (D=1) received by the reformatter have two sets of VXI and BDI fields, two bits CYC1 and CYC2, and two bits UD1 and UD2. While the IPP’s may send cells with RC=011, meaning that two copies of the cell should be made and sent to specified OPP’s, the switch elements make the two copies of the cell, one with RC=010 and the other with RC=001. The OPP’s may then use the RC field to determine which set of VXI, BDI, CYC, and UD information to use. If RC is 000, 010, or anything beginning with a 1, the fields with index 1 are extracted. If RC is 001, the fields with index 2 are extracted. From now on, we refer to the selected fields as VXI, BDI, CYC (1 bit), and UD. If a cell with RC=011 arrives, then either the switch elements are not working properly, or there was some other kind of error. The reformatter should discard such cells.
System Architecture Document
60
If the data cell is destined for the outgoing link (CYC=0) and the upstream discard (UD) bit is 1, then the source trunk group (STG) field of the cell is extracted and compared with the Trunk Group Identifier maintenance register field. If they match, then the cell is discarded. See Section 10.2.5 for an example of the use of this feature. This discarding is a normal and expected part of the switch’s behavior, so no counters or error flags are modified when a cell is discarded for this reason. For all other data cells, the time stamp (TS), continuous stream (CS), bypass resequencer (BR), cell loss priority (CLP), and the payload type (PT) fields are extracted and sent to the resequencer. The selected CYC bit and BDI field are also sent. Whether the data cell should be recycled or not, the reformatter sends it to the cell store in the recycling data cell format (Figure 17). All fields are copied from the corresponding fields in the incoming data cell (including the STG and D fields that are shaded). The BI bit does not need to be filled in by the reformatter, as the MREG will do so. While the STG and D fields need not be filled in for data cells going to the link, it makes the reformatter simpler if they are filled in both for recycling and link data cells. The SCH field must be filled in for cells going to the link, and it must be filled with four 0 bits. See below for discussion of the DIR and UD fields in Figure 17. If the cell received is a control cell (D=0), then the RC field is used in the same way as for data cells, but now it is only used to determine which of the two CYC bits is extracted. If the cell should be recycled, then the cell is sent to the cell store with no reformatting. If the cell should go out on the link, then the cell is reformatted into the I/O cell storage format (Figure 17), with the return header (RHDR) in place of the row containing the VXI. The payload of this cell should be formatted in the Switch to CP external control cell format (Figure 20). The TS, CYC, CS, and BR fields are extracted and sent to the resequencer, just as for data cells. The BDI value sent should be 0, so that the block discard controller never discards a control cell (except due to congestion). The CLP value sent should be 0, so the transmit buffer does not treat control cells as low priority. The PT value sent is unimportant, since it is never used if BDI=0. The above description is for the normal behavior of the RFMT, when the MREG field "Reliable Multicasting" has its default value of 0. We plan on designing and fabricating a new version of the IPP chip that supports several new types of connections, and we would like the first version of the OPP chip to be able to work with both this new version of the IPP chip as well as the first one. Below are the changes to the RFMT behavior that should be implemented when the Reliable Multicasting field is 1. They apply only to data cell processing. Control cells are processed as described above regardless of the value of the Reliable Multicasting field. The DIR and UD fields in Figure 17 should be filled in from the corresponding fields of the internal data cell format. This should be done at least for recycling cells, but the reformatter implementation is simplified if it is also done for cells going to the link. The SCH field must be filled in for both recycling and link data cells, and its value should come from the SCH field of the internal data cell format (Figure 18). The UD1/2 bits should now be treated as a single 2 bit field called UD. The reformatter should no longer select which of the two bits to use based on the RC value, as described above. Instead, if UD=00, then the cell should be propagated, regardless of its other fields. If UD=10, then the cell should be "upstream discarded" if it is destined for the link (i.e., the selected CYC bit is 0) and its STG field matches the Trunk Group Identifier maintenance register field. These cases are exactly like the UD=0 and UD=1 cases described above. However, if UD=01, the cell is destined for the link, and its STG field matches the Trunk Group Identifier maintenance register field, then instead of discarding the cell, the reformatter should instead do the following. The cell should be recycled, so the CYC bit sent to the resequencer should be 1 rather than the 0 value extracted from the cell. The UD value put in the cell to the cell store should be 11 rather than the 01 received in the incoming cell. If UD=01, but either the cell is destined to be recycled, or the STG field does not match the Trunk Group Identifier maintenance register field, then the cell should be propagated normally to its desired destination, as chosen by the selected CYC bit.
61
Gigabit Switching Technology
The UD value received should never be 11 during correct operation of the system, and the cell should be discarded. (Note: Due to a mistake in version 1 of the OPP chip, UD=11 cells are treated the same as UD=10 cells, described above. This is not a catastrophe, since the OPP chip should never receive such cells anyway.) For future reference, the next version of the IPP chip will use this special UD=01 value for START cells in a many-to-many reliable multicast connection. The idea is that if the sender in a reliable many-to-many connection does not want to receive copies of their own data back (i.e., they should be "upstream discarded"), then START cells should be converted by the switch into ACK (acknowledgement) cells internally. See [Turner-96b] for details. Note that since the first version of the IPP chip will ignore the SCH, DIR, and UD fields of recycling cells, the reformatter may as well fill in these values for both recycling and link data cells regardless of the value of Reliable Multicasting. The difference is that if Reliable Multicasting is 0, the value used for SCH should be four 0 bits, whereas if Reliable Multicasting is 1, the value used for SCH should come from the SCH field of the internal data cell format.
8.3.2
Resequencer (RESEQ)
It is the resequencer’s responsibility to take arriving cells, which may be arriving out of order, and send them out in their original order. First we describe the operational behavior of the resequencer in detail, and then discuss its implementation. At each cell time, the resequencer may receive control information of a cell from the reformatter, and a pointer OPP_PTR to the rest of the cell’s data in the cell store. The reformatter may send such a cell even when the resequencer is full. The resequencer should discard such a cell, and signal the MREG to increment the Resequencer Overflow
Counter field. If not full when receiving a cell, the resequencer computes the age of the incoming cell. If the BR bit is 1, this indicates that the cell should not be delayed. The resequencer implements this by ignoring the TS field of the cell, and behaving as if the age of the cell is equal to the Resequencer Offset maintenance register field. If the BR bit is 0, then the age is computed by taking the value in the Time maintenance register field and subtracting the time stamp in the cell. For the purpose of this subtraction, the time stamp in the cell is an 11 bit integer value plus a 1 bit fractional value, while the value of Time used is the least significant 11 bits treated as an integer, with a 1 bit fractional value of ".0". The resulting age is a 12 bit value in the same format as the time stamp, except that it should be treated as a signed integer in 2’s complement format. This is because the resulting age can be negative for cells that were transitionally time stamped. For example, suppose that the IPP maintenance register field TSOffset has a value of 60. A data cell that leaves the IPP immediately after transitional time stamping is initiated for the cell’s VPI/VCI value will have a time stamp that is the Time value plus 60 (truncated to 12 bits in length). Suppose it only takes 5 cell times to reach an OPP. Then the age of the cell is -55. If the computed age were treated as an unsigned value, it would be equal to 211 - 55 = 1993, larger than the Resequencer Offset, and it would be discarded (see below). If the resulting age is larger than the value in the Resequencer Offset maintenance register field, which is treated as an 8 bit unsigned integer value, then the cell has taken too long to arrive at the resequencer. Other cells with the same destination (i.e., either data cells in the same connection, or control cells destined to perform operations on the same maintenance register field or VXT table entry) may have already been sent out of the resequencer. If so, and this cell is kept, the two cells will be out of order. It is considered preferable to discard the late cell. For every such cell discarded, the reformatter signals the cell store to discard the cell, and the MREG to increment the Too Late Discard Counter field. Note that the value of the Resequencer Offset should be chosen so that at most a tiny fraction of all cells will arrive older than this value. If the cell is not too old, then it is placed in the resequencer. The current age of all cells in the resequencer is stored, and incremented during each cell time. All cells are maintained in age order, oldest first.
System Architecture Document
62
Figure 34: Implementation of the cell resequencer Each cell time, the oldest cell’s age is examined. If the age is at least as large as the Resequencer Offset, a copy of the cell is sent to the transmit circuit, the cell is removed from the buffer, and all other cells behind it shift forward by one position. The implementation of the resequencer is shown (at a high level) in Figure 34. The left part of the figure shows the entire resequencer, and the right part shows a more detailed implementation of each of the 80 RSQ elements. Let the number of cells in the resequencer be n, and let the age of the cell in RSQ(i) be age(i), or 0 if there is no cell in RSQ(i). The following conditions are maintained at all times by the resequencer. All n cells are stored in RSQ(0) through RSQ(n-1), and RSQ(n) through RSQ(79) contain no cells. All cells are stored in age order, from oldest to youngest. Formally, age(i) ≥ age(i+1) for all i, 0 ≤ i ≤ n-2, and age(i)=0 for all i, n ≤ i ≤ 79. When a new cell arrives that is not discarded for being too old, it must be inserted into the proper place in the sorted array of cells. This is done in a way much like a new element is inserted into a list in the Insertion Sort sorting algorithm, except that it is done in parallel. When the central resequencer controller sends the INSERT signal and the age of the new cell, each of the RSQ elements compares the new cell’s age with the age of the cell they contain, if any. If an RSQ contains a cell that is younger than the new cell, it sends a YOUNGER signal to its right neighbor, otherwise not. If an RSQ has not sent a YOUNGER signal, it keeps its current contents. If an RSQ has sent a YOUNGER signal, but it does not receive one from its left neighbor, then this RSQ is the insertion point for the new cell, and it sets its control circuitry to copy the new cell into its memory (note that RSQ(0) never receives a YOUNGER signal from its left neighbor, and should behave accordingly). If an RSQ has sent a YOUNGER signal, and receives one from its left neighbor, then it is in part of the sorted list that must be shifted to the right to make room for the new cell. It sets its control circuitry to copy the cell from its left neighbor. Note that if the new cell is the same age as some other cells in the resequencer, it is placed after those cells. When the oldest cell (in RSQ(0)) is sent to the transmit circuit, that cell is removed by shifting all cells to the left one slot. The resequencer control sends a SHIFT signal to all RSQ elements to copy the cell from their right neighbor, with RSQ(79) receiving an idle cell slot. Once per cell time, all RSQ elements that contain a cell that is not already at the maximum representable age increment the age of their cell by one. Cells that are already at the maximum age remain at the maximum age, to avoid wrapping around to a negative value.
8.3.3
Transmit Circuit (XMIT)
The transmit circuit receives cells from the resequencer and examines the CYC bit of each one to determine whether the cell should go to the maintenance register (if CYC=1) or the transmit buffer (if CYC=0). If a cell goes to the main-
63
Gigabit Switching Technology
tenance register, the OPP_PTR field is sent to the cell store. If a cell goes to the transmit buffer, all of the fields CS, CLP, PT, BDI, and OPP_PTR are sent.
8.3.4
Maintenance Register (MREG)
The maintenance register interprets all control cells destined for this OPP chip, and passes all other cells through to the corresponding IPP unchanged (except for the COF field of control cells not destined for this chip). Cells are received from the cell store in either the recycling data cell format (Figure 17) or internal control cell format (Figure 21, except that the four control columns are not included). All cells passed through the maintenance register are counted in the Recycling Cell Counter field. If the cell is a data cell (D=1), it is passed on unchanged. If the cell is a control cell (D=0), the COF value sent to the IPP is one less than the COF value received. If the value received is not 0, then this is the only change made. All fields in the processed control cell are the same as the incoming control cell unless it is explicitly stated that the processed control cell has a different value for that field. In particular, the following fields should not change: OPC, FIELD, RHDR, and CMDATA. COF
If the COF value received is 0, then the control cell’s operation is performed. The only operations that may be performed in the OPP maintenance register are reading and writing a field (RDMR and WRMR), report errors (ERRORS), and no operation (NOP, see Figure 22). If the opcode has any other value, then the return value (RVAL) of the outgoing cell is set to BAD_OPCODE (Figure 25). For NOP control cells, the operation is always successful. For ERRORS control cells, the control cell is discarded if the Report Errors maintenance register field is 0, or if none of the error flags in the Hardware Status and Error Information is 1 (see documentation of this field in Section 7.2.2 for those subfields included in this check). If Report Errors is 1 and at least one of the error flags is 1, then the INFO field of the processed control cell is filled in as described in the Hardware Status and Error Information documentation. The RVAL is SUCCESS. For RDMR and WRMR operations, the FIELD field is extracted from the incoming cell to determine which maintenance register field to operate on. For read operations, the INFO field of the outgoing cell is overwritten with the contents of the selected maintenance register field. For write operations, the information to write to the selected field comes from the INFO field of the control cell. If a write is attempted on a read only maintenance register field, no write occurs. For all write operations, a verifying read is done immediately afterwards, with the result placed in the INFO field of the cell sent out, just as for a normal read operation. If the FIELD value does not correspond to any existing maintenance register field, then RVAL in the outgoing cell is set to BAD_FIELD. Otherwise, the operation is successful, and RVAL is set to SUCCESS. The local time (LT) field of the outgoing cell is set to the current time (i.e., the value in the Time maintenance register field) whether the operation succeeded or not. In an effort to ensure that the specification of the MREG is unambiguous, Figure 35 presents a summary of its behavior when it receives a control cell (D=0). Any field name within the internal control cell format with a prime (’) after its name refers to the value of this field in the control cell sent out of the MREG. Any field name without a prime after its name refers to the value of this field in the received control cell. At the output of the MREG, a start of cell (SOC) signal is asserted once every 16 clock periods, regardless of whether a busy or idle cell is sent, and even while the chip is being reset. This signal is used by the skew compensation circuit that receives the cell in the IPP chip. The BI bit in the cell formats of Figure 17 or Figure 21 must be 1 when a busy cell (i.e., data or control) is being sent, otherwise it must be 0. The BI bit must be 0 while the chip is reset, so that the receiving IPP will not incorrectly interpret the received bits as a busy cell. Since the board will provide a cell clock signal to all chips even while they are reset, the SOC output should simply be a delayed version of this cell clock signal
64
System Architecture Document
Condition
Action
COF≠0
no other change
OPC=NOP
RVAL’=SUCCESS RVAL’=SUCCESS INFO’=contents of
Report Errors=1 and at least one error flag is 1
OPC= ERRORS
Hardware Status and Error Information field, plus ChipID and Trunk Group Identifier
and... otherwise COF=
COF ’= COF-1
0 and...
and... OPC=RDMR FIELD
or
is valid
OPC=WRMR
and... otherwise OPC
invalid
discard cell LT’=Time
and...
RVAL’=SUCCESS if OPC=WRMR then
write appropriate maintenance register field with contents of INFO end if INFO’=contents of appropriate maintenance register field RVAL’=BAD_FIELD RVAL’=BAD_OPCODE
Figure 35: Summary of OPP Maintenance Register Behavior on Control Cells that has its high pulse at the appropriate time. This guarantees that it will continue having high pulses while the OPP chip is reset. A parity signal is sent at all times. It is the odd parity of the 32 pins containing data for the cell sent.
8.3.5
Block Discard Controller (BDC)
One congestion control feature of the switch is the block discard mechanism. It is expected that the switch will carry many connections that use ATM adaptation layer (AAL) 5 to carry data packets in ATM cells [de Prycker-1993, Section 3.7.5]. When a source in such a connection wants to send a large packet, it segments the packet into 48 byte pieces and sends the pieces in successive ATM cells. The last such cell has U=1, where U is the user bit inside the payload type (PT) field of the ATM header (see Figure 16), while all previous cells within the packet have U=0. End to end error checking and retransmission is done in units of entire packets, not cells. If a single cell within the packet is lost, the entire packet is lost and, if the end to end protocol requires all data to get through successfully, retransmitted. Thus, if one cell is dropped because the transmit buffer was full, the rest of the cells within the packet may be dropped without further harm. In fact, dropping such cells can help ease the congestion, making it more likely for cells in other connections to arrive at their destination. This mechanism is called frame tail discarding, and it can be implemented as follows. For each AAL 5 connection, maintain one bit of state that is either in the state named PROPAGATE or the state named DISCARD. After a hardware reset, the initial state of all of these connections is PROPAGATE. If the state of an AAL 5 connection is PROPAGATE, this implies that all previous cells in the connection's current frame were sent to the transmit buffer successfully, and so any successive cells should be kept if possible. If the state of an AAL 5 connection is DISCARD, this implies that a previous cell in the current frame was discarded, and thus later cells in the frame may be discarded. Note that the last cell of a frame should always be kept (if possible) even if the connection's state is DISCARD, because otherwise the AAL 5 reassembler at the receiver would concatenate one partially received frame with the next one (it has seen no last cell of a frame to instruct it to do otherwise). Thus, the state of the connection will also be DISCARD if the last cell of the previous frame was discarded, since the receiver cannot then distinguish the cells of the next frame from those of the frame whose last cell was discarded.
65
Gigabit Switching Technology
congestion --> discard cell
PROPAGATE
no congestion --> propagate cell
last cell (U=1) and no congestion --> propagate cell
DISCARD
non-last cell (U=0) or congestion --> discard cell
Figure 36: Basic Frame Tail Discard State Machine When a cell in an AAL 5 connection arrives, and it is a non-last cell (U=0), and the state of the connection is then the BDC discards this cell (see below for details of discarding a cell). This is called a tail discard.
DISCARD,
Even if the cell is not tail discarded, it may be discarded due to congestion in the transmit buffer. The transmit buffer generates three signals, CS1_FULL, CS0_FULL, and CS0_CONG (for congested), that are sent to the BDC. The FULL signals are asserted when the appropriate queue within the XMB is completely full, and the CS0_CONG signal is asserted when the number of cells in the discrete stream queue within the XMB is larger than the value in the XMB CS0 Congestion Threshold OPP maintenance register field. For any given cell, we say that the cells’s desired queue in the XMB is congested under the following conditions: (1) the cell is part of a continuous stream connection (CS=1), and the CS1_FULL signal is asserted; or (2) the cell is part of a discrete stream connection (CS=0), and either the CS0_FULL signal is asserted, or the cell is also low priority (CLP=1) and the CS0_CONG signal is asserted. If a cell arrives when its desired queue is congested, the cell is discarded. Whenever the BDC discards a cell, either due to congestion or tail discarding, it signals the cell store to discard the cell, The BDC must also signal the maintenance register to increment either the XMB CS1 Overflow Counter field, for CS=1 cells, or the corresponding CS0 field for CS=0 cells. If the cell is not discarded, the OPP_PTR and CS fields are sent to the transmit buffer. The state diagram in Figure 36 summarizes the behavior of the state machine that is simulated for each AAL 5 connection. Note that if the current state is DISCARD, a last cell arrives, and the desired queue in the XMB is not congested, the cell is kept and the state of the connection returns to PROPAGATE. This allows the next frame in the connection to have an opportunity to be transmitted. It was originally intended that this feature should be available for every possible ATM connection, but this would require carrying the 24 bit VXI through the OPP control path, and possibly a content addressable memory to store the VXI -> state mapping. This was deemed too expensive in terms of the chip area required. Instead, the CP gives every AAL 5 connection that wishes to use this mechanism an 8 bit block discard index (BDI) in the range 1 to 255. This value is used to index a table containing the state of up to 255 different connection. Thus the BDI value given to two connections that pass through the BDC and XMB of the same OPP chip must be different. All connections that do not use AAL 5, or AAL 5 connections that do not wish to use this block discard mechanism, are assigned a BDI of 0. When the BDC receives a cell with a BDI of 0, it is only discarded if the desired queue in the XMB is congested. This is enough to implement basic frame tail discarding, but the basic method can perform badly in overload conditions, when many connections are transmitting sequences of frames back to back, and the total rate of all such connections is larger than the rate of the outgoing link. It performs badly in the sense that many cells are transmitted on the link that are part of frames that have at least one cell discarded (this is called “badput”, because it is put on the link, but this link use is wasted). An intuitive explanation for why this occurs is that the connection is allowed to go
66
System Architecture Document
congestion or (first cell, but not last and over threshold and occupancy rising) --> discard cell otherwise --> propagate cell PROPAGATE
DISCARD
otherwise --> discard cell, but keep last cells if not congested
no congestion and [first cell and ((under threshold and occupancy falling) or near empty)] --> propagate cell
Figure 37: Early Packet Discard with Hysteresis (EPDH) State Machine back to the PROPAGATE state after a single frame has its tail discarded. When the next frame of that connection begins, the desired queue is likely to be very close to congestion, and only part of the frame will be transmitted on the link before the queue is congested again, and the tail of that frame is discarded as well. The performance of the basic frame tail discarding method can be improved in several ways. One is to have a timer that starts running when any cell is discarded due to congestion (but not tail discarding), and as long as that timer is running, no connection in the DISCARD state is allowed to go back to the PROPAGATE state. Another is the early packet discard method simulated by Romanow and Floyd [RF-94b]. We call the method we have chosen to implement in the prototype early packet discard with hysteresis (EPDH), and it was chosen over these other two methods after simulation and analysis were done to compare all of the methods mentioned [Turner-96a]. In the basic early packet discard (EPD) mechanism, a decision is made when the first cell of a frame arrives whether to keep that entire frame. If the current buffer level is over a given threshold, the entire frame is discarded (by discarding the first cell, and thus causing a tail discard of the rest of the frame). If the current buffer level is under the threshold, an attempt is made to keep the entire frame (it must be tail discarded if the buffer becomes full, of course). EPD works well at preventing partial frame discards if the buffer is large enough, where one frame’s worth of buffering for each of the active connections is sufficient. EPDH achieves the same goal with just two frame’s worth of buffering, regardless of the number of active connections. See Turner [Turner-96a] for the analysis. The basic idea is that when the first cell of a frame arrives, the entire frame is discarded if the buffer occupancy is over the threshold and it is increasing. If it is over the threshold but not increasing, the connection’s PROPAGATE/DISCARD state is left at the value for the connection’s previous frame. If the buffer occupancy is under the threshold and decreasing, the connection is changed to the PROPAGATE state. If it is under the threshold but not decreasing, the connection’s PROPAGATE/ DISCARD state remains at its previous value. As a special case, the state of any connection whose first cell arrives when the buffer level is below a very small threshold value (e.g., 10 cells) is set to PROPAGATE. See Figure 36 for a state diagram.
A few implementation notes are in order. In order to determine whether a given cell is the first cell in a frame, the U bit of the previous cell is saved for each connection, in addition to the PROPAGATE/DISCARD state bit. The threshold mentioned here comes from the XMB CS0 EPDH Threshold field in the maintenance register, and the XMB CS0 Near Empty Threshold is used to determine when the buffer is near empty. The XMB sends back the current number of cells in the CS=0 queue to the BDC so that the BDC can compute these conditions itself (it is not always possible for the BDC to determine whether the XMB queues are full merely from their occupancy, due to an implementation detail in the XMB). Note that last cells are kept whenever possible. This is so that if the next frame is kept, we know for certain that the receiver’s reassembler will not concatenate that next frame with any previous partial frame. Our implementation doesn’t actually try to compute whether the buffer occupancy of the CS=0 queue is rising or falling. Instead, the BDC maintains a value EPDH_MAX that is equal to the largest occupancy the buffer has had since the last time it crossed from under the threshold to over the threshold. EPDH_MAX is set equal to the current CS=0 queue
67
Gigabit Switching Technology
occupancy whenever the occupancy is larger then EPDH_MAX and the first cell of some frame arrives, or to the threshold value if the occupancy falls below the threshold in any cell time. With this value, the condition "occupancy rising" in Figure 36 is implemented as "current CS=0 queue occupancy is at least EPDH_MAX" (it doesn’t matter whether this condition is checked before or after EPDH_MAX is updated for that first cell). Similarly, EPDH_MIN is equal to the smallest occupancy the buffer has had since the last time it crossed from over the threshold to under (or 0 initially). EPDH_MIN is set equal to the current CS=0 queue occupancy whenever the occupancy is smaller than EPDH_MIN and the first cell of some frame arrives, or to the threshold value if the occupancy goes over the threshold in any cell time. The condition "occupancy falling" is implemented as "current CS=0 queue occupancy is at most EPDH_MIN". This block discard mechanism is intended primarily for discrete stream (CS=0) connections. For continuous stream connections, only basic frame tail discarding is implemented. It is recommended to set the maintenance register fields such that the following values are ordered from largest to smallest (with consecutive values perhaps being the same): XMB CS0 Buffer Size, XMB CS0 Congestion Threshold, XMB CS0 EPDH Threshold, XMB CS0 Near Empty Threshold. Note that the discussion above has been given under the assumption that all cells within a connection are user data cells. However, there could also be end-to-end OAM flow F5 cells or resource management cells intermingled with the user data cells of a connection (see Figure 16), and these are propagated by the prototype switch. In the prototype, the BDC will treat any cells with the most significant bit of the PT field equal to 0 as user data cells, for which the state machine described above will be updated. Any cell with the most significant bit of the PT field equal to 1 will be treated as something other than a user data cell, and the state machine for the connection will not be consulted or updated when processing the cell. Such cells will always be kept by the BDC as long as the desired queue in the XMB is not congested. The BDC also receives requests from the maintenance register to read or write the block discard state of connections. The maintenance register sends a 1 bit operation signal (the contents of its Block Discard Operation field), an 8 bit BDI value (the contents of its BDI to Operate field), and a 2 bit state value (the contents of its Block Discard State to Write field). Once per cell time, the BDC examines these signals simultaneously, and performs the appropriate read or write operation. The BDC also sends to the maintenance register the BDI value which it has most recently read, and the 2 bit state value read. If the most recently performed operation requested by the maintenance register was a write, the values of BDI and state sent are all 0’s.
8.3.6
Transmit Buffer (XMB)
The transmit buffer is responsible for buffering cells as they arrive at the internal speed of the switch, but are sent out at the slower speed of the external link. It contains two separate buffers. One is for continuous stream (CS=1) traffic, and the other is for discrete stream (CS=0) traffic. Only the OPP_PTR field is stored in the buffer slots. The two buffers are implemented as one 166 word memory, where each word holds one OPP_PTR (8 bits), plus some control circuitry. The desired size of the CS=0 buffer may be chosen by the CP by writing the XMB CS0 Buffer Size field of the maintenance register. The rest of the memory is devoted to the CS=1 buffer. The details of implementation for the control circuitry are left for the design document on the OPP chip [FHR-94]. Four signals are generated by the transmit buffer and sent back to the BDC. One is asserted when the CS=1 buffer is full. Another is asserted when the CS=0 buffer is full. The last is asserted when the number of cells in the CS=0 buffer is larger than the XMB CS0 Congestion Threshold field of the maintenance register. The BDC should be designed so that if a cell is sent to the transmit buffer, there is room in the appropriate (CS=0 or CS=1) buffer to hold the cell. The XMB also sends the current number of cells in the CS=0 buffer to the BDC, so that it may implement the EPDH block discarding mechanism.
System Architecture Document
68
Control cells are treated exactly as data cells, according to their CS field value. It is expected that the CP will normally set this field to 1 for control cells, so that they receive better treatment by the XMB. However, it may be useful to set CS=0 for some control cells, to test the operation of the CS=0 buffer. The transmit framer sends requests to the cell store for cells to be transmitted, and the cell store then relays these requests to the transmit buffer. When such a request is received, the first cell pointer in the CS=1 buffer is sent to the cell store, if any. If the CS=1 buffer is empty, but the CS=0 buffer is not, the first cell pointer in the CS=0 buffer is sent. If both buffers are empty, then a “no cell available” signal is sent to the cell store. Thus continuous stream traffic receives priority over discrete stream traffic. The transmit buffer also generates the Forward Explicit Congestion Notification signal and sends it to the cell store. This signal is asserted exactly when the CS=0 buffer is over the XMB CS0 Congestion Threshold (thus it is the same as one of the signals sent back to the BDC).
8.3.7
Transmit Framer (XFRAMER)
The transmit framer runs on a clock driven by the link interface. On each of its cell times, it requests a cell from the cell store. One cell time later (the XFRAMER’s cell time), either a cell comes from the cell store in the I/O cell storage format, or an unassigned cell comes if no "real" cell was available. The XFRAMER fills in the first four bits of the VPI (or GFC) field with the value of the SCH field of the I/O data cell format of Figure 17 (note that if the cell is a control cell, these bits come from the four most significant bits of the RHDR field in the control cell). It sets the congestion (C) bit in the payload type (PT) field of the outgoing cell to be the logical OR of the incoming congestion bit and the FECN signal from the XMB, and generates the header error correction (HEC) byte. The PT field of the outgoing cell must not be modified if its most significant bit is 1, because that indicates that the cell is an ATM signaling cell (see Figure 16). The XFRAMER will set the middle bit of any PT field whose most significant bit is 0, if the XMB is asserting the FECN signal. Note that this will modify the PT field of meta-signaling, general broadcast, and point-to-point signaling cells during XMB congestion. The XFRAMER signals the MREG to increment the Transmit Cell Counter field of the maintenance register for every cell that it transmits.
8.3.8
Cell Store (CSTR)
The four control columns need not be stored. See the note for the IPP cell store. The OPP cell store contains 256 cells. The total storage of all of the other buffers in the OPP that contain only pointers and other control information should be no more than this, and perhaps a few less to account for cells buffered for a cell time or two between components. The resequencer contains 80 cells. This leaves a few less than 176 cells total for both of the queues in the transmit buffer. We will implement a 166 cell (pointer) capacity in the transmit buffer, leaving 10 cells for the rest of the control path. As for the IPP cell store, and for the same reasons (see the description of the IPP cell store), it is important for the OPP cell store to be able to hold at least as many cells as the entire control path of the OPP chip, most of which is in the resequencer and the transmit buffer. The cell store handles requests to store new cells from the reformatter (RFMT), requests to read cells from the transmit framer (XFRAMER) and the maintenance register (MREG), and requests to discard cells from the resequencer (RESEQ) and block discard controller (BDC). One of each of these requests could all occur within one cell time.
69
Gigabit Switching Technology
Figure 38: Switch Element Organization
9 SWITCH ELEMENT DESIGN This section presents the design of a chip implementing the eight port switch element that will be used in the prototype switch. The switch element is “dumb,” in the sense that it cannot be configured to behave differently depending on the value of a maintenance register, since it has no maintenance register. Its behavior can be modified by inputs provided on several signal pins, but these values remain the same while the switch is operating. The internal organization of the eight port switch element is shown in Figure 38. As discussed earlier (see Section 6.3), cells enter the switching fabric in a 36 bit wide by 15 bit long format (Figure 18 and Figure 21). Within the switching fabric, only the BI, RC, and IADR fields are used by the switch elements to make routing decisions. Of these fields, the RC and IADR fields may be modified in the switch element chips; the Reserved field may be modified as well. All other fields of the cell are passed through the switch elements unmodified. For a detailed input/output behavioral description of the switch element, see Section 9.4. The routing information and data for up to 8 cells may arrive simultaneously on any of the sets of pins labeled ud(0) through ud(7) in Figure 38 (ud stands for upstream data). These input lines are connected to an input crossbar that enables a cell arriving on any of the eight input ports to be placed into any of 40 cell slots in a cell buffer memory (implemented as flip-flops, because the SRAM available was not fast enough). On the output side, up to eight cells can be read simultaneously from the cell buffer and switched by an output crossbar to the eight output ports dd(0) through dd(7) (dd stands for downstream data). Note that the reading and writing from/to the cell buffer goes on in parallel; as a 12 bit word from one cell slot is being read, a new 12 bit word may be arriving in some other (vacant) cell slot. Since there are eight input and eight output ports, there are at most 16 cell buffer cell slots that are “busy” (either being read from or written to) at any instant.
9.1 Data Paths and Grants Recall that each 8 x 8 switch element is implemented using four identical chips (see Section 4). Each of the four chips receives eight of the 32 data columns of the internal cell formats. Each chip also receives an identical copy of the four control columns. All four chips make identical routing choices simultaneously, so that the outputs of the four chips can be used to reconstruct the original cell (original, except for the modified fields in the four control columns). There is also a parity bit for each input port. See Section 9.6.
70
System Architecture Document
Thus, in each chip, cells enter each input port 12 bits at a time, spread over 15 clock ticks, plus 1 extra clock tick between cells. In the figure, the eight input ports of the switching element, each of which is 13 bits wide (12 bits of cell information plus the parity bit), are shown as lines ud(0) through ud(7). On the output side, each port has 13 pins, just like the input ports. TODO. Discuss how grants are sent out, and note that a grant means “you may send me a cell x cell times from now”, where x is 1, 2, or 3, depending on the implementation. If x is larger than 1, then the switch element must continue sending out grants, but it must never have more unanswered grants than it has empty cell slots.
9.2 Behavior of Switching Fabric It may be easier to understand the desired behavior of the individual switch elements by first understanding the desired behavior of the switching fabric as a whole. Viewed in this way, the IPP chips send cells to the switching fabric whose routing information is contained completely inside the RC and IADR fields of the internal data and control cell formats. Here we describe what cells should come out of the switching fabric, and where. For cells to be routed on specific paths (RC=000), the IADR field contains a sequence of ten switch element output port numbers. At each successive stage of switch elements through which the cell passes, the next one of these ten output port numbers is used to select the path of the cell. The cell leaving the switching fabric has RC=000. For single copy cells (RC=010 or 001) and copy by two cells (RC=011), the IADR field contains two row-interleaved switching fabric output port numbers, PORT1 and PORT2 (in the range 0 to n-1). See Figure 42 for the exact placement of bits of PORT1 and PORT2. The cell sent to the switching fabric should be routed randomly in the first half. Starting in the middle stage, and continuing for the remaining stages, the cell is routed to the desired output port (PORT1 if RC=010, PORT2 if RC=001), or copied and routed to both PORT1 and PORT2 if RC=011, with two copies being made even if PORT1=PORT2. If two copies are made, the copying is done as late as possible in the switching fabric. The copy sent to PORT1 must have RC=010, and the copy sent to PORT2 must have RC=001, so that the OPP chips can easily distinguish the two copies. For copy to range cells (RC=111), the IADR field also contains two row-interleaved switching fabric output port numbers, PORT1 and PORT2. The implementation described later works when PORT1 ≤ PORT2, but not otherwise (no such restriction applies for the other RC values above). The switching fabric routes the cell randomly in the first half, and then copies and routes the cell to output ports PORT1 through PORT2, inclusive. All copies leaving the swiching fabric have RC=111.
9.3 Switch Element Interconnection and Option Pins For this project, we will construct a switch with 8 inputs and 8 outputs. However, the switch element chip designed is capable of constructing a switch with 2i inputs and 2i outputs, for any value of i from 3 to 15, inclusive. Thus, a switch with up to 32,768 2.4 Gbps ports may be constructed using the switch element chip. Constructing such a large switch would require a larger resequencer in the OPP chip, unless the estimates in Figure 11 are too large. Given the estimates there and a resequencer size of 80, a switch with up to 64 ports could certainly be constructed with the chips to be designed. Switching fabrics with even more than 32,768 ports could be constructed, but this would require redesigning a few parts of the system; in particular, more bits would need to be added to the IADR field. For any size switch, all switch element chips are identical, but some of them behave differently based on the signals on several option pins. To show the need for these different behaviors, let us examine how these larger switches are constructed. ˆ
As mentioned in Section 3.2, the switching fabric is constructed as a Benes network. It is constructed with 8 input, 8 output switch elements, allowing us to build a switch with 8i inputs and outputs, for some integer i in the range 1 to 5, inclusive. Such a network has (2i-1) stages of switch elements, with 8i-1 switch elements in each stage (recall
71
Gigabit Switching Technology
Distribute
Route & Copy
0 1 2 3 4 5 6 7
0 1 2 3 4 5 6 7
8 9 10 11 12 13 14 15
8 9 10 11 12 13 14 15
Figure 39: An Example of a 16 × 16 Switch that each switch element is implemented with four chips). All switch elements in the first (i-1) stages send cells to “random” outputs, regardless of their final destination. We say that the cells are distributed in the first (i-1) stages. Starting in stage i, and continuing for all of the last i stages, there is only one way to reach the desired output(s), so cells are sent to the appropriate output port(s) of the switch elements they pass through. We say that cells are copied and routed in the last i stages (they are only copied if the cell has more than one destination). In order to use the same chip design for both the stages that distribute and the stages that route and copy, we need at least one option pin on each chip to signal which function they should perform. However, to be able to construct switches where the number of ports is any power of 2, rather than only powers of 8, we must generalize the definition of a Benes network. ˆ
As an example, consider the 16 port network in Figure 39. The first stage should distribute cells completely randomly, and the last stage should route and copy cells deterministically, but the middle stage should be a hybrid of each. If a cell in one of the middle stage switch elements should go to output 0 of the entire network, then it should be routed to one of the four output ports of the middle stage switch element that leads to the top switch element in the last stage. When there are many such cells, they should be distributed over the four possible paths, to prevent the load on any one of the four paths from being too high. A simple way to implement this is to insert “random” bits in front of the two port numbers in the IADR field of all but the specific path cells (RC=000). In a stage that completely distributes the cells, insert three random bits before the IADR field. In a stage like the second stage of Figure 39, two random bits would be chosen and inserted in front of each port number of the IADR field. In the second stage of a 32 x 32 switch (e.g., see Figure 41), one random bit suffices. In the middle stage of a switching fabric with 8i ports, or in the last half of a switching fabric of any size, deterministic copying and routing is performed, so no random bits are inserted. This is summarized in Figure 40. Since the only possibilities are 0, 1, 2, or 3, two option pins suffice, which we collectively call FUNCTION_CONFIG_SE. They encode the number of random bits to insert. Recall that the switching fabric makes two copies of cells that have two distinct output port numbers, and that copying is done as late as possible (see Figure 4). If the two output port numbers in a cell are identical, then the default behavior of the switch elements would be to send only one copy of the cell to that output port. This could be remedied by designing the OPP chips to make two copies of such cells, but it was decided that it would be easier to design the
72
System Architecture Document
Number of ports
Number of stages
Number of random bits to insert Stages < i
8i
Stage i
Stages > i
0
8i/2 (i > 1)
2i-1
3
1
8i/4 (i > 1)
0
2
Figure 40: Number of random routing bits needed for any switch size switch elements to make the two copies. To override the default behavior, another option pin is needed. It is called DO_COPY, and it is 0 for all switch element chips except for those in the last stage of the switching fabric. For the last stage, DO_COPY is 1, and those switch element chips make two copies of cells with two output port numbers, even if those two numbers are the same. Figure 41 shows how the chips in a 32 port switch should be interconnected. In general, for any number of ports n, where n is a power of 2 and at least 8, a formal description of the switch element interconnections is B n, 8 , where B n, d is defined below. The notation is from Dr. Turner’s CS 577 notes.
8 X 1B 1X < : XX 1 X 1 X
B
d;d
n;d =
d;d
r
n=d;d r d;d
d;d
d;d
d;d
if if if
n � d2 d < n < d2 n d
, where
r d2 =n =
=
9.4 Behavior of Switch Element Chips Given the many different switch sizes we wish to construct from the switch element chips, and the option pins discussed in the previous section, we now present the desired input/output behavior of the switch element chips. That is, given that a cell arrives at an input port of the switch element, where should copies of the cell be sent, and how should the RC and IADR fields of each copy differ from the input cell, if at all? To implement the “random” routing desired in the distribution stages, each switch element chip has a 3 bit counter c. The switch element increments c once every cell time, and it wraps around from 111 back to 000. Since there are four parallel chips implementing a single switch element, and c is used to choose the output to which partial cells are sent in each chip, it is necessary that all c values be identical among the four chips of a single switch element. This condition is easy to maintain once it is true, but it requires care during a hardware reset to be certain that it holds after the reset is complete. See Section 9.8 for more details. When a cell arrives at input port i of a switch element, 0 ≤ i ≤ 7, the three random bits for that cell (of which none, 1, 2, or 3 are used, depending on the FUNCTION_CONFIG_SE option pins) are the binary representation of (c + i) mod 8. These three bits are denoted xyz. In distribution stages, where FUNCTION_CONFIG_SE = 3, this scheme ensures that all cells arriving during one cell time are destined for different output ports of the switch element. The top one or two rows of the IADR field may be used for routing. These bits are denoted abc and def, as shown in the Figure 42. The behavior of the switch element chip is shown in Figure 43, where the values P1 and P2 are defined in Figure 44. Cells to be sent out are denoted by (P,↑n,RC), where P is a 3 bit switch element output port number, ↑n means that the IADR field of the outgoing cell should be equal to the IADR of the incoming cell shifted up by n rows, and RC is the value to place in the RC field of the outgoing cell (a dash means the same value as the incoming cell). When the IADR field is shifted up, the bottom rows may be filled wth any values, as they are never read. For copy to a range cells (RC=111), the IADR field must be shifted up, and then the bits representing PORT1 or PORT2, as shown in Figure 42, are replaced for some copies of the cell.
73
Gigabit Switching Technology
Distribute
Route & Copy
0 1 2 3 4 5 6 7
0 1 2 3 4 5 6 7
8 9 10 11 12 13 14 15
8 9 10 11 12 13 14 15
16 17 18 19 20 21 22 23
16 17 18 19 20 21 22 23
24 25 26 27 28 29 30 31
24 25 26 27 28 29 30 31
Figure 41: An Example of a 32 × 32 Switch Note that specific path (RC=000) cells are always routed to a single output determined by the top row of the incoming IADR field. The IADR rows are shifted up so that the routing bits used by the next stage of switch elements (if any) are always in the top row of the IADR field. This is also the reason for shifting up the IADR field for the other kinds of cells. For RC = 000, cells are routed randomly (using all three random bits xyz) and the IADR field does not change when cells pass through the distribution stages (where FUNCTION_CONFIG_SE=3). No copies are made in the distribution stages. When the cell reaches the first routing stage (where FUNCTION_CONFIG_SE P1 then PORT1 = all 0’s else PORT1 unchanged if P < P2 then PORT2 = all 1’s else PORT2 unchanged
Figure 43: Behavior of Switch Element Chips
9.5 Behavior of Major Circuits in the Switch Element Chip Now that the input/output behavior of an entire switch element chip has been explained, we describe one way to implement this behavior that may be implemented in the final chip design. Each of the following sections describes the input/output behavior of a major circuit within the switch element chip. When these behaviors are combined, they implement the behavior of the entire switch element, as described in Section 9.4.
75
Gigabit Switching Technology
DO_COPY, FUNCTION_CONFIG_SE
0,3
0,2
0,1
P1=xyz P2=xyz
P1=yzc P2=yzf
P1=zbc P2=zef
option pin values 0,0
1,x
P1 = abc P2 = def
Figure 44: Definition of P1 and P2
9.5.1
Distribution Circuit (DSTC)
The distribution circuit modifies the IADR field, and sometimes the Reserved field, so that the desired switch element output port numbers are easily accessible to the downstream circuitry. For RC=000 cells, no changes are made. Downstream circuitry uses the bits abc to route the cell to one output port. For cells with RC = 000, the modification depends on the DO_COPY and FUNCTION_CONFIG_SE option pins, and is closely related to Figure 44. The necessary modification is shown in Figure 45. DO_COPY, FUNCTION_CONFIG_SE
field value from cell
RC
0,3
0,2
RC=000 (specific path)
RC≠000
option pin values 0,1
0,0
1,x
no change Insert xyz into first row, and shift all other rows down by one (overwriting the Reserved field)
Replace abc with yzc, and def with yzf
Replace abc with zbc, and def with zef
no change
Figure 45: Behavior of Distribution Circuits
9.5.2
Input Crossbar and Grant Generation Circuit (IXBAR, GGC)
9.5.3
Shared Buffer and Control Circuit
9.5.4
Output Crossbar
9.5.5
Header Modification Circuit (HMC)
The header modification circuit’s primary function is to shift up the IADR field by enough rows that the routing bits needed by the next stage of switch elements (in a multi-stage switch fabric) are at the top. For copy by two cells (RC=011), it must also modify the RC field of one copy to 010 and the other copy to 001, if two copies of the cell are actually sent out. For copy to a range cells (RC=111), it must modify the PORT1 or PORT2 portions of the IADR field for some copies.
76
System Architecture Document
Figure 46 summarizes this behavior. As before, the notation ↑n means that the IADR field of the outgoing cell DO_COPY, FUNCTION_CONFIG_SE
field value from cell
RC
0,3
000
0,2
0,1
option pin values
0,0
1,x
↑1,-
(specific path)
010 (one cell to PORT1)
↑2,-
001 (one cell to PORT2)
011 (two cells; one to PORT1 and one to PORT2)
↑1,-
↑2, if P = abc and P ≠ def then RC = 010 if P ≠ abc and P = def then RC = 001 if P = abc and P = def then if DO_COPY = 0 then RC = 011 if DO_COPY = 1 then if FIRST_COPY_OF_TWO = 1 then RC = 010 if FIRST_COPY_OF_TWO = 0 then RC = 001 ↑2,Also: if P > abc then PORT1 = all 0’s else PORT1 unchanged if P < def then PORT2 = all 1’s else PORT2 unchanged
111 (1xx?) (copy to range PORT1 through PORT2)
Figure 46: Behavior of Header Modification Circuits should be equal to the IADR of the incoming cell shifted up by n rows, and a dash means that the outgoing RC should be equal to the incoming RC. When the IADR field is shifted up, the Reserved field should also be shifted up. The bottom one or two rows of the combined IADR and Reserved fields may be filled with any values, as they are never read. There are eight parts to the header modification circuit, one for each of the eight output ports. Each part functions identically, except that each has a different output port number, denoted P in Figure 46. The values abc and def in the figure denote the appropriate bits in the top two rows of the IADR field of the incoming cell. Note that these are the values as modified by the distribution circuit, not the values that were originally in the cell when it entered the switch element chip. The FIRST_COPY_OF_TWO signal and its motivation was described in Section ?.
9.6 Parity Checking Each SE chip has an 8 bit register. Bit i is 1 if a parity error has been detected on input port i, otherwise 0. If bit i is 1, then the parity generation circuitry at output port i of the switch element generates the wrong parity bit on purpose. Thus, if a parity error occurs in the first stage of a multistage switching fabric, it will propagate along a particular path until it reaches an OPP chip. There it can be detected by the CP by the Hardware Status and Error Information field of the maintenance register. If such an error is detected, this design does not localize the error to a particular port, but it does localize it to one of s ports, where s is the number of stages in the switching fabric. These 8 bits can only be cleared by a CLRERR control cell arriving at an input port processor, which then asserts the CLRERR pin on all chips in the switch.
77
Gigabit Switching Technology
9.7 Deskewing the Signals Sent Between Chips The collection of chips comprising the eight port switching system will all derive their clock input (called CLK) from a single 120 MHz source on the printed circuit board. This clock source will also generate a separate signal called CELCLK, for cell clock. The CELCLK signal has a pulse with a duration of one clock period, repeated once every 16 clock ticks. The rising and falling edges of this pulse are aligned with consecutive rising edges of CLK. The pulses of CELCLK cause all circuits to begin another cell cycle (except those few circuits that operate on the clock of the transmission interface circuits, the “link clock”). The clock source will generate these two signals, and the board will be designed to distribute these two signals to all chips. This distribution will be done such that for each receiving chip, the relative timing of the CLK and CELCLK signals will be maintained closely. When data is passed from one chip to another across the board, there are several sources of signal delay variability that cannot be eliminated with current technology. The data signal passes through a pad going from the source chip to the board, through a trace on the board, and then through a pad to a receiving circuit in the destination chip. The delay through the pads from different chips can vary because of variations in the fabrication process. The switch should operate correctly when initially turned on “cold” (say 25 degrees Celsius), until it heats up to as high as 80 degrees Celsius (chip temperature). Finally, the delay through the pads can vary based on the chip power supply voltage. We are planning for the design to tolerate chip power supply voltages from 3.3 volts to 3.6 volts. This variability would present little problem for data sent at 40 MHz (clock period 25 ns). At 120 MHz (clock period 8.3 ns), a delay variation on the order of 3 ns would make it difficult to know when, within a clock period, to sample the incoming data signal to reliably obtain the correct value. With the magnitude of the delay variations mentioned above, it is also difficult to know which clock tick within a cell cycle is being sampled. The first word of a cell could fall within any of ( 12.6ns ) ⁄ ( 8.3ns ) = 2 different consecutive clock ticks, relative to the receiver’s CELCLK signal. Both of these problems are solved with a novel deskewing circuit. The circuit design can be generalized to handle a delay variation from 0 to v-1 clock ticks (v has been fixed at 3 for the planned implementation). It operates in two modes. During the initial “learn” mode, it finds the number of clock ticks difference (from 0 to v-1) that exists between the phase of the local CELCLK signal and the phase of the CELCLK implied by the received data signal. It also finds one of three possible CLK signals to use in sampling the data signal, where each of these three CLK signals is one third of a clock period out of phase with each other. This requires that the circuit sending the data signal to the deskewing circuit generates a pattern that repeats once every CELCLK period (16 clock ticks), and the location of the sender’s CELCLK signal must be readily apparent from this pattern. Also, this sending circuit must start sending this pattern before the deskewing circuit starts learning. The deskewing circuit completes its task in “learn” mode within v cell cycles, and then goes to “track” mode. In track mode, the deskewing circuit uses a particular one of the three different phase CLK signals, and a particular number of clock ticks in the range 0 to v-1, as the phase difference between the sender and receiver. However, it also monitors the incoming data signal for gradual changes in this phase difference. When the phase of the incoming signal has moved too far away from the current state of the deskewing circuit, the state is changed by choosing a different one of the three different phase CLK signals, and possibly a different number of clock ticks. This is needed to handle changes in the delay due to changing temperature and power supply voltage. For more details on the capabilities and implementation of the deskewing circuit, see the chip design document for the switch element chip (give reference in bibliography to all three chip design documents, and possibly Tom’s patent???).
System Architecture Document
78
9.8 System Reset A hardware reset of the entire board may be initiated either by sending a control cell with opcode RST to an IPP chip that has been enabled to receive control cells, by pushing a reset button on the board, or by powering up the switch after power has been off (there will be circuitry to do this included as part of the reset push button circuit). Every IPP chip has an open-drain output pad called RESET_REQ connected to the same board trace that the reset push button drives. Any IPP chip enabled to receive control cells that receives a RST control cell will drive this board trace low until the whole system is reset. The reset push button will also drive this trace low. There is a pull-up resistor on this trace that makes the signal float high if nothing drives it low. There is a circuit that samples this common board trace and debounces it. It drives the RESET inputs of all chips identically, and synchronizes the deasserting (rising) edge of RESET to a fixed clock period relative to the CELCLK pulse. The reset signal will be asserted for at least 64 cell times (or 64x16 = 1024 clock periods). The edges of this signal will be restricted to have a fixed relationship to the CELCLK signal distributed on the board (the exact choice has been made, but should be documented here in the future). The RESET signal is distributed on the board to all IPP, OPP, SE, and transmission interface chips, causing them to empty themselves of cells, and enter a known initial state. The duration of this asserted signal was chosen to be long enough that all chips would sample it at a time when it was asserted, and then complete their reset operations. This need only be on the order of 3-5 cell times for the IPP, OPP, and SE chips, but it needs to be much longer to guarantee that every type of transmission interface chip (among all the types that we are designing for) will notice the signal. (Include discussion of the 64 cell time reset period, if indeed that will be the final duration, and how the number was derived. The 64 cell time period was derived from the desire to perhaps have a 10 Mbps speed link carrying ATM cells, and a transmission interface chip that has a 16 bit wide parallel interface to the port processor chips, assuming that such a transmission interface chip would reset properly if the reset signal were asserted for at least 2 of its clock periods. The clock speed of the 16 bit wide interface would only need to be 10 MHz/16, for a clock period of 1.6 usec. Twice this is 3.2 usec, and 64 internal cell times is about 8 usec, which should be plenty long enough.) While RESET is asserted, all blocks within all chips must ignore incoming cells, if any, and behave as if no cells arrive. When RESET is deasserted, all blocks must have finished emptying any cells from their internal state, and must have been transmitting idle cells to their downstream neighbors for at least one cell time (the exact signals that constitute an idle cell may vary from one block to another). At this time, all blocks except the deskewing circuits begin hardware initialization. This consists of creating the free space lists within the IPP and OPP cell stores, clearing out all bits of all 1024 VXT entries within the VXTC, and initializing all 256 entries in the discard table within the BDC. Hardware initialization in these blocks takes many cell times (e.g., 256 cell times for the VXTC), and is performed by a small state machine that begins running when RESET is deasserted. For all other blocks, hardware initialization requires no actions after RESET is deasserted. Note that there is not one single moment when every block completes hardware initialization; each block may complete hardware initialization at a different time from every other block. Every block continues ignoring cells at its inputs during hardware initialization, and continues sending idle cells to its downstream neighbors. When a block completes hardware initialization, it begins paying attention to any cells that might be sent to it from upstream neighbors. Because the IPP RFRAMER blocks do not allow cells through to the rest of the IPP for about 1 million cell times (approximately 0.14 seconds), and all blocks destroy cells within them while RESET is asserted, every block except the IPP RFRAMERs should only see idle cells for a long time after completing hardware initialization. Without this RFRAMER behavior, there is the possibility that a block completes hardware initialization after its upstream neighbor does, and begins paying attention to its inputs in the middle of a “real” (i.e., non-idle) cell transmission (even this is often not a serious problem, because there is usually a single busy/idle bit transmitted at the beginning of a cell that determines whether the downstream block treats it as a “real” cell). The deskewing circuits are a special case. As mentioned in the previous section, they must be receiving a synchronization pattern when they enter “learn” mode, or else they may never discover the proper phase difference between the sender and receiver. The circuits that generate the synchronization patterns begin sending these patterns as soon as RESET is deasserted. When we can be certain that these patterns are being received at all deskewers, then all
79
Gigabit Switching Technology
deskewers are allowed to enter learn mode. We have chosen to make the deskewers enter learn mode 8 cell times after the synchronization pattern generators begin sending (when RESET is deasserted).
9.9 Other Signals Sent to All Chips Besides RESET, there are a few other signals common to all chips. There are several error flags in the chips, like the parity error flags that exist in the IPP and OPP maintenance registers, and also in the SE chips. There are also several error flags in the IPP maintenance register (see the Hardware Status and Error Information field described in Section 7.2.1). The flags in the IPP and OPP may be cleared by sending appropriate control cells with the opcode for writing a maintenance register field (WRMR), but the parity error flags in the SE chips cannot be cleared in this way. To clear those flags, the CP may send a control cell with opcode CLRERR. This causes the receiving IPP to assert (low) a pin called CLR_ERR that is attached to all other IPP, OPP, and SE chips in the switch. This signal will clear all error flags in all chips within the switch immediately. Even if there were a way to send control cells with opcode WRMR to clear error flags in SE chips, it is still useful to be able to clear all error conditions within the switch quickly, without resetting it. Note that the Hardware Reset fields in the IPP and OPP maintenance registers are not cleared by this signal. This choice was made so that sending a CLRERR control cell does not cause the CP to miss noticing a hardware reset of the switch that the CP did not initiate itself (e.g., a reset caused by pushing the reset button). Also note that every flag that is cleared by the CLR_ERR signal is also cleared during a hardware reset. Thus any circuit that is sensitive to CLR_ERR should also be sensitive to RESET. The driving IPP asserts the CLR_ERR signal low for 256 cell times. The most important feature of distributing this signal to all chips is that every chip should simultaneously "see" this signal asserted for at least one cell time that is simultaneous with all other chips "seeing" the signal asserted. It would be bad, for example, if the IPP chip asserting it only asserted it for one cell time, and some last stage SE chips that currently were forcing parity errors on their outputs received the asserted signal one cell time after the downstream OPP chips did. If this happened, the OPP chips would clear the parity error indication first, then see the forced parity errors of the SE chips that had not yet cleared their errors, then the SE chips would clear their error flags and stop forcing parity errors (assuming that no more parity errors occurred on their inputs). The resulting state would still have parity error flags set in the OPP chips, even though the only parity errors that occurred since the CLR_ERR signal was initiated were ones that were forced by the SE chips due to past parity errors. Asserting this signal for 256 cell times makes it easy to distribute this signal to all chips, even in a switch with thousands of ports, while satisfying this requirement. All IPP chips will receive the CELCLK pulse during the same tick of the CLK signal. However, the ???
10 OPERATIONAL SCENARIOS In this section, we present several scenarios that demonstrate the interaction between the CP and the switch in a setting like the one that will be constructed in the gigabit test bed. The purpose of this section is to verify that all cell formats and operational behavior described previously are sufficient to perform the tasks that we expect of the switch. Figure 23 shows the interconnection of the CP and an eight port switch that will be used in most of these scenarios. The switch is attached directly to the CP, where the link from the CP to the switch is attached to IPP 0 of the switch, and the link from the switch to the CP is attached to OPP 0 of the switch. For scenarios in which the path of a cell through the switch fabric is shown, a 16 port switch is also used. This is done because routing through the eight port switching fabric (Figure 12) is trivial, although routing scenarios are also shown for the eight port switch. In these scenarios, the link from the CP to the switch is attached to IPP 5, but the
System Architecture Document
80
link from the switch to the CP is attached to OPP 11. This is done merely to demonstrate that the CP need not be attached to particular ports, and the two links need not even be attached to corresponding IPP and OPP chips. Recall that the CP can also control multiple switches, and it need not be directly attached to each switch in order to control it. To control a switch, the CP need only be attached directly to one switch that it controls, and have a path through that switch, and perhaps others that it controls, to the desired switch. See the beginning of Section 6.4 for more details. In the figures accompanying the scenarios, there are many abbreviations used. The scenarios in Section 10.1 explain most of these abbreviations, and they are explained more fully than any other scenarios. It is suggested that those scenarios be read first before trying to understand any of the others.
10.1 Testing We begin the scenarios by assuming that the switch has completed a hardware reset, and all of its state is as specified in various places throughout this document (except for things like Time maintenance register fields and the counters inside the header modification circuits, which increment whether cells arrive or not). In this section we describe how the CP may test the data paths between chips within the switch, i.e., the connections between the IPP and switch elements, between different switch elements (in a multi-stage switch), between the switch elements and OPP’s, and the recycling path between each OPP and its corresponding IPP. In the eight port prototype switch (see Figure 12), all paths may be tested quite easily by sending control cells that perform no operation (opcode=NOP), and causing them to be routed to the appropriate OPP chips, recycled, and then routed to the OPP chip that leads back to the CP. If a cell returns, then the path it was sent through is functioning properly. If a cell does not return, it is a sign of a problem somewhere on the specified path. We will not show scenarios of the cells passing through the IPP or OPP chips of the eight port switch, as they are very similar to those for the 16 port switch, described below. We will also not show scenarios of cells passing through the switching fabric of an eight port switch, as it is fairly uninteresting (cells are always sent directly to their desired output port(s) of the switch element). Testing the data paths between each pair of switch elements is more challenging if the switch has more than eight ports. We do not present an algorithm for exhausting all paths in a switching fabric with arbitrary number of ports n, although we do note that every internal link may be tested by sending exactly n specific path cells. When the topology is given as at the end of Section 9.3, this may be accomplished by always sending cells out the same switch element port at which they arrived. We give a scenario in which a no operation (NOP) control cell is sent from the CP to IPP 5 of the 16 port switch. It is then routed to OPP 2, recycled to IPP 2, sent on a specific path through the switching fabric to OPP 14, recycled to IPP 14, routed to OPP 11, and then sent on the link back to the CP. We arbitrarily choose the NOP operation to be performed in IPP 14. 1. Scenario 10.1.1 - NOP control cell coming from link to IPP 5 and OPP 2, and recycling To save the reader from an ominous feeling of impending boredom, we note that there are many scenarios that are very similar to one another. Each type is described most completely when it is first introduced. Later incarnations of the same type of scenario are given much more briefly, only mentioning the aspects that are significantly different than the previous similar scenario. Figure 49 shows how the fields of the cell change as it passes through IPP 5 and OPP 2. The time order of this process is indicated by the numbers 1 through 5 labeling the description above each cell. All field names have been defined earlier, but the way their contents are denoted in these scenarios deserves some explanation. All numbers are denoted in either base 2, 10, or 16. The base of any number may be determined by the field in which it lies, as shown in Figure 48. This table also shows some special characters that may appear as the value of a field. One special value that may appear in any field is a dash, which denotes a “don’t care” value, a value that is unimportant. Another impor-
81
Gigabit Switching Technology
tant fact is that if a field is modified at a particular place, then the picture of the cell for that place will have that field shaded gray. All other field values are unchanged from the previous step. The first event is the cell arriving in the format shown in the left part of Figure 20 (the CP to switch external control cell format) on the link attached to IPP 5. The arriving cell has a VPI/VCI of 0/32, which signifies to the switch that it is a control cell. All three sets of BI fields are 1, so this cell will pass through the switching fabric three times. The first time it will have RC=010, meaning that the cell will be distributed randomly in the first half of the switching fabric, and then routed to one of the two port addresses in EADR1 (more about EADR appears below). The second time it will have RC=000, meaning that this is a specific path cell; EADR2 contains a sequence of switch element output port numbers to which the cell will be routed. The third time it will have RC=010 again. The EADR fields are given in an abbreviated form that is easier to read than the 32 bit binary representation. For specific path cells, EADR is a sequence of one up to nine integers in the range 0 to 7, inclusive. At the first switch element through which the cell passes, it will be sent to the output port of that switch element given by the first integer in this sequence. At the second switch element, it will be sent to the output port given by the second integer in this sequence, an so on. For all of these scenarios, less than nine of the integers will be important, so the sequence ends with a dash to indicate that the rest of the sequence consists of “don’t care” values. The 32 bit binary representation of this field is described in Section 6.4. For all other cells, EADR is a pair of output port numbers of the entire switching fabric. In the scenarios, these are given as a pair of decimal integers. Often one of these values is given as a “don’t care”. The binary representation depends upon the number of ports in the switching fabric, and is described in Section 6.4. The RHDR and CMDATA fields are usually given as *, denoting that their value is set by the CP, but in these scenarios we are not concerned with the exact values. Note that different fields given as * will usually not have the same value. The RFRAMER in IPP 5 determines that the cell is a control cell, but it is not a reset or clear errors control cell, so the RFRAMER should not perform the operation. It passes along a CCD of NEWCTL (14) through the control path of the IPP. At step 2, we show the cell as it is stored in the IPP cell store. This is essentially the same as the cell received on the link, but it is now in the I/O data cell format (Figure 17). The only difference is that the picture has been changed somewhat to pack some of the fields more densely. The VXT does not do anything with new control cells, but the RFMT rearranges the control cell from the external control cell format to the internal control cell format (Figure 21). It uses the collection of fields BRDCC1 to fill in the BI, RC, and DCC fields. The BRDCC and EADR fields are shifted to lower numbered indices, and the fields with index 3 are filled with zeros. The IADR field is converted from the EADR1 field as described in Section 8.2.10, and it is shown in binary. The TS field is usually filled with an @, indicating that this is the normal (as opposed to the transitional) time stamp that should be assigned to the cell at the time it is about to enter the switching fabric. In most of the scenarios, we will treat the switching fabric (SF) as a “black box” that functions as specified in Section 9.2. However, to show some of the internal workings of the switch elements, several scenarios will also show cells traversing through the switching fabric one switch element at a time. See Section 2. When the cell leaves the switching fabric and arrives at an OPP, usually the only change is that the IADR field has been “mangled” by the switch elements. This is denoted by a +. The only other possible change is in the RC field of copy by two cells (see Section 9.5.5). The OPP RFMT extracts the appropriate control information from the cell and sends it through the control path of the OPP. This includes a CYC bit of 1, so the XMIT circuit recycles the cell through the MREG. The MREG determines that it is a control cell since D=0, and decrements the COF field to 2. The received COF value was not 0, though, so no operation is performed here. 2. Scenario 10.1.2 - Normally routed cell passing through 16 port switching fabric
System Architecture Document
82
Figure 50 shows a cell that should be routed to ouput port 2 of a 16 port switching fabric, but not along any specific path chosen by the CP. Thus “random” bits are used for routing in some stages of switch elements, as determined by the option pins FUNCTION_CONFIG_SE described in Section 9.3. The cell labeled 1 shows the contents of the 4 control columns as the cell arrives at the first switch element on input port 5 (the reserved field is treated as part of the IADR field throughout the scenarios). Every switch element chip in the first stage has FUNCTION_CONFIG_SE=11 and DO_COPY=0. Thus each of the four SE chips shifts the IADR field down one row and inserts three random bits at the top. These are computed by adding the counter c to the switch element port number at which the cell arrived (in this case 5). The result is 010+101=111 in binary. Thus the cell is sent to output port 7 of the switch element. The header modification circuit shifts the IADR field back up, so the resulting cell, labeled 2, is the same (technically, the reserved field may have changed, but this is unimportant). The cell labeled 2 arrives at input port 6 of the bottom switch element in the second stage. In this stage, the least significant two of the three random bits computed are inserted in front of each address (because FUNCTION_CONFIG_SE=10). The three random bits computed are the counter value, 101, plus the input port 6 (110 binary), giving 011 (the carry bit is discarded). The two least significant bits replace the two “don’t care” bits in the top row of the IADR field, and the first two in the second row as well (although the second row is ignored, because RC=010). Thus the destination output port number is 110. The header modification circuit shifts the address up by two rows, giving the modified field shown in the cell labeled 3. The cell labeled 3 arrives at input port 7 of the top switch element in the last stage. No random bits are used in this stage (FUNCTION_CONFIG_SE=00). DO_COPY=1 for all last stage switch elements, but that is not significant in this scenario (see Scen. ? for an example where it is significant). Again, the second row of the IADR field is ignored because RC=010. The first row is used to choose the output port number 2, which is also output port 2 of the entire switching fabric. The header modification circuit shifts the IADR field up by two rows, leaving every bit containing “don’t care” values. 3. Scenario 10.1.3 - NOP control cell recycling from OPP 2, going to OPP 14, and recycling Figure 51 shows the cell that was recycled by OPP 2 to IPP 2 as it makes its way through IPP 2 and OPP 14. The cell labeled 1 is exactly the same as the one labeled 5 in Figure 49. The IPP MREG does not perform the control cell operation, because the received COF value is not 0. It still decrements COF, and this is reflected in the cell shown in the cell store (labeled 2). The CCD value sent through the control path of the IPP for this cell is CYCCTL, as opposed to NEWCTL. Other than this, the operations on the cell are very similar to the scenario in Section 1. 4. Scenario 10.1.4 - Specific path cell passing through 16 port switching fabric Figure 52 shows a cell that should be routed to output port 14 of a 16 port switching fabric, and it should use the specific path determined by following the sequence of switch element output port numbers 4,5,6. No random bits are used for routing. The FUNCTION_CONFIG_SE and DO_COPY option pins have the same values as the scenario in Figure 50, but they are not shown because they are not used by the switch elements to make routing decisions here. All switch elements perform identically when receiving a specific path cell. They use the top row of the IADR field to select an output port, and the header modification circuits shift the IADR field up by one row. 5. Scenario 10.1.5 - NOP control cell recycling from OPP 14, going to OPP 11’s link Figure 53 shows the cell that was recycled by OPP 14 in Figure 51 as it passes through IPP 14, goes to OPP 11, and from there is sent on the link attached to OPP 11 back to the CP. When the cell arrives at the IPP MREG, it has COF=0, so the operation is performed there. For a NOP control cell, this involves changing the RVAL and LT fields of the cell only. The COF field is still decremented, wrapping around from 0 to the maximum possible value, FF hexadecimal. The only other significant difference between this and previous scenarios is that the OPP does not recycle the cell, but sends it out on the link. The OPP RFMT sees that the appropriate CYC bit is 0, so it reformats the control cell contents into that shown in the right part of Figure 20 (the switch to CP external control cell format). The RHDR value
83
Gigabit Switching Technology
is used to fill in the VPI, VCI, PT, and CLP fields, although the congestion bit of the PT field may be set by the XFRAMER if the XMB is congested. There is no corresponding scenario showing the cell passing through the switching fabric, because it would be similar to the one in Figure 50. The actual numbers used would be different, but the procedure would be similar because RC=010 on this pass, as it was in that scenario.
10.2 Setting Up, Modifying, and Removing Connections Establish a point-to-point connection, then modify it to be multicast. Remove endpoints one at a time, demonstrating the transitional time stamping feature. TODO. Show the OPC=WRVPXT control cell that is sent by the CP, and show it making its way through the relevant PP’s (switch fabric traversal scenario should not be duplicated unnecessarily; show one somewhere and reference it from everywhere else). Show a data cell with appropriate VPI accessing the table entry, mention it passing through the switch fabric, and show it passing through the OPP to the link. Then show the control cells that should be sent to add two endpoints to the connection, giving it three endpoints. Show a data cell entering, getting copied, recycling at one OPP but not the other, show the recycled copy accessing a new table entry, and show where the copies come out.
10.2.1 Setting up a point to point connection In this section we will show a control cell that would be sent by the CP to set up a virtual path connection from workstation 1 to workstation 2, where workstation 1 sends cells with VPI 21 and workstation 2 expects cells to contain VPI 42. The VCI of all cells will be preserved. In addition, the particular connection in the demonstration will be a discrete stream connection that will use the block discard mechanism provided in the OPP’s. All cells sent by workstation 1 with VPI 21 will be forced by the switch to be low priority, by changing any cells with CLP=0 to CLP=1 cells. To do this, the CP will send a control cell with an operation code of WRVPXT that will recycle into IPP 1 and perform the VXT write operation. The INFO field will be of the form shown in the top part of Figure 27. The exact contents of the INFO field are shown in Figure 47. 16 --
16 see below
EADR 2,VXI1 42,VXI2 24
BI 1
RC 010
D 1
BDI1 16 BDI2 8
16 CS UD1 UD2 SC VPT RCO 0- 0 1 - 1 0 0
1 1 1 1
CYC1/2
--
1
Figure 47: INFO Field Contents for control cell of Scenario 10.2.1 1. Scenario 10.2.1.1 - WRVPXT control cell coming from link to IPP 5 and OPP 1, and recycling
2. Scenario 10.2.1.2 - WRVPXT control cell recycling from OPP 1, going to OPP 11’s link
System Architecture Document
84
3. Scenario 10.2.1.3 - data cell coming from link to IPP 1, then to OPP 2’s link
10.2.2 Adding endpoints to create a point to multipoint connection Don’t do this in the example, but mention that it is possible for the most lightly loaded port (the one that is chosen for a new recycling point in the augmented multicast tree) could be the same port as its sibling in the tree. This is why the switch needs to be able to send two copies of a cell to the same output port. Also mention the possibility that a downstream switch may not have the capability to do multicast, so it is desirable that this switch do the copying for it. Demonstrate the use of the RCO field.
10.2.3 Removing endpoints from a point to multipoint connection, and transitional time stamping Note in the scenario that it would be desirable to have two TS fields, one for each copy to be made of a cell, instead of only one. Perhaps show some other examples of normal or special cases in how to remove an endpoint from a point to multipoint connection.
10.2.4 Removing a point to point connection This is very simple. Just put BI=0 in the appropriate table entry.
10.2.5 Multipoint to Multipoint Connections Demonstrate a multipoint to multipoint connection and the upstream discard feature. Show how Trunk Group Identifier maintenance register field is more flexible than a Switch Port Number field, in that it allows more flexible networkwide multipoint to multipoint connections to be established. Demonstrate how two upstream discard bits in the internal cell format can be used to control echo independently for each source. Show that it is necessary to have upstream discard in a multipoint to multipoint connection that spans several switches.
10.3 Monitoring Statistics and Error Conditions Show how to monitor traffic statistics, and various ways that cells are discarded. Show how the CP can effectively get “interrupt” cells from the switch (indicating error conditions) by occasionally sending control cells with opcode ERRORS, and copying them to all IPP’s or OPP’s. Show how link enabling/ disabling functions can help the CP in monitoring the network. Parity error monitoring.
10.4 Switch Reset and Initialization Show how reset of switch 1 done first, then mention hardware initialization of 1, and explain software initialization of 1, then reset and initialization of 2 after setting up a connection through switch 1. What if switch 1 is reset while switch 2 is being initialized, or while making a modification to a connection through switch 2 during normal operation? A modification of a multicast connection could get “half done” when switch 1 resets. How serious can the consequences be? For software initialization, show how CP can write or read the maintenance registers of all IPP’s (or OPP’s) at once by sending a copy to range control cell.
85
Gigabit Switching Technology
Make sure that the CP can detect a hardware initiated reset, even if it occurs while the CP is turning off the Hardware Reset maintenance register flags. To do so, it is probably best to turn them off one at a time, instead of all at once with a CLRERR control cell. Add documentation produced by Saied on this topic. He presented this on April 20, 1994. See also Jon’s short note on April 13, 1994.
11 Known Problems and Possibly Surprising Features This section lists features that either do not work as desired, or that work as specified but may exhibit unexpected behavior. The initial value of the Software Link Enable field in all IPP chips is 0 after the switch is reset, indicating that all data cells should be discarded at the IPP receive framer. This value must be changed to 1 before any data cells will pass from the link interface into the "core" of the IPP chip. After a switch has been reset, it is necessary to write two VXT entries in order to set up a single virtual circuit connection. To set up a virtual circuit with VPI x and VCI y in a switch that has just been reset, one must send the following two control cells. (1) A control cell with opcode WRVPXT, a FIELD field containing the value x in the most significant 8 bits, and an INFO field with the top format of Figure 27. The VPT bit should be 1, and all other bits are "don’t care" values because if the VPT bit is 1 for a virtual path table entry, no other bit of that entry is used by the hardware. (2) A control cell with opcode WRVCXT, a FIELD field containing the value y in the least significant 16 bits, and an INFO field with the top format of Figure 27. The BI bit should be 1, D should be 1 (there is no reason to set D=0 in normal operation for any table entry), VPT is a "don’t care" value, and RCO should be 0 if this connection is for data cells from the link. After these writes succeed, it is only necessary to send a single WRVCXT control cell to set up another virtual circuit with the same VPI but a different VCI, since data cells from both connections will access the virtual path entry x first, see that the VPT bit is 1, and read the proper virtual circuit entry. Control cells with an opcode of ERRORS that read fields in the IPP or OPP maintenance register and return to the control processor will contain a strange mix of values in the INFO field, if the FIELD field of the cell received by the switch is 1 or 2 for the IPP, or 12 or 13 for the OPP. Any other values in the FIELD field should cause the INFO field of returning ERRORS control cells to be filled in as specified, i.e., by reading field 3 in an IPP chip, or field 14 in an OPP chip. It is recommended that all ERRORS control cells sent to the switch be sent with a FIELD value of 0. This problem exists in version 1 of the IPP and version 1 of the OPP. The specification says that if the Hardware Link Enable is 0 for more internal cell times than the value stored in the Software Carrier Loss Time field, then the Software Link Enable field will be changed to the value stored in the Set Software Link Enable field. This does not work in IPP version 1. There is no workaround known, but this feature was only intended to allow the control software to disable data processing on input ports when there was a physical network topology change. See Section 8.2.1 for more details on the intended purpose of this feature. The IPP RFMT does not fill in the "bypass resequencer" (BR) bit of control cells as indicated in the documentation (data cells do have their BR bit filled in correctly). Instead, it comes from some bit of the last VXT entry that was read, either because of a previous data cell or a control cell that performed a VXT operation. Extensive simulations of the RFMT lead me to believe that it is the least significant bit of VPI1. John DeHart discovered this when he was reducing the value of the Resequencer Offset maintenance register value in an OPP chip, and then found that if it was set too low, no cell could get in to set it higher again, because the control cells with BR=0 are thrown away by the OPP RSQ for being too old when they arrive. If the BR bit of control cells was filled in correctly, then it would be easy to send a control cell with BR=1 to that OPP to set it back again. Therefore, note that setting the Resequencer Offset of an OPP too low makes that OPP effectively unusuable until the switch is reset, except for data traffic with BR=1. I think that it should be possible to hack around this, by intentionally setting up a VXT entry in the IPP chip connected to the CP that has the proper bit position equal to 1, and then reading that entry before sending a control cell. This will only work reliably if nothing besides the CP is sending data or control cells through that IPP chip.
System Architecture Document
86
Another easy way to make a port unusable, at least until the entire switch is reset, is to write the Time field. Unless you are lucky, the value written will be such that all BR=0 cells arriving to an OPP will be discarded in the resequencer for being too old. Even if control cells could consistently be sent with BR=1 (see previous paragraph), it would be difficult to properly choose the time to write the Time field such that it was synchronized closely enough with the other ports. The OPP version 1 has a TIME_SYNC input pin that allows Time to be synchronized with all other ports every 64 cell times, but this feature was conceived after the IPP version 1 was fabricated, so it does not have that feature, and the WUGS-20 main board does not take advantage of the OPP TIME_SYNC. After the switch has been reset but before any cells go through, the synchronization patterns coming out of a correctly functioning IPP chip will contain garbage values in the first of the 15 data words of a cell. This garbage value can change from one power-up time of the switch to the next, but is not affected by resetting the switch. This is because the garbage values come from particular bit positions of the cell store RAM, which are not initialized except by an arriving cell. The output pin containing the busy/idle bit should always contain a 0 in the first word of the cell, as long as no busy cells are passing through the switch. The 32 data bits leaving the IPP may have two pulses per cell time. This is normal. As long as the cell clock taps of neighboring IPP and SE chips have good relative values, this garbage word should be ignored by the downstream SE chips and not affect the ability of their skew compensation circuits to lock on. I have not yet tested this on the gigabit switch, but it appears from the IPP maintenance register VHDL code that every control cell processed by it (meaning COF=0 when the control cell arrives at the mreg todo: Add info about the relative link and internal clock rates at which the IPP and OPP link interface hardware will run, as well as the absolute maximum rates that they should be able to work at for worst and typical operating conditions, at least according to backannotation.
REFERENCES [CHG-94] Chaney, Tom, Craig Horn, and Brian Gottlieb, “The Switch Element: Gigabit Switch Chip Description”, ARL Working Note 94-06, June, 1994. [CHRG-94] Chung, K., Saied Hosseini, Randy Richards, and Brian Gottlieb, “The Input Port Processor (IPP): Gigabit Switch Chip Description”, ARL Working Note 94-09, June, 1994. [FHR-94] Fluck, Margaret, Saied Hosseini, and Randy Richards, “The Output Port Processor (OPP): Gigabit Switch Chip Description”, ARL Working Note 94-07, June, 1994. [Lee-88] Lee, Tony T. “Non-Blocking Copy Networks for Multicast Packet Switching,” IEEE Journal on Selected Areas in Communications, pp. 1455–1467, December, 1988. [de Prycker-93] de Prycker, Martin, “Asynchronous transfer mode: Solution for broadband ISDN”, 2nd ed., Ellis Horwood, 1993 [RF-94a] Richard, William D. and J. Andrew Fingerhut, “The Gigabit Switch (WUGS-20) Link Interface Specification”, ARL Working Note 94-17, Department of Computer Science, Washington University, St. Louis, Missouri. [RF-94b] Romanow, Allyn, and Sally Floyd, “Dynamics of TCP Traffic over ATM Networks”, ACM SIGCOMM ’94 [Turner-88b] Turner, Jonathan S., “Broadcast Packet Switching Network,” United States Patent #4,734,907, March, 1988. [Turner-88c] Turner, Jonathan S., “Design of a Broadcast Packet Network,” IEEE Transactions on Communications, June, 1988. [Turner-91a] Turner, Jonathan S., “Resequencing Cells in an ATM Switch,” Technical Report WUCS-91-21, Department of Computer Science, Washington University, St. Louis, Missouri. [Turner-93a] Turner, Jonathan S., “An Optimal Non-Blocking Multicast Virtual Circuit Switch,” Technical Report
87
Gigabit Switching Technology WUCS-93-30, Department of Computer Science, Washington University, St. Louis, Missouri.
[Turner-96a] Turner, Jonathan S., "Maintaining High Throughput During Overload in ATM Switches," IEEE INFOCOM ’96, March, 1996 [Turner-96b] Turner, Jonathan S., "Extending ATM Networks for Efficient Reliable Multicast", Technical Report WUCS-96-16, Department of Computer Science, Washington University, St. Louis, Missouri. http:// www.cs.wustl.edu/cs/techreports/1996/wucs-96-16.ps.Z
88
System Architecture Document
Field Name
Base
BI
2
Busy/Idle
BRDCC
2 (all of them)
Combination of BI, RC, D, CYC, and CS fields
CCD
10
Control CoDe
CLP
2
Cell Loss Priority
Special Values
CMDATA
* denotes value from CP
Full name
16
Control OFfset
CS
2
Continuous Stream
CYC
2
reCYCle
D
2
Data
DCC
2 (all of them)
Combination of D, CYC, and CS fields
EADR
10
External ADdRess FIELD number + denotes value mangled by SF (switch fabric)
Internal ADdRess
INFO
R denotes value set by read operation
INFOrmation
LT
T denotes 32 bit value of Time M.R. when control cell operation was performed
Local Time
IADR
2
OPC
10
OPeration Code
PORT
10
PORT number of switch fabric
PT
2
Payload Type
RC
2
Routing Control
RHDR
*
RVAL
16
TS
Figure 30
Connection Management DATA
COF
FIELD
Further description
* denotes value from CP
Figure 22
Return HeaDeR Return VALue
@ is least significant 11 bits of Time, appended with a 0. @@ is transitional time stamp.
Figure 48: Key to Fields appearing in Operational Scenarios
Figure 25
89
Gigabit Switching Technology
Field Name
Base
UD
2
Upstream Discard
UUPC
2 (all of them)
Combination of UD1, UD2, PT, and CLP fields
VCI
16
Virtual Circuit/channel Identifier
VPI
16
Virtual Path Identifier
VXI
16
Combination of VPI and VCI fields
Special Values
Full name
Figure 48: Key to Fields appearing in Operational Scenarios
Further description
VXI FFFFFF
EADR1 EADR2 EADR3 RHDR INFO CMDATA
BRDCC2 BRDCC3 1,000, 1,010, 0,10,1 0,00,1
EADR1 EADR2 EADR3 RHDR LT INFO CMDATA
4,5,6,11,0 * *
——
RFMT
——
BRDCC1 BRDCC2 BRDCC3 all 0,10,1 0,00,1 0’s
—— 1,000, 1,010,
——
2,4,5,6,11,* *
VXT
CCD = NEWCTL (14)
DCC 0101
RVAL 1 FIELD -
RCB RCV
RFRM
COF 2
PORT 5
MREG
SF
VXI/FIELD = --
XFRM
OPC 0 COF 3 RVAL 1 FIELD BRDCC3 —— 1,010, 0,10,1
OPC 0
XMIT
——
P,C 000, 0
PORT 2
3. Internal Control Cell to SE OPC 0
COF 3
DCC 0101
——
IADR RVAL 1 FIELD --0 BRDCC1 BRDCC2 BRDCC3 --1,010, all 010 —— 1,000, 0,10,1 0,00,1 0’s --. EADR1 4,5,6,. EADR2 11,. EADR3 0 RHDR * LT INFO TS CMDATA * @ ——
4. Internal Control Cell from SE BI/RC 1,010
OPC 0
COF 3
IADR RVAL 1 +
TS @
DCC 0101
——
FIELD -
BRDCC1 BRDCC2 BRDCC3 —— 1,000, 1,010, all 0,10,1 0,00,1 0’s EADR1 EADR2 EADR3 RHDR LT INFO CMDATA
——
3
BI/RC 1,010
——
CYCB
4
MREG
Figure 49: Scenario 10.1.1
VPI/VCI=0/32 PT=000 CLP=0 OPC 0 COF 3 RVAL 1 FIELD BI= 1 RC= 010 D=0 CYC= 10 CS=1 BI= 1 RC= 000 D=0 CYC= 10 CS=1 BI= 1 RC= 010 D=0 CYC= 00 CS=1 EADR1 2,EADR2 4,5,6,EADR3 11,RHDR * INFO CMDATA *
5
2. New Control Cell
BDC/XMB
2
RSQ
1. External Control Cell from Link
5. Internal Control Cell to IPP
CELL STORE
RFMT
1
System Architecture Document
Control Cell Processing
Description: NOP (Opcode 0) test cell (page 1 of 5)
4,5,6,11,0 * *
——
90
91
Cell Processing
Description: Cell routing using RC=010. Cell arrives at port 5 and is destined to port 2. (page 2 of 5) 3. Internal Cell Format
--0 --010 --. . .
4. Internal Cell Format
BI/RC 1,010
BI/RC 1,010
IADR
IADR
010 --. . .
--. . .
——
--0 --010 --. . .
——
IADR
IADR
——
BI/RC 1,010
BI/RC 1,010
——
2. Internal Cell Format
1. Internal Cell Format
TS
TS
Figure 50: Scenario 10.1.2
TS
TS
Route & Copy
Distribute
: Address used for routing. : Random bit : from IADR field
0 1 1 1 1 2 3 C=010 4 5 6 DISDO- 7 ROUTE COPY 1 1
8 9 10 11 12 13 14 15
0
DISROUTE
0 1 2 3 4 5 6 DO- 7 COPY
1 0
1 1 0
C=101
0
0 1 0 1 0 2 3 C=101 4 5 6 DISDO- 7 ROUTE COPY 0 0
0 1 2 3 4 5 6 7
1
8 9 10 11 12 13 14 15
Gigabit Switching Technology
C:Counter value of the switch element at the time the routing decision is made.
0 1 2 3 4 5 6 7
5. Internal Control Cell to IPP
CELL STORE
5
2. Recycled Control Cell COF 1
RVAL 1
DCC 0101
——
EADR1 EADR2 EADR3 RHDR LT INFO CMDATA
XMIT
RSQ
RFMT
RFMT
VXT
RCV
PORT 2
MREG
SF
VXI/FIELD = --
1 COF 2
——
3
OPC 0
COF 1
DCC 0101
——
4. Internal Control Cell from SE BI/RC 1,000
OPC 0
COF 1
DCC 0101
——
FIELD -
BRDCC1 BRDCC2 BRDCC3 all 0,10,1 0,00,1 0’s
—— 1,000, 1,010, EADR1 EADR2 EADR3 RHDR LT INFO CMDATA
3. Internal Control Cell to SE BI/RC 1,000
4,5,6,11,0 * *
——
IADR RVAL 1 FIELD 100 BRDCC1 BRDCC2 BRDCC3 101 all 110 —— 1,010, all 0,00,1 0’s 0’s --. EADR1 11,. EADR2 0 . EADR3 0 RHDR * LT INFO TS CMDATA * @ ——
IADR RVAL 1 +
TS @
FIELD -
BRDCC1 BRDCC2 BRDCC3 —— 1,010, all all 0,00,1 0’s 0’s EADR1 EADR2 EADR3 RHDR LT INFO CMDATA
——
RVAL 1
DCC 0101
——
OPC 0
4 CYCB
1. Internal Control Cell from OPP
11,0 0 * *
——
RCB
MREG
Figure 51: Scenario 10.1.3
4,5,6,11,0 * * PORT 14
CCD = CYCCTL (13)
——
BRDCC1 BRDCC2 BRDCC3 all all 0,00,1 0’s 0’s
—— 1,010,
FIELD -
BRDCC1 BRDCC2 BRDCC3 all 0,10,1 0,00,1 0’s
RFRM
DCC 0101
RVAL 1 FIELD -
—— 1,000, 1,010, EADR1 EADR2 EADR3 RHDR LT INFO CMDATA
COF 0
XFRM
OPC 0
OPC 0
BDC/XMB
2
System Architecture Document
Control Cell Processing
Description: NOP (Opcode 0) test cell (page 3 of 5)
11,0 0 * *
——
92
93
Cell Processing
Description: Cell routing using specific path routing (RC=000) (page 4 of 5) BI/RC 1,000
IADR
IADR
IADR
101 110 --. . .
110 --. . .
——
TS
TS
——
BI/RC 1,000
——
BI/RC 1,000
100 101 110 --. . .
4. Internal Cell Format
3. Internal Cell Format
BI/RC 1,000 IADR
——
2. Internal Cell Format
1. Internal Cell Format
--. . .
TS
TS
Figure 52: Scenario 10.1.4
Route & Copy Distribute 0 1 2 3 4 5 6 7
8 9 10 11 12 13 14 15
8 9 10 11 12 13 14 15
Gigabit Switching Technology
0 1 2 3 4 5 6 7
System Architecture Document
Control Cell Processing Description: NOP (Opcode 0) test cell (page 5 of 5)
CELL STORE
2
2. Recycled Control Cell OPC 0
COF FF
RVAL 0
DCC 0101
——
FIELD -
BRDCC1 BRDCC2 BRDCC3 all —— 1,010, all 0,00,1 0’s 0’s 11,0 0 * T *
SF
VXI/FIELD = --
1 COF 0
DCC 0101
——
3. Internal Control Cell to SE
3
RVAL 1 FIELD BRDCC1 BRDCC2 BRDCC3 all all 0,00,1 0’s 0’s
—— 1,010, EADR1 EADR2 EADR3 RHDR LT INFO CMDATA
11,0 0 * *
——
COF=0, so perform operation. Set RVAL to SUCCESS (0) and LT to current time (T).
BI/RC 1,010
OPC 0
COF FF
DCC 0001
——
IADR RVAL 0 FIELD --1 BRDCC1 BRDCC2 BRDCC3 --all all all 011 —— 0’s, 0’s 0’s --. EADR1 0 . EADR2 0 . EADR3 0 RHDR * LT T INFO TS CMDATA * @ ——
OPC 0
COF FF
IADR RVAL 0 +
——
@
DCC 0001
——
FIELD -
BRDCC1 BRDCC2 BRDCC3 all all all 0’s 0’s 0’s
EADR1 EADR2 EADR3 RHDR LT INFO CMDATA
TS
5
5. External Control Cell to Link
4. Internal Control Cell from SE BI/RC 1,010
——
OPC 0
——
1. Internal Control Cell from OPP
CYCB
4
XFRM
BDC/XMB
XMIT
PORT 14
RSQ
VXT
CCD = CYCCTL (13)
RFMT
RCB RCV
RFRM
MREG RFMT
PORT 11
MREG
Figure 53: Scenario 10.1.5
EADR1 EADR2 EADR3 RHDR LT INFO CMDATA
0 0 0 * T *
VPI/VCI ++ OPC COF RVAL FIELD RHDR LT INFO CMDATA
PT= ++
CLP= ++
0 FF 0 * T *
——
94
95
Control Cell Processing
Description:
5. Internal Control Cell to IPP
VXI FFFFFF
EADR1 EADR2 EADR3 RHDR INFO CMDATA
——
BRDCC1 BRDCC2 BRDCC3 all all 0,00,1 0’s 0’s
——
—— 1,010,
21,BRDCC2 BRDCC3 1,010, 0,000, 0,00,1 0,00,0
EADR1 EADR2 EADR3 RHDR LT INFO CMDATA
1,11,0 * X *
11,0 0 * X *
——
RFMT
VXT
CCD = NEWCTL (14)
DCC 0101
RVAL 1 FIELD 21,-
RCB RCV
RFRM
COF 0
PORT 5
MREG
SF
VXI/FIELD = --
XFRM
OPC 7 COF 1 RVAL 1 FIELD BRDCC3 —— 1,010, 0,10,1
OPC 7
XMIT
——
P,C 000, 0
PORT 1
3. Internal Control Cell to SE COF 1
DCC 0101
——
4. Internal Control Cell from SE BI/RC 1,010
OPC 7
COF 1
IADR RVAL 1 +
TS @
DCC 0101
——
FIELD 21,-
BRDCC1 BRDCC2 BRDCC3 -- 1,010, all all 0,00,1 0’s 0’s EADR1 EADR2 EADR3 RHDR LT INFO CMDATA
——
OPC 7
IADR RVAL 1 FIELD 21,--0 BRDCC1 BRDCC2 BRDCC3 --all 001 —— 1,010, all 0,00,1 0’s 0’s --. EADR1 11,. EADR2 0 . EADR3 0 RHDR * LT INFO X TS CMDATA * @ ——
——
3
BI/RC 1,010
11,0 0 * X *
——
Gigabit Switching Technology
CYCB
4
MREG
Figure 54: Scenario ?.1
VPI/VCI=0/32 PT=000 CLP=0 OPC 7 (WRVPXT) COF 1 RVAL 1 FIELD 21,BI= 1 RC= 010 D=0 CYC= 10 CS=1 BI= 1 RC= 010 D=0 CYC= 00 CS=1 BI= 0 RC= 000 D=0 CYC= 00 CS=0 EADR1 1,EADR2 11,EADR3 0 RHDR * INFO X CMDATA *
5
2. New Control Cell
BDC/XMB
2
RSQ
1. External Control Cell from Link
CELL STORE
RFMT
1
System Architecture Document
Control Cell Processing Description:
CELL STORE
2
2. Recycled Control Cell OPC 7
COF FF
RVAL 1
DCC 0101
——
FIELD 21,-
BRDCC1 BRDCC2 BRDCC3 all —— 1,010, all 0,00,1 0’s 0’s 11,0 0 * X *
SF
VXI/FIELD = 21,-
1 COF 0
DCC 0101
——
RVAL 1 FIELD 21,BRDCC1 BRDCC2 BRDCC3 all all 0,00,1 0’s 0’s
—— 1,010, EADR1 EADR2 EADR3 RHDR LT INFO CMDATA
11,0 0 * X *
——
3. Internal Control Cell to SE
3
BI/RC 1,010
OPC 7
COF FF
DCC 0001
——
IADR RVAL 0 FIELD 21,--1 BRDCC1 BRDCC2 BRDCC3 --all all all 011 —— 0’s, 0’s 0’s --. EADR1 0 . EADR2 0 . EADR3 0 RHDR * LT T INFO VR TS CMDATA * @ ——
OPC 7
COF FF
IADR RVAL 0 +
——
@
DCC 0001
——
FIELD 21,-
BRDCC1 BRDCC2 BRDCC3 all all all 0’s 0’s 0’s
EADR1 EADR2 EADR3 RHDR LT INFO CMDATA
TS
5
5. External Control Cell to Link
4. Internal Control Cell from SE BI/RC 1,010
——
OPC 7
——
1. Internal Control Cell from OPP
CYCB
4
XFRM
RSQ
XMIT
PORT 1
BDC/XMB
VXT
CCD = 7 (WRVPXT)
RFMT
RCB RCV
RFRM
MREG RFMT
PORT 11
MREG
Figure 55: Scenario ?.2
EADR1 EADR2 EADR3 RHDR LT INFO CMDATA
0 0 0 * T VR *
VPI/VCI ++
PT= ++
OPC COF RVAL FIELD RHDR LT INFO CMDATA
7 FF 0 21,* T VR *
CLP= ++
——
96
97
Data Cell Processing
Description:
3. VXT Table
3 BI
RC 010 UD1 UD2 SC VPT 1 1 0 EADR 2,VXI1 42,BDI1 16 VXI2 BDI2 -
VPI=21
1
D CYC CS 0 RCO —— 0
1 0-
——
PT,CLP - VXI=21,15 0CU,0 Payload
6
UUPC BI/RC STG DCC G 10-0 - 1,-,0CU,1 1,010
——
UUPC BI/RC STG DCC G 10-0 - 1,-,0CU,1 1,010
From OPP
IADR VXI1=42,15 BDI1=16 --0 VXI2=--,15 BDI2=--010 --. Payload .
TS @
Payload
TS @
PORT 2
-
MREG
XFRM
4
——
PT,CLP VXI= 0CU,1 Payload
BDI1=16 BDI2=-
BDC/XMB
4. Internal Data Cell to SF
IADR VXI1=42,15 VXI2=--,15 +
XMIT
SF
6. CELL STORE STG=G D=1
——
VXI = 21,15
CYCB
1
PORT 1
5 5. Internal Data Cell from SF
To IPP To link 7. External Data Cell
7
VPI=42 VCI=15 PT=0CU CLP=1 Payload
Gigabit Switching Technology
VPI=21 VCI=15 PT=0CU CLP=0 Payload
CCD = NEWDATA (1)
RFMT
1. External Data Cell
VXT
RCB RCV
RFRM
RSQ
From link
RFMT
2
MREG
Figure 56: Scenario ?.3
2. CELL STORE STG=- D=-
UUPC BI/RC STG DCC G 1 - 1,1,0CU, 1,010
EADR VXI1 BDI1 VXI2 BDI2
VCI=
2. CELL STORE STG=- D=-
PT,CLP 0CU, Payload
- VXI=
RSQ
To IPP To link 7A. External Data Cell
7a
VPI= VCI= PT=0CU CLP= Payload
4. Internal Data Cell to SF
4
UUPC BI/RC STG DCC G 1 - 1,1,0CU,1 1,011 BDI1= BDI2=
——
MREG
IADR VXI1= VXI2=
From OPP
Payload TS @
IADR VXI1= VXI2= +
7B. Internal Data Cell to IPP —— STG=G D=1
7b
Payload
TS @
PORT 2
BDI1= BDI2=
——
PT,CLP VXI= 0CU, Payload
-
PT,CLP 0CU, Payload
- VXI= MREG
XFRM
CYCB
——
VXI =
STG=G D=1
UUPC BI/RC STG DCC G 1 - 1,1,0CU, 1,001
BDC/XMB
SF
6B. CELL STORE
XMIT
PORT 0
5b 5B. Internal Data Cell from SF
RSQ
CCD = NEWDATA (1)
RFMT
1. External Data Cell
VXT
RCB RCV
RFRM
1
7a
6b
From link
VPI= VCI= PT=0CU CLP=1 Payload
6a
7A. Internal Data Cell to IPP STG=G D=1 ——
MREG RFMT
BI RC D CYC CS 1 1 UD1 UD2 SC VPT RCO —— 1 1 1 EADR VXI1 BDI1 VXI2 BDI2
——
PT,CLP VXI= OCU, Payload
BDI1= BDI2=
TS @ PORT 1
STG=G D=1
-
Payload
RFMT
-
——
PT,CLP VXI= 0CU, Payload
IADR VXI1= VXI2= +
BDC/XMB
—— ——
UD1 UD2 SC VPT RCO
VPI=
5A. Internal Data Cell from SF
D CYC CS
XMIT
RC
...
Figure 57: Data cell from link, copied twice, to both links and recycling paths
BI
XFRM
3. VXT Table
3
2
6A. CELL STORE
5a
System Architecture Document
Data Cell Processing
Description:
To IPP To link 7B. External Data Cell
7b
VPI= VCI= PT=0CU CLP= Payload
98
99
Data Cell Processing UUPC BI/RC STG DCC G 1 - 1,1,0CU, 1,010
——
PT,CLP VXI= 0CU, Payload
-
PT,CLP 0CU, Payload
- VXI=
From link 5B. Internal Data Cell from SF
Payload
IADR VXI1= VXI2=
BDI1= BDI2=
—— From OPP
7A. External Data Cell VPI= VCI= PT=0CU CLP= Payload
Payload TS @
——
PT,CLP VXI= 0CU, Payload
-
7B. Internal Data Cell to IPP —— STG=G D=1 PT,CLP 0CU, Payload
Payload
TS @
PORT 2
STG=G D=1
BDI1= BDI2=
- VXI= MREG BDC/XMB
PT,CLP
UUPC BI/RC STG DCC G 1 - 1,1,0CU,1 1,011
MREG
——
STG=G D=1
- VXI=
4. Internal Data Cell to SF
IADR VXI1= VXI2= +
XMIT
CYCB
——
UUPC BI/RC STG DCC G 1 - 1,1,0CU, 1,001
RSQ
SF
RFMT
PORT 0
VXI =
1. Internal Data Cell from OPP
To link
To IPP To link 7B. External Data Cell VPI= VCI= PT=0CU CLP= Payload
Gigabit Switching Technology
RFMT
VXT
CCD = CYCDATA (2)
To IPP
6B. CELL STORE
RCB RCV
RFRM
7A. Internal Data Cell to IPP STG=G D=1 ——
BDI1= BDI2=
MREG RFMT
BI RC D CYC CS 1 1 UD1 UD2 SC VPT RCO —— 1 1 1 EADR VXI1 BDI1 VXI2 BDI2
——
PT,CLP VXI= OCU, Payload
Payload
TS @ PORT 1
STG=G D=1
-
XFRM
STG=G D=-
VCI=
2. CELL STORE
IADR VXI1= VXI2= +
BDC/XMB
EADR VXI1 BDI1 VXI2 BDI2
XMIT
—— ——
UD1 UD2 SC VPT RCO
VPI=
5A. Internal Data Cell from SF
D CYC CS
RSQ
RC
6A. CELL STORE
XFRM
3. VXT Table BI
...
Figure 58: Data cell from recycling path, copied twice, to both links and recycling paths
Description:
5. Internal Control Cell to IPP
CELL STORE
OPC
VXI FFFFFF
BRDCC1 BRDCC2 BRDCC3 all all 0,00,1 0’s 0’s
—— 1,010, EADR1 EADR2 EADR3 RHDR LT INFO CMDATA
0 0 *
RSQ
XMIT
MREG RFMT
RFMT
VXT
RCV
PORT 0
SF
CYCB
3. Internal Control Cell to SE OPC
COF
DCC 0101
——
4. Internal Control Cell from SE BI/RC 1,010
IADR RVAL 1 FIELD
*
@
DCC 0101
——
FIELD
BRDCC1 BRDCC2 BRDCC3 -- 1,010, all all 0,00,1 0’s 0’s EADR1 EADR2 EADR3 RHDR LT INFO CMDATA
TS
——
COF
0 0 0 *
*
——
100
@
0 0 0 *
+
——
——
EADR1 EADR2 EADR3 RHDR LT INFO CMDATA
OPC
IADR RVAL 1
BRDCC1 BRDCC2 BRDCC3 all —— 1,010, all 0,00,1 0’s 0’s
TS
*
——
VXI/FIELD =
BI/RC 1,010
0 0 0 *
*
RCB
CCD = NEWCTL (14)
——
RVAL 1 FIELD
—— OPC COF RVAL 1 FIELD BRDCC3 BRDCC2 BRDCC3 —— 1,010, 1,010, 0,000, 0,10,1 0,00,1 0,00,0 EADR1 EADR2 EADR3 RHDR INFO CMDATA
DCC 0101
XFRM
——
P,C 000, 0
PORT 1
MREG
Figure 59: Control cell from IPP link to OPP recycling path
VPI/VCI=0/32 PT=000 CLP=0 OPC COF RVAL 1 FIELD BI= 1 RC= 010 D=0 CYC= 10 CS=1 BI= 1 RC= 010 D=0 CYC= 00 CS=1 BI= 0 RC= 000 D=0 CYC= 00 CS=0 EADR1 EADR2 0 EADR3 0 RHDR * INFO CMDATA *
RFRM
COF
2. New Control Cell
BDC/XMB
1. External Control Cell from Link
System Architecture Document
Control Cell Processing
Description:
101
Control Cell Processing Description:
CELL STORE 2. Recycled Control Cell OPC
COF
RVAL 1
DCC 0101
——
FIELD
0 0 0 *
*
XMIT
SF
VXI/FIELD =
XFRM
PORT 0
BDC/XMB
VXT
CCD =
RFMT
RCB RCV
RFRM
MREG RSQ
PORT 1
RFMT
EADR1 EADR2 EADR3 RHDR LT INFO CMDATA
COF
DCC 0101
——
3. Internal Control Cell to SE BI/RC 1,010
RVAL 1 FIELD
0 0 0 *
*
EADR1 EADR2 EADR3 RHDR LT INFO CMDATA
TS
——
DCC 0001
——
4. Internal Control Cell from SE BI/RC 1,010
@
0 0 0 *
*
+
COF
@
DCC 0001
——
FIELD
BRDCC1 BRDCC2 BRDCC3 —— all all all 0’s 0’s 0’s EADR1 EADR2 EADR3 RHDR LT INFO CMDATA
TS
——
OPC
IADR RVAL 0
FIELD
BRDCC1 BRDCC2 BRDCC3 all all —— all 0’s, 0’s 0’s
——
EADR1 EADR2 EADR3 RHDR LT INFO CMDATA
COF
IADR RVAL 0
MREG
BRDCC1 BRDCC2 BRDCC3 —— 1,010, all all 0,00,1 0’s 0’s
OPC
——
OPC
CYCB
5. External Control Cell to Link 1. Internal Control Cell from OPP
0 0 0 *
*
——
VPI/VCI ++ OPC COF RVAL FIELD RHDR LT INFO CMDATA
PT= ++ FF 0 *
*
CLP= ++
Gigabit Switching Technology
Figure 60: Control cell from IPP recycling path to OPP link
BRDCC1 BRDCC2 BRDCC3 all —— 1,010, all 0,00,1 0’s 0’s
System Architecture Document
102
Version history: Version 3.5 - August 27, 1998 Version 3.4 - July 6, 1998 Version 3.3 - October 14, 1997 Version 3.2 - January 2, 1997 Version 3.1 - January 30, 1996 Version 3.0 - January 9, 1995 Version 2.9 - August 3, 1994 Version 2.8 - July 21, 1994 Version 2.7 - July 12, 1994 Version 2.6 - June 22, 1994 Version 2.5 - May 18, 1994 Version 2.4 - March 23, 1994 Version 2.3 - February 18, 1994 Version 2.2 - February 9, 1994 Version 2.1 - February 4, 1994 Version 2.0 - February 2, 1994 Version 1.9 - January 11, 1994. Written by Zubin Dittia. Andy Fingerhut assumed responsibility of the document at this time. Future plans: • Add reason to Section 6.1 why the GFC field is ignored in our design. Is it because it is not well-defined in the standard? Also specify how many VCI values will be supported, instead of saying only that “not all VCI values will be supported”. Add reference to a standard document for definition of PT field given in that section. Explain why the choices about which types of cells will be handled, and which will be discarded, were made. • In Section 6.3, under discussion of STG field, make it clear that not only is it “desirable that the source of a particular cell does not receive a copy of that cell”, it is necessary for multipoint to multipoint connections to be set up between terminals attached to different switches. If the upstream discard feature were not implemented, cells could be sent back and forth between a pair of switches indefinitely, each time causing a copy of the cells to be sent to all terminals in the connection. Also explain that the UD bits are needed, because there may be a few cases when we want a terminal in a multipoint to multipoint connection to receive a copy of what it is sending. • Add example of how Trunk Group Identifier maintenance register fields, and STG and UD1/UD2 internal cell fields can used to make more flexible multipoint to multipoint connections than could be constructed with Switch Port Numbers. Add references to this example at appropriate places, like definition of Trunk Group Identifier, UD, and STG fields. • Add to the definition of the Parity field in Section 6.3 a forward reference to the complete discussion of the parity generation and checking. • Every circuit that has a state should specify its state after a reset. This is already done for the maintenance registers, but it should also be done explicitly for the VXT entries (DONE), the cell stores, all buffers in the IPP’s and OPP’s, the BDC’s, the parity error flags in the switch elements, and the grant generation circuitry in the switch elements. Anything else? • Explain that the reason there is no flow control back from the OPP’s to the switch elements is not because of fear
103
Gigabit Switching Technology
of deadlock, but because JST doesn’t like the possibility of a hardware fault or design error resulting in an OPP being stuck in a state in which it never sends a grant back to the switch elements. Actually, this reason would also apply to switch element chips in a multi-stage switching fabric (i.e., a fault in a switch element can cause cells to back up as well). Another reason not to have flow control at the input side of the OPP is given by Einir Valdimarsson’s simulation results on transient traffic patterns when single OPP’s are overloaded. • Should a key be included for figures with lots of acronyms? Consider making a glossary of acronyms. • Section 3.4 discusses the speed advantage needed to avoid blocking when there is no contention. Section 4 “Prototype Switch Configuration” discusses the 4/3 speed advantage needed to overcome contention in a Benes network (of any size in a fairly large range) with shared buffer switch elements. The architecture document should make it clear that these can be considered separately, and give a reference to simulation results (if published anywhere) for the 4/3 part. Has JST ever simulated or done analysis of the queueing loss speed advantage needed in a Benes switch that performs multicast copying as well? He may have only done it for point-to-point traffic. Check with him. ˆ
ˆ
• Possibly expand Section 5. Label the links in Figure 13 with their bandwidths. • The sentence “The motivating factor used to select this design for the switching element in preference to a single crossbar is the reduced circuitry that results on the chip.” in Section 4 sounds wrong to someone who does not know more about switch design. Clarify it. That paragraph should also give a forward reference to the place where the switch element design is given in detail. Should a reference be given to a place where it is shown how to construct large switching fabrics? • Study what the effects of changing various maintenance registers “on the fly” would be. For example, what if the discard threshold values are suddenly reduced below the current buffer occupancies? • Try to find a nice way to show the data flow in the switch elements. If this is done with a directed acylic graph, with time going down, nodes representing major circuits, and edges representing data flowing from one circuit to another, then we can label edges with the number of ticks required to get from one circuit to the next, and label circuits with the time required to compute the outputs from their inputs. • Add discussion of the physical link interfaces. Six of them will be 620 Mb/s, and 2 will be 2.4 Gb/s, but the exact physical format of data on these lines is still to be decided. In the RFRAMER discussion, mention the need for deskewing of two parallel G-link interfaces to implement a single 2.4 Gb/s link, and anything else that seems appropriate. UPDATE: the cell format has been decided, and is described fully in Dave Richard’s link specification document. See it for more details. • Perhaps add some explanation of how multipoint to multipoint connections can be realized in Section 3. This is a basic feature of the switch, and seems like it should at least be mentioned early in the document. Actually, they are mentioned, but only briefly. Include a reference in Section 3 to a later example/discussion of this feature. • Document how all pins are interconnected on the board of an 8 port switch. Mention how they would be interconnected for arbitrary size switches. Andy has done this, but it is not in this document. It is described in a separate text file on disk: /project/gbn_hw/switch/docs/arch_docs/detailed/board-interconnection Future possible enhancements to switch that will neither be included in first silicon, nor mentioned in the body of this document: • Jon Turner noticed around the last week of 1995 that we could probably get by in the IPP and OPP cell stores with storing only 14 32-bit words for each cell, instead of 15 32-bit words. Notice that there is an entire unused row in the I/O and recycling data cell format of Figure 17, and there are two entirely unused rows in the internal control cell format of Figure 21. If the unused row in Figure 17 were deleted, and every row after that were shifted up by one, then the bottom row in both cell formats could be eliminated. This would give about a 7% reduction in the amount of memory needed in the IPP and OPP cell stores. Making this change would require changes to the IPP reformatter, and to the IPP RFRAMER. It doesn’t seem worth the effort right now to make such design changes, but it is good to record them for possible future chips. • Add several read-only maintenance register fields that contain sizes of various buffers, and other things that are useful for the CP to know that could change from one fabrication run of the chips to the next. In this way, the CP
System Architecture Document
104
need not keep a table that maps chip types and version numbers to the corresponding buffer sizes. RESULT: I talked with Jon Turner about this, and he decided not to add these. I leave this note in here, because I still think it is a good idea, and a future commercial implementation might consider adding them, or something similar. • Similar to the previous note, it would be a good idea if the state of the IPP chip option pins CP Enable, WIDTH_LINK, D_SKEW_LINK, and perhaps QUIK_TEST were readable from software as maintenance register fields, in addition to the current ability to read the TYPE_LINK pins. • Mention that just as there is a pair of each of the following fields in the internal data cell format: VXI, BDI, CYC, UD; it would make sense to have a pair of TS fields as well. This is because there could be times when we want one branch of a multipoint connection tree to be transitionally time stamped, but not the other. This would require shuffling around the internal cell format a bit, and perhaps making it larger, to find room. It is not clear now how badly the cell stream received by an endpoint in a dynamic multipoint connection would be disrupted by lacking this feature. JST says not to include this in the document (it should document what we have actually built). • (Note: The following deficiency has actually been avoided in the first version of the OPP chip, by adding a maintenance register field to the OPP that allows the CP to write or read specific BDI states. See the description of fields in the OPP maintenance register for details. One difference from what is noted below is that there are two bits of state per connection, rather than the one described below.) In a switch built to the current specification, it is possible for the state of a connection as stored by the block discard controller (BDC) to be DISCARD at the time that the connection is torn down. As specified now, there is no way to reliably return the state back to PROPAGATE without performing a hardware reset of the entire switch. When a new AAL 5 connection uses the same value for its block discard index (BDI), its first frame will be completely discarded except possibly the last cell. To avoid this, it would be better if the CP could send a control cell that would cause the state of a selected BDI value to return to the initial state. No such control cell is currently defined. • My proposal to fix this is for the CP to send a control cell with opcode WRMR and a newly defined value for FIELD that specifies that a BDI entry in the BDC should be changed. The INFO field of the control cell contains an 8 bit BDI, and a new state (1 bit) to store as the new state for that BDI. When the OPP MREG receives such a cell, it would assert a “write BDI” signal to the BDC for one cell time, and send the 8 bit BDI value and 1 bit new value on 9 separate wires. Every cell time, the BDC examines these signals, and if the write signal is asserted, it will sample the BDI and new state signals and perform the corresponding write operation. This is easy to do because the normal processing of a cell can do at most one read and one write of the memory, memory accesses are fast, we’d only need to do one more write every cell time, and there is plenty of time to do it. • Jon Turner’s proposal is to have a new opcode that the OPP RFMT recognizes, and when it sees such a cell, it sends a BDI value extracted from the cell in the OPP control path, and we add a new bit to the control path that means “the BDC should set the table entry for this BDI value to the initial state, and then discard this cell with no record kept of the discard”. The only disadvantage to this from the CP’s perspective is that it gets no verification that the operation is complete by a returning control cell. Actually, in the previous solution, the CP receives a returning control cell, but that control cell does not verify that the operation was successful in the same way as WRMR operations on other MREG fields, because no verifying read is performed. Still, the returning control cell in that solution is some kind of confirmation that the write operation is complete, and the control cell did not get lost before performing the operation. • JST noted that we don’t really need two separate UD bits in the cell. We could get by with only one, as long as it is treated similar to the STG field in the data cells. That is, it is filled in when the data cell arrives at an IPP from the link (rather than being recycled), and its value is preserved from that point on. The difference is that it should be filled in from the VXT entry, rather than from a configuration value in the MREG, because we might want to choose its value differently on a per connection basis, rather than per chip. Update: Version 2 of the IPP chip, with reliable multicast features, will treat the UD field this way, and only have 1 UD bit in the VXT entries. However, it will still be 2 bits in the internal data cell format, because he had an idea for a third code point for the UD field in cells, to implement a simple feature where the UD value can be used to indicate a reliable multicast START cell that was recycled rather than upstream discarded. • JST would like to record the following feature idea, so that it might be implemented in a future IPP chip. The
105
Gigabit Switching Technology
idea is that there should be two new configuration info bits in the IPP maintenance register. One could be called "Read Control Cells Enabled" and the other could be "Write Control Cells Enabled". If "Read Control Cells Enabled" is 1, then control cells from the link interface with an opcode for reading would be propagated by the RFRAMER, but if it is 0, then such control cells are discarded. The other field operates similarly for control cells with opcodes indicating a write operation should be performed. (Should this be for both maintenance register fields and for VXT operations? Note that as specified in this paragraph, such control cells could operate anywhere in the switch, not just in the IPP chip whose RFRAMER propagated the cell. Is that level of control too coarsegrained?) The default value of these fields on reset would be taken from the option pin already described in this document. However, note that in the new scheme, a control processor that had write access could give read or write access to other input ports, by writing the desired field in the appropriate IPP chip. • Andy Fingerhut noticed recently that in the internal control cell format, the third set of BI,RC,D,CYC, and CS bits, and the EADR3 field, are unnecessary. The first IPP reformatter through which the control cell passes will overwrite the BI bit in the third set with 0, making the other fields mentioned unused. These bit positions could be used for other purposes in a future set of IPP and OPP chips, if desired. • It might be nice if a future set of SE chips could accept copy to range cells with PORT1 > PORT2, in which case the entire switching network would send copies of the cell to output ports PORT1 through the last one, and the first output through PORT2. At first I thought that this would require only a small change in the BCC control circuitry in the SE chips, but then I realized that in a multiple stage switch, say 64 ports, sending to output ports 14 (base 8) through 11 (base 8) would look the same to a middle stage switch element as sending to output ports 11 through 14. Hmm. But in both cases, the middle stage SE should send one copy to output port 1, so that example seems to work correctly as long as the last stage SE chips send to outputs 4 wrapping around back to 1 correctly. Maybe it is only a simple change in the BCC control circuit. I’ll have to think about it more. It might not be a terribly useful feature to have, anyway, but it would make the SE chips useful for certain other kinds of multicast connection schemes implemented by a different set of port processor chips. There might be other reasons discovered to have such a feature. • There is a change to the IPP reformatter specification that would be nice to implement in a future version of the IPP chip. I believe that the first implementation of the reformatter initiates transitional time stamping whenever it receives a recycled control cell with CCD equal to WRVPXTTR or WRVCXTTR, even if the VXTC determined that the VPI or VCI were out of range and sent a return value (RVAL) of BAD_FIELD to the reformatter for insertion in the control cell. It would be better if the reformatter only initiated transitional time stamping if this return value were SUCCESS. Changes from version 3.4 to version 3.5, by Andy: • Touched up a couple of things as a result of the gigabit kits course. The description in Section 6.4 of how to fill in the FIELD field for maintenance register read/write operations was worded in a confusing way, and is now hopefully clarified. Several figures in the scenarios section were cleaned up for presentation in the course. Changes from version 3.3 to version 3.4, by Andy: • I don’t recall right now, but both versions are still on line, so we could do a "Compare Documents" in FrameMaker if we wanted to. Changes from version 3.2 to version 3.3, by Andy: • Changed most references of Trunk Group Identifier and Source Trunk Group (STG) fields to 12 bits rather than the previous 16 bits, due to the desire to have a LINK_INFO field in the internal data cell format that could pass information from a future version of the IPP chip out to the outgoing link interface, such as whether the cell is part of a virtual path or virtual circuit, for a future planned adapter card that could do per-VC queueing. We considered the possibility of using the undefined bits to the left of the IADR field, but unfortunately the first version of the SE chips mangle that field for some copy to range cells, and also expect the bits in the first two rows when arriving at the SE chip to be 0. All references to the Trunk Group Identifier field in the IPP chip were left at 16 bits, since that is what is implemented in the first version of the IPP chips (the idea to steal some bits from the STG field was after the IPP had been fabricated). • Changed size of cell store to 256, resequencer to 80, transmit buffer to 166, and OPP pointer size to 8 bits, all to
System Architecture Document
106
reflect what will fit comfortably in a large die chip with ES2’s ECLP07 process, because they won’t let us use the smaller ECAT05 process. Changes from version 3.1 to version 3.2, by Andy: • Changed the VPI/VCI used to indicate a control cell to the switch from FF/FFFF hex to 0/32 decimal, everywhere in the document. It was changed because we believe that some ATM host interface cards are incapable of sending out cells with arbitrary VPI and VCI values. In particular, some appear to be capable only of sending cells with VPI=0. We chose this VPI, and a VCI that is nearly as small as possible, but still large enough for the ATM standards to indicate that it is a user data cell, rather than a special signaling cell. • Changed the spec for the OPP reformatter and resequencer so that the resequencer is responsible for discarding cells it receives while full, rather than sending a full signal back to the reformatter. The resequencer was already responsible for discarding cells because they were too old on arrival, so it already had the discard cell signal interface with the cell store anyway. It simplifies the interface between the reformatter and resequencer to do the discarding in the resequencer, because it has all the information necessary to determine whether this should be done, and if the reformatter did it, we’d have to worry about the timing of when the full signal could be asserted after the last cell was sent. Things are simpler with the new spec. • Added a description of what the resequencer should do when it receives a cell with the BR (bypass resequencer) bit equal to 1. Added a few extra comments on computing the age when BR=0 that hopefully clarify things. • Added a note that for RC=111 cells (copy to a range), PORT1 must be less than or equal to PORT2. • Corrected the description of the interface from the OPP to the IPP chip in the OPP maintenance register description. These changes are due to more careful thinking about the IPP skew compensation circuit on the recycling path while implementing it. • Updated the description of the BDC to describe the early packet discard with hysteresis (EPDH) scheme, rather than whatever scheme was there in the previous version (I think it was the frame tail discard with hysteresis). Several OPP maintenance register fields were changed as a result. • Added SCH and DIR fields to the recycling data cell format and the internal data cell format, and UD to the recycling data cell format. These fields will be used and/or propagated by the OPP chip, but the first version of the IPP chip will ignore them when it receives them in the recycling data cell format, and they will be undefined in the internal data cell format cells that it sends out. These fields will be used by a planned future version of the IPP chip that implements features for reliable multicast connections. The OPP chip actually requires a new maintenance register field (called Reliable Multicast) to configure whether it should work with a version 1 IPP chip, or a future version IPP chip. The value of this field only affects the operation of the OPP RFMT. • The previous change required a small functional change to the XFRAMER. It only affects how it fills in the GFC field of outgoing cells. Changes from version 3.0 to version 3.1, by Andy: • Modified Figure 24 so that bits were numbered from 31 down to 0, instead of 1 up to 32, just so that it is more consistent with the usual numbering of bits used in computer architecture. The text describing the bit positions, and giving examples of how to fill in the EADR field, were also updated appropriately. • Updated Figure 16, to reflect the recent decisions to keep most kinds of ATM signaling cells, and discard only a few kinds that would require more changes to the IPP design to handle elegantly. • Changed all occurrences of the name DIS_ROUTE (except the one in this sentence) to FUNCTION_CONFIG_SE, to match the code that the SE chip designers have been using. • Added BI bit to both the data (Figure 17) and control cell (Figure 21) recycling formats, because it is needed by the deskewing circuit in the IPP that receives the recycling cells. It is shaded in both figures, to indicate that it only needs to be defined for recycling cells. • Added a description of the QUIK_TEST input signal to the IPP chip. It affects the default values of a couple of maintenance register fields, and the behavior of the VXTC during hardware initialization. The OPP chip will likely have similar input signals, but they have not been defined yet.
107
Gigabit Switching Technology
• Added a bit called “bypass resequencer” (BR) to the internal data cell (Figure 18) and control cell (Figure 21) formats, the CP to switch external control cell format (Figure 20), and the VXT entries (Figure 27). This bit was suggested by Jon Turner. The previous normal behavior occurs when this bit is 0. For those cells in which this bit is 1, the cell is given an age equal to the age threshold of the resequencer, so that if there are no other cells with the same age, the cell leaves the resequencer in one cell time. This feature is intended as an answer to those who want the absolute minimum delay through the switch possible. However, this implies that either the endpoints must not require the cells to arrive in order, or the cells must arrive at the resequencer in order. Jon thought that this could be ensured by routing consecutive cells within a virtual circuit along a specific path through the switching fabric. If the individual switch elements never reordered cells within a virtual circuit, this would be true. However, the switch element chips can reorder two cells within a virtual circuit if they arrive at the switch element within 8 cell times of each other, because the switch elements do not use the least significant 3 bits of the cell’s age when determining which one leaves the switch element first. Doing so would increase the time required to resolve contention too much. Even if this were done, cells within a virtual circuit could still be misordered by a single switch element. This could happen if either the switch element did not receive a grant on the desired output for a long time, or it had a lot of contention for that particular output. In such a case, two cells in the same virtual circuit could both reach the maximum age, and could then be sent out in the wrong order. Even with all the caveats above, as long as the switch doesn’t get too much contention, and as long as the cells within a virtual circuit using this feature arrived at the switch elements at least 8 cell times after the previous cell did, then FIFO ordering is guaranteed. Changes from version 2.9 to version 3.0, by Andy: • Changed the section on the block discard controller so that it describes the new method called frame tail discard with hysteresis. This also implied the removal of the BDC Discard Hold Duration field in the OPP maintenance register, and the adding of the XMB CS0 Low Hysteresis Threshold field. • Added Section 9.7, which describes the need for, and the high level operation of, the deskewing circuits. • Added Section 9.8, which describes the behavior of all blocks in all chips during hardware reset and initializatoin, at least at a high level. We should also make a small document that describes to all VHDL code writers how to achieve the desired behavior. • Moved the CC value from the top row to the bottom row of 4 in the lower half of Figure 27. Peter Chung requested this change to ease implementation of the VXTC, and it seemed harmless enough. (Be certain that John DeHart and Dakang Wu are notified of this, and all other changes to the maintenance register fields made this time.) • Added the decisions of whether to discard or propagate each kind of cell in Figure 16. This is redundant with the text given later, but it is a lot easier to understand when this information is placed in the table. • TODO. Add a list of the other documents that are most important to this project, i.e., the three chip design documents, and the link interface spec. Besides adding these to the references, also include an explicit list near the beginning, explaining what each one is. • Clarified Figure 46, in particular the entry for RC=011, DO_COPY=0, and FUNCTION_CONFIG_SE equal to one of 0, 1, or 2. It was not clear in the previous version that there were really three possible cases. • Changed the handling of point-to-point signalling cells from discard to propagate in Figure 16. This change was made after talking with John DeHart and Zubin Dittia, and realizing that the hosts could not send signalling messages to the control processor if the switch discards these cells. I’ve informed Randy of the change, since this effects the implementation of the receive framer in the IPP. Changes from version 2.8 to version 2.9, by Andy: • I went over the whole document with a fine-toothed comb, looking for inconsistencies. It should be quite “clean” and up to date now. I’m not willing to call it “final” until I’ve reviewed each section with the designers. • Added the recycling cells only (RCO) field to the VXT entries in Section 7.1, and updated the description of the VXTC in Section 8.2.8 to explain a new condition in which new data cells should be discarded.
System Architecture Document
108
Changes from version 2.7 to version 2.8, by Andy: • Completed Section 8.2.1 describing the link enabling/disabling circuitry. • Updated the new section called VXT Control Circuitry (Section 8.2.8), which is an edited combination of the old RCBI and RCBO sections. • Made some changes to other block descriptions in Section 8.2 and Section 8.3, mostly minor, but hardware designers should scan the description of their block(s) for changes (as always). Changes from version 2.6 to version 2.7, by Andy: • Changed internal control cell format by switching LT and FIELD fields, and moving RVAL. This was done to simplify the hardware implementation of the maintenance registers. Corresponding changes were made in the external control cell formats. • Changed some subfields and their organization within the Configuration Information field of the OPP maintenance register. The most significant changes are: XMB Discard Threshold increased from 1 to 2 bytes; XMB Discard Hold Duration removed and replaced with BDC Discard Hold Duration; added XMB CS0 Buffer Size. • Added description of timer discard mechanism in the BDC, and how the XMB will be logically split into the CS=1 and CS=0 buffers, where the dividing line between the two is controlled by a maintenance register field (the implementation details are saved for another document). Changes from version 2.5 to version 2.6, by Andy: • The maintenance register fields have been completely updated. There are many new fields, a few fields that were removed, and the ones that exist now have been grouped for efficient access by the CP. • Removed CYCB from OPP in Figure 33. Also removed the data (D) bit, which is no longer needed in the OPP control path (I think). Please correct me if it is needed. • Added explanation of the function of the switch element chips. I didn’t explain any of the implementation in detail, as I don’t know what Tom’s current implementation ideas are. • Changed upstream discard (UD) bit to two bits, UD1 and UD2. This allows one to set up multipoint to multipoint connections where the echo for each source can be independently controlled. Also split the two bit CYC field into CYC1 and CYC2. This is only a name change, not a change in the bits that are in the cell. • Changed the description of the VXT entries. The format that the CP should use for the INFO field of control cells for reading and writing table entries is given. Changes from version 2.4 to version 2.5, by Andy: • Changed the name of the ADR field used everywhere to either IADR (for Internal ADRress) or EADR (for External ADRress). This is to distinguish the from the 30-bit IADR field used in the four control columns of the internal data and control cell formats from the 32-bit EADR field used in control cells. • Moved the recycling buffer from the OPP to the IPP, and changed the description of the transmit circuit in the OPP accordingly. • The IPP was reorganized a lot. See Section 8.2. • Changed the UD bit to UD1, UD2, one bit for each copy of a copy-by-two cell. This allows us to choose which ports can receive an echo of what they send in a multipoint to multipoint connection, individually. With only a single bit, there are kludges to achieve this, but in general, you can only choose whether all ports receive an echo, or all ports do not receive an echo. Changes from version 2.3 to version 2.4, by Andy: • Added lots of details on how transitional time stamping is initiated and performed, and on how the age of cells is computed in the resequencers. Changes from version 2.2 to version 2.3, by Andy: • Lots of questions that were embedded in previous version of Section 8.2 were answered, and the corresponding
109
Gigabit Switching Technology
changes made in the text. • Removed payload type (PT) field from the control path of the IPP, since we couldn’t think of any reason that it was needed there. Only possible reason would be to make the IPP RFMT’s job a little bit easier. • Changed external control cell format (Figure 20) so that now there is one format for control cells sent from the CP to the switch, and a slightly different format for control cells sent in reply from the switch to the CP. There are some fields that are only needed in one direction, and removing them allowed us to word-align some of the fields. This should make the reformatter’s jobs easier, in both the IPP and OPP. • Changed control cell (CC) bit in control path of OPP to data (D) bit, since that is now part of the internal cell format. • Changed VXT table entry format (Figure 27) so that the order of bits is closer to that placed in the internal data cell format (Figure 18). Made similar changes in the internal and external control cell formats. • Changed all mentions of cell type (CT) to either busy/idle (BI), data (D), or both. Now CT is only mentioned in this section. • Cell stores need not store the four control columns of the internal cell formats, only the 32 data columns. This saves about 10% of the memory that the cell stores would otherwise need. Changed several 36’s in the IPP and OPP physical organization figures to 32’s, to reflect this change. • Draft of Section 8.3 on the OPP written. Please check it for errors and questions you know how to answer. Changes from version 2.1 to version 2.2, by Andy: •
physical organization, Figure 29, changed back to the previous version, after I figured out my changes weren’t necessary. Sorry for any confusion caused. The descriptions of the various IPP circuits have been updated. IPP
Changes from version 2.0 to version 2.1, by Andy: •
IPP
physical organization, Figure 29, changed to add some fields to the control path. These are proposed, not checked with Jon yet. I think they may be needed, because the CCD field is not enough for the RCBI, RCBO, and IPP RFMT to distinguish all cell types that they need to distinguish. With the recent changes in the internal control cell format (i.e., removing the SRC/STG field), this may no longer be necessary. I will check.
•
OPP physical organization, Figure 33, changed slightly from Jon’s slides. Added CC field (0 for data cell, 1 for control cell), needed by MREG and CYCB to recognize control cells, and U field (from the PT field of the ATM standard header), needed by the block discard controller (BDC) to recognize the last cell of an AAL5 frame.
• Many of the figures are imported EPSI (Encapsulated PostScript with device Independent bitmap preview image) files, imported by reference. They are located in the figures subdirectory. They look “grainy” on the screen, and they take a little longer to appear when you view the document on line, but they print out just fine. I am looking for a way to make them look better on the screen. • Updated table in Figure 11 so that its entries were accurate for a switch constructed of 8x8 switch elements. The previous version was accurate for 16x16 switch elements. • Updated internal data cell format in Figure 18 and the internal control cell format in Figure 21 as discussed in meeting on Wednesday, February 2. The format of the 4 control columns on the left is new, and the format of the first row is different. New field busy/idle (BI) is 0 for idle cells and 1 for a busy cell (either control or data). New field “data” (D) is 0 for control cells and 1 for data cells. It should probably always be 0 for idle cells, along with almost every other bit in the internal cell format. • Updated cell type (CT) field value meaning slightly. Previously the meaning was 00 for idle, 01 for data, and 10 for control. Now data cells are 11. Why? Because then the CT field is just the concatenation of the BI bit and the D bit defined above. • All numbered fields (i.e., EADR0, EADR1, EADR2, BDI0, BDI1, etc.) have been renumbered to start with 1 instead of 0, to make the field names more like those used in ATM standards documents. • Clarified meaning of CLRERR operation code for control cells in Figure 22. Jon intended such control cells to clear error codes in all chips, port processors and switch elements. To clear individual error flags, we need to
110
System Architecture Document
add some kind of way for write maintenance register (WRMR) operations to do it (see next bullet). Updated the behavioral description of the receive framer (RFRAMER) in Section 8.2 to include handling of CLRERR control cells. • Proposed a suggestion for clearing individual error flags, which is to change the meaning of the write maintenance register (WRMR) control cell operation code when performed on fields containing error bits. See the description of the Error Flags field in Section 7.2.1 for a detailed explanation. • Added Hardware Reset maintenance register field to the OPP. Its exact use is still undefined, as is the Hardware Reset field in the IPP. • Added subfield Too-late-discard-counter to Statistics-B field of OPP, thanks to Margaret noticing that I had mistakenly removed it. • Changed the SRC field name to STG, for Source Trunk Group. Replaced maintenance register field Switch Port Number of both IPP and OPP with Trunk Group Identifier. Changes from version 1.9 to version 2.0, by Andy: • Added Section 8.2 and started outline of Section 8.3 giving detailed behavioral descriptions of the major circuits in the port processors. There are lots of questions remaining to be answered that appear in the text. • Added the new heading “PP Access” to maintenance register field descriptions in Section 7.2.1 and Section 7.2.2. Changed “Access” heading to “CP Access”, to distinguish it from PP Access. This information in this heading should help the hardware designers. • Added a maintenance register field Trunk Group Identifier for both IPP and OPP. • Removed the subfield Too-late-discard-counter from the Statistics-B field in the OPP, because I didn’t know that the resequencer ever discarded cells. This was added back in to version 2.1. • Added the subfield CYCB-discard-counter to the Statistics-B field in the OPP. • Changed default value of Resequencer Offset maintenance register field from 112 to 60, by Jon’s request. • Changed names of maintenance register fields RCB CS=0 Discard Hold Timer and Hold Timer to use the word Duration instead of Timer. It sounded better to me.
XMB CS=0, CLP=1
Discard
• Minor editing of spelling and grammar. Figured out a kludge to get the diacritical mark over the s in Benes.


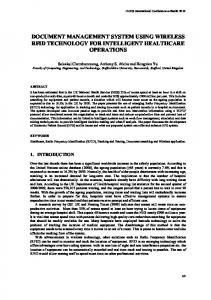


![Gigabit Communities - ctc technology & energy [PDF]](https://m.moam.info/img/260x300/gigabit-communities-ctc-technology-energy-pdf_647a16bc098a9e8f5f8b45fc.jpg)