Jan 29, 2008 ... Passport / Mike Meyers' CompTIA Linux+ Certification Passport / Jang, Meyers /
154671-5 / Chapter 9. 9. System Security. 247. Passport / Mike ...
Color profile: Generic CMYK printer profile Passport / Mike Meyers’ CompTIA Composite Default screen
Linux+ Certification Passport / Jang, Meyers / 154671-5 / Chapter 9
System Security
9
ITINERARY
• • • • • •
Objective 9.01 Objective 9.02 Objective 9.03 Objective 9.04 Objective 9.05 Objective 9.06
Configure Encryption Detect Intrusion Attempts Understand Intrusion Detection Systems Decipher Basic Firewall Configurations Audit Key Security Files Identify File Corruption
NEWBIE
SOME EXPERIENCE
VETERAN
60+ hours
12 hours
8 hours
247
P:\010Comp\Passport\671-5\ch09.vp Tuesday, January 29, 2008 2:55:12 PM
Color profile: Generic CMYK printer profile / Mike Meyers’ CompTIA Composite Passport Default screen
248
Linux+ Certification Passport / Jang, Meyers / 154671-5 / Chapter 9
MIKE MEYERS’ COMPTIA LINUX+ CERTIFICATION PASSPORT
Understanding Linux security means understanding the options for encryption as well as the basic files and tools administrators can configure to record attempts to break into Linux systems. Additional security options not covered elsewhere are associated with the Internet Super Server, configured by service in the /etc/xinetd.d/ directory. It’s important to also have a basic understanding of the iptables firewall tool, along with ports that can be blocked by a firewall. Auditing key security files and logs on a periodic basis can help you detect problems based on intrusions that may have otherwise gone undetected. Part of the auditing process means identifying file corruption with tools such as the rpm -V command and the Tripwire tool.
Objective 9.01
Configure Encryption
I
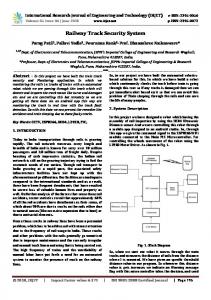
t’s far too easy to break into most computer systems. Many users still insist on connecting to remote systems using unencrypted services. As shown in Figure 9.1, unencrypted passwords are sent (and can be read) over networks in clear text; in this case, the figure shows the first letter of a Telnet password. Every other alphanumeric character in the password follows in subsequent packets.
FIGURE 9.1
It’s too easy to find unencrypted passwords.
P:\010Comp\Passport\671-5\ch09.vp Tuesday, January 29, 2008 2:55:39 PM
Color profile: Generic CMYK printer profile / Mike Meyers’ CompTIA Composite Passport Default screen
Linux+ Certification Passport / Jang, Meyers / 154671-5 / Chapter 9
CHAPTER 9 System Security
249
Encryption can help Linux systems protect passwords, files, partitions, and even entire hard disks. You need to at least know the names of several encryption schemes for the Linux+ exam.
Exam Tip Know about programs, such as Crack, that can detect weak passwords and common encryption schemes for passwords, networks, and more.
Shadow Passwords The Shadow Password Suite described in the Chapter 8 section “Configure Password Policies” encrypts passwords in files available only to the administrative root user. As defined by PAM (Pluggable Authentication Modules), passwords are hidden using the MD5 (Message-Digest algorithm 5) encryption scheme. It uses a 128-bit hash value; in other words, passwords are processed into a 128-bit number, which corresponds to the second column shown in this excerpt from /etc/shadow: donna:$1$o1w6g9zo$DH1yvuuIUlHgRvX7QGebk/:13741:0:99999:7:::
Travel Advisory It’s an oversimplification to refer to MD5 as an encryption mode. Strictly speaking, MD5 is a cryptographic hash function.
The Linux password encryption scheme is controlled in /etc/pam.d/passwd, which in the selected Linux distributions (except SUSE) refers to the following directive from the /etc/pam.d/system-auth file. The settings in bold highlight the use of MD5 encryption and the Shadow Password Suite. password sufficient use_authtok
pam_unix.so md5 shadow nullok try_first_pass \
One other encryption scheme is available when using PAM for passwords, as described in the documentation for the associated module, pam_unix.so. The bigcrypt scheme uses the DEC C2 extension to the crypt algorithm, developed by the former Digital Equipment Corporation (now a part of HP). Older distributions configured MD5 encryption in the /etc/login.defs file with the following directive: MD5_CRYPT_ENAB=yes
P:\010Comp\Passport\671-5\ch09.vp Tuesday, January 29, 2008 2:55:56 PM
Color profile: Generic CMYK printer profile / Mike Meyers’ CompTIA Composite Passport Default screen
250
Linux+ Certification Passport / Jang, Meyers / 154671-5 / Chapter 9
MIKE MEYERS’ COMPTIA LINUX+ CERTIFICATION PASSPORT
Password Strength Password encryption helps only if the passwords are sufficiently complex. Stronger passwords depend on users avoiding dictionary words and other simple alphanumeric patterns. As described in the Chapter 8 section “Configure Password Policies,” the “Crack” libraries (short for libCrack) are often used to evaluate the strength of user passwords. While the default configuration objects to passwords that may be too short or are based on dictionary words, it does not prohibit them. Because weak passwords may violate organizational policies, many Unix and Linux administrators often use the Crack password-cracking program to identify users with such passwords.
Travel Advisory We do not endorse the use of programs like Crack, Cain, John the Ripper, or LC5 to break into user accounts. But as an administrator, you already have access to regular user accounts. So when you use such programs as an administrator, these programs can help you learn if your users are creating sufficiently strong passwords.
Disk Encryption Files, partitions, and hard disks on a Linux system can be encrypted. As described in the Disk Encryption HOWTO (http://tldp.org/HOWTO/Disk-EncryptionHOWTO/), a 128-bit version of the Advanced Encryption Standard (AES128) is the current standard for this purpose. AES128 is the successor to the Data Encryption Standard (DES), which is faster than the 3DES (also known as Triple DES) standard, which is still in use. It’s often used with a separate key embedded in a bootable CD or USB drive. When properly configured, data on protected systems isn’t readable and therefore is protected without that key.
Other Encryption Schemes There are several other encryption schemes commonly used on Linux systems. Perhaps the most common is used for secure Web communications, based on the secure HTTP protocol (HTTPS), which normally uses TCP/IP port 443. The old standard for this protocol used the Secure Sockets Layer (SSL). Today, most Web servers encrypt HTTPS communications using the Transport Layer Security (TLS) protocol, which was being introduced when the Linux+ objectives were released.
P:\010Comp\Passport\671-5\ch09.vp Tuesday, January 29, 2008 2:56:15 PM
Color profile: Generic CMYK printer profile / Mike Meyers’ CompTIA Composite Passport Default screen
Linux+ Certification Passport / Jang, Meyers / 154671-5 / Chapter 9
CHAPTER 9 System Security
251
There’s also encryption for e-mail. Conceptually similar to SSH private and public keys (as discussed in the Chapter 8 section “Set Up Security Environment Files”), GPG encryption is often used to secure e-mail communications.
Local Lingo GNU Privacy Guard (GPG) The Linux implementation of the Pretty Good Privacy (PGP) encryption program. Private/public encryption key pairs in Linux are often known as GPG/PGP keys.
SSH private/public key pairs can be created using either the RSA or DSA encryption algorithms. The RSA algorithm is named after its developers, Rivest, Shamir, and Adelman. DSA is the acronym of the Digital Signature Algorithm, which was developed by the U.S. government and made publicly available on a royalty-free basis. Either key pair can be generated with the ssh-keygen command. (The RSA algorithm is the default with ssh-keygen; if you prefer the DSA algorithm, it can be generated with the -t dsa switch.) Virtual Private Networks (VPNs) in Linux are implemented through Crypto IP Encapsulation (CIPE), which can be configured to use a variety of algorithms, including Blowfish, 3DES, AES128, or IDEA (which is short for the International Data Encryption Algorithm). The password associated with the GRUB bootloader described in the Chapter 2 section “Understand and Reinstall a Boot Manager” is normally encrypted to the MD5 standard. You can create a GRUB password from the command line with the grub-md5-crypt command. After typing and confirming a password, the command returns an MD5 hash similar to $1$Ekcy5$rFZE7/bEJUxXfuPvnw/5N.
which can then be associated with the password --md5 directive in the GRUB configuration file, as shown here: password --md5 $1$Ekcy5$rFZE7/bEJUxXfuPvnw/5N.
You may have noticed that the Samba passwords created by the smbpasswd command in /etc/samba/smbpasswd are encrypted. While the hash in this file is similar to the MD5 encryption algorithm associated with the Shadow Password Suite, the encryption actually conforms to Microsoft NT–series encryption. Because it uses the MD4 encryption algorithm, it’s incompatible with current Linux passwords.
P:\010Comp\Passport\671-5\ch09.vp Tuesday, January 29, 2008 2:56:32 PM
Color profile: Generic CMYK printer profile / Mike Meyers’ CompTIA Composite Passport Default screen
252
Linux+ Certification Passport / Jang, Meyers / 154671-5 / Chapter 9
MIKE MEYERS’ COMPTIA LINUX+ CERTIFICATION PASSPORT
Travel Advisory Microsoft clients can’t use an unadulterated Linux password database.
Objective 9.02
Detect Intrusion Attempts
T
here are several files and commands that can help Linux administrators detect attempts by crackers to break into their system. Local and remote logins are normally reported in /var/log/secure. Depending on configuration, other log files, such as /var/log/auth.log, /var/log/messages, and /var/log/wtmp, are also frequently used to document local and remote logins. There are also commands that list logged-in users, including those who log in from remote locations. One useful tool for monitoring these log files is the tail -f logfile command. For example, I could use the following command to monitor the latest changes to /var/log/messages:
# tail -f /var/log/messages
This command locks the screen on the last few lines of /var/log/messages; as new messages are logged in this file, you can watch as they’re added. (You need to press CTRL-C to return to the command line.)
Logging Logins There are several files in the /var/log directory that document how and when users log into a Linux system, normally associated with the auth and authpriv directives in the /etc/syslog.conf configuration file, as described in the Chapter 6 section “Work with Log Files.” The most common option for these directives is /var/log/secure. On Red Hat/Fedora systems, this file documents all local and remote logins. For example, this excerpt documents a remote login: Aug 15 19:08:32 enterprise5hp login: LOGIN ON pts/1 BY michael FROM 192.168.0.4
This documents the date and time of a login to my system named enterprise5hp from a remote client, with IP address 192.168.0.4. But /var/log/secure isn’t configured on all Linux distributions. In several cases, including SUSE, Mandriva, and Turbolinux, remote logins are documented in /var/log/messages. If you believe an attack is in progress, it might make sense to watch /var/log/messages with the tail -f
P:\010Comp\Passport\671-5\ch09.vp Tuesday, January 29, 2008 2:57:00 PM
Color profile: Generic CMYK printer profile / Mike Meyers’ CompTIA Composite Passport Default screen
Linux+ Certification Passport / Jang, Meyers / 154671-5 / Chapter 9
CHAPTER 9 System Security
253
command described in the introduction to this section. For example, I saw the following ominous looking items when I monitored my /var/log/messages file (192.168.0.50 is the IP address of one of my other home systems): Aug 16 13:08:18 enterprise5hp sshd[7743]: pam_unix(sshd:auth): authentication failure; logname= uid=0 euid=0 tty=ssh ruser=rhost=192.168.0.50 user=root Aug 16 13:08:20 enterprise5hp sshd[7743]: Failed password for root from 192.168.0.50 port 54711 ssh2 Aug 16 13:08:32 enterprise5hp last message repeated 2 times Aug 16 13:08:32 enterprise5hp sshd[7744]: Connection closed by 192.168.0.50
The default Mandriva configuration includes login messages in /var/log/auth.log. The actual file depends on the configuration in the /etc/syslog.conf file. The applicable Mandriva directive is auth,authpriv.*
/var/log/auth.log
whereas the applicable directive for Turbolinux and Red Hat in /etc/syslog.conf is authpriv.*
/var/log/secure
Other Log Files Services such as Apache and CUPS also maintain logs of access attempts. Thus, any cracker who tries to break into a Linux system through these services may be logged through their log files. By default, both Apache and CUPS maintain access logs in the access_log file in the /var/log/cups and /var/log/httpd directory, respectively. (Substitute /var/log/apache2 for /var/log/httpd if you’re running SUSE Linux.) The location is as documented in the configuration files for each service.
The w and who Commands A couple of commands can also help you check for crackers who may be currently logged into the local Linux system. For example, the following output from the who command suggests that I’ve logged in both locally and from a remote system: michael michael
tty1 2007-08-15 10:53 pts/0 2007-08-14 (10.11.12.13)
If I know that I haven’t logged in remotely from a system with the noted IP address, I should worry that someone may have cracked my account and is currently logged in from the noted address.
P:\010Comp\Passport\671-5\ch09.vp Tuesday, January 29, 2008 2:57:16 PM
Color profile: Generic CMYK printer profile / Mike Meyers’ CompTIA Composite Passport Default screen
254
Linux+ Certification Passport / Jang, Meyers / 154671-5 / Chapter 9
MIKE MEYERS’ COMPTIA LINUX+ CERTIFICATION PASSPORT
As strange as it may sound, you can get more information with the w command. One example output is shown in Figure 9.2, which illustrates how user michael is now logged in from more IP addresses. Just be aware that the programs being run may just be a cover for what a cracker is really doing to your system. One more option is the top command, which is examined in the Chapter 10 section “Document a System Performance Baseline.” The user column in the output to this command documents the user who is running specific processes.
Checking Up on Users with last and utmpdump The last username command searches through the /var/log/wtmp database for user logins. It’s possible to read through the whole database with the utmpdump /var/log/wtmp command. But the output is long, and is mixed with reboot and shutdown events, as shown in Figure 9.3. Alternatively, the last username command can help the Linux administrator investigate potential security breaches on suspect accounts. For example, the following output illustrates logins from the root account into the first (tty1) and second (tty2) local terminals as well as remote logins from IP address 192.168.0.30: $ last root root tty1 root pts/1 192.168.0.30 root pts/1 192.168.0.30 root tty2 wtmp begins Wed Aug
Mon Mon Mon Sun
Aug Aug Aug Aug
6 6 6 5
19:59 19:43 19:42 06:29
-
crash (8+23:17) crash (8+23:34) 19:43 (00:00) crash (10+12:48)
1 20:49:24 2007
While it’s certainly possible to “spoof ” logins from a different IP address, a login to the root account from an unknown IP address certainly suggests reason for concern.
FIGURE 9.2
w command output
P:\010Comp\Passport\671-5\ch09.vp Tuesday, January 29, 2008 2:57:33 PM
Color profile: Generic CMYK printer profile / Mike Meyers’ CompTIA Composite Passport Default screen
Linux+ Certification Passport / Jang, Meyers / 154671-5 / Chapter 9
CHAPTER 9 System Security
FIGURE 9.3
255
utmpdump /var/log/wtmp command output
Objective 9.03
Understand Intrusion Detection Systems
T
wo Intrusion Detection Systems (IDSs) are listed in the Linux+ objectives: Snort and PortSentry. Both IDS applications can capture and analyze packets on a network. While these systems are not currently packaged by the companies behind the selected distributions, you need to know that these tools are available. However, even the basic operation of these tools is beyond the scope of this book.
Exam Tip Although you don’t need to know how to use either Snort or PortSentry for the exam, you do need to understand the basic functionality of each of these tools.
While the Simple WATCHer (SWATCH) and the Linux Intrusion Detection System (LIDS) are also often cited as IDSs, they are focused on protecting configuration files and other files. Other tools in this chapter that also technically qualify as IDSs are Tripwire and the rpm -V command. This section also takes a look at the tcpdump and netstat -a commands, which are used to monitor the network at the command-line interface (CLI).
P:\010Comp\Passport\671-5\ch09.vp Tuesday, January 29, 2008 2:58:02 PM
Color profile: Generic CMYK printer profile / Mike Meyers’ CompTIA Composite Passport Default screen
256
Linux+ Certification Passport / Jang, Meyers / 154671-5 / Chapter 9
MIKE MEYERS’ COMPTIA LINUX+ CERTIFICATION PASSPORT
Travel Advisory Some countries regulate the use of IDSs, because the port scans associated with IDSs such as PortSentry and Snort often precede attempts to break into computer systems.
Snort The Snort IDS can analyze network packets against known security issues, also known as exploits. You can download and install this program from the Snort website at www.snort.org. It’s available as a “tarball”; guidelines for installation are provided in the Chapter 2 section “Perform Post-Installation Package Management.” As described on the Snort website, “Snort is the most widely deployed intrusion detection and prevention technology worldwide and has become the de facto standard for the industry.” In essence, Snort can be used to detect attacks such as the following:
• • •
Stealth TCP/IP network port scans Buffer overflows (where a program goes beyond allocated memory) CGI-based attacks
Travel Advisory The related airsnort package can recover forgotten encryption keys. It can detect Wireless Encryption Protocol (WEP) keys associated with wireless networks. While we do not endorse the unauthorized use of the airsnort package to break into encrypted wireless networks, you should be aware of this security weakness in wireless networking.
PortSentry PortSentry is one of three sentry host-level security service tools in the TriSentry suite. Third parties have repackaged and customized it in RPM format for some distributions. The latest version of the PortSentry package can be downloaded in tarball format from http://sourceforge.net/projects/sentrytools/. Guidelines for installation from a tarball are discussed in the Chapter 2 section “Perform Post-Installation Package Management.”
P:\010Comp\Passport\671-5\ch09.vp Tuesday, January 29, 2008 2:58:16 PM
Color profile: Generic CMYK printer profile / Mike Meyers’ CompTIA Composite Passport Default screen
Linux+ Certification Passport / Jang, Meyers / 154671-5 / Chapter 9
CHAPTER 9 System Security
257
PortSentry is intended to monitor various TCP/IP ports for a wide variety of network scans associated with both the TCP and UDP protocols. Such scans can be used to gather information on network weaknesses, which a cracker can use to attack systems on your network.
Local Lingo Transmission Control Protocol (TCP) A connection-oriented protocol that tells the client if a connection is made. User Datagram Protocol (UDP) A connectionless protocol that does not wait for network acknowledgment before sending the message. TCP and UDP are mutually exclusive alternative protocols for different ports as defined in /etc/services.
Command-line Monitoring There are two major tools associated with monitoring the network at the command-line interface: tcpdump and netstat -a. The tcpdump command by itself displays the headers of all network packets that can be read from available network interfaces. The command by itself scrolls information on the screen at high speed, with time, source, destination, and packet type. While it’s possible to send the output to files or search through the output with filters like the grep command, front-ends such as Wireshark, shown earlier in Figure 9.1, can help classify what’s captured by the tcpdump command.
Travel Advisory Wireshark is the successor to Ethereal, which is a protocol analyzer, more popularly known as a “sniffer.”
The netstat -a command can help administrators identify open network connections, which may help them to detect forgotten TCP/IP ports in use by crackers. The output in Figure 9.4 shows connections from systems with names like enterprise5hp, as well as IP addresses like 192.168.0.30. It also shows connections from remote systems such as ns1.centos.org and rhlx01.hs-esslingen.de. It’s worth some investigation. CentOS.org is the URL for the group behind the most popular rebuild of Red Hat Enterprise Linux 5; rhlx01.hs-esslingen.de is the URL for a Linux users group in Germany, which administers some mirrors of major Linux repositories.
P:\010Comp\Passport\671-5\ch09.vp Tuesday, January 29, 2008 2:58:34 PM
Color profile: Generic CMYK printer profile / Mike Meyers’ CompTIA Composite Passport Default screen
258
Linux+ Certification Passport / Jang, Meyers / 154671-5 / Chapter 9
MIKE MEYERS’ COMPTIA LINUX+ CERTIFICATION PASSPORT
FIGURE 9.4
Objective 9.04
netstat -a command output
Decipher Basic Firewall Configurations
F
irewalls are intended to regulate traffic in three directions. Normally configured on a router or gateway computer, a firewall can regulate the traffic that goes into the gateway, traffic that originates from the gateway, and traffic that is forwarded through that gateway system. Most of the configuration on the firewall is designed to regulate through the gateway, to help protect users and computers on a LAN behind the gateway. Firewalls on Linux are configured with the iptables command. For the selected distributions, the configuration is normally saved in /etc/sysconfig/iptables and is controlled by the /etc/init.d/iptables script. (As usual, SUSE Linux is different; while it’s not necessary to know for the Linux+ exam, substitute SuSEfirewall2 and SuSEfirewall2_init, respectively, for the aforementioned files.) While it’s possible to create firewall rules based on factors such as IP addresses and packet types, you need to be aware of the TCP/IP ports that should be blocked or kept open. The iptables command is not the only way to protect a system. The TCP Wrappers system described in the Chapter 8 section “Set Up Security Environment Files” can also protect network services. PAM, AppArmor, and SELinux can also help protect network services. But firewalls in Linux normally refer to iptables.
P:\010Comp\Passport\671-5\ch09.vp Tuesday, January 29, 2008 2:59:03 PM
Color profile: Generic CMYK printer profile / Mike Meyers’ CompTIA Composite Passport Default screen
Linux+ Certification Passport / Jang, Meyers / 154671-5 / Chapter 9
CHAPTER 9 System Security
259
This assumes you have activated IP forwarding, which configures a Linux system as a router, per the discussion in the Chapter 7 section “Implement Basic Routing and Subnetting.”
Travel Advisory Firewalls with iptables are sometimes known as netfiltering. The iptables command can also be used for the IP masquerading described in the Chapter 7 section “Implement Basic Routing and Subnetting.”
Common Ports Common ports on a Linux system are configured in /etc/services. While you don’t need to memorize the services associated with all 65,000 TCP/IP ports, it can be helpful to know some of the more common ports, as listed and described in Table 9.1. When you read this file, note how many ports are configured for both TCP and UDP packets. Be aware that these are just default ports. Services can be configured on nonstandard ports. For example, Apache can be (and often is) configured to serve webpages on port 8080. If a TCP/IP port such as 23 is open, or is otherwise not protected by a firewall such as that based on iptables, then it is a vulnerability that could be exploited. If there’s also an active service that serves that port, such as Telnet, then your system is at risk.
Exam Tip Know the TCP/IP port numbers associated with common protocols such as FTP, Telnet, SSH, POP, and IMAP. Because Telnet is considered insecure, an open port 23 is often considered a sign of an insecure system. Recognize the basic functionality of various iptables commands.
One common firewall configuration blocks all standard TCP/IP ports, between 1 and 1023, with custom rules that open ports such as 80 for Web access and 22 for SSH access.
Travel Advisory Some services, such as the rpc.mountd service associated with NFS, do not normally work on fixed ports. The ports for these services can be fixed in /etc/services (and in this case, /etc/sysconfig/nfs), which can enable firewalls that allow the use of services such as NFS.
P:\010Comp\Passport\671-5\ch09.vp Tuesday, January 29, 2008 2:59:23 PM
Color profile: Generic CMYK printer profile / Mike Meyers’ CompTIA Composite Passport Default screen
260
Linux+ Certification Passport / Jang, Meyers / 154671-5 / Chapter 9
MIKE MEYERS’ COMPTIA LINUX+ CERTIFICATION PASSPORT
TABLE 9.1
More Important TCP/IP Ports, per /etc/services
Port Number
Description
20 21 22 23 25
FTP data (actual data is sent through port 20) FTP connections SSH (Secure Shell) Telnet SMTP, the Simple Mail Transfer Protocol, for outgoing e-mail; common for sendmail and Postfix DNS, the Domain Name Service, the standard for name resolution TFTP, the Trivial File Transfer Protocol, commonly used for terminal servers HTTP, the well-known protocol for webpages POP3, the current version of the Post Office Protocol, for receiving e-mail Portmapper service, required for NIS and NFS connections Network Time Protocol (NTP), for connections to time servers NetBIOS Session Service, for sharing connections over Microsoft networks IMAP, associated with the Internet Message Access Protocol version 4, for incoming e-mail HTTPS, for secure, encrypted Web connections IPP, associated with the Internet Printing Protocol, for CUPS, the Common Unix Printing System
53 69 80 110 111 123 139 143 443 631
Configuring iptables The way iptables works is based on a “chain” of rules. Each rule is implemented by an iptables command. The rules, chained together, are applied to each network packet. Each rule does two things: specifies a pattern that iptables uses to see if a packet qualifies for firewalling, and specifies what iptables is supposed to do if the packet matches. Because the Linux+ objectives were developed before IPv6 came into common use on Linux, I don’t expect any reference to the ip6tables command. But, except for IPv6 addressing, the ip6tables command isn’t all that different from iptables. To take full advantage of the iptables command, you need to understand its basic command format of switches and options: iptables -t tabletype -j
Let’s analyze the switches and options, one by one. The first setting is based on the -t tabletype switch. There are two basic tabletype options available, the choice of which drives settings in the rest of the command:
P:\010Comp\Passport\671-5\ch09.vp Tuesday, January 29, 2008 2:59:45 PM
Color profile: Generic CMYK printer profile / Mike Meyers’ CompTIA Composite Passport Default screen
Linux+ Certification Passport / Jang, Meyers / 154671-5 / Chapter 9
CHAPTER 9 System Security
• •
-t filter
261
Supports configuring a pattern for matching packets
-t nat Sets up Network Address Translation, also known as IP masquerading, discussed in the Chapter 7 section “Implement Basic Routing and Subnetting”
The default is -t filter; if you don’t specify a -t tabletype, the iptables command assumes that you’re trying to create a rule for filtering. The next setting is the . There are four settings available for iptables filtering rules:
• • • •
-A (--append) -D (--delete) -L (--list)
Adds another rule to the end of a chain Deletes a rule from a chain
Lists the currently configured rules in the chain
-F (--flush)
Flushes all the rules in the current set of iptables chains
If you’re appending to (-A) or deleting from (-D) a chain, you’ll want to apply it to network data traveling in one of three directions:
• • •
INPUT Packets that come into the network are checked against the rules in this chain. OUTPUT Packets that are going out from this computer through the firewall are checked against the rules in this chain. FORWARD All packets being sent through the firewall from a computer on the local network to a remote computer are checked against the rules in this chain.
Next, the iptables command needs to see a . The firewall checks every packet against this pattern. The simplest pattern is by IP address:
• •
-s ip_address
All packets are checked for a specific source IP address.
-d ip_address
All packets are checked for a specific destination IP address.
The ip_address can be associated with a network. IP addresses in iptables rules can handle CIDR notation, so you can specify addresses such as that from a private 192.168.0.0/24 network. Packet patterns can be more complex. In TCP/IP, packets travel over a network using the TCP, UDP, or ICMP protocol. The protocol can be specified with the -p switch, followed by the destination port (--dport). For example, the -p tcp --dport 21 extension affects users outside your network who are trying to connect to an FTP server on your network.
P:\010Comp\Passport\671-5\ch09.vp Tuesday, January 29, 2008 3:00:02 PM
Color profile: Generic CMYK printer profile / Mike Meyers’ CompTIA Composite Passport Default screen
262
Linux+ Certification Passport / Jang, Meyers / 154671-5 / Chapter 9
MIKE MEYERS’ COMPTIA LINUX+ CERTIFICATION PASSPORT
Once the iptables command finds a packet pattern match, it needs to know what to do with that packet, which leads to the last part of the command, -j . There are three basic options:
• • •
DROP The packet is dropped. No message is sent to the requesting computer. Attempts to connect to the associated service may be locked. REJECT The packet is dropped. An error message is sent to the requesting computer, which can help users help you diagnose problems. ACCEPT
The packet is allowed to proceed through the firewall.
Let’s examine how you can use iptables commands to configure a firewall. The first step is always to see what is currently configured; the following command lists active firewall rules: # iptables -L
If iptables is properly configured, the output will display rules in at least three different categories: INPUT, FORWARD, and OUTPUT. Normally, iptables returns output with hostnames. For this purpose, the system requires a reliable connection to a DNS server, and real host and domain names. As many crackers may use fake domain names, Linux administrators sometimes add the -n switch, which keeps the output in the numeric format associated with IP addresses. One example which lists all active rules is # iptables -n -L
Travel Advisory The -n switch is a common command option that specifies the use of IP addresses, disabling searches for host files and sometimes problematic DNS servers. It can work with commands such as route, arp, netstat, and more.
Run both the iptables -L and iptables -n -L commands. Observe the differences. For example, here’s the firewall rule, as listed in the output to iptables -L, which allows SSH connections: ACCEPT
tcp
--
anywhere
anywhere
state NEW tcp dpt:ssh
Now here’s the same rule, as listed in the output to the iptables -n -L command: ACCEPT
tcp
--
0.0.0.0/0
P:\010Comp\Passport\671-5\ch09.vp Tuesday, January 29, 2008 3:00:21 PM
0.0.0.0/0
state NEW tcp dpt:22
Color profile: Generic CMYK printer profile / Mike Meyers’ CompTIA Composite Passport Default screen
Linux+ Certification Passport / Jang, Meyers / 154671-5 / Chapter 9
CHAPTER 9 System Security
263
Note the difference: anywhere is associated with the default IP address, 0.0.0.0, and ssh is translated to its standard TCP/IP port number, 22, as listed in /etc/services. Now let’s go a bit further. The following command defines a rule that rejects all traffic from the 10.18.75.0 subnet, and it sends a “destination unreachable” error message back to any client that tried to connect: # iptables -A INPUT -s 10.18.75.0/24 -j REJECT
The next rule stops users from the computer with an IP address of 192.168.88.212 from “pinging” your system. This iptables command has that effect because the ping command uses the ICMP protocol. # iptables -A INPUT -s 192.168.88.212 -p icmp -j DROP
The following command guards against TCP SYN “packet flood” attacks from outside the local network. Assume that your network IP address is 192.168.10.0. The “bang,” as expressed by the exclamation point (!), inverts the meaning; in this case, the command applies to all IP addresses except those with a 192.168.10.0 network address (and a 255.255.255.0 subnet mask, which translates in CIDR notation to /24). # iptables -A INPUT -s !192.168.10.0/24 -p tcp -j DROP
Then, if you want to delete the rule related to the ping command in this list, use the following command: # iptables -D INPUT -s 192.168.88.212 -p icmp -j DROP
The default rule for INPUT, OUTPUT, and FORWARD is to ACCEPT all packets. One way to stop packet forwarding is to add the following rule: # iptables -A FORWARD -j DROP
Any changes made to a firewall don’t survive a reboot unless they’re saved to the appropriate configuration file. While in most cases, the file is /etc/sysconfig/iptables, that’s not the case for all of the selected distributions. For that reason, once you’ve made any desired changes, run the following command to save the new firewall to the appropriate configuration file: # iptables-save > configfile
On the other hand, iptables rules are complex. Mistakes are far too easy to make. When it makes sense to start over, the following command can restore the original firewall: # iptables-restore < configfile
One common option for the configfile is /etc/sysconfig/iptables.
P:\010Comp\Passport\671-5\ch09.vp Tuesday, January 29, 2008 3:00:38 PM
Color profile: Generic CMYK printer profile / Mike Meyers’ CompTIA Composite Passport Default screen
264
Linux+ Certification Passport / Jang, Meyers / 154671-5 / Chapter 9
MIKE MEYERS’ COMPTIA LINUX+ CERTIFICATION PASSPORT
Objective 9.05
Audit Key Security Files
T
here are a wide variety of security files on any Linux system. Some were described earlier; for example, firewall commands associated with iptables are normally saved in the /etc/sysconfig/iptables configuration file. Most security files are configured somewhere in the /etc/ directory tree.
Exam Tip Recognize standard security log files. Know how they’re monitored. Understand the security risk associated with a dot (.) and related hidden directories in the PATH variable.
Security-related /etc/ Configuration Files Most security configuration settings are included in configuration files based in the /etc/ directory. Key files include /etc/passwd, /etc/group, /etc/shadow, /etc/gshadow, /etc/hosts.allow, /etc/hosts.deny, /etc/securetty, /etc/sudoers, /etc/fstab, and more. Others, such as those for iptables, are configured in the /etc/sysconfig directory. Details are described throughout the book. Just be aware that most services can promote security within their base configuration files.
The Internet Super Server The Extended Internet Services Daemon (xinetd) is also known as the “Internet Super Server.” The xinetd script can start a number of server daemons configured in the /etc/xinetd.d directory simultaneously. The generic configuration file for xinetd services is /etc/xinetd.conf. The files in the /etc/xinetd.d directory are service specific.
Exam Tip Recognize common services associated with the Extended Internet Services Daemon (xinetd), including Telnet, rsync, and TFTP.
Examine the directives in /etc/xinetd.conf. They vary a bit between the selected distributions. The order of directives vary, but all enable default settings with the following command: defaults
P:\010Comp\Passport\671-5\ch09.vp Tuesday, January 29, 2008 3:01:05 PM
Color profile: Generic CMYK printer profile / Mike Meyers’ CompTIA Composite Passport Default screen
Linux+ Certification Passport / Jang, Meyers / 154671-5 / Chapter 9
CHAPTER 9 System Security
265
This allows services such as rsync to retain their default TCP/IP ports (873) within the xinetd service. The next line, instances =
limits the number of active services for a particular service. Depending on distribution, it may be 30, 50, or 60. In other words, no more than 30, 50, or 60 users can be logged into an xinetd-based Telnet server simultaneously. If other xinetd services are running, that reduces the number of instances available to Telnet. This is often followed by log_type SYSLOG
which specifies logging through the syslog daemon as configured in /etc/syslog.conf, described in more detail in the Chapter 6 section “Work with Log Files.” This is followed by two lines that specify logging information for success and failure through an xinetd-controlled service: log_on_success PID HOST log_on_failure HOST
Naturally, this specifies the hostname (or IP address) of the client host, as well as the Process Identifier (PID) of the connection. One option is to add USERID to the list, which lists the UID number associated with the login. Other directives are distribution specific; a substantial number of options are available as defined in the man page for xinetd.conf. But remember, the Linux+ exam covers only common settings, so that information is beyond the scope of this book. But there is one more common directive, which includes the contents of the configuration files in the /etc/xinetd.d directory: includedir /etc/xinetd.d
Each file in the /etc/xinetd.d directory is normally associated with a specific service. Normally, scripts in this directory are disabled with the following directive: disable = yes
You can enable any xinetd service by changing disable = yes to disable = no in its custom /etc/xinetd.d/ configuration file. Examine the options in Table 9.2. Note the only_from and no_access directives, as they can help configure security by hostname or IP address. There are two basic ways to activate a service. First, you can edit a configuration file in the /etc/xinetd.d directory directly. Just open it in a text editor and
P:\010Comp\Passport\671-5\ch09.vp Tuesday, January 29, 2008 3:01:23 PM
Color profile: Generic CMYK printer profile / Mike Meyers’ CompTIA Composite Passport Default screen
266
Linux+ Certification Passport / Jang, Meyers / 154671-5 / Chapter 9
MIKE MEYERS’ COMPTIA LINUX+ CERTIFICATION PASSPORT
TABLE 9.2
Standard Parameters for xinetd Configuration Files
Field
Description of Field Entry
user group server only_from
Specifies the server user account. Specifies the server group account. Notes the full path to the server daemon. Associates with the hostname or IP address allowed to use the server. CIDR notation (such as 192.168.0.0/24) is okay. Works with the hostname or IP address not allowed to use the server. CIDR notation is okay. Sets the information sent to a log file if there’s a successful login attempt. Assigns the information sent to a log file if there’s a failed login attempt. By default, set to yes, which disables the service.
no_access log_on_success log_on_failure disable
change the disable directive from no to yes. The other way is to use the chkconfig command; for example, the chkconfig telnet on command automatically changes the disable directive in the /etc/xinetd.d/telnet configuration file.
Security Logs Security logs can be general for the system, or specific based on services. They commonly include access and error logs. For example, the CUPS service includes access_log and error_log files in the /var/log/cups directory. Alternatively, Samba access logs are available by IP address or hostname in the /var/log/samba directory. Details are customized in service-specific configuration files.
Other Security Configuration Issues One key security configuration issue is related to the PATH. When logged in, review your own path with the echo $PATH command. If you see a dot in the path, such as in the following outputs, .:/bin:/usr/bin:/sbin /bin:/usr/sbin:/usr/.sbin:/sbin
there may be a security problem with your system. A cracker who has logged into an account with the first PATH is able to execute scripts from the current directory. A cracker who has logged into an account with the second PATH has access to scripts in the /usr/.sbin directory. As the dot (.) in front of a file or directory hides that object, an unobservant Linux administrator could miss a whole bunch of malicious scripts in that directory.
P:\010Comp\Passport\671-5\ch09.vp Tuesday, January 29, 2008 3:01:44 PM
Color profile: Generic CMYK printer profile / Mike Meyers’ CompTIA Composite Passport Default screen
Linux+ Certification Passport / Jang, Meyers / 154671-5 / Chapter 9
CHAPTER 9 System Security
Objective 9.06
267
Identify File Corruption
F
ile corruption is often a symptom of something worse. For example, a so-called rootkit appears to conceal malware in familiar commands. Such malware could open network ports to transmit data such as packets with passwords or keylogs with data such as your credit card numbers. Two available tools for fighting malware are the rpm -V command and Tripwire. These tools can help the Linux administrator detect unauthorized changes to critical files. Options such as the md5sum and sha1sum commands are often also used to identify corruption in large downloads.
Verifying with rpm One way to identify corruption in files or packages is to verify the integrity of the associated RPM package. When verifying an installed package, it compares information about that package with information from the local system RPM database. The --verify (or -V) switch compares the MD5 checksum, size, permissions, type, user owner, and group owner of each file in the package. For example, you can verify every file associated with every installed RPM package with the following command: # rpm --verify -a
With the hundreds and even thousands of RPMs that may be installed, this process may take some time. As described in the RPM man page, you can substitute -V for the --verify option, and take the same action with the rpm -Va command. Alternatively, a limited level of verification is possible against a downloaded RPM. For example, the following command verifies all files associated with the Samba RPM package, as installed from the home directory of the root user: # rpm --verify -p /root/samba-3.*.rpm
Another option is to verify a specific file installed from an RPM. For example, the following command checks the integrity of the mount command: # rpm --verify --file /bin/mount
If the integrity of the file is good—in other words, if there are no changes from the originally installed RPM package—there will be no output. If there’s output, that means that there have been changes to files and/or packages. If there are a few changes, there might not be a problem. For example, administrators do change configuration files. Users change files in their own home directories. So we need more information. When running rpm --verify, there are eight tests. Changes are associated with output of up to eight characters. Each active character is associated with a change.
P:\010Comp\Passport\671-5\ch09.vp Tuesday, January 29, 2008 3:02:12 PM
Color profile: Generic CMYK printer profile / Mike Meyers’ CompTIA Composite Passport Default screen
268
Linux+ Certification Passport / Jang, Meyers / 154671-5 / Chapter 9
MIKE MEYERS’ COMPTIA LINUX+ CERTIFICATION PASSPORT
Alternatively, a dot (.) in a column means that there is no change in that category. For example, the following command, which verifies the integrity of the /bin/vi file, shows an incorrect user ID assignment: # rpm --verify --file /bin/vi .....U.. /bin/vi
Table 9.3 lists and describes the meaning of failure codes shown in the output to the rpm --verify command.
Running Tripwire There are open source and commercial versions of Tripwire. The open source version of Tripwire is designed to detect changes to files and associated system objects. Based on parameters set in a policy file, Tripwire takes a “snapshot” of the current state of a system. As Tripwire is no longer included in the default versions of the selected Linux distributions, it must be installed separately. The commercial version is available from www.tripwire.com; the open source version is available from http:// sourceforge.net/projects/tripwire/. A standard Tripwire report provides a big-picture view of files that have been added, deleted, or otherwise changed. Objects or files that have been modified can be defined more closely.
Checking Download Integrity When downloading large files, there is often a small file known as a checksum. The most common checksum is associated with the MD5 hash, and is normally stored in a text file in the same directory as the download. For example, after downloading the Snort RPM package for my system, I run the following command to verify the MD5 hash: # md5sum snort-2.7.0.1-1.RHEL4.i386.rpm 1de7e5190c73ab3d3a6154a0a7748874 snort-2.7.0.1-1.RHEL4.i386.rpm
TABLE 9.3
rpm --verify Codes
Code
Description
5 S L T D U G M
MD5 checksum File size Symbolic link File modification time Device User Group Mode
P:\010Comp\Passport\671-5\ch09.vp Tuesday, January 29, 2008 3:02:29 PM
Color profile: Generic CMYK printer profile / Mike Meyers’ CompTIA Composite Passport Default screen
Linux+ Certification Passport / Jang, Meyers / 154671-5 / Chapter 9
CHAPTER 9 System Security
269
I should be able to verify the bolded long number in the left column against the MD5 hash available from the download server. Sometimes, the Secure Hash Algorithm 1 (SHA1, developed by the U.S. National Security Agency) hash is used instead of MD5. For example, Red Hat makes a SHA1SUM file available with the ISO files associated with Fedora Linux downloads. Before burning a DVD or CD from a Fedora Linux download, I usually check its integrity with a command like: # sha1sum F-7-x86_64-DVD.iso 7cdbd9e1bed9cc9ce2c7970abeaca4da08d2994a
F-7-x86_64-DVD.iso
I should be able to verify the SHA1 hash (shown in bold) against the SHA1SUM file available with the Fedora Linux 7 download.
CHECKPOINT ✔Objective 9.01: Configure Encryption
Encryption in Linux starts with the Shadow Password Suite, which uses MD5 encryption. Files can also be encrypted. Communications can be encrypted using CIPE and SSH. To this end, a number of encryption schemes are available, including SSL/TLS for websites, GPG for e-mail, and RSA and DSA keys for SSH connections.
✔Objective 9.02: Detect Intrusion Attempts
Intrusions can be detected through log files like /var/log/secure, as well as those customized per service. The who, w, and last commands can also help.
✔Objective 9.03: Understand Intrusion Detection Systems
There are a number of third-party Intrusion Detection Systems available, including Snort, PortSentry, SWATCH, and LIDS. Excellent command-line IDS tools include tcpdump and netstat -a.
✔Objective 9.04: Decipher Basic Firewall Configurations
To configure a firewall, you need to know at least the basic TCP/IP ports. Then you can use the iptables command to secure all but essential ports.
✔Objective 9.05: Audit Key Security Files
Some security files are specific to the Internet Super Server in the /etc/xinetd.d directory. Others are service specific and are configured in the configuration file associated with the service.
✔Objective 9.06: Identify File Corruption
The rpm -V and Tripwire tools can help the administrator detect files that may be altered by corruption or even crackers breaking into the local system.
P:\010Comp\Passport\671-5\ch09.vp Tuesday, January 29, 2008 3:02:47 PM
Color profile: Generic CMYK printer profile / Mike Meyers’ CompTIA Composite Passport Default screen
270
Linux+ Certification Passport / Jang, Meyers / 154671-5 / Chapter 9
MIKE MEYERS’ COMPTIA LINUX+ CERTIFICATION PASSPORT
REVIEW QUESTIONS Before leaving for the next chapter, take a few minutes to go through these questions. While doing so, take in both the content and the question format. Understanding what to expect on the exam can increase your chances for success. 1. Which of the following encryption algorithms is standard for Linux Virtual Private Network connections? A. B. C. D.
CIPE GPG Blowfish MD5
2. Which of the following applications is often used to check the integrity of a password? A. B. C. D.
Crack pwcheck Snort PAM
3. You’re checking the PATH of several users. Which of the following values of PATH is the highest security risk? A. B. C. D.
/usr/local/sbin:/usr/local/bin:/usr/sbin /usr/kerberos/bin:/bin:/usr/bin:/home/michael/bin /usr/bin:/root/bin .:/bin:/usr/bin:/sbin
4. Which of the following Intrusion Detection Systems is not intended to help protect systems from network intrusions? A. B. C. D.
Snort Tripwire PortSentry netstat
5. Which of the following TCP/IP ports is not associated with the FTP, SSH, or SMTP protocols? A. B. C. D.
21 22 23 25
P:\010Comp\Passport\671-5\ch09.vp Tuesday, January 29, 2008 3:02:58 PM
Color profile: Generic CMYK printer profile / Mike Meyers’ CompTIA Composite Passport Default screen
Linux+ Certification Passport / Jang, Meyers / 154671-5 / Chapter 9
CHAPTER 9 System Security
6. Which of the following is the current standard for encryption of the Apache Web server? A. B. C. D.
HTTPS SSL Virtual Hosts TLS
7. If you’re running a Samba-based File server, which of the following TCP/IP ports should not be blocked by a firewall? A. B. C. D.
139 110 80 53
8. Which of the following commands displays the current firewall rules associated with iptables? A. B. C. D.
iptables iptables -D iptables -A iptables -L
9. Which of the following files is normally edited in order to activate the Telnet service? A. B. C. D.
/etc/telnet /etc/krb5-telnet /etc/xinetd.conf /etc/xinetd.d/telnet
10. Which of the following commands checks the integrity of all files and packages on the local system? A. B. C. D.
rpm -V /var/log/rpmpkgs rpm -V rpm -A rpm -Va
REVIEW ANSWERS 1.
Linux Virtual Private Networks, implemented through Cryptographic IP Encapsulation (CIPE), are frequently configured with the Blowfish encryption algorithm.
P:\010Comp\Passport\671-5\ch09.vp Tuesday, January 29, 2008 3:03:08 PM
271
Color profile: Generic CMYK printer profile / Mike Meyers’ CompTIA Composite Passport Default screen
272
Linux+ Certification Passport / Jang, Meyers / 154671-5 / Chapter 9
MIKE MEYERS’ COMPTIA LINUX+ CERTIFICATION PASSPORT
2.
The Crack software tries to decipher passwords using standard dictionary checks. It’s intended to help administrators identify users who use passwords of inadequate strength.
3.
The dot (.) means that scripts in the local directory are run without the full path. Crackers may be able to run root-level scripts from the current directory, which can put at least the local system at risk. That is a more substantial risk than any specific directory, even any subdirectory of the root user.
4.
The Tripwire system is intended to detect unauthorized changes to files. Snort and PortSentry are commonly used to detect network intrusions. The netstat command, as suggested in the Chapter 5 section “Understand Network Troubleshooting,” can display current network connectivity information.
5.
As shown in /etc/services, port 23 is associated with Telnet. Port 21 is associated with FTP, port 22 is associated with SSH, and port 25 is associated with SMTP.
6.
Transport Layer Security (TLS) is the successor to SSL, which provides encryption on client connections to the Apache Web server.
7.
TCP/IP port 139 is associated with the NetBIOS session service, which supports connections between Samba systems. Port 110 is associated with POP3 e-mail connections, port 80 is associated with Web connections, and port 53 is associated with DNS services.
8.
The iptables -L command lists all rules currently configured and active for the local system. The iptables -D command deletes a selected rule. The iptables -A command adds a selected rule. If you see a -n with it as well, don’t let it confuse you. The -n just keeps rules associated with IP addresses.
9.
For the selected distributions, Telnet is an xinetd service, configured in individual files in the /etc/xinetd.d/ directory. There is a Kerberosenabled version of Telnet available, configured in the krb5-telnet file, which is also in the /etc/xinetd.d directory. Otherwise, answer B would also be correct.
10.
The rpm -Va command verifies the integrity of files from all installed RPM packages. Any file which has been changed or is otherwise different from its status as originally installed is listed with labels associated with the type of change.
P:\010Comp\Passport\671-5\ch09.vp Tuesday, January 29, 2008 3:03:29 PM