Jeff Davis. 1. Tutorial 2: Calibrating a Detector. Introduction. After creating a
detector, the next step is to calibrate the detector for the energy resolution.
Tutorial 2: Calibrating a Detector Introduction After creating a detector, the next step is to calibrate the detector for the energy resolution. The values entered in during the setup of the detector are approximations, often derived from instrument specifications and settings. It is imperative for accurate simulation and quantification to calibrate the detector precisely. Calibration is often done with a metallic sample (Cu, Zn, Fe and Mn are common calibration references). A high precision spectrum (at least 100,000 counts in the Kα peak) is collected and saved in one of DTSA II’s readable file formats. This spectrum is used to calculate the full width at half max (FWHM) for the Mn Kα line, and the energy recorded per channel. In this tutorial, you will learn to: • Use the calibration alien to calibrate a detector o With manual calibration o With spectrum reference calibration • Manage calibrations for each detector
Detector Calibration Start the calibration alien by selecting Tools / Calibration Alien. In the first screen, you will be asked to select an instrument and detector to calibrate. If your instrument or detector is not listed, refer to tutorial 1 for instructions on adding a detector. If the detector has not been calibrated previously, then the word “initial” will appear after the detector name and calibration value. After the detector has been calibrated, the date of the calibration will appear at the end of the detector name.
Jeff Davis
1
Manual Calibration
and comments section.
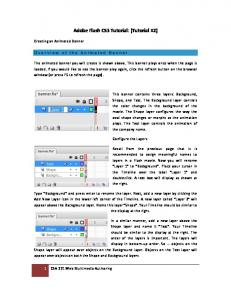
In the second screen, you will select either manual or reference calibration. If manual calibration is selected, the screen shown at the left is the next and final window. The user may input the values for the full width at half maximum at the Mn K L-3 (Mn Kα) peak, the channel width, zero offset and the effective calibration date. Please note that managing different calibrations for each detector is discussed in the troubleshooting
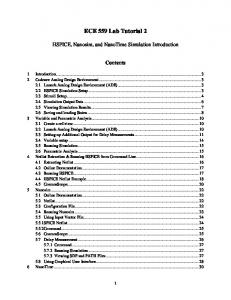
Reference Calibration If the option is selected to calibrate using an elemental reference, the screen shown at the left is the next screen. DTSA II will calibrate using 4 elemental references: Cu, Zn, Mn and Fe. After specifying the material, you should select the spectrum collected for use as a calibration standard. The standard will ideally be a pure element, with at least 100,000 counts in the primary peak of interest. If the spectrum selected was saved in the EMSA (.msa) format, then the fields for Live Time and Probe Current and Effective Date should automatically fill in. When all of the fields are filled in, click the Next button to continue. After setting the reference parameters, DTSA II will calculate the fit. When the Next button becomes active, click it to view the Fit Results screen. This screen shows the results of the fit calculation, which will now be associated with the detector. Users interested in the methods of calculation for each parameter should refer to the DTSA II User’s Manual.
Jeff Davis
2
After the calculation has finished, DTSA II will add two spectra to the spectrum list: the original calibrated reference, and the fit spectrum. You should check the fit and calibration to ensure that the system has worked correctly. The fit displayed above in red is an example of a good fit.
Command Line Functions In terms of command line functions relating to calibration, it may be useful to the user to call up individual calibration values such as FWHM, Noise and Fano Factor. The following examples are some methods for doing just that. Command Syntax Comments d1.getCalibration()
d{#}.getCalibration
d1.calibration.getZeroOffset()
d{#}.calibration.getZeroOffset
d1.calibration.lineshape.getNoise
d{#}.calibration.lineshape .getNoise
Returns the calibration value for d# (e.g. d1, d2, d3) Returns a value for the zero offset in eV As shown in other examples, the individual calibration values (i.e. FWHM, Noise, Fano Factor, etc.) can all be individually called and recorded.
Troubleshooting and Comments As noted in the first tutorial, a common problem with calibration (See Tutorial 1, “Setting and Initial Resolution”) is in setting the initial values. For instance, if you set up a detector with an initial calibration of 10 eV/ch, but the actual calibration is 5 eV, DTSA II will not be able to calibrate the detector using an
Jeff Davis
3
elemental reference. The simplest solution is to use a manual calibration to correct the initial calibration, and then calibrate using an elemental reference.
Managing Calibrations Each calibration is associated with a date. That date is used to determine which calibration should be associated with which spectrum. Naturally, as a detector ages, the calibration shifts, yet it is unwise to apply a recent calibration to spectra collected over a year ago. DTSA II is capable of organizing calibrations by date, meaning that older spectra can be associated with a corresponding older calibration. For beginning users, it is important to note that the effective date displayed for each calibration represents the earliest date of application for that calibration. All spectra collected before the date of calibration are associated with older calibrations.
Jeff Davis
4