Email: [email protected]. Website: ..... Web-based email, e-commerce sites and online shopping sites are all database-driven. ...... by
interactive by a technologically enhanced Learning Management System (LMS). ... INTUITEL is implemented for five different leading eLearning platforms (eX-.
Oct 26, 2011 - design principles of best practice and localization of content.)2. The two ...... Open Source Software: S
MySQL Reference Manual (esp. searchable HTML version with user comments)
... Build Your Own Database Driven Website Using PHP & MySQL. 3rd ed.
Mar 28, 2016 - of Illinois, Chicago. John Diamond University of. Wisconsin, Madison. Sarah Lubienski University of. Illinois, Urbana-Champaign. Larisa Warhol.
15 projects, the development of the OER Impact Map, and 20 surveys .... In addition, the team have adopted an agile meth
from existing research repositories (e.g. OER Knowledge Cloud and MOOC Research .... By internet access: An overwhelming
Eros, Thanatos, and Captive Lives in Federico Garcia Lorca's Blood ... The opening scene of Blood Wedding reveals the Mother in an in-between ..... the flesh which moves in the scene from a mere image to a symbol, with the capacity to be.
Nov 26, 2015 - With our free mobile-friendly Princess@Sea service, you'll have a world of .... a Captain's Circle Help D
Nov 26, 2015 - S3 Penthouse suite Aft (Dolphin). S4 Premium ...... We will then send you a Fact Sheet and Questionnaire
OKORO, O. I.. Author 3. NWANGWU, E. O. ... *Nwangwu E.O., Okoro 0.1, **Oti S. E.* ..... (1980), Finite Elements in Electrical and Magnetic Field Problems. John.
Apr 5, 2016 - Sapling Learning, and Top Hat. Andrew Misseldine. Teaching Math ... Desmos.com, eMathHelp.net, and Android/iOS apps. Andrew Misseldine.
HIST& 146 – US History (5). Spring quarter. CMST& 101 – Introduction to
Communication (5). CSCI 212 – Web Development with Scripting (5). PE 101 –
Global ...
May 25, 2011 - resources (usually combinations of text, audio and visual/video files) and ... Recognition that effective
John Seely Brown. Allen L. Hammond. We welcome your feedback, comments and discussion. Please post your comments at http://www.oerderves.org.
Mar 28, 2011 - credit for students project and the OER university concept. .... the perception associated with online de
Mar 28, 2011 - Please consult the relevant history pages in the wiki for the relevant contribution history and ...... A
Keywords: Open Educational Resources, Initiatives, Web 2.0, Open Content,. Qualitative Analysis ..... create free content in terms of freedom and money. To give ...
Dec 20, 2017 - The road to Llubjana has ... Yesterday we learned from the first keynote that of the 12 Arab countries surveyed, the availability of.
and research resources that reside in the public domain or have been ... curated to connect educators to digital OER in a meaningful manner via hosting, rating, ... 2008), it is currently unclear how to best ensure quality in lieu of a traditional pu
May 25, 2011 - Distance education is a set of teaching and learning strategies (or educational methods) that can be used
Asabe Ibrahim et al JMSCR Volume 3 Issue 3 March 2015. Page 4745. JMSCR ...... tions in reproductive and maternal-child health. Journal of health communi-.
universal access to language education. This is a good thing. Use this introductory guide to find open resources for you
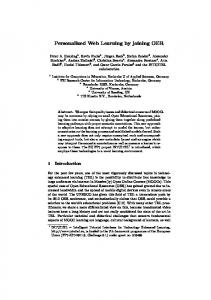
s2 educator. He teaches math. '7;. He has created his own videos. F. P. Pen is a flipped whole wor|d. Creative. (Sommons
TCC 242/05 Web Database Application. 1.3 Creating basic PHP scripts.
Objectives. Introduction. Overview of PHP syntax. Creating your first web page
with PHP.
UNIT 1 i Introduction to web development and PHP
Unit 1 TCC 242/05
Web Database Application
Introduction to Web Development and PHP
ii WAWASAN OPEN UNIVERSITY TCC 242/05 Web Database Application
COURSE TEAM Course Team Coordinator: Mr. Ishan Sudeera Abeywardena Content Writer: Mr. Tang Chun Chong Instructional Designer: Mr. Yeap Hock Aun Academic Member: Mr. Chandarasageran Natarajan
COURSE COORDINATOR Mr. Ishan Sudeera Abeywardena
EXTERNAL COURSE ASSESSOR Dr. Sanjay Jasola, Gautam Buddha University
PRODUCTION In-house Editor: Mr. Yeap Hock Aun Graphic Designer: Ms. Leong Yin Ling
Wawasan Open University is Malaysia’s first private not-for-profit tertiary institution dedicated to adult learners. It is funded by the Wawasan Education Foundation, a tax-exempt entity established by the Malaysian People’s Movement Party (Gerakan) and supported by the Yeap Chor Ee Charitable and Endowment Trusts, other charities, corporations, members of the public and occasional grants from the Government of Malaysia. The course material development of the university is funded by Yeap Chor Ee Charitable and Endowment Trusts.
Wawasan Open University Jalan Sultan Ahmad Shah, 10050 Penang. Tel: (604) 2180333 Fax: (604) 2279214 Email: [email protected] Website: www.wou.edu.my
UNIT 1 iii Introduction to web development and PHP
Contents Unit 1 Introduction to Web Development and PHP Course overview
1
Unit overview
3
Unit objectives
3
1.1 Understanding web development
5
Objectives
5
Introduction
5
Web development A brief description
5
Methodologies for web development
8
Databases on the Web
16
Suggested answers to activities
20
1.2 Installing and configuring Apache, MySQL and PHP
23
Objectives
23
Introduction
23
Installing LAMP
23
Testing the configurations of Apache, PHP and MySQL
26
Suggested answers to activities
35
iv WAWASAN OPEN UNIVERSITY TCC 242/05 Web Database Application
1.3 Creating basic PHP scripts
37
Objectives
37
Introduction
37
Overview of PHP syntax
37
Creating your first web page with PHP
38
Suggested answers to activity
45
Summary of Unit 1
47
Unit practice exercises
49
Suggested answers to self-tests
55
Suggested answers to unit practice exercises
57
Appendix
61
References
95
Glossary
97
UNIT 1 1 Introduction to web development and PHP
Course Overview Welcome to TCC 242/05 Web Database Application. This is a course that emphasises both theory and application. It introduces the concepts, methods and software that will help you create web database applications. A web database application is a database-driven web application that enables websites such as online shopping, Internet banking or social networking sites to be created. In this course, you will learn how to build web database applications that incorporate authentication and security, and that adhere to industry standards with respect to database-driven websites. This course module has five study units. Each unit takes three to four weeks to complete. The course is structured so that each unit builds on previous ones. In Unit 1, you will be introduced to the fundamentals of web application development, web servers and the syntax of the PHP scripting language. PHP is a powerful server-side scripting language that allows you to build dynamic websites. You will also be shown how to install Apache web server, PHP and MySQL on your computer. Unit 2 will focus on the basics of PHP. Here, you will learn PHP data types, customised functions and control structures. Unit 3 will discuss the intermediate-level features of PHP such as strings, arrays and files. The discussion of database integration begins in Unit 4. You will learn how PHP interacts with MySQL and MySQL library functions. The final unit of this course will cover the principles of using sessions and cookies for saving state information on a web page. The material in this module is presented in a simple, step-by-step format, and it includes many examples and web programming exercises. Each unit has specific objectives, activities and self-tests. The activities and self-tests allow you to check your progress and improve your understanding of what you have learnt. The practice exercises at the end of each unit allow you to practise the skills that you have learned so that you can develop proficiency in real-world problem solving. By the end of this course, you should be able to: 1. Install and configure Apache web server, PHP and MySQL. 2. Create a web database application incorporating functions and control structures using PHP. 3. Manipulate strings using PHP. 4. Handle web form submissions.
2 WAWASAN OPEN UNIVERSITY TCC 242/05 Web Database Application
5. Work with database records and manage user accounts. 6. Use PHP to manipulate database records. 7. Use hidden forms, query strings, cookies and sessions to save state information.
UNIT 1 3 Introduction to web development and PHP
Unit Overview his unit introduces you to web development methodologies. It introduces the Apache web server, PHP and MySQL, and discusses the rationale of using databases on the web. You will also learn how to install and configure the Apache web server, PHP and MySQL on both Linux and Windows systems. In addition, you will create web pages that use basic PHP scripts.
T
Unit Objectives By the end of this unit, you should be able to: 1. Discuss web development methodologies. 2. Install, configure and run the Apache web server, PHP and MySQL on your computer. 3. Create web pages using PHP scripts.
4 WAWASAN OPEN UNIVERSITY TCC 242/05 Web Database Application
UNIT 1 5 Introduction to web development and PHP
1.1 Understanding Web Development Objectives By the end of this section, you should be able to: 1. Describe web development methodologies. 2. Describe how information is exchanged between servers and clients. 3. Explain why databases are used on the World Wide Web.
Introduction A web database application is a database-driven web application. This type of application is used in Internet banking websites such as Maybank2U.com, online shopping websites such as Amazon.com and social networking sites like Facebook. For sites like Amazon.com, even a few minutes of downtime could cost millions of dollars in lost revenue. Many dotcom failures in the early nineties were caused by the improper management and underestimation of the scope and features of web development. In this section, we are going to look at the architecture of a web application, starting with the methodologies of web development. We will also show how databases are used on the Web.
Web development A brief description A website is a place for publishing information using web pages. A web page is a collection of text, multimedia and hyperlinks that allow users to navigate from one page to another. Web development is defined as the conception, design and implementation of a web entity created to serve a specific purpose. The purpose could be to sell something, promote products or publish information. Websites can be categorised as personal or professional. Personal sites are mainly for people to share information about themselves or their products. They may also just want to get attention, promote their skills or post their curriculum vitae online to improve their chances of getting a job. Recently, people have started to publish virtual journals called blogs that describe events in their lives, their interests or their personal opinions on various topics. Professional sites are created as portals that showcase businesses and provide information on their products and services. Some of these portals enable businesses to sell products online and act as virtual storefronts for receiving orders and payment. Such sites can directly generate revenue for businesses.
6 WAWASAN OPEN UNIVERSITY TCC 242/05 Web Database Application
Websites can also be categorised as static or dynamic. Static websites are developed with fixed-content pages (pages with content that does not change dynamically) that do not contain any programmatically controlled content. The content will only change when the website designer manually modifies it. As the pace of change and business information flows have become more rapid, static websites are no longer effective at showcasing fast-moving businesses. Dynamic websites are more effective tools for such businesses. Dynamic websites are driven by dynamic content that is loaded or created using programming and databases. The following are some of the popular platforms that are used to create dynamic websites.
LAMP (Linux, Apache, MySQL and PHP) This is a popular platform for creating dynamic websites because it is open source, free of charge and easily adaptable. This course will go into the details of MySQL and PHP, while also briefly describing Linux and Apache. Linux is an open-source operating system, Apache is an open-source web server, MySQL is an open-source database and PHP is an open-source scripting language.
Microsoft .NET The .NET framework is a platform that was created by Microsoft. It has a huge library that supports several programming languages like Visual Basic and C#. It also provides many ready-made tools, templates and applications that assist developers in creating software. However, to use these tools and templates, developers have to purchase the appropriate licenses from Microsoft.
Java Struts and JSP Java Struts and Java Server Pages (JSP) are technologies for developing dynamic websites with the Java programming language. Java provides a standardised Integrated Development Environment (IDE), but it is not as intuitive as the Microsoft Visual Studio IDE.
What platform should I use? Since LAMP is free and open-source, you should consider using it for web development projects in which cost is the main constraint. If the software you are dealing with is written in Java, JSP or Struts could be better candidates. If you are looking for ease of starting, ready-made tools and templates, technical support and more robust applications, you should consider .NET.
UNIT 1 7 Introduction to web development and PHP
When choosing a platform, you should also consider the following important aspects of web development: 1. Security 2. Scalability 3. Search engine optimisation 4. Portability 5. Maintenance 6. Administration
Web Reference You can read more about the Open-Source Software movement at: 1. http://www.opensource.org/ 2. http://foss.org.my/
Activity 1.1 1. Web development is defined as A. a concept that describes the growth of an online business. B. the conception, design and implementation of a web entity to serve a purpose. C. a reference guide for writing a web programming language. D. the philosophy of how to create and run an online business.
2. Which of the following is not a platform for creating dynamic websites? A. B. C. D.
JSP LAMP MS.NET Internet Explorer
8 WAWASAN OPEN UNIVERSITY TCC 242/05 Web Database Application
3. Personal sites are mainly for people to share information about themselves or their products. People nowadays publish virtual journals called _____________ that describe events in their lives, their interests or their opinions.
4. ____________ websites have pages with fixed content, which is not programmatically controlled.
5. LAMP is one of the most popular platforms for creating websites because it is open source, free of charge and easily adaptable. True / False?
6. What are the important aspects of web development that you should consider when choosing a platform?
Methodologies for web development Some web development projects involve minor modifications to existing websites, while others may involve major development work. To make sure that projects are delivered on time and within budget, we need to look into several development methodologies.
Waterfall model (also known as the traditional model) In this model, systems development is divided into five well-defined sequential stages. The stages are (Figure 1.1): 1. Analysis: Identifying the problem and formulating how to translate it into the software domain as a specification. 2. Design: Designing the system. 3. Implementation: Implementing the system for end users in a real-world scenario. 4. Testing: Testing the system for functionality and bugs, against the initial specification. 5. Delivery/Support: Handing over the finished product to the customer and providing software, hardware and usability support.
These stages must be performed sequentially. Hence, the final product will be delivered when all the stages have been completed.
UNIT 1 9 Introduction to web development and PHP
Analysis
Design
Implementation
Testing
Delivery/Support
Figure 1.1 The waterfall model of systems development
The advantages of using the waterfall model in systems development are: 1. It enables you to plan and organise the tasks needed to achieve the main objective. Your objective in systems development is to develop a usable system and deliver it to the user on time. You need to organise your team members’ schedules in order to meet the deadline. The waterfall model enables you to see where you are heading and it clearly differentiates between the various stages of the development process. Thus, by using this model as your fundamental framework, you can plan and organise the workload for your project.
2. Short development times. Using the waterfall model will enable short development times as there is no iterative process involved. Therefore, it enables you to reach your goal in a shorter time. However, the quality of your system will be affected if you do not properly complete the tasks in one stage before moving on to the next.
3. Low cost. Due to the direct approach to the objective taken by this model, we can shorten development time. Hence, manpower, documentation and utility costs can be reduced.
10 WAWASAN OPEN UNIVERSITY TCC 242/05 Web Database Application
The disadvantages of the waterfall model are: 1. Not flexible to changes. The model has a rigid sequence. Hence, you cannot start a new stage until you have completed the previous stage. In addition, it does not let you backtrack when you discover problems. As such, errors will accumulate from stage to stage.
2. System limitations are not discovered until later stages in the development cycle. This model does not allow you to backtrack; hence when you discover an error in a stage, the error will be carried forward to the subsequent stages. For example, if you make an error in the analysis stage, the error will be carried to the delivery stage. Therefore, the error will exist in the final product.
3. Unable to see the whole product until it is finished. We usually need to see a product before purchasing it. The waterfall model does not give us the luxury to see the product until the final stage. Thus, if the user does not like the product, it is too late for changes. If you restart the project, the cost of development will increase substantially.
For these reasons, the waterfall model is impractical in the real world. When we develop a system, it is often difficult to anticipate problems that may arise. In addition, users’ demands change from time to time but the waterfall model is not flexible enough to cope with the changes. Consequently, we need a model that is flexible and able to cope with changes. This leads us to the next model, namely the iterative development model.
Iterative development model This model is similar to the waterfall model in that we still have to go through the analysis, design, implementation, testing and delivery stages. However, an iterative process has been added to the model, so that each stage can provide feedback to the stages that precede it. This iterative process enables you to refine the system or amend errors before progressing to the next stage. As you can see in Figure 1.2, the iterative process has been added to the waterfall model to create the iterative development model. This model enables feedback to be iterated between stages until you are satisfied with the result. For example, you can iterate between the analysis and design stages until the result is acceptable. If problems are discovered at the implementation stage, you can go back to either the design stage or the analysis stage.
UNIT 1 11 Introduction to web development and PHP
Analysis
Design
Implementation
Testing
Delivery/Support
Figure 1.2 The iterative development model
The advantages of using the iterative development model in systems development are: 1. Problems can be discovered and rectified at an early stage. You still carry out the various stages, but not in a manner as rigid as in the waterfall model. Errors discovered at an early stage can be rectified. As such, the accumulation of errors from stage to stage can be eliminated.
2. Can cope with changes. At any point of the process, you can decide to continue, amend or stop the project. This flexibility is important because unexpected circumstances or changes in user’s requirements can arise. By providing flexibility during the development of a system, changes can be made by the developer, stakeholders and users without unduly increasing costs.
3. A better quality system. Due to the flexibility of iteration, you can refine each stage until you are ready to move on. In addition, when you iterate between stages, you may discover new ideas or better ways to implement the system.
12 WAWASAN OPEN UNIVERSITY TCC 242/05 Web Database Application
The disadvantages of using the iterative development model are: 1. Limited application range. The iterative development model is only applicable for developing business applications and not really suitable for technical applications. Hence, its focus is narrower.
2. The process can be messy. Due to its flexibility, there might be so many changes that it is difficult to keep track of all of them. In addition, you can be so drawn to new ideas as you keep iterating between the stages that the main objective of the system becomes lost in the process.
3. Costs can increase. Excessive iteration can increase development time. When development time is increased, development costs will increase as well.
Prototype approaches The essence of iterative design is to build, test and then refine the design. We need an approach that enables us to quickly build a system and obtain useful feedback. Prototyping is such an approach. There are three types of prototyping: 1. Throwaway (rapid) prototyping technique Throwaway prototyping is also known as rapid prototyping. A prototype built using this technique will not be used as part of the final system. This technique requires that the prototype be built quickly so that information can be promptly collected and used in the development life cycle.
Preliminary requirements
Build prototype
Evaluate prototype
no
Adequate?
yes
Figure 1.3 The throwaway (rapid) prototyping technique
Final requirements
UNIT 1 13 Introduction to web development and PHP
As you can see from Figure 1.3, a prototype will be built after the preliminary requirements analysis. Then you will evaluate the prototype. If the prototype is adequate, you may move to the final requirements specification. Here, adequacy means that the design knowledge gained from the prototype is good enough to derive the final requirements. If the prototype is found to be inadequate during testing, you need to rebuild and then re-evaluate the specifications/ideas until they are acceptable to the user. In the throwaway technique, the prototype will be discarded upon completion of the final requirements specification. This method enables you to see the overall features of the system before it is completed.
2. Incremental technique The idea here is to save time between the specification and delivery stages. This requires a compromise between the developer and the clients. A large system will be broken down into components and installed separately. The developer will first set up the skeleton of the system at the client’s premises. Then, the installation of different components is carried out progressively. This incremental approach uses one overall design, even though different components are added at different times. At the end of this progressive process, the entire system will be in place. The advantage of this approach is that it enables a prototype to be tested at the location where the finished system will be used. Changes to the critical features of the system are possible as it is being built by adding components incrementally.
Designing component/prototype Identify components
Req Arch Det Impl Int
no deliver increment
System complete?
yes deliver system
Operation and maintenance
Figure 1.4 Incremental technique
Note: Req = requirements specification, Arch = architectural design, Det = detailed design, Imp = implementation and testing, Int = integration and testing.
14 WAWASAN OPEN UNIVERSITY TCC 242/05 Web Database Application
3. Evolutionary technique In the evolutionary prototyping approach, a prototype is first developed. It will then be evaluated and continually evolved into a fully functional system. The advantage of this method is that it can cope with changes during and after development.
Req
Build prototype
Arch Det Impl
Evaluate prototype
Int
Operation and maintenance
Figure 1.5 The evolutionary technique
Extreme programming Extreme programming (XP) is one of the popular Agile systems development methods. It is a model that works in a rapidly changing environment. The XP model encourages developers to work in pairs to promote synergy and to support each other. Developers are also required to write their own test scripts for the software that they have created. This model assumes that developers are good at teamwork and are highly committed to their work. An XP team emphasises on customer satisfaction as it is expected to quickly deliver tangible results. Thus, this approach needs the heavy involvement of the customer’s representatives in development meetings. The XP model is optimised for small team projects that require less than 20 people.
Scrum Scrum is another Agile approach to software development. Scrum uses iterative development to address requirement changes. The model refers to these repetitions as sprints that usually last for 3 to 4 weeks. Each sprint needs to achieve some targets. For example, Sprint #1 may be required to deliver a part of the project such as the web authentication logic and mechanism. In this approach, the entire team will spend 10 to 15 minutes in “standup” meetings every morning before they start work. Team members will update each other on tasks that were performed after the last standup meeting, tasks to be accomplished
UNIT 1 15 Introduction to web development and PHP
on that day and problems that they faced. They will not resolve the problems during the standup meeting. The problems will be solved outside of the meeting so that team members who are not involved with the problem can go about their own tasks. At the end of a sprint, the customer’s representative will be invited to a demonstration of the features that were implemented in that particular sprint. For example, the developers may demonstrate the login box, user registration page and password retrieval mechanism that were developed based on the targets set for that sprint. Scrum also works for large projects (Schwalbe 2004).
Web Reference The following web references present a comprehensive view of various web development methodologies: 1. “Successful Web Development Methodologies” http://articles.sitepoint.com/article/successful-development
2. “Extreme Programming: A gentle introduction” http://www.extremeprogramming.org/
Activity 1.2 State whether each of the following is True or False. 1. In the methodology of web development, many developers agree with the waterfall model, which states that, in practice, it is feasible to finish a stage perfectly before moving to the next stage because customers will never change their requirements. 2. Extreme Programming is a model that works in a rapidly changing environment, encourages developers to work in pairs and requires developers to write their own test scripts for the software they have developed.
16 WAWASAN OPEN UNIVERSITY TCC 242/05 Web Database Application
Databases on the Web When we surf the Internet, we use a web browser such as Internet Explorer or Firefox to request information from a web server. The request could be submitted as a form, by clicking on hyperlinks or by entering URLs in our web browser. The web server will then respond to our web browser. At the basic level, the Web has a client/server architecture in which the web server is the server and the web browser is the client. Figure 1.6 shows the client-server architecture of the Web.
Request Web Browser
Response
Web Server
Figure 1.6 Client-server architecture of the Web
The web server is not a dedicated storage area. Complex data manipulation operations, especially on commercial sites, should be handled by a separate database server. Figure 1.7 shows how a web browser requests a resource from a database server and how the database and web servers respond to the request. The browser is still the client, but the web server is now the middle tier and the database server is the database tier of the architecture.
Web Browser
Web Server
Database Server
Figure 1.7 A web browser requesting a resource from a database server
Most of the websites that we visit today are powered by web database applications. Web-based email, e-commerce sites and online shopping sites are all database-driven. To build a practical and powerful website, you need to develop a web database application. In order to build web database applications, we need to have a web server such as Apache and a database server such as MySQL. Apache is one of the popular web servers and works best in Unix/Linux-based systems. It can also be implemented in Windows-based systems. As it is open-source, developers can write code to extend the functionality of Apache. It is an extremely quick and stable web server. MySQL is particularly suitable for web applications. You can install and use MYSQL at no cost. MySQL is fast and powerful when used for building small- to medium-sized databases. As it is open source, updates and feature improvements are frequently added.
UNIT 1 17 Introduction to web development and PHP
The key consideration here is to come up with an efficient and reliable way for the web server to communicate with the database. Using PHP is one of the better ways of accomplishing this task. PHP is a powerful, open-source, server-side scripting language particularly suited to web database applications because of integration tools available in the web server and database environments. PHP provides the capability to interact with almost all popular database servers.
Web Reference The following web references present a comprehensive view of websites and web applications: 1. “Web Site vs Web Application” http://www.tonymarston.net/php-mysql/web-site-vs-webapplication.html
2. “PHP” http://www.php.net/
3. “Apache” http://www.apache.org/
Activity 1.3 1. What happens to the web server when we click on a hyperlink in a web page? 2. Why is MySQL suitable for web applications? 3. Apache is a popular web server that works in Unix systems but cannot run under Windows. True / False?
18 WAWASAN OPEN UNIVERSITY TCC 242/05 Web Database Application
Summary In this section, you have learnt the basics of web development. The various web development methodologies were briefly described and their advantages and disadvantages were discussed. You were also introduced to the application of databases on the Web. In the next section, you will be given step-by-step instructions on how to install Apache, MySQL and PHP on your computer. You will use these open-source software to build web database applications.
Self-test 1.1 1. A website is a place for publishing information using web pages. A web page may contain text, images and hyperlinks for users to navigate from one page to another. True / False?
2. Professional sites are created to describe a business, provide contact information and to generate revenues for a business. True / False?
3. As business information flows and the pace of change have become more rapid, dynamic websites have become effective tools for achieving business success. Dynamic websites have dynamic content that is loaded by ______________ or _______________.
4. Linux is an open-source _______________, Apache is an open-source ______________, MySQL is an open-source _____________, and PHP is an open-source _____________. A. web server; operating system; database; programming language B. programming language; operating system; database; web server C. programming language; web server; database; operating system D. operating system; web server; database; web programming language
5. Describe how incremental prototyping is useful in web development.
UNIT 1 19 Introduction to web development and PHP
6. What are the two popular Agile models of web development?
7. An XP team spends 10 to 15 minutes in a “standup” meeting every morning before its members start work. True / False?
8. What is Scrum?
9. Complex data manipulation operations, especially on commercial sites, should be handled by a separate _______________. A. B. C. D.
data server programming language web server web browser
10. PHP is an open-source programming language that is particularly suited to web database applications because of integration tools available in the web server and database environments. True / False?
20 WAWASAN OPEN UNIVERSITY TCC 242/05 Web Database Application
Activity 1.3 1. When we click on a hyperlink, the web browser requests information or a resource from a web server. The web server will then respond to the web browser and deliver the information or resources that were requested.
UNIT 1 21 Introduction to web development and PHP
2. MySQL is open source and free, so you can install and use it without paying anything. It is fast and powerful when used for building small- to medium-sized databases. Updates and feature improvements are frequently added to MySQL. 3. False
22 WAWASAN OPEN UNIVERSITY TCC 242/05 Web Database Application
UNIT 1 23 Introduction to web development and PHP
1.2 Installing and Configuring Apache, MySQL and PHP Objectives By the end of this section, you should be able to: 1. Install and configure the LAMP system under Ubuntu on your computer. 2. Configure the Apache web server to work with PHP. 3. Interact with MySQL using basic SQL queries.
Introduction This section introduces you to the general techniques for installing the Apache web server, MySQL and PHP on a Linux (Ubuntu) system. Apache is one of the most popular web servers and works best on Unix or Linux systems. However, it works well on the Windows system too. Understanding the techniques to install and configure a web server is essential to hosting your own web application. The following installation guide is for the Linux system. For the Windows system, please refer to the Appendix. Note: The following guide uses Linux Ubuntu 10.10. You can download Ubuntu from www.ubuntu.com. It is assumed that you have basic knowledge of installing and operating Ubuntu. For more information on Ubuntu installation, please refer to the following web pages: 1. “Ubuntu Documentation Installation”: https://help.ubuntu.com/ community/Installation 2. “Installing Ubuntu 10.10”: http://news.softpedia.com/news/InstallingUbuntu-10-10-160966.shtml
Installing LAMP Linux (Ubuntu) will be the platform for the Apache, PHP and MySQL components that you will be installing and using soon. You will be installing LAMP (Linux, Apache, MySQL and PHP) packages from within Ubuntu. Once you have an understanding of how to set up LAMP on Ubuntu, you will be able set it up on other Linux versions as well.
24 WAWASAN OPEN UNIVERSITY TCC 242/05 Web Database Application
Installation steps 1. Open the terminal window (also known as the command line or console window). On the Ubuntu desktop, go to Applications > Accessories > Terminal. You will then see a command-line window like the one shown in Figure 1.8.
Figure 1.8 Opening a terminal window in Ubuntu
2. Enter the following command in the command-line window: sudo apt-get install lamp-server^
This is the general command used to install a program and package in the Ubuntu system. The command sudo means that you will be running the command with root (administrator) privileges. You will be prompted to enter a password. Notice the caret (^) symbol at the end of the command. It is not a typo and must be included.
UNIT 1 25 Introduction to web development and PHP
3. Hit the key after the command and you will be shown the packages that need to be installed. Type Y and hit to begin the installation.
Figure 1.9 Packages that need to be installed for LAMP
4. The installation begins and you will be prompted to enter a new password for the MySQL root user (Figure 1.10). Type wawasan as the password for our purposes. Hit to continue. If there is no response or the on-screen button is not highlighted in red, hit the key to move the focus to the button.
Figure 1.10 Entering a new password for the MySQL root user
26 WAWASAN OPEN UNIVERSITY TCC 242/05 Web Database Application
5. You will be asked to confirm the password. Re-type the same password and the installation will then continue until it is complete. 6. That’s it, the LAMP installation is done! Congratulations! Now you just need to run some configuration processes and tests to confirm your installation.
Activity 1.4 1. What is LAMP and why do we want to install it? 2. __________________ is the single line command that will install the LAMP (Linux, Apache, MySQL and PHP) packages from Ubuntu.
Testing the configurations of Apache, PHP and MySQL You can use the following steps to test the configurations of Apache, PHP and MySQL. You will first test the Apache server.
Apache 1. At this stage, the Apache web server should have been installed on your computer. Type the following in the terminal to check the version of Apache that was installed: apache2 -v
Figure 1.11 Checking the version of Apache that was installed
UNIT 1 27 Introduction to web development and PHP
2. The version will be displayed. Check if the Apache service is running by typing service apache2 status.
Figure 1.12 Confirming that the Apache service is running
3. If the service is not running, type the following command to start the service: sudo service apache2 start
4. Once you have confirmed that the Apache service is running, you can test the Apache server by entering http://localhost on the web browser. If the installation is successful, you will be able to see the default Apache page that has the “It works!” headline (Figure 1.13). If you cannot see this page, visit the ‘error.log’ file located in the ‘/var/log/apache2/’ folder to see what went wrong with your installation.
Figure 1.13 Testing your Apache installation
28 WAWASAN OPEN UNIVERSITY TCC 242/05 Web Database Application
PHP 1. After confirming that Apache is running, we can then test the PHP installation. By default, the document root directory for Apache is the ‘/var/www/’ directory. Note that you can change the document root directory path in the ‘/etc/apache2/sites-available/default’ file under the “DocumentRoot” section.
2. Let’s retain the default document root directory as ‘/var/www/’ and create a ‘test.php’ file in it. Open the terminal and call up the nano editor by entering: sudo nano /var/www/test.php
3. Enter the following PHP code into the new text file:
Figure 1.14 Entering PHP code using the nano editor
4. Hit + to exit the editor. Save the code you entered earlier by typing Y and hitting for the default format option.
5. To ensure that the changes are updated in Apache, restart the Apache server using the following code on the terminal line: sudo service apache2 restart
UNIT 1 29 Introduction to web development and PHP
6. You can now test the page you created by entering http://localhost/ test.php on a web browser. You should get the PHP information page shown in Figure 1.15.
Figure 1.15 Viewing PHP information on the Apache server
Web Reference To learn more about configuring Apache with PHP, please read the following: “Ubuntu 10.10 PHP5 Scripting Language” at: https://help. ubuntu.com/10.10/serverguide/C/php5.html#php5-configuration
30 WAWASAN OPEN UNIVERSITY TCC 242/05 Web Database Application
MySQL 1. After the installation, you should make sure that the MySQL database is bound to your localhost IP address. At the terminal, type: cat /etc/hosts | grep localhost
2. You can also verify the localhost bind address at ‘my.cnf ’ of MySQL. cat /etc/mysql/my.cnf | grep bind-address
Figure 1.16 Verifying that MySQL is bound to your localhost IP address
3. Notice that the bind-address = 127.0.0.1 (Figure 1.16)
4. Check that the MYSQL service is running by typing: service mysql status
Figure 1.17 Checking that the MySQL service is running
UNIT 1 31 Introduction to web development and PHP
5. If the service is not running, type the following command to start the service: sudo service mysql start
6. After confirming that the MYSQL service is running, check the databases in the MySQL version that was installed. Follow the steps below to do this.
7. Type the following to enter the MySQL monitor: mysql –h localhost –u root –p
8. You will be prompted to enter a password. Enter the password wawasan that you set earlier.
Figure 1.18 Entering the MySQL monitor
9. You will then be in the MySQL monitor with the “mysql>” prompt showing on-screen. All commands used here will end with a semicolon “;” or “\g”. View your pre-installed databases by typing: show databases;
Do not forget to add the semicolon before you execute your command. You will then see some pre-installed databases listed. However, you might not have databases that are identical to those shown in the following figure.
Figure 1.19 The MySQL monitor showing a list of databases
32 WAWASAN OPEN UNIVERSITY TCC 242/05 Web Database Application
10. You can list all the tables in the database by typing: a. use mysql to use the ‘mysql’ database. b. show tables; to list all the tables in the database.
Figure 1.20 The MySQL monitor showing a list of tables
11. Next, you can list the users in your MySQL system. In this case, you should already have a localhost root user with the password that you entered. Type: SELECT User, Host, Password FROM mysql.user;
Note that the password is hashed for security purposes.
Figure 1.21 The MySQL monitor showing a user list
If everything works, you should get the results shown in Figure 1.21. If so, congratulations, your MySQL installation is fine.
UNIT 1 33 Introduction to web development and PHP
Type exit twice to exit the MySQL monitor and terminal. Notice that you have just used the SQL query language to obtain the user list. The SQL query that you used was: SELECT User, Host, Password FROM mysql.user;
The query is an example of the SQL SELECT statement, which is used to select data from a database. The general syntax of this statement is: SELECT column_name(s) FROM table_name;
Do not worry about SQL commands for now. We are just giving you some basic knowledge on how you can interact with MySQL using the SQL query language. You will go into the details of SQL when you learn about MySQL in Unit 4.
Web Reference To learn more about MySQL post-installation procedures, please visit “Unix Postinstallation Procedures” at: http://dev.mysql.com/doc/refman/5.1/en/unix-postinstallation. html
Activity 1.5 1. Once you have confirmed that the Apache service is running, you can test the Apache server by entering h t t p : / / _______________________ on your web browser. 2. In a PHP content page, you enter the code _____________ ______________ to test that PHP is working and to display information about PHP, Apache and MySQL on your system.
34 WAWASAN OPEN UNIVERSITY TCC 242/05 Web Database Application
Summary This section discussed the common techniques for installing Apache, MySQL and PHP in the Linux system. We have chosen to install the LAMP packages via a package manager because it is easier to do so. We are sure that you will be able to do the same by following the step-by-step guide provided in this section. We have also prepared a version of the installation guide for the Windows operating system. For Windows, we will be installing the components individually so that you will be exposed to different ways of doing things. If you need to install the packages in Windows, please refer to the Appendix. In the next section, we will discuss basic PHP syntax and language constructs. You will also learn how PHP is embedded in a web page.
Self-test 1.2 1. In the Linux system, what is the command to check the Apache 2 service status?
2. You can change the document root directory path of the ‘/etc/ apache2/sites-available/default’ file under the ___________ section. A. B. C. D.
Feedback Activity 1.4 1. LAMP is a software bundle consisting of Linux, Apache, MySQL and PHP. We install LAMP to build an Apache web server in the Linux operating system. Apache will host a web database application via PHP, the middle-tier programming language and MySQL, the database component. 2. sudo apt-get install lamp-server^
Activity 1.5 1. localhost or 127.0.0.1 2.
36 WAWASAN OPEN UNIVERSITY TCC 242/05 Web Database Application
UNIT 1 37 Introduction to web development and PHP
1.3 Creating Basic PHP Scripts Objectives By the end of this section, you should be able to: 1. Describe and use basic PHP syntax and language constructs. 2. Embed PHP code in a web page.
Introduction PHP, as a server-side scripting language, is intended largely for the Web environment. PHP has gained quite a following in recent times, and it is one of the forerunners of the Open-Source Software movement. Its popularity is due to its syntax, which is similar to that of the C programming language, and its simplicity. Basically, PHP allows a static web page to become a dynamic one. “PHP” is an acronym that stands for “Pre-Hypertext Processor”. This means that PHP code is parsed on a server before it creates HTML. PHP file names end with the “.php” extension. This extension notifies a web server that PHP code needs to be parsed before HTML is displayed on a web browser.
Overview of PHP syntax PHP syntax is relatively straightforward. In this section, you will learn the general rules and basic syntax of PHP. The following are three basic rules that apply to PHP: 1. PHP statements are enclosed within the opening tag :
or
It does not matter if both the tags are on one line or if the second one starts on a new line. To a server, the code will show up as one continuous line, regardless of tabs or new lines. It is up to us to arrange the code so that it is organised and easily understood by people who may want to modify the code.
38 WAWASAN OPEN UNIVERSITY TCC 242/05 Web Database Application
2. PHP statements end with a semicolon:
3. PHP comments are represented by double slashes // for a single-line comment or by /* and */ for several lines of comment: // This is a single-line comment /* This is a multipleline comment */
Comments are used throughout the code to explain the purpose of the code to people. We encourage you to use as many comments as you think are necessary, so that other developers can easily understand your programming.
Note: The following discussion assumes that you have basic knowledge of HTML.
Web Reference For a tutorial on HTML, please refer to the following website: “HTML Tutorial”, http://www.w3schools.com/html/default.asp
Creating your first web page with PHP As you may already know, web pages are actually generated by HTML code. A HTML document begins with a tag and ends with a tag. A typical HTML page is shown below: HTML document Content of the page.
UNIT 1 39 Introduction to web development and PHP
If we save the content above into a file with the extension “.html” (e.g., ‘first.html’), we can display this page in a web browser like Internet Explorer or Firefox.
Figure 1.22 A web page generated by HTML code
We will be able to see the HTML source code that generated this web page by going to View > Source in Internet Explorer.
Figure 1.23 The HTML source code of a web page
Notice that every opening tag, such as , will always end with an ending tag that comes with a forward slash, such as . PHP works in almost the same way. Every PHP opening tag will also end with an ending tag. The difference is that PHP code is hidden from web page visitors as PHP is a server-side scripting language. The only code that the visitors can see is the resulting HTML output.
40 WAWASAN OPEN UNIVERSITY TCC 242/05 Web Database Application
Let’s start creating our first PHP script by using the echo function to print text in a web browser. We will reproduce the HTML code that we wrote earlier by using the PHP echo function. The echo function is used inside the PHP tags. We also change the content in the title tag to “PHP document” as shown below. PHP document
We then save the content above into a file with the “.php” extension (e.g., ‘first. php’). A web page with the “.html” extension can be displayed from anywhere on the local disk. But as PHP is a server-side page, the file needs to be placed on the Apache server that we installed earlier. The location to store the server pages is ‘/var/www/’ for Linux or ‘C:\Program Files\Apache Software Foundation\ Apache2.2\htdocs’ for Windows. Save the ‘first.php’ file there and display this page in a web browser by entering localhost/first.php.
Figure 1.24 Web page displayed by embedded PHP code
UNIT 1 41 Introduction to web development and PHP
Notice that you get the same result as that of the earlier HTML page except that the title of the page is now “PHP document”. Access the source code by going to View > Source on Internet Explorer. You will see HTML code that is nearly identical to the code that generated the HTML-only web page.
Figure 1.25 HTML source code produced by PHP code
You should notice from looking at the source code that the PHP tags and echo function are all hidden from web page visitors. They only get to see the resulting HTML output. This will provide more security and flexibility to your PHP code. PHP can also be written as a pure PHP program without being enclosed in HTML tags. Pure PHP code can be used to store business logic such as calculations and a separate HTML file is then used as the presentation layer. The advantage of doing this is that the same business logic can be reused for different presentations. You will learn more about the use of pure PHP code in the following units. An example is shown below.
42 WAWASAN OPEN UNIVERSITY TCC 242/05 Web Database Application
Figure 1.26 A web page created by pure PHP code
Congratulations, you have just created your very first PHP page.
Activity 1.6 1. “PHP” in the context of the scripting language for web development is an acronym that stands for “Personal Hypertext Protocol”. True / False?
2. A single line of PHP code ends with ____________. A. B. C. D.
double slashes (//) an asterisk followed by a slash (*/) the hash key (#) a semicolon (;)
3. A HTML document begins with a ___________ tag and ends with a __________ tag. A. B. C. D.
, , , ,
UNIT 1 43 Introduction to web development and PHP
Web Reference To learn more about basic PHP syntax, please visit: “PHP Basic Syntax”, http://www.php.net/manual/en/language. basic-syntax.php
Summary You should now have some idea of what PHP code looks like and how PHP can be integrated into HTML code to create dynamic web pages. To summarise, you should now be familiar with: 1. PHP basic syntax. 2. The purpose of using comments throughout program code. 3. How PHP, as a server-side scripting language, gives you flexibility. 4. How to create a HTML web page using a pure PHP program.
In the next unit, you will learn about variables and data types, and learn how to create functions and control structures. You will also write a PHP program that contains a function that you will write yourself.
Self-test 1.3 1. PHP file names end with a .php extension to notify the server that PHP code needs to be parsed before the HTML web page is displayed in the user’s web browser. True / False?
2. The more comments you put into your PHP program code, the more processing time is needed by the web server to display a web page in a browser. True / False?
44 WAWASAN OPEN UNIVERSITY TCC 242/05 Web Database Application
3. PHP code is always enclosed within the opening tag _______ and the closing tag ________. A. B. C. D.
4. PHP comments are represented by _________ for a single-line comment and by _________ for several lines of comment. A. B. C. D.
and and ” … “ // and // and /* … */
A. B. C. D.
This is TCC242\\05 This is TCC24205 This is TCC242\05 “This is TCC242\\05”
UNIT 1 45 Introduction to web development and PHP
8. What is the output produced by the following PHP code?
A. B. C. D.
echo; echo echo”; echo”; ;
9. What is the PHP code that produces the following result in a web browser?
10. What is the PHP code that produces the following result in a web browser? 18/01/2011 11:41:02 A. echo date(“H:i:s m/d/Y”) ?> echo date(“m/d/Y H:i:s”) ?> echo date(“d/m/Y H:i:s”) ?>
Suggested answers to activity
Feedback Activity 1.6 1. False 2. D 3. C
46 WAWASAN OPEN UNIVERSITY TCC 242/05 Web Database Application
UNIT 1 47 Introduction to web development and PHP
Summary of Unit 1 Summary In this unit, you learnt about the development of different types of web sites. You also learnt about popular programming platforms that are used to create dynamic websites. You looked at several development methodologies, including the two popular development models in the Agile group of methodologies, which are used to ensure that web projects are delivered on time and within their scope and budget. You have also seen how databases are used on the Web. In the second section, you learnt how to install, configure, run and test the Apache web server, MySQL and PHP on Linux systems. The installation procedures for Windows systems are covered in the Appendix. In the final section, you studied basic PHP syntax and discovered how PHP, as a server-side scripting language, gives you flexibility. You also learnt to write and execute a pure PHP program. In the next unit, you will focus on PHP variables and data types, and learn about the constructs that PHP provides for controlling program execution flow.
48 WAWASAN OPEN UNIVERSITY TCC 242/05 Web Database Application
UNIT 1 49 Introduction to web development and PHP
Unit Practice Exercises 1. Create a PHP file in the ‘/var/www/Unit1’ directory (or ‘\ htdocs\Unit1’ in Windows) and name it ‘MySite01.php’. The PHP web page will consist of a title, a welcome message, your name and a message stating the current day, as laid out in the following table. Object
Markup
Value/Example
Title
…
My Site 01
Welcome Message
Welcome, {Your name}!
…
Current Day
Create the page as shown in the following figure.
Today is 09 January, 2011
50 WAWASAN OPEN UNIVERSITY TCC 242/05 Web Database Application
2. In this exercise, you will modify the web page from question 1. Duplicate the PHP file from question 1 in the ‘/var/www/Unit1’ directory (or ‘\htdocs\Unit1’ in Windows) and rename it ‘MySite02.php’. a. Copy and paste the contents of the “About Wawasan” message into the file. b. Insert the footer note that includes your e-mail address.
Object
Markup
Value/Example
Title
…
My Site 02
About Wawasan page
{Copy About Wawasan page from http://wou. edu.my/about_ overview.aspx}
…
Footer note
The site is developed by
{Your_Name}
The results should look like the figure below.
e.g., “The site is developed by John Doe”
UNIT 1 51 Introduction to web development and PHP
3. In this exercise, you will modify the web page from question 2. Duplicate the PHP file from question 2 in the ‘/var/www/Unit1’ directory (or ‘\htdocs\Unit1’ in Windows) and rename it ‘MySite03.php’. a. Add the current time after the date by using the PHP function shown below. b. Insert Javascript code to update the clock every second.
Object Title
Markup …
PHP current time
// echo a space before the
e.g., 2:39:14
current time
Insert Javascript into the
clockFace id placement
Insert the PHP random function into the body tag ‘bgcolor’
2. MySite02.php My Site 02
Welcome, John!
// Copy About Wawasan page from http://wou. edu.my/about_overview.aspx
60 WAWASAN OPEN UNIVERSITY TCC 242/05 Web Database Application
UNIT 1 61 Introduction to web development and PHP
Appendix Introduction This appendix introduces you to the general techniques for installing Apache, MySQL and PHP on the Windows operating system. The installation steps for the Linux system were covered in section 1.2.
Installing Apache The Apache web server will be the server hosting the PHP and MySQL components that you will be using soon. The following guide works for Windows XP SP 3 and above. For other versions of Windows, please read the notes for Win32 at http://httpd.apache.org.
Installation steps 1. Visit www.apache.org, scroll down and look for the HTTP Server hyperlink and click on it (Figure 1.27).
Figure 1.27 The HTTP Server hyperlink at www.apache.org
62 WAWASAN OPEN UNIVERSITY TCC 242/05 Web Database Application
2. You will arrive at the Apache HTTP Server Project page. Look for the Apache HTTP Server 2.2 latest and stable releases, usually located on the second row. Avoid selecting the alpha releases. In this guide, the Apache HTTP Server 2.2.17 is selected. Click on the Download hyperlink (Figure 1.28).
Figure 1.28 Download hyperlink of Apache HTTP Server 2.2.17
3. This will take you to the download page. Look for the section entitled “Apache HTTP Server (httpd) 2.2.17 is the best available version” and select Win32 Binary without crypto (no mod_ssl) (MSI Installer): httpd2.2.17-win32-x86-no_ssl.msi (Figure 1.29). At this stage, security is not our major concern, so it is fine to select the installer without crypto. Download the MSI Installer to your computer’s hard disk.
Figure 1.29 Win32 Binary without crypto
UNIT 1 63 Introduction to web development and PHP
4. Once the download is complete, launch the installer by double-clicking on its icon. This will bring up the “Apache HTTP Server 2.2 Installation Wizard”.
Figure 1.30 Apache HTTP Server 2.2 Installation wizard
5. Click on Next > to begin the installation process.
Figure 1.31 Apache HTTP Server 2.2 License agreement
64 WAWASAN OPEN UNIVERSITY TCC 242/05 Web Database Application
6. You will be shown the License Agreement (Figure 1.31). Select the button to accept the License Agreement and then click on Next >. You will then be shown the “Read This First” screen. Read it if you want to know more about Apache.
Figure 1.32 Apache HTTP Server 2.2 Read this first
7. Continue by clicking on Next > and you should arrive at the Server Information screen (Figure 1.33). Enter the following information: a. Network Domain: domain_name.com (or something similar) b. Server Name: testpc.domain_name.com (or something similar) c. Administrator’s Email Address: admin@domain_name.com (or something similar) d. Select the button to install Apache programs and shortcuts for ‘All Users’ so that the server will be available to anyone who arrives at your site. e. Click on Next > to continue.
UNIT 1 65 Introduction to web development and PHP
Figure 1.33 Apache HTTP Server 2.2 Server information
8. Next, select the Setup Type (Figure 1.34). You may choose “Custom” so that you will know in detail the components and features that you are installing.
Figure 1.34 Apache HTTP Server 2.2 Setup type
66 WAWASAN OPEN UNIVERSITY TCC 242/05 Web Database Application
9. You may read the feature description of each component on the “Custom Setup” screen. Leave the default installation path as it is and click on Next > to continue.
Figure 1.35 Apache HTTP Server 2.2 Custom Setup
10. You are now ready to install the program. Click on Install (Figure 1.36) and let the installation process begin.
Figure 1.36 Apache HTTP Server 2.2 Ready to install
UNIT 1 67 Introduction to web development and PHP
Figure 1.37 Apache HTTP Server 2.2 Installing
11. When the installation is complete, click on Finish (Figure 1.38).
Figure 1.38 Apache HTTP Server 2.2 Installation completed
68 WAWASAN OPEN UNIVERSITY TCC 242/05 Web Database Application
Installing PHP PHP is a widely used general-purpose scripting language that is especially suited for web development and can be embedded into HTML. The following guide works for Windows XP SP 3 and above. For other versions of Windows, please read the notes for Windows systems at http://php.net/manual/en/install.windows.php.
Installation steps 1. Visit www.php.net, look for the downloads hyperlink at the top of the web page and click on it (Figure 1.39).
Figure 1.39 PHP.net download hyperlink
2. Look for the PHP 5.3 current stable releases. In this guide, we will be using PHP 5.3.4. Scroll to the Windows Binaries section and click on http://windows.php.net/download/.
Figure 1.40 PHP.net Windows Binaries
UNIT 1 69 Introduction to web development and PHP
3. You will arrive at a download page showing various versions of PHP. Since we are using Apache 2.2 from apache.org, we will select the VC6 x86 Thread Safe version for non-CGI applications. Click on VC6 x86 Thread Safe, Zip format.
Figure 1.41 PHP.net VC6 x86 Thread Safe, Zip format
To learn more about the various versions of PHP, please read the following: “Manual Installation Steps”, http://www.php.net/manual/en/ install.windows.manual.php
4. Save the zip file to your local disk. Then, unzip the package with any standard unzip program. We recommend you unzip the package to C:\ and rename it ‘C:\php’. Be careful not to insert spaces in between the directory name to avoid the web server string concatenation problem.
5. The next step is to set up a valid configuration file for PHP, ‘php.ini’. Go to ‘C:\php’ and look for the file named ‘php.ini-development’. There are two ‘ini’ files distributed in the zip file, ‘php.ini-production’ and ‘php.ini-development’ (Figure 1.42). The ‘php.ini-production’ file is optimised for performance and security. For the purposes of learning, you will be using the ‘php.ini-development’ file for simplicity and fewer configuration steps. You can switch to ‘php.ini-production’ once you are more familiar with PHP. Therefore, rename ‘php.ini-development’ as ‘php.ini’.
70 WAWASAN OPEN UNIVERSITY TCC 242/05 Web Database Application
Figure 1.42 Renaming php.ini-development as php.ini
6. Next, you will make a copy of the ‘php.ini’ file (Figure 1.43) and place it in the ‘C:\WINDOWS’ directory so that Apache can find it.
Figure 1.43 Copy the php.ini file into C:\WINDOWS
UNIT 1 71 Introduction to web development and PHP
7. Finally, you need to copy the ‘php5ts.dll’ file (since we are using PHP version 5) from ‘C:\php’ into the ‘C:\Program Files\\ \bin’ directory, which is named ‘C:\Program Files\ Apache Software Foundation\Apache2.2\bin’ in this case.
Figure 1.44 Copy php5ts.dll from C:\php into the \bin directory
You have now completed the installation of both Apache and PHP on the Windows system. Next, you are going to configure Apache and PHP.
Configuring Apache and PHP At this point, the Apache web server should already have been installed on your computer. You should be able to see the “Apache Service” taskbar icon (Figure 1.45) at the lower right-hand corner of your Windows desktop screen if you had accepted all the default installation features.
Figure 1.45 Apache Service taskbar icon
72 WAWASAN OPEN UNIVERSITY TCC 242/05 Web Database Application
If you cannot see the icon, the Apache service can be accessed via the Start menu or from the program installation directory, which by default is at ‘C:\Program Files\ Apache Software Foundation\Apache2.2\bin’.
Figure 1.46 The Apache service can be accessed via the Start menu
Once you have confirmed that the Apache service is running, you can test the Apache server by entering http://localhost in the web browser. If the installation was successful, you will be able to see the default Apache page with the “It works!” headline. If this web page is not displayed, visit the ‘error.log’ file located in the ‘C:\Program Files\Apache Software Foundation\Apache2.2\logs’ folder to see what went wrong with your installation. The setup may fail if Apache is trying to share HTTP port 80 with another web server, such as Windows IIS, or an application, such as a firewall.
Figure 1.47 Test the Apache installation with http://localhost
After verifying that your Apache installation works fine, you then need to add some code to the configuration file, ‘httpd.conf ’, which can be found in the ‘C:\ Program Files\Apache Software Foundation\Apache2.2\conf ’ folder, before you can run PHP. This file can be opened with any text editor, for instance Notepad. You are advised to make a backup copy of the ‘httpd.conf ’ file before you start making any modifications to it.
UNIT 1 73 Introduction to web development and PHP
Configuring Apache to recognise PHP files 1. Go to the ‘C:\Program Files\\\conf ’ directory, which is ‘C:\Program Files\Apache Software Foundation\ Apache2.2\conf ’ in this case. Make a copy of the ‘httpd.conf ’ file and name it ‘httpd.conf.backup’.
Figure 1.48 Create a backup copy of httpd.conf
2. Open ‘httpd.conf ’ with a text editor like Notepad. Use the text editor to find the “LoadModule” section. Scroll to the end of the “LoadModule” section and add the following code after the last #LoadModule line (Figure 1.49). #Insert the following to set up the PHP 5 module for Apache 2.2. #Make sure your path matches the location of this file. LoadModule php5_module “c:/php/php5apache2_2.dll”
Figure 1.49 Adding the LoadModule code to httpd.conf
3. Note that the words followed by the hash character, “#” are interpreted as comments and they will not be executed. Please make sure the path ‘php5apache2_2.dll’ matches the location of the existing file.
74 WAWASAN OPEN UNIVERSITY TCC 242/05 Web Database Application
4. Next, find the “AddType” section. Scroll to the end of the “AddType” section and add the following code after the last line of this section. # In order for Apache to recognise a PHP file as one that needs to be # parsed with the PHP engine, you need to add the following two lines AddType application/x-httpd-php .php # For syntax highlighted .phps files, also add AddType application/x-httpd-php-source .phps
Figure 1.50 Adding the AddType code to httpd.conf
5. Save the changes you made to ‘httpd.conf ’ and close the file. Launch the Apache Service Monitor (Figure 1.51) from the Apache Service taskbar icon by right clicking on the icon and then selecting Open Apache Monitor. You can also launch the Monitor from the start > All Programs menu if you did not install the taskbar icon.
Figure 1.51 The Apache Service Monitor
UNIT 1 75 Introduction to web development and PHP
6. Select Apache 2.2 and then click the Restart button. Note that after you restart the service, there will be a “PHP/5.3.4” label shown next to the “Apache/2.2.17 (Win32)” label at the bottom left-hand side of the monitor window (Figure 1.52). This shows that you have successfully configured Apache with PHP. If not, check for errors and revisit the steps above.
Figure 1.52 An additional “PHP/5.3.4” label situated next to the “Apache/ 2.2.17 (Win32)” label indicates that you have successfully configured Apache with PHP
Once Apache is configured to recognise PHP, you can test a PHP script. By default, the document root directory for Apache is the ‘C:\Program Files\\\conf ’ directory, which is ‘C:\Program Files\Apache Software Foundation\Apache2.2\htdocs’ in this case. Note that you can change the document root directory path in the ‘httpd.conf ’ file under the “DocumentRoot” section. Let us now use the default document root directory (‘C:\Program Files\Apache Software Foundation\Apache2.2\htdocs’) and create a ‘test.php’ file in it. Using Notepad, enter the following code into a new text file: PHP Testing
76 WAWASAN OPEN UNIVERSITY TCC 242/05 Web Database Application
Save this file as ‘test.php’ in the ‘C:\Program Files\Apache Software Foundation\ Apache2.2\htdocs’ directory. You can now test the page you created in a web browser by entering http://localhost/test.php. The PHP information page shown in the following figure should be displayed.
Figure 1.53 The output of test.php in a web browser
Installing MySQL MySQL will be used as the database to hold the information that is going to be accessed by the web application that you will learn to create. The following guide describes how to install a MySQL database. It works for Windows XP SP 3 and above. For other versions of Windows, please read “Installing MySQL on Microsoft Windows” at http://dev.mysql.com/doc/refman/5.5/en/windowsinstallation.html.
Installation steps 1. Visit www.mysql.com and click on the Downloads (GA) tab (Figure 1.54).
Figure 1.54 MySQL.com Downloads (GA) tab
UNIT 1 77 Introduction to web development and PHP
2. On the download page, scroll to the “MySQL Community Server” section and click on the DOWNLOAD hyperlink shown in Figure 1.55.
Figure 1.55 MySQL.com MySQL Community Server download section
3. Select the Microsoft Windows platform, choose the Windows (x86, 32-bit), MSI Installer by clicking on the Download button next to it (Figure 1.56).
Figure 1.56 MySQL Microsoft Windows (x86, 32-bit), MSI Installer
78 WAWASAN OPEN UNIVERSITY TCC 242/05 Web Database Application
4. You will be brought to a registration page. You may register or simply skip to the download page by clicking on “» No thanks, just take me to the downloads!”.
Figure 1.57 MySQL.com Registration page
5. On the download page, scroll to the “Asia” section, select the nearest mirror site and click on its HTTP download hyperlink.
Figure 1.58 MySQL.com Select the nearest mirror site
UNIT 1 79 Introduction to web development and PHP
6. Download the MSI Installer to your local disk. Once the download is complete, launch the installer by double-clicking on the icon. This will bring up the “MySQL Server Setup Wizard”.
Figure 1.59 MySQL Server Setup Wizard
7. Click on Next to start the setup wizard for MySQL Server.
Figure 1.60 MySQL Server Setup License Agreement
80 WAWASAN OPEN UNIVERSITY TCC 242/05 Web Database Application
8. After accepting the License Agreement and clicking on Next, you will be brought to the “Choose Setup Type” screen. Click on the Custom button.
Figure 1.61 MySQL Server Setup Choose setup type
9. On the “Custom Setup” screen, click on the Browse button to re-select the program destination path.
Figure 1.62 MySQL Server Setup Custom setup
UNIT 1 81 Introduction to web development and PHP
10. In the “Folder name:” box, enter ‘C:\mysql’ and click on OK to close the “Change destination folder” window. Click on Next in the “Custom Setup” screen to continue.
Figure 1.63 MySQL Server Setup Changing the destination folder
11. You are now ready to install the program. Click on Install and let the installation begin.
Figure 1.64 MySQL Server Setup Ready to install
82 WAWASAN OPEN UNIVERSITY TCC 242/05 Web Database Application
12. During installation, the MySQL Enterprise subscription window may pop up. Simply click on Next twice and this will bring you to the end of the installation.
Figure 1.65 MySQL Server Setup Installing
Figure 1.66 MySQL Server Setup MySQL Enterprise subscription window
UNIT 1 83 Introduction to web development and PHP
13. When the installation is complete, leave the “Launch the MySQL Instance Configuration Wizard” checkbox checked and click on Finish to end the installation.
Figure 1.67 MySQL Server Setup Setup completed
Next, you will use the “MySQL Instance Configuration Wizard” to configure the MySQL installation in the ‘my.ini’ configuration file.
Configuring and running MySQL The “MySQL Instance Configuration Wizard” will be launched once the setup is completed. You can also launch the wizard manually from the start > All Programs menu in Windows.
Figure 1.68 Launching the MySQL Instance Configuration Wizard from the program menu
84 WAWASAN OPEN UNIVERSITY TCC 242/05 Web Database Application
Use the following steps in the wizard to configure MySQL.
Configuration steps 1. On the welcome screen of the wizard, click on Next > to begin configuration.
Figure 1.69 MySQL Server Instance Configuration Wizard welcome screen
2. Select the “Detailed Configuration” option to learn more about and have control over the configuration. Click on Next > to continue.
Figure 1.70 MySQL Configuration Detailed configuration selection
UNIT 1 85 Introduction to web development and PHP
3. MySQL will be installed on your personal computer intended for personal use, so we assume that other applications will be running and MySQL will have to use minimal system resources. Thus you will select the “Developer Machine” option.
Figure 1.71 MySQL Configuration Developer Machine option selection
4. The “Multifunctional Database” option is for regular use and will enable both InnoDB (for fast transactions) and MyISAM (high speed) storage engines to divide resources equally. Select this option, then click on Next >.
Figure 1.72 MySQL Configuration Multifunctional Database option selection
86 WAWASAN OPEN UNIVERSITY TCC 242/05 Web Database Application
5. For better performance, you may want to place the InnoDB Tablespace in a separate location like in a RAID storage system. But for your learning purposes, you will place it in the “C:” drive and the “Installation Path”. Click on Next >.
Figure 1.73 MySQL Configuration InnoDB tablespace settings
6. We can set the limits of concurrent connections to the MySQL Server but since you will be the only user connecting to MySQL in this case, this setting is not important at the moment. Select the “Decision Support (DSS)/ OLAP” option, then click on Next >.
Figure 1.74 MySQL Configuration number of concurrent connections
UNIT 1 87 Introduction to web development and PHP
7. We need to enable TCP/IP for MySQL to run properly. In any Windows installation that has a firewall enabled, you need to open the MySQL port 3306 for connections from your firewall configuration. Check the “Enable TCP/IP Networking” option, retain the default port number as 3306 and ensure that the “Add firewall exception for this port” checkbox is checked. You will also enable strict mode so that MySQL enforces rules to control and handle invalid or missing input values. Check the “Enable Strict Mode” box and then click on Next >.
Figure 1.75 MySQL Configuration enabling TCP/IP, firewall exception and strict mode
8. You will now select the default character set. If you will be working with international languages that require the UTF8 character set, you should choose the “Best Support for Multilingualism” option. Otherwise, select the “Standard Character Set” option as the default server character set. Then click on Next >.
Figure 1.76 MySQL Configuration Standard character set option
88 WAWASAN OPEN UNIVERSITY TCC 242/05 Web Database Application
9. In the MySQL Server Instance Configuration screen, selecting the “Install As Windows Service” option makes MySQL Server start automatically when Windows boots up. Check the boxes as shown in the figure below and then click on Next >.
Figure 1.77 MySQL Configuration Windows service and add the bin directory to the PATH variable
10. We recommend that you set the root password for your MySQL Server to increase server security and to avoid any login and permission difficulties. You will use the password wawasan . Do not check the “Anonymous Account” option. Click on Next > after setting the password.
Figure 1.78 MySQL Configuration Security settings
UNIT 1 89 Introduction to web development and PHP
11. Now the final screen will be displayed. Click on the Execute button to start the configuration process.
Figure 1.79 MySQL Configuration Executing the configuration
12. Once the configuration file is created, you will see a summary as shown in the figure below. Click on Finish to exit the wizard.
Figure 1.80 MySQL Configuration Summary of the tasks performed
90 WAWASAN OPEN UNIVERSITY TCC 242/05 Web Database Application
If for some reason you need to reinstall and reconfigure MySQL Server, follow the steps below to remove MySQL Server first. 1. Go to Start > Control Panel > Add or Remove Programs, select MySQL Server 5.5 and then click on the Remove button. 2. Once the uninstall process is completed, manually remove the MySQL program folder ‘C:\mysql’. 3. Navigate to ‘C:\Documents and Settings\All Users\Application Data’ and remove the MySQL folder. If you cannot see the ‘Application Data’ folder, go to Start > Control Panel > Folder Options, select the View tab and under the ‘Hidden files and Folders’ section, choose Show hidden files and folders. 4. If you are told to restart the system, follow the on-screen instructions to reboot Windows before you continue. 5. Go back to the steps above to install, configure and run MySQL Server.
Test your installation to ensure that MySQL Server is running After the installation, you should make sure that MySQL Server is running. 1. Go to Start > Run. Type cmd in the ‘Open:’ box.
Figure 1.81 The Run applet in Windows
2. Change the directory by typing cd C:\mysql\bin and pressing .
UNIT 1 91 Introduction to web development and PHP
3. Then type mysql –h localhost –u root –p to enter the MySQL monitor. You will be prompted to enter a password. Type the password wawasan that you set earlier and press .
Figure 1.82 Entering MySQL monitor
4. You will now be in the MySQL monitor with the ‘mysql>’ prompt displayed. As indicated in the message, all commands used here will end with ; or \g. View your pre-installed databases by typing show databases;. Do not forget to add the semicolon before you press . You will notice that there are four pre-installed databases listed.
Figure 1.83 MySQL Monitor Show databases
92 WAWASAN OPEN UNIVERSITY TCC 242/05 Web Database Application
5. You can list all the tables in the database by typing: a. use mysql to use the mysql database, and then b. show tables; to list all the tables in the database.
Figure 1.84 MySQL Monitor Show tables
6. Next, you can list the users of your MySQL database. In this case you should only have a localhost root user with the password that you entered. Type SELECT User, Host, Password FROM mysql.user;. Take note that the password is hashed for security purposes.
Figure 1.85 MySQL Monitor Show user list
If everything works, you should get the results shown in the figure above. Congratulations, your MySQL Server installation now works. Type exit twice to exit the MySQL monitor and the Windows command prompt. Do not worry about all the commands for now. We will go into details when we discuss MySQL in Unit 4.
UNIT 1 93 Introduction to web development and PHP
Summary This appendix discussed the common techniques for installing Apache, MySQL and PHP on a Windows system. We have chosen to install the components separately so that you know how to setup each component. If you need to install Apache, MySQL and PHP in a Linux system, please refer to section 1.2.
94 WAWASAN OPEN UNIVERSITY TCC 242/05 Web Database Application
UNIT 1 95 Introduction to web development and PHP
References Apache (2010) The Apache Software Foundation, http://www.apache.org (Accessed 20 Dec 2010). Marston, T (2008) Web Site vs Web Application, http://www.tonymarston.net/phpmysql/web-site-vs-web-application.html (Accessed 7 Dec 2010). MySQL (2010) MySQL : The world’s most popular open source database, http://www. mysql.com (Accessed 20 Dec 2010). PHP (2010) Hypertext Preprocessor, http://www.php.net (Accessed 20 Dec 2010). Schwalbe, K (2004) Information Technology Project Management, 3rd edn, Boston, MC: Course Technology, Thomson. Simply Geniass! (2007) Article on website development, http://www.simply-geniass. com (Accessed 7 Dec 2010). Smith, A (2009) Dynamic Websites versus Static Websites, http://blog.spinxwebdesign. com/article/dynamic-websites-versus-static-websites/ (Accessed 19 Dec 2010). Wikibooks (2010) PHP programming, http://en.wikibooks.org/wiki/PHP, used under a Creative Commons Attribution-ShareAlike licence: http://creativecommons. org/licenses/by-sa/3.0/ Wikibooks (2010) Web development, http://en.wikibooks.org/wiki/Web_ Development, used under a Creative Commons Attribution-ShareAlike licence: http://creativecommons.org/licenses/by-sa/3.0/
96 WAWASAN OPEN UNIVERSITY TCC 242/05 Web Database Application
UNIT 1 97 Introduction to web development and PHP
Glossary Apache
An open-source web server.
Client/Server
An architecture in which the web server is the server and the web browser is the client.
Comments
Are used throughout program source code to explain the purpose of the code.
Dynamic websites
Websites that have dynamic content created by web programming languages and databases.
Echo
PHP function used to print text in a web browser.
Extreme Programming
Also known as XP. It is a software development model used in rapidly changing development environments; it encourages developers to work in pairs.
HTML
HyperText Markup Language. It is the predominant markup language for web pages.
LAMP
Linux, Apache, MySQL and PHP.
Linux
An open-source operating system.
MySQL
An open-source relational database management system (RDBMS).
MySQL monitor
A command area that gives a user the ability to query MySQL server.
Open-source
Any software program whose source code is available for modification and is free of charge.
Personal sites
Websites where people share information about themselves or their products.
PHP
Hypertext Preprocessor. A server-side scripting language.
Portals
Online platforms or online showcases.
Professional sites
Websites that provide information on a business and/or generate revenue for a business.
98 WAWASAN OPEN UNIVERSITY TCC 242/05 Web Database Application
RAD
Rapid Application Development. A development approach in which developers work with an evolving prototype.
Root
A user with administrator privileges in the Linux system.
Scrum
A development approach that uses iterative development to address requirement changes.
Static websites
Websites that have fixed content and do not contain any programmatically controlled content.
Sudo
Used to give a Linux command with root (administrator) privileges.
Terminal
Command line or console window in the Linux system.
Web database application
A web application that involves a database, in which the browser is the client, the web server is the middle tier and the database server is the database tier.
Web development
Conception, design and implementation of a web entity created to serve a specific purpose.
Web page
A document on the World Wide Web that may contain text, images and hyperlinks.
UNIT 2 i Data types, functions and control structures
Unit 2 TCC 242/05
Web Database Application
Data Types, Functions and Control Structures
ii WAWASAN OPEN UNIVERSITY TCC 242/05 Web Database Application
COURSE TEAM Course Team Coordinator: Mr. Ishan Sudeera Abeywardena Content Writer: Mr. Tang Chun Chong Instructional Designer: Mr. Yeap Hock Aun Academic Member: Mr. Chandarasageran Natarajan
COURSE COORDINATOR Mr. Ishan Sudeera Abeywardena
EXTERNAL COURSE ASSESSOR Dr. Sanjay Jasola, Gautam Buddha University
PRODUCTION In-house Editor: Mr. Yeap Hock Aun Graphic Designer: Ms. Leong Yin Ling
Wawasan Open University is Malaysia’s first private not-for-profit tertiary institution dedicated to adult learners. It is funded by the Wawasan Education Foundation, a tax-exempt entity established by the Malaysian People’s Movement Party (Gerakan) and supported by the Yeap Chor Ee Charitable and Endowment Trusts, other charities, corporations, members of the public and occasional grants from the Government of Malaysia. The course material development of the university is funded by Yeap Chor Ee Charitable and Endowment Trusts.
Wawasan Open University Jalan Sultan Ahmad Shah, 10050 Penang. Tel: (604) 2180333 Fax: (604) 2279214 Email: [email protected] Website: www.wou.edu.my
UNIT 2 iii Data types, functions and control structures
Contents Unit 2 Data Types, Functions and Control Structures Unit overview
1
Unit objectives
1
2.1 Working with data types and building expressions
3
Objectives
3
Introduction
3
What are data types?
3
Building expressions
9
Suggested answers to activities
16
2.2 Working with functions
19
Objectives
19
Introduction
19
What are functions?
19
Applying PHP built-in functions
19
Creating customised functions
21
Suggested answers to activities
30
2.3 Control structures
31
Objectives
31
Introduction
31
The if, elseif and else statements
31
The switch statement
34
iv WAWASAN OPEN UNIVERSITY TCC 242/05 Web Database Application
The for loop
36
The while and do-while loops
38
Suggested answers to activities
43
Summary of Unit 2
45
Unit practice exercises
47
Suggested answers to self-tests
53
Suggested answers to unit practice exercises
57
References
63
Glossary
65
UNIT 2 1 Data types, functions and control structures
Unit Overview his unit introduces you to the fundamental components of the PHP scripting language such as data types and functions. It also introduces you to control structures such as loops and conditional statements.
T
The first section discusses several PHP data types and explains how these data types are used. It also explains how data type conversion is performed and how expressions are built. The second section describes the use of functions for efficient coding. You will learn to use built-in PHP functions as well as create your own customised functions. The third section discusses how to control program flow with control structures. It explains the use of conditional statements and various types of loops.
Unit Objectives By the end of this unit, you should be able to: 1. Define the data types used in PHP. 2. Explain how expressions are written in PHP. 3. Implement customised functions. 4. Apply various control structures such as loops and conditional statements.
2 WAWASAN OPEN UNIVERSITY TCC 242/05 Web Database Application
UNIT 2 3 Data types, functions and control structures
2.1 Working with Data Types and Building Expressions Objectives By the end of this section, you should be able to: 1. Identify the main PHP data types. 2. Explain how data types are used. 3. Perform data type conversions. 4. Explain how to build expressions in PHP.
Introduction You created your very first PHP web page in Unit 1 and it was written in basic PHP syntax. In this section, you will be exposed to more PHP code in a systematic manner. Let us first take a look at the data types that are supported in PHP and see how they are used. Later in this section, we will examine how PHP expressions are created.
What are data types? In Malaysia, there are different ethnic groups such as Malay, Chinese, Indian and other minority groups. Each of these groups has its own set of characteristics. The same concept applies to data in PHP as data values in PHP are grouped based on their characteristics. These different groups of data are called data types. There are two main categories of data types, namely: 1. Scalar types 2. Compound types
Scalar types Scalar types store single items of data. The four primitive scalar types in PHP are: 1. Boolean 2. Integer
4 WAWASAN OPEN UNIVERSITY TCC 242/05 Web Database Application
3. Float 4. String
Boolean The Boolean data type is the simplest one. Its value can only be either TRUE or FALSE. Alternatively, you can use a non-zero value (usually “1”) to represent TRUE and a zero (“0”) value to represent FALSE. The values are also not casesensitive, which means that TRUE, True and true are identical and are all valid. Consider the following examples: $open = True;
// $open is TRUE
$open = TRUE;
// $open is TRUE
$open = 1;
// $open is TRUE
$open = 0;
// $open is FALSE
$open = false;
// $open is FALSE
Each line above is called an assignment statement. The combination of a dollar sign ($) and letters (open) on the left-hand side of the “equals” sign (which is called the assignment operator in PHP and does not have the same meaning as the equals sign in mathematics) in each line above is called a variable in PHP. We will discuss variables after the data type topic but at this stage we will just say that each statement above assigns a Boolean value (TRUE or FALSE) to the variable $open as shown by the comment line after each statement.
Integer Any number, either positive or negative, that does not have a fractional part is an integer. The number zero is also an integer. An integer is optionally preceded by a sign (− or +). Integers can be written in base 8 (octal), base 10 (decimal) or base 16 (hexadecimal) formats. The following examples show how a variable ($i) is assigned different integer values: $i = 0567;
// octal integer
$i = 24205;
// decimal integer
$i = -2011;
// negative integer
$i = 0x1B;
// hexadecimal integer
Note: To use octal notation, precede the number with “0” (zero). To use hexadecimal notation, precede the number with “0x”.
UNIT 2 5 Data types, functions and control structures
Float (Floating-point numbers) Floating-point numbers are numbers that have fractional parts. They are also known as real numbers. In PHP, floating-point numbers are known as either floats or doubles. They are used when an integer value cannot adequately represent the preciseness of a number. The following examples show how a variable ($f) is assigned different floating-point values: $f = 0.567;
// floating point number
$f = 5.0;
// floating point number
$f = 2.42e5;
// in exponential format
$f = 2.0E-11;
// in engineering format
String A string is a sequence of characters that are treated as a contiguous group and delimited by single or double quotes. Generally, PHP does not limit the size of a string; its size depends on the amount of computer memory available. In the following examples, the characters within the quote marks form strings; for example, simple string is a string. echo ‘simple string’;
// String
echo ‘It can embed a
// Strings can embed
new line’;
// new lines
echo ‘I\’ll be back’;
// Escape sequence \’
echo “Print capital A: \x41”;
// Escape sequence \x41 // outputs A
In all the examples above, the echo function causes the strings to be displayed on the computer screen. You will learn more about strings and string library functions in Unit 3.
Compound types Compound data types store multiple items of data under a single representation. The compound data types are: 1. Arrays 2. Objects
6 WAWASAN OPEN UNIVERSITY TCC 242/05 Web Database Application
Arrays An array is an ordered map that associates values to keys. It is an indexed collection of data values. Each item in an array is accessed using a simple integer reference, called a key, corresponding to the item. For example, to create a list of states in Malaysia, you could use an integer indexed array called $state, as shown below: $state[0] = “Kuala Lumpur”; $state[1] = “Penang”; … $state[13] = “Johor”;
Arrays will be discussed in more detail in Unit 3. Do not worry if you do not completely understand the concept at this point.
Objects The term “object” refers to an essential component in object-oriented programming. An object is a particular instance of a class. In PHP, an object is created using the new statement. Here is how you can define a class (called program ), instantiate an object (called $instance) of the class and then use the object to do something (output “An action”): class program
// Define a class
{ function do_work() { echo “An action”; } } $instance = new program;
// Instantiate an object
$instance -> do_work();
//Output: An action
Web Reference The following web reference presents a comprehensive view of classes and objects: “Classes and Objects”, http://www.php.net/manual/en/language. oop5.php
UNIT 2 7 Data types, functions and control structures
Variables A variable is a “container” that can hold different values of a particular data type. In PHP, variables are represented by a dollar sign ($) followed by the name of the variable. The names of PHP variables are case-sensitive. This means that $var and $Var are two different variables. PHP does not require explicit type definition in variable declaration. This means that if a variable, such as $a, is assigned a string value, it becomes a string. If it is assigned an integer value, it becomes an integer. You do not need to specifically declare the type before using it. As PHP is a flexible language, it allows variables to be set to any data type. You could first define a variable as a string and then later replace the string with a number, as shown in the example below: $var = “two four two”; $var = 242;
Type conversion You can convert values from one data type to another using type casting (type conversion). This can be done by placing the casting operator of the intended type in front of the variable that you intend to convert. Refer to Table 2.1 for a list of PHP casting operators. Casting operators
Cast to
(bool)
Booleans
(int)
Integers
(float) or (double)
Floating-point number
(string)
Strings
Table 2.1 Type casting operators
For example, if you want to cast an integer to a double, here is how you would write the code: $var = (double)242;
// $var = 242.0
If you cast a double value to an integer, the decimal part will be truncated: $var = (int)2.8;
// $var = 2
8 WAWASAN OPEN UNIVERSITY TCC 242/05 Web Database Application
Type juggling PHP supports type juggling. This means that PHP is able to perform automatic type conversion of a variable to best fit the situation in which the variable is referenced. Consider the following example: $var = “242”;
//Variable $var is assigned a string value
$a = $var + 1.1;//Addition of $var and a float value echo $a;
//Output: 243.1
Here, the value in the variable $var has been automatically converted from type string to type float during the addition process, resulting in the float number 243.1 being output.
Web Reference The following web reference presents a comprehensive view of type juggling: “Type Juggling”, http://php.net/manual/en/language.types.typejuggling.php
Activity 2.1
1. The four primitive scalar types are _____________________. A. B. C. D.
2. Which of the following is not a valid statement? A. B. C. D.
$a = ON; $a = -1; $a = tRuE; $a = 5;
3. Floating-point numbers are also known as ______________, ______________, or ______________.
UNIT 2 9 Data types, functions and control structures
4. Write a single quote echo statement to output I’m learning $php now.
5. Arrays and objects are compound data types that can store multiple items of data under a single representation. True/False?
6. List all the type casts that are allowed in PHP.
Building expressions You have now learnt most of the data types that are supported by PHP. Now let us start looking into building simple expressions. In school, you learnt to build mathematics expressions that involved simple arithmetic operations. In programming, an expression is a phrase representing an action in a program. An expression consists of operands and operators. For example, the following simple expression assigns the integer value 8 to the variable $a: $a = 8;
In this example, the operator is represented by the symbol “=” and the operands are $a and 8. Operands and operators are discussed next.
Operands and operators Operands are the data input into an expression while operators are the symbols used to manipulate the operands in an expression.
Operands In the examples below, $a, $sum, $value1 and $value2 are all operands. $a++; $sum = $value1 + $value2;
Arithmetic operators The basic arithmetic operators are shown in Table 2.2. Operator
Operation
+
Addition
–
Subtraction
*
Multiplication
10 WAWASAN OPEN UNIVERSITY TCC 242/05 Web Database Application
/
Division
%
Modulus
.
Concatenation
Table 2.2 Arithmetic operators
Assignment operators The assignment operators used in PHP are shown in Table 2.3. As you can see, arithmetic operators can be combined with the assignment operator. The combined assignment operators are used when a variable and a second value are to be manipulated and the result of this manipulation is to be assigned to the variable itself. Operator =
Operation Assignment
+=
Addition assignment
–=
Subtraction assignment
*=
Multiplication assignment
/=
Division assignment
%=
Modulus assignment
.=
Concatenation assignment
Table 2.3 Assignment operators
For example, the results of both the expressions below will be identical: $var = $var + 8; $var += 8;
Increment and decrement operators The increment and decrement operators are listed in Table 2.4. They are used to shorten statements and thus make code easier to read and understand. Operators
Effect
++
Increment
--
Decrement
Table 2.4 Increment and decrement operators
UNIT 2 11 Data types, functions and control structures
For example, the results of both the expressions below will be identical: $var += 1; $var ++;
PHP also supports C language pre- and post-increment and decrement operators. Example
Name
Effect
++$a
Pre-increment
Increments $a by one, then returns $a.
$a++
Post-increment
Returns $a, then increments $a by one.
--$a
Pre-decrement
Decrements $a by one, then returns $a.
$a--
Post-decrement
Returns $a, then decrements $a by one.
Table 2.5 Pre- and post-increment and decrement operators
Examples: $a = 8; echo $a++;
// Output: 8
echo $a;
// Output: 9
$a = 8; echo ++$a;
// Output: 9
echo $a;
// Output: 9
$a = 8; echo $a--;
// Output: 8
echo $a;
// Output: 7
$a = 8; echo $--a;
// Output: 7
echo $a;
// Output: 7
Web Reference The following web reference presents a comprehensive view of operators: “Operators”, http://www.php.net/manual/en/language.operators. php
12 WAWASAN OPEN UNIVERSITY TCC 242/05 Web Database Application
Operator precedence Operator precedence determines the order in which operations in an expression will be performed. PHP follows the standard precedence rules used in mathematics. You will need to refer to the online PHP manual listed in the web reference below to learn about operator precedence in PHP. Operator precedence is the reason why the first statement below can be written as the second statement because the multiplication operator has a higher precedence than the addition operator. The parentheses in the second statement forces the operation $quantity * 8 to be evaluated first. Both statements will produce the same result. $total = $tax + $quantity * 8; $total = $tax + ($quantity * 8);
Operator associativity Operator associativity determines how multiple operators that have the same precedence in an expression are grouped. Associativity can be either from left to right or right to left. For example, the following statements can be written from left to right or right to left and will produce the same result. $a = 2*4*2*5;
// Equals 80
$a = (((2*4)*2)*5);
// Equals 80
$a = (2*(4*(2*5)));
// Equals 80
However, in the next example, writing from left to right and from right to left will produce different results. $a = 2 * 4 / 2 * 5;
// Equals 20
$a = (((2 * 4) / 2) * 5);
// Also equals 20
$a = (2 * (4 / (2 * 5)));
// Equals 0.8
Generally, it is good practice to make groupings explicit by using parentheses to avoid mistakes and improve readability.
Web Reference To learn about PHP operator precedence and associativity, please refer to the following: http://php.net/manual/en/language.operators.precedence.php
UNIT 2 13 Data types, functions and control structures
14 WAWASAN OPEN UNIVERSITY TCC 242/05 Web Database Application
Summary Data that share a set of characteristics are grouped into a specific data type. The two main categories of data types in PHP are scalar types and compound types. Scalar data types store a single item of data. The four primitive scalar types are: 1. Boolean the simplest data type; its value can only be either TRUE or FALSE. 2. Integer any whole number without a fractional part. 3. Float numbers with a fractional part; also known as real numbers. 4. String a series of characters.
Compound data types store multiple items of data under a single representation. There are two compound data types: 1. Arrays ordered map that associates values to keys. 2. Objects an instance of a class.
You can convert values from one data type to another by using type casting. PHP is able to perform automatic type conversion of a value to best fit the situation in which it is referenced. This is known as type juggling. A variable is a “container” that can hold different values of a particular data type. An expression is a phrase representing an action in a program. It consists of operands and operators. The types of operators discussed in this section were: 1. Arithmetic operators 2. Assignment operators 3. Incrementing and decrementing operators
Operator precedence and associativity were also briefly discussed in this section. You also learnt how to build simple expressions with operators and operands. In the next section, you will learn about functions.
UNIT 2 15 Data types, functions and control structures
Self-test 2.1 1. An integer is a number that contains a fractional part and can be used to represent monetary values, weights and distances. True / False?
2. A string is a sequence of characters that are treated as a contiguous group and delimited by single or double quotes. True / False?
3. The two compound data types in PHP are __________ and ___________. A. B. C. D.
4. It is often useful to aggregate a series of similar data values together, arranging and referencing them in some specific way. This data structure, known as a/an ____________, is formally defined as an indexed collection of data values. A. B. C. D.
boolean object data type array
5. Describe how data types can be adapted by type juggling in PHP.
6. What is an expression in PHP?
7. The output of the two following PHP statements will be 1. True / False? $a = 2; echo $a--;
8. What is operator precedence?
16 WAWASAN OPEN UNIVERSITY TCC 242/05 Web Database Application
9. What is the value of $var after the following type casting is performed? $var = (int)188.9;
A. B. C. D.
188 189 190 188.9
10. In PHP, the names of variables are not case-sensitive. This means that $var and $Var are identical variables. True / False?
Suggested answers to activities
Feedback Activity 2.1 1. C
2. A
3. floats, doubles, real numbers
4. echo ‘I\’m learning $php now’;
5. True
6. The casts allowed are: a. (int), (integer) cast to integer b. (bool), (boolean) cast to boolean c. (float), (double), (real) cast to float d. (string) cast to string e. (array) cast to array f. (object) cast to object
UNIT 2 17 Data types, functions and control structures
18 WAWASAN OPEN UNIVERSITY TCC 242/05 Web Database Application
UNIT 2 19 Data types, functions and control structures
2.2 Working with Functions Objectives By the end of this section, you should be able to: 1. Discuss the use of functions for efficient coding. 2. Use PHP built-in functions. 3. Create your own customised functions.
Introduction The e-commerce sites and web database applications of today rely heavily on features such as mortgage payment calculators and shopping carts. These features provide users with the ability to perform repetitive tasks. Providing a convenient way to perform these repetitive tasks within a section of code is a key concept in modern programming languages like PHP. This is achieved through the use of functions. In this section, you will learn how to use and create functions in PHP.
What are functions? A function (also known as a method) is a reusable group or block of code that performs a specific task. You can give a PHP function values to work with and it will process the values and output the result. If the task that a function performs needs to be modified, the function is the single point at which you need to make the modification. In other words, it gives you the convenience of a single point of reference. This reduces the possibility of programming errors and enables programs to be maintained easily.
Applying PHP built-in functions PHP has more than a thousand built-in functions (refer to the online PHP manual for information about these functions). Some functions require you to add the include() or require() functions before you can use them. These two functions allow you to insert the contents of a PHP file into another PHP file before the server executes it. They are used to create functions, headers, footers and to reuse certain elements on multiple pages. They are identical except that: 1. include() generates a warning if it cannot find a file. 2. require() generates an error if it cannot find a file.
20 WAWASAN OPEN UNIVERSITY TCC 242/05 Web Database Application
You can call the function that you want from within a program by simply entering the function name. For example, if you want to calculate the square root of 64, you can call the PHP sqrt() function: $var = sqrt(64);
// returns 8
echo $var;
// displays 8
You can also directly output the function’s result without first assigning the value to a variable: echo sqrt(64);
// returns and displays 8
You may also output the function result within a larger string by using printf(). printf(“The square root of 64 is %d.”, sqrt(64));
The printf() function The printf() function works like the echo function but provides more formatting capability. The printf() function is used to output a mixture of static text and dynamic information stored within one or more variables. It separates static and dynamic data into two sections and allows you to control how dynamic information is rendered on the screen in terms of position and precision. Its general format is: int printf(string $format [, mixed $args [, mixed $... ]] )
Example: printf(“TCC%d/05: Web Database Application”, 242);
Output: TCC242/05: Web Database Application
In the previous example, note how an integer (242) was inserted into a static string. The %d is a type specifier which represents an integer value placed between “TCC” and “/05”. Table 2.6 lists the commonly used type specifiers. Type specifier
Description
%d
Signed decimal number
%f
Floating point number
%s
String
%o
Octal number
%x
Lowercase hexadecimal number
Table 2.6 Type specifiers
UNIT 2 21 Data types, functions and control structures
Here is another example of how to output two values using printf(): $q = 5; $costPerPen = 1.98; $amt = $q * $costPerPen; printf(“The total cost of %d pens is RM%.2f”, $q, $amt);
Output: The total cost of 5 pens is RM9.90
Note: The specifier %.2f is used to adjust the number of decimal points or the precision of the floating-point number.
Activity 2.3 1. What are functions and why do you want to use them?
2. ___________ is the PHP built-in function that you can use if you need to raise x to the power of y. (Hint: You can find this function in the PHP online manual)
3. What is the output of the following statement? printf(“%d bottles of drinking water cost RM%.2f”, 10, 21.20);
Creating customised functions You can create functions that have the logic and calculations that you require. You can even build entire function libraries. The format for a typical function is: Function FunctionName(parameters) { Function body }
As an example, consider the following function, which is called generateHeader(): Function GenerateHeader() { echo “*****”; echo “Welcome to WOU”; echo “*****”; }
22 WAWASAN OPEN UNIVERSITY TCC 242/05 Web Database Application
After defining the function, you can call it by using
The function will give you the output: *****Welcome to WOU*****
Passing parameters by value Parameters are variables within a function. They are passed to the function by the program that calls the function. The function can then read and change the parameters locally. When calling a function that has more than one parameter, you can separate each parameter with a comma. The following function has two parameters $var1 and $var2: function PrintWords($var1, $var2) { echo $var1; echo $var2; }
The function PrintWords can be called with the following statement, which also passes two string parameters “Web” and “Application” to the function: PrintWords(“Web”, “Application”);
The output will be: Web Application
When you pass parameters to a function in this way, you are passing them by value. In other words, any changes you make to those values within the function are ignored outside the function.
UNIT 2 23 Data types, functions and control structures
Note Many functions take multiple parameters. The syntax or the prototype of such a function is as follows: bool function (mixed $needle, array $haystack [, bool $strict])
This function returns a boolean value, TRUE on success (if the $needle was found in the $haystack) or FALSE on failure (if the $needle was not found in the $haystack). The first parameter is named $needle and it can be of many different data types, so we call it mixed . This mixed $needle (what we are looking for) can be either a scalar value (string, integer or float), or an array. The array $haystack (the array we are searching in) is the second parameter. The third optional parameter is named $strict. All optional parameters are placed in square brackets “[]”.
Passing parameters by reference If you need the changes made to a parameter within a function to be reflected outside the function, you can pass the parameter by reference. You pass a parameter by reference by adding an ampersand symbol in front of the parameter. Here is an example: $amount = 10.00; $tax = 0.05; function NewTaxAmount(&$amount, $tax) { // Change the $amount variable $amount += $amount * $tax; // Add 1% to $tax variable. $tax += 0.01; } NewTaxAmount($amount, $tax); echo “Tax is $tax ”;
// Tax is 0.05
echo “Amount is $$amount ”;
// Amount is $10.5
Note that in this example the value of $tax was changed in the function but this change was not reflected outside whereas the value of &$amount was also changed in the function and the change was reflected outside the function.
24 WAWASAN OPEN UNIVERSITY TCC 242/05 Web Database Application
Default parameter values When writing a function, you sometimes want to have the flexibility not to use all the parameters in a function call. PHP allows you to define default parameter values during function declaration. The following example illustrates this: function NewTaxAmount($amount, $tax=0.06) { $amount += $amount * $tax; echo “Total amount: $amount”; }
The default value of $tax, which is 0.06, will only be used if the function call does not include enough parameters. If only one parameter is provided, $tax=0.06 will be applied. The following example shows only one parameter being passed in the call to the function NewTaxAmount: $amount = 10.00; NewTaxAmount($amount);
//Total amount: 10.6
Default parameter values must be placed at the end of the parameter list and are required to be constant expressions. This allows you to call a function like NewTaxAmount() without passing the second parameter. A constant is an identifier for a fixed value. As the name suggests, the value of a constant cannot be changed during the execution of the script.
Returning values from a function Sometimes you need a function to return the result of a calculation. For example, by passing the loan amount, loan period and interest rate to a function that calculates loan instalments, you would expect it to return the monthly instalment amount. To return a value from a function, you use the return statement in the function. function SumNumbers($var1 = 0, $var2 = 0, $var3 = 0) { $total = $var1 + $var2 + $var3; return $total; } //Call the function and print the result $sum = SumNumbers(23, 24, 25); echo “The sum of 23 + 24 + 25 = {$sum}”;
In this case, the value returned by the function will be assigned to the variable $sum.
UNIT 2 25 Data types, functions and control structures
You may also want the function to return a value to indicate if a parameter is not valid: function Divide($number, $divider) { if ($divider == 0) { //Checking to avoid division by 0. return false; } $result = $number/$divider; return $result; }
The return statement ends the function execution. If there are any statements after the return statement, they will not be executed. In this example, if $divider is equal to 0, the return false statement will be executed and the function stops without proceeding to the calculation of $result.
Returning multiple values from a function When you want to return multiple values from a function, you need to return an array set. For example: function MultipleOperation($input1, $input2) { $total = ($input1 + $input2); $difference = ($input1 - $input2); $ret = array(“tot”=>$total, “diff”=>$difference); return $ret; } $result = MultipleOperation (20, 10); echo $result [‘tot’];
// 30
echo $result [‘diff’];
// 10
Recursive functions Recursive functions are functions that call themselves. A recursive function is often very useful in dividing a complex problem into a number of simpler ones. It will iterate through the simpler cases until the problem is resolved. Here is an example of a recursive function being used to calculate a loan payment.
26 WAWASAN OPEN UNIVERSITY TCC 242/05 Web Database Application
function InterestPayment ($amount, $interest, $years) { if ($years > 0) { echo $amount; echo “ ”; $amount = $amount + $amount * $interest; return (InterestPayment($amount, $interest, $years-1)); //Here the function calls itself } else return ($amount); } // Apply the function echo InterestPayment (100, 0.18, 10); // Output: // 100 (At year 0) // 118 (At year 1, 100 + 100 * 18%) // 139.24 (At year 2, 118 + 118 * 18%) // 164.3032 (At year 3, 139.24 + 139.24 * 18%) // 193.877776 … // 228.77577568 … // 269.9554153024 … // 318.54739005683 … // 375.88592026706 … // 443.54538591513 … // 523.38355537986 (Final payment at year 10)
When $years = 0, the function will return $amount. The recursive function will always have a conditional expression that serves to end the recursion. Otherwise, the program will perform infinite recursions. In this example, the conditional expression is if ($years > 0) and the step expression is $years-1. When the condition $years > 0 is no longer true, the recursion will end and the function will return the final $amount.
UNIT 2 27 Data types, functions and control structures
Web Reference To learn more about functions, please visit “Functions” at: http://www.php.net/manual/en/language.functions.php
Activity 2.4 1. What is the output of the following block of code? function PrintText($var1, $var2, $var3) { echo $var3; echo $var1; echo “by “; echo $var2; } PrintText(“parameters “, “value “, “passing “);
2. In the function TotalBill(100) below, what is the default percentage value of $service when the function is called? function TotalBill($amount, $service=0.12) {…}
3. When you need a function to return the result of a calculation, you use the _____________ statement in the function.
4. What is the output of the following recursive function? function simple ($num) { if ($num > 0) { echo $num; return simple($num-1); } } simple(5);
28 WAWASAN OPEN UNIVERSITY TCC 242/05 Web Database Application
Summary A function is a group or block of code that performs a specific task. It can be reused when needed. It reduces the possibility of programming errors and enables easy maintenance. PHP has more than a thousand built-in functions and you can also create your own functions. Parameters are variables within a function. They are passed to a function by the program that calls it. The function can read and change parameters locally. If you need the changes made to a parameter within a function to be reflected outside the function, you can pass the parameters by reference. PHP also allows you to define default parameter values during function declaration. To return a value from a function, you use the return statement in the function. The return statement ends function execution. When you need to return multiple values, you need to return an array set. Recursive functions are functions that call themselves. They are very useful for dividing complex problems into simpler cases. They iterate through the simpler cases until the problem is resolved. In the next section, you will learn about control structures.
Self-test 2.2 1. Some PHP built-in functions require you to add the _________ or _________ statement before you can use them.
2. What is the built-in function that you can use to round a number to the nearest integer? (Hint: You can find it in the online PHP manual.) A. B. C. D.
ceil() round() nearest() floor()
3. Write a function named P r i n t O u t p u t that generates the output “I come I see I conquer” when the function call PrintOutput(“see”, “conquer”, “I”, “come”) is made.
UNIT 2 29 Data types, functions and control structures
4. What is the output of the following code? $cost = 10.00; $tax = 0.05; function EstimateCost(&$cost, $tax) { $cost = $cost + ($cost * $tax); $tax += 4; } EstimateCost($cost, $tax); echo “Tax is “. $tax * 100 .”% ”; echo “Cost is: $”.$cost;
5. What is the output of the following code? function CarSalesTax($price, $tax=””) { $total = $price + ($price * $tax); echo “Total cost: $$total”; } CarSalesTax(49800.00);
6. What is the output of the following code? function BikeSalesTax($price, $tax=.05) { return $price + ($price * $tax); } $price = 1800; $total = BikeSalesTax($price); echo “Total cost: $$total”;
7. What is the output of the following code? function Sum ($start, $end, $amount=0) { if ($start > $end) { return ($amount); } else { $amount += $start; return (Sum($start+1, $end, $amount)); } } echo Sum(1, 5);
30 WAWASAN OPEN UNIVERSITY TCC 242/05 Web Database Application
Suggested answers to activities
Feedback Activity 2.3 1. A function (also known as a method) is a group or block of code that performs a specific task. It can be reused when needed. You can give a PHP function values to work with and it will process the values and output the result. If the task that a function performs needs to be modified, the function is the single point at which you need to make the modification. In other words, it gives you the convenience of a single point of reference. You use functions because they reduce the possibility of programming errors and enable easy maintenance. 2. pow(x,y) 3. 10 bottles of drinking water cost RM21.20
Activity 2.4 1. passing parameters by value 2. 12 % 3. return 4. 54321
UNIT 2 31 Data types, functions and control structures
2.3 Control Structures Objectives By the end of this section, you should be able to: 1. Explain how to control program flow with control structures. 2. Apply conditional statements. 3. Use various types of loops.
Introduction When you want to control how your code flows by specifying which statements in an application are to be executed, you will need to use control structures. There are two control structures in PHP: conditional statements and looping statements. The conditional statement controls a program using logic to distinguish between different conditions based on an input value. The common conditional statements are if-else and switch. A looping statement provides a repeating sequence of instructions that is executed until a specific condition is fulfilled. The more common forms of looping statements in PHP are the for, foreach, while and do while statements. You will learn about these statements in this section.
The if, elseif and else statements The if statement structure begins with an if clause, which is made up of the keyword if followed by a true/false expression in parentheses. Subsequent statements in the structure will be located within a block delimited by curly braces { }. The if clause says, “If the expression in parentheses is true, execute the statements located within the curly braces. If it is false, ignore these statements.” The format of the if statement is as follows: if (expr) { Statement1; Statement2; }
If the curly braces are omitted, only one line will be executed following the if statement. This rule also applies to other control structures. if (expr) statement1_only
32 WAWASAN OPEN UNIVERSITY TCC 242/05 Web Database Application
If you want to compare two numbers and then print the result of the comparison, you may use the if statement as in the following example. $var1 = 10; $var2 = 20; if ($var2 > $var1) { echo “var2 is greater than var1”; }
If $var2 is greater than $var1, the statement “var2 is greater than var1” will be displayed. In this example, $var2 = 20 and $var1 = 10, thus the conditional expression $var2 > $var1 is true and the statement is displayed. What happens if $var2 is smaller than $var1? In the previous example, nothing will happen if the conditional expression evaluates to false. If you want your program to be able to do something when the if statement evaluates to false, you can use the elseif clause. The elseif clause says, “If the previous if statement was false, check if this statement is true. Execute it if it is true and skip it if it is not.” Thus, the elseif statement is only evaluated when the preceding if statement is false, otherwise it is skipped. The following example illustrates this: $var1 = 20; $var2 = 10; if ($var2 > $var1) { echo “var2 is greater than var1”; } elseif ($var2 < $var1) { echo “var2 is smaller than var1”; }
In this example, $var2 is indeed smaller than $var1, thus the statement “var2 is smaller than var1” is displayed. Another form of the if statement uses the else clause. The else clause says, “If all the preceding tests fail, execute this code”. Here is how you would use the if-else statement: $var1 = 10; $var2 = 10; if ($var2 > $var1) { echo “var2 is greater than var1”; } elseif ($var2 < $var1) {
UNIT 2 33 Data types, functions and control structures
echo “var2 is smaller than var1”; } else { echo “var2 is equal to var1”; }
In this example, $var2 is equal to $var1, so the else clause is executed and the words “var2 is equal to var1” are displayed.
Web Reference To learn more about if-else statements, please visit: “Elseif/else if ”, http://www.php.net/manual/en/control-structures. elseif.php
Activity 2.5 1. The if clause says “If this conditional expression is true, the program will execute the following statements. If it is false, ignore these statements”. True / False?
2. What is the output of the following PHP code? $d=date(“D”); if ($d==”Sat”) echo “Have a nice weekend!”; elseif ($d==”Sun”) echo “Have a nice Sunday!”; else echo “Have a nice day!”;
34 WAWASAN OPEN UNIVERSITY TCC 242/05 Web Database Application
The switch statement In the previous subsection, you learned to use the if-elseif-else statement combination. There are certain occasions when you will need to use many elseif clauses to test a single variable or expression with different values. The following example illustrates this: if($command == “p”) { play(); } elseif($command == “r”) { record(); } elseif($command == “a”) { pause(); } else { stop(); }
In such a case, there will be a lot of repeated code. The switch statement allows you to avoid these repetitions as it compares the value of a certain variable or expression to a list of possible values and executes an action corresponding to a value if a match is found. Here is how to rewrite the preceding example using the switch statement: switch($command) { case “p”: play(); break; case “r”: record(); break; case “a”: pause(); break; default: stop(); break; }
UNIT 2 35 Data types, functions and control structures
In this example, the value of the variable $command (the test variable) is compared against the value listed in each case statement from top to bottom until a match is found. When a match is found, the statement in the matching case will be executed. For example, if $command equals “p”, then play() is executed. The break statement causes the program to exit the switch statement block once a case statement has been executed. If you forget the break statement at the end of a case statement, the program will continue executing all statements until the end of the switch block. The default statement appears after the last case statement and the statement(s) it contains will be executed if no case statement value matches the test variable. In the previous example, if the test variable $command does not match any case, then stop() will be executed.
Web Reference To learn more about switch statements, please visit: “Switch”, http://www.php.net/manual/en/control-structures. switch.php
Activity 2.6 1. In a switch statement, if you forget the break statement at the end of a case statement, the program will still be able to automatically prevent execution from running into the next case. True / False? 2. Write a switch statement to print out “section 1” when $var is 1, “section 2” when $var is 2, and so on up to “section 5” when $var = 5. Print “No section between 1 to 5” if $var is other than 1 to 5.
36 WAWASAN OPEN UNIVERSITY TCC 242/05 Web Database Application
The for loop You have seen conditional statements using if-else and switch . Another useful mechanism in programming is the looping statement. A looping statement accomplishes a task by repeating a sequence of instructions until a specific condition is satisfied. Let us first look at the most commonly used loop, which is called the for loop. The for loop is slightly complex in terms of syntax. The basic syntax of the for loop is: for([initialisation]; [condition]; [step]) { body statements }
[Initialisation] is the first expression to run in the loop. It initialises variables or carries out any actions that are needed before the execution of the body statements. The [condition] expression is evaluated before each execution of the body statements. If it is true, the body statements will be executed, if it is false, the for loop will exit. [Step] specifies an action, such as variable increment or decrement, to be performed after each execution of the body statements. Consider the for loop example below that prints numbers from 0 to 9. for ($i = 0; $i < 10; $i++) { echo $i;
// Output: 0123456789
}
First, the variable $i is initialised to 0. Then the conditional expression, $i < 10 is evaluated. Since $i = 0, which is less than 10, the condition is true and the program will enter the body statement and print the value of $i, which is 0 at this point. Then the loop increments $i using $i++ . Now $i = 1. Next, $i enters the conditional expression again to be evaluated against $i < 10. Since $i is still less than 10, the program will execute the body statement and the value of $i, which is now 1, will be printed. Each time the loop runs, $i will be incremented and the conditional expression is evaluated. When $i finally reaches 10, which means that $i < 10 is false, the body statement will not be executed and the program will exit the loop. Thus, the result of the loop execution is: 0123456789
UNIT 2 37 Data types, functions and control structures
The foreach loop The foreach loop is a special form of the standard for loop. The foreach loop is used to iterate through an array and to manipulate the values in it. For instance, it is commonly used to print out all the values in an array. You will deal with arrays in Unit 3 but for now consider the following example: $array = array(“Toyota”, “Nissan”, “Honda”, “Perodua”); foreach ($array as $var) { echo ($var . “ ”); }
In this example, the as keyword within the foreach parentheses is used to sequentially assign each item in the array to the variable, $var. Each item is then displayed on its own line by the echo statement.
Web Reference To learn more about for loop statements, please visit: “For”, http://www.php.net/manual/en/control-structures.for.php
Activity 2.7 1. A for loop consists of: for ([initialisation];
[condition]; [step])
{ body statements }
What is the typical execution sequence when the loop starts running? A. B. C. D.
38 WAWASAN OPEN UNIVERSITY TCC 242/05 Web Database Application
The while and do-while loops The while loop The while loop is the simplest type of loop in PHP. It tells PHP to repeatedly execute the body statement(s) as long as the conditional expression is true. The syntax of the while loop is shown below: [initialisation]
//optional
while([condition]) { body statements [steps]
//optional
}
The conditional expression [condition] is checked at the beginning of each iteration of the loop. This means that the body statements will not be run even once if the conditional expression is evaluated to false at the beginning of the first iteration. The example below shows an alternative way of writing the for loop that prints 0123456789 using the while statement. $i = 0; while ($i < 10) { echo $i++;
// Output: 0123456789
}
Do-while loops The do-while loop has a similar syntax and purpose as the while loop except that its conditional expression is checked at the end of each iteration instead of at the beginning. This means that the body statement(s) will execute at least once. The syntax of the do-while loop is shown below: [initialisation]
//optional
do { body statements [steps]
//optional
} while([condition]);
The code block below will print out “Hi” even though $c is initialised to 6, which makes the conditional expression $c < 5 false because the conditional expression is only evaluated at the end of the loop.
UNIT 2 39 Data types, functions and control structures
$c = 6; do { echo ‘Hi’; } while ($c < 5);
So, when do you use the do-while loop? Since the body statement(s) will always execute once regardless of the status of the conditional expression, you can use it to run a pre-checking procedure before the loop is executed. For example, you may use a do-while loop to perform file existence checking before you start to work on a file or you may want to get confirmation input from a user before running the loop.
Web Reference To learn more about do-while loop statements, please visit: “Do-while”, http://www.php.net/manual/en/control-structures. do.while.php
Break and continue You have already seen how the break statement was used in the switch block. The break statement is also useful when you need to end the execution of for, foreach, while, or do-while loops. The following is an example of the application of the break statement in a while loop. Note that the conditional expression for the while loop in this example is set to true to make it an infinite loop on purpose. Then the break statement is used to end the execution of the loop when $i equals 10. $i = 0; while (true) { if ($i >= 10) break; echo $i++;
// Output: 0123456789
}
The continue statement is used within looping structures to skip the rest of the current looping statement. It forces the program to continue execution at the conditional expression and begin the next iteration of the loop. In the example below, when $i is equal to 2, the continue statement will be executed and the echo $i statement will be skipped. Thus the number 2 will not be printed. Execution continues at $i++ where $i will become 3 and the loop then continues.
40 WAWASAN OPEN UNIVERSITY TCC 242/05 Web Database Application
for ($i = 0; $i < 10; $i++) { if ($i == 2) continue; echo $i;
// Output: 013456789
}
Activity 2.8 1. What is the difference between the while loop and the do-while loop? 2. What happens when a program encounters the b r e a k statement and what happens when the program encounters the continue statement?
Summary There are two main control structures in PHP: the conditional statement and the looping statement. The conditional statement controls the program by using logic to distinguish between different conditions based on an input value. The if-else statement is used to execute some task if a condition is true and another task if the condition is false. The switch statement allows you to compare the value of a certain variable to a list of possible values and execute an action when a match is found. The looping statement repeats a sequence of instructions until a specific condition is fulfilled. The for loop is used to execute a block of code a specified number of times or while a specified condition is true. Its basic syntax includes initialisation, condition and step. The foreach loop is a special form of the standard for loop. The common use of the foreach loop is to iterate through an array. The while loop repeatedly executes statements as long as its conditional expression is true. The do-while loop has a similar syntax and purpose as the while loop except that the conditional expression is checked at the end of each iteration instead of at the beginning. To summarise, you should now be familiar with: •
Conditional statements like if-else and switch.
•
Looping statements like for, foreach, while and do-while.
•
The use of the break and continue statements.
UNIT 2 41 Data types, functions and control structures
Self-test 2.3 1. The conditional statement repeats a sequence of instructions until a specified condition is fulfilled to accomplish a programming task. True / False?
2. Consider the following PHP code: $secretNumber = 555; $guessNumber = 123;
What is the output when a. $guessNumber = 500; b. $guessNumber = 550; c. $guessNumber = 555;
3. What will be the output of the following PHP code? $category = “weather”; switch($category) { case “news”: echo “
What’s happening around the world
”; case “weather”: echo “
Your weekly forecast
”; case “sports”: echo “
Latest sports highlights
”; default: echo “
Welcome to my Web site
”; }
42 WAWASAN OPEN UNIVERSITY TCC 242/05 Web Database Application
4. Print out the following lines with a for loop: 1 km = 0.621400 miles 2 km = 1.242800 miles 3 km = 1.864200 miles 4 km = 2.485600 miles 5 km = 3.107000 miles
5. What is the output of the following PHP code? $arr = array(“HTML”, “XML”, “JavaScript”); foreach ($arr as $a) { if ($a == “XML”) continue; echo ($a . “ ”); }
“XHTML”,
“CSS”,
6. Print out the following lines with a while loop. 1 squared = 1 2 squared = 4 3 squared = 9 4 squared = 16
7. What is the output of the following PHP code? $count = 11; do { printf(“%d squared pow($count, 2)); } while ($count < 10);
=
%d
”,
$count,
8. What is the output of the following PHP code? $gal = 1; for (;;) { if ($gal > 5) break; printf(“%d gallon = %.2f liters ”, $gal, $gal*3.7854); $gal++; }
UNIT 2 43 Data types, functions and control structures
Suggested answers to activities
Feedback Activity 2.5 1. True
2. The result varies depending on what the current day is. Mon-Fri: Have a nice day! Sat: Have a nice weekend! Sun: Have a nice Sunday!
Activity 2.6 1. False 2. $var = 0;
// assign different values here
switch ($var) { case 1: echo “section 1”; break; case 2: echo “section 2”; break; case 3: echo “section 3”; break; case 4: echo “section 4”; break; case 5: echo “section 5”; break; default: echo “No section between 1 to 5”; }
44 WAWASAN OPEN UNIVERSITY TCC 242/05 Web Database Application
Activity 2.7 1. D 2. for ($i=5; $i>=1; $i--) { echo $i; }
Activity 2.8 1. The difference is that the code embedded within a while statement could possibly never be executed, whereas the code embedded within a do-while statement will always execute at least once. 2. A break statement will immediately end the execution of a control structure block. The continue statement causes execution of the current loop iteration to end and recommence at the beginning of the loop.
UNIT 2 45 Data types, functions and control structures
Summary of Unit 2 Summary In the first section of this unit, you learnt about the two main categories of data types found in PHP, which are the scalar and compound types. You were also introduced to variables, type conversion and type juggling. Additionally, you learnt to build simple expressions with operands and operators. In the second section, you learnt how to apply PHP built-in functions and create customised functions. You also learnt to pass parameters by value and by reference to functions. You saw how functions return values and how recursive functions are used. In the final section, you studied control structures that involve conditional statements and looping statements. You learnt about the if-else statement, switch statement, for loop, foreach loop, while loop and do-while loop. You are now well on your way towards developing a strong foundation for building web database applications! In the next unit, you will learn how to manipulate strings and arrays and you will also begin to work with files.
46 WAWASAN OPEN UNIVERSITY TCC 242/05 Web Database Application
UNIT 2 47 Data types, functions and control structures
Unit Practice Exercises 1. Create a PHP file in the ‘/var/www/Unit2’ directory (or ‘\ htdocs\Unit2’ in Windows) and name it ‘MySite05.php’. In this file, you are to write code that will display a web page with a message based on the current time of day. For example, if it is in the morning, have the site display “Good Morning,”. Object
Markup
Value/Example
Title
…
My Site 05
Greeting Message
Use
markup Insert date_default_timezone_
Good Morning,
set(‘Asia/Kuala_Lumpur’);
Use date(“G”) to get the hour value 5:00 – 11:00: Good Morning, 12:00 – 18:00: Good Afternoon, 19:00 – 4:00: Good Evening, You may use either if-else or switch statement.
Create the page shown in Figure 2.1.
Figure 2.1 Greeting message
48 WAWASAN OPEN UNIVERSITY TCC 242/05 Web Database Application
2. In this exercise, you will modify the My Site web page from question 1. Duplicate the PHP file from question1 in the ‘/var/www/Unit2’ directory (or ‘\htdocs\Unit2’ in Windows) and name it ‘MySite06. php’. a. Save the greeting message into a new file called ‘header.php’. b. Call the header file from ‘MySite06.php’ with include “header.php”. Object
Markup …
Use the include function
include "header.
{the greeting message}
php"
3. In this exercise, you will modify the My Site web page from question 2. Duplicate the PHP file from question 2 in the ‘/var/www/Unit2’ directory (or ‘\htdocs\Unit2’ in Windows) and name it ‘MySite07. php’. a. Print the following lines with a while loop. Espresso Roast Grade 1 earns 1 loyalty points Espresso Roast Grade 2 earns 4 loyalty points Espresso Roast Grade 3 earns 9 loyalty points Espresso Roast Grade 4 earns 16 loyalty points Espresso Roast Grade 5 earns 25 loyalty points Object Title
Markup …
PHP current time
Use a while loop and the pow() function
Compare your results with Figure 2.2.
Value/Example My Site 07
UNIT 2 49 Data types, functions and control structures
Figure 2.2 Use a while loop to print the lines
4. In this exercise, you will modify the My Site web page from question 3. Duplicate the PHP file from question 3 in the ‘/var/www/Unit2’ directory (or ‘\htdocs\Unit2’ in Windows) and name it ‘MySite08. php’. a. Print a table using the following information:
Coffee
Cost
Quantity
Sub Total
b. Use a for loop to print out 5 rows of items as shown below in the PHP tag. Coffee
Cost
Quantity
Sub total
Espresso Roast Grade 1
RM10.95
5
RM54.75
Espresso Roast Grade 2
RM21.90
4
RM87.60
Espresso Roast Grade 3
RM32.85
3
RM98.55
Espresso Roast Grade 4
RM43.80
2
RM87.60
Espresso Roast Grade 5
RM54.75
1
RM54.75
50 WAWASAN OPEN UNIVERSITY TCC 242/05 Web Database Application
c. Use the following simulation data to assist you. Object Title
Markup …
Coffee
Espresso Roast Grade with the number equivalent to the row number.
Row no. 1 means Espresso Roast Grade 1
Cost
Use $pricePerOz = 10.95; Each grade increment will increase the cost, which is $pricePerOz multiplied by grade number
Espresso Roast Grade 2 = 2 x $pricePerOz Espresso Roast Grade 5 = 5 x $pricePerOz Hint: Use printf() with floating 2 decimal points
5. In this exercise, you will modify the My Site web page from question 4. Duplicate the PHP file from question 4 in the ‘/var/www/Unit2’ directory (or ‘\htdocs\Unit2’ in Windows) and name it ‘MySite09. php’. a. Display the grand total of the cost of all the items.
b. Display the total loyalty points earned based on the chart in question 3.
c. Use the following simulation data to assist you. Object Title
Markup …
Grand total
The grand total is the total of the sub totals.
Hint: Use printf() with 2 decimal points.
Total points
Total points are equivalent to quantity multiplied by points earned on each grade of coffee.
Points for Espresso Roast Grade 2 = 4 x 4 Points for Espresso Roast Grade 5 = 1 x 25
UNIT 2 51 Data types, functions and control structures
See Figure 2.3.
Figure 2.3 Displaying the grand total and total points earned
d. If you are required to display only Espresso Roast Grade 4 and above, how would you modify your for loop? (Hint: Use the if and continue statements.)
52 WAWASAN OPEN UNIVERSITY TCC 242/05 Web Database Application
UNIT 2 53 Data types, functions and control structures
Suggested Answers to Self-tests Feedback Self-test 2.1 1. False 2. True 3. B 4. D 5. Because of PHP’s lax attitude toward type definitions, variables are sometimes automatically cast to best fit the circumstances in which they are referenced. PHP’s automatic type conversion can be illustrated by the addition operation. If either operand in an addition operation is a float, then both operands are evaluated as floats, and the result will be a float. Otherwise, the operands will be interpreted as integers, and the result will also be an integer. 6. An expression is a phrase representing a particular action in a program. All expressions consist of at least one operand and one or more operators. 7. False 8. Operator precedence determines the order in which operators evaluate the operands surrounding them. PHP follows the standard precedence rules used in mathematics. 9. A 10. False
Self-test 2.2 1. include(), require()
2. B
54 WAWASAN OPEN UNIVERSITY TCC 242/05 Web Database Application
2. a. Sorry! b. You’re getting close! c. Congratulations!
3. Output: Your weekly forecast Latest sports highlights Welcome to my Web site
4. Code: for ($i = 1; $i ,
2. MySite06.php My Site 06
header.php
,
UNIT 2 59 Data types, functions and control structures
3. MySite07.php My Site 07
4. MySite08.php My Site 08
Coffee
Cost
Quantity
Sub Total
5. MySite09.php My Site 09
Coffee
Cost
Quantity
Sub Total
62 WAWASAN OPEN UNIVERSITY TCC 242/05 Web Database Application
UNIT 2 63 Data types, functions and control structures
References Gilmore, W J (2008) Beginning PHP and MySQL, 3rd edn, Berkeley, CA: Apress. PHP (2011) Control Structures Manual, http://www.php.net/manual/en/language. control-structures.php (Accessed 1 Feb 2011). PHP (2011) Functions Manual, http://php.net/manual/en/language.functions. php (Accessed 1 Feb 2011). PHP (2011) Operators Manual, http://www.php.net/manual/en/language. operators.php (Accessed 1 Feb 2011). PHP (2011) Strings Manual, http://www.php.net/manual/en/language.types. string.php (Accessed 31 Jan 2011). PHP (2011) Types Manual, http://www.php.net/manual/en/language.types.php (Accessed 31 Jan 2011). Wikibooks (2010) PHP programming, http://en.wikibooks.org/wiki/PHP, used under a Creative Commons Attribution-ShareAlike licence: http://creativecommons. org/licenses/by-sa/3.0/
64 WAWASAN OPEN UNIVERSITY TCC 242/05 Web Database Application
UNIT 2 65 Data types, functions and control structures
Glossary Arithmetic operators
The basic arithmetic operators in PHP are the addition, subtraction, multiplication, division, modulus and concatenation operators.
Array
An ordered map that associates values to keys. It is an indexed collection of data values.
Assignment operator
An operator that is used to assign a value to a variable.
Boolean
The simplest data type. Its value can only be either TRUE or FALSE.
Break statement
Used to end execution of the current switch, for, foreach, while or do-while structure.
Casting
Converting values from one data type into another data type. In PHP, this can be done by placing the intended type in front of the variable that you intend to convert.
Compound types
Compound data types store multiple items of data under a single representation. In PHP, arrays and objects are compound data types.
Conditional statement
Controls a program by using logic to distinguish between different conditions based on an input value.
Continue statement
Used within looping structures to skip the rest of the current iteration. It forces execution to continue at the evaluation of the conditional expression and thus begins the next iteration.
Data type
A group of data values that share a set of characteristics. Data types in PHP are represented by names like boolean, integer and array.
Decrementing operator
An operator that decrements a value by one, such as “−−”. It is used to shorten a statement and thus make code easier to read and understand.
66 WAWASAN OPEN UNIVERSITY TCC 242/05 Web Database Application
Do-while loop
The do-while loop has a similar syntax and purpose as the while loop except that its conditional expression is checked at the end of each iteration instead of at the beginning.
Expression
An expression is a phrase representing an action in a program. It consists of operands and operators.
Floating-point number
A number that has a fractional part; also known as a real number.
Function
A function (also known as a method) is a reusable group or block of code that performs a specific task.
For-loop
The for loop is a statement that enables code to be executed repeatedly.
Foreach-loop
The foreach loop is a special form of the standard for loop. The foreach loop is used to iterate through the values in an array.
If-else statement
A conditional statement that is used to select one of several blocks of code to be executed.
Incrementing operator
An operator that increments a value by one, such as “++”. It is used to shorten a statement and thus make code easier to read and understand.
Integer
A number without a fractional part.
Looping statement
Repeats a sequence of instructions until a specific condition is fulfilled.
Object
The essential component in object-oriented programming. Objects refer to an instance of a class.
Operands
The inputs to expressions.
Operator associativity
Determines how multiple operators that have the same precedence are grouped.
UNIT 2 67 Data types, functions and control structures
Operator precedence
Determines the order in which operations in an expression will be performed.
Operators
Any symbol used to manipulate data in an expression.
Parameters
Variables within a function.
Recursive functions
Functions that call themselves.
Scalar types
Scalar data types store single items of data. The four primitive scalar types in PHP are boolean, integer, float and string.
String
A series of characters. Strings are delimited by single or double quotes.
Switch statement
A conditional statement that is used to select one of a number of blocks of code for execution.
Type juggling
Automatic type conversion of a value to best fit the situation in which it is referenced.
Variable
A “container” that can hold different values of a data type.
While-loop
A loop that repeatedly executes statements within its structure as long as the conditional expression is true.
68 WAWASAN OPEN UNIVERSITY TCC 242/05 Web Database Application
UNIT 3 i Manipulating strings, arrays and working with files
Unit 3 TCC 242/05
Web Database Application
Manipulating Strings, Arrays and Working with Files
ii WAWASAN OPEN UNIVERSITY TCC 242/05 Web Database Application
COURSE TEAM Course Team Coordinator: Mr. Ishan Sudeera Abeywardena Content Writer: Mr. Tang Chun Chong Instructional Designer: Mr. Yeap Hock Aun Academic Member: Mr. Chandarasageran Natarajan
COURSE COORDINATOR Mr. Ishan Sudeera Abeywardena
EXTERNAL COURSE ASSESSOR Dr. Sanjay Jasola, Gautam Buddha University
PRODUCTION In-house Editor: Mr. Yeap Hock Aun Graphic Designer: Ms. Leong Yin Ling
Wawasan Open University is Malaysia’s first private not-for-profit tertiary institution dedicated to adult learners. It is funded by the Wawasan Education Foundation, a tax-exempt entity established by the Malaysian People’s Movement Party (Gerakan) and supported by the Yeap Chor Ee Charitable and Endowment Trusts, other charities, corporations, members of the public and occasional grants from the Government of Malaysia. The course material development of the university is funded by Yeap Chor Ee Charitable and Endowment Trusts.
Wawasan Open University Jalan Sultan Ahmad Shah, 10050 Penang. Tel: (604) 2180333 Fax: (604) 2279214 Email: [email protected] Website: www.wou.edu.my
UNIT 3 iii Manipulating strings, arrays and working with files
Contents Unit 3 Manipulating Strings, Arrays and Working with Files Unit overview
1
Unit objectives
1
3.1 Strings
3
Objectives
3
Introduction
3
String length
3
Trimming whitespace or other characters
4
String padding
5
Comparing two strings
7
Extracting substrings
8
Finding the position of a substring
9
Replacing substrings
10
Suggested answers to activities
15
3.2 Arrays
17
Objectives
17
Introduction
17
Creating arrays
18
Outputting arrays
19
Adding and removing array elements
19
Extracting items from arrays
21
Determining array size
22
iv WAWASAN OPEN UNIVERSITY TCC 242/05 Web Database Application
Array traversal
23
Sorting arrays
24
Multidimensional arrays
26
Suggested answers to activities
34
3.3 Files
37
Objectives
37
Introduction
37
Opening a file
37
Closing a file
38
Reading a file
39
Writing a file
41
Deleting a file
43
Reading directory contents
43
Checking file or directory existence
44
Suggested answers to activities
47
Summary of Unit 3
49
Unit practice exercises
51
Suggested answers to self-tests
57
Suggested answers to unit practice exercises
63
References
69
Glossary
71
UNIT 3 1 Manipulating strings, arrays and working with files
Unit Overview his unit discusses techniques for manipulating strings, arrays and files using PHP. The first section discusses how string library functions are used. It also explains how you can modify strings to achieve the results or formatting that you require. The second section describes the use of arrays to deal with collections of data. It also shows you some common applications of multidimensional arrays. The third section discusses the processes involved in the creation as well as the removal of files. Functions for dealing with the file system are also covered in this section.
T
Unit Objectives By the end of this unit, you should be able to: 1. Describe and use PHP string library functions. 2. Describe and use PHP array library functions. 3. Describe and use PHP functions for working with files and directories.
2 WAWASAN OPEN UNIVERSITY TCC 242/05 Web Database Application
UNIT 3 3 Manipulating strings, arrays and working with files
3.1 Strings Objectives By the end of this section, you should be able to: 1. Describe basic PHP string functions. 2. Format and compare strings. 3. Find, extract and replace strings. 4. Apply various string functions to solve programming problems.
Introduction In Unit 2, strings were defined as a series of characters. Strings are one of the most commonly used data types in PHP scripts. In this section, you will learn how to manipulate strings. PHP provides a large library of string functions to help you manage and manipulate strings. You will be focusing on some of the more useful PHP string functions in this section.
String length Obtaining the length of a string is a very common task when writing PHP scripts. The length of a string can be determined with the strlen() function. It returns the length of a string as an integer or 0 if the string is empty. The syntax of the function is: int strlen ( string $string )
The following example counts and verifies the length of a given username string. Note that the comment line at the end of the code listing shows the output: $username = strlen(“alice”); if (strlen($username) < 6) echo “Error: Username must be at least six characters”; else echo “Username is valid!”; // Output: Error: Username must be at least six characters
In this case, the output will be the error message since the string “alice” is only five characters long whereas the username should be at least six characters in length.
4 WAWASAN OPEN UNIVERSITY TCC 242/05 Web Database Application
Trimming whitespace or other characters When your PHP script gets string input from a user through a web form, it may consist of whitespace characters before or after the text. Whitespace characters are spaces or tabs, which the user may sometimes accidentally include in a web form. It is important that you remove or trim whitespaces to avoid errors during string manipulation. PHP provides three functions to trim leading and trailing whitespaces, and whitespaces on both sides of a string. The syntax of each of the functions is shown below: string ltrim ( string $str [, string $charlist ] ) string rtrim ( string $str [, string $charlist ] ) string trim ( string $str [, string $charlist ] )
If the optional second parameter ($charlist) is omitted, these functions remove the following whitespaces: 1. space (“ ”) 2. tab (\t) 3. newline (\n) 4. carriage return (\r) 5. NULL (\x00)
The examples below illustrate the use of these functions: $var = trim(“ Hypertext Preprocessor \n”); //Result: “Hypertext Preprocessor” $var = ltrim(“ Hypertext Preprocessor \n”); //Result: “Hypertext Preprocessor \n” $var = rtrim(“ Hypertext Preprocessor \n”); //Result: “ Hypertext Preprocessor”
The optional second parameter, $charlist, allows you to specify characters to trim. Simply list all characters that you want to trim in this parameter. With the symbol “..”, you can specify a range of characters or digits to be trimmed. For example: $var = trim(“01 FEB 2012”, “0..9 “); // Trims digits and spaces echo $var;
// Prints “FEB”
UNIT 3 5 Manipulating strings, arrays and working with files
String padding Padding is used for spacing out strings to reduce clutter and enhance readability. PHP has a handy function called str_pad() that performs string padding. The syntax of the function is: string str_pad ( string $input , int $pad_length [, string $pad_string [, int $pad_type ]] )
The function increases the number of characters of an input string, $input, to a new length of $pad_length characters. If the optional parameter $pad_string is not supplied, the input is padded with blank spaces. You can use $pad_type to pad a string on: 1. the left ($pad_type = STR_PAD_LEFT) 2. the right ($pad_type = STR_PAD_RIGHT) 3. or both sides ($pad_type = STR_PAD_BOTH)
By default, the string will be padded on the right. The following example shows the use of str_pad() without optional parameters: echo str_pad(“web”, 6); // Prints “web “ followed by three spaces
The following example shows the use of str_pad() with optional parameters. The function is enclosed within the HTML
tag. Text in the
tag is displayed in a fixed-width font with the spaces and line breaks being preserved. These tags enable us to see the effects of string padding in a web browser. echo “
6 WAWASAN OPEN UNIVERSITY TCC 242/05 Web Database Application
The output of this script will be: Topics 3.1 Intro.......................................Page 1 String Length...............................Page 3 Trim whitespace.............................Page 6 String Padding..............................Page 8
Activity 3.1 1. The three optional $pad_type parameters used in the str_pad() function are A. B. C. D.
2. Which of the following is not a valid whitespace? A. B. C. D.
NULL (\x00) white (#FF0000) newline (\n) carriage return (\r)
3. PHP provides three functions to trim _________ and _________ whitespaces, and whitespaces on __________ of a string.
4. Write PHP code to output the length of the string “I’m learning php now”.
5. Write PHP code that trims the trailing whitespaces of the string “Log Report \t” and shows the results of the trimming.
6. What is the output of the following code? echo “
”; echo str_pad(“Vegetables”, 20).” are good for health”; echo “
”;
UNIT 3 7 Manipulating strings, arrays and working with files
Comparing two strings String comparison is used to determine whether two strings are identical. Although you can compare two strings using the equality operator (==), this may cause unexpected or unsafe results for strings with binary content or multi-byte encoding. There are two basic string comparison functions. The syntax of each of the functions is: int strcmp ( string $str1 , string $str2 ) int strncmp ( string $str1 , string $str2 , int $len )
Note: You may have heard about binary content being unsafe when you read about functions in PHP. What does binary safe mean? The term binary safe is related to the handling of binary data. Binary data is encoded as a string of 1s and 0s. If you use Microsoft Word to open a Word document (binary content), then you are actually handling the document in a binary safe way. Binary data need to be handled differently than other data types to avoid the data becoming corrupt.
The strcmp() function performs case-sensitive comparison of two strings. It returns 1. < 0 if $str1 is less than $str2 2. > 0 if $str1 is greater than $str2 3. 0 if they are equal
The following examples show you how to use the function: echo strcmp(“a”, “b”);
// Returns -1
echo strcmp(“b”, “a”);
// Returns 1
echo strcmp(“linux”, “linux”);
// Returns 0
echo strcmp(“linux”, “Linux”);
// Returns 1
The strncmp() function takes a third parameter, $len , which restricts the comparison to a specified number of characters. For example, to compare the first seven characters of two strings, you will use: echo strncmp(“windowsxp”, “windows7”, 7); // Returns 0
The result will be different when you change the third parameter to eight: echo strncmp(“windowsxp”, “windows7”, 8); // Returns 1
8 WAWASAN OPEN UNIVERSITY TCC 242/05 Web Database Application
The strncmp() function performs case-sensitive comparisons. If you want to compare strings with case-insensitivity, you can use strcasecmp() or strncasecmp(): int strcasecmp ( string $str1 , string $str2 ) int strncasecmp ( string $str1 , string $str2 , int $len )
The following examples show the use of strcasecmp() and strncasecmp(): echo strcasecmp(“linux”, “Linux”);
// Returns 0
echo strncasecmp(“windowsxp”, “WINDOWS7”, 7);
// Returns 0
Extracting substrings The substr() function allows you to extract part of a string or “substring” from a source string with a predefined start position ($start). The syntax of the function is: string substr ( string $source , int $start [, int $length ] )
Consider the following string: $plane = “Airbus-A380”;
1. If $start is positive, the returned string will start at the specified position of the source string, counting from zero. For example: echo substr($plane, 3);
// Returns “bus-A380”
2. If $start is negative, the returned string will start at the specified position counting in reverse from the end of the source string. For example: echo substr($plane, -4);
// Returns “A380”
If the optional $length parameter is specified, the number of characters specified by this parameter is returned.
UNIT 3 9 Manipulating strings, arrays and working with files
Consider the same source string used in the previous example: $plane = “Airbus-A380”;
1. If $length is positive, the string returned will contain $length characters counting from the start position of the substring. For example: echo substr($plane, 3, 5);
// Returns “bus-A”
2. If $length is negative, the returned string will have $length characters omitted from the end of the string. For example: echo substr($plane, 3, -1);
// Returns “bus-A38”
3. Here is an example when both the $start and $length parameters are negative: echo substr($plane, -4, -1);
// Returns “A38”
Finding the position of a substring When manipulating a string, you may need to find the position of a substring. The strpos() function is used to do this. Its syntax is: int strpos ( string $source , string $substr [, int $offset ] )
The function returns the position (counting from 0) of the first case-sensitive character of $substr if it is in the $source string. Consider the following examples: $source = “first come first served”; echo strpos($source, “f”);
// Returns 0
echo strpos($source, “e”);
// Returns 9
If the optional $offset parameter is used, the search starts from the offset position in the source string. The following example statements start to search from the 11th character of the previous source string. echo strpos($source, “f”, 10); // Returns 11, targets 2nd “first” echo strpos($source, “e”, 10); // Returns 18, targets “served”
10 WAWASAN OPEN UNIVERSITY TCC 242/05 Web Database Application
The strpos() function performs case-sensitive search. If you want to search without case-sensitivity, you will use the following syntax: int stripos ( string $source , string $substr [, int $offset ] )
The following example shows how stripos() returns a result different from that of strpos() when applied to the source string used in the previous example: echo strpos($source, “F”); // Since “F” is not found, it returns boolean FALSE echo stripos($source, “F”);
// Returns 0
Replacing substrings The substr_replace() function replaces the source string with a new string beginning from the $start position to the end of the source string. The syntax of the function is: string substr_replace(string $source, string $replacement, int $start [, int $length])
It is used in the same way as the substring extraction function substr(), except that there is an additional parameter (i.e., $replacement) for this function. Consider the following string: $plane = “Boeing-B787”;
1. If $start is positive, the replacement string will start at the position specified by $start in the source string, counting from zero. For example: echo substr_replace($plane, “A380”, 3); //Returns “BoeA380”
2. If $start is negative, the replacement string will start at the position specified by $start, counting from the end of the source string. For example: echo substr_replace($plane, “A380”, -4); //Returns “Boeing-A380”
UNIT 3 11 Manipulating strings, arrays and working with files
If the optional $length parameter is used, a maximum of $length characters are replaced. Consider the same source string used in the previous example: $plane = “Boeing-B787”;
1. If $length is positive, the string replacement function will replace only $length characters beginning from the start position. For example: echo substr_replace($plane, “A380”, 3, 2); // Returns “BoeA380g-B787”
2. If $length is negative, the function will stop replacing at $length characters from the end of the source string. For example: echo substr_replace($plane, “A380”, 3, -1); // Returns “BoeA3807”
3. Here is an example when both $start and $length parameters are negative: echo substr_replace($plane, “A380”, -4, -1); // Returns “Boeing-A3807”
Web Reference The following web reference presents a comprehensive view of string functions: “String Functions”, http://www.php.net/manual/en/ref.strings.php
Activity 3.2 1. The int strcmp ( string $str1 , string $str2 ) function performs a case-sensitive comparison of two strings. It returns _________ if $str1 is less than $str2, _________ if $str1 is greater than $str2, and _________ if they are equal. A. B. C. D.
positive, zero, negative zero, negative, positive negative, positive, zero positive, negative, zero
12 WAWASAN OPEN UNIVERSITY TCC 242/05 Web Database Application
2. Which of the following will not produce zero? A. B. C. D.
3. Write the output of echo substr(“Today is a PHP day”, -7, -4);
4. Write the output of $source = “Today is a PHP day”; echo stripos($source, “p”);
5. You are given $source = “Accomplish the same goal”. Write code using the s u b s t r _ r e p l a c e ( ) function to replace “same” with “different” so that the source string becomes “Accomplish the different goal”.
6. Write the output of the following code: $original = “PHP has string functions to manipulate strings”; $pos = strpos($original, “string functions”); $pos_end = $pos + strlen(“string functions”); $new = substr_replace($original, “ that give you an incredible ability”, $pos_end, 0); echo $new;
UNIT 3 13 Manipulating strings, arrays and working with files
Summary In this section, you learnt a number of PHP string library functions that help you to manage and manipulate strings. The following functions were discussed: 1. strlen() Returns string length 2. trim() Trims whitespaces or other characters 3. str_pad() String padding 4. strcmp() Compares two strings 5. substr() Extracts substrings 6. strpos() Finds the position of a substring 7. substr_replace() Replaces substrings
In the next section, you will learn about arrays.
Self-test 3.1 1. Obtaining string length is a very common task when writing PHP scripts. The length of a string can be determined by the str_pad() function. True / False?
2. Why do you need to use the string comparison function to compare two strings instead of the equality operator (==)?
3. The output of the following code is ____________. $productCode = “AF8765”; if ( strlen($productCode) < 6 ) { echo “That product code is not valid”; exit; }
A. B. C. D.
That product code is not valid AF8765 exit
14 WAWASAN OPEN UNIVERSITY TCC 242/05 Web Database Application
4. The following function trims digits and spaces. What is the expected output? $var = trim(“64oid brings Nintendo 64 emulation via channel 64”, “0..9 “);
A. B. C. D.
64oidbringsNintendo64emulationviachannel64 oid brings Nintendo emulation via channel oidbringsNintendoemulationviachannel oid brings Nintendo 64 emulation via channel
5. Use the str_pad() and echo() functions to print the following table by enclosing the code within the
6. Consider the following variables. Write a strcmp() function to check if the two variables are the same. If they are the same, display “Passwords match!”. If they are different, display “Passwords do not match!”. $pswd = “supersecret”; $pswd2 = “supersecret2”;
7. You are given the following log file variables: $file = “index.html”; $log = “192.168.1.11:/www/htdocs/index. html:[2012/02/10:20:36:50]”;
A. What is the position ($pos) of $file in $log? B. What is the string length ($filelen) of $file? C. Calculate the position ($pos2) of the timestamp by using $pos, $filelen and an integer. D. Using $log , $pos2 and a substr() function, print the statement: “The file index.html was accessed on: 2012/02/10:20:36:50”.
8. Write code that puts the substring “introduced in this chapter” into the string “Many functions will be used within your PHP applications” so that you get the string “Many functions introduced in this chapter will be used within your PHP applications”. Hint: Get the position and string length of the substring “Many functions”.
UNIT 3 15 Manipulating strings, arrays and working with files
Suggested answers to activities
Feedback Activity 3.1 1. D 2. B 3. leading, trailing, both sides 4. echo strlen(“I’m learning php now”); // Returns 20 5. echo rtrim(“Log Report \t”); // Returns “Log Report”
6. Vegetables
are good for health
// Prints additional ten spaces after Vegetables
Activity 3.2 1. C 2. B 3. PHP 4. 11 5. echo substr_replace($source, “different”, 15, 4); // OR echo substr_replace($source, “different”, -9, 4); // OR echo substr_replace($source, “different”, -9, -5);
6. PHP has string functions that give you an incredible ability to manipulate strings.
16 WAWASAN OPEN UNIVERSITY TCC 242/05 Web Database Application
UNIT 3 17 Manipulating strings, arrays and working with files
3.2 Arrays Objectives By the end of this section, you should be able to: 1. Handle collections of data with PHP. 2. Explain the concept of arrays. 3. Implement data collection using arrays. 4. Apply various types of array library functions. 5. Describe common applications of arrays.
Introduction As a programmer of e-commerce web applications, you will spend a lot of time dealing with data sets. Some of these data sets might include customer details such as name, age or gender, while other data sets, such as one for an online shopping cart, would contain details like product name, quantity ordered and price. By using PHP, you will be able to deal with these data sets in a more organised and structured way. PHP allows you to store, update, retrieve and sort items in these data sets. These data sets are called arrays. In Unit 2, you were introduced to compound data types that are able to store multiple items of data under a single representation. One of these compound types is the array. In this section, you will learn to use arrays. Figure 3.1 shows a list of products that can be stored in an array.
Watch
Shoe
Cap
Product Figure 3.1 A list of products that can be stored in an array
18 WAWASAN OPEN UNIVERSITY TCC 242/05 Web Database Application
Creating arrays Arrays can be created in two ways. The first involves using the function array(). The syntax of the function is: array([item1 [,item2 ... [,itemN]]])
For example, to create an array for the items in Figure 3.1, we can write: $product = array( “Watch”, “Shoe”, “Cap” );
An array is actually an ordered map. A map is a type that associates values to keys. A key may only be an integer or a string, whereas a value may be of any type. It is possible to define the value associated with a key in the following way: array( key => value , ... )
The following example shows how you can create an array called $states and map its keys to corresponding values: $states = array(“PEN” => “Penang”, “SEL” => “Selangor”, “JHR” => “Johor”);
The second way of creating an array is to use square brackets. This method allows you to set up an array by directly setting the values. The syntax is: $arr[key] = value;
UNIT 3 19 Manipulating strings, arrays and working with files
Outputting arrays You can print out individual values in an array by accessing the values with their key. The following statements print out values from the arrays created in the preceding example: echo $product[0];
// Prints “Watch”
echo $states[“PEN”];
// Prints “Penang”
You can also use the foreach loop to iterate through and to print all the values in an array as stated in Unit 2. Remember that the as keyword in the foreach bracket is used to assign each item in the array to the variable, $var. foreach ($product as $var) { echo ($var . “ “);
// Prints “Watch Shoe Cap”
}
There is a function that can print out array contents for testing purposes called print_r(). The following examples print out the contents of the arrays $product and $state using this function: print_r($product); // Output: Array ( [0] => Watch [1] => Shoe [2] => Cap ) print_r($states); // Output: Array ( [PEN] => Penang [SEL] => Selangor [JHR] => Johor )
Adding and removing array elements PHP provides functions that add or remove elements from an array. These tasks can be carried out by using the queue implementation functions, namely array_unshift, array_push, array_shift and array_pop.
Unshift The array_unshift() function adds elements to the beginning of an array. You can add multiple elements into an array all at the same time. The syntax of the function is: int array_unshift ( array &$array , mixed $var [, mixed $... ] )
For example, to insert two elements to the front of an array: $platform = array (“delivery”, “payment”); array_unshift ($platform, “cart”, “content”); // $platform = array (“cart”, “content”, “delivery”, “payment”);
20 WAWASAN OPEN UNIVERSITY TCC 242/05 Web Database Application
Push The array_push() function adds elements to the end of an array. You can add multiple elements into an array all at the same time. The syntax of the function is: int array_push ( array &$array , mixed $var [, mixed $... ] )
For example, to insert two elements to the end of an array: $platform = array (“delivery”, “payment”); array_push ($platform, “service”, “maintenance”); // $platform = array (“delivery”, “payment”, “service”, “maintenance”);
Shift The array_shift() function removes the first element from an array and returns the item. The syntax of the function is: mixed array_shift ( array &$array )
For example, to remove the first element from an array: $platform = array (“cart”, “content”, “delivery”, “payment”); $firstElement = array_shift ($platform); // $platform = array (“content”, “delivery”, “payment”); // $firstElement = “cart”
Pop The array_pop() function removes the last element from an array and returns the item. The syntax of the function is: mixed array_pop ( array &$array )
For example, to remove the last element from an array: $platform = array (“cart”, “content”, “delivery”, “payment”); $lastElement = array_pop ($platform); // $platform = array (“cart”, “content”, “delivery”); // $lastElement = “payment”
UNIT 3 21 Manipulating strings, arrays and working with files
Extracting items from arrays You can extract items from arrays by using the list() function. The list() function assigns variables as if they were an array. It is used to assign a list of variables in one operation. The list() function is useful when you are extracting information from a database or file. The syntax of the function is: array list ( mixed $varname [, mixed $... ] )
For example, if an array of items is assigned to $info as follows: $info = array(“Value meal”, “burger”, “fries”, “coke”);
Then the list() function can be used to extract all the items from $info and assign them to variables: list($set, $food, $sideline, $drink) = $info;
The extracted variables can then be used to print out a sentence: echo “$set is made up of $food, $sideline and $drink.”; // Output: “Value meal is made up of burger, fries and coke.”
Web Reference To learn more about arrays, please visit: “Arrays”, http://www.php.net/manual/en/language.types.array.php
Activity 3.3 1. What are arrays and why do we want to use them?
2. Arrays can be created in two ways. The first involves using the function _____________ and the second way of creating an array is to use _____________.
22 WAWASAN OPEN UNIVERSITY TCC 242/05 Web Database Application
3. Use the syntax array( key => value , ... ) to store the following table. Then use the print_r function to print out the array. EmployeeID
YearsEmployed
E908766
11
E915637
8
E987560
2
4. PHP provides convenient ways for you to add or remove elements from an array. These tasks can be done using the queue implementation functions _____________. A. array_left, array_right, array_up and array_down B. array_in, array_out, array_push and array_pull C. array_pull, array_unpage, array_unpop and array_ page
D. array_unshift, array_push, array_shift and array_ pop
5. The list() function assigns variables as if they were an array. It is used to assign a list of items in an array to variables in one operation. True / False?
Determining array size You can determine the size of an array by using the count() function. This function will return the number of values found in an array. The syntax of the function is: int count ( array $var [, int $mode ] )
The following example shows how you can obtain the size of an array: $commercePlatform = array (“cart”, “content”, “delivery”, “payment”); echo count($commercePlatform);
// Output: 4
The count() function does not detect infinite recursion. If the optional parameter is set to COUNT_RECURSIVE (or 1), count() will recursively count the array. This is particularly useful for counting all the elements of a multidimensional array. We will look at an example of this in the section on multidimensional arrays.
UNIT 3 23 Manipulating strings, arrays and working with files
Array traversal In certain circumstances, you will need to visit every array element and perform a task upon it. Every array has an internal pointer that points to the “current” value (element) in the array. The following functions operate using the internal array pointer: next The next() function sets the internal pointer to the next element and returns the element. Here is an example of its use: $service = array(“contact center”, “knowledge base”, “selfservice”, “live help”, “email”, “video connect”); echo next($service);
// Output: “knowledge base”
echo next($service);
// Output: “self-service”
prev The prev() function sets the internal pointer to the previous element and returns the element. It may return FALSE if the pointer currently resides at the first position in the array. The example below is a continuation from the previous example in which the internal pointer is currently at “self-service”: echo prev($service);
// Output: “knowledge base”
reset The reset() function sets the internal pointer to the first element in an array and returns the first element. It is usually used when you need to review an array multiple times or when sorting has been completed. The example below is a continuation from the previous example in which the internal pointer is currently at “knowledge base”: echo reset($service);
// Output: “contact center”
current The current() function returns the current element and does not move the internal pointer. The example below is a continuation from the previous example: echo current($service);
// Output: “contact center”
24 WAWASAN OPEN UNIVERSITY TCC 242/05 Web Database Application
end The end() function sets the internal pointer to the last element and returns the last element . The example below is a continuation from the previous example: echo end($service);
// Output: “video connect”
each The each() function returns the current element, then sets the internal pointer to the next element. The each() function is typically used in conjunction with key/value pairs from an array to traverse an array. For example: $food = array(“a” => “burger”, “b” => “fries”, “c” => “coke”); list($key, $val) = each($food); // moves to next element echo “$key is $val “;
// Output: “a is burger”
list($key, $val) = each($food); // moves to next element echo “$key is $val “;
// Output: “b is fries”
list($key, $val) = each($food); // moves to next element echo “$key is $val “;
// Output: “c is coke”
Sorting arrays Data sets that you extract from databases or files are usually not well arranged or categorised. If you need to do some serious data analysis, you have to segregate the items into groups according to specified criteria. This is what we call data sorting. Several techniques for sorting arrays are described next.
Normal sort You can sort an array by using the sort() function. It will help you to arrange the elements from the lowest to the highest value. The syntax of the function is: bool sort ( array &$array [, int $sort_flags ] )
For example, we can sort an array containing marks that students in a class obtained: $marks = array(80, 60, 20, 100, 40); sort($marks); print_r($marks); // Output: Array ( [0] => 20 [1] => 40 [2] => 60 [3] => 80 [4] => 100 )
UNIT 3 25 Manipulating strings, arrays and working with files
The optional parameter $sort_flags may be used to modify the sorting behaviour using the following values: 1. SORT_REGULAR compare items normally (do not change types) 2. SORT_NUMERIC compare items numerically 3. SORT_STRING compare items as strings 4. SORT_LOCALE_STRING compare items as strings, based on the current locale
Reverse sort If you need to sort an array in descending or reverse order, you can use the rsort() function. The syntax of the function is: bool rsort ( array &$array [, int $sort_flags ] )
Other than providing reverse sorting, this function’s usage and optional features are identical to that of sort(). The following code example performs reverse sorting: $marks = array(80, 60, 20, 100, 40); rsort($marks); print_r($marks); // Output: Array ( [0] => 100 [1] => 80 [2] => 60 [3] => 40 [4] => 20 )
Sorting an array while maintaining key/value pairs To sort an array while maintaining the key/value pair associations, you can use the asort() function. The syntax of the function is: bool asort ( array &$array [, int $sort_flags ] )
Consider the following key/value pairs: $meal = array(“food” => “burger”, “sideline” => “fries”, “drink” => “coke”);
If the sort() function is used on the array: sort($meal); print_r($meal); // Output: Array ( [0] => burger [1] => coke [2] => fries )
26 WAWASAN OPEN UNIVERSITY TCC 242/05 Web Database Application
If the asort() function is used instead: asort($meal); print_r($meal); // Output: Array ( [food] => burger [drink] => coke [sideline] => fries )
Sorting an array in reverse order while maintaining key/value pairs If you need to sort an array in descending or reverse order while maintaining key/value pairs, you can use the arsort() function. The syntax of the function is: bool arsort ( array &$array [, int $sort_flags ] )
Other than providing reverse sorting, this function’s usage and optional features are identical to that of asort(). Consider the key/value pairs array again: $meal = array(“food” => “burger”, “sideline” => “fries”, “drink” => “coke”);
Using the arsort() function on $meal: arsort($meal); print_r($meal); // Output: Array ( [sideline] => fries [drink] => coke [food] => burger )
Multidimensional arrays You have learnt that arrays are a list of keys and values. What if you need to store more information like that found in the following table of fares for flights to Singapore? Code
From
Fare
PEN
Penang
RM176
KUL
Kuala Lumpur
RM83
LGK
Langkawi
RM205
Figure 3.2 Flight fare table
UNIT 3 27 Manipulating strings, arrays and working with files
In PHP, elements in an array can also be an array, thus allowing for multidimensional arrays. You can use a two-dimensional array to store the fare information shown in Figure 3.2. The information can be stored as follows: $SGPFlight = array(array(“PEN”, “Penang”, 176), array(“KUL”, “Kuala Lumpur”, 83), array(“LGK”, “Langkawi”, 205));
To access an element of a two-dimensional array, you need to indicate the row and column in which the element is located. The top row is row 0 and the leftmost column is column 0. The following examples show how to display the contents of the array of flight fares: echo $SgpFlight[0][0].” | “.$SgpFlight[0][1].” | “.$SgpFlight[0] [2].” ”; // Output: PEN | Penang | 176 echo $SgpFlight[1][0].” | “.$SgpFlight[1][1].” | “.$SgpFlight[1] [2].” ”; // Output: KUL | Kuala Lumpur | 83 echo $SgpFlight[2][0].” | “.$SgpFlight[2][1].” | “.$SgpFlight[2] [2].” ”; // Output: LGK | Langkawi | 205
We can also use a nested for loop to obtain the same result: for ($row = 0; $row < 3; $row++) { for ($col = 0; $col < 3; $col++) { echo $SgpFlight[$row][$col].” | “; } echo “ ”; } // Output: PEN | Penang | 176 // Output: KUL | Kuala Lumpur | 83 // Output: LGK | Langkawi | 205
Remember that you can get the size of an array by using the count() function. However, to count the sub-elements inside a two-dimensional array, you need to include the COUNT_RECURSIVE optional parameter. echo count($SgpFlight);
// Output: 3
echo count($SgpFlight, COUNT_RECURSIVE);
// Output: 12
28 WAWASAN OPEN UNIVERSITY TCC 242/05 Web Database Application
In this example, you have a total of 3 parent elements plus the 9 sub-elements in the recursive array, which gives you a total of 12. Multidimensional arrays mean that you can use array elements to hold other arrays and these arrays can in turn hold more arrays. The example above showed the fares of flights to Singapore. You can store even more information, such as the fares of flights to Bangkok and the Gold Coast, by using a three-dimensional array. Refer to Figure 3.3 to see how this three-dimensional array is represented graphically.
Figure 3.3 The three-dimensional array to store flight fare information
Here is how we can create the three-dimensional array: $MultipleFlights = array ( array (
UNIT 3 29 Manipulating strings, arrays and working with files
We can then use nested for loops to display the contents of the multidimensional array: for ($layer = 0; $layer < 3; $layer++) { echo “Flight”.$layer.” ”; for ($row = 0; $row < 3; $row++) { for ($col = 0; $col < 3; $col++) { echo $MultipleFlights[$layer][$row][$col].” | “; } echo “ ”; } }
The output of the code block will be: Flight0 PEN | Penang | 1176 | KUL | Kuala Lumpur | 1083 | LGK | Langkawi | 1205 | Flight1 PEN | Penang | 276 | KUL | Kuala Lumpur | 183 | LGK | Langkawi | 305 | Flight2 PEN | Penang | 176 | KUL | Kuala Lumpur | 83 | LGK | Langkawi | 205 |
Although there is no limit to the number of dimensions an array can have in PHP, most real-world problems require arrays with three or less dimensions.
Web Reference To learn more about array functions, please visit: “Array Functions”, http://www.php.net/manual/en/ref.array.php
30 WAWASAN OPEN UNIVERSITY TCC 242/05 Web Database Application
Activity 3.4 1. You can determine the size of an array by using the __________ function.
2. In certain circumstances, you will need to visit every array element and perform a task upon it. The following functions provide ways of traversing an array using the internal array pointer: A. B. C. D.
incoming(), outgoing(), every()
and adjust()
come(), goto(), take()
and put() and each() shift(), push(), pull() and unpop()
current(), reset(), end()
3. If you need to sort an array in reverse order while maintaining key/value pairs, you can use the ___________ function.
4. Write PHP code that stores the information in the following table in a multidimensional array and then prints the array using a nested for loop. Symbol
ElementName
AtomicNumber
Li
Lithium
3
Ti
Titanium
22
Pb
Lead
82
Summary Arrays allow you to deal with data sets in a more organised and structured way. Using arrays, you can store, update, retrieve and sort groups of items. In this section, we discussed the following array library functions: 1. array() or $arr[key] = value Creates arrays 2. array( key => value , ... ) Key/value mapping 3. $arr[key] or foreach() or print_r() Outputs arrays 4. array_unshift() and array_push() Add elements
UNIT 3 31 Manipulating strings, arrays and working with files
We also discussed multidimensional arrays and looked at how they are applied. In the next section, we will discuss files and directories, and how to read from and write to a file. PHP file system library functions will also be introduced in the next section.
Self-test 3.2 1. Create an array based on the table of accessories shown below.
Battery
Lubricant
Wax
Accessories
a. Use a foreach loop to print out the array with a space between the items. b. Use a for loop to print out the array with a line “ | ” after each item.
2. Based on the table below, create an array using the array() function and also the square brackets method. Use the print_r() function to print the arrays. Code
Country
SOM
Somalia
SUD
Sudan
MAU
Mauritania
32 WAWASAN OPEN UNIVERSITY TCC 242/05 Web Database Application
3. Rewrite the contents of the array after each operation below: a. $fruits = array (“strawberry”, “kiwi”, “banana”); array_unshift ($fruits, “apple”);
b. $fruits = array (“strawberry”, “kiwi”, “banana”); array_push ($fruits, “durian”);
c. $fruits = array (“strawberry”, “kiwi”, “banana”); array_shift ($fruits);
d. $fruits = array (“strawberry”, “kiwi”, “banana”); array_pop ($fruits);
4. You are given $ v a r = a r r a y ( “ M a r y ” , “ f o r m a t ” , “information”); Write an echo function to print “Mary wants to format output information.” by extracting the elements of the array with a list() function.
5. What is the output of the following code? $prices = array(“Battery” => 200, “Lubricant” => 80, “Wax” => 30); while (list($accessories, $price) = each ($prices)) echo “$accessories = $$price ”;
6. Write PHP code to determine the size of the following arrays: a. $accounts = array (“saving”, “fixed deposit”, “current”,
UNIT 3 33 Manipulating strings, arrays and working with files
7. You are given the following array: $commodities = array(“metal”, “energy”, “fuel”, “grains”, “agricultural”, “solar”);
Determine each of the elements using the internal array pointer in sequence from a. to e.: a. echo next($commodities); b. echo end($commodities); c. echo prev($commodities); d. echo reset($commodities); e. echo current($commodities);
8. Consider the following “News” sections: World Sci-Tech Business Entertainment Sports Health
Create an array to store the data. a. Sort the array so that it displays the elements in alphabetical order. Print out the array using the print_r() function. b. Sort the array so that it displays the elements in reverse order. Print out the array using the print_r() function.
9. Consider the following table: Code
Direction
N
North
E
East
S
South
W
West
Create an array to store the data in the table. a. Sort the array so that it displays the elements in alphabetical order while maintaining key/value pairs. Print out the array using the print_r() function.
34 WAWASAN OPEN UNIVERSITY TCC 242/05 Web Database Application
b. Sort the array so that it displays the elements in reverse order while maintaining key/value pairs. Print out the array using the print_r() function.
10. Store the following BWF World Ranking table in a multidimensional array and print the array using a nested for loop Rank
Player name
Country
1
Chong Wei LEE
MAS
2
Taufik HIDAYAT
INA
3
Dan LIN
CHN
4
Peter Hoeg GADE
DEN
5
Long CHEN
CHN
Suggested answers to activities
Feedback Activity 3.3 1. Arrays are defined as data sets that share similar characteristics or a data type. We use arrays to organise data in a structured way that allows us to store, update, retrieve and sort a group of data items easily. 2. array(); square brackets 3. $emp = array(“E908766” => 11, “E915637” => 8, “E987560” => 2); print_r ($emp); //Array ( [E908766] => 11 [E915637] => 8 [E987560] => 2 )
4. D 5. True
UNIT 3 35 Manipulating strings, arrays and working with files
36 WAWASAN OPEN UNIVERSITY TCC 242/05 Web Database Application
UNIT 3 37 Manipulating strings, arrays and working with files
3.3 Files Objectives By the end of this section, you should be able to: 1. Describe the basic file operations in PHP. 2. Perform a variety of operations on files using PHP. 3. Apply PHP file system library functions.
Introduction When working with web applications, it is often necessary to store information in a permanent form. There are two primary ways to store data: files and databases. In this section you will learn how to interact with files. You will learn about databases in Unit 4. It is easier and quicker to use files to perform simple tasks. Files are usually used to store web logs, configurations and server settings. To manipulate files, PHP provides a number of file-related functions.
Opening a file The fopen() function opens a file in a mode that you specify and returns a handle. Using this handle you can read or write to a file via a file pointer. The file pointer is used to denote the present position in the file. When you open a file for reading, the file pointer points to the beginning of the file. The syntax for this function is: resource fopen ( string $filename , string $mode [, bool $use_ include_path [, resource $context ]] )
The following is a list of the common modes used as the second parameter: Mode
Description
r
Open for reading only; place the file pointer at the beginning of the file.
r+
Open for reading and writing; place the file pointer at the beginning of the file.
w
Open for writing only; place the file pointer at the beginning of the file and delete contents. If the file does not exist, attempt to create it.
38 WAWASAN OPEN UNIVERSITY TCC 242/05 Web Database Application
w+
Open for reading and writing; place the file pointer at the beginning of the file and delete contents. If the file does not exist, attempt to create it.
a
Open for writing only; place the file pointer at the end of the file. If the file does not exist, attempt to create it. Also known as append mode.
a+
Open for reading and writing; place the file pointer at the end of the file. If the file does not exist, attempt to create it. Also known as append mode.
Figure 3.4 The fopen() file modes
Let us now look at how the fopen()function is used: $Hdl = fopen(“data.txt”, “r”);
// Open a read-only handle
$Hdl = fopen(“data.txt”, “w”);
// Open the write handle
In the first example above, you will notice that the file was opened for reading only by specifying “r” as the mode. The fopen() function only prepares the file for another operation. Other than establishing the handle, it does nothing else. You will need to use other functions to actually perform the read and write operations.
Closing a file The fclose() function closes a file after you finish using it. The syntax of the function is: bool fclose ( resource $handle )
To close the file that you opened in the previous example, you will use: fclose($Hdl); // Close the file
When a PHP script finishes executing, all open files are automatically closed. Although it is not strictly necessary to close a file using the fclose() function after opening it, it is considered good programming practice to do so.
UNIT 3 39 Manipulating strings, arrays and working with files
Reading a file PHP provides many functions for reading data from a file. If you just want to make all the contents of a file available for you to work with, you can use the file_get_contents() function. However, if you want each line of a file stored in an array, you will use the file() function. For total control over the task of reading from a file, the fread() function is used. The file_get_contents() and file() functions do not require you to use the open and close file commands. These functions are good for quick, one-time file operations. If you plan on performing multiple operations on a file, it is best to use fopen() in conjunction with fread(), fwrite() and fclose() as this is more efficient. The functions for reading data from a file are described in detail next.
file_get_contents The syntax of the file_get_contents() function is: string file_get_contents ( string $filename [, bool $use_include_ path = false [, resource $context [, int $offset = -1 [, int $maxlen ]]]] )
Assume that you have a text file named ‘file.txt’ in the same directory as your PHP source code file. The following example code causes the contents of the file to be printed: $myfile = file_get_contents(‘file.txt’); echo $myfile;
// Print all contents from the file
Using the optional parameters, you can tell file_get_contents() to search through the paths specified in the $use_include_path parameter. The resource $context parameter refers to a stream context. A stream is a resource object which can be read from or written to in a linear fashion. The $offset parameter indicates where the reading starts from in the original stream. You can indicate the maximum length of data read using $maxlen.
file The syntax of the file() function is: array file ( string $filename [, int $use_include_path = 0 [, resource $context ]] )
40 WAWASAN OPEN UNIVERSITY TCC 242/05 Web Database Application
The following example shows how the function reads an entire file into an array. Each item in the array corresponds to a line in the file. $Lines = file(‘file.txt’); foreach($Lines as $Key => $Line) { $LineNum = $Key + 1; echo “Line $LineNum: $Line ”; }
The result of the code above is: Line 1: Line 1 content Line 2: Line 2 content Line 3: Line 3 content
The $use_include_path and resource $context parameters operate in a manner identical to those described in the file_get_contents subsection.
fread The syntax of the fread() function is: string fread ( resource $handle , int $length )
The following code shows how this function is used. The code opens a file (file.txt), reads a number of bytes (as specified in the $length parameter) from the file and returns a string. The file is then closed and the string is printed. $handle = fopen(‘file.txt’, ‘r’); $string = fread($handle, 64); fclose($handle); echo $string;
// Print 64 bytes from the contents of the file
Note that with ASCII encoding, storing a character in a file requires one byte. A Unicode character requires two bytes.
Web Reference To learn more about file system functions, please visit: “Filesystem Functions”, http://www.php.net/manual/en/ref. filesystem.php
UNIT 3 41 Manipulating strings, arrays and working with files
Activity 3.5 1. An internal array pointer is used to denote the present position in a file. When you open a file for reading, the internal array pointer points to the beginning of the file. True / False?
2. A file named preface.txt contains the following two lines: What is a web database application? It brings databases and the Web together.
What is the output of the following code? a. $Source = file(‘preface.txt’); foreach($Source as $Counter => $Display) { $Num = $Counter + 1; echo “Going to $Num: $Display ”; };
b. $handle = fopen(‘preface.txt’, ‘r’); $string = fread($handle, 34); fclose($handle);
Writing to a file The function file_put_contents() enables a file to be written to. Writing to a file can also be performed by the fwrite() function in conjunction with fopen() and fclose(). Generally, there are two modes you can supply to the fopen() function when you write to a file. The first mode, ‘w’, deletes the original contents of the file and replaces them with what you write. The second mode, ‘a’, appends the new content just after the original contents of the file. The functions that are used to write to a file are discussed next.
file_put_contents The syntax of the file_put_contents() function is: int file_put_contents ( string $filename , mixed $data [, int $flags = 0 [, resource $context ]] )
42 WAWASAN OPEN UNIVERSITY TCC 242/05 Web Database Application
The following is an example of how to write to a file. In this example, the original contents of the file are completely replaced by new content: $content = ‘New content.’; file_put_contents(‘file.txt’, $content); $myfile = file_get_contents(‘file.txt’); echo $myfile;
// Prints: “New content.”
The next example shows you how to append new content to the original contents: $appContent = ‘ and other languages are no different.’; file_put_contents(‘file.txt’, $appContent, FILE_APPEND); $myfile = file_get_contents(‘file.txt’); echo $myfile;
// Prints: “Original content and other
languages are no different.”
The file_put_contents() function will also attempt to create the file if it does not exist. Note that this function is binary safe.
fwrite The syntax of the fwrite() function is: int fwrite ( resource $handle , string $string [, int $length ] )
The following example shows how this function is used to write to a file. It replaces the original contents of the file with new content: $handle = fopen(‘file.txt’, ‘w’); // Open and delete all contents $data = “New content.”; fwrite($handle, $data); fclose($handle); echo file_get_contents(‘file.txt’); // Prints: “New content.”
The next example shows how fwrite() is used to append new content to the original contents: $handle = fopen(‘file.txt’, ‘a’); // Open file for appending $data = “ and other languages are no different.”; fwrite($handle, $data); fclose($handle); echo $myfile;
//Prints: Original content + and other
languages are no different.
UNIT 3 43 Manipulating strings, arrays and working with files
Deleting a file The unlink() function helps to delete a file. The syntax of the function is: bool unlink ( string $filename [, resource $context ] )
For example, the following statement deletes a file called ‘file.txt’: unlink (‘file.txt’); // Delete the file called ‘file.txt’
To unlink , the user must have permissions to write to the directory that contains the file. Take note that if a user has write permissions to a server directory, the user may delete files from that server directory regardless of who owns them.
Reading directory contents Sometimes, you may need to list all the files and child directories in a given directory. To do this, you need to first open the directory, then read the directory to list the files and subdirectories, and finally close the directory. The following subsection describes the functions that are used to open, close and read a directory:
Opening a directory The opendir() function opens a directory stream specified by a path. The syntax of the function is: resource opendir(string path)
Closing a directory handle The closedir() function closes the directory stream. Its syntax is as follows: void closedir(resource directory_handle)
Parsing directory contents The readdir() function returns each element in a directory. Its syntax is as follows: string readdir(int directory_handle)
44 WAWASAN OPEN UNIVERSITY TCC 242/05 Web Database Application
For example, the following code lists all the files and child directories in a given directory: $dh = opendir(“C:\Program Files\Apache Software Foundation\ Apache2.2\htdocs\”); while ($file = readdir($dh)) { echo “$file ”; } closedir($dh);
Checking file or directory existence The file_exists() function checks whether a file or directory exists. Its syntax is: bool file_exists ( string $filename )
For example, the following code checks whether a file called ‘file.txt’ exists: echo file_exists(‘file.txt’); // Return true if the file exists; false otherwise.
Web Reference To learn more about the PHP file system, please visit: “Filesystem”, http://php.net/manual/en/book.filesystem.php
Activity 3.6 1. The function file_write_contents() enables the process of writing to a file. This function will also attempt to create the file if it does not exist and it is binary safe. True / False?
2. To delete a file, you will use the function delete($filename). True / False?
UNIT 3 45 Manipulating strings, arrays and working with files
3. What does the following PHP code do? $dh = opendir(“C:”); while ($file = readdir($dh)) { echo “$file ”; } closedir($dh);
Summary PHP provides a number of file-related functions that are used to manipulate files. In this section, we discussed the following filerelated functions: 1. fopen() Opens a file 2. fclose() Closes a file 3. file_get_contents(), file(), fread() Read a file 4. file_put_contents(), fwrite() Write a file 5. unlink() Deletes a file 6. opendir(), closedir(), readdir() Manipulate a directory 7. file_exists() Checks file or directory existence
You should now know how to write PHP code to: 1. Open and close a file. 2. Read from and write to a file. 3. Read directory contents and check file or directory existence. 4. Delete a file.
46 WAWASAN OPEN UNIVERSITY TCC 242/05 Web Database Application
Self-test 3.3 1. The file_get_contents() and file() functions do not require you to use the fopen() and fclose() functions. True / False?
2. All of the following file modes allow you to open a file for writing except: A. B. C. D.
Write PHP code to print the contents from the file using the following functions: a. fread() (Assume that 64 bytes of the contents are to be printed) b. file() c. file_get_contents()
4. Using the file_put_contents() function, create a text file named ‘km_miles.txt’ that has the following contents: 1 km = 0.621400 miles 2 km = 1.242800 miles 3 km = 1.864200 miles
Then append the following data into the file using the fwrite() function. 4 km = 2.485600 miles 5 km = 3.107000 miles
UNIT 3 47 Manipulating strings, arrays and working with files
5. Write PHP code to list all files and child directories in ‘C:\Program Files’.
6. Write PHP code that: a. Checks that a file exists and if it does, deletes the file. b. Checks that a subdirectory does not exist and if does not, creates the subdirectory.
Suggested answers to activities
Feedback Activity 3.5 1. False
2. a. Going to 1: What is a web database application? Going to 2: It brings databases and the Web together. b. What is a web database application
Activity 3.6 1. False 2. False 3. It will list all the directories and files in the C drive.
48 WAWASAN OPEN UNIVERSITY TCC 242/05 Web Database Application
UNIT 3 49 Manipulating strings, arrays and working with files
Summary of Unit 3 Summary In the first section of this unit, you learnt how to use PHP string library functions to manipulate strings. You focused on stringrelated tasks that frequently appear in web application design, such as trimming whitespaces, comparing strings and extracting strings. You also learnt how to perform string padding. In the second section, you learnt to handle collections of data by using arrays. You also learnt about the various array library functions, as well as the common applications of arrays and multidimensional arrays. In the final section, you learnt how to work with files. You were exposed to the various file and directory manipulation functions that PHP provides. In the next unit, you will be introduced to the very interesting topic of connecting a web page to a MySQL database server using PHP.
50 WAWASAN OPEN UNIVERSITY TCC 242/05 Web Database Application
UNIT 3 51 Manipulating strings, arrays and working with files
Unit Practice Exercises 1. In this exercise, you will modify the “MySite09” web page from Unit 2. Copy the ‘MySite09.php’ file from Unit 2 into the ‘/var/www/Unit3’ directory (or ‘\htdocs\Unit3’ in Windows) and name it ‘MySite10.php’. Your task is to print the same table that you created in ‘MySite09.php’ but you will use a two-dimensional array to store the data this time. You should obtain a web page like the one shown in Figure 3.5. Note: You will need to copy the “include” files like ‘header.php’ over to the Unit3 directory. Object
By using the same for loop, create a new array in the loop: $element = array();
Remove all the HTML tags but retain the formulas. Store each column data into the array $element by using the array_push() function. See examples in the righthand side column of this table and complete all other column data. Maintain the formulas: $totalPoints += $p; $grandTotal += $subTotal;
Print array
By using a nested for loop, print out the array. Insert HTML table tags into the nested for loop to print out the table. See example in the right-hand side column.
52 WAWASAN OPEN UNIVERSITY TCC 242/05 Web Database Application
Figure 3.5 Using a two-dimensional array to store and print a table
2. In this exercise, create two new PHP files in the ‘/var/www/Unit3’ directory (or ‘\htdocs\Unit3’ in Windows) and name them ‘MySite11. php’ and ‘MySite11-register.php’. a. In ‘MySite11.php’, create a registration form by using the HTML code shown in the table below. Object
Markup
Value/Example
Title
…
My Site 11
Registration form
Insert into the HTML body tag.
Name: Email: Password: Confirm Password: Mobile Phone Number:
UNIT 3 53 Manipulating strings, arrays and working with files
You should obtain a web page like the one shown in Figure 3.6.
Figure 3.6 User registration form
b. In ‘MySite11-register.php’, you are going to manipulate various string functions according to the instructions given in the table below. Object
Markup
PHP page
Obtain form values
Use the $_
Value/Example
$_POST[‘name’];
POST[]
to obtain values from the user registration form in question 2.a. Trim whitespace
Trim whitespace and store data into the following variables:
$name = trim($_ POST[‘name’]);
$name $email $password $password2 $phone
String length
Use a string function to validate the length of the string in the $name field. Any string less than 6 characters in length will produce an error message and cause the exit() function to execute.
// If error, echo “Invalid name”; exit;
54 WAWASAN OPEN UNIVERSITY TCC 242/05 Web Database Application
String position and substring extraction
Use a string function to extract the part of the string before the @ symbol from the $email field. If the @ symbol is not found, an error message will be displayed and the exit() function will be executed.
// If error, echo “Invalid email”; exit;
String comparison
Use a string function to compare $password and $password2. If they are not the same, an error message will be displayed and the exit() function will be executed.
// If error, echo “Invalid passwords”; exit;
Substring and substring replacement
Check to make sure that the phone number is exactly 10 digits. Use several string functions to transform the phone number from 01XXXXXXXX into the international format (+60)XX-XXXXXXX.
// E.g., 0124567890 becomes (+60)12-4567890
Test the form
Fill up the registration form, ‘MySite11.php’ with valid and invalid data to test the string validation in the fields. See Figure 3.7.
Figure 3.8 shows an example of the page displayed when the data is invalid.
Figure 3.7 User registration data
UNIT 3 55 Manipulating strings, arrays and working with files
Figure 3.8 Error message when data is invalid
3. In this exercise, you will modify the “MySite11” and “MySite11-register” web pages from question 2. Copy both files into the ‘/var/www/Unit3’ directory (or ‘\htdocs\Unit3’ in Windows) and name them ‘MySite12.php’ and ‘MySite12-register.php’ respectively. a. In ‘MySite12.php’, modify the form action to action=”MySite12register.php”. Object
Markup
Value/Example
Title
…
My Site 12
Form action
Modify the form action
56 WAWASAN OPEN UNIVERSITY TCC 242/05 Web Database Application
b. In ‘MySite12-register.php’, you will create a log file. Object
Markup
Value/Example
PHP page
My Site 12
Writing a file
Create a function that is able to timestamp the current date and time together with the $message into a ‘register.log’ file. Use the example shown in the right-hand side column to help you.
Title $name $email $password $phone $username $intmobile
Read and display the log file
Display the contents of the ‘register.log’ file.
You should obtain a page similar to the one shown in Figure 3.9.
Figure 3.9 Displaying the contents of the log file
UNIT 3 57 Manipulating strings, arrays and working with files
Suggested Answers to Self-tests Feedback Self-test 3.1 1. False
2. Although you can compare two strings using the equality operator (==), this may cause unexpected or unsafe results for strings with binary content or multi-byte encoding.
6. if (strcmp($pswd,$pswd2) != 0) echo “Passwords do not match!”; else echo “Passwords match!”;
7. a. $pos = strpos($log, $file); echo $pos;
// 25
b. $filelen = strlen($file); echo $filelen; //10 c. $pos2 = $pos + $filelen + 2; echo $pos2;
//37
58 WAWASAN OPEN UNIVERSITY TCC 242/05 Web Database Application
d. $timestamp = substr($log, $pos2, -1); echo “The file $file was accessed on: $timestamp”; //The
file
index.html
was
accessed
on:
2012/02/10:20:36:50
8. $original = “Many functions will be used within your PHP applications”; // Get the position of ‘Many functions’ $pos = strpos($original, “Many functions”); // Find where ‘Many functions’ ends by adding the length of ‘Many functions’ $pos_end = $pos + strlen(“Many functions”); // Replace new substring content $new = substr_replace($original, “ introduced in this chapter”, $pos_end, 0);
UNIT 3 69 Manipulating strings, arrays and working with files
References Gilmore, W J (2008) Beginning PHP and MySQL, 3rd edn, Berkeley, CA: Apress. Lane, D and Williams, H E (2004) Web Database Application with PHP and MySQL, 2nd edn, Sebastopol: O’Reilly. PHP (2011) Array Functions, http://www.php.net/manual/en/ref.array.php (Accessed 16 Feb 2011). PHP (2011) Filesystem Functions, http://www.php.net/manual/en/ref.filesystem.php (Accessed 23 Feb 2011). PHP (2011) Strings, http://www.php.net/manual/en/language.types.string.php (Accessed 31 Jan 2011). Welling, L and Thomson, L (2008) PHP and MySQL Web Development, 4th edn, Upper Saddle River, NJ: Addison-Wesley Professional. Wikibooks (2010) PHP programming, http://en.wikibooks.org/wiki/PHP, used under a Creative Commons Attribution-ShareAlike licence: http://creativecommons. org/licenses/by-sa/3.0/
70 WAWASAN OPEN UNIVERSITY TCC 242/05 Web Database Application
UNIT 3 71 Manipulating strings, arrays and working with files
Glossary Array
An array is an ordered map that associates values to keys. It is an indexed collection of data values. Arrays can be used to organise data in a structured way that allows us to store, update, retrieve and sort groups of data items easily.
Binary-safe function
A binary-safe function is essentially one that treats its input as a raw stream of data without any specific format. Binary data is encoded as a string of 1s and 0s. Binary data needs to be handled differently; otherwise the data will become corrupt. A binary-safe function does not modify the binary data that it handles and thus does not corrupt the data.
Multidimensional array
An array that is created by using array elements to hold other arrays, which, in turn, can hold more arrays.
Padding
Padding is used for spacing-out strings to reduce clutter and enhance readability.
Sort
Segregate items into groups according to a specified criterion.
Traversal
Move from one array element to another and perform a task upon each element. Usually, traversal is performed using the internal array pointer.
Whitespace
The following characters are considered to be whitespace in PHP: spaces, tabs, newline, carriage return and NULL.
72 WAWASAN OPEN UNIVERSITY TCC 242/05 Web Database Application
UNIT 4 i Working with MySQL and PHP
Unit 4 TCC 242/05
Web Database Application
Working with MySQL and PHP
ii WAWASAN OPEN UNIVERSITY TCC 242/05 Web Database Application
COURSE TEAM Course Team Coordinator: Mr. Ishan Sudeera Abeywardena Content Writer: Mr. Tang Chun Chong Instructional Designer: Mr. Yeap Hock Aun Academic Member: Mr. Chandarasageran Natarajan
COURSE COORDINATOR Mr. Ishan Sudeera Abeywardena
EXTERNAL COURSE ASSESSOR Dr. Sanjay Jasola, Gautam Buddha University
PRODUCTION In-house Editor: Mr. Yeap Hock Aun Graphic Designer: Ms. Leong Yin Ling
Wawasan Open University is Malaysia’s first private not-for-profit tertiary institution dedicated to adult learners. It is funded by the Wawasan Education Foundation, a tax-exempt entity established by the Malaysian People’s Movement Party (Gerakan) and supported by the Yeap Chor Ee Charitable and Endowment Trusts, other charities, corporations, members of the public and occasional grants from the Government of Malaysia. The course material development of the university is funded by Yeap Chor Ee Charitable and Endowment Trusts.
Wawasan Open University Jalan Sultan Ahmad Shah, 10050 Penang. Tel: (604) 2180333 Fax: (604) 2279214 Email: [email protected] Website: www.wou.edu.my
UNIT 4 iii Working with MySQL and PHP
Contents Unit 4 Working with MySQL and PHP Unit overview
1
Unit objectives
1
4.1 Working with relational databases
3
Objectives
3
Introduction
3
Relational database concepts
3
Modelling real-world objects
9
Avoiding redundant data
10
Single item single column
11
Avoiding empty attributes
12
Unique keys
12
Creating questions to ask a database
13
Suggested answers to activity
15
4.2 Managing databases and user accounts
17
Objectives
17
Introduction
17
Creating a database
17
Using a database
19
Deleting a database
19
Creating tables
19
Deleting a table
22
iv WAWASAN OPEN UNIVERSITY TCC 242/05 Web Database Application
Altering a table
23
Setting up new accounts for database users
25
Granting access privileges
26
Managing account passwords
28
Suggested answers to activities
34
4.3 The bridge connecting MySQL and PHP
35
Objectives
35
Introduction
35
Connecting to MySQL server
35
Querying a database
37
Inserting data into a database
38
Retrieving data from a database
39
Updating records in a database
42
Deleting records from a database
43
Using phpMyAdmin
45
Suggested answers to activity
51
Summary of Unit 4
53
Unit practice exercises
55
Suggested answers to self-tests
63
Suggested answers to unit practice exercises
67
Appendix
77
References
79
Glossary
81
UNIT 4 1 Working with MySQL and PHP
Unit Overview his unit discusses techniques for manipulating MySQL databases. You will be shown how to create database records and manage user accounts in MySQL server. In addition, you will learn how PHP interacts with MySQL server.
T
The first section describes the key concepts of relational databases. It explains the basic principles of data modelling and database design. The second section discusses database tables. It also describes MySQL access privileges and how to set up new accounts for database users. The third section discusses how to connect to MySQL server with PHP. It explains the use of PHP to query a database in order to insert, retrieve, modify and delete database records.
Unit Objectives By the end of this unit, you should be able to: 1. Describe relational database design concepts. 2. Create MySQL relational databases. 3. Manage user accounts in MySQL databases. 4. Access data in MySQL databases. 5. Connect a PHP web application to MySQL server. 6. Use MySQL library functions to query databases.
2 WAWASAN OPEN UNIVERSITY TCC 242/05 Web Database Application
UNIT 4 3 Working with MySQL and PHP
4.1 Working with Relational Databases Objectives By the end of this section, you should be able to: 1. Explain the concept of relational databases. 2. Model data with real-world objects. 3. Explain how data in relational databases are represented as collections of records. 4. Discuss the key principles of relational database design.
Introduction You should by now have a good understanding of PHP. It is now time for you to move on to the next stage of creating a web database application, which is the task of integrating MySQL with PHP. You were introduced to MySQL in Unit 1 and shown how to install and configure MySQL on your computer. MySQL is a type of relational database server. In this section, you will first learn the fundamental concepts of relational databases.
Relational database concepts A relational database is a database that organises its data into collections of tables, attributes, records, values, keys, schemas and relationships. Predicate logic is used to both describe the information contained in the database and to query it. There are many advantages of storing and accessing data in a relational database compared to storing and accessing data in a flat file. One of the main advantages of a relational database is its built-in access privilege system. A relational database also provides faster access to data and simplifies querying. For example, a relational database in a human resource management application allows you to easily obtain data about employees, such as where they are from and what department they are in. You will next be introduced to the elements in the structure of a relational database.
4 WAWASAN OPEN UNIVERSITY TCC 242/05 Web Database Application
Tables Tables (also known as relations) are sets of data values that make up relational databases. In Figure 4.1, the sample table called EMPLOYEES stores employee ID numbers, names, departments and locations. EMPLOYEES EmployeeID
Name
Department
Location
168
John Doe
Accounting
US
787
Alice Carol
Marketing
US
251
Shion Lee
Engineering
Malaysia
Figure 4.1 Employee data stored in a table
Attributes Attributes or fields are the columns in a table. They have unique names and distinctive data types. For example, in Figure 4.1 the EmployeeID attribute is an integer whereas the other three attributes are strings.
Records Records or tuples are rows in a table. In the previous example, each record in the table represents different attributes of an employee. Since the information is in a tabular format, all the records have the same attributes.
Values Records consist of a set of values that correspond to the attributes. Each value has a fixed data type specified by its attribute.
Keys A key is an attribute that has a unique value for each row in a table. For example, in Figure 4.1, we can take EmployeeID as the key for the table. We select EmployeeID
because it is unique for each employee and will guarantee that information will not be repeated. We know that EmployeeID 168 belongs to “John Doe” in the US. Therefore, EmployeeID 168 cannot be assigned to another person. This unique key is also known as the primary key for that table. You should not take Location as the primary key since another employee, namely “Alice Carol”, is also located in the US. In this case, Name, Department and Location are not unique for each employee.
UNIT 4 5 Working with MySQL and PHP
You will understand tables, attributes, records, values and keys better when you start creating tables in later sections. A typical database consists of multiple tables. These tables can be interlinked using a key. Figure 4.2 shows a second table called BONUS PAY, which has been added into the database that contains the EMPLOYEES table. It stores the amounts of the bonus paid to employees. By referring to the EmployeeID, we can see the amount of the bonus each employee has received. For example, the employee with EmployeeID 168, “John Doe”, received $2500 in bonuses. Although EmployeeID is the primary key in the EMPLOYEES table, it is called a foreign key in the BONUS PAY table. The BONUS PAY table has its own primary key, namely TransactionID. In a relational database, a foreign key is used by a table to reference other tables that have related information.
EMPLOYEES EmployeeID
Name
Department
Location
168
John Doe
Accounting
US
787
Alice Carol
Marketing
US
251
Shion Lee
Engineering
Malaysia
BONUS PAY TransactionID
EmployeeID
Amount
Date
1
168
2500.00
1-Jun-2011
2
251
800.00
1-Jun-2011
3
787
2000.00
1-Jun-2011
4
168
3000.00
1-Jul-2011
Figure 4.2 Linking to a related table with a foreign key
Schemas A database schema is the design of a database. It can be considered to be the blueprint that is used to create the database. A schema defines the tables, attributes and relationships in a database. A schema will not usually include any data values. The database schema for the example shown in Figure 4.2 can be represented in text form as shown below: employees (EmployeeID, Name, Department, Location) bonus_pay (TransactionID, EmployeeID, Amount, Date)
Note that the underlined attributes are the primary and foreign keys of each table.
6 WAWASAN OPEN UNIVERSITY TCC 242/05 Web Database Application
Relationships There are three types of relationships in a relational database, namely: 1. one-to-one 2. one-to-many 3. many-to-many
A one-to-one relationship means that one record in a table corresponds to only one record in a related table. For example, we could have placed the Location field in the EMPLOYEES table of Figure 4.1 in another table called LOCATION. That would create a one-to-one relationship between the two tables. Figure 4.3 shows this one-to-one relationship.
EMPLOYEES EmployeeID
Name
Department
Location
168
John Doe
Accounting
1
787
Alice Carol
Marketing
1
251
Shion Lee
Engineering
2
LOCATION LocationID
Location
1
US
2
Malaysia
Figure 4.3 One-to-one relationship
A one-to-many relationship is a relationship where one record in a table is linked to many records in another table. In the example shown in Figure 4.2, one particular employee received two bonuses EmployeeID 168 appears twice in the BONUS PAY table. Figure 4.4 shows this one-to-many relationship.
UNIT 4 7 Working with MySQL and PHP
EMPLOYEES EmployeeID
Name
Department
168
John Doe
Accounting
787
Alice Carol
Marketing
251
Shion Lee
Engineering
BONUS PAY TransactionID
EmployeeID
Amount
Date
1
168
2500.00
1-Jun-2011
2
251
800.00
1-Jun-2011
3
787
2000.00
1-Jun-2011
4
168
3000.00
1-Jul-2011
Figure 4.4 One-to-many relationship
A many-to-many relationship is a relationship in which many records in a table are linked to many other records in another table. For example, looking at the two tables EMPLOYEES and TRAINING shown in Figure 4.5, you will see that one employee can attend several training courses. Conversely, each of the training courses can be attended by a number of employees. This many-to-many relationship can be represented by a new table called EMPLOYEE_TRAINING. This table will contain only the foreign keys from the EMPLOYEES and TRAINING tables to show which employee has attended which training course.
8 WAWASAN OPEN UNIVERSITY TCC 242/05 Web Database Application
EMPLOYEES EmployeeID
Name
Department
Location
168
John Doe
Accounting
US
787
Alice Carol
Marketing
US
251
Shion Lee
Engineering
Malaysia
EMPLOYEE_TRAINING EmployeeID
TrainingID
168
83
251
81
787
81
787
83
251
82
TRAINING TrainingID
Trainer
CourseName
Cost
81
Josh Low
Database Administration
5000
82
Jason Tan
PHP Programming
5000
83
Mohandas
Project Management
8000
Figure 4.5 Many-to-many relationship
Activity 4.1 1. What is a relational database?
2. __________ or fields are columns in a table. Each has a unique name and contains data.
3. Records or tuples are __________ in a table. Each record in a table consists of a number of attributes.
UNIT 4 9 Working with MySQL and PHP
4. A relational database is a database that organises its data into collections of ___________. A. statements, identifiers, keywords and expressions B. primary keys and foreign keys C. tables, attributes, records, values, keys, schemas and relationships D. one-to-one, one-to-many and many-to-many relationships
5. A database schema is the set of table designs for a database. A schema shows the attributes of each table and indicates the primary key and any foreign key it possesses. True / False?
6. Create a schema based on the table below, where FlightID is the primary key and Code is the foreign key. WAIR_FLIGHT FlightID
Code
Place
Time
Fare
DepartureGate
WA08
PEN
Penang
20:00
RM176
B1
WA88
KUL
Kuala Lumpur
21:00
RM83
B2
WA77
LGK
Langkawi
08:00
RM205
B1
Modelling real-world objects When creating a database, you will need to model real-world items and their relationships. Once you have a clear idea of how each item is related to the other items, you can store that information in a data model. A data model is a set of rules and conventions that assist in transforming loosely defined relationships in the real world into a finite model by means of reusable concepts (Relational Database Design 2010). In general, each class of the real-world items (e.g., employees, trees, vehicles) that you model will need a table of its own. For example, if you want to store information about employees, you will need to identify the attributes of an employee which are common to all employees. Only then will you be able to model the employees table. Figure 4.1, Figure 4.2 and Figure 4.5 show how data about employees are modelled in terms of general details, bonus pay and training. For the real-world object that we just mentioned (i.e., employees), you can apply the data modelling concept by creating at least three tables in the database, namely EMPLOYEES, BONUS PAY and TRAINING.
10 WAWASAN OPEN UNIVERSITY TCC 242/05 Web Database Application
Avoiding redundant data At this point you might be wondering why general information about employees such as name, department and location cannot be stored in the BONUS PAY table. Figure 4.6 shows what happens when you actually try do this. The shaded columns in the table contain redundant data. BONUS PAY TransactionID
Amount
Date
EmployeeID
Name
Department
Location
11
3000.00
1-Aug-2011
168
John Doe
Accounting
US
14
3000.00
1-Sep-2011
168
John Doe
Accounting
US
17
3000.00
1-Oct-2011
168
John Doe
Accounting
US
18
3000.00
1-Nov-2011
168
John Doe
Accounting
US
Figure 4.6 Redundant data in the BONUS PAY table
From Figure 4.6, you can see that the name, department and location data of the employee named “John Doe” are repeated a number of times in the BONUS PAY table. As your list of employees grows, and since they will be paid bonuses every year, there will be a lot of duplicated information in your table as time goes by. This will take up a lot of space in your database. Therefore, you need to avoid storing duplicate or redundant data so that the performance and efficiency of the database is optimised. Redundant data are also subject to update anomalies, which are situations where inconsistent data are created when a database is updated. This violates the integrity of the data, which leads to us being unsure of the correctness of the data (Welling 2008). For example, if “John Doe” moves to a new location, you will have to update the Location attribute for all the transactions that appear in the BONUS PAY table shown in Figure 4.6. In this case, the BONUS PAY table has four rows stating John Doe’s location and you will thus have to update the table four times. Besides that, you will need to ensure that all the Location values are consistent throughout the table. For example, different ways of recording “US”, such as writing “United States”, will cause data conflicts for “John Doe”. In addition, removing transactions involving John Doe from the BONUS PAY table means that you risk losing his location information. In general, you want to design your database so that it is free from update anomalies.
UNIT 4 11 Working with MySQL and PHP
Single item single column You should store only a single item in each column. This means that you should only store one item in each attribute of each record. For example, if you want to track how many training sessions an employee has attended, you may add a column called TrainingAttended to the EMPLOYEES table as shown in Figure 4.7 and store the training IDs in this column. EMPLOYEES EmployeeID
Name
Department
Location
TrainingAttended
168
John Doe
Accounting
US
83
787
Alice Carol
Marketing
US
81, 83
251
Shion Lee
Engineering
Malaysia
81, 82
Figure 4.7 The TrainingAttended attribute in each record has multiple values
However, note that by doing this you are actually nesting a whole table into one column. This will lead to problems when you want to answer questions like “How many employees have attended project management (TrainingID=83) training sessions?” If your table is set up as shown in Figure 4.7, the TrainingAttended field in each record will have to be separately analysed to see if a matching TrainingID is inside it. You should instead create a new table to hold the training data. For example, you can create a new table called EMPLOYEE_TRAINING as shown in Figure 4.8. This new table makes it easier to count the number of employees who have attended a particular training session. EMPLOYEE_TRAINING EmployeeID
TrainingID
168
83
251
81
787
81
787
83
251
82
Figure 4.8 The EMPLOYEE_TRAINING table
12 WAWASAN OPEN UNIVERSITY TCC 242/05 Web Database Application
Avoiding empty attributes There are two ways to add a non-mandatory or optional attribute to a table. One way would be to add a new column to the table. For example, you can add an additional column called Note to the TRAINING table. TRAINING TrainingID
Trainer
CourseName
Cost
81
Josh Low
Database Administration
5000
82
Jason Tan
PHP Programming
5000
83
Mohandas
Project Management
8000
Note
Figure 4.9 Null value in the Note column
However, if you have many records in the TRAINING table and if there is only a small chance that a note is written in a record, the table will end up with many empty attributes or “null values” in the Note column. This will waste storage space and the null values may also cause errors when used in numerical functions like those that calculate totals. A null value in a table cell also creates doubts as it is not known whether the cell was intentionally left empty or if data has not been entered yet. To avoid this problem, you can create a new table called TRAINING_NOTES. This table will only store the training courses that have a note attached to them. The training courses that have no notes will not be stored in this table so that the creation of null values is avoided. TRAINING_NOTES TrainingID
Note
Figure 4.10 Dedicated table for training notes
Unique keys You should make sure that the primary key you select is really unique. In the previous examples, primary keys were created for the EMPLOYEES (EmployeeID), BONUS PAY (TransactionID) and TRAINING (TrainingID) tables. This was done because these objects do not have a unique identifier that can ensure that each record is unique. For tables like EMPLOYEE_TRAINING, you do not need to create a unique identifier since both the foreign keys (EmployeeID and TrainingID) found in EMPLOYEE_TRAINING can be treated as unique identifiers.
UNIT 4 13 Working with MySQL and PHP
Creating questions to ask a database An important database design principle is to always create questions that you want to ask the database that you are designing. As long as the database that you are designing contains the relationships that can answer these questions, the design is considered to be good.
Web Reference To learn more about designing relational databases, please visit: “Relational Database Design”, http://en.wikibooks.org/wiki/ Relational_Database_Design
Summary A relational database is a database that organises its data into collections of tables, attributes, records, values, keys, schemas and relationships. When creating a database, you can model it on real-world items and their relationships. You can store information about the items and relationships in data models. In general, you have to design your database so that it is free from update anomalies. The fundamental concept is to store only one item in each record field. You should create a new table instead of storing a nested table in a column. You should also avoid having too many null values in your table. Always select the right unique key and always create questions that you want to ask the database that you are designing. In the next section, you will learn how to create and work with databases and user accounts.
14 WAWASAN OPEN UNIVERSITY TCC 242/05 Web Database Application
Self-test 4.1 1. What are update anomalies?
2. For some many-to-many relationship tables, you do not need to create a unique identifier since the foreign keys can be treated as unique identifiers. True / False?
3. One of the principles in designing a relational database is to A. B. C. D.
always assign a unique key to a table immediately. always insert records into the database. always create tables in the database. always create questions that you want to ask the database.
4. Consider the following tables that respectively show the various types of camels and the countries with the highest camel populations in the world. CAMEL TypeID
CamelType
T1
Dromedary
T2
Bactrian
T3
Wild Bactrian
T4
F1 Hybrid
T5
F2 Hybrid POPULATION
Code
Country
Population
CamelTypesFound
SOM
Somalia
3,860
T1, T3, T5
SUD
Sudan
14,660
T2, T4, T5
MAU
Mauritania
37,000
T1, T5
a. Can you identify the design problem in the POPULATION table? b. How can you resolve the problem?
UNIT 4 15 Working with MySQL and PHP
5. Consider the following table that shows the countries with the highest camel populations in the world, which has a record field for the total amount of donations received by each country. POPULATION Code
Country
Population
SOM
Somalia
3,860
SUD
Sudan
14,660
MAU
Mauritania
37,000
Donation
a. Can you identify the design problem in the POPULATION table? b. How can you resolve the problem?
Suggested answers to activity
Feedback Activity 4.1 1. A relational database is a database that organises its data into collections of tables, rows, attributes and domains. Predicate logic is used to both describe the information contained in the database and to query information from it. 2. Attributes 3. rows 4. C 5. True 6. WAIR_FLIGHT (FlightID, Code, Place, Time, Fare, DepartureGate)
16 WAWASAN OPEN UNIVERSITY TCC 242/05 Web Database Application
UNIT 4 17 Working with MySQL and PHP
4.2 Managing Databases and User Accounts Objectives By the end of this section, you should be able to: 1. Create databases and relation structures. 2. Create tables based on schemas. 3. Delete and alter tables. 4. Describe the MySQL access privilege system. 5. Perform user authentication from a given host. 6. Manage and assign account passwords.
Introduction In this section, you will learn how to manage databases and user accounts in MySQL server via the MySQL monitor. You will reuse the data model that was discussed in the previous section. Here is the schema of that data model. employees (EmployeeID, Name, Department, Location) bonus_pay (TransactionID, EmployeeID, Amount, Date) training (TrainingID, Trainer, CourseName, Date) employee_training (EmployeeID, TrainingID) training_notes (TrainingID, Note)
The database that you will create with this schema will be called “human_resource”.
Creating a database You will now create a database in MySQL server via the MySQL monitor. In Unit 1, you learnt how to access the MySQL monitor. To run MySQL monitor, open the terminal window in Ubuntu. In Windows go to Start > Run and then type cmd. 1. At the terminal prompt, type the following to enter the MySQL monitor: mysql –h localhost –u root –p
18 WAWASAN OPEN UNIVERSITY TCC 242/05 Web Database Application
2. You will be prompted to enter a password. Enter wawasan, which is the password you set earlier.
3. You will then be in the MySQL monitor and the mysql> prompt will be displayed. Remember that all commands used here will end with a semicolon “; ” or a “\g ”. View your pre-installed databases by typing show databases;.
Figure 4.11 MySQL Monitor showing pre-installed databases
Note that permission to view or use databases on MySQL server is based on the user’s privileges in the MySQL Access Privilege System. We will discuss this topic later in the unit. Since you login as the root, you will have all the administrative privileges including the ability to create a new database. To create a database, you will use the CREATE DATABASE command. The syntax of the command is: CREATE DATABASE db_name;
For example, to create a database called human_resource, use the following syntax: mysql> CREATE DATABASE human_resource;
Once you run the command, you will receive a confirmation message: Query OK, 1 row affected (0.03 sec).
You can verify whether the database has been created by typing: show databases;
UNIT 4 19 Working with MySQL and PHP
Using a database After the database is created, you can set it as your default working database by using the USE command: mysql> USE human_resource;
After issuing the USE command, you will receive a confirmation message: Database changed
You may also directly log in to the database through MySQL monitor by indicating its name in the following command line: %> mysql -h localhost -u root -p human_resource
Deleting a database You may remove a database that you created by using the DROP command. The syntax of the command is: DROP DATABASE db_name;
To remove the database named human_resource, use the following command: mysql> DROP human_resource;
Creating tables In this section, you will learn how to create tables using the schemas in the human_resource database. If you have removed it in the previous subsection, please re-create the database. Before you work on the database, make sure that you are using the human_resource database by running the USE command: mysql> USE human_resource;
A table is created within a database by using the CREATE TABLE statement. The syntax of the CREATE TABLE statement is: CREATE TABLE table_name ( col_name data_type [NOT NULL | NULL] [AUTO_INCREMENT] [PRIMARY] KEY], …);
20 WAWASAN OPEN UNIVERSITY TCC 242/05 Web Database Application
Based on the schema employees(EmployeeID, Name, Department, Location), the following command will create a table called employees: mysql>CREATE TABLE employees ( EmployeeID INT NOT NULL PRIMARY KEY, Name VARCHAR(50) NOT NULL, Department VARCHAR(20) NOT NULL, Location VARCHAR(40) NOT NULL );
The command that you used above names the first column or field of the table EmployeeID, assigns to the field the integer (INT) data type, and states that it must not be a null value (NOT NULL). It is assigned as the PRIMARY KEY. The other three fields have the string data type (VARCHAR). VARCHAR(50) means that the field can store a variable-length string with a maximum of 50 characters. If you are currently using another database and would like to create a table in human_resource , simply type the table name with the target database name like this: human_resource.employees
View the table that you created by using the SHOW TABLES command: mysql>SHOW TABLES;
The output of this command will be something like the following: +--------------------------+ | Tables_in_human_resource | +--------------------------+ | employees
|
+--------------------------+ 1 row in set (0.00 sec)
The output above does not describe much about the structure of the table. To view the structure in detail, you need to use the DESCRIBE command: mysql>DESCRIBE employees;
UNIT 4 21 Working with MySQL and PHP
This command will display the following information: +------------+-------------+------+-----+---------+-------+ | Field
+------------+-------------+------+-----+---------+-------+ 4 rows in set (0.00 sec)
Now create the bonus_pay table based on the schema: bonus_pay (TransactionID, EmployeeID, Amount, Date). The statement to do this is: mysql>CREATE TABLE bonus_pay ( TransactionID INT NOT NULL PRIMARY KEY AUTO_INCREMENT, EmployeeID INT NOT NULL, Amount FLOAT(10,2) NOT NULL, Date DATE NOT NULL );
The TransactionID field, which is the primary key for this table, is created with the AUTO_INCREMENT facility. AUTO_INCREMENT allows a unique number to be auto-generated when you insert a new record into the table. By default, the starting value for AUTO_INCREMENT is 1 and it will increment by 1 for each new record. The data type of Amount is FLOAT(10,2), which means that the values of this field can have a maximum of 10 digits with 2 decimal places. The Date field has the DATE data type. Create the other tables in the human_resource database using the following schemas: training (TrainingID, Trainer, CourseName, Cost) employee_training (EmployeeID, TrainingID) training_notes (TrainingID, Note)
You can use the statements shown below to create these tables. mysql>CREATE TABLE training ( TrainingID INT NOT NULL PRIMARY KEY AUTO_INCREMENT, Trainer VARCHAR(50) NOT NULL, CourseName VARCHAR(40) NOT NULL, Cost FLOAT(10,2) NOT NULL );
22 WAWASAN OPEN UNIVERSITY TCC 242/05 Web Database Application
mysql>CREATE TABLE employee_training ( EmployeeID INT NOT NULL, TrainingID INT NOT NULL, PRIMARY KEY (EmployeeID, TrainingID));
mysql>CREATE TABLE training_notes ( TrainingID INT NOT NULL PRIMARY KEY, Note TEXT );
Note that when creating the employee_training table, you indicated multiple fields of primary keys by using the special PRIMARY KEY clause in the last line: PRIMARY KEY (EmployeeID, TrainingID));
In this clause, the fields are separated by using a comma. Lastly, the data type of Note is TEXT, which is used for accepting long strings such as text documents. Instead of running the CREATE TABLE statements one by one in MySQL monitor, you can store all the CREATE TABLE statements in one external SQL file and execute them together. Creating the external SQL file has a few advantages. One advantage is that you can edit the commands in a text editor before you execute them; doing this will minimise errors. Another advantage is that you can reuse the file to create the same tables in another database. To create an SQL file, copy all the CREATE TABLE statements into a file called ‘hr_tbls.sql’. Then exit MySQL monitor and execute the following command from the Linux terminal or Windows command prompt: mysql -h localhost -u root -D human_resource –p < hr_tbls.sql
You may want to remove all the existing tables in the human_resource database prior to trying out the above command. Refer to the next section on how to remove tables. Note: The Appendix in this unit has the complete contents of ‘hr_tbls.sql’.
Deleting a table You can remove (delete) a table in a database by using the DROP TABLE command. For example, if you want to remove the table called employees, you will execute the following command: DROP TABLE employees;
UNIT 4 23 Working with MySQL and PHP
You can remove several tables at the same time by separating the table names with commas in the DROP TABLE command: DROP TABLE employees, bonus_pay, training;
Altering a table Often, you will need to revise and improve upon the structures of the tables in your database. You do not have to delete and re-create a table each time you need to make a change to its structure. Instead, you can change the table structure with the ALTER TABLE statement. For example, if you want to add an additional Address field to the employees table, you can use the ADD COLUMN clause to indicate the new field name and data type: ALTER TABLE employees ADD COLUMN Address VARCHAR(200);
By default, the new field that you inserted will be placed in the last position in the table. If you want to specify the position of the new field, you can place the positioning keywords FIRST or AFTER directly after a field name: ALTER TABLE employees ADD COLUMN Address VARCHAR(200) AFTER Department;
You can use the CHANGE clause to modify field properties. In case you forgot to insert the NOT NULL clause to the new field, you can modify the new field by using the following statement: ALTER TABLE employees CHANGE Address VARCHAR(200) NOT NULL;
Another modification that you can make to a table is to set the auto increment to start from a value other than the default value 1. To set the AUTO_INCREMENT index in the training table to start from 80, you can use the following statement after creating the table: ALTER TABLE training AUTO_INCREMENT = 80;
Lastly, you can remove a field from a table by using the DROP clause. For example, if you want to remove the Address field from the employees table, you can use the following statement: ALTER TABLE employees DROP Address;
24 WAWASAN OPEN UNIVERSITY TCC 242/05 Web Database Application
Web Reference To learn more about managing databases and tables, please visit: “12.1 Data Definition Statements”, http://dev.mysql.com/doc/ refman/5.5/en/sql-syntax-data-definition.html
Activity 4.2 1. To create a database, you will use the __________ command.
2. Which of the following command(s) can be used to set a database called db_name as the default working database after it is created? A. B. C. D.
mysql> USING db_name; mysql> CHANGE DATABASE db_name; %> mysql -h localhost -u root –p db_name All of the above
3. You may remove the database called db_name that you have created by using the _________ command. A. B. C. D.
DELETE DATABASE db_name; DROP DATABASE db_name; REMOVE DATABASE db_name;
All of the above
4. What are the option(s) that you can set when you create a new table with the CREATE TABLE statement? A. B. C. D.
PRIMARY KEY; AUTO_INCREMENT; NOT NULL | NULL;
All of the above
5. You can use the SHOW TABLES or DESCRIBE command to view tables that you have created. True / False?
UNIT 4 25 Working with MySQL and PHP
6. Write an SQL statement to create the table below (without inserting the records). Take AtomicNumber as the primary key and allow both Symbol and ElementName to have a maximum length of 5 and 20 respectively. All fields must not be null. PERIODIC Symbol
ElementName
AtomicNumber
Li
Lithium
3
Ti
Titanium
22
Pb
Lead
82
Setting up new accounts for database users Just as you would lock the door when you leave your house, you will need to secure the data in your database. Remember that the driving factor of any database-driven application is data. An organisation cannot operate if it loses its data. A database system like MySQL provides several security options for protecting your data. This section will describe the MySQL Access Privilege System. It will explain how you can create users, grant privileges and manage passwords. The MySQL Access Privilege System protects your data from unauthorised access or modification. MySQL allows you to grant different access privileges to different users. For example, you may want to provide a clerk with only read access to certain table columns while providing an analyst with write access to those columns. The MySQL Access Privilege System is based on the concepts of authentication and authorisation. Authentication involves connecting the user to the database server. Authorisation specifies what privileges the user has in executing queries. MySQL user account information, which enables authentication and authorisation to be performed, is stored in the mysql database, which is installed by default. Let us now create a new MySQL account by using the CREATE USER statement. The syntax is as follows: CREATE USER user [IDENTIFIED BY [PASSWORD] ‘password’];
Create an account called “johndoe” at localhost with the password wawasan: CREATE USER johndoe@localhost IDENTIFIED BY ‘wawasan’;
After the previous statement is executed, you will receive a confirmation message: Query OK, 0 rows affected (0.00 sec).
26 WAWASAN OPEN UNIVERSITY TCC 242/05 Web Database Application
You can then verify the current user list by entering: SELECT User, Host, Password FROM mysql.user;
You should be able to see an additional user called johndoe at localhost. Note that you were logged in as the root account and this means that you have the global CREATE USER privilege for the mysql database. You can rename an existing MySQL account by using the RENAME USER statement. The general syntax is as follows: RENAME USER old_user TO new_user;
To rename the account “johndoe” at localhost to “babydoe”: RENAME USER johndoe@localhost TO babydoe@localhost;
You may remove an existing MySQL account by using the DROP USER statement. The general syntax is as follows: DROP USER user;
For example, to drop the account “babydoe” at localhost, you will type: DROP USER babydoe@localhost;
After using this statement, you should check the current user list to see whether the user “babydoe” has been removed.
Granting access privileges Recall that the MySQL Access Privilege System allows you to grant different access privileges to different users. You can use the GRANT and REVOKE commands to manage access privileges. To illustrate the application of these commands, let us first create a user account. Create a user account called johndoe@localhost: CREATE USER johndoe@localhost IDENTIFIED BY ‘wawasan’;
UNIT 4 27 Working with MySQL and PHP
By default, the new user account that you have just created will have no privileges. You may grant privileges to a user by using the GRANT command. The general syntax is as follows: GRANT privilege_type [(column_list)] ON {table_name | * | *.* | database_name.*} TO user_name [IDENTIFIED BY ‘password’];
You will now reuse the human_resource database that you created earlier. Assume that you want to grant johndoe@localhost all user rights to the entire human_ resource database. The following is the statement that you would use: GRANT ALL ON human_resource.* TO johndoe@localhost;
means all user rights including the right to select, insert, update and delete tables and records in the database. The asterisk (*) means all tables from human_ resource. ALL
You can create a new account and grant privileges at the same time by using the GRANT statement. For instance, the following statement grants SELECT and INSERT privileges to a new user account called marydoe@localhost , which has the password wawasan: GRANT SELECT, INSERT ON human_resource.* TO marydoe@localhost IDENTIFIED BY ‘wawasan’;
You may remove privileges from a user by using the REVOKE command. The syntax is as follows: REVOKE privilege_type [(column_list)] ON {table_name | * | *.* | database_name.*} FROM user_name;
To remove the INSERT privilege granted earlier to marydoe@localhost: REVOKE INSERT ON human_resource.* FROM marydoe@localhost;
You may view all the privileges granted to a user by using SHOW GRANTS command. The syntax is as follows: SHOW GRANTS FOR user;
28 WAWASAN OPEN UNIVERSITY TCC 242/05 Web Database Application
For example, to view all the privileges granted to johndoe@localhost and marydoe@localhost you will type: SHOW GRANTS FOR johndoe@localhost; SHOW GRANTS FOR marydoe@localhost;
Figure 4.12 Viewing all the privileges granted to johndoe@localhost and marydoe@localhost
You may also view the privileges of a currently logged-in user by using the CURRENT_ USER() command as follows: SHOW GRANTS FOR CURRENT_USER();
Managing account passwords During user account creation, you have the option to assign or not assign a password to the user account. If you are the administrator creating a new user account, you would expect the default password that you generated to be eventually overwritten. You may assign or change a password for an existing account by using the SET PASSWORD statement. The syntax is as follows: SET PASSWORD [FOR user] = { PASSWORD(‘some password’) | ‘encrypted password’ };
To change the password for marydoe@localhost to wawasan2: SET PASSWORD FOR marydoe@localhost = PASSWORD(‘wawasan2’);
UNIT 4 29 Working with MySQL and PHP
You may also use SET PASSWORD to change a currently logged-in user’s password by removing the FOR clause: SET PASSWORD = PASSWORD(‘wawasan2’);
Note that SET PASSWORD may be recorded in server logs or in a history file such as ‘~/.mysql_history’, which means that plain text passwords may be read by anyone having read access to that information (MySQL 5.5 Reference Manual 2011). To avoid sending plain text passwords to the server logs, you may directly specify the hash value that PASSWORD() will return for your password. You can use the SELECT PASSWORD(str) statement to perform a one-way (irreversible) encryption. For example, to know the hash value for wawasan2, you can use the following statement: SELECT PASSWORD(‘wawasan2’);
This statement will return you the hash value: *9CEA96BAEC56D8CB17C813A152A918DC23EB100.
Next, you can use this hash value to assign the hash value of your password directly by using the SET PASSWORD statement without the PASSWORD() function clause. To set the password for marydoe@localhost using the hash value of wawasan2: SET PASSWORD FOR marydoe@localhost = ‘*9CEA96BAEC56D8CB17C813A152A918DC23EB100’;
Notice the difference between using the SET PASSWORD command with and without the PASSWORD() function clause. Similarly, you can assign the hash value when you use the CREATE USER or GRANT statements by specifying the hash value preceded by the keyword PASSWORD: CREATE USER marydoe@localhost IDENTIFIED BY PASSWORD ‘*90E462C37378CED12064BB3388827D2BA3A9B689’;
(Equivalent to: CREATE USER marydoe@localhost IDENTIFIED BY ‘wawasan2’;)
GRANT SELECT, INSERT ON human_resource.* TO marydoe@localhost IDENTIFIED BY PASSWORD ‘*90E462C37378CED12064BB3388827D2BA3A9B689’;
(Equivalent to: GRANT SELECT, INSERT ON human_resource.* TO marydoe@ localhost IDENTIFIED BY ‘wawasan2’)
30 WAWASAN OPEN UNIVERSITY TCC 242/05 Web Database Application
Web Reference The following web reference presents a comprehensive view of MySQL account management statements: “Account Management Statements”, http://dev.mysql.com/doc/ refman/5.5/en/account-management-sql.html
Activity 4.3 1. The MySQL Access Privilege System is based on the concepts of ___________ and ___________.
2. Write an SQL statement to create a user called william at localhost who has the password p@ssw0rd.
3. Write an SQL statement to rename the user william at localhost to bill at localhost.
4. You may remove privileges granted to a user by using the GRANT command. True / False?
5. Can you explain the result of the execution of the following SQL statement? GRANT SELECT ON army.* TO kenny@localhost IDENTIFIED BY ‘p@ssw0rd’;
6. Write an SQL statement to view the privileges of a currently logged-in user.
UNIT 4 31 Working with MySQL and PHP
Summary In this section, you learnt how to create a database in MySQL server via MySQL monitor. To create a database, you use the CREATE DATABASE command. After the database is created, you can set it as your default working database by using the USE command. You may remove a database by using the DROP command. You also learnt how to create tables using schemas. You can create a table by using the CREATE TABLE statement. You can use the SHOW TABLES command or the DESCRIBE command to view the tables in a database. To remove a table, use the DROP TABLE command, and to change the table structure use the ALTER TABLE statement. The MySQL Access Privilege System protects your data from unauthorised access or modification. You can create and manage a MySQL user account by using the CREATE USER, RENAME USER and DROP USER statements. You may grant privileges to a user by using the GRANT statement and remove privileges by using the REVOKE statement. You may set a password for an existing account by using the SET PASSWORD statement. In the next section, you will learn how to connect to MySQL server using PHP.
32 WAWASAN OPEN UNIVERSITY TCC 242/05 Web Database Application
Self-test 4.2 1. By using an SQL statement, create a database called stock_ market and set it as your current working database.
2. Write an SQL statement to create the table shown below (without inserting the records). Take ID as the primary key and put it in auto_increment mode. Allow the Symbol and StockName fields to have maximum lengths of 10 and 20 respectively. The Price, Changes and PercentRate fields will have maximum lengths of 10, 8 and 6 respectively, and each will have 2 decimal places (float type fields). All fields must not be null. STOCK_MARKET ID
Symbol
StockName
1
IXIC
Nasdaq
2
N225
3
HSI
Price
Changes
PercentRate
2,741.83
−29.68
−1.07
Nikkei 225
9,555.26
−164.44
−1.69
Hang Seng
23,976.37
−326.70
−1.34
3. Based on question 2 above, write an SQL statement to insert a new column called Region (as shown below), between the ID field and the Symbol field. Allow Region to have a maximum length of 15. This field can accept null values. Region US Asia Asia
4. After the SQL statements shown below are executed, which user account(s) will still be in the database? CREATE USER joseph@localhost IDENTIFIED BY ‘p@ssw0rd’; CREATE USER patrick@localhost IDENTIFIED BY ‘p@ssw0rd’; CREATE USER alex@localhost IDENTIFIED BY ‘p@ssw0rd’; RENAME USER patrick@localhost TO patrick2@localhost; DROP USER joseph@localhost, alex@localhost;
UNIT 4 33 Working with MySQL and PHP
5. Write SQL statements to grant all user rights in a database called accounting to an existing user, leeann@localhost, and grant read-only permission to a new user, maria@localhost, who has the password p@ssw0rd.
6. Based on the database in question 5, write SQL statements to remove insertion and updating rights from leeann@localhost and to display the privileges granted to both leeann@localhost and maria@localhost.
7. As a root user, how would you change the password for an existing user named leeann@localhost to 12345678 using a MySQL statement? In addition, use an SQL statement to display the hash value for 12345678.
8. You are given the following password and its hash value: +-------------------------------------------+ | PASSWORD(‘p@ssw0rd’)
What is the difference between the two SQL statements shown below? a. CREATE USER doe@localhost IDENTIFIED BY ‘p@ssw0rd’;
b. CREATE USER doe@localhost IDENTIFIED BY PASSWORD ‘*D7E39C3AF517EC9EF7086223B036E0B4F22821F8’;
9. Which of the following statements is an invalid way to set a password? A. CREATE USER william@localhost IDENTIFIED BY ‘p@ssw0rd’;
B. RENAME USER bill@localhost TO william@localhost IDENTIFIED BY ‘p@ssw0rd’;
C. SET PASSWORD FOR william@localhost = PASSWORD (‘p@ssw0rd’);
D. REVOKE ALL ON database.* FROM william@localhost IDENTIFIED BY ‘p@ssw0rd’;
34 WAWASAN OPEN UNIVERSITY TCC 242/05 Web Database Application
Suggested answers to activities
Feedback Activity 4.2 1. CREATE DATABASE 2. C 3. B 4. D 5. True 6. CREATE TABLE PERIODIC ( Symbol VARCHAR(5) NOT NULL, ElementName VARCHAR(20) NOT NULL, AtomicNumber INT NOT NULL, PRIMARY KEY (AtomicNumber));
Activity 4.3 1. authentication and authorisation 2. CREATE USER william@localhost IDENTIFIED BY ‘p@ssw0rd’;
3. RENAME USER william@localhost TO bill@localhost; 4. False 5. All tables in the army database will provide read-only privilege to the user account called kenny@localhost which has the password p@ssw0rd. 6. SHOW GRANTS FOR CURRENT_USER();
UNIT 4 35 Working with MySQL and PHP
4.3 The Bridge Connecting MySQL and PHP Objectives By the end of this section, you should be able to: 1. Describe the process of connecting to MySQL server with PHP. 2. Describe the PHP syntax used in querying databases. 3. Use PHP to implement the insertion, selection, modification and deletion of records in MySQL databases. 4. Install and use the web-based MySQL administration tool.
Introduction MySQL has been supported by PHP since its early versions. These two prominent technologies have been used together to create powerful, dynamic databasedriven web applications. You will be using MySQL Improved or mysqli, which comes with the updated MySQL extension in PHP 5. The mysqli extension offers all of the functionality of its predecessor mysql, in addition to some new features. You will be introduced to how the mysqli extension is used to connect to the database server, and to run queries to get data and perform modification tasks. You will start by learning how to connect to MySQL server with PHP script.
Connecting to MySQL server To connect to MySQL server, you will need to use the host name, user name and password connection variables. In this section, you will reuse the user account that you created in the previous section. It has the following connection variables: Host name
User name
Password
localhost
johndoe
wawasan
Figure 4.13 Connection variables
36 WAWASAN OPEN UNIVERSITY TCC 242/05 Web Database Application
You will use the PHP mysqli_connect function to create a connection command. The connection command will open a new connection to MySQL server. The general syntax of the command is as follows: mysqli_connect([string $host [, string $username [, string $passwd [, string $dbname [, int $port, [string $socket]]]]]])
You will supply four parameters to this function: the server host name, the user name, the user password and the name of the database. Since you are setting up on the localhost server, your server host name is localhost. If you are running a web server on one system and MySQL on another system, you can replace localhost with the IP address or domain name of the system MySQL resides on. The mysqli_connect function returns a connection object that you can use to communicate with the database. In keeping with the object-oriented paradigm, the new mysqli extension is encapsulated into a class. As a result, you need to first instantiate the mysqli class by using the new keyword. You will store the connection object in a variable called $mysqli: $mysqli = new mysqli(“localhost”, “johndoe”, “wawasan”, “human_ resource”);
Here, you are trying to establish a connection with the MySQL server. If you want to be notified of an error so that you can stop your program from executing further, you can retrieve error codes and error messages using the following predefined syntax of the mysqli class: class mysqli { int connect_errno string connect_error }
The following PHP code attempts to connect to MySQL server and retrieves error codes and messages if an error occurs during the connection attempt: $mysqli = new mysqli(“localhost”, “johndoe”, “wawasan”, “human_ resource”); if ($mysqli->connect_errno) { printf(“Unable to connect to the database: %s”, $mysqli>connect_error); exit(); }
UNIT 4 37 Working with MySQL and PHP
For example, if an incorrect password is provided, you will see the following message and the program will be terminated by the exit() function: Unable to connect to the database: Access denied for user ‘johndoe’@’localhost’ (using password: YES)
Note: Invoking fields You may have seen the operator “ - > ” in the object-oriented context. This operator is used to invoke fields. This is different from the variables that are prefixed with a dollar sign. An object is correlated with its specific field’s value and is referenced like this: $object -> field
Since the mysqli class includes the fields connect_errno and connect_error, that is how you get the referred fields below under the object $mysqli: $mysqli->connect_errno $mysqli->connect_error
After you have finished interacting with the database, it is always good practice to close the connection at the end of the script. To close the MySQL connection, you will use the close() function as shown below: $mysqli->close();
Querying a database We can use the PHP query() method to query a database. Queries involve data insertion, retrieval, update and deletion. The query() method’s syntax is as follows: class mysqli { mixed query(string query [, int resultmode]) }
The optional resultmode parameter accepts two values: 1. MYSQLI_STORE_RESULT: The default setting that returns the result as a buffered set and ensures that all data are available for retrieval. 2. MYSQLI_USE_RESULT: Returns the result as an unbuffered set; the data will be retrieved as needed from the server.
38 WAWASAN OPEN UNIVERSITY TCC 242/05 Web Database Application
After you have set up the query (it could be an insertion, retrieval, update or deletion), you need to send the query to MySQL by running the PHP statement below and assigning it to the $result variable. By default, you will use the MYSQLI_STORE_RESULT setting to get the full buffered set since you do not have a large resulting data set: $result = $mysqli->query($query, MYSQLI_STORE_RESULT);
Just like when you establish a connection with MySQL server, you can be notified if an error happens during the execution of a query so that you can stop your program from executing further. For successful queries, $mysqli->query will return the resulting object, whereas for a failed query it will return FALSE. Since we know that $mysqli->query or $result returns FALSE on failure, we can use the following statement to catch the error: if(!$result) { echo($mysqli->error); exit(); }
Inserting data into a database You have created a database and the table structures. You have also established a connection to MySQL server. However, at this stage your database is still empty since no records have been inserted yet. You will now learn how to store data into the database that you have created. You can insert data into a database by using the SQL INSERT command. The syntax is as follows: INSERT [INTO] table [(column1, column2, column3, …)] VALUES (value1, value2, value3,…);
You will now insert some data into the human_resource database’s employees table by using the SQL INSERT command and the PHP code shown below: $query = “INSERT INTO employees VALUES (168, ‘John Doe’, ‘Accounting’, ‘US’)”; $result = $mysqli->query($query, MYSQLI_STORE_RESULT); if(!$result) { echo($mysqli->error); exit(); }
UNIT 4 39 Working with MySQL and PHP
Notice that the string value that you inserted is enclosed by a pair of quotes but for numbers or dates, you do not need them. In this example, you filled up the table columns by following the order given in the schema below: employees (EmployeeID, Name, Department, Location)
If you want to put data into specific columns, you can list the columns and their corresponding values. For example, to store only EmployeeID and Name: $query = “INSERT INTO employees (EmployeeID, Name) VALUES (168, ‘John Doe’)”;
or $query = “INSERT INTO employees SET EmployeeID = 168, Name = ‘John Doe’”;
Note that running the INSERT command above may cause an error to occur because in the existing employees table you indicated that the Department and Location fields are not to be NULL. To run the command successfully, you need to alter these fields to accept NULL values. You can also insert multiple records into a table at the same time. Each row is placed in its own set of brackets and is separated by a comma. You can place all the INSERT statements into an SQL file just like the one you created in the previous section for the CREATE statements. For convenience, we have put together an SQL INSERT script that populates the database. This script can be found in the file ‘hr_tbls.sql’, which is given in the Appendix. This SQL script is used in the same way as was described in the previous section.
Retrieving data from a database To retrieve data from a database, you can use the SQL SELECT command. The general syntax of this command is as follows: SELECT items FROM tables [WHERE condition] [GROUP BY group_type] [HAVING where_definition] [ORDER BY order_type];
The following statements perform a simple query that retrieves data from the Name and Department fields in the employees table: $query = “SELECT Name, Department FROM employees”; $result = $mysqli->query($query, MYSQLI_STORE_RESULT);
40 WAWASAN OPEN UNIVERSITY TCC 242/05 Web Database Application
You can iterate through the result set by using a while loop with the list and fetch_row() functions and print out the results with the echo function: while(list($name, $dept) = $result->fetch_row()) echo “$name | $dept ”;
Output: John Doe | Accounting Shion Lee | Engineering Alice Carol | Marketing
The list() function was introduced in Unit 3. If you recall, the list() function assigns variables as if they were an array. It is used to assign a list of variables ($name, $dept) in one operation. The mysqli extension offers the ability to manage result sets using indexed arrays by using the fetch_row() method. The resulting output displays the two columns Name and Department. If you want to retrieve all the columns and rows from the employees table, you can use the wildcard operator, *, which will match all columns and rows from the employees table: $query = “SELECT * FROM employees”; $result = $mysqli->query($query, MYSQLI_STORE_RESULT); while(list($id, $name, $dept, $location) = $result->fetch_row()) echo “$id | $name | $dept | $location ”;
Output: 168 | John Doe | Accounting | US 251 | Shion Lee | Engineering | Malaysia 787 | Alice Carol | Marketing | US
To quickly test an array result, remember that you can use the print_r() function within the HTML
tag: while ($myrow = $result->fetch_row()) { echo “
”; print_r($myrow); echo “
”; }
UNIT 4 41 Working with MySQL and PHP
Output: Array ( [0] => 168 [1] => John Doe [2] => Accounting [3] => US ) …
To access a specific record in a table, you need to specify some criteria by using the WHERE clause. For example, to retrieve the record of an employee with employeeID = 168: $query = “SELECT * FROM employees WHERE employeeID = 168”;
Output: 168 | John Doe | Accounting | US
You may use the wildcard character % and the LIKE operator to search for partial matches in your database. For example, to retrieve the record of an employee who has the name “Lee”, you can use the following statement: $query = “SELECT * FROM employees WHERE name LIKE ‘%Lee%’”;
Output: 251 | Shion Lee | Engineering | Malaysia
If you want to display query results in a particular order, you can use the ORDER BY clause. For example, to retrieve the records of employees in alphabetical order by Name: $query = “SELECT * FROM employees ORDER BY Name”;
Output: 787 | Alice Carol | Marketing | US 168 | John Doe | Accounting | US 251 | Shion Lee | Engineering | Malaysia
42 WAWASAN OPEN UNIVERSITY TCC 242/05 Web Database Application
To do the above in reverse order, use the DESC (descending) keyword: query = “SELECT * FROM employees ORDER BY Name DESC”;
You may also perform simple calculations on the data such as AVG (average), COUNT (count items), MIN (minimum value), MAX (maximum value) and SUM (sum of values). For example, to get the average bonus amount from the bonus_pay table: $query = “SELECT AVG(Amount) FROM bonus_pay”;
Output: 2075.00
To get more detailed information, we can group data by using the GROUP BY clause. For example, to get the bonus amount for each employee from the bonus_pay table: $query = “SELECT EmployeeId, SUM(Amount) FROM bonus_pay GROUP BY EmployeeId”;
Output: 168 | 5500.00 251 | 800.00 787 | 2000.00
Updating records in a database You will inevitably have to update records in a database. For example, you may need to update the cost of training. The UPDATE statement can be used to modify data in a record. The general syntax of this statement is as follows: UPDATE tablename SET column1=expression1, column2=expression2,… [WHERE condition]
For example, if you want to increase the training cost stored in the training table by 20%, you can execute the following statement: $query = “UPDATE training SET Cost = Cost * 1.2”;
UNIT 4 43 Working with MySQL and PHP
If you just want to change a particular record, you can attach the WHERE clause to the UPDATE statement. For example, if Alice (EmployeeID 787) has been transferred to the Sales department, you can update the employees table with the following statement: $query = “UPDATE employees SET Department = ‘Sales’ WHERE EmployeeID = 787”;
Deleting records from a database To delete a record from a database, you will use the DELETE statement: DELETE FROM table [WHERE condition]
For example, to remove all records from the employee_training table, you will use the following statement: $query = “DELETE FROM employee_training”;
If you just want to remove a particular record from the employee_training table, you will attach the WHERE clause: $query = “DELETE FROM employee_training WHERE EmployeeID = 787”;
Activity 4.4 1. In keeping with the object-oriented paradigm, the mysql extension is encapsulated into a class. As a result, we need to first instantiate the mysql class using the new keyword. True / False?
2. Consider the following information: Host name
User name
Password
Database
localhost
paul_dubois
p@ssw0rd
epub
Using the information in the table, write a PHP connection string to MySQL server using the mysqli extension.
44 WAWASAN OPEN UNIVERSITY TCC 242/05 Web Database Application
3. What is the purpose of the following command? $mysqli->close();
4. We use the query() method to send a query to a database. Queries involve the __________ of data. A. insertion, retrieval, updating and deletion B. primary key and foreign key C. tables, attributes, records, values, keys, schemas and relationships D. one-to-one, one-to-many and many-to-many relationships
5. Which of the following is a valid data insertion query? A. “INSERT INTO books VALUES (123, ‘Jonathan Stephens’, 39.95)”;
B. “INSERT INTO books (Author, BookID, Price) VALUES (‘Jonathan Stephens’, 123, 39.95)”
C. “INSERT INTO books SET Price = 39.95, Author = ‘Jonathan Stephens’, BookID = 123”
D. All of the above
6. You can retrieve all the columns and rows from a database table by using the wildcard operator, *, which will match all columns and rows. True / False?
7. What is the possible result of the following query? $query = “UPDATE product SET Price = Price * 0.94”;
A. B. C. D.
The product price will be increased by 94% The product price will have a discount of 94% The product price will be increased by 6% The product price will have a discount of 6%
UNIT 4 45 Working with MySQL and PHP
Using phpMyAdmin When your database grows bigger, you will have more complex transactions, inter-joined-tables and complicated entity-relationship diagrams. When that happens, managing databases from the MySQL monitor (command-line) alone will no longer be adequate. Fortunately, you have a GUI-based database management tool called phpMyAdmin to assist you. The phpMyAdmin tool is a web-based MySQL administration tool written in PHP that is recognised by web hosting providers around the world. It is a stable, feature-rich and open-source tool released under the GNU General Public License. It is viewed in a browser, which means that you can easily manage your MySQL database from a remote location if you have an Internet connection. Administrators can perform almost all the operations that MySQL database server offers using phpMyAdmin. Do the following to install phpMyAdmin in Linux Ubuntu 10.10: 1. Run the Terminal.
2. Enter the following: sudo apt-get install libapache2-mod-auth-mysql phpmyadmin
3. You will then be shown the configuration applet. Select to proceed with dbconfig-common.
Figure 4.14 Configuring phpMyAdmin
46 WAWASAN OPEN UNIVERSITY TCC 242/05 Web Database Application
4. Next, you will be asked to enter a password for the MySQL root account. If you have followed our LAMP installation steps, use wawasan as the root account password.
Figure 4.15 Enter the password for the MySQL root account
5. Next, you will be asked to enter a password for the phpMyAdmin account. Enter wawasan for the phpMyAdmin account password too. Confirm your password if the confirmation screen is displayed. If you are asked to choose a web server, hit the to select apache2.
Figure 4.16 Select apache2 as the web server
UNIT 4 47 Working with MySQL and PHP
6. You should get the following screen upon successful completion of the installation.
Figure 4.17 Successful completion of the installation
7. Open a web browser and enter http://localhost/phpmyadmin/index.php to run phpMyAdmin. The login screen shown in Figure 4.18 will be displayed.
Figure 4.18 phpMyAdmin login screen
48 WAWASAN OPEN UNIVERSITY TCC 242/05 Web Database Application
8. You can login with the username root and the password wawasan. Congratulations, you have successfully installed phpMyAdmin. You can view the human_resource database and the tables that you have created and browse the records that you have inserted using phpMyAdmin.
Figure 4.19 Using phpMyAdmin to view database tables and to browse records in phpMyAdmin
To install phpMyAdmin in the Windows system: 1. Visit the phpMyAdmin homepage to download the file ‘phpMyAdmin3.x.x-english.zip’.
2. Unzip the package into the Apache2 ‘htdocs’ directory (e.g., C:\Program Files\Apache Software Foundation\Apache2.2\htdocs\phpmyadmin).
3. Create a file called ‘config.inc.php’ in the ‘phpmyadmin’ directory. Enter the following PHP code into ‘config.inc.php’ by using a text editor.
4. Save and then close the file.
UNIT 4 49 Working with MySQL and PHP
5. Open a web browser and enter http://localhost/phpmyadmin/index.php.
6. Login with the username root and the password wawasan. Congratulations, you have successfully installed phpMyAdmin on Windows.
Web Reference To learn more about phpMyAdmin, please visit: “phpMyAdmin homepage”, http://www.phpmyadmin.net
Summary This section discussed the process of connecting to MySQL server with PHP scripts. You can use the PHP mysqli_connect function to create a connection command. To send a query to a database, you can use the query() method. You can insert data into a database by using the SQL INSERT command. To retrieve data from a database, you can use the SQL SELECT command. The UPDATE statement will be used to make changes to your existing data. To delete a record from a database, you will use the DELETE statement. When your database grows bigger, managing databases from the MySQL monitor alone will no longer be adequate. Fortunately, you have a GUI-based database management tool called phpMyAdmin to assist you. The process of installing this tool on both the Linux Ubuntu and Windows platforms was described. To summarise, you should now be familiar with: 1. Querying and inserting data into a database. 2. Retrieving, updating and deleting records from a database. 3. Installing phpMyAdmin.
50 WAWASAN OPEN UNIVERSITY TCC 242/05 Web Database Application
Self-test 4.3 1. Consider the following information: Host name
User name
Password
Database
localhost
stefan_hinz
p@ssw0rd
docbook
With the information given in the table, write a PHP script to connect to MySQL server using the mysqli extension. If the connection fails, display the error codes and error messages, and then terminate the program.
2. Write PHP code to insert all three records shown in the table below into a MySQL table called PERIODIC . Assume that the table already exists and has the schema: PERIODIC (Symbol, ElementName, AtomicNumber). You do not need to create the table. PERIODIC Symbol
ElementName
AtomicNumber
Li
Lithium
3
Ti
Titanium
22
Pb
Lead
82
3. Consider the following schema for a database called HOTEL: hotel (HotelID, Name, City) room (RoomID, HotelID, Type, Price) guest (GuestID, Fullname, Address) booking(BookingID, HotelID, GuestID, DateFrom, DateTo, RoomID)
Write PHP code to execute the following queries: a. List the full details of all hotels. b. List the Name and City of all hotels in Georgetown. c. List the Fullname and Address of all guests staying in Georgetown, alphabetically ordered by Fullname. d. List all superior rooms with a price below $100 per night, in descending order of Price. e. List the bookings for which no DateTo has been specified.
UNIT 4 51 Working with MySQL and PHP
4. Based on the HOTEL schema in question 3, write PHP code for the following queries: a. How many hotels are there? b. What is the average price of a room? c. List the total number of rooms according to the room type. d. List the average price of rooms according to the room type.
5. Based on the HOTEL schema in question 3, write PHP code for the following queries: a. Increase the price of all rooms by 10%. b. Discount the price of superior rooms by 20%. c. Delete the guest record that has GuestID = 618. d. Delete all records from the booking table.
3. The command is used to close the MySQL connection. It is good practice to close the connection at the end of a script. 4. A 5. D 6. True 7. D
52 WAWASAN OPEN UNIVERSITY TCC 242/05 Web Database Application
UNIT 4 53 Working with MySQL and PHP
Summary of Unit 4 Summary In this unit, you learnt about the concepts of relational database design. The key principles of database design, such as object modelling, avoiding redundant data and empty attributes, atomic column values, unique key selection, and creating questions for a database, were briefly explored. Additionally, you learnt that data in relational databases are organised into tables, attributes, records, values, keys, schemas and relationships. Next, you were taught how to manage databases. You were given descriptions of the various types of MySQL database library functions that are used to retrieve and manipulate data. You were also shown how to set up and manage new accounts for database users. Finally, you learnt how to connect to MySQL server with PHP. You were shown PHP statements that are used to insert, select, modify and delete records in a MySQL database. In the next unit, which is the final unit of this course, you will study the principles of using sessions and cookies for saving state information. You will then be able to build a complete web database application.
54 WAWASAN OPEN UNIVERSITY TCC 242/05 Web Database Application
UNIT 4 55 Working with MySQL and PHP
Unit Practice Exercises 1. In this exercise, you will create a simple product page and a simple shopping cart. First, using SQL scripts, you will create a database called SHOPPING that has the tables shown below. Store all your code in a file named ‘var/ www/Unit4/create_table.sql’ (or ‘\htdocs\Unit4\create_ table.sql’ in Windows). Fields should not have null values unless otherwise indicated. CUSTOMER Field
Type
Description
CustomerID
INT
Primary key, auto_increment, starts from 100
Fullname
VARCHAR(50)
Customer’s full name
Email
VARCHAR(50)
Customer’s email address
Password
CHAR(41)
Customer’s hashed password
Address
TEXT
Customer’s shipping address. Can be a null value.
PRODUCT Field
Type
Description
ProductID
CHAR(5)
Primary key, unique product ID
Name
VARCHAR(50)
Product title
Description
TEXT
Product description. Can be a null value.
Price
DEC(6,2)
Price of the product up to 999.99
ORDERS Field
Type
Description
OrderID
INT
Primary key, auto_increment, starts from 1000
CustomerID
INT
ID of customer who placed the order
Date
DATE
Order date
Total
DEC(8,2)
Total amount up to 99999.99
PRODUCT_ORDERS Field
Type
Description
OrderID
INT
Foreign key from ORDER (Set as primary key)
ProductID
CHAR(5)
Foreign key from PRODUCT (Set as primary key)
Quantity
INT
Quantity ordered
56 WAWASAN OPEN UNIVERSITY TCC 242/05 Web Database Application
SHOPPING_CART Field
Type
Description
CartID
INT
Primary key, auto_increment, starts from 0
SessionID
CHAR(50)
Session ID for the current session. Can be a null value for now since you have yet to learn about sessions.
ProductID
CHAR(5)
Foreign key from PRODUCT
Quantity
INT
Quantity ordered
2. The SHOPPING_CART table is a temporary item holder for the customer who is shopping online. After the customer has checked-out, the items from SHOPPING_CART will be moved to PRODUCT_ORDERS for permanent storage. Insert the following product information into the PRODUCT table. Store your code into a file called ‘/var/www/Unit4/insert_product.sql’ (or ‘\htdocs\Unit4\ insert_product.sql’ in Windows). PRODUCT ProductID
Name
Description
Price
22103
Tribute Blend
Sun-dried beans from Ethiopia, inspired by our collaboration with Ethiopian farmers.
13.95
97902
Pike Place Roast
The smoother finish and soft acidity are attributed to a proprietary blend of high-altitude arabica beans.
9.95
12948
French Roast
Blunt, smoky flavours are the objective in creating this, our darkest roasted coffee.
10.95
12983
Sumatra
The concentrated spicy, herbal notes and earthy aroma are the telltale signatures of this wellloved coffee.
3. Load ‘create_table.sql’ from question 1 and ‘insert_product.sql’ from question 2 into MySQL server using your root privilege. Create a PHP page to display all products from the PRODUCT table. Store it in the ‘/var/www/Unit4’ directory (or ‘\htdocs\Unit4’ in Windows) and name it ‘MySite13.php’. The description of the page is as follows: Object Title
Markup/Instruction …
Display products in a table
Create a two-column table. The left column will display ProductID and Name. The right column will display all fields from the PRODUCT table and a Quantity text box together with an “Add to cart” button. Besides the “Add to cart button”, add a hidden field called ‘prodID’ to store the value of ProductID. The form tag should link to ‘MySite14.php’.
… …
You should obtain a page like the one shown in Figure 4.20.
Figure 4.20 Displaying all products from the PRODUCT table
58 WAWASAN OPEN UNIVERSITY TCC 242/05 Web Database Application
4. Next, you will create a shopping cart page in the ‘/var/www/Unit4’ directory (or ‘\htdocs\Unit4’ in Windows) and name it ‘MySite14.php’. In ‘MySite14.php’, you are going to store Quantity and ProductID in the SHOPPING_CART table. Based on the ProductID in SHOPPING_CART, you will display all product information from the PRODUCT table on the shopping cart page. Show the total price for each item ordered and the total order amount. Provide a link to return to ‘MySite13.php’ and a “Checkout” button. Object Title
Markup/Instruction …
Store the Quantity and ProductID in the SHOPPING_ CART table
Retrieve the qty and prodID from MySite13. php.
$qty =$_POST[‘qty’];
Display all product information from the PRODUCT table on the shopping cart page
Use a while loop to get the ProductID values from the SHOPPING_ CART table and another nested while loop to get all product information from the PRODUC T table.
while(…FROM SHOPPING_
Show the total price of each item ordered and the total order amount.
Show the Quantity as an input text field and create a new column called Total (Price × Quantity). Accumulate the overall Order Total during looping and display it below the shopping cart table. Store the $OrderTotal in a hidden field in order to pass it to the checkout page.
You should obtain a page like the one shown in Figure 4.21.
UNIT 4 59 Working with MySQL and PHP
Figure 4.21 Simple shopping cart web page
5. When customers click on the “Checkout” button that you created in question 4, a confirmation page showing customer billing and shipping information will be displayed. Create a PHP file in the ‘/var/www/Unit4’ directory (or ‘\htdocs\Unit4’ in Windows) and name it ‘MySite15.php’. You will retrieve the dummy customer information that was stored in the CUSTOMER table earlier. Object Title
Markup/Instruction …
Display customer details in a table
Create a two-column table. The left column will display field labels like Customer ID, Full Name, Email and Address. The right column will display all fields from the CUSTOMER table. Disable the CustomerID field so that no changes can be made to it. Add two hidden fields to store the $CustomerID and $OrderTotal values that were passed from the previous web page. Add a “Confirm” button as well. The form tag should link to ‘MySite16. php’.
… $OrderTotal = $_ POST[‘orderTotal’]; …
You should obtain a page like the one shown in Figure 4.22.
60 WAWASAN OPEN UNIVERSITY TCC 242/05 Web Database Application
Figure 4.22 Displaying customer details for confirmation
6. Lastly, you will create a confirmation page to show customer billing details and the items purchased. Create a PHP file in the ‘/var/www/Unit4’ directory (or ‘\htdocs\Unit4’ in Windows) and name it ‘MySite16. php’. You will insert the order into the ORDERS table, copy the items in the SHOPPING_CART table to the PRODUCT_ORDERS table, remove the items from SHOPPING_CART and show billing information and the items purchased. Object
Markup/Instruction
Value/Example
Title
…
My Site 16
Insert the order into the ORDERS table
Insert the order into the ORDERS table. CustomerID and Total can be obtained from the previous page by using the $_POST[] function. Let the OrderID auto generate by inserting a NULL. The OrderID can be obtained by invoking $mysqli->inser t_id. Set today’s date as the Date.
Copy the SHOPPING_CART items to the PRODUCT_ORDERS table
Retrieve ProductID and Quantity from SHOPPING_ CART and insert them into PRODUC T_ORDERS together with the OrderID.
$query = “SELECT … while(… { $query2 = “INSERT…
Remove the items from SHOPPING_ CART
Remove all records from the shopping cart.
“DELETE FROM…
UNIT 4 61 Working with MySQL and PHP
Show billing information
List customer details from the CUSTOMER table using the $custID that you used earlier.
Thank you for your order
Bill to:
Show the items purchased
Use a while loop to get the ProductID from the PRODUCT_ORDERS table and another nested while loop to get all product information from the PRODUCT table, neglecting t h e D e s c r i p t i o n . S h ow the Order Total from the $ O r d e r To t a l t h a t y o u obtained earlier. Create a link to return to the product page.
while(…FROM PRODUCT_ORDERS …) { while (…FROM PRODUCT…) … Back to Shopping
You should obtain a page like the one shown in Figure 4.23.
Figure 4.23 Displaying billing information and a summary of purchased items
62 WAWASAN OPEN UNIVERSITY TCC 242/05 Web Database Application
UNIT 4 63 Working with MySQL and PHP
Suggested Answers to Self-tests Feedback Self-test 4.1 1. An update anomaly is a situation where inconsistent data is created when a database is updated. The integrity of the data is violated and we no longer know which data item is correct and which is incorrect.
2. True
3. D
4. a. The design problem is in the CamelTypesFound column because it is nesting an entire table in one column. It does not follow the “single item single column” strategy. When you want the answer to questions like “How many types of Dromedary (T1) camels are found in Somalia?”, the database cannot count the matching TypeIDs. Each of the attributes will have to be analysed to see if it matches the TypeID inside. b. The problem is resolved if a new table called CAMELTYPE_ COUNTRIES is created as shown in the figure below. CAMELTYPE_COUNTRIES Code
TypeID
SOM
T1
SOM
T3
SOM
T5
SUD
T2
SUD
T4
SUD
T5
MAU
T1
MAU
T5
64 WAWASAN OPEN UNIVERSITY TCC 242/05 Web Database Application
5. a. The design problem is in the Donation column because chances of donations being received by each country may be small (no donations are recorded in the table). This will cause many empty attributes or null values to be present in the Donation column. This type of data model wastes storage and null values may cause problems when numerical functions like calculating the total are executed. Null values also create uncertainty as the question will arise whether the field is intentionally left empty or data has not been entered yet. b. To resolve the problem, you can create a new table called COUNTRIES_DONATION. This table only stores the code of countries that have received donations. The code of the countries that have not received any donation will not be stored to avoid storing null values. COUNTRIES_DONATION Code
Donation
Self-test 4.2 1. CREATE DATABASE stock_market; USE stock_market;
2. CREATE TABLE STOCK_MARKET ( ID INT NOT NULL PRIMARY KEY AUTO_INCREMENT, Symbol VARCHAR(10) NOT NULL, StockName VARCHAR(20) NOT NULL, Price FLOAT(10,2) NOT NULL, Changes FLOAT(8,2) NOT NULL, PercentRate FLOAT(6,2) NOT NULL );
3. ALTER TABLE STOCK_MARKET ADD COLUMN Region VARCHAR(15) NULL AFTER ID;
4. patrick2@localhost 5. GRANT ALL ON accounting.* TO leeann@localhost; GRANT SELECT ON accounting.* TO maria@localhost IDENTIFIED BY ‘p@ssw0rd’;
6. REVOKE INSERT, UPDATE ON accounting.* FROM leeann@ localhost; SHOW GRANTS FOR leeann@localhost; SHOW GRANTS FOR maria@localhost;
UNIT 4 65 Working with MySQL and PHP
7. SET PASSWORD FOR leeann@localhost = PASSWORD (‘12345678’); SELECT PASSWORD(‘12345678’); +-------------------------------------------+ | *84AAC12F54AB666ECFC2A83C676908C8BBC381B1 | +-------------------------------------------+
8. Both SQL statements will produce the same results. The first statement uses a plain text password and the second one uses a hash value. The second statement will not send a plain text password to the server logs. Therefore, only the hash value can be read by anyone who can view the server logs. 9. B
Self-test 4.3 1. $mysqli = new mysqli(“localhost”, “stefan_hinz”, “p@ssw0rd”, “docbook”); if ($mysqli->connect_errno) { printf(“%s: %s”, $mysqli->connect_errno, $mysqli>connect_error); }
3. a. $query = “SELECT * FROM hotel”; b. $query = “SELECT Name, City FROM hotel WHERE City = ‘Georgetown’”;
c. $query = “SELECT Fullname, Address FROM guest WHERE Address LIKE ‘%Georgetown%’ ORDER BY Fullname”;
d. $query = “SELECT * FROM room WHERE Type = ‘superior’ AND Price < 100 ORDER BY Price DESC”;
e. $query = “SELECT * FROM booking WHERE DateTo IS NULL”;
66 WAWASAN OPEN UNIVERSITY TCC 242/05 Web Database Application
4. a. $query = “SELECT COUNT(*) FROM hotel”; b. $query = “SELECT AVG(Price) FROM room”; c. $query = “SELECT Type, COUNT(Type) FROM room GROUP BY Type”;
d. $query = “SELECT Type, AVG(Price) FROM room GROUP BY Type”;
5. a. $query = “UPDATE room SET Price = Price * 1.1”; b. $query = “UPDATE room SET Price = Price * 0.8 WHERE Type = ‘superior’”;
c. $query = “DELETE FROM guest WHERE GuestID = 618”; d. $query = “DELETE FROM booking”;
6. The phpMyAdmin tool is a web-based MySQL administration tool written in PHP and it is recognised by web hosting providers around the world. It is a stable and feature-rich tool. It is viewed on a browser, which means that you can easily manage your MySQL database from a remote location that is connected to the Internet. Administrators can perform almost all operations that MySQL database server offers using phpMyAdmin.
UNIT 4 67 Working with MySQL and PHP
Suggested Answers to Unit Practice Exercises Feedback 1. create_table.sql /****** CREATE TABLE statements ******/ CREATE DATABASE SHOPPING; USE SHOPPING; /****** CREATE TABLE statements ******/ CREATE TABLE CUSTOMER ( CustomerID INT NOT NULL PRIMARY KEY AUTO_INCREMENT, Fullname VARCHAR(50) NOT NULL, Email VARCHAR(50) NOT NULL, Password CHAR(41) NOT NULL, Address TEXT ); CREATE TABLE PRODUCT ( ProductID INT NOT NULL PRIMARY KEY, Name VARCHAR(50) NOT NULL, Description TEXT, Price DEC(6,2) NOT NULL ); CREATE TABLE ORDERS ( OrderID INT NOT NULL PRIMARY KEY AUTO_INCREMENT, CustomerID INT NOT NULL, Date DATE NOT NULL, Total DEC(8,2) NOT NULL ); CREATE TABLE PRODUCT_ORDERS ( OrderID INT NOT NULL, ProductID INT NOT NULL, Quantity INT NOT NULL, PRIMARY KEY (OrderID, ProductID)); CREATE TABLE SHOPPING_CART ( CartID INT NOT NULL PRIMARY KEY AUTO_INCREMENT, SessionID CHAR(50), ProductID INT NOT NULL, Quantity INT NOT NULL ); /****** ALTER TABLE statement ******/ ALTER TABLE CUSTOMER AUTO_INCREMENT = 100; ALTER TABLE ORDERS AUTO_INCREMENT = 1000;
68 WAWASAN OPEN UNIVERSITY TCC 242/05 Web Database Application
2. insert_product.sql /****** INSERT statements ******/ INSERT INTO PRODUCT VALUES (22103, ‘Tribute Blend’, ‘Sun-dried beans from Ethiopia, inspired by our collaboration with Ethiopian farmers.’, 13.95), (97902, ‘Pike Place Roast’, ‘The smoother finish and soft acidity are attributed to a proprietary blend of high-altitude arabica beans.’, 9.95), (12948, ‘French Roast’, ‘Blunt, smoky flavours are the objective in creating this, our darkest roasted coffee.’, 10.95), (12983, ‘Sumatra’, ‘The concentrated spicy, herbal notes and earthy aroma are the telltale signatures of this well-loved coffee.’, 10.95); INSERT INTO CUSTOMER VALUES (NULL,
76 WAWASAN OPEN UNIVERSITY TCC 242/05 Web Database Application
UNIT 4 77 Working with MySQL and PHP
Appendix human_resource database hr_tbls.sql /****** CREATE TABLE statements ******/ CREATE TABLE employees ( EmployeeID INT NOT NULL PRIMARY KEY, Name VARCHAR(50) NOT NULL, Department VARCHAR(20) NOT NULL, Location VARCHAR(40) NOT NULL ); CREATE TABLE bonus_pay ( TransactionID INT NOT NULL PRIMARY KEY AUTO_INCREMENT, EmployeeID INT NOT NULL, Amount FLOAT(10,2) NOT NULL, Date DATE NOT NULL ); CREATE TABLE training ( TrainingID INT NOT NULL PRIMARY KEY AUTO_INCREMENT, Trainer VARCHAR(50) NOT NULL, CourseName VARCHAR(40) NOT NULL, Cost FLOAT(10,2) NOT NULL ); CREATE TABLE employee_training ( EmployeeID INT NOT NULL, TrainingID INT NOT NULL, PRIMARY KEY (EmployeeID, TrainingID)); CREATE TABLE training_notes ( TrainingID INT NOT NULL PRIMARY KEY, Note TEXT ); /****** ALTER TABLE statement ******/ ALTER TABLE training AUTO_INCREMENT = 80; /****** INSERT statements ******/ INSERT INTO employees VALUES (168, ‘John Doe’, ‘Accounting’, ‘US’), (787, ‘Alice Carol’, ‘Marketing’, ‘US’), (251, ‘Shion Lee’, ‘Engineering’, ‘Malaysia’); INSERT INTO bonus_pay VALUES (NULL, 168, 2500.00, ‘2011-06-01’), (NULL, 251, 800.00, ‘2011-06-01’), (NULL, 787, 2000.00, ‘2011-06-01’), (NULL, 168, 3000.00, ‘2011-07-01’);
78 WAWASAN OPEN UNIVERSITY TCC 242/05 Web Database Application
INSERT INTO training VALUES (NULL, ‘Josh Low’, ‘Database Administration’, 5000), (NULL, ‘Jason Tan’, ‘PHP Programming’, 5000), (NULL, ‘Mohandas’, ‘Project Management’, 8000); INSERT INTO employee_training VALUES (168, 83), (251, 81), (787, 81), (787, 83), (251, 82); INSERT INTO training_notes VALUES (168, ‘Lunch and hi tea are provided’);
UNIT 4 79 Working with MySQL and PHP
References Gilmore, W J (2008) Beginning PHP and MySQL, 3rd edn, Berkeley, CA: Apress. MySQL 5.5 Reference Manual (2011) Account management statements, http:// dev.mysql.com/doc/refman/5.5/en/account-management-sql.html (Accessed 28 Mar 2011). MySQL 5.5 Reference Manual (2011) Data definition statements, http://dev.mysql. com/doc/refman/5.5/en/sql-syntax-data-definition.html (Accessed 1 Apr 2011). PHP (2011) MySQLi Manual, http://php.net/manual/en/class.mysqli.php (Accessed 8 Apr 2011). Welling, L and Thomson, L (2008) PHP and MySQL Web Development, 4th edn, Upper Saddle River, NJ: Addison-Wesley Professional. Wikibooks (2010) Relational database design, http://en.wikibooks.org/wiki/Relational _Database_Design, used under a Creative Commons Attribution-ShareAlike licence: http://creativecommons.org/licenses/by-sa/3.0/
80 WAWASAN OPEN UNIVERSITY TCC 242/05 Web Database Application
UNIT 4 81 Working with MySQL and PHP
Glossary Attributes
Attributes or fields are columns in a database table. Each attribute has a unique name and can contain data of a certain type.
Data model
A data model is a set of rules and conventions that assist in transforming loose concepts in the real world into a finite model by means of reusable concepts.
Foreign key
A foreign key is a field in a database table that matches the primary key of another table.
Invoking fields
The operator -> in the object-oriented context is used to invoke fields. An object is correlated with its specific field’s value and is referenced like this: $object -> field.
Key
A key is an attribute identifier in a database table. It is a unique attribute that can guarantee that the information in a record will not be repeated.
Many-to-many relationship
In a many-to-many relationship, many records in a table are linked to many records in another table.
One-to-many relationship
In a one-to-many relationship, one record in a table is linked to many records in another table.
One-to-one relationship
In a one-to-one relationship, one record in a table is related to only one record in another table.
phpMyAdmin
This is a web-based MySQL administration tool.
Primary key
A primary key is a unique key in a table.
Queries
SQL queries involve data insertion, retrieval, updating and deletion.
Records
Records or tuples are rows in a table. Each record in a table is made up of a number of attributes or fields.
82 WAWASAN OPEN UNIVERSITY TCC 242/05 Web Database Application
Redundant data
Redundant data are duplicate data that will suffer from update anomalies.
Relational database
A relational database is a database that organises its data into collections of tables, rows, attributes and domains. Predicate logic is used to both describe the information contained in the database and to query it.
Schemas
A database schema is a set of table designs for a database. A schema shows a table’s attributes, and it indicates the primary key and any foreign key the table possesses. Typically, a schema will not include any actual data values.
Update anomalies
An update anomaly is a situation that causes inconsistent data to be created when a database is updated. When this happens, the integrity of the data is violated and it is no longer known if the data are correct.
UNIT 5 i Managing state information
Unit 5 TCC 242/05
Web Database Application
Managing State Information
ii WAWASAN OPEN UNIVERSITY TCC 242/05 Web Database Application
COURSE TEAM Course Team Coordinator: Mr. Ishan Sudeera Abeywardena Content Writer: Mr. Tang Chun Chong Instructional Designer: Mr. Yeap Hock Aun Academic Member: Mr. Chandarasageran Natarajan
COURSE COORDINATOR Mr. Ishan Sudeera Abeywardena
EXTERNAL COURSE ASSESSOR Dr. Sanjay Jasola, Gautam Buddha University
PRODUCTION In-house Editor: Mr. Yeap Hock Aun Graphic Designer: Ms. Leong Yin Ling
Wawasan Open University is Malaysia’s first private not-for-profit tertiary institution dedicated to adult learners. It is funded by the Wawasan Education Foundation, a tax-exempt entity established by the Malaysian People’s Movement Party (Gerakan) and supported by the Yeap Chor Ee Charitable and Endowment Trusts, other charities, corporations, members of the public and occasional grants from the Government of Malaysia. The course material development of the university is funded by Yeap Chor Ee Charitable and Endowment Trusts.
Wawasan Open University Jalan Sultan Ahmad Shah, 10050 Penang. Tel: (604) 2180333 Fax: (604) 2279214 Email: [email protected] Website: www.wou.edu.my
UNIT 5 iii Managing state information
Contents Unit 5 Managing State Information Unit overview
1
Unit objectives
1
5.1 Passing data between pages
3
Objectives
3
Introduction
3
Form elements
3
Query strings
6
Suggested answers to activities
11
5.2 Using cookies to save state information
13
Objectives
13
Introduction
13
What is a cookie?
13
Setting a cookie
14
Retrieving cookie data
15
Suggested answers to activity
19
5.3 Using sessions to save state information
21
Objectives
21
Introduction
21
Starting a session
21
Destroying a session
22
Setting and retrieving the session ID
22
iv WAWASAN OPEN UNIVERSITY TCC 242/05 Web Database Application
Creating and deleting session variables
24
Session management example
25
Suggested answers to activity
30
Summary of Unit 5
31
Course summary
33
Unit practice exercises
35
Suggested answers to self-tests
53
Suggested answers to unit practice exercises
57
References
77
Glossary
79
UNIT 5 1 Managing state information
Unit Overview n web programming, state information is information relating to the current status of a web page. Websites use the Hypertext Transfer Protocol (HTTP) to deliver information via the Web when users send requests to them. However, HTTP is a stateless protocol, which means it has no record of state information from previous web requests made by a user. Therefore, alternative methods need to be used to gather and store information when the user moves from one page to another on a website. For example, when a user moves from the product selection page to the payment page of an e-commerce site, the information provided by the user in the product selection page needs to be passed on to the payment page.
I
This unit discusses the techniques of using sessions and cookies in web database applications to manage state information. It will also discuss how to track the interactions between a user and a web application by using PHP. The first section discusses various techniques used to pass information such as data and variables between web pages. It explains how you can use hidden form fields and query strings. The second section describes how cookies are used. It shows you how to implement cookies with PHP. The third section discusses the use of sessions. It explains the methods of adding and reading sessions. It also covers the session management mechanism of a web database application.
Unit Objectives By the end of this unit, you should be able to: 1. Explain various techniques used to pass state information between web pages. 2. Create and use cookies to save state information. 3. Create and destroy sessions and manage session variables.
2 WAWASAN OPEN UNIVERSITY TCC 242/05 Web Database Application
UNIT 5 3 Managing state information
5.1 Passing Data between Web Pages Objectives By the end of this section, you should be able to: 1. Describe how to pass information between web pages. 2. Discuss the use of form elements for passing information between web pages. 3. Explain the use of URLs for passing information between web pages.
Introduction In web database applications, it is essential for developers to collect and pass information from one web page to another for processing. For example, if you host an e-commerce web application, you need to know the items selected and placed in the shopping cart by a user. You also need to keep track of whether the user is a returning customer or a new customer. In order to have a successful e-commerce web application, you need to handle the sign-in mechanism and the billing job as well. Because the Hypertext Transfer Protocol (HTTP) that defines the rules of transferring data via the World Wide Web is a stateless protocol, it is incapable of retaining the current state of a web page. This means that each time a server receives a request from a client; it processes the request, sends a response and then forgets about the request. A new request from the client is independent of any of the previous requests. That is why you need to use HTML form elements, URLs, cookies or sessions to save state information. In this section, you will learn how to pass variables using form elements and URLs.
Form elements Forms allow you to collect data from your visitors and send it to the server for storage, manipulation or to return some results to the visitors. PHP has various functions and techniques for handling input from HTML forms. You will use the special array variables $_GET[] and $_POST[] to handle form input.
4 WAWASAN OPEN UNIVERSITY TCC 242/05 Web Database Application
Before we can use these special array variables, let us first take a look at a typical HTML form. Here is a simple form used to login to a web portal: SIGN IN Email: Password:
The example shows a form set up with a method and an action attribute. The method defines how the data from the form is to be transferred to the handler page. The handler page is defined by the action attribute. The method can be either GET or POST. Let us first focus on the POST method. When POST is used, the data from a form will be put into a special server variable. To access it in PHP, you may use the builtin array variable, $_POST[]. The built-in array variable identifies the form values by referencing the name attribute of the input tags or any other name attribute of the form elements. To retrieve the POST variables, we can use the following method: $email = $_POST[‘email’]; $password = $_POST[‘password’]; echo “Email : $email \n Password : $password”;
If you enter [email protected] in the email field and wawasan in the password field, you will get the following output: Email : [email protected] Password : wawasan
When POST is used, the posted data is completely invisible to the user. In a typical login mechanism, the data obtained will be checked against the records in the database and verified before the user is allowed access. If you have some information that is not passed through any form field, you can create a hidden field to hold that information. A hidden field is similar to a text field except that it is not shown on the page. Hence, the visitor cannot type anything into the hidden field. This is a powerful feature that you can use to transfer data or variables from a form page into a handler page. A hidden field is represented by an INPUT element with type = hidden. You can place the hidden field anywhere you want as long as it is within the form tag and follows HTML rules.
UNIT 5 5 Managing state information
The following example shows how a hidden field is used to store a user’s preferred language so that the server will be informed of this preference when it handles the form: Email: Password:
Activity 5.1 1. PHP uses special array variables to handle the input from HTML forms. They are ___________ and ___________. A. B. C. D.
$_SESSION[]
and $_COOKIE[]
and $_POST[] and $_ACTION[] $_HIDDEN[] and $_INPUT[] $_GET[]
$_QUERY_STRING[]
2. Which of the following is a valid way of writing a hidden field in HTML forms? A. B. C. D.
input hidden=”type” hidden type=”input” input type=”hidden” type input=”hidden”
3. The PHP built-in array variables identify form values by referencing the __________ attribute of the __________ tags or any other name attribute of the form elements.
6 WAWASAN OPEN UNIVERSITY TCC 242/05 Web Database Application
Query strings A query string is a part of the Uniform Resource Locator (URL); it contains data to be passed to another page. The following is a typical URL containing a query string: http://web/page.php?{query_string}
The question mark (after http://web/page.php in the previous example) is used as a separator and is not part of the query string. The main use of query strings is to transfer the contents of a HTML form. We discussed the POST method in the previous subsection. If the GET method is used in the form, all control names and values in the form will be appended as a query string to the end of the handler page URL that is specified in the action attribute. For example: Email: Password:
To retrieve the GET variables, you can use the $_GET[] array: $email = $_GET[‘email’]; $password = $_GET[‘password’]; echo “Email : $email \n Password : $password”;
If you enter [email protected] in the email field and wawasan in the password field, the URL address of the handler page will become: [email protected]&password=wawasan
You can see that the GET method is not very appropriate for this example because you do not want the email address and password details to be displayed in the URL for security reasons. A better and more secure way would be to use the POST method when login details need to be sent to a web server.
Query string structure A query string is usually made up of a series of field-value pairs. A form that submitted input1, input2, input3 will have its corresponding value1, value2, value3 as shown in the following query string: input1=value1&input2=value2&input3=value3
UNIT 5 7 Managing state information
Notice that the field-value pairs are separated by the ampersand (‘&’) symbol. The field-value pair itself uses the equals sign (‘=’) as its relational operator. If you had created hidden fields in the form, these fields will be included in the query string when the form is submitted with the GET method. For example, the following hidden field,
will generate the query string …?Language=English&….
In a nutshell, form content is encoded as a query string when the form is submitted via the GET method. On the other hand, form content submitted via the POST method will be sent as the body of the request and is not displayed in the URL.
Web Reference The following web reference presents a comprehensive view of form elements and the processing of form data: “W3C Recommendation: 17 Forms in HTML documents”, http://www.w3.org/TR/REC-html40/interact/forms.html
Activity 5.2 1. What is a query string?
2. If the GET method is used in a form and if you enter Alice in the name field and Female in the gender field of the form, the URL of the target.php page will become: A. B. C. D.
3. What is the difference between submitting a HTML form using the POST method and the GET method? How do you retrieve field variables using each of these methods in PHP?
8 WAWASAN OPEN UNIVERSITY TCC 242/05 Web Database Application
Summary In this section, you looked at some mechanisms for passing data between web pages. You can use HTML forms to collect data from visitors to your website and then send the data to the server for processing. When POST is used, the data will be put into a special server variable. To access it in PHP, you may use the built-in array variable $_POST[]. The built-in array variable identifies the form values by referencing the name attribute of the input tags or any other name attribute of the form elements. A query string is a part of the Uniform Resource Locator (URL); it contains data to be passed to another page. If the GET method is used in the form, all the form elements will be appended as a query string to the end of the handler page URL. A query string is usually made up of a series of field-value pairs. You have learnt about form elements and the various PHP functions for passing data between pages. In the next section, you will look at cookies. Cookies are a powerful way of saving state information in PHP.
Self-test 5.1 1. The Hypertext Transfer Protocol (HTTP), which defines the rules of transferring data via the World Wide Web, is a stateful protocol; that is, it is capable of retaining a state between web pages. True / False?
2. You can create a __________ field to hold information that is not passed through any form field. This field is similar to a text field except that it does not appear on the web page.
UNIT 5 9 Managing state information
3. Consider the following HTML form elements:
To retrieve the field variables from ‘target.php’, you can use the following: A. B. C. D.
and $_POST[‘productID’] $_GET[‘quantity’] and $_GET[‘productID’] $_POST[‘text’] and $_POST[‘hidden’] $_GET[‘text’] and $_GET[‘hidden’]
$_POST[‘quantity’]
4. Write the PHP code to retrieve the following query string: http://server/web/handler.php?Country=Malaysia& Organizer=Disted+College&PhoneNumber=090-1234567
5. Write PHP code to retrieve and echo information from the following online form using the POST method.
10 WAWASAN OPEN UNIVERSITY TCC 242/05 Web Database Application
6. Consider the source code of the following HTML form and the details entered into the web form shown below the source code. Write the URL query string that will be generated by the GET method. Ordering information: Charge to my MasterCard Visa Credit card number: Expiration date (mm/yyyy): / Phone: E-mail address: (Necessary
if
you
want
us
to
send
confirmation message)
you
a
UNIT 5 11 Managing state information
Suggested answers to activities
Feedback Activity 5.1 1. B 2. C 3. name, input
Activity 5.2 1. A query string is a part of the Uniform Resource Locator (URL); it contains data to be passed to another page. A typical URL containing a query string is: http://web/page.php?{query_string}
2. D
3. The HTML form content is encoded as a query string when the form is submitted via the GET method. On the other hand, the form content submitted via the POST method will be sent as the body of the request, not in the URL. To retrieve field variables via the POST method in PHP, the built-in array variable $_POST[] will be used. To retrieve field variables via the GET method in PHP, the built-in array variable $_GET[] will be used.
12 WAWASAN OPEN UNIVERSITY TCC 242/05 Web Database Application
UNIT 5 13 Managing state information
5.2 Using Cookies to Save State Information Objectives By the end of this section, you should be able to: 1. Explain what a cookie is in PHP. 2. Implement cookies with PHP. 3. Describe how to retrieve cookie data.
Introduction Cookies are small text files that you can store on the computer of a visitor to your website. Cookies can be used to personalise a user’s experience of your website by presenting information in the same way during each visit or eliminating the need for repeated logins. Cookies can be used to automatically keep track of the browsing and buying habits of your visitors. Before we discuss how to implement cookies with PHP, let us get an idea of what a cookie is in the context of PHP.
What is a cookie? A cookie is a small text file that is placed on the computer of a visitor by a website. It contains a unique tracking number that enables websites to remember or recognise visitors. Hence, cookies can be used to manage user information. When a user visits your website, you can create a cookie to store information about the user, such as preferences and browsing habits. When the user executes a request for another page, your server retrieves the user’s information from the cookie and uses it, for example, to eliminate the login prompt or to personalise the page. A cookie can be used to store a session ID (SID). As the client navigates through your site, the SID is retrieved and used when necessary. Various items of data related to the SID will be furnished for use within the page. The SID will be explained in detail in the next section. As a cookie can remain on the user’s browser even after a session ends (after the web browser or computer is shut down), the cookie can be read during other sessions as well. In other words, the persistency of the user’s preferences is maintained even over long periods of time. Some cookies are set to expire after a certain period of time to avoid the storage of outdated data.
14 WAWASAN OPEN UNIVERSITY TCC 242/05 Web Database Application
You must understand that cookie acceptance is ultimately controlled by the user. There may be the possibility that a user will disable cookie support within the browser or will clear cookies from his or her computer. To remedy this situation, you can use the URL rewriting method. This method simply appends the SID to every local URL found within the requested page. It results in automatic SID propagation whenever the user clicks on one of your website’s links. Therefore, the URL rewriting method helps to maintain the SID even if the user disables cookie support. The following is an example that shows how URL rewriting is used to append the SID to a hyperlink: .....
Note that cookies need to be placed at the very top of a web page, before the first tag. Otherwise, you may get an error. If you want to set the cookie for a longer period of time like a month, you can use the time() function. To set the cookie to last for a month (60 sec/min * 60 min/hour * 24 hours/day * 30 days/ month), use the following PHP code: $expire=time()+60*60*24*30; setcookie(“username”, “Alice”, $expire);
In case you need to delete a cookie, you can set the cookie to an expired date or time by using the minus operator in the $expire field and leaving $value as an empty string. The following example code sets the cookie expiration date to one hour ago: $expire=time()-3600; setcookie(“username”, “”, $expire);
Retrieving cookie data To retrieve cookie data in PHP, you will use the $_COOKIE function. For example, to retrieve the value of a cookie named “username” and print it out, you can use: echo $_COOKIE[“username”];
To view all cookies available, you can use the print_r function: print_r($_COOKIE);
16 WAWASAN OPEN UNIVERSITY TCC 242/05 Web Database Application
You may also check if a cookie has been set before you display it by using the isset() function. The following code uses the isset() function to check that a cookie has been previously set and then prints a greeting message to a customer returning to your website. if (isset($_COOKIE[“username”])) echo “Welcome “ . $_COOKIE[“username”] . “! ”; else echo “Welcome guest! ”;
Web Reference To learn more about setting cookies, please visit: “PHP Manual setcookie”, http://php.net/manual/en/function. setcookie.php
Activity 5.3 1. Explain what a cookie is and how it is used in a web application.
2. Some cookies are set to _________ after a certain period of time to avoid the storage of outdated data. There is the possibility that a user will _________ cookie support within the browser to protect his or her privacy.
3. The URL rewriting method appends the SID to every local URL found within the requested web page. This helps to maintain the SID even if a user disables cookies. True / False?
4. Which of the following is the PHP code that will create a cookie named “user” that will expire in one day? A. B. C. D.
5. Write PHP code to retrieve and echo the cookies named “product”, “age”, “gender”, “location” and “language”.
UNIT 5 17 Managing state information
Summary In this section, you learnt about cookies and how to implement cookies with PHP. A cookie contains a unique tracking number that enables websites to remember or recognise visitors. Cookies can be used to manage user information, eliminate login prompts or to personalise a web page for a specific returning user. To set a cookie in PHP, you use the setcookie() function and insert the following parameters: cookie name, cookie value and cookie expiration time. To retrieve cookie data, you use the $_COOKIE function with the cookie’s name as its parameter. In the next section, you will learn how to use sessions to save state information. You will implement a session and work with session IDs and look at a session management example.
Self-test 5.2 1. Most of the time, information in a cookie is coded in a way that it is unreadable to any third party who happens to access your cookie folder. The only computer that can read and decode the information is the server that created the cookie in the first place. True / False?
2. What is the URL rewriting method? What are the pros and cons of using URL rewriting?
3. Which line of PHP code below will delete the cookie called “user”? A. B. C. D.
18 WAWASAN OPEN UNIVERSITY TCC 242/05 Web Database Application
4. Write PHP code to create cookies that will last for three months (assume that there are 30 days per month) based on the following table: Name
Value
Type
MPV
Colour
Black
Model
CX9
Price
200000
5. Based on the table in question 4, write PHP code to retrieve and echo all the data in the cookies.
6. Consider the following online form:
a. Write PHP code to retrieve the information in the form by using the POST method.
b. Create cookies that will last for two months based on the information retrieved in question 6a.
UNIT 5 19 Managing state information
c. Retrieve and echo all the cookie data from question 6b. The web page that shows the retrieved data should look like the one in the following figure. By using the isset() function, check to see if a cookie has been set before you display it.
Suggested answers to activity
Feedback Activity 5.3 1. A cookie is a small text file that contains a unique tracking number that enables websites to remember users when they make subsequent visits. When a user visits a web application, a cookie can be created and saved in the user’s browser to store information about the user, such as his or her preferences. As the user executes a request for another web page on the website, the server retrieves the user’s information from the cookie and uses it, for example, to personalise the page or to eliminate the need for the login prompt. 2. expire; disable 3. True 4. C 5. echo $_COOKIE[“product”]; echo echo echo echo
20 WAWASAN OPEN UNIVERSITY TCC 242/05 Web Database Application
UNIT 5 21 Managing state information
5.3 Using Sessions to Save State Information Objectives By the end of this section, you should be able to: 1. Start and read sessions. 2. Pass information through sessions. 3. Explain the session management mechanism in web database applications.
Introduction Passing values through a URL works fine provided that the information is not sensitive or confidential in nature. If you are transmitting information like usernames or passwords, better methods exist for passing the information and keeping it private. For this, you have the option of using either cookies or sessions. However, if you are looking for a method to maintain data only in a particular browsing session (meaning that the data will be removed once the user shuts down his or her web browser), you may want to consider using a session. This section will introduce you to the implementation of sessions. You will learn about session creation, destruction and designation, as well as the retrieval of the session ID (SID) and the storage and retrieval of session variables.
Starting a session A session is generally a temporary set of variables that exist only until a user shuts down his or her web browser. An example of a session variable is the session ID (SID), which is a variable that can be used to indicate that a user has been authenticated to login to your website. This information is stored temporarily for the PHP program to refer to throughout the browsing session. A server distinguishes among multiple sessions being implemented on it simultaneously by referring to the SID. The SID is a unique identifier, usually in the form of a hash generated by a hash function. Every session is assigned a unique SID when the session is created. The browser retains the SID and uses it to let a server know which session to use.
22 WAWASAN OPEN UNIVERSITY TCC 242/05 Web Database Application
Before you start using session variables, you need to start a session. This needs to be done on every web page that makes use of the session variables. It is important to note that a session must be started before anything else is coded. To start a session, you will use the following function: session_start();
Next, you need to decide what information will be stored in your session. You can store anything that you retrieve from the database in your session. Generally, the information that you will store is the username and other login information. It could also be a set of preferences obtained from a particular user. Of course, the information that can be stored in the session is not limited to user information. You can even store information such as the total cost of products selected by a user.
Destroying a session Even if we know that a session has been pre-configured to expire based on an expiration time or when the user exits his or her browser, it is good to know how to cancel the session yourself. This is useful if a user logs off from the website. When the user clicks on the log off link, you can erase the session variables from memory or completely destroy the session from storage. To erase all session variables stored in the current session, you can use the following function: session_unset();
This will effectively reset the session. However, session_unset() does not completely remove the session from the storage mechanism. If you want to completely destroy the session, you need to use the session_destroy() function. This will ensure the session is removed from the storage mechanism.
Setting and retrieving the session ID The session ID (SID) is used to identify all session data tied to a particular user during a browsing session. Although PHP creates and uses the SID automatically, there are some circumstances in which you may want to set or retrieve it manually. Since the SID is unique for every browsing session, you can use it to keep track of sessions so that they can be easily differentiated. Imagine that visitor A and visitor B are visiting your online shopping site at the same time. Visitor A’s SID is ABC123 and visitor B’s SID is XYZ789. Both visitors are adding your products into their shopping carts. You can identify the items selected by the visitors based on their SIDs. To do this, you will assign the SID ABC123 to all items (e.g., items J and K) selected by visitor A, and the SID XYZ789 to all items (e.g., items J and T) selected by visitor B. This will ensure
UNIT 5 23 Managing state information
that the products selected by the visitors do not get mixed up. See Figure 5.1 for an illustration of this process.
Database server
Figure 5.1 Use of SID in an e-commerce shopping cart
You can force visitors to login before they are allowed to view or add products to the shopping cart, but by doing this you may miss the selling opportunity. Some visitors find it troublesome to register and login if they are still not sure about buying the products. By using the SID method, you can push the registration or login procedure to the end of the shopping process. By that time, the visitors have already selected the products that they are interested in, and thus, it will be more likely that they will go through the registration or login procedure. To set or get the SID, you can use the following function: session_id([string sid])
To get the current SID, you can write the following PHP code: session_start(); echo “Your SID is “ . session_id(); // Output: Your SID is 40j2m6nb798lpr57hvod849if0
24 WAWASAN OPEN UNIVERSITY TCC 242/05 Web Database Application
If no parameter is passed to the function, it will return the current SID. If the optional SID is included, the current SID will be replaced with that value. Here is an example: session_start(); session_id(“johnny123”); echo “Your SID is “ . session_id(); // Output: Your SID is johnny123
Creating and deleting session variables You can use session variables to manage users’ data or any other information that you intend to transfer from one web page to another. You can easily set and delete these variables just like any other variable. Once a session is created, variables may be stored in and retrieved from the $_SESSION[] array variable. Here is an example: session_start(); $_SESSION[‘email’] = “[email protected]”; echo “Your email is “ . $_SESSION[‘email’]; // Output: Your email is [email protected]
To delete session variables, you will use the unset() function. For example: session_start(); $_SESSION[‘email’] = “[email protected]”; unset($_SESSION[‘email’]); echo “Your email has been unset to empty:” . $_SESSION[‘email’]; // Output: Your email has been unset to empty:
Activity 5.4 1. Explain what session and session ID mean.
2. To start a session, you will use the start_session() function. True / False?
3. Which of the following is NOT a valid way of resetting a session in PHP? A. B. C. D.
4. Write PHP code to start a session, set a session variable called “username” to “lerdorf ” and then print the retrieved value of the session variable.
Session management example Now that you have been introduced to the basic functions that make session handling work, let us consider a real-world example of session management. This example illustrates a popular mechanism that automatically authenticates returning registered website users. In web database applications, it is common to create a login form that is able to authenticate a visitor’s identity. However, once a visitor registers, logs in and is authenticated, it is convenient to allow the visitor to return to your site later without having to repeat the login process. If you want to keep your visitor logged in and not have to go through the login process for subsequent visits, you can use the $_COOKIE function. If you want to maintain this mechanism only in the visitor’s current web browsing session due to security concerns, you can use the $_SESSION management method. You just need to store a session variable once the visitor’s identity is authenticated. If the session variable is set, your visitors can log in to your website. Otherwise, you will show them a login form. We will use the CUSTOMER table in the SHOPPING database that you created in the Unit 4 Practice Exercise for this example. If you have yet to create them, you may use the following SQL script to create the database and table. Refer to the Unit 4 subsections Creating a database and Creating tables for further details on executing the SQL script. /****** CREATE DATABASE statements ******/ CREATE DATABASE SHOPPING; USE SHOPPING; /****** CREATE TABLE statements ******/ CREATE TABLE CUSTOMER ( CustomerID INT NOT NULL PRIMARY KEY AUTO_INCREMENT, Fullname VARCHAR(50) NOT NULL, Email VARCHAR(50) NOT NULL, Password CHAR(41) NOT NULL, Address TEXT ); /****** INSERT CUSTOMER detail ******/ INSERT INTO CUSTOMER VALUES (NULL, ‘John Doe’, ‘[email protected]’, PASSWORD(‘wawasan’), ‘1 Seattle, Washington’);
26 WAWASAN OPEN UNIVERSITY TCC 242/05 Web Database Application
The following PHP code is used to create and run session management for the auto-login process. Create a PHP extension file called ‘example.php’ to store the following code:
UNIT 5 27 Managing state information
The following is the code for creating the login form that is to be displayed if the user has not logged in before. You will create a file called ‘login.php’ to store the following code: LOGIN
Update form action attribute value and add a hidden field
• Change form action attribute value from ‘MySite14.php’ to ‘cart_update.php’ • Add the session ID value to a hidden field called “sID”. Make sure the hidden field is placed within the tag
store.php echo “”; … echo “”; … echo “”;
The completed page should look like the one in Figure 5.3.
Figure 5.3 What ‘store.php’ should look like
38 WAWASAN OPEN UNIVERSITY TCC 242/05 Web Database Application
3. Next, you will enhance the shopping cart to support multiple users by using session IDs and adding the cart update and deletion features. Since each customer has a unique session ID during a browsing session, items added by each customer to the cart will not result in conflicts. a. Enable your customer to view the cart. Enhance the shopping cart query method so that it can search for items based on the current session ID. If no items have been selected in a session, display “No items in your shopping cart”. b. Provide the cart update feature to enable customers to update the quantities of the products selected. c. Provide the cart item delete feature to enable customers to remove an item from the cart. d. Save the total order amount into a session so that you do not have to carry this information from page to page. e. Change the HTML main form action attribute value to ‘login.php’ instead of ‘MySite15.php’. Remove the duplicate “Keep Shopping” link.
You may copy ‘MySite14.php’ from Unit 4 or create a page that displays the SHOPPING_CART table based on the current session ID. Refer to the Unit 4 Practice Exercise for specific instructions. Store the page in the ‘/var/ www/Unit5’ directory (or ‘\htdocs\Unit5’ in Windows) and name it ‘cart.php’. The description of the page is as follows: Object
Markup/Instruction
Value/Example
Title
…
Shopping Cart
Add the PHP session and connection codes
Retrieve the current SID and use the PHP include function
Remove the INSERT INTO SHOPPING_CART query. You will later add it to ‘cart_update. php’. Check to see if an item has already been added before making the INSERT query
Remove: $query = “INSERT INTO SHOPPING_CART…
UNIT 5 39 Managing state information
View cart
• Search for shopping cart items based on the current session ID • Use num_rows to check for empty items. If there are no items in this session, display “No items in your shopping cart”
$query = “SELECT ProductID, Quantity FROM SHOPPING_CART WHERE SessionID = ‘$sID’”; … if ($result->num_rows == 0) { echo “
No items in your shopping cart”;
Provide the cart update feature
• Add a form into the “Qty.” text field using a loop. Use the POST method and send form data to ‘cart_update.php’ • Add two hidden fields named “prodID” and “sID” to store “$ProductID” and “$sID” respectively • Add an “Update” button to the form
5. Provide the cart item delete feature for customers to remove items from the cart. a. First check if the item has been added to the cart. This will ensure that item deletion can be successfully performed. b. If the item exists, perform the DELETE query. c. Print a message stating that the cart item has been deleted and display ‘cart.php’.
42 WAWASAN OPEN UNIVERSITY TCC 242/05 Web Database Application
Create a PHP page in the ‘/var/www/Unit5’ directory (or ‘\ htdocs\Unit5’ in Windows) and name it ‘cart_delete.php’. Object
Markup/Instruction
Value/Example
Add the PHP connection code and retrieve variables
Use the PHP include function and retrieve the session ID and product ID using $_ POST[] from the form
include(“connect.php”);
First check if the item has been added
• Use the SessionID and ProductID to check for the item in SHOPPING_CART • If the item does not exist, exit from the code
$query = “SELECT
$sID = $_POST[‘sID’]; …
SessionID, ProductID, Quantity FROM SHOPPING_ CART WHERE SessionID = ‘$sID’ AND ProductID = ‘$prodID’”; … if(!$result) { echo($mysqli->error); exit(); }
If the item exists, perform the DELETE query Print a message that the cart item has been deleted and display ‘cart.php’
• If the item exists, perform the DELETE query using the SessionID and ProductID
$query = “DELETE FROM
• Print “The item has been deleted” using the echo function • Display ‘cart.php’ using the include function
echo “The item has been
SHOPPING_CART WHERE SessionID = ‘$sID’ AND ProductID = ‘$prodID’”; … deleted ”; include(“cart.php”);
6. At the checkout stage, you need to get information from your customer. You will first create a sign-in page. a. First check if the user has already logged in. If the user has already logged in, redirect the user to the details confirmation page. b. Create a login form. Provide options for a new customer and a returning customer. For a returning customer, provide email address and password fields.
Create a PHP page in the ‘/var/www/Unit5’ directory (or ‘\ htdocs\Unit5’ in Windows) and name it ‘login.php’.
UNIT 5 43 Managing state information
The description of the page is as follows: Object
Markup/Instruction
Value/Example
Start a session and check for errors during authentication
• Add the session start function • Check if the session variable “fullname” is set. If it is, redirect to ‘details.php’ • If there are errors during the authentication, retrieve and echo the $_GET[] array
session_start();
Title
…
Sign in
Include the PHP session codes
Use the PHP include function
include(“session.php”);
Create a login form. Provide options for a new customer and a returning customer
• Provide a form using the POST method and set the value of the action attribute to ‘authenticate.php’ • Provide an input field for the email address • Provide radio button inputs for new customers or returning customers • Provide a password field • Provide the “Submit” button
… … … … …
Your sign-in page should look like the one shown in Figure 5.5.
44 WAWASAN OPEN UNIVERSITY TCC 242/05 Web Database Application
Figure 5.5 Sign-in page
7. On the authentication page, check for customer types and authenticate the login information. a. Check for customer type. If the option is not selected, redirect to the login form and display a message asking the customer to select a customer type. b. If the “new customer” type is selected, redirect to the new customer registration page. c. For returning customers, process the information retrieved via $_POST. If the email address provided is invalid, redirect to the form and display a message telling the customer that the email address is invalid. d. Query the CUSTOMER table to check for email address and password matches. If the provided data match the data in the CUSTOMER table, apply session variables for “fullname” and “email” and redirect to ‘details. php’. e. If they do not match, redirect to the form and display an error message.
Create a PHP page in the ‘/var/www/Unit5’ directory (or ‘\ htdocs\Unit5’ in Windows) and name it ‘authenticate.php’.
UNIT 5 45 Managing state information
The description of the page is as follows: Object
Markup/Instruction
Value/Example
Add the PHP session start function and retrieve and trim information from the form
• Add the session start function • Check if the session variable “fullname” is set. If it is, redirect to ‘details.php’ • Retrieve and trim form information obtained via $_POST
… $email = trim($_POST [‘email’]); …
Check for customer type
• If the option is not selected, redirect to the form and display an error message
if (! isset($_POST[‘customer _type’])) { header(“Location: … exit(); }
For new customers
• If the new customer type is selected, redirect to the new customer registration page • Copy the email variable to the registration page if the customer inserted an email address
For returning customers, process the information retrieved
• If the email address is invalid, redirect to the form and display an error message
… … strpos($email, “@”); …
Query the CUSTOMER table to check for email and password matches
• Include a database connection • Make a query to the CUSTOMER table based on the login information • If login data match the data in the CUSTOMER table, apply session variables for “fullname” and “email” and redirect to ‘details.php’
If login data does not match data in the CUSTOMER table
• If they do not match, redirect to the form and display an error message
46 WAWASAN OPEN UNIVERSITY TCC 242/05 Web Database Application
8. On the registration page, you will provide a form to collect the following customer information: Full Name, Email, Password, Confirm Password and Address. Create a PHP page in the ‘/var/www/Unit5’ directory (or ‘\ htdocs\Unit5’ in Windows) and name it ‘register.php’. The description of the page is as follows: Object
Markup/Instruction
Value/Example
Retrieve email query string and check for the error message query string. Include the PHP session code
• Retrieve email query string if it was passed from the login page • If there are errors during the authentication, you will echo the error message query string by retrieving the $_GET[] array • Use the PHP include function
… $_GET[‘email’]…
Title
…
Customer Registration
Create a registration form
• Provide a form that uses the POST method and set the value of the action attribute to ‘reg_validation.php’ • Provide input fields for fullname, email, password, confirm password, and a text area for address • Add in the email value retrieved from the login form • Provide the “Register” button