Adobe Flash CS4 Tutorial – Note 02 - Animation Techniques. Traditional
animation involves a series of still images, usually painted or sketched, displayed
in ...
Adobe Flash CS4 Tutorial
Adobe Flash CS4 Tutorial – Note 02 - Animation Techniques Traditional animation involves a series of still images, usually painted or sketched, displayed in rapid sequence. Because the receptors in our retina require recovery time, we are unable to distinguish each individual image in the sequence. In effect, as the previous image is replaced by a new image the previous image is still burned on our retinas. Each image is blurred into the other, creating the illusion of motion. This is called Persistence of Vision. If we didn’t experience retinal lag, we’d be able to distinguish each individual frame, destroying the illusion of motion. With film, each image is called a frame. As a result, the rate at which each frame is displayed is measured in frames per second (fps). The movies you see at a theatre display 24 frames per second. Videotapes and television display 30 frames per second. Film and video have fixed frame rates. With Flash, you can set the frame rate. Higher frame rates result in smoother animation, but also require more processing power.
Key Frames and In-between Frames Animation is a laborious task. An animated movie, playing at 24 fps, at a total duration of 90 minutes, requires 129600 individual frames to be drawn and painted. Each of these frames, at least before the advent of computer animation, must be drawn by hand. To facilitate production, there are Key Frame animators and In-between Frame animators. Key Frames Key Frames are frames that act as reference points, usually illustrating a major moment in time. For example, if you were to create an animation of a runner practicing a 100-meter dash, you could have the following Key Frames: Key Frame 1: Runner Standing Straight Key Frame 2: Runner crouched in the blocks Key Frame 3: Runner at full stride Key Frame 4: Runner crossing the line The Key Frame artist (or a team of Key Frame artists) is responsible for drawing each Key Frame. If this entire sequence is to last for 15 seconds (at a frame rate of 24fps), we’ll obviously need more than four frames to animate it
By Frankie, K. F. Yip
Page 1
Adobe Flash CS4 Tutorial
(360 frames in total). This is where the In-between Frame artists come in.
The Timeline Animations are built with the Timeline. Layers.
The Timeline is divided into
Layers are similar to acetate or transparent paper where
individual Symbols are placed and animated. Each Layer is stacked, one on top of the other, which, when combined, create an animation or image composed of many different elements. Symbol per Layer can be animated.
In Flash, only one
The Timeline also contains controls to edit and manage animation, including onion skin controls, the ability to edit multiple frames, the ability to move to specific frames within animations, as well as customizing the display of Layers. New Layer As you use Symbols to build animations, you’ll need to add Layers for each Symbol you animate. To add new Layers, {Click} the New Layer button. A new Layer is added. You should label the Layer accordingly. Delete Layer To remove a Layer from the Timeline, select the Layer and {Click} the Delete Layer icon. Hide/Show Layer As you build animations, you may want to hide the contents of a Layer or multiple Layers to assist in editing. Select the Layer you wish to hide and {Click} the dot in the Hide/Show Layer column. A red x appears indicating the Layer is hidden. Any content on that Layer is hidden on the Stage. {Click} the red x to make the Layer visible again. By Frankie, K. F. Yip
Page 2
Adobe Flash CS4 Tutorial
Alternately, you can hide or show all Layers by {Clicking} on Hide/Show Layer icon itself. Lock/Unlock Layer As you build animations, you may want to lock the contents of a Layer or Layers to prevent accidentally selecting and moving content. Select the Layer you wish to lock and {Click} the dot in the Lock/Unlock Layer column. A lock appears indicating the Layer is locked. You will not be able to move or edit the content of a locked Layer until you unlock the Layer. {Click} the red x to make the Layer visible again.
Outline Layer As you build animations, you may set Symbols to 0% Alpha, which makes them invisible on the Stage. This can make it difficult to edit animations when content isn’t visible. {Clicking} the dot in the Outline Layer column causes the content of the Layer to display as an outline, making Symbols set to 0% Alpha visible. The outline box is colored, indicating the Layer will display outlines.
Symbol at 100% Alpha.
By Frankie, K. F. Yip
Symbol at 0% Alpha with Outline Layer selected.
Page 3
Adobe Flash CS4 Tutorial
Creating Animations with the Timeline Once you have created the Symbols for your Flash movie, you use the Timeline to animate Instances of each Symbol. When you animate an Instance, you are limited to one Instance per Layer. The first thing you should do is create a new Layer for the Instance you want to animate. Think of each Layer as a roll of film, which you view through the Stage. By default, a blank key frame is placed in the first frame of the Layer. Each frame is separated by a line and a frame number appears above each frame every 5 frames.
If you wish to start your animation at the first frame, simply drag an Instance onto the Stage. The key frame changes from an empty circle to a filled circle, indicating that at that moment in time, there is an Instance on the Stage within this particular Layer.
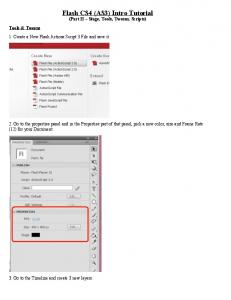
Document Properties – Select [Modify] � [Document…] It is essential to set up the parameters of your Flash movie before you create your animations. By default, Flash movies are set on a Stage with a white background, at 550 pixels wide by 400 pixels high, at 12 frames per second.
By Frankie, K. F. Yip
Page 4
Adobe Flash CS4 Tutorial
Frame Rate Set the frame rate (fps) to a minimum of 12. Keep in mind that the greater the frame rate, the greater the processing power required. You may find that 12 fps is too slow (the animation is not smooth). Try a range between 15 – 20 fps. As you create animations, you’ll find a frame rate that complements your particular style. In regards to the Timeline, if you have set your frame rate at 15 fps, then each individual frame in each Layer is 1/15 of a second in time. Dimensions The default Stage dimensions of 550 pixels wide by 400 pixels high is intended for display at 640 x 480, the lowest common denominator in terms of screen resolution. Adding Frames To add additional frames, simply select the frame in the Timeline where you want to place additional frames and select Insert/Frame or press [F5]. A frame is added.
Selecting Frame 1 and pressing [F5] or selecting Insert/Frame, inserts an additional frame after the currently selected frame in the Timeline.
Removing Frames The process of removing frames from the Timeline is similar to that of adding frames. Select the frame you want to remove and select Insert/Delete Frame or press [SHIFT] + [F5]. The frame you selected is deleted. If you continually select Insert/Delete Frame or press [SHIFT] + [F5], frames are continually deleted. Rather than removing a set of frames from each Layer individually, you can select a frame, or group of frames, across Layers and add or remove them. Frame 7 is selected across both the Ball
By Frankie, K. F. Yip
Page 5
Adobe Flash CS4 Tutorial Layer and the Floor Layer.
Motion Tweening Motion tweening is the primary method of animation in Flash. The process of motion tweening involves creating at least two key frames, such as a key frame at Frame 1 and a key frame at Frame 40, and having Flash calculate and create the frames in-between. You can have multiple key frames on the same Layer, but you are limited to one Instance per Layer when motion tweening. You cannot, for instance, place two Instances in a key frame, and motion tween both. Nor can you place one Instance of a Symbol in a key frame and place another Instance of the same Symbol in another key frame on the same Layer. We can reproduce the bouncing ball animation using motion tweening. We create a Layer for the floor, draw our floor at key frame 1, and extend that key frame for a given number of frames, in this case to Frame 30. That means, click frame 30 and click [F5].
The Floor is extended to a range of 30 frames.
Next, we create a new Layer for the ball, and draw a ball on the Stage. After drawing the ball and fill with radial gradient color. Select [Modify] � [Group] to group the outline and fill into an object. It is an important step in Motion By Frankie, K. F. Yip
Page 6
Adobe Flash CS4 Tutorial
Tween.
The ball is placed on the Stage.
We need three key frames for our animation. One at the beginning (Frame 1), one at the point of impact (Frame 14), and one at the end (Frame 30). As we create each key frame, the information from the previous key frame is duplicated. In other words, the Instance that we placed in the initial key frame is duplicated in subsequent key frames within the Layer. To add key frames, we select the Frame on the Timeline we want to create a key frame at and select Insert/Keyframe or press [F6].
Three keyframes are placed on within the ball Layer. Each key frame (at Frames 1, 14, and 30) is, at this point, identical. To modify By Frankie, K. F. Yip
Page 7
Adobe Flash CS4 Tutorial
the Instance in each key frame simply select the key frame you want to modify and manipulate the Instance accordingly. At Frame 14, we need to place the ball at the point of impact, and at Frame 30, we need to place the ball above the floor.
The ball placed at the point of impact. We’ll squash the ball later.
The ball placed at the end point in Frame 30.
Now we can tween the animation to make Flash create all the frames in-between our key frames. It’s important to understand how the tweening process works. We have only one Instance within this Layer. We did not drag another Instance of the Symbol onto the Stage within each key frame, rather, you should think of it as the same Instance at different points in time. At these different points in time, the Instance can change position, change scale, By Frankie, K. F. Yip
Page 8
Adobe Flash CS4 Tutorial
change transparency (alpha), and so forth. When we motion tween, Flash compares the key frames (or moments in time) and creates the in-between frames automatically. To motion tween, select a point in the Timeline anywhere in-between two key frames and select “Motion” in Tween menu of Properties Panel. In the Timeline, the area between the key frames is colored purple and an arrow points from one key frame to the other.
Keyframes at Frame 1 and Frame 14 are motion tweened.
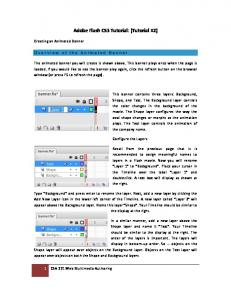
Choose Classic Motion in FLASH CS4
A number of options to control the motion tween are presented as follows:
Tween Scaling Tween Scaling is checked by default. This ensures that any changes in scale of an Instance from one key frame to another are tweened. Rotate Select from None, Automatic, Clockwise, or Counterclockwise. If you select None, any rotation you’ve applied to an Instance will not be tweened. By default, Automatic is selected. Automatic will tween any rotation you’ve applied to an Instance. Select Clockwise or Counterclockwise to have Flash automatically rotate the Instance 360 degrees in either direction. Input the amount of times you want the Instance to rotate in the times field.
By Frankie, K. F. Yip
Page 9
Adobe Flash CS4 Tutorial
Easing Easing controls the pace of the Instance from one key frame to another and is an excellent method of adding realistic motion to your animation. Easing in causes the Instance to move slowly at the start and come up to full speed. Easing out causes the Instance to slow down as it reaches the end. Drag the slider to control the amount of easing in or out that is applied to the motion tween. By default, easing is set to 0, meaning motion will be continuous, from one point to another.
Onion Skinning In traditional animation, animators would draw the contents of each frame on onion skin paper, a thin, translucent paper which permits them to see the state of the previous key frame or frames to use as a reference. To enable Onion Skinning in Flash, {Click} one of two Onion Skin buttons, Onion Skin , or Onion Skin Outline at the bottom of the Timeline. � �
Onion Skin presents us with a translucent reference of previous frames. Onion Skin Outline presents each frame as an outline.
You should adjust the range of frames that Flash will display as Onion Skinned. The moment you enable Onion Skinning, a Range Marker pops up at the top of the Timeline. Let’s make the following together:
{Click}, hold, and drag the Marker Handles to adjust the range of By Frankie, K. F. Yip
Page 10
Adobe Flash CS4 Tutorial
frames. In this case, we want the entire range of 10 frames to be onion skinned.
Viewing your Animation To watch the animation, press the [ENTER] key. The animation will play from the point where the scrub is until the end of the animation. Keep pressing [ENTER] to view the animation again and again. To avoid confusion, at this point you might want to disable Onion Skinning by {Clicking} on the Onion Skin button again. You can also press [Ctrl]+[ENTER] to show the animation. Our next step is to modify the Instance at Frame 14 by squashing it and positioning it appropriately at the point of impact. Because of the way motion tweening works, by comparing the state of the Instance in one key frame to another, the ball actually begins to squash before the point of impact. On the bounce up, the ball will regain its form, which works well. But on the way down, we don’t want the ball to squash until it hits the floor. Because we squashed the Instance by modifying the scale, we merely have to modify the motion tween and uncheck the Tween scaling control. Flash will ignore the change in scale between the key frames, but will not ignore the change in position. Modify the motion tween by {Double-Clicking} in between the key frames on the Timeline or {Double-Clicking} the first keyframe in the motion tween sequence.
With Tween scaling enabled, the ball begins to squash before Impact.
By Frankie, K. F. Yip
Page 11
Adobe Flash CS4 Tutorial
With Tween scaling disabled, the ball does not squash before impact.
Our next step is to add an additional key frame at Frame 15 to make the squash process last a little longer. You’ll find that many animations require the use of a combination of approaches, in this case motion tweening and frame-by-frame. When you already have motion tween occuring in the Timeline, and you add a key frame, Flash creates the key frame containing the state of the Instance as it calculated it. In this case, it does not duplicate the previous key frame. When we create a key frame at Frame 15, it does not replicate the key frame at Frame 14, but converts the state of the Instance as it calculated it to a new key frame. As a result, we have to manually select our new key frame and position and scale the Instance accordingly. It’s usually a good idea to enable onion skinning to see the affects of your adjustments.
Originally, we had motion tweened the key frame at Frame 14 with the key frame at Frame 30. When we created a new key frame at Frame 15, Flash created the key frame based on the state of the Instance as it had calculated it when tweening between the original key frames.
By Frankie, K. F. Yip
Page 12
Adobe Flash CS4 Tutorial
The Instance in the new key frame positioned and scaled properly.
Motion Guides When Flash motion tweens an Instance where a change in position has occurred, it does so in a straight path. In our bouncing ball animation for example, the ball falls to the ground in a straight line and bounces off the ground in a straight line. Using the frame-by-frame method of animation, we can make the ball fall and bounce along an arched path, but using the frame-by-frame method is a tedious solution. Fortunately, in Flash we can use motion guides (often referred to as motion paths). After we have created an animation using Motion Tweening, we can apply a Motion Guide to that animation, forcing the Instance to follow the path or shape of the Guide. Motion guides are lines that must be on the Shape level. To create a motion guide, simply draw a line in the shape you wish, using the Pencil Tool. For our ball animation we need to draw a line that arcs down toward the floor and up from the floor.
By Frankie, K. F. Yip
Page 13
Adobe Flash CS4 Tutorial
A motion guide on the Stage.
Guide Layer There are two specialized Layer types, Guide and Mask Layers. Both are used for specialized types of animation that are covered later. Briefly, when you use Guides, {Click} the Add Guide Layer button to add a Layer with content that acts as an animation guide.
Using Guides To use the Motion Guide you’ve created, select the Layer you wish to apply the Guide too and select Insert/Motion Guide or click the Guide Layer icon . A Guide Layer is placed above the currently selected Layer and the name of the Layer that the Guide is applied to is indented in the Timeline. The Guide Layer is added to the Timeline. Note the title of the Guide Layer is “Guide: ” followed by the name of the Layer it is applied to.
Make sure the new Guide Layer is selected. Use the Pencil Tool to draw path onto the stage. Then, select each key frame in the animation and position the Instance along the Guide. It is necessary to make sure Snap is enabled by selecting [View] � [Snap to object].
By Frankie, K. F. Yip
Page 14
Adobe Flash CS4 Tutorial
In the first key frame, we position the Instance at the beginning of the Guide.
In the second key frame, we position the Instance at the impact point as shown.
In the third key frame, we position the Instance at the impact point again, where the By Frankie, K. F. Yip
Page 15
Adobe Flash CS4 Tutorial Guide hits the floor. This is the second part of the squash sequence.
In the fourth key frame, we position the Instance at the end of the Guide.
Press [ENTER] to view the animation. The Instance should follow the Guide. When you publish the movie, the Guide will be invisible. To preview the published version, press [CTRL] + [ENTER]. You can close the preview by {Clicking} on the Close icon in the title bar or press [CTRL] + [W]. You will be returned to the Flash authoring environment. If the Instance does not follow the Guide, try to reattach the Instance in each key frame to points on the Guide. If you modify the Guide in any way, you will have to reattach the Instance in each key frame again.
By Frankie, K. F. Yip
Page 16
Adobe Flash CS4 Tutorial
Creating Another Motion Guide Example let take an object aeroplane on stage and we want it to go from the left to right in a zig zag or a smooth curve motion, we can do that by using a motion path or guide in Flash CS4, we do that by drawing a stroke or curve on a different layer and orient to path,. lets take an object for example like this aeroplane on stage and save it as a graphic symbol called plane, now call this layer1 aeroplane layer, now you must create another layer called guide layer on top of the aeroplane layer.
Lets go an lock the aeroplane layer and also make it invisible by clicking on the lock and eye icon on top of the layers, and work on the guide layer, in this guide layer on frame1 draw a curve in the form of a snake shape, it doesn’t matter what color you use, just draw a curve in a zig zag manner going from left to right of the stage like the one below.
Now we need to attach this aeroplane to the guide layer, so unlock and make the aeroplane layer visible, and lock the guide layer above the aeroplane layer by clicking on the lock icon. Now with snap objects turned on, click on the little circle in the middle of the aeroplane and take it to the starting point of the guide, it will automatically snap in place, lets make a motion tween and snap it to the right side of the guide, so lets create a new keyframe by pressing F6 in frame 24, now when you look at the stage from frame 24, we cant see the guide layer, now where has the guide layer gone, we need to insert keyframes in the guide layer because only frame 1 has the guide lines showing, but frame 2 to frame 24 does not have the guide lines showing, so go to frame 24 in the guide layer and press F5, now you will see the guide layer visible in the entire animation like the one below.
By Frankie, K. F. Yip
Page 17
Adobe Flash CS4 Tutorial
So in frame 24 in our aeroplane layer we need to get this aeroplane on the right side, so go to frame 24 and place the aeroplane to the right by clicking in the middle of the aeroplane grab it and drag it till it snaps into place. So in frame 1 it is on the left side of the guide and in frame 24 it is on the right side of the guide like the one below.
Now make a motion tween by clicking in the middle of both the layers and select the motion tween. Now check your movie clip, you will notice that the aeroplane is going from the left to the right along the guide like the one below.
If you test you movie, the best thing about this guide layer is that it does not show up while running the movie clip. While you run the movie clip, although you see the aeroplane going along the path directed, but it is a little weird that it is wiggling back and forth, and that’s not the way an aeroplane flies. Let’s use the free transform tool and go to the first frame and rotate the aeroplane in the way the guide is moving, also do this in the last keyframe (keyframe 24) and position it in the way the guidelines end like this one below.
By Frankie, K. F. Yip
Page 18
Adobe Flash CS4 Tutorial
When you test you movie clip, the animation is still not working properly as you see below
To get this properly click anywhere between your first and 24th key frame and go to your properties panel and you will notice that there is something called orient to path,
just check that option and test the movie clip.
If you find the animation too fast, that is the aeroplane moving from left to right too fast, you can insert some layers in-between the fist and twenty forth by clicking and dragging both the layers and pressing F5, lets say we want to take it up to frame 48, so insert frames in both the aeroplane and the guide layer till it reaches frame 48, now test you movie clip, you will notice that the aeroplane animates much slower and also looks good. That’s it you have learnt how to make a motion guide in Flash CS4.
By Frankie, K. F. Yip
Page 19


![[PDF] Download Adobe Flash CS4 Professional ... - Google Sites](https://m.moam.info/img/260x300/pdf-download-adobe-flash-cs4-professional-google-s_6476f6ce097c474b228b52a0.jpg)


