Audio / Sound in Flash CS4 - Tutorial. Understanding Audio – Basic Primer.
Comparing analogue and digital audio. In analogue and digital audio, sound is ...
Audio / Sound in Flash CS4 - Tutorial
Understanding Audio – Basic Primer Comparing analogue and digital audio In analogue and digital audio, sound is transmitted and stored in very different ways. Analogue audio: positive and negative voltage A microphone converts the pressure waves of sound into voltage changes in a wire: high pressure becomes positive voltage, and low pressure becomes negative voltage. When these voltage changes travel down a microphone wire, they can be recorded onto tape as changes in magnetic strength or onto vinyl records as changes in groove size. A speaker works like a microphone in reverse, taking the voltage signals from an audio recording and vibrating to re-create the pressure wave. Digital audio: zeroes and ones Unlike analogue storage media such as magnetic tape or vinyl records, computers store audio information digitally as a series of zeroes and ones. In digital storage, the original waveform is broken up into individual snapshots called samples. This process is typically known as digitising or sampling the audio, but it is sometimes called analogue-to-digital conversion. When you record from a microphone into a computer, for example, analogue-to-digital converters transform the analog signal into digital samples that computers can store and process. Understanding sample rate Sample rate indicates the number of digital samples taken of an audio signal each second. This rate determines the frequency range of an audio file. The higher the sample rate, the closer the shape of the digital waveform is to that of the original analogue waveform. Low sample rates limit the range of frequencies that can be recorded, which can result in a recording that poorly represents the original sound.
Two sample rates A. Low sample rate that distorts the original sound wave B. High sample rate that perfectly reproduces the original sound wave To reproduce a given frequency, the sample rate must be at least twice that frequency. For example, CDs have a sample rate of 44,100 samples per second, so they can reproduce frequencies up to 22,050 Hz, which is just beyond the limit of human hearing, 20,000 Hz. The following table lists the most common sample rates for digital audio: Sample Rate
Quality level
Frequency Range
11,025 Hz
Poor AM radio (low-end multimedia)
0–5,512 Hz
22,050 Hz
Near FM radio (high-end multimedia)
0–11,025 Hz
32,000 Hz
Better than FM radio (standard broadcast rate)
0–16,000 Hz
44,100 Hz
CD
0–22,050 Hz
48,000 Hz
Standard DVD
0–24,000 Hz
96,000 Hz
High-end DVD
0–48,000 Hz
Understanding bit depth Bit depth determines dynamic range. When a sound wave is sampled, each sample is assigned the amplitude value closest to the original wave’s amplitude. Higher bit depth provides more possible amplitude values, producing greater dynamic range, a lower noise floor, and higher fidelity. For the best audio quality, remain at 32-bit resolution while transforming audio in Soundbooth, and then convert to a lower bit depth for output. Bit Depth Quality Level Amplitude Values Dynamic Range 8-bit
Telephony
256
48 dB
16-bit
CD
65,536
96 dB
24-bit
DVD
16,777,216
144 dB
32-bit
Best
4,294,967,296
192 dB
Higher bit depths provide greater dynamic range.
Audio file contents and size An audio file on your hard drive, such as a WAV file, consists of a small header indicating sample rate and bit depth, and then a long series of numbers, one for each sample. These files can be very large. For example, at 44,100 samples per second and 16 bits per sample, a mono file requires 86 KB per second—about 5 MB per minute. That figure doubles to 10 MB per minute for a stereo file, which has two channels. How Audio Tools such as Soundbooth / SoundForge, etc. digitise audio When you record audio in an audiot tool such as Adobe Soundbooth, the sound card starts the recording process and you have normally pre-specified what sample rate and bit depth to use. Through Line-In or Microphone-In ports, the sound card receives analogue audio and digitally samples it at the specified rate. The audio tool stores each sample in sequence until you stop recording. When you play a file in Soundbooth, the process happens in reverse. Soundbooth sends a series of digital samples to the sound card. The card reconstructs the original waveform and sends it as an analogue signal through Line-Out ports to your speakers. To sum up, the process of digitising audio starts with a pressure wave in the air. A microphone converts this pressure wave into voltage changes. A sound card converts these voltage changes into digital samples. After analogue sound becomes digital audio, the audio tool can record, edit, and process it.
Flash and Audio / Sound Flash CS4 Professional offers several ways to utilise sound / audio elements. You can make sounds that play continuously, independent of the Timeline, or use the Timeline to synchronize animation to a sound track. Add sounds to buttons to make them more interactive, and make sounds fade in and out for a more polished soundtrack – although in most instances you are better to manipulate There are two types of sounds in Flash: event sounds and stream sounds. An event sound must download completely before it begins playing, and it continues playing until explicitly stopped. Stream sounds begin playing as soon as enough data for the first few frames has been downloaded; stream sounds are synchronized to the Timeline for playing on a website. If you’re creating Flash content for mobile devices, Flash also lets you include device sounds in your published SWF file. Device sounds are encoded in the device’s natively supported audio format, such as MIDI, MFi, or SMAF. You can use shared libraries to link a sound to multiple documents. You can also use the ActionScript® 2.0 onSoundComplete event or ActionScript® 3.0 soundComplete event to trigger an event based on the completion of a sound. You can load sounds and control sound playback using prewritten behaviours or media components; the latter also provide a controller for stop, pause, rewind, and so on. You can also use ActionScript 2.0 or 3.0 to load sounds dynamically using attachSound and loadSound.
Importing sounds You place sound files into Flash by importing them into the library for the current document. 1. Select File > Import > Import To Library. 2. In the Import dialog box, locate and open the desired sound file. Note: You can also drag a sound from a common library into the library for the current document. N.B. Flash stores sounds in the library along with bitmaps and symbols. You need only one copy of a sound file to use that sound multiple ways in your document. If you want to share sounds among Flash documents, you can include the sounds in shared libraries. Flash includes a Sounds library containing many useful sounds that can be used for effects. To open the Sounds library, choose Window > Common Libraries > Sounds. To import a sound from the Sounds library to your FLA file, drag the sound from the Sounds library to the Library panel of your FLA file. You can also drag sounds from the Sounds library to other shared libraries. Sounds can use large amounts of disk space and RAM. However, mp3 sound data is compressed and smaller than WAV or AIFF sound data. Generally, when using WAV or AIFF files, it’s best to use 16-22 kHz mono sounds (stereo uses twice as much data as mono), but Flash can import either 8- or 16-bit sounds at sample rates of 11, 22, or 44 kHz. Sounds recorded in formats that are not multiples of 11 kHz (such as 8, 32, or 96 kHz) are resampled when imported into Flash. Flash can convert sounds to lower sample rates on export. If you want to add effects to sounds in Flash, it’s best to import 16-bit sounds. If you have limited RAM, keep your sound clips short or work with 8-bit sounds instead of 16-bit sounds. Supported sound file formats You can import the following sound file formats into Flash:
ASND (Windows or Macintosh). This is the native sound format of Adobe® Soundbooth™. WAV (Windows only) AIFF (Macintosh only) mp3 (Windows or Macintosh) If you have QuickTime® 4 or later installed on your system, you can import these additional sound file formats:
AIFF (Windows or Macintosh) Sound Designer® II (Macintosh only) Sound Only QuickTime Movies (Windows or Macintosh) Sun AU (Windows or Macintosh) System 7 Sounds (Macintosh only) WAV (Windows or Macintosh)
N.B.: The ASND format is a non-destructive audio file format, native to Adobe Soundbooth. ASND files can contain audio data with effects that can be modified later, Soundbooth multitrack sessions, and snapshots that allow you to revert to a previous state of the ASND file.
Add a sound to the Timeline You can add a sound to a document using the library, or you can load a sound into a SWF file during runtime, using the loadSound method of the Sound object which we will cover later. (For more information, see loadSound (Sound.loadSound method) in the ActionScript 2.0 Language Reference or Sound Class in the ActionScript 3.0 Language and Components Reference). 1. Import the sound into the library if it has not already been imported. 2. Select Insert > Timeline > Layer. 3. With the new sound layer selected, drag the sound from the Library panel onto the Stage NOT the Timeline. The sound is added to the current layer. You can place multiple sounds on one layer or on layers containing other objects. However, it is recommended that each sound be placed on a separate layer. Each layer acts as a separate sound channel. The sounds on all layers are combined when you play the SWF file. 4. In the Timeline, select the first frame that contains the sound file. 5. Select Window > Properties, and click the arrow in the lower-right corner to expand the Property inspector. 6. In the Property inspector, select the sound file from the Sound pop-up menu. 7. Select an effect option from the Effects pop-up menu:
None - Applies no effects to the sound file. Select this option to remove previously applied effects.
Left Channel/Right Channel - Plays sound in the left or right channel only.
Fade Left To Right/Fade Right To Left - Shifts the sound from one channel to the other.
Fade In - Gradually increases the volume of a sound over its duration.
Fade Out - Gradually decreases the volume of a sound over its duration.
Custom - Lets you create custom in and out points of sound using the Edit Envelope.
8. Select a synchronization option from the Sync pop-up menu: Note: If you are placing the sound on a frame other than frame 1 in the main Timeline, select the Stop option.
Event - Synchronizes the sound to the occurrence of an event. An event sound, such as a sound that plays when a user clicks a button, plays when its starting keyframe first appears and plays in its entirety, independently of the Timeline, even if the SWF file stops playing. Event sounds are mixed when you play your published SWF file. If an event sound is playing and the sound is instantiated again (for example, by the user clicking the button again), the first instance of the sound continues to play and another instance begins to play simultaneously.
Start - The same as Event, except that if the sound is already playing, no new instance of the sound plays.
Stop - Silences the specified sound.
Stream - Synchronizes the sound for playing on a website. Flash forces animation to keep pace with stream sounds. If Flash can’t draw animation frames quickly enough, it skips frames. Unlike event sounds, stream sounds stop if the SWF file stops playing. Also, a stream sound can never play longer than the length of the frames it occupies. Stream sounds are mixed when you publish your SWF file.
An example of a stream sound is the voice of a character in an animation that plays in multiple frames. Note: If you use an mp3 sound as a stream sound, you must recompress the sound for export. You can export the sound as an mp3 file, with the same compression settings that it had on import. 9. Enter a value for Repeat to specify the number of times the sound should loop, or select Loop to repeat the sound continuously. For continuous play, enter a number large enough to play the sound for an extended duration. For example, to loop a 15-second sound for 15 minutes, enter 60. Looping stream sounds is not recommended. If a stream sound is set to loop, frames are added to the file and the file size is increased by the number of times the sound is looped. 10. To test the sound, drag the playhead over the frames containing the sound or use commands in the Controller or the Control menu. Add a sound to a button You can associate sounds with the different states of a button symbol. Because the sounds are stored with the symbol, they work for all instances of the symbol. 1. 2. 3. 4.
Select the button in the Library panel. Select Edit from the Panel menu in the upper-right corner of the panel. In the button’s Timeline, add a layer for sound (Insert > Timeline > Layer). In the sound layer, create a regular or blank keyframe to correspond with the button state to which you want to add a sound (Insert > Timeline > Keyframe or Insert > Timeline > Blank Keyframe). For example, to add a sound that plays when you click the button, create a keyframe in the frame labeled Down.
5. Click the keyframe you created. 6. Select Window > Properties. 7. In the Property inspector, select a sound file from the Sound pop-up menu which lists the sounds you have imported into the library. 8. Select Event from the Sync pop-up menu. To associate a different sound with each of the button’s keyframes, create a blank keyframe and add another sound file for each keyframe. You can also use the same sound file and apply a different sound effect for each button keyframe.
Synchronize a sound with animation To synchronize a sound with animation, you start and stop the sound at keyframes. 1. Add a sound to a document. 2. To synchronize this sound with an event in the scene, select a beginning keyframe that corresponds to the keyframe of the event in the scene. You can select any of the synchronization options. 3. Create a keyframe in the sound layer’s Timeline at the frame where you want the sound to end. A representation of the sound file appears in the Timeline. 4. Select Window > Properties, and click the arrow in the lower-right corner to expand the Property inspector. 5. In the Property inspector, select the same sound from the Sound pop-up menu. 6. Select Stop from the Sync pop-up menu. When you play the SWF file, the sound stops playing when it reaches the ending keyframe. 7. To play back the sound, simply move the playhead. Edit a sound in Flash In Flash, you can define the starting point of a sound or control the volume of the sound as it plays. You can also change the point at which a sound starts and stops playing. This is useful for making sound files smaller by removing unused sections. 1. 2. 3. 4.
Add a sound to a frame, or select a frame that already contains a sound. Select Window > Properties. Click the Edit button on the right side of the Property inspector. Do any of the following: o To change the start and end points of a sound, drag the Time In and Time Out controls in the Edit Envelope. o To change the sound envelope, drag the envelope handles to change levels at different points in the sound. Envelope lines show the volume of the sound as it plays. To create additional envelope handles (up to eight total), click the envelope lines. To remove an envelope handle, drag it out of the window. o To display more or less of the sound in the window, click the Zoom In or Out buttons. o To switch the time units between seconds and frames, click the Seconds and Frames buttons. 5. To hear the edited sound, click the Play button. Edit a sound in Soundbooth On a machine such as the ones in the lab with both Adobe Flash and Adobe Soundbooth installed, you can use Soundbooth to edit sounds you have imported into your FLA file. After making changes in Soundbooth, when you save the file and overwrite the original, the changes are automatically reflected in the FLA file. If you change the filename or format of the sound after editing it, you will need to re-import it into Flash. Note: Soundbooth is available only on Windows computers and Intel®-based Macintoshes.
To edit an imported sound in Soundbooth: 1. 2. 3. 4.
Right-click (Windows) or Ctrl-click (Macintosh) the sound in the Library panel. Choose Edit in Soundbooth from the context menu. The file opens in Soundbooth. Edit the file in Soundbooth. When you are finished, save the file. To save the changes in a non-destructive format, choose the ASND format. If you save the file in a different format from the original, you will need to re-import the sound file into Flash.
5. Return to Flash to see the edited version of the sound file in the Library panel. N.B.: You cannot edit sounds from the Sounds library (Window > Common Libraries > Sounds) with the Edit in Soundbooth command. To edit these sounds in Soundbooth, open Soundbooth and select the sound from the Resource Central panel. Edit the sound and then import it into Flash.
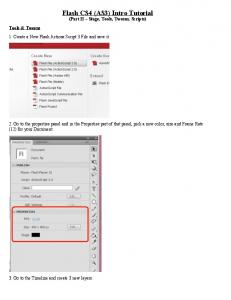
Creating a volume slider to control audio volume Create a new Flash ActionScript 2.0 document with a size of 550 by 550 pixels. Name the layer background and add a new layer and name it Bar. Make sure that this layer is selected then select the rectangle tool from the toolbar and create a long thin horizontal bar on the stage.
For those of you who have drawn the box with a coloured edge as opposed to no edge move the bar and select and delete the surrounding line.
Now select the coloured bar again and make sure under the properties panel that the X coordinate for registration point is set to zero and that the width is set to 400 pixels.
Now add a new layer and name it Ball and make sure that this layer is selected.
Choose the Oval tool from the tool bar and create a circle.
Again for those of you who have a coloured edge move the circle and delete the outline edge.
Move the circle until its centre registration point is over the middle of the horizontal bar.
Now add a text box to the top right of the circle on the same Ball layer.
Select the text box on the stage and make sure that on the properties panel it is Dynamic Text and give the instance name as volText.
With both the ball and text box selected right click and convert them to a symbol make sure it’s a movie clip symbol object and call it Ball.
Click on the Bar layer and select the bar only and right click again and convert it to a Movie Clip Symbol object named Bar. Select both the movie clips now the bar and the ball and text objects and convert them to one Movie Clip Symbol object named Controller.
Now delete the objects from the stage and rename the Bar and Ball layers to buttons and actions respectively.
Select the background layer and drag an instance of the Controller movie clip from the library to the stage.
Select the buttons layer and create three text labels Play Resume and Stop. You can use the align window to make sure that they are evenly spaced and horizontally aligned.
Under properties make sure that each of these text labels are static text NOT dynamic text.
Select each label in turn and convert it to a Button Symbol object named PlayButtonSymbol, ResumeButtonSymbol and StopButtonSymbol respectively. Then click each button and name the instances btnPlay,btnResume and btnStop respectively.
Select the Controller movie clip and give its instance name as mcVolSlider.
Double-click on the Controller Movie Clip Symbol to enter it and then select the Ball Movie Clip Symbol within it and give its instance name as volBall.
When saving the source Flash file make sure you save it in the same directory as the rsgimmeshelter.mp3 file as we are about to enter some ActionScript that will dynamically load the sound in to the Flash movie. Select Frame 1 of the actions layer and enter the following ActionScript. stop();
var mySound:Sound= new Sound(); mySound.loadSound("rsgimmeshelter.mp3" , true); mySound.stop();
btnStop.onRelease = function():Void { mySound.stop(); }; btnPlay.onRelease = function():Void { mySound.start(0,0); }; btnResume.onRelease = function():Void { mySound.start(mySound.position / 1000); }; // set volume var nVolCheck:Number; mcVolSlider.volBall.onPress = function():Void { this. startDrag (false, 0, 0, 400, 0); nVolCheck = setInterval(updateVolume, 100); };
mcVolSlider.volBall.onRelease = function():Void { this.stopDrag (); clearInterval(nVolCheck); }; // function for nVolCheck function updateVolume():Void { var vol:Number = (mcVolSlider.volBall._x)/4; mySound.setVolume(vol); mcVolSlider.volBall.volText.text = vol; }; // end set volume
In Flash CS5.5 you have to embed the font for Dynamic Text – so when you have the volume readout in the ball movie clip selected (volText Instance) then choose embed.
When the Embed Screen appears you can choose either All of the Font(s) or just the aspects of the font(s) that you have used.
Now save the file and test the movie. If your volume slider starts at zero in the middle of the bar you have not fixed the registration point of the bar correctly.
In order to fix this double click on the Controller movie clip and make sure the X coordinate of the bar is 0.
If this moves the bar to the right (relocates the registration point) then go back up out of editing the bar to the controller movie clip symbol and move the Ball back onto the Bar.
Then click back to the Scene and move the Controller Movie Clip to the right position on the screen and test Movie again.
That’s it – you can now control audio volume and playback dynamically in a Flash movie !