But did you know that you can use Flash for more than creating animated ... With
Flash CS4 Professional, you can also manipulate video and sound, and.
Lesson 2 What you’ll learn in this lesson: • Using Flash’s key features and capabilities
• Exploring the Flash Player
• Saving and opening documents
• Examining the Flash workspace
• Understanding
Flash CS4 Jumpstart
illustration and animation essentials
This lesson takes you through the basics you’ll need to get up-and-running with Flash CS4 Professional. Starting up In this lesson, you will set up a new Flash document and work with several prepared files to explore Flash’s tools and features. Before starting, make sure that your tools and panels are consistent by resetting your workspace. See “Resetting the Flash workspace” on page 3. You will work with several files from the fl02lessons folder in this lesson. Make sure that you have loaded the fllessons folder onto your hard drive from the supplied DVD. See “Loading lesson files” on page 3.
Lesson 2, Flash CS4 Jumpstart
FLCS4.indb 17
17
9/17/2008 10:20:14 AM
2
What is Flash?
2
See Lesson 2 in action! Use the accompanying video to gain a better understanding of how to use some of the features shown in this lesson.The video tutorial for this lesson can be found on the included DVD.
What is Flash? You may have heard about Flash and seen it on eye-catching web sites, online games, and banner advertisements. But did you know that you can use Flash for more than creating animated graphics? With Flash CS4 Professional, you can also manipulate video and sound, and even connect to databases to build web-based applications, such as shopping carts, or display news feeds of continuously updated information. There are four key feature areas in Flash CS4 Professional: Drawing environment. Flash features a complete set of drawing tools to handle intricate illustration and typography. Like its cousin, Adobe Illustrator CS4, Flash is a native vectordrawing application where you’ll create rich, detailed, and scalable digital illustrations. Flash now supports Illustrator and Photoshop files in their native file formats, .ai and .psd, making it easy to work with your favorite applications. All the content you create in Flash or these other programs can be brought to life through animation and interactivity. Animation. Flash creates lightweight animation that incorporates images, sound, and video, and can be quickly downloaded through the web. It has become a favorite—and essential—tool among web designers and developers who want to take their creativity to a whole new level. Flash animation is featured on web sites, CD-ROMs, and interactive games, and has become very popular for developing interactive, web-based advertisements. Flash’s compact files make it the ideal application for creating animated content, games, and applications for mobile phones and PDAs.
18
FLCS4.indb 18
Adobe Flash CS4 Professional Digital Classroom
9/17/2008 10:20:16 AM
What is Flash?
2
Flash supports traditional frame-by-frame animation as well as its own method of animation, known as tweening. With tweening, you specify an object to animate, create starting and ending frames, and Flash automatically creates the frames in between (hence tween) to create slick motion, color, and transformation effects.You’ll design your own Flash animations in Lesson 6, “Creating Basic Animation.”
Flash’s animation tweening generates slick animation between starting and ending frames.
Layout. The Flash Stage gives you the flexibility to create extraordinary web site layouts without the design restrictions that are typical of HTML-based web pages.You can position content anywhere on the Flash Stage with flexibility and precision, taking your layouts far beyond the limitations of static web pages. Flash movies can also include any typefaces you choose, allowing you to use fancy typography and unusual fonts freely on your web pages, which is typically difficult outside of Flash.
Lesson 2, Flash CS4 Jumpstart
FLCS4.indb 19
19
9/17/2008 10:20:17 AM
2
What is Flash?
Programming. Hidden beneath the beauty of Flash CS4 Professional is the brain of ActionScript, a powerful, built-in scripting language that extends your capabilities beyond simple design and animation. With basic ActionScript, which you’ll learn about in Lesson 10, “Introducing ActionScript,” you can control movie playback or give functionality to buttons. If you venture deeper, ActionScript can turn Flash into a full-fledged, application-building environment to create shopping carts, music players, games, and mobile phone applications.
Flash can develop lightweight games for phones, PDAs, and other consumer devices.
About Flash Player The Flash Player is a standalone application found most often as a plug-in to such popular browsers as Internet Explorer, Safari, and Firefox. The Flash Player is required to play compressed Flash movies (.swf files), much like a movie projector is needed to play film reels. The Flash Player is much more than just a playback machine, however. It reads instructions written in ActionScript to add rich interactivity to your movies. As of this writing, the Flash Player is installed on more than 99 percent of Internet-enabled computers, so a majority of your online audience is already equipped to view your Flash creations. For users who do not have Flash Player installed, it is available as a free download from the Adobe web site, adobe.com. Flash Player 10, including both a standalone application and browser plug-in, is automatically installed with the Flash CS4 Professional application.
20
FLCS4.indb 20
Adobe Flash CS4 Professional Digital Classroom
9/17/2008 10:20:17 AM
Flash file types
2
Flash file types You’ll work with two types of files in Flash: .fla and .swf. Each one has a very specific purpose in the process of creating your Flash movie.
When you create and save a new document, Flash generates an .fla (Flash authoring) document. These are the working documents you’ll use to design, edit, and store resources such as graphics, images, sound, and video. Additionally, each .fla document stores its own unique settings for final publishing. Because they are intended for designing and editing, .fla files can’t be viewed with the Flash Player—they’re used as the foundation to publish your final movie files in the .swf file format. Shockwave Flash, or .swf, files are completed, compressed movie files exported from the Flash CS4 Professional application. These files, created from your original .fla authoring files, are the only format the Flash Player can display and play. Although you can import .swf files into the Flash CS4 Professional application, you cannot edit them; you will need to reopen the original .fla files to make changes or additions. Now that you know what you’re going to be working with, it’s time to get your first Flash document started and begin exploring the Flash CS4 Professional workspace.
Lesson 2, Flash CS4 Jumpstart
FLCS4.indb 21
21
9/17/2008 10:20:18 AM
2
Creating a new document
Creating a new document Before you can draw or animate, you need to create a new document, or more specifically, an .fla file where all your work takes place.You can create and open documents from the Welcome Screen or from the File menu at the top of the screen. The Welcome Screen is the launch pad for creating and opening files, including handy, built-in sample templates for common document types, such as advertising banners and graphics for cell phones. The Welcome Screen appears when Flash is first launched or when no documents are open in the application.
The Welcome Screen is the launch pad for new documents, including many templates for common projects.
1
To create a new .fla document using the Welcome Screen, open Flash CS4 Professional. If the application is already open, close any files that are currently open using File > Close All.
2
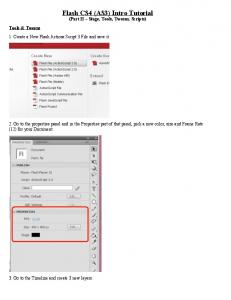
From the Create New column in the middle of the Welcome Screen, select Flash File (ActionScript 3.0).Your workspace, including the Stage, Timeline, and Tools panel, appears. Alternatively, you can create a new .fla document using the File menu. If you already created a new document using the Welcome Screen, this is not necessary.
22
FLCS4.indb 22
3
Choose File > New. The New Document dialog box appears.
4
Select Flash File (ActionScript 3.0), and press OK to create the new document.Your workspace appears.
Adobe Flash CS4 Professional Digital Classroom
9/17/2008 10:20:18 AM
Creating a new document
2
Setting up your new document Now that you’ve created your new Flash file, take a moment to specify some important settings for it. These settings, or properties, will prepare your document before you get to work.
1
Choose Modify > Document or use the keyboard shortcut Ctrl+J (Windows) or Command+J (Mac OS) to open the Document Properties dialog box.
2
In the Width and Height fields, type 500 and 300, respectively, to set the size of your movie. These dimensions set the width and height of the Stage, measured in pixels. The size of the Stage is identical to the size of your final movie, so make sure the size accommodates the design you want to create.
3
Click on the Background Color swatch ( ) and the Swatches panel appears. This lets you choose the color of your Stage and, in turn, the background color for your final movie (.swf file) when it’s published. If necessary, set the background color to white (#FFFFFF).
4
Type 30 in the Frame rate field to set your movie’s frame rate to 30 fps (frames per second). The frame rate determines the playback speed and performance of your movie. You’ll learn more about fine-tuning your frame rate in Lesson 7, “Advanced Animation.” The Match to Printer option sets your new document to match the paper size of your default system printer.This option is typically set to Default, requiring you to specify the width and height, or use the default Dimensions settings stored in Flash.
5
From the Ruler units drop-down menu, choose Pixels, if it is not already selected, to define the unit of measurement used throughout your Flash movie, including rulers, panels, and dialog boxes.
6
Press OK to exit the Document Properties dialog box and apply these settings. Leave the new document open.You’ll save it in the next part of this lesson.
Use the Document Properties dialog box to specify settings.
Lesson 2, Flash CS4 Jumpstart
FLCS4.indb 23
23
9/17/2008 10:20:19 AM
2
Creating a new document
If you are new to designing for the web, the concept of pixels may feel a bit alien to you. It helps to remember that there are generally 72 pixels in one inch for size calculation. If you prefer, you can use the Document Properties dialog box at any time to change the Ruler units for your file to a different unit of measurement.
Saving your Flash document Your new document should be saved before starting any work or adding any content. By default, the application saves documents in Flash CS4 (.fla) format.
1
Choose File > Save.
2
In the Save As dialog box that appears, type fl0201_work.fla into the Name text field. Navigate to the fl02lessons folder, and press Save. Choose File > Close to close the document.
Use the Save dialog box to choose a name and location for your new file.
Always include the .fla extension at the end of your filename to make it easy to identify the file format. To share your work with designers using earlier versions of Flash, you can choose to save your document in Flash CS3 format. Flash CS4 Professional format files will not open in previous versions of Flash, unless you set the format to Flash CS3 when saving the file. Flash CS4 Professional can open files created in older versions of Flash.
24
FLCS4.indb 24
Adobe Flash CS4 Professional Digital Classroom
9/17/2008 10:20:20 AM
Creating a new document
2
Get started with sample templates Flash includes a variety of sample templates to streamline the process of setting up common Flash projects. Creating files from these templates will pre-configure options such as document size and ActionScript version. Choose File > New > Template to view Flash’s included templates. In the Advertising section, templates include common banner sizes. Be aware that creating files from these templates sets the Flash player and ActionScript versions extremely conservatively for maximum compatibility. If you were planning on using the latest and greatest techniques and features in your project, this may be constricting. The Handset and Devices categories automatically set document size to the appropriate resolution for the selected device. These templates also use appropriate versions of Flash Lite. The Photo Slideshow category with its included Modern Photo Slideshow template is a quick and easy way to create a photo slideshow. Simply repopulate the file with your own photos. All the appropriate ActionScript has been written for you.
The Modern Photo Slideshow is one of the many useful templates available from the New from Template dialog box.
Lesson 2, Flash CS4 Jumpstart
FLCS4.indb 25
25
9/17/2008 10:20:22 AM
2
The Flash workspace
Opening documents Knowing how to open documents is as important as knowing how to save them. In addition to files created in Flash CS4 Professional, such as those included with this book, you can open documents created in previous versions of Flash. The steps are simple.
1
Choose File > Open. Use the Open dialog box to locate the fl0201_work.fla file you previously saved into the fl02lessons folder.
2
Select the fl0201_work.fla file, then press Open. Leave this file open.You will be using it in the next exercise. Don’t confuse the Open command with the Import options also found in the File menu.To access files created in other applications, such as Photoshop or Illustrator, you must use the Import menu. Importing files from other applications is explored in detail in Lesson 9, “Working with Imported Files.” If you want to reopen a document on which you have recently worked, there’s a shortcut. To list the last ten documents you’ve opened, and to reopen one, choose File > Open Recent, then select the file you need.
Choose File > Open Recent to access the last ten documents opened in Flash.
You can also open files using the Open button ( ) at the bottom of the Open Recent Items column on the Welcome Screen. Above this icon, you’ll see the last eight documents you worked on; this is a useful alternative to the Open Recent menu option.
26
FLCS4.indb 26
Adobe Flash CS4 Professional Digital Classroom
9/17/2008 10:20:22 AM
The Flash workspace
2
The Flash workspace Now that you know how to create, save, and open Flash documents, you’re ready to get familiar with the workspace where you’ll spend your time creating Flash content.
The Stage and work area After you create a Flash document, the center of your screen, called the Stage, is where the action happens. The Stage is the visible area of your movie, where you place graphics and build animations. By default, the Flash Stage appears white, but, as you saw earlier, you can change this from the Document Properties dialog box using the Modify > Document command. The gray area surrounding the Stage is the work area; artwork you place or create here is not included in your final movie. Think of this area as the backstage; for instance, you can animate a character to enter from the work area onto the Stage. The work area is also a good place to store objects that are not ready to appear in your movie. The Stage reflects the actual size of the movie you create when it is published.
A B
A.Work area. B. Stage.
Lesson 2, Flash CS4 Jumpstart
FLCS4.indb 27
27
9/17/2008 10:20:24 AM
2
The Flash workspace
The Flash Tools panel The Flash Tools panel includes everything you need to create, select, or edit graphics on the Stage.You can use the double arrows at the top of the Tools panel to collapse the panel icon-only view, or to expand the panel and see all of the tools.
Selection Tool (V) Subselection Tool (A) Free Transform Tool (Q) 3D Rotation Tool (W) Lasso Tool (L) Pen Tool (P) Text Tool (T) Line Tool (N) Rectangle Tool (R) Pencil Tool (Y) Brush Tool (B) Deco Tool (U) Bone Tool (X) Paint Bucket Tool (K) Eyedropper Tool (I) Eraser Tool (E) Hand Tool (H) Zoom Tool (M)
Stroke Color
Fill Color Black and White Swap Colors Snap to Objects Smooth Straighten
The Tools panel.
28
FLCS4.indb 28
Adobe Flash CS4 Professional Digital Classroom
9/17/2008 10:20:25 AM
The Flash workspace
2
Selection tools ICON
TOOL NAME
USE
WHERE IT’S COVERED
Selection
Moves selections or layers.
Lessons 2, 3
Subselection
Selects and moves points on a path.
Lesson 3
Free Transform
Resizes, rotates, and skews objects.
Lesson 6
Lasso
Makes selections.
Lesson 3
3D Rotation
Rotates objects in 3D space
Lesson 7
TOOL NAME
USE
WHERE IT’S COVERED
Pen
Draws a vector path.
Lesson 3
Text
Creates a text box.
Lesson 3
Line
Draws straight lines.
Lesson 3
Shapes
Draws vector shapes.
Lesson 3
Pencil
Draws freehand paths.
Lesson 3
Brush
Draws freehand filled areas.
Lesson 4
Deco
Creates patterns using symbols
Lesson 5
TOOL NAME
USE
WHERE IT’S COVERED
Ink Bottle
Applies or modifies strokes.
Lessons 3, 4
Paint Bucket
Applies or modifies fills.
Lessons 3, 4
Eyedropper
Samples colors and styles.
Lessons 3, 4
Eraser
Erases artwork.
Not referenced in this book
Bone
Creates Inverse Kinematic objects
Lessons 5, 7
Drawing and Text tools ICON
Color tools ICON
Lesson 2, Flash CS4 Jumpstart
FLCS4.indb 29
29
9/17/2008 10:20:26 AM
2
The Flash workspace
Navigation tools ICON
TOOL NAME
USE
WHERE IT’S COVERED
Hand
Navigates the page.
Lesson 8
Zoom
Increases or decreases the relative size of the view.
Lesson 8
TOOL NAME
USE
WHERE IT’S COVERED
Stroke Color
Selects stroke (outline) color
Lesson 3
Fill Color
Selects fill (inside) color
Lesson 3
Default Stroke/Fill
Sets stroke and fill to default colors: black and white.
Lesson 3
Swap Colors
Swaps stroke and fill colors
Lesson 3
No Color
Sets selected color to none
Lesson 3
TOOL NAME
USE
WHERE IT’S COVERED
Snap to Objects
Enables snapping between objects on the Stage.
Lesson 5
Stroke and fill color selectors ICON
Tool options ICON
The Property Inspector The Property Inspector appears on the right side of your Flash workspace. Grouped with the Library panel, it displays properties and options for objects selected on the Stage, and also allows you to modify them. The Property Inspector is contextual, and so the information it displays is specific to the tool or object you select. The Property Inspector is an essential part of the Flash workflow; it can display and set an object’s properties, including width, height, position, and fill color. Let’s take a look at the Property Inspector in action.
30
FLCS4.indb 30
Adobe Flash CS4 Professional Digital Classroom
9/17/2008 10:20:32 AM
The Flash workspace
1
If the fl0201_work.fla file is not still open from the last exercise, choose File > Open to reopen it from inside the fl02lessons folder. Select the Rectangle tool ( ) from the Tools panel.
2
At the bottom of the Tools panel, click the Fill Color swatch ( ). When the Swatches panel appears, choose a yellow shade from the right side of the Swatches panel.
2
Choose fill and stroke colors using the swatches at the bottom of the Tools panel.
3
Move your cursor to the center of the Stage. Click and hold, then drag to draw a new rectangle. Release the mouse button after you have created a rectangle at the center of the Stage.
To draw shapes on the Stage, select a Shape tool, then click and drag.
4
Choose the Selection tool ( ) from the top of the Tools panel, and double-click the fill of the new shape to select it. Notice that the Property Inspector on the right side of the workspace now displays the selected shape’s width (W) and height (H) in pixels. Above the width and height, the object’s X and Y positions on the Stage are also displayed.
Lesson 2, Flash CS4 Jumpstart
FLCS4.indb 31
31
9/17/2008 10:20:37 AM
2
The Flash workspace
5
Click the underlined number next to W: to highlight the current value, then type 250 to set the rectangle’s width. Press Enter (Windows) or Return (Mac OS). Use this same method to set the height to 150.
You can set properties for a selected shape using the Property Inspector.
6
Choose the Text tool ( ) from the Tools panel. Click above the new rectangle you created and type the phrase Flash CS4. Notice that the Property Inspector now displays text options such as font and size.
When text is selected, the Property Inspector displays relevant options such as font and size.
32
FLCS4.indb 32
Adobe Flash CS4 Professional Digital Classroom
9/17/2008 10:20:39 AM
The Flash workspace
7
Click and drag inside the new text box to select all the text. In the Property Inspector, locate the Family drop-down menu and choose Arial (or, if that’s unavailable,Verdana). Click on the Size and set the type size to 45.
8
In the Property Inspector, click the Color swatch and choose a blue shade from the Swatches panel that appears to change the color of your type. In this exercise, the color #000099 was used.
2
Select and format type directly from the Property Inspector.
Lesson 2, Flash CS4 Jumpstart
FLCS4.indb 33
33
9/17/2008 10:20:40 AM
2
The Flash workspace
9
Choose File > Save to save your work, then choose File > Close. In addition to text and graphics, the Property Inspector also works with the Timeline, allowing you to set options and view information for specific frames.You will use this essential tool throughout the lessons to modify objects on the Stage, and frames in the Timeline.
The Property Inspector shows options for an active tool or information about a selected object, even frames on the Timeline.
Panels and panel groups The Flash workspace is extremely flexible. It is organized into a series of panels, many of which you’ll become quite familiar with, including the Library panel, Property Inspector, and Timeline.You’re free to arrange any of these panels however you like.You can also open panels that are not available in the default workspace and arrange, group, and resize them to suit your needs.
Panels can be freely repositioned, resized, and grouped.
34
FLCS4.indb 34
Adobe Flash CS4 Professional Digital Classroom
9/17/2008 10:20:41 AM
The Flash workspace
2
You’ll explore the workspace in more detail in Lesson 8, “Customizing Your Workflow,” but there are a couple of things that you should be aware of in the interim. Eventually you’ll want to take control of your workspace and customize it to your preference, but for now, the flexibility of the workspace might be more confusing than advantageous. If you mistakenly drag panels around and start losing them, you can always reset your panels to their default positions by choosing Window > Workspace > Essentials. If you’re migrating to Flash CS4 from an earlier version, you may also be interested in the Classic option found in this menu. For the sake of consistency, this book uses the default CS4 workspace.
Choose Window > Workspace > Essentials to reset your workspace to the Flash CS4 defaults.
Lesson 2, Flash CS4 Jumpstart
FLCS4.indb 35
35
9/17/2008 10:20:42 AM
2
The Flash workspace
It’s also important to note that each panel features a panel menu that can be accessed from the button in the top-right corner. This menu contains options that may or may not be available inside the panel. Sometimes this menu is superfluous; sometimes it’s integral. Just remember to keep it in the back of your mind. It’s usually the first place to look if you can’t find an option that you’re looking for.
Panel menus are accessed using the button in the top-right corner.
The Timeline The Flash Timeline is the heart of the action, where you create animations and sequence graphics with sound, video, and controls. The Timeline comprises frames, each one representing a point in time, just like a historical timeline. Graphics and animations are placed at specific points, or keyframes, along the Timeline to create sequences, slide shows, or movies.You can place ActionScript on individual keyframes to control playback and add interactivity, or place sounds along the Timeline to add sound effects, music, and dialogue. A
B
D E
F
C
G
A. Click and drag to undock the Timeline from the document window. B. Frames. C. Frame/Layer view options. D. Insert Layer. E. Insert Layer Folder. F. Delete Layer. G. Keyframe. 36
FLCS4.indb 36
Adobe Flash CS4 Professional Digital Classroom
9/17/2008 10:20:43 AM
The Flash workspace
2
The Timeline also comprises layers; layers behave like transparent pieces of film stacked on top of one another. Each animation and piece of artwork can be placed on its own individual layer, which helps you organize and manage your work. If you’ve worked with other Adobe CS4 applications, such as Illustrator, Photoshop, or InDesign, you may already be familiar with the power and flexibility of layers. Like all panels, the Timeline has a panel menu. Most of the options included in the Timeline’s panel menu relate to customizing its display. Here you can adjust the size of layers and frames and turn on Preview mode to display the objects included on each layer as a thumbnail in the Timeline.
Change the Timeline settings according to how you’d like it to appear.
Lesson 2, Flash CS4 Jumpstart
FLCS4.indb 37
37
9/17/2008 10:20:44 AM
2
The Flash workspace
In this exercise, you’ll explore a Timeline with multiple keyframes, animations, and layers to see how a typical Flash document looks.
1
Choose File > Open, and select the fl0203.fla document inside the fl02lessons folder. Press Open to open it for editing.
2
Examine the Timeline below the Stage.You’ll see that it contains a layer, with a layer folder above it. Layer folders can contain layers and are used to organize the Timeline when layers start to add up. Click the arrow to the left of the Gears layer folder to expand it and reveal its contents. The three indented layers under the Gears name are the layers that are inside the folder.
Click the arrow to the left of a layer folder to expand it.
3
Each of the three layers contains a separate animation that is marked at the beginning and end with a keyframe. Keyframes are special frames that are created along the Timeline where you want to introduce or remove a graphic, start or end an animation, or trigger something to happen with ActionScript. A blue background on frames indicates a Motion tween animation. Press Enter (Windows) or Return (Mac OS) to play the Timeline.
4
Look at Layer 4 in the Timeline, which contains several consecutive keyframes. Click once on each keyframe to jump to that frame and see what it displays at that specific point in time.
5
To shuttle through the Timeline, grab the playhead at the top (indicated by the red marker), and drag it in either direction.
Shuttle back and forth in the Timeline by dragging the playhead.
38
FLCS4.indb 38
Adobe Flash CS4 Professional Digital Classroom
9/17/2008 10:20:45 AM
The Flash workspace
6
2
Choose File > Close to close the current document. If prompted to save any changes, press Don’t Save.
Tabbing between open documents When you have more than one document open at a time, each document displays its own tab at the top of the document window. Click on a document’s tab to switch to it and bring it forward for editing. To close the active document, you can choose File > Close, or use the small x that appears at the top of the document’s tab. To close all open documents at once, choose File > Close All.
Tab easily between multiple documents at a time.
The Swatches panel You’ll see the swatch icon ( ) quite a few times in Flash—it opens the Swatches panel, which is used to set colors for backgrounds, fills, outlines, and type. You can choose from 256 websafe colors and seven preset gradients, or create your own.You will learn how to add your own custom colors and gradients to the Swatches panel in Lesson 3, “Getting Started with the Drawing Tools.”
The Flash CS4 Swatches panel.
The six-character code at the top of the Swatches panel is a hexadecimal code, the standard color-coding system for the web. As you choose colors from the Swatches panel, you’ll see the hexadecimal value for the selected color displayed at the top. The Color Picker in Adobe CS4 applications such as Illustrator and Photoshop also features hexadecimal values, so you can easily match colors between applications by copying and pasting the code shown.
Lesson 2, Flash CS4 Jumpstart
FLCS4.indb 39
39
9/17/2008 10:20:46 AM
2
Practicing with the Flash tools
Practicing with the Flash tools Now that you’ve had a tour of the Flash tools and workspace, it’s time to take them for a test drive. In the following exercises, you’ll complete the illustration shown in fl0202_fish.fla while getting the feel for the selection, drawing, and transformation tools.You’ll also use Flash tweening to create your first animation.
The drawing and selection tools in action Your first steps will be to create and modify shapes and freehand artwork with the drawing tools, and then fine-tune your work with the selection tools. The selection tools work as a team with the drawing tools to position and modify shapes, illustrations, and type.
1
If you haven’t done so already, open the fl0202.fla file located in the fl02lessons folder.
2
Choose File > Save As; the Save As dialog box appears. In the Name text field, type fl0202_work.fla, then navigate to the fl02lessons folder and press Save.
3
Choose the Selection tool ( ) in the Tools panel. This versatile tool can select, move, and manipulate objects directly on the Stage.
4
On the Stage, click once on the fin above the fish’s body to select it. Click and drag it downward until it joins with the body. Release the mouse button.
Use the Selection tool to select and move objects on the Stage.
40
FLCS4.indb 40
Adobe Flash CS4 Professional Digital Classroom
9/17/2008 10:20:47 AM
Practicing with the Flash tools
5
2
You need to make a copy of this fin to use on the bottom of the fish. The easiest way is to clone it, or to drag a copy from the original. To do this, click the top fin once to select it, then, while holding the Alt (Windows) or Option (Mac OS) key, click and drag a copy away from the original fin.
Hold down Alt (Windows) or Option (Mac OS) and drag an object to clone it.
6
Because the new copy will serve as the bottom fin, you’ll need to flip it around so it’s pointed in the proper direction. Click once to select the new fin copy, and choose Modify > Transform > Flip Vertical. This Transform menu command flips the fin so it’s pointed in the right direction.
The Transform menu features commands that flip, skew, and rotate a selected object.
Lesson 2, Flash CS4 Jumpstart
FLCS4.indb 41
41
9/17/2008 10:20:48 AM
2
Practicing with the Flash tools
7
Still using the Selection tool, click and drag the new fin copy to the bottom of the fish’s body, and leave it selected.
8
The new fin is almost there, but it’s a bit big. There are several places within Flash where you can resize an object, including the Transform panel; choose Window > Transform to open it.
9
With the new fin selected, type 60 in the horizontal and vertical Scale fields at the top of the panel and press Enter or Return to commit the change. The fin is reduced to 60 percent of its original size.
The Transform panel precisely resizes objects by a set percentage.
Notice the Constrain button ( ) (Windows) or the Constrain checkbox (Mac OS) next to the Transform panel’s Width and Height scale text fields.When you check this box, you can enter a size in only one field and Flash automatically resizes the selected object proportionally. 10 To add an eye to your fish, select the Oval tool ( ) from the Tools panel.You may need to click and hold on the Rectangle tool ( ) to access this tool. At the bottom of the Tools panel, click on the Fill color swatch and choose black as the fill color. 11 The Oval tool lets you manipulate shapes even further; here, you’ll add an inner radius to ovals to create ring-style shapes. In the Property Inspector, type 50 in the Inner radius text field and press Enter or Return.
42
FLCS4.indb 42
Adobe Flash CS4 Professional Digital Classroom
9/17/2008 10:20:49 AM
Practicing with the Flash tools
2
12 Select Layer 1 in the Timeline by clicking on the name, and click and drag on the left side of the fish to draw a small oval, which will serve as the fish’s eye. Make sure to position your oval before de-selecting it to avoid removing color from the fish below. To create perfect circles, hold down the Shift key while drawing ovals.
Use the Oval tool with an inner radius to add an eye to your fish.
Congratulations! You’ve designed your first graphic object in Flash. However, this fish is rather basic.
Using gradient and color tools Now you’ll add some depth and more vibrant color to your fish, using the gradient colors and artistic stroke styles.
1
Choose the Selection tool ( ) from the Tools panel, and click once inside the body of the fish; a dotted pattern indicates the fill area is selected.
2
To change the body’s color, click on the Fill color swatch at the bottom of the Tools panel. In the resulting Swatches panel, choose the orange/yellow gradient located at the bottom of the panel to apply it to the selected area. Deselect the fish by choosing Edit > Deselect All or by clicking offstage in the gray work area.
Give your fish more depth by filling it with a gradient from your Swatches panel.
Lesson 2, Flash CS4 Jumpstart
FLCS4.indb 43
43
9/17/2008 10:20:52 AM
2
Practicing with the Flash tools
3
The Eyedropper tool ( ) enables you to sample a color from one object and transfer it to another.You’ll use it to apply the body color to the fish’s fins. Using the Selection tool ( ), hold down the Shift key and click once on each fin so that both are selected at the same time. Select the Eyedropper tool from the Tools panel. Click once on the body of the fish to sample the new color and apply it to the selected fins.
4
Choose Edit > Deselect All to deselect all items on the Stage. In the Tools panel, click and hold the Paint Bucket tool ( ) and select the Ink Bottle tool ( ) from the menu that appears. The Ink Bottle tool lets you change an object’s stroke color.You’ll use the Property Inspector to set a stroke color and style to apply.
5
In the Property Inspector, click the Stroke color swatch and type #FF6600 (orange) into the hexadecimal field at the top-left corner of the Swatches panel that appears. Press Enter or Return to set this color.
6
Click on the Style menu that appears below the color swatches. Choose the ragged style from the drop-down menu.
Choose a stroke color and style and apply them using the Ink Bottle tool.
7
44
FLCS4.indb 44
Click on the edge of the fish body to apply the new stroke color and style. Click on the edge of the remaining two fins and the gill line to apply the same color and stroke style to all three. Choose Edit > Deselect All to deselect any active items on the Stage.
Adobe Flash CS4 Professional Digital Classroom
9/17/2008 10:20:55 AM
Practicing with the Flash tools
8
2
Choose the Selection tool from the top of the Tools panel. Move the pointer slightly to the right of the gill line without touching it; a small curve appears below your pointer. Click and drag slightly to the right to bend the gill line into a curve.
The Selection tool can bend straight lines or distort shapes.
9
Click and hold the Rectangle tool ( ) in the Tools panel and select the Oval tool ( ). Click the Fill color swatch at the bottom of the Tools panel, and choose a light blue color. Click the Stroke color swatch and set your stroke color to No color ( ).
10 While holding down the Shift key, draw several ovals in front of the fish to create bubbles. 11 Choose File > Save to save your work.
Use the Oval Primitive tool to draw bubbles in front of your fish.
12 Choose File > Open, select the fl0202_done.fla file in the fl02lessons folder, and press Open to open it. Compare your work against the completed file fl0202_done.fla. Choose File > Close All to close all currently open documents. You’re off to a good start with the drawing tools.You will work with these tools in more depth in Lesson 3, “Getting Started with the Drawing Tools.”
Lesson 2, Flash CS4 Jumpstart
FLCS4.indb 45
45
9/17/2008 10:20:57 AM
2
Practicing with the Flash tools
Animation in action Flash is known for powerful, yet easy-to-use animation that you create directly in the Timeline. The Timeline displays content over periods of time, represented on the Timeline in frames. Each frame can be set as a keyframe, where items can be placed and animation can start or end. Flash can generate animation with little more than a starting point and ending point; this method is known as tweening.You tell Flash where you want an object to start and stop its animation, and it figures out the frames in between. To apply the same animation behavior to more than one object on the Stage, you’ll use the new Copy Motion and Paste Motion features.
1
Choose File > Open and, when prompted, select the fl0201.fla file in the fl02lessons folder. Press Open. Two tortoises appear on the Stage. In the next steps you’ll animate the big turtle crossing the stage.
2
Using the Selection tool ( ), click on the big turtle. Notice that the Big Turtle layer in the Timeline is highlighted in blue, along with the 60 frames included in the Big Turtle layer. Right-click (Windows) or Ctrl+click (Mac OS) on the big turtle and choose Create Motion Tween from the context menu.
Right-click/Ctrl+click on the Big Turtle and choose Create Motion Tween from the context menu.
Motion tweens allow you to easily create animations by simply adjusting an object’s properties at different points on the Timeline. Flash takes care of all the heavy lifting. 3
Click and drag the playhead to frame 60.
Drag the playhead to frame 60.
46
FLCS4.indb 46
Adobe Flash CS4 Professional Digital Classroom
9/17/2008 10:20:59 AM
Getting help
4
2
Click and drag the big turtle to the left side of the stage (just before the head reaches the edge). When you release the mouse, you will see a green motion spline appear between his old location and his new one.
The big turtle repositioned.
5
Press Enter or Return to preview your first animation. It feels good, doesn’t it?
Getting help If at any point you can’t find a specific command, want to know how a tool works, or want to learn how to complete a certain task, you can always consult the Flash Help menu. The Help menu launches the Help viewer (an all-in-one glossary, troubleshooter, and reference manual), and also provides links to key Adobe forums and support centers. The Flash Help viewer is a good source for quick answers.
1
Choose Help > Flash Help.
2
When the panel appears, use the categorized list on the left, or type in a search term to get help on a specific topic or keyword.
Lesson 2, Flash CS4 Jumpstart
FLCS4.indb 47
47
9/17/2008 10:21:00 AM
2
Moving forward
Support forums Adobe’s Flash forums can be a rich source of answers, ideas, and tips from experts and other avid Flash users.You can search for answers to common questions or post your own topics and questions.
1
Choose Help > Flash Developer Center. The Support forum launches in your system’s default browser.
2
In the search field in the upper-right corner, enter terms you want to explore, then press the Search button.
3
To post topics, questions, or replies, click the Your Account link at the top of the page to log in with your Adobe ID. You must register to post questions or replies to Adobe’s Flash forums.
Moving forward In the next chapter, you’ll put pen to paper (or mouse to Stage, rather) to get your creativity flowing with the Flash drawing tools. Now that you’ve become familiar with the workspace, things should be just a bit easier. Don’t hesitate to reference this chapter again to refresh your memory.
Self study Create and save a new document in the fl02lessons folder. Use the Property Inspector to set dimensions, background color, and frame rate. Experiment with the drawing tools you’ve learned so far, to create artwork on the Stage, and use the Selection tool to move and adjust the artwork as needed. To get a feel for the workspace, experiment with different panel setups and positions. The Workspace menu (Window > Workspace) features some presets that show how you can maximize the space in your work area. Try animating the little turtle in fl0201.fla. Experiment with animating other properties using the Property Inspector.
48
FLCS4.indb 48
Adobe Flash CS4 Professional Digital Classroom
9/17/2008 10:21:01 AM
Review
2
Review Questions 1 From what two locations can you open a document that was previously open?
2
What panel allows you to view information about a selected object, or set options for an active tool?
3
What method does Flash use to automatically create animation from a starting and ending point?
Answers 1 From File > Open Recent, or the Open a Recent Item column on the Welcome Screen.
2
The Property Inspector.
3
Tweening.
Lesson 2, Flash CS4 Jumpstart
FLCS4.indb 49
49
9/17/2008 10:21:02 AM


![[PDF] Download Adobe Flash CS4 Professional ... - Google Sites](https://m.moam.info/img/260x300/pdf-download-adobe-flash-cs4-professional-google-s_6476f6ce097c474b228b52a0.jpg)
![[PDF BOOK] The Essential Guide to Flash CS4 - Google Sites](https://m.moam.info/img/260x300/pdf-book-the-essential-guide-to-flash-cs4-google-s_6478005d097c474d228caaa1.jpg)