5. Setting up Cubase with your Alesis Audio device. .... By going through this
setup guide, and properly setting up Cubase LE 4, any such errors will be
resolved.
Cubase 7.5 / Artist 7.5 / Elements 7 extensive comparison. Full feature. Limited
feature. BASICS. Cubase 7.5. Cubase. Artist 7.5. Cubase Elements 7. Number of
...
Page 1 ... not already have one). • Apple iphone SDK (can be downloaded from:
... •Consider the following sample application (open it up in Xcode). • Click on ...
If the following screen appears, the USB cable is connected. ... Step 2: Install the software and follow on screen instr
A List Of 100 Free Directories For Your Site. Please Note That Free Directories Are No Longer A Reliable Way To Build Qu
Select Easy Install in order to install the application software, electronic manual ... Select Custom Install in order t
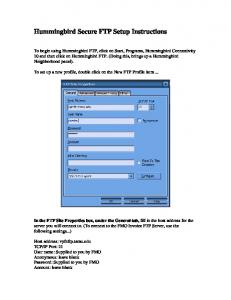
Hummingbird Secure FTP Setup Instructions. To begin using Hummingbird FTP,
click on Start, Programs, Hummingbird Connectivity. 10 and then click on ...
Monitor Speakers Setup (Electrovoice ZX1-90) . ... Monitor Speaker Wiring . ......
contains the speaker connection jacks, and a set of input jacks (see diagram in.
is based on using TranzPort v1.0.0 drivers with Cubase SX (Version 2.2) and
Cubase (Version 1.0.7), but may apply to earlier versions of these programs as
well ...
a PlayBook functions, please download and review the User Quick Start first. 1.
Create a BlackBerry ID for the PlayBook you are activating. ... and tap Restart. 4.
The last step is to go back to your wireless networking configuration and select the GCSS-BYOT network if it is not alre
If you are unfamiliar with Android, please download and review the Quick Start
first. ... 2. Charge the device. • Prior to turning on the Galaxy Tab, plug it into a
wall ...
Easily setup or replace your jointer knives without all the headaches. Two
precisely ... Find the Top Dead Center of your jointer knife by placing a straight
edge ...
100 (45). 25. 120 (55). 30. 140 (65). 35. 160 (75). 40. 180 (85). 45. 200+. (90+).
50 - 60. Or, this formula may be used: PSI: divide your weight in pounds by 4.
Instructions ... Twist the tail on the back of the pig to the left, this will ... balloon. Be
careful not to squeeze the belly and pop the balloon or let children put this, ...
Function. With the external Parallel/Centronics interface printers of the. A+ and
MACH4 series can be connected to the parallel inter- face of a computer.
the back right rod hole of the Mini-baseplate. On the black 15mm ... lenses. (See Zipgear video for further instructions
1. 2. 3. Installation and Setup Instructions. FAS8040 and FAS8060 Systems. Power cables ... 1. 2. See your network administrator for help connecting to your switch. ..... Set up Service Processor and Remote Support Agent. Download ...
Required Setup Instructions: Samsung Galaxy Player. Estimated ... If there is an
icon in the notification bar labeled Software Update, tap it and follow the on-.
SHERLINE Lathe and Mill Setup Instructions. Getting answers to your questions
about machining. Over the years we have found that the majority of our ...
Comparsion Chart. Page 2. Steinberg Media Technologies GmbH. Cubase 7 /
Artist 7 / Elements 7 comparison. Full feature. Limited feature. BASICS. Cubase 7.
Jan 21, 2013 ... This PDF provides improved access for vision-impaired users. Please ... Table of
Contents. 4. About Cubase iC Pro. 5. Installation Procedure. 6.
Consolidating regions in Cubase/Nuendo. Steps. 1. Select the Range Tool, and
highlight all tracks from 0:00:00.000 through to the very end of the very.
Upon launching Cubase you will be brought to the this screen. We will want to
begin by ... This will allow Cubase to use up to four Delta sound cards. .... Page 7
...
Cubase Set-up Instructions By James DeBenedetti @ sprawlingdelusions.com
Upon launching Cubase you will be brought to the this screen We will want to begin by taking care of basic settings and creating a project that has no tracks that will serve as a template for future projects and will keep us from having to make several basic setting every time we create a new project.
The setting we need to make can all be found through the “Devices” menu Let’s start by selecting the “Device Setup” from the Devices main menu.
Now we need to set the audio drive. This is done in the VST Multitrack menu. To show this menu left click the VST Multitrack line. Assuming that you are using M-Audio Delta sound cards (Delta 1010-lt or Delta 410) you will want to ensure that the ASIO Driver is set to “M-Audio Delta ASIO”. This will allow Cubase to use up to four Delta sound cards.
Next we will need to make sure that we can see the audio outputs of the soundcards. To do this left click the VST Output line. In the right pane you will want to ensure that all the outputs have a yes in the “visible” column.
We will now want to go to VST Inputs and turn off the audio inputs unless you plan on doing some audio recording. This will save system resources.
Next we need to make sure that your Midi ports are visible. So go to “Windows MIDI” and check to see if your midi ports are shown.
Using your mouse left click the ok button to make your setting take effect
Now we need to add Audio bus to use with audio tracks. Start by going to the “Devices” menu and selecting “VST Connections” or press the “F4” key. This will bring up the window shown below.
Audio Bus’ are how Cubase manages its audio connections to your sound cards and the real world. Bus’ can be either Stereo, Mono, or Surround (5 or 5.1). With a Stereo Bus you will assign two mono outputs of the Delta sound card (one for the left channel and one for the right) To add a Bus, position your mouse pointer over the “Add Bus” button and click the left mouse button. The Add Bus menu will pop up and ask you to select the type of Bus (Mono, Stereo, 5.1, etc) you would like to add.
After choosing the type of Bus you are adding, click the “OK” button using your mouse.
For this example I have selected to add a stereo Bus. You can see from the image to the left that Stereo Bus 3 has been added. The prior state of the Bus’ can be seen in the image above.
Using the same procedure I have now added a mono Bus that can be seen below.
By moving your mouse pointer over the Bus name (Stereo Out 2 for example) and double clicking your left mouse button you will select the Bus’ name. Once selected you will get a curser and you can change the name of the Bus to something more meaningful. An example would be naming the bus that goes to the amp and speakers that pipe sound to the que line of your haunt to be “Que Line”. By doing this it will be easier in later stages when you are adding audio tracks to your project and assigning the bus the track will output through. The renamed Bus can be seen in the next image.
The last step of adding an audio Bus is to assign which output of your sound card the Bus is connected to. This is done by right clicking the name of the “ASIO Device Port” for the channel of the bus you are adding, and selecting from the pop-up list the port that you would like to connect. If you add a second, third or fourth delta audio card after you have created a project or the template we are currently working on, make sure you come back to the VST Connections area and add Bus’ for the new card and check to see that you’re old assignments have not changed. When you are done adding audio Bus’ close the window and return to the main start screen of Cubase.
Congratulations you have just completed the basic configuration of Cubase and are now ready to create a project, or in our case a template to be used for creating future projects
Creating the New Project
Go to the file menu and select New Project The below New Project menu will pop-up. Generally you will want to select “Empty” from the list and then click the “OK” button using your mouse.
After you click the “OK” button the below pop-up box will appear. This box Allows you to select the directory (location on your computer) that the project will be saved. I recommend that you create a master directory like “Midi Shows” that you can then create additional sub directories in for each of your shows. In this master directory I would use to save the template that we are currently making.
An important thing to remember is that a copy of any audio files (wav. Mp3, etc) that you import into your project will be saved to the same directory that your project is set up to. After you click the “OK” button your screen should look like the one shown in the next image.
Now we want to save this empty project that has all of your basic Cubase setting. Then the next time you want to create a project you can open your blank template and save it to a new directory under a different more meaningful name and you will be all ready to start adding tracks and recording you new show.
Now you want to make a copy of your template and we will start adding tracks and building our new show
After you have converted your template to be your new project, position your mouse pointer in this section and right click the mouse to get the pop-up menu shown to the right. I normally start by adding a Midi track.
After you add the Midi track your screen should look like the image at the left.
Next we should change the midi channel number to “Any”. This is a good default setting and can be changed to 1-16 as a need arises and you become more familiar with your set-up. Additionally you probably want to start out with “in” set to all Midi inputs and out set to Delta 1010 LT assuming you are using the Delta 1010 as your midi interface.
It’s not a bad Idea to save your project every now and then just as percussion. So go to the File menu and click on “Save”
Once you have a midi track inserted you can check the rest of your set-up by banging on a few keys of an Oxygen8 keyboard, assuming you are planning on using one and have it plugged into the computer you are using with Cubase. The teal indicator shown to the right in the midi track will change with the quantity of midi data being received or sent from the track Additionally the teal and red indicators in the transport bar also indicate incoming and outgoing midi data
To record your show select your midi track and click the record button Once recording had begun any key on the Oxygen8 you depress will be recoded and passed through to the midi output of the Delta 1010 or whatever midi interface you have chosen to use with your computer. To stop recording click the stop button with your mouse.
Once you have recorded your midi track you may find that you need to edit or tweak what you have recorded. This can be easily done by using the piano roll (Key Editor). To open the Key Editor you have to have the midi segment selected. Once the midi segment is selected open the “MIDI” menu.
From the MIDI Menu select “Open Key Editor” from the menu
The image to the left is what the Key Editor looks like. Each row represents one midi note. You can use your mouse and the tools at the top of the screen to edit your midi segment By using the pencil looking to you can draw in additional midi note. This is how I added the below note to the midi sequence, the image to the left is the before sequence.
After you are doe editing your sequence just close the Editor.
Loop playback After you have finished your show you will most likely want to have the show playback and control your props and show. While on one shot playback can be useful I believe you will find extreme power from Cubases ability to do looped playback. To start we need to select the time period that you want to playback in a loop. Do this by highlighting the time period you need.
Once you have the desired period selected, use your mouse to select the loop button. You have now set-up Cubase to play the desired time period and then start over again at the beginning of your selection. To start playback now you just have to click the play button with your mouse.
Adding an Audio Track One of the most powerful features of using Midi and Cubase to control your props is the ability have both your control sequence and an audio track in the same program and perfectly synchronized. Most of the time you will be importing the audio track from an existing file. To do this opens the File Menu and select “Import”. When you select import you well get a second menu that asking for the type of item you with to import. Most of the time you will be importing an audio track
After you select from File you will get a pop-up window asking you for the file that you would like to import. Navigate to the location of your audio file and open it. After you click the open button you will be asked if you would like to copy the audio file to your working directory. It is generally a good idea to let Cubase make a copy of your audio file and save it in your working directory of your project.
Your screen should now look something like the one on the right. Next we need to set the Audio Bus that the new audio track will be played through. With the audio track selected you should have options to select “In” and “Out”. Using your mouse activate the drop down menu for the “Out”. When this happens you should see a menu that looks like this.
You will see that we have several Bus’ to choose from, but you will also notice that you can only choose from Bus’ that we added in the previous steps above. Also note that the highlighted item in the image to the left is “Que Line”. So do you still remember what ports of the delta sound card “Stereo Out 3” is connected to? Naming the Bus’ to more meaningful things will make this part of your project easier as you can see from the Bus that was renamed to “Que Line”.


![Installation and Setup Instructions - NetApp Support [PDF]](https://m.moam.info/img/260x300/installation-and-setup-instructions-netapp-support_648c9e0e098a9e63548b4620.jpg)


