Formula Flowcode micromouse Guide to getting started
Recommend Documents
Drawing Template. ..... This manual uses the following typographical conventions
: Convention .... power, speed, and accuracy associated with 2D CAD drafting.
This manual will assume you have the CHIPINO Deluxe Starter. Kit. If you have
..... books Beginner's Guide to Embedded C Programming by Chuck. Hellebuyck
...
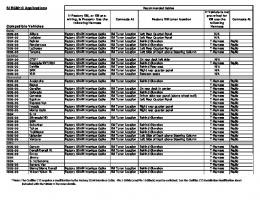
wiring, is Present- Use the following Harness. Connects ... T-Harness. Radio.
2003-06. Rendezvous. Factory SDAR Interface Cable. XM Tuner Location.
Behind Glovebox. T-Harness. Radio. 2005-06. LaCrosse .... T-Harness. Radio.
Pontiac. 2003-05. Aztek
... EDUCATION. A Bloomberg Professional Service Offering. GETTING.
STARTED. GUIDE ... Connects to function Help Pages (online user guides) as
well as the ...
access the platform's services by filling out the fields. Fill out the required fields and confirm your subscription via
4 Feb 2010 ... See the license file "OpenCascadeLicense.txt" in the Navisworks installation
directory. Source code is available .... Animation Interaction . ... In this short
tutorial, you learn the essential knowledge required to use Autodesk.
NetSupport Protect disk recovery is ideally suited to training and classroom ...
install disk recovery on Windows XP and Vista the system restore/protection must
.
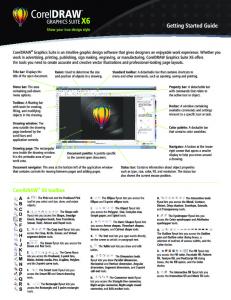
CorelDRAW® X6 toolbox. Rs, A ... which include Tips 8r Tricks and video tutorials
. ..... With both CorelDRAW X6 and Corel PHOTO-PAINT X6, a custom color.
... EDUCATION. A Bloomberg Professional Service Offering. GETTING.
STARTED. GUIDE ... Connects to function Help Pages (online user guides) as
well as the ...
... EDUCaTION a bloomberg Professional Service Offering. GETTING. STaRTED.
GUIDE ... Connects to function Help Pages (online user guides) as well as the ...
Getting started guide. Go to https://openstax.org/adoption? to fill out our two-minute survey and let us know you've ado
... gallery or scrapbook - a curated space where you can gather and enjoy the best ... Arkiver has apps for iOS, Android
Check Your AT&T Wireless Network Connection. 9. Make a Phone ..... Ask your IT Administrator which wireless email so
Check Your AT&T Wireless Network Connection & Make a Phone Call. 9 .... customer service representative, or revi
3.2.2 Opening the GPC Processing Method....................... 48 ..... use the Empower
PDA option to develop a PDA processing method and to review PDA results.
Please check with your customer support team if you are in any ... of this Getting
Started Guide for more information. Set up the .... Samsung E250. USB settings ...
pages using your own images. This guide will walk you through all features and
tools of Comic Life 3 ..... adjusting the perspective and depth. Metrics Inspector.
MATLAB and Simulink are registered trademarks of The MathWorks, Inc. See
www.mathworks.com/trademarks for a list of additional trademarks. Other product
...
Minor revision for MATLAB 7.0.4 (Release 14SP2). September 2005 ...... Creating
Graphical User Interfaces — GUI-building tools and how to write callback ...
... EDUCaTION a bloomberg Professional Service Offering. GETTING. STaRTED.
GUIDE ... Connects to function Help Pages (online user guides) as well as the ...
Inspiration Software owns U.S. and foreign trademark ...... Any files you created
using Inspiration 6, 7, or 8 can be opened by. Inspiration 9. Macintosh.
Any files you created using Inspiration 6 or Inspiration 7 can be opened by
Inspiration .... Inspiration, you can contact us by email, telephone or fax. You can
also.
Synchronize your social accounts, which appear with a miniature profile photo. If they do not appear, verify that the em
Getting Started Guide. BlackBerry Curve 8310 Smartphone ..... on your device.
This guide provides tips and instructions to help you learn the basics quickly. 3 ...
Formula Flowcode micromouse Guide to getting started
a Windows XP / 2000 b Windows Vista c Windows ME / 98. 4 Installing Flowcode.
5 The micromouse Programming Software. 6 Testing your micromouse.
Formula Flowcode micromouse Guide to getting started
Contents 1 Contents of the Formula Flowcode micromouse 2 Assembling the micromouse 3 Installing the USB drivers a Windows XP / 2000 b Windows Vista c Windows ME / 98 4 Installing Flowcode 5 The micromouse Programming Software 6 Testing your micromouse 7 Troubleshooting
HP794
1. Contents of the Formula Flowcode Micromouse 1 x HP629 Formula Flowcode circuit board 1 x HP295 Formula Flowcode chassis complete with wheels. 2 x 6mm M3 screws 2 x M3 Nuts 4 x 6.5mm Self Tapping Screws 1 x Flowcode 1 x User guide and example line Check that you have all of the parts listed above before you start. If you are missing any parts then please contact your supplier.
HP794
2. Assembling the Micromouse 1. Fit the tyres onto the wheels and then fit the wheels onto the chassis.
2. Insert 4 x AA rechargeable batteries into the chassis.
3. Plug the power connector onto the underside of the circuit board.
4. Plug the right hand motor cable into the right hand side of the upside down circuit board.
HP794
5. Plug the left hand motor cable into the left hand side of the upside down circuit board.
6. Attach the line sensor module to the chassis by using the two M3 screws and the two M3 nuts.
HP794
3. Installing the USB Drivers The USB drivers allow the Formula Flowcode micromouse to be connected to a computer, allowing the device to be programmed. The following process will have to be done the first time the Formula Flowcode micromouse is connected to a computer and again if plugged into a different USB port.
a. Windows XP/2000 Insert the Flowcode CD into your CD-ROM drive and then click on the Start menu and click Run. Type the following command into the run dialogue and then click OK. D:\etc\drivers\HP-629\ Formula_Flowcode_Driver_Install.exe Where D is the letter of your CD-ROM drive.
Click Next and then when asked click to agree with the license agreement. Then click next again and then click continue anyway and finish. This will pre install the drivers so that they are ready for when you plug your Formula Flowcode micromouse into the USB.
b. Windows Vista The Vista install is very similar to the XP / 2000 install with the difference of an extra UAC screen which you must agree to before proceeding. Once the driver has been installed on Windows Vista you must insert a USB cable between the computer and the micromouse and switch the micromouse on. Then you have to right click on my computer and select properties. Then select device manager and scroll down to Universal serial bus devices. Inside the Universal serial bus devices option there should now be a device called Formula Flowcode Buggy. Double click the Buggy and then click on the Power Management tab. Un-tick the box that says allow this device to be powered down to save power.
HP794
c. Windows ME / 98 1.The Formula Flowcode device drivers are located on the Flowcode CD. If you have not got the latest CD then the driver can be downloaded from the Formula Flowcode section of our website. 2. Insert the Flowcode CD into your CD drive. 3. Insert a USB cable into a spare USB port on your computer, 4. Insert the other end of the cable into the USB port onboard the Formula Flowcode Micromouse. The green power LED on the Formula Flowcode Micromouse should be dimly lit. 5. Switch on the Formula Flowcode Micromouse using the switch SW1 located towards the rear. The green power LED should now be lit brightly. If the LED does not become bright then see the power section of our troubleshooting guide. 6. The following screen should pop up on your computer, choose the (Recommended) option and click next.
7. At the next screen click “Continue Anyway”.
8. Click Finish
HP794
4. Installing Flowcode
For help installing Flowcode please refer to the Flowcode manual available from the Flowcode section of our website. http://www.matrixmultimedia.com/software/FLOWCODE%203%20MANUALpq.pdf You should only register Flowcode if you have purchased a copy other then the free version that is included with the Formula Flowcode Micromouse. This also includes updates and patches that are made available on our website. Steps to creating your first program 1. Create a new Flowchart.
2. Scroll down to the Formula Flowcode Buggy.
3. Create your program.
Steps to connect your Formula Flowcode micromouse to your computer Packaged with the programming software is a help file detailing use of the programming tool and how to connect your micromouse to your computer.
5. The micromouse Programming Software The Formula Flowcode micromouse programming software is used to transfer users programs into the memory of the microcontroller onboard the micromouse. The programming tool is included with versions of Flowcode V3.2 onwards. It is recommended to update your version of Flowcode to the latest version by downloading the latest patch from our website. The tool is located within the Flowcode V3 directory named “BuggyProg.exe”. If you intend to use the Formula Flowcode micromouse without Flowcode then you will need to download the programming tool from the Formula Flowcode section of our website. www.matrixmultimedia.com/software/Buggy%20Programmer.zip
The software can be used to transfer a program to the micromouse, read the program back from the micromouse, erase the micromouse or restart the micromouse. There is a help file that accompanies the programming tool, which shows users exactly how to use the tool with command line parameters etc.
HP794
6. Testing your micromouse
There is a test file available which will help to test the functions of the Formula Flowcode micromouse. The test file is available from the Formula Flowcode section of our website. The programming tool should be used to open the hex file and to transfer the program onto the micromouse. Once the micromouse has been programmed it should light up a single LED at the front of the micromouse. Pressing the left hand switch SW5 transfers the lit LED one place to the left. Pressing the right hand switch SW4 selects the chosen test program. There are eight test programs to correspond with the eight LEDs. Here is a list of the test programs and their functions. 1. Tests the front LEDs by performing a knight rider style flasher. 2. Reads the light sensor and outputs the reading onto the LEDs. 3. Reads the microphone and outputs the reading onto the LEDs, Pot P1 can be used to adjust the sensitivity. 4. Plays a tune using the speaker. 5. Reads the line sensors and outputs the reading onto the LEDs. 6. Reads the IR proximity sensors and outputs the reading onto the LEDs. 7. Drives the motors forwards and then backwards when SW4 or SW5 is pressed. 8. Spins the micromouse anti-clockwise and then clockwise when SW4 or SW5 is pressed. Each of these test programs is also available as a stand-alone program. www.matrixmultimedia.com/software/Buggy%20Test.zip
HP794
7. Troubleshooting the Formula Flowcode Micromouse 1. Power Problems To troubleshoot any power problems firstly check that your batteries are fully charged up and inserted into the chassis with the correct orientation. Using a Multimeter test the voltage present on the battery input pins. The voltage present should be between 4V and 6V. If you do not have a Multimeter then a way of detecting a power problem is to connect a USB cable between the Formula Flowcode micromouse and a computer and then switching on the micromouse. If the power is connected correctly then two of the LEDs at the front of the micromouse should start flashing.
If you are not receiving a voltage then check the following items. Is the voltage under 4V? This means that either one or all of the batteries are running with low power. Try recharging or replacing the batteries. Are the batteries getting a good contact with the terminals? This can be tested by gently moving the Micromouse from side to side. If you can hear the batteries moving or rattling then the contacts are not bent out enough. This problem can be improved by bending the metal contacts outwards slightly with a flat head screwdriver.
HP794
Have any of the power terminals lifted out of the chassis? If so you can lever them back into the chassis using a screwdriver as shown. Please make sure that the device is powered off just in case a short circuit is made when levering the terminal back into the chassis.
Terminal lifted out
Terminal back in place
Has the wire joining the battery compartments come loose? If so you can bend the metal back into position and if you wish you can increase the strength of this connection by soldering the wire to the battery terminal taking care not to melt the plastic.
2. Line Following Problems The line following sensors, give an incorrect reading if the spacers are both at the rear of the chassis or missing. Move at least one of the spacers to the front of the chassis to allow a space between the sensors and the floor to be maintained.