When you first enter the Sage E-marketing online editor, you will see two tabs on
the left-hand side of the screen: Content Editor and Customize Template.
Quick Start Guide To:
Using the Sage E-marketing Online Editor
When you first enter the Sage E-marketing online editor, you will see two tabs on the left-hand side of the screen: Content Editor and Customize Template. You will primarily use the Content Editor tab when editing your template’s images and text. The Customize Template tab is primarily used to structure your template, including column widths, colors, adding windows and so on. The following sections explain the functions of both of these tabs.
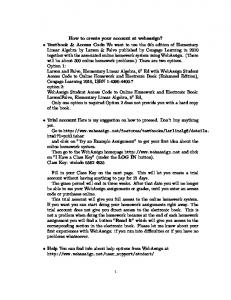
Content Editor Functions When you click on the Content Editor tab, you will be presented with the buttons shown and described below.
1. Help: accesses Sage E-marketing online help. 2. Text Options, Image Options and PDF Options: each of these buttons expands a larger menu with more options. Generally speaking, Text Options allows you to add and edit text, Image options allows you to add and edit images, and PDF options allows you to add PDF documents and link them to your template. See below for further details. Note: each of these options require that you first select one of the windows in your template by clicking on it. When you scroll over windows in your template, a green border appears around them. When you click on a window to select it, the border turns into a solid blue border. 3. Refresh Template: click this button to view the most up-to-date version of your Sage Emarketing template.
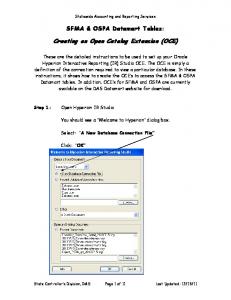
The Text Options Menu
1. Back: returns to the original Content Editor menu. 2. Help: accesses Sage E-marketing online help. 3. Editor/Spell check language: allows you to select the language for various aspects of the online editor. 4. Edit Text: opens a text editing window that allows you to edit text in the selected window of your template. See below for a complete description of the text editing toolbar. 5. Link to Survey: click this button to link a specific line of text in your window to one of your Sage E-marketing surveys. 6. Undo Text Update: if you have just edited text in one of your template windows, click this button to undo those edits. 7. Erase Window Text: this button erases all text within the selected window of your template.
The Text Editing Toolbar When you click the Edit Text button on the Text Options tab, you will see a screen for typing text with the following options. Note: always click Submit after typing text to make your changes take effect.
First Row: 1. Source: allows you to edit the HTML source code. 2. Clears text: clears all text 3. Cut text 4. Copy text 5. Paste 6. Paste as plain text 7. Paste from Microsoft Word 8. Print 9. Undo 10. Redo 11. Find 12. Replace 13. Select all 14. Remove format Second Row: 15. Bold text 16. Italic text 17. Underline text 18. Strikethrough text 19. Subscript 20. Superscript 21. Insert/remove number list 22. Insert/remove bulleted list 23. Decrease indent 24. Increase indent 25. Left alignment 26. Center alignment 27. Right alignment 28. Justified alignment 29. Insert/edit hyperlink 30. Remove hyperlink 31. Insert/edit table 32. Insert horizontal line 33. Insert special character 34. Text color
35. Text background color Third Row: 36. Text font 37. Text size 38. Mail merge fields for email personalization 39. SpeProfile mail merge fields for personalization
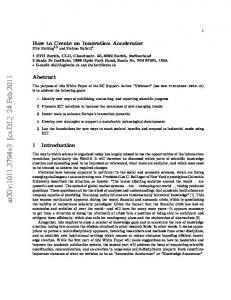
The Image Options Menu
1. Back: returns to the original Content Editor menu. 2. Help: accesses Sage E-marketing online help. 3. Add/Replace an Image: use this button to insert an image into the selected window of your template or to replace the image currently there. When you click this button, you will be asked to browse for the image to upload. You can then choose where to position the template within the window: Top positions the image in the center at the top with text below it. Left or Right positions the image next to the text. Bottom positions the image in the center at the bottom of the window with text above it. Note: template windows are limited to one image each. 4. Replace Header Image: the 600-pixel-wide image at the top of most Sage E-marketing templates is called the Header image. Click this button to replace the header image. You can select to replace the header with your own image that you upload or with an image from the Sage Emarketing Header Library. All Header images should be 600 pixels wide—wider images will be truncated. 5. Remove Logo: if you are using a Sage E-marketing template that includes a logo and you have uploaded a logo to the “Your User Profile” section of My Sage E-marketing, click this button to remove it permanently from the current template. Note: removing a logo cannot be undone. 6. Change Position: as mentioned above (number 3), images can be positioned at the Top, Left, Right or Bottom. Click the Change Position button to move the image from one position to another. 7. Change Width: changes the width of the picture (the height of the picture will adjust automatically, so the image does not skew). You will be asked how many pixels wide you want the image to be. (Remember, for reference, that the whole template is 600 pixels wide.) 8. Link to Survey/Web: click this button to link the image in the selected window to a web URL. 9. Remove Image: this button will remove the image from the selected window.
The PDF Options Menu
1. Back: both buttons return to the original Content Editor menu. 2. Help: accesses Sage E-marketing online help. 3. Upload a PDF: click this button to begin the process of adding a PDF and linking it to text or an image within the selected window. You will be asked to browse for your PDF document on your computer. Note: PDFs uploaded to Sage E-marketing cannot be larger than 4MB in file size and you are limited to one PDF document per window in your template. 4. Link Text to PDF: after uploading your PDF document, click this button to link text from the selected window to your PDF. You will be asked to copy and paste or retype the text into a window. That text will then be linked to the PDF. 5. Link Image to PDF: after uploading your PDF document, this button will link the image in the selected window to your PDF.
Customize Template Functions
When you click on the Customize Template tab, you will be presented with the buttons shown and described below. 1. Help: accesses Sage E-marketing online help. 2. Set Column Width: every Sage E-marketing template is 600 pixels wide, and every Sage Emarketing template has two columns. (In some Sage E-marketing templates, the left-hand column is made as wide as possible, making the template appear as a one-column template rather than two.) The Set Column Width button allows you to establish the width of the lefthand column and the right-hand column will adjust automatically. So, for instance, if you set the left column width at 400 pixels, the right column will be about 200 pixels wide (slightly smaller because of the automatic space Sage E-marketing puts between columns), so you will have a left-hand column that is about double the size of the right. If you set the left column at 300 pixels, the right column will also be about 300 pixels and the columns will appear to be an equal width. You can test different widths to get the look you want. 3. Background Colors: click this button to change the background color of your template, a column of your template or a single window. When you click the button, you can select a color (or type in an RGB code), select which portion of the email you wish to color (whole template, column or window), and click Submit to apply the color. 4. Horizontal Lines: use this button to insert horizontal lines between windows in your template. 5. Add/Delete Window: this button gives you three options: (1) add a window below the current window, (2) delete the selected window or (3) duplicate the selected window (duplicate windows appear immediately below the original). Note: you cannot delete the topmost window in a column—you have to move it down to do that. (See Move Window, below.) 6. Move Window: this window allows you to move the selected window up or down within its column. You cannot move a window from one column to another. 7. Lock/Unlock Window: use this function to lock a window so no changes can be made to it.
8. Refresh Template: click this button to view the most up-to-date version of your Sage Emarketing template.