contents of this manual can be restricted to apply to derivatives of Ubuntu. Most
users of .... We invite Ubuntu Tweak by this webside: http://ubuntu-tweak.com/.
PureBasic on Ubuntu install for beginners This tutorial should help the beginners to install PureBasic for Linux. This tutorial applies only to installation on Ubuntu! The contents of this manual can be restricted to apply to derivatives of Ubuntu. Most users of this guide will have already gained experience in Windows, therefore I will avoid console instructions when appropriate GUI alternatives are.
Requirements: Installed Ubuntu (12:04 recommended) Internet connection
Preparation: Before installing the dependencies (libraries required by PB), we should Ubuntu update our system. For this purpose, we select the top menu from the desktop, right‐most the gear‐like switch and select the menu item: applications are up to date! in the now We update the appearing window, select "Check" and install the updates.
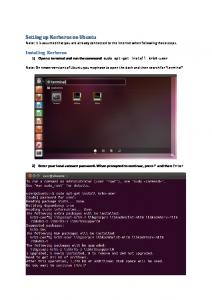
Step 1: Install dependencies: We open a terminal and type as follows as a single line: sudo apt-get install build-essential libgtk2.0-dev libgnome2-dev libgnomeprintui2.2-dev libxinedev libsdl1.2-dev unixodbc-dev libxxf86vm-dev libwebkitgtk-dev nvidia-cg-toolkit
The dependencies listed here refer to PB 5:00! These libraries can also be installed from the Software Centre. This makes it necessary for to find each and every library and install.
Step 2: PureBasic download, unzip and move: The first thing we log in our user account and download the appropriate version of PureBasic. Please make sure x86 for 32‐bit Ubuntu and x64 (AMD64) for 64‐bit Ubuntu. We open the File Manger (folder icon in the launchbar) the downloads folder. We click "purebasic_*.tgz" file and select it, right‐ click the: Extract here. The result is a new folder called "purebasic", we cut and paste into "Personal Folders".
Next, we press "CTRL + H" to display hidden files. With a double we open the file "bashrc."
At the end of this file, we add the following lines: export PUREBASIC_HOME=~/purebasic export PATH=$PUREBASIC_HOME/compilers:$PATH
and save it.
Now we have a fully functioning PureBasic, what is lacking is the ability it in call the launchbar. We do this in step 3
Step 3: Before we integrate into the PB launchbar of Unity, it is necessary a main menu item create for PB. For this, we install the menu editor "alacarte"! Enter the following into the terminal: sudo apt-get install alacarte
(Alternatively, install from the software center) and invoke it (is called "Main Menu"!) On the left side click on "Software Development" and right after the entry "New Entry ". The other entries you can see in the picture below. The logo you will find in the folder purebasic (logo.png).
Once you have logged out you once again and Remember, your place in the Dash also Entry "PureBasic" and it can easily start there.
Docking now works without problems.
PureBasic on Ubuntu ‐ Tips and Tricks After you have successfully installed on Ubuntu PureBasic. Here are a few useful tips.
1 Install other useful programs DevHelp contains the documentation for many libraries that we use. It is by following… Enter installed in the terminal: sudo apt-get install devhelp On the possibility to use the software center to install, I will not point. But I recommend to do it via the terminal. Many use the Windows Font Consolas, which is doing very well in programming. Linux offers a very similar font for this, but has yet to be installed. sudo apt-get install fonts-inconsolata
The IDE now still choose this font, Inconsolata medium 10 or 11 and everything will be fine :)
2 The PureBasic extensions *.pb and *.pbi register. This part is a little more difficult. Trond (English forum) this has created a video which we should follow for now. The article is available on the English forum: http://www.purebasic.fr/english/viewtopic.php?p=333507#p333507 find. The video gives it here: http://www.youtube.com/watch?v=1olY5Qzmbk8 Here again the important steps from the video. We open a terminal and type as follows: sudo nautilus /usr/share/mime/packages
Now we open the file manager to copy the file "apt.xml" and paste it in the same place again. The resulting copy now to detect the name contained in the now "copy" we rename "purebasic.xml" in. This file must now be edited. For this purpose we choose a right click, "With text processing open ". Now we change the text as follows: PureBasic source code
Save now, close editor and file manager. In the terminal we enter as follows: sudo update-mime-database /usr/share/mime
The rest of the video we can ignore it because it works so no more unfortunately. Instead use another program to make this entry yet can. We invite Ubuntu Tweak by this webside: http://ubuntu‐tweak.com/ The "ubuntu‐tweak_0.7.3‐1~precise1_all.deb" we save, as with the other downloads also. The installation is now double‐click on this file, located in the Downloads folder should. Now we start the application and go to the tab "System Administrator", there we click on "file type association".
At the bottom left we remove the hook and select text / PureBasic source code from before we click on the "Edit" button.
In the following dialogue, we choose "Add". Then the following dialog appears:
On "Browse ..." we choose purebasic in our PureBasic compilers installation folder. A click Add, and if we have not made a mistake, we can use our sources opened by double clicking with the IDE. This document is the copyright of realsource.de. Distribution in unmodified form is expressly desired. Liability for the accuracy of all information contained herein is excluded.