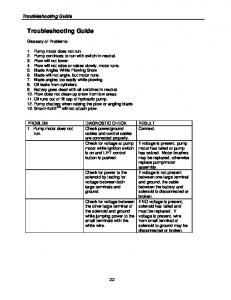
While trying to raise the plow, blades extend and wings will not retract. 6. ... Plow
does not clean-up snow from low areas. 20. ... Refer to the wiring diagram in.
Plow does not clean-up snow from low areas. 11. Oil runs out of ... plow. Replace
solenoid. If pump stops running, check wiring of switch box for short between ...
Manifold Wiring. Diagram in this manual. ... See an Authorized BOSS. Dealer for
...
Blade Angles While Plowing Snow. 6. Blade will not angle, but motor runs. 7.
Blade angles too easily while plowing. 8. Oil leaks ... Pump chatters when raising
the plow or angling blade. 13. ... DIAGNOSTIC CHECK .... See an Authorized
BOSS.
Wing(s) retract too easily while plowing. 11. Oil leaks ... Plow does not clean-up
snow from low areas. 20. Oil runs out of ... DIAGNOSTIC CHECK. RESULT. 1. ....
set too low. See an Authorized BOSS ... Hitting snowbanks too hard. Do not plow
...
nants in the mobile phase are especially troublesome in gradient elution. The baseline ... to direct the solvent stream to waste when a peak is detected. When.
Check make-up of mobile phase and make up new if ..... distinguish between inlet and outlet check-valves, mark them with a scribe or label the beakers clearly.
Tractor Troubleshooting Guide. ISSUED 10/99 TP-9973. 472 500 30. 0. MADE IN
GERMANY. 001 20/98 xxxxx xxxxxxxxxx xxxxx. 16. COLOR KEY. SUPPLY.
Elluminate Live!: Troubleshooting Guide for Windows i. Contents ... out ..................
..............10. File Download Window Appears When Trying to Enter a. Session.
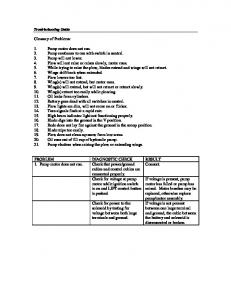
MZ-OM0010. TROUBLESHOOTING GUIDE. Symptom. Possible Cause. Solution.
Queen is not laying eggs on the. MiteZapper® frame. Ensure the queen is in ...
Bad Turbo Circuit/Relays. Corroded Battery ... Check/Replace Battery Fuse (if so
equipped). Back ... Locate the Plug under the Dash on Metal Framed Jeeps. 3.
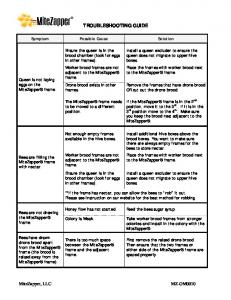
Water Heater Innovations 2005. 1. Service Technician's ... Heater is on load
control program. 5. Dip tube failure ... Hot water leak somewhere in plumbing
system.
The information in this guide is subject to change without notice. COMPAQ
COMPUTER .... chapter 2. Troubleshooting Flowcharts for Desktop Computers. 1.
Jun 10, 2014 ... (You will have to run additional wire from the cluster through the boat to the
engine) ..... plugs necessary on 50, 70, 90 and 120 HP models.
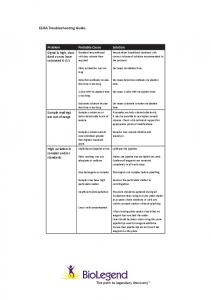
ELISA Troubleshooting Guide: Problem. Probable Cause. Solution. Signal is high, stan- dard curves have saturated O.D.'s. Standard reconstituted with less ...
Introduction to the accessory belt drive system and to understanding failure of the
system . .... Nissan • Opel • Peugeot • Porsche • Renault • Saab • Seat • Subaru •
Suzuki ... troubleshooting instructions which help prevent installation errors.
If message persists call Waters Service. Representative. Carousel Z axis malfunction .... Total Recovery Vials with Preslit Septa. 186000385. In-Line Filter Insert.
Modified audio output circuit using fewer components than original . ... CX7 Block
Diagram . ... have been common to the CX7 and CX7A transceivers and help.
with this entire manual before installing and operating the charger. DO NOT .....
wiring harness between the battery and the receptacle. Other things that could ...
Trouble-Shooting FAQs — Wireless Internet. If the green indicator light on your
network card is flashing steadily, but you cannot connect to the. Airport Wireless ...
Troubleshooting Guide for Digital-to-Analog. Converter ... you aren't receiving
digital signals on your analog TV, you can purchase a digital-to-analog converter.
model or you may need to try a different Schutt helmet model alto- gether. Make sure ... faceguard has a double-wire (DW
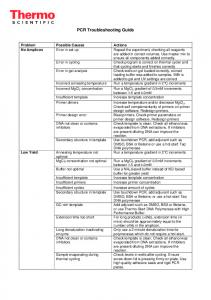
No Amplicon. Secondary structure in template. Use touchdown PCR, add adjuvant such as. DMSO, BSA or Betaine or use a hot-start Taq. DNA polymerase.
Sony Ericsson Mobile Communications AB – Company Internal
Troubleshooting Guide (mech)
CONTENTS 1
Problem Areas ................................................................................ 3 1.1 On/Off .................................................................................................... 3 1.1.1
Will not power on or will switch off randomly ........................................... 3
No keyboard illumination............................................................................. 5 No Navi key illumination .............................................................................. 5
M2 Card not detected ................................................................................. 13
1.9 FM Radio ............................................................................................. 14 1.9.1
No/Poor FM Radio reception ..................................................................... 14
1.10 Bluetooth............................................................................................. 15 1.10.1 No Bluetooth connection........................................................................... 15
1.11 Charging/Capacity.............................................................................. 16 1.11.1 Battery will not charge ............................................................................... 16 1.11.2 Poor battery capacity ................................................................................. 16
1.13 Data Communication.......................................................................... 18 1.13.1 No communication via the System Connector ........................................ 18
1.14 Network/Signal.................................................................................... 19 1.14.1 No Signal or Poor Signal ........................................................................... 19 1.14.2 No signal when using external antenna (ex. Hands free in car)............. 19
1.15 Hinge ................................................................................................... 20 1.15.1 Hinge stiff or stuck ..................................................................................... 20
2
Revision History ........................................................................... 21
1223-6752 Rev 1 Sony Ericsson Mobile Communications AB – Company Internal
2(21)
Troubleshooting Guide (mech)
1
Problem Areas
1.1
On/Off
1.1.1 Will not power on or will switch off randomly Check: Check whether the phone vibrates and the Navigation Keypad illuminates after the power key is depressed Action: If activation of the Vibrator and Navigation Keypad illumination is detected, refer to section 1.2 ‘Display’
Check: Visually inspect contact pads on battery Action: 1. If dirty or oxidized – clean pads 2. If damaged – replace the battery
Check: Visually inspect battery connector Action: 1. If dirty or oxidized – clean it Be careful not to bend or damage the connector pins! 2. If damaged – send to higher level of repair
Check: 1. Visually inspect for debris or damage between Upper Keypad Assy and the Navi Key Assy 2. Inspect the H-H FPC connection to Upper Keypad Assy and PBA Action: Refer to section 1.4.2 ‘Navigation keys’
1223-6752 Rev 1 Sony Ericsson Mobile Communications AB – Company Internal
3(21)
Troubleshooting Guide (mech)
Problem Areas
1.2
Display
1.2.1 Graphics & Illumination Check: Check whether the phone vibrates and the Navigation Keypad illuminates after the power key has been pressed Action: If the activation described above is not detected, refer to section 1.1 ‘On/Off’ Problems
Check: Inspect the LCD FPC connection to Upper Keypad Assy and the H-H FPC connection to Upper Keypad Assy and PBA Action: 1. If the connectors (a),(b),(c) are dirty or oxidized – clean them 2. If improperly connected – re-establish proper connection 3. If the Upper Keypad Assy is damaged – replace the Upper Keypad Assy
4. If H-H FPC is damaged – replace the H-H FPC
5. If the problem is not resolved – replace the LCD TFT 2.0 6. If still not resolved – send to higher level of repair
1223-6752 Rev 1 Sony Ericsson Mobile Communications AB – Company Internal
4(21)
Troubleshooting Guide (mech)
Problem Areas
1.3
Illumination
1.3.1 No keyboard illumination Check: Visually inspect the keyboard and the Main Key Dome Assy Action: 1. If damaged – replace keyboard and/or Main Key Dome Assy
1.3.2 No Navi key illumination Visually inspect the Upper Keypad Assy (a) and the Navi Key Assy (b) Action: 1. If damaged – replace the Upper Keypad Assy (a) and/or the Navi Key Assy (b)
Check: Inspect the H-H FPC connection to Upper Keypad Assy and PBA Action: 1. If the connectors (c) and (d) are dirty or oxidized – clean them 2. If improperly connected – re-establish proper connection
3. If H-H FPC is damaged – replace the H-H FPC 4. If the problem is not resolved – send to higher level of repair
1223-6752 Rev 1 Sony Ericsson Mobile Communications AB – Company Internal
5(21)
Troubleshooting Guide (mech)
Problem Areas
1.4
Keys
1.4.1 Keyboard key Check: Visually inspect for debris or damage between keyboard and the Main Key Dome Assy Action: 1. If dirty – clean both parts 2. If damaged – replace keyboard and/or Main Key Dome Assy
1.4.2 Navigation keys Check: Visually inspect for debris or damage between Upper Keypad Assy and the Navi Key Assy Action: If damaged – replace the Upper Keypad Assy and/or the Navi Key Assy
Check: Inspect the H-H FPC connection to Upper Keypad Assy and PBA Action: 1. If the connectors (a) and (b) are dirty or oxidized – clean them 2. If improperly connected – re-establish proper connection
3. If H-H FPC is damaged – replace H-H FPC 4. If the problem is not resolved – send to higher level of repair
1223-6752 Rev 1 Sony Ericsson Mobile Communications AB – Company Internal
6(21)
Troubleshooting Guide (mech)
Problem Areas: Keys 1.4.3 Side keys Check: Visually inspect for damage to the side keys ‘Volume Key and Camera Key’ Action: 1. If damaged – replace them 2. If the problem is not resolved – send to higher level of repair
1223-6752 Rev 1 Sony Ericsson Mobile Communications AB – Company Internal
7(21)
Troubleshooting Guide (mech)
Problem Areas
1.5
Audio
1.5.1 Microphone Check: Visually inspect the microphone’s external port Action: 1. If clogged – clean or replace Lower Rear Assy 2. If the problem is not resolved – send to higher level of repair
1.5.2 Earphone Check: Visually inspect Earphoner’s external port Action: If clogged – clean or replace the Bezel Assembly
Check: Visually inspect Earphone’s dust cloth Action: If clogged – clean or replace the Front Cover Assy
Check: Visually inspect the Upper Keypad Assy Action: 1. If the Upper Keypad Assy is damaged – replace the Upper Keypad Assy
1223-6752 Rev 1 Sony Ericsson Mobile Communications AB – Company Internal
8(21)
Troubleshooting Guide (mech)
Problem Areas: Audio
Check: Inspect the H-H FPC connection to Upper Keypad Assy and PBA Action: 1. If the connectors (a) and (b) are dirty or oxidized – clean them 2. If improperly connected – re-establish proper connection
3. If H-H FPC is damaged – replace H-H FPC 4. If the problem is not resolved – send to higher level of repair
1.5.3 Loudspeaker Check: Visually inspect 2 speaker’s external port Action: If clogged – clean or replace the Lower Rear Assy
Check: Visually inspect the 2 loudspeaker’s connect pins (or pads) and connect pads (or pins) on PBA Action: 1. If dirty or oxidized – clean them
1223-6752 Rev 1 Sony Ericsson Mobile Communications AB – Company Internal
9(21)
Troubleshooting Guide (mech)
Problem Areas: Audio
2. If the problem is not resolved – replace the SpeakerboxAssy (Speakerbox Ant Assy / Speakerbox BT Assy) 3. If still not resolved – send to higher level of repair
1223-6752 Rev 1 Sony Ericsson Mobile Communications AB – Company Internal
10(21)
Troubleshooting Guide (mech)
Problem Areas
1.6
Vibrating alert
1.6.1 Vibrator not generating alert Check: Visually inspect the vibrator pads on the PBA Action: If dirty or oxidized – clean them
Check: Visually inspect the vibrator Action: 1. If dirty, oxidized or damaged– replace the vibrator 2. If the problem is not resolved –send to higher level of repair
1223-6752 Rev 1 Sony Ericsson Mobile Communications AB – Company Internal
11(21)
Troubleshooting Guide (mech)
Problem Areas
1.7
Camera
1.7.1 Camera defects Check: Visually inspect the camera window Action: 1. If dirty – clean the window 2. If scratched or damaged – replace the Lower Rear Assy
Check: Visually inspect for damage to the camera key Action: 1. If dirty – clean the camera key 2. If damaged – replace the camera key as necessary
Check: Visually inspect whether the camera is properly connected to its socket on the PBA Action: 1. If improperly connected – re-establish proper connection 2. If the connector (a) is dirty or oxidized – clean it 3. If the problem is not resolved – replace the 2MP Camera Module (b) 4. If still not resolved – send to higher level of repair
1223-6752 Rev 1 Sony Ericsson Mobile Communications AB – Company Internal
12(21)
Troubleshooting Guide (mech)
Problem Areas
1.8
Memory Card
1.8.1 M2 Card not detected Check: Inspect the M2 Card holder Action: 1. If dirty or oxidized – clean the M2 Card holder 2. If the problem is not resolved – send to higher level of repair
1223-6752 Rev 1 Sony Ericsson Mobile Communications AB – Company Internal
13(21)
Troubleshooting Guide (mech)
Problem Areas
1.9
FM Radio
1.9.1 No/Poor FM Radio reception Check: Inspect System Connector Action: 1. If dirty or oxidized – clean the connector 2. If damaged – send to higher level of repair
1223-6752 Rev 1 Sony Ericsson Mobile Communications AB – Company Internal
14(21)
Troubleshooting Guide (mech)
Problem Areas
1.10 Bluetooth 1.10.1 No Bluetooth connection Check: Visually inspect the antenna contact pad/pin on the PBA and the Speakerbox BT Assy Action: 1. If dirty or oxidized – clean the pad/pin 2. If the problem is not resolved – replace the Speakerbox BT Assy 3. If still not resolved – send to higher level of repair
1223-6752 Rev 1 Sony Ericsson Mobile Communications AB – Company Internal
15(21)
Troubleshooting Guide (mech)
Problem Areas
1.11 Charging/Capacity 1.11.1 Battery will not charge Check: Visually inspect the contact pads of the battery Action: 1. If dirty or oxidized – clean the pads 2. If damaged – replace the battery
Check: Visually inspect the battery connector Action: 1. If dirty or oxidized – clean the battery connector Be careful not to bend or damage the connector pins! 2. If damaged – send to higher level of repair
Check: Visually inspect the system connector 1. If dirty or oxidized – clean the system connector 2. If still not resolved – send to higher level of repair
1.11.2 Poor battery capacity Check: Some features noticeably reduce the amount of standby time when turned on, Such as the back light (when on all the time), Bluetooth Action: 1. Deactivate the backlight, Bluetooth 2. If still not resolved – Send to higher level of repair
1223-6752 Rev 1 Sony Ericsson Mobile Communications AB – Company Internal
16(21)
Troubleshooting Guide (mech)
Problem Areas
1.12 SIM 1.12.1 SIM undetected Check: Inspect SIM holder Action: 1. If dirty or oxidized – clean the SIM holder 2. If still not resolved – send to higher level of repair
1.12.2 Incorrect SIM indicated Check: Check whether the phone is locked to a particular operator and whether the correct operator SIM is being used Action: 1. Use a proper operator SIM or test SIM 2. If the problem is not resolved – send to higher level of repair
1223-6752 Rev 1 Sony Ericsson Mobile Communications AB – Company Internal
17(21)
Troubleshooting Guide (mech)
Problem Areas
1.13 Data Communication 1.13.1 No communication via the System Connector Check: Visually inspect the system connector Action: 1. If dirty or oxidized– clean the connector 2. If the problem is not resolved – send to higher level of repair
1223-6752 Rev 1 Sony Ericsson Mobile Communications AB – Company Internal
18(21)
Troubleshooting Guide (mech)
Problem Areas
1.14 Network/Signal 1.14.1 No Signal or Poor Signal Check: Visually inspect the SIM Card holder Action: 1. If dirty or oxidized – clean the holder 2. If damaged – send to higher level of repair
Check: Visually inspect Antenna connector on PBA Action: If dirty or oxidized – clean it
Check: Visually inspect Speakerbox Ant Assy connect pads Action: 1. If dirty or oxidized – clean the pads 2. If damaged – replace the Speakerbox Ant Assy 3. If still not resolved – send to higher level of repair
1.14.2 No signal when using external antenna (ex. Hands free in car) Check: Connect the phone to hands free car kit connected with external antenna Visually inspect the antenna bar on the phone Action: 1. If no or only very less signal – push the middle pin of the external antenna connector a few times 2. If still not resolved – send to higher level of repair 1223-6752 Rev 1 Sony Ericsson Mobile Communications AB – Company Internal
19(21)
Troubleshooting Guide (mech)
Problem Areas
1.15 Hinge 1.15.1 Hinge stiff or stuck Check: Visually inspect whether the Hinge Assy are deforming Action: If damaged – replace the Hinge Assy
1223-6752 Rev 1 Sony Ericsson Mobile Communications AB – Company Internal
20(21)
Troubleshooting Guide (mech)
2 Rev. 1
Revision History Date 2009-Jan -14
Changes / Comments 1st release
1223-6752 Rev 1 Sony Ericsson Mobile Communications AB – Company Internal