Fusing Maps with Photos from Mobile Devices Mark J. Carlotto (
[email protected]) General Dynamics Advanced Information Systems ABSTRACT A method for fusing imagery from mobile devices with map data in real time is described. A camera model for iOS devices equipped with a camera, GPS, and compass is developed. The parameters of the camera model are determined from information supplied by the device’s on board sensors. The camera model projects photo and video data into the ground plane so they can be combined and exploited with map data. Keywords: image-map fusion, camera model, perspective transform, ground overlays, Google Earth, iOS devices
1. INTRODUCTION Data sources like Google Earth provide near worldwide map coverage of the Earth’s surface. This is a valuable source of geo-spatial context for ATR, surveillance and other applications. In this paper we develop a real-time camera model that is capable of registering photos and video from mobile devices like smart phones and tablets with map data. The parameters of the camera model are determined from information supplied by the device’s on board sensors. All computation is performed within the mobile device.
2. PROBLEM FORMULATION Developing a perspective camera model is one key element in being able to fuse a camera photo or video with a map. The perspective camera model:
ax + by + c gx + hy + 1 dx + ey + f Y= gx + hy + 1 X=
(1)
relates longitude and latitude (X,Y) with horizontal and vertical screen coordinates (x,y). Criminsi [1][2] shows how to solve for the eight unknown coefficients using a least-squares approach. Expressed in matrix notation, using a minimum € of four control points (2)
(x n , y n , X n ,Yn ) for n=1,2,3,4, we must solve the 8x8 system of linear equations for the eight unknown parameters (a-h):
€ # x1 % %0 % x2 % %0 % x3 % %0 % x4 %0 $
€
y1 0 y2 0 y3 0 y4 0
1 0 1 0 1 0 1 0
0 x1 0 x2 0 x3 0 x4
0 y1 0 y2 0 y3 0 y4
0 −X1 x1 1 −Y1 x1 0 −X 2 x 2 1 −Y2 x 2 0 −X 3 x 3 1 −Y3 x 3 0 −X 4 x 4 1 −Y4 x 4
−X1 y1 &# a & # X1 & (% ( % ( −Y1 y1 (% b ( % Y1 ( −X 2 y 2 (% c ( % X 2 ( (% ( % ( −Y2 y 2 (% d ( % Y2 ( = −X 3 y 3 (% e ( % X 3 ( (% ( % ( −Y3 y 3 (% f ( % Y3 ( −X 4 y 4 (% g ( % X 4 ( −Y4 y 4 ('%$ h (' %$ Y4 ('
(3)
or
Aλ = B
(4)
The simplest solution is by the pseudo-inverse
€ λ = (A T A) −1 A T B
(5)
The other key element in the fusion approach is determining the control points (2). Define the following camera/GPS parameters: €
€
€
€ € €
θ – look direction or heading angle of the camera with respect to north φ – tilt angle w.r.t. nadir, i.e., φ =0 is looking straight down. α H , αV – horizontal and vertical field of view of the camera (X c ,Yc ) – longitude and latitude of the camera z – height of the camera above ground.
€
Assume the x-axis of the camera is aligned parallel to the ground plane, and define the following distances:
dU,1 = z tan(φ + α v / 2) d L,1 = z tan(φ − α v / 2) dU,2 = z tan(α H / 2) / cos(φ + α v / 2)
(6)
d L,2 = z tan(α H / 2) / cos(φ − α v / 2) The coordinates of the four corner points of the camera image: upper left (UL), lower left (LL), upper right (UR), and lower right (LR) are: €
YLL = Yc + ΔY [ d L,1 cos θ + d L,2 cos(θ − π / 2)], X LL = X c + ΔX [Yc ,d L,1 sin θ + d L,2 sin(θ − π / 2)] YLR = Yc + ΔY [ d L,1 cos θ + d L,2 cos(θ + π / 2)], X LR = X c + ΔX [Yc ,d L,1 sin θ + d L,2 sin(θ + π / 2)] YUL = Yc + ΔY [ dU,1 cos θ + dU,2 cos(θ − π / 2)], XUL = X c + ΔX [Yc ,dU ,1 sin θ + dU,2 sin(θ − π / 2)]
(7)
YUR = Yc + ΔY [ dU,1 cos θ + dU,2 cos(θ + π / 2)], XUR = X c + ΔX [Yc ,dU ,1 sin θ + dU,2 sin(θ + π / 2)] where
€
ΔX [Y ,d ] = d /(6378137.3 cos Y ) ΔY [ d ] = d / 6356752.3
(8)
are functions that give longitude and latitude differences (in radians) as a function of physical distances in those € directions based on the WGS-84 spherical reference frame [3]. The four control point pairs are thus:
(0, 0, XUL ,YUL ) (W − 1, 0, XUR ,YUR ) (0, H − 1, X LL ,YLLL ) (W − 1, H − 1, X LR ,YLR )
(9)
where W and H are the width and height of screen (in pixels). The solution (5) using the control points (9) provides a mapping from image pixels (screen coordinates) to geo-coordinates as a function of the location and attitude of the € mobile device.
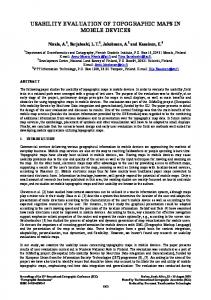
Fig. 1 iPhone implementation of real-time camera model continuously fuses images with map data (background imagery courtesy Google Earth).
3. IMPLEMENTATION A real-time camera model has been implemented on iOS devices that have a camera, GPS, accelerometer, and magnetometer (compass). Most parameters are available directly via the iOS API [4]. The tilt is computed from the yand z-axis components of the acceleration vector. We have found the pseudo-inverse solution (5) is sufficient provided the tilt angle is not too close to 90°. The control points
(0, 0,UUL ,VUL ) (W − 1, 0,UUR ,VUR ) (0, H − 1,U LL ,VLL ) (W − 1, H − 1,U LR ,VLR )
(9)
are used for display updates, where (U,V) are the screen coordinates of the corresponding map geo-locations in the MKMapView framework (see Ref. 4). The resulting coefficients project UIImagePicker image corners to MKMapView € image coordinates by a 3-D affine transform
"U % "a $ ' $ $ V ' = $d $W ' $ 0 $ ' $ # 1 & #g
b e 0 h
0 0 1 0
c %" X % '$ ' f '$ Y ' 0 '$ 0 ' '$ ' 1 &# 1 &
(10)
which is implemented using the CATransform3D framework (see Ref. 4). € Although it is difficult to state precisely the accuracy of an iOS GPS or compass, they are clearly not sufficient to obtain good photo/video to map registration without manual adjustment. Fig. 1 shows the app in GPS mode. Tapping “Adjust”
allows the user to manually adjust the altitude, geo-location, and heading of the device so as to align the projected camera image with the map background. Tapping the camera button (not shown in figure) takes single photos or sequences of photos at set intervals. They may be stored either locally on the device or uploaded in real-time to a web server. The camera model of a saved photo can be re-adjusted at any time in edit mode (not shown in figure). -70.666885 42.639933 0.000000 167.825745 50.097237 7.131645 clampToGround 2013.06.29.10.26.46 2013_06_29_10_26_46.png -70.666889,42.640020 -70.666930,42.640013 -70.666950,42.639836 -70.666771,42.639864
Fig. 2 Example KML ground overlay object
Photos can be viewed within the app or exported. Outside of the app, photos are stored as KML ground overlays (Fig. 2), which can be displayed in Google Earth in two ways: 1) by emailing the image and corresponding KML file, or by uploading the image and KML file to a web server and displaying the data via a KML network link, which is emailed. The later is useful for displaying video image sequences at low (several seconds per frame) frame rates for surveillance applications.
4. DISCUSSION Registering camera photos to the underlying map base allows them to be exploited geographically. For example, one can add ground photos to maps to provide an added level of detail over selected areas (Fig. 3). Alternatively, ground photos can be rendered as KML photo overlays [5] in Google Earth ground level views. Although photo overlays can be visually stunning the photos are not, strictly speaking, registered to the ground plane. Since our photos are registered they can be exploited using ATR and other geo-spatial algorithms, in which detected pixel locations must be converted to ground coordinates to be useful. Fig. 4 (a-c) shows a person in a sequence of geo-registered frames taken 5 seconds apart. Fig. 4d plots his detected geo-location (track) in Google Earth.
Fig. 3 Adding detail to maps with fused ground photos (background imagery courtesy Google Earth).
Fig. 4 Geo-spatial tracking with an iPhone (background imagery courtesy Google Earth).
REFERENCES [1] A. Criminisi, I. Reid, A. Zisserman, “A plane measuring device”, Image and Vision Computing, Volume 17, Issue 8, June 1999, Pages 625–634 [2] Perspective Transform Estimation, http://alumni.media.mit.edu/~cwren/interpolator/ [3] http://en.wikipedia.org/wiki/World_Geodetic_System [4] https://developer.apple.com/library/ios/navigation/index.html [5] https://developers.google.com/kml/documentation/kmlreference