Installing Microsoft Windows XP Professional on a Mac Creating a ...
Recommend Documents
Supporting Applications in Windows XP ... CHAPTER 10: Connecting Windows
XP Professional to ...... Introduction to Windows XP Professional Printing .
recommended that you purchase a copy of the Microsoft Office CD-ROM from
them also. ... There are several ways of installing Microsoft Office XP. You can ...
Introduction. Microsoft Windows XP is a major upgrade of all the following
operating systems used on personal computers: ❖ MS-DOS. ❖ Microsoft
Windows.
Installing Ruby on Windows XP. Page 5 of 26. Once installation is complete, you
should see this screen: Click “Finish”, and the installer will close.
INSTALLING "WINDOWS VIRTUAL PC". WITHOUT "WINDOWS XP MODE". INTO
A "WINDOWS 7" HOST COMPUTER. Summary: All computers running ...
In Windows XP, you can no longer access Paint directly from the. Microsoft Office
applications; instead, you insert the picture file or copy and paste the picture ...
Installing Windows using HP Recovery media . ... Windows Vista: HP Workstation
recovery media cannot be used to install Windows Vista on AF drives because ...
have a specific need to uninstall Microsoft® Windows Vista® and install Microsoft
... v It is a good idea to create a set of Windows Vista Product Recovery discs ...
Microsoft Windows XP Registry Guide. Microsoft Windows XP ... Overview. Heart
and Soul of Windows XP. ..... Chapter 2: Using the Registry Editor. Searching in ...
On four of the client systems we installed Windows 98 Second Edition Gold, on
four other client ... Windows XP Professional, using the latest available updates.
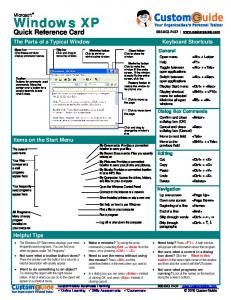
Microsoft®. Windows XP. Quick Reference Card. The Parts of a Typical Window.
Keyboard Shortcuts. Items on the Start Menu. General. Open menu.
Microsoft Windows XP Professional. CONTRATTO DI LICENZA CON L'UTENTE
FINALE. IMPORTANTE - LEGGERE CON ATTENZIONE: il presente Contratto di ...
Licensing of Microsoft Office for Windows and Microsoft Office for Mac . ...
Enterprise can be installed locally if the Mac is licensed for Windows 7/8/8.1/10
Pro.
Remote Install Service instructions to integrate the M58/M58p SATA and ... This
section will give you step by step instructions on installing Windows XP SP2 on a
...
OpenMeetings 2.X Installation on Windows XP\7 32\64bit. Stephen Cottham. 14/
02/2013. This Guide is intended to help users install and configure Open ...
taken the time to prepare for the installation of Packet Tracer. 1. Make sure you
have downloaded the Windows .exe file from the packet tracer portal on the
Cisco ...
GUIDANCE FOR SECURING MICROSOFT WINDOWS XP HOME EDITION.
Reports on ... Microsoft, Windows, Windows XP, Windows 2000, Windows NT,
Internet Explorer, Microsoft. Office ...... B.3 Disable Unneeded Networking
Features .
Windows. Microsoft xp®. TM. M. Reviewers Guide / August 2001. ® ...... saved the
movie for his Pocket PC device, so he could boast to everyone at work.
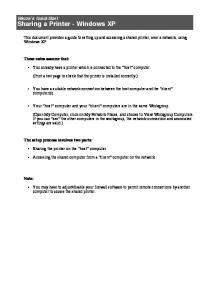
This document provides a guide to setting up and accessing a shared printer,
over a network, using. Windows XP. These notes assume that: • You already
have ...
windows xp sp2 professional english.pdf. windows xp sp2 professional english.pdf. Open. Extract. Open with. Sign In. Mai
There was a problem previewing this document. Retrying... Download. Connect more apps... Try one of the apps below to op
Tutorial:Windows. From careful ... For example, QuickCensus takes a com- ...
Systems Management Server To Deploy Windows 2000" at www.micro-soft.-.
Installing Microsoft Windows XP Professional on a Mac Creating a ...
Installing Microsoft Windows XP Professional on a Mac. Creating a CD from the
Disk Image. 1.) Download the disk image. 2.) In Finder click on the disk image ...
Installing Microsoft Windows XP Professional on a Mac Creating a CD from the Disk Image 1.) 2.) 3.) 4.)
Download the disk image. In Finder click on the disk image (filename.iso). Choose File->Open With->Disk Utility from the top menu. Once Disk Utility Opens, click on the file in the side pane and then click the “Burn“ button in the toolbar. 5.) Insert a blank CD-R. 6.) Click Burn.
Installing Windows XP Professional w/SP3 1.) 2.) 3.) 4.) 5.) 6.) 7.)
8.)
Verify system requirements and install updates if needed. Run Boot Camp Assistant located in the Utilities folder. At the Introduction screen click Continue. To adjust the Windows partition click and drag the slider, or click “Use 32 GB” to use the default. Click Partition to continue. Insert the Windows XP w/SP3 CD into the drive and click Start Installation. After the install completes, follow the onscreen instructions to setup a user account. Once Windows boots to the desktop restart the computer and hold down the mouse/trackpad button. This will eject the CD. Alternatively, you can open My Computer and choose File-> Eject, but this feature may not work until after a reboot from the initial installation of Windows XP. Insert your Mac OS install CD to install Boot Camp and the necessary drivers.
**To switch between Mac OS and Windows hold down Alt/Option during boot. ** Depending on the model Mac you are using Right Click MAY be Three Fingers OR Two Fingers. If Three Fingers are required to achieve a Right Click download the following update from Apple. Multi-Touch Trackpad Update for Windows XP & Vista http://support.apple.com/downloads/Multi_Touch_Trackpad_Update_for_Windows_XP___Vista
To remove Windows XP from your computer: 1.) In Mac OS X, quit all open applications and log out any other users on your computer. 2.) Open Boot Camp Assistant in the Utilities folder in the Applications folder. 3.) Select “Restore the startup disk to a single volume” and then click Continue.