OpenOffice.org Calc is a spread sheet program that makes it easy for you to .....
The AutoSum icon on the Standard toolbar automatically creates a SUM function.
Introduction to OpenOffice.org Calc
1
OpenOffice.org Calc is a spread sheet program that makes it easy for you to create, track, and update all sorts of data. OpenOffice.org Calc's calculating functions are ideal for creating such products as inventories, check registries, or sales invoices.
1. Getting Started Terms Before we even learn about the “Calc” program itself here are a few keywords that you will hear frequently hear during your sessions: Mouse: A device that allows you to select on screen items by pointing at them with the mouse pointer. A mouse is connected to the computer by a long, thin cord that resembles a mouse tail – hence the name. Spreadsheet: Also known as worksheet, a spreadsheet is a grid composed of rows and columns that intersect to form cells. You enter data (text, numbers and formulas) into these cells, and the spreadsheet performs calculations on the data. Active Cell: The cell in which the cursor (or cell pointer) is currently located. A cell must be active in order for you to enter data into it. Cell Pointer: A dark border around a cell in a worksheet, indicating that it’s the active cell. You can move the cell pointer with the mouse or the keyboard. Menu: A list of commands. You’ll find a program’s menu located at the top of the program window, just below the title bar. Toolbar: A long bar or row of buttons (small pictures) that represent various commands. Opening Calc: In order to open the OpenOffice.org Calc program you must: Click the “Start” button in the corner of the task to open the “Start Menu” Go to Programs Go to “OpenOffice.org” and select “OpenOffice.org Calc,” click this icon to open
2
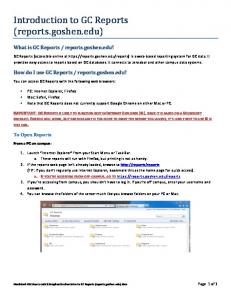
When you open your “Calc” this is what your screen should look like:
The Calc Window contains many parts: Scroll Bars: Used to display a part of a worksheet that is currently hidden from view – there is a horizontal and vertical scroll bar. Formula Bar: Provides an area for entering and changing cell data and reviewing cell formulas Row Headings: Contains numbers for each row in the worksheet. Rows are labeled 1, 2, and 3 and so on. A worksheet usually contains 65,536 rows. Column Headings: Contain letters for each column in the worksheet. Columns are labeled A to Z then AA to AZ and so on. Worksheets usually contain 256 columns. Cell: The intersection of a column and a row. The active cell is marked with a dark outline. A cell’s address is composed of its column letter followed by its row number, as in cell B3. 3
Status Bar: Displays the current status of the workbook, along with other data, such as The sum of the selected cells.
Getting Familiar with Calc The Title Bar This lesson will familiarize you with the OpenOffice.org Calc screen. We will start with the Title bar, which is located at the very top of the screen. On the Title bar, OpenOffice.org Calc displays the name of the workbook you are currently using. At the top of your screen, you should see "OpenOffice.org Calc – Untitled 1" or a similar name. The Menu Bar
The Menu bar is directly below the Title bar and displays the menu. The menu begins with the word File and continues with the following: Edit, View, Insert, Format, Tools, Data, Window, and Help. You use the menu to give instructions to the software. Point with your mouse to a menu option and click the left mouse button. A drop-down menu will appear. You can now use the left and right arrow keys on your keyboard to move left and right across the Menu bar options. You can use the up and down arrow keys to move up and down the drop-down menu. To select an option, highlight the item on the dropdown menu and press Enter. An ellipse after a menu item signifies additional options; if you select that option, a dialog box will appear. Do the following exercise, which demonstrates using the OpenOffice.org Calc menu. 1. Point to the word File, which is located on the Menu bar. 2. Click your left mouse button. 3. Press the right arrow key until Help is highlighted.
4
4. Press the left arrow key until Format is highlighted. 5. Press the down arrow key until Style is highlighted. 6. Press the up arrow key until Cells is highlighted. 7. Press Enter to select the Cells menu option. 8. Point to Cancel and click the left mouse button to close the dialog box. Toolbars
The Standard Toolbar
The Formatting Toolbar
Toolbars provide shortcuts to menu commands. Toolbars are generally located just below the Menu bar. Before proceeding with the lesson, make sure the toolbars we will use -Standard and Formatting -- are available. Follow the steps outlined here: Point to View, which is located on the Menu bar. 1. Click the left mouse button. 2. Press the down arrow key until Toolbars is highlighted. 3. Press Enter. Both Standard and Formatting should have a checkmark next to them. If both have a checkmark next to them, press Esc three times to close the menu. If either does not have a checkmark, press the down arrow key until Customize is highlighted. 4. Press Enter. 5. Point to the box or boxes next to the unchecked word or words, Standard and/or Formatting, and click the left mouse button. A checkmark should appear. 6. Note: You turn the checkmark on and off by clicking the left mouse button. 7. Point to Close and click the left mouse button to close the dialog box.
5
Worksheets
OpenOffice.org Calc consists of worksheets. Each worksheet contains columns and rows. The columns are lettered A to IV; the rows are numbered 1 to 65536. The combination of column and row coordinates make up a cell address. For example, the cell located in the upper left corner of the worksheet is cell A1, meaning column A, row 1. Cell E10 is located under column E on row 10. You enter your data into the cells on the worksheet.
6
The Formula Bar
If the Formula bar is turned on, the cell address displays on the left side of the Formula bar. Cell entries display on the right side of the Formula bar. Before proceeding, make sure the Formula bar is turned on. 1. Point to View, which is located on the Menu bar. 2. Click the left mouse button. A drop-down menu will appear. 3. On the drop-down menu, if Formula Bar has a checkmark next to it, the Formula bar is turned on. Press the Esc key twice to close the drop-down menu. 4. If Formula Bar does not have a checkmark next to it, press the down arrow key until Formula Bar is highlighted and press Enter. The Formula bar should appear below the toolbars. 5. Note that the current cell address displays on the left side of the Formula bar.
7
Selecting Cells
If you wish to perform a function on a group of cells, you must first select those cells by highlighting them. To highlight cells A1 to E1: 1. Place the cursor in cell A1. 2. Press the F8 key. This anchors the cursor. 3. Note that EXT appears on the Status bar in the lower right corner of the screen. You are in the Extend mode. 4. Click in cell E7. Cells A1 to E7 should now be highlighted. 5. Press Esc and click anywhere on the worksheet to clear the highlighting.
8
Alternative Method - Selecting Cells by Dragging You can also highlight an area by holding down the left mouse button and dragging the mouse over the area. In addition, you can select noncontiguous areas of the worksheet by doing the following: 1. Place the cursor in cell A1. 2. Hold down the Ctrl key. Do not release it until you are told. Holding down the Ctrl key enables you to select noncontiguous areas of the worksheet. 3. Press the left mouse button. 4. While holding down the left mouse button, use the mouse to move from cell A1 to E7. 5. Continue to hold down the Ctrl key, but release the left mouse button. 6. Using the mouse, place the cursor in cell G8. 7. Press the left mouse button. 8. While holding down the left mouse button, move to cell I17. Release the left mouse button. 9. Release the Ctrl key. 10. Press Esc and click anywhere on the worksheet to remove the highlighting
Entering Text In this lesson you are going to learn how to enter text. To begin, open OpenOffice.org Calc. For this lesson, your default font should be set to Arial. Let’s check to make sure it is. 1. On the Formatting Toolbar, there should be 3 drop down menus 2. Select the middle of the 3 drop down menus 3. Press Enter. A dialog box will appear.
9
This lesson will teach you how to enter data into your worksheet. First you place the cursor in the cell in which you would like to enter data, type the data, and then press Enter. 1. Place the cursor in cell A1. 2. Type John Jordan. Note that the word Ready on the Status bar changes to Enter. 3. The Backspace key erases one character at a time. Erase "Jordan" by pressing the backspace key until Jordan is erased. 4. Press Enter. The name "John" should appear in cell A1.
Editing a Cell After you enter data into a cell, you can edit it by pressing F2 while you are in the cell you wish to edit. 1. Move the cursor to cell A1. 2. Press F2. Note that the word Ready on the Status bar changes to Edit.
10
3. Change "John" to "Jones." 4. Use the backspace key to delete the "n" and the "h." 5. Type nes. 6. Press Enter.
Alternate Method – Editing a Cell by Double-Clicking in the Cell You can change "Jones" to "Johnson" as follows: 1. 2. 3. 4. 5. 6.
Move the cursor to cell A1. Double-click in cell A1. Press the End key. That will place the cursor at the end of your text. Use the backspace to erase "n," "e," and "s." Type hnson. Press Enter.
11
Adjusting the Standard Column Width When you enter OpenOffice.org Calc, the width of each cell is set to a default width. This width is called the standard column width. We need to change the standard column width to complete our exercises. To make the change, follow these steps: 1. Click on Format, which is located on the Menu bar. 2. Press the down arrow key until Column is highlighted. 3. Press Enter. 4. Press the down arrow key until Standard Width is highlighted. 5. Press Enter. 6. Type 25 in the Standard Column Width field. 7. Click on OK. The width of every cell on the worksheet should now be set to 25.
12
Cell Alignment Look at cell A1. The name "Cathy" is aligned with the left side of the cell. You can change the cell alignment.
Using the Formatting toolbar, you can quickly perform functions. You can use the Formatting toolbar to change alignment. Centering by Using the Toolbar To center the name "Cathy," follow these steps: 1. Move the cursor to cell A1. 2. Click on the Center icon, which is located on the Formatting toolbar. ↓
The arrow designates the Align Center icon.
Right-Aligning by Using the Toolbar To right-align the name "Cathy," follow these steps: 1. Move the cursor to cell A1. 2. Click on the Align Right icon, which is located on the Formatting toolbar. ↓
The arrow designates the Align Right icon.
13
Left-Aligning by Using the Toolbar To left-align the name "Cathy," follow these steps: 1. Move the cursor to cell A1. 2. Click on the Align Left icon, which is located on the Formatting toolbar. ↓
The arrow designates the Align Left icon.
Adding Bold, Underline, and Italic Adding Bold by Using the Icon 1. Type Bold in cell A3. 2. Click on the checkmark located on the Formula bar. 3. Click on the Bold icon, which is on the Formatting toolbar. 4. Click again on the Bold icon if you wish to remove the bolding. Alternate Method – Adding Italic by Using the Icon 1. Type Italic in cell B3. 2. Click on the checkmark located on the Formula bar. 3. Click on the Italic icon, which is on the Formatting toolbar. 4. Click again on the Italic icon if you wish to remove the italics. Alternate Method – Adding Underline by Using the Icon 1. Type Underline in cell C3. 2. Click on the checkmark located on the Formula bar. 3. Click on the Underline icon, which is on the Formatting toolbar.
14
4. Click again on the Underline icon if you wish to remove the underline. Alternate Method – Bold, Underline, and Italicize Using Icons 1. Type All Three in cell D3. 2. Click on the checkmark located on the Formula bar. 3. Click on the Bold icon. 4. Click on the Italic icon. 5. Click on the Underline icon.
Changing the Font and Font Size You can change the Font and Font Size of the data you enter. 1. Type Times New Roman in cell A5. 2. Click on the checkmark located on the Formula bar. 3. Click on Format, which is located on the Menu bar. 4. Press the down arrow and highlight Cells. Press Enter. 5. Click on the Font tab, if it is not in the front. All of the Fonts listed in the Font box are available to you. 6. Find and click on Times New Roman in the Font box. 7. Click on OK. 8. Note: The font changes from Arial to Times New Roman.
Changing the Font Size 1. Place the cursor in cell A5. 2. Click on Format, which is located on the Menu bar. 3. Press the down arrow and highlight Cells.
15
4. Press Enter. 5. Click on the Font tab, if it is not in the front. 6. Click on 16 in the Size box. 7. Click on OK. Deleting a Cell Entry To delete an entry in a cell or a group of cells, you place the cursor in the cell or highlight the group of cells and press Delete. 1. Place the cursor in cell A5. 2. Press the Delete key. Changing a Single Column Width 1. Place the cursor on the line between the B and C column headings. The cursor should look like a solid black bar with an arrow pointing in either direction. 2. Move your mouse to the right while holding down the left mouse button. The width indicator will appear on the screen.
3. Release the left mouse button when the width indicator shows approximately 3 inches
16
Moving to a New Worksheet In OpenOffice.org Calc, each workbook is made up of several worksheets. Before moving to the next topic, move to a new worksheet. 1. Click on Sheet2, which is located in the lower left corner of the screen.
Filling Cells Automatically You can use OpenOffice.org Calc to automatically fill cells with information that occur in a series. For example, you can have word automatically fill in times, the days of the week or months of the year, years, and other types of series. The following demonstrates: 1. Type the following into the worksheet as shown. A
1
B C 1 Sun Sunday 2. Place the cursor in cell A1.
D Jan
E January
F 2000
G Type 1
3. Press F8. This will anchor the cursor. 4. Press the right arrow key six times to highlight cells A1 through G1. 5. Find the small black square in the lower right corner of the highlighted area. This is called the Fill Handle.
17
6. Grab the Fill Handle and drag with your mouse to highlight cells A1 to G24. 7. Note how each cell fills. 8. Press Esc and then click anywhere on the worksheet to remove the highlighting.
18
Numbers and Mathematical Calculations In this lesson you will learn how to work with numbers and how to perform mathematical calculations. To begin, open OpenOffice.org Calc. Making Numeric Entries In OpenOffice.org Calc, you can enter numbers and mathematical formulas into cells. When a number is entered into a cell, you can perform mathematical calculations such as addition, subtraction, multiplication, and division. When entering a mathematical formula, precede the formula with an equals sign. Use the following to indicate the type of calculation you wish to perform: + -
Addition Subtraction
*
Multiplication /
Division
Performing Mathematical Calculations The following exercises demonstrate how to perform mathematical calculations. Addition 1. Move the cursor to cell A1. 2. Type 1. 3. Press Enter. 4. Type 1 in cell A2. 5. Press Enter. 6. Type =A1+A2 in cell A3.
19
7. Press Enter. 8. Note that cell A1 has been added to cell A2 and the result is shown in cell A3.
Place the cursor in cell A3 and look at the Formula bar.
20
Subtraction 1. Press F5. The Go To dialog box will appear. 2. Type B1. 3. Press Enter. 4. The cursor should move to cell B1. 5. Type 5 in cell B1. 6. Press Enter. 7. Type 3 in cell B2. 8. Press Enter. 9. Type =B1-B2 in cell B3. 10. Press Enter. 11. Note that cell B2 has been subtracted from B1 and the result is shown in cell B3.
Place the cursor in cell B3 and look at the Formula bar.
21
Multiplication 1. Hold down the Ctrl key while you press "g" (CTRL + G). The Go To dialog box will appear. 2. Type C1. 3. Press Enter. You should now be in cell C1. 4. Type 2 in cell C1. 5. Press Enter. 6. Type 3 in cell C2. 7. Press Enter. 8. Type =C1*C2 in cell C3. 9. Press Enter. 10. Note that C1 is multiplied by C2 and the answer is displayed in C3.
Place the cursor in cell C3 and look at the Formula bar.
22
Division 1. Press F5. 2. Type D1. 3. Press Enter. You should now be in cell D1. 4. Type 6 in cell D1. 5. Press Enter. 6. Type 3 in cell D2. 7. Press Enter. 8. Type =D1/D2 in cell D3. 9. Press Enter. 10. Note that D1 is divided by D2 and the answer is displayed in cell D3.
Place the cursor in cell D3 and look at the Formula bar.
23
The AutoSum Icon The AutoSum icon on the Standard toolbar automatically creates a SUM function. The following illustrates using the SUM function to total the Region 1 sales: 1. Press F5. 2. Type B16. 3. Press Enter. 4. Click on the AutoSum button, which is located on the Standard toolbar. ↓
B4 to B15 should now be highlighted.
5. Press Enter.
24
Inserting Rows You can use OpenOffice.org Calc to insert or delete rows on the worksheet. You need to insert three rows so you can add headings to the chart. 1. Highlight cells A1 to A3. Move the cursor to cell A1. Press F8. Press the down arrow key twice.
2. Click on Insert, which is located on the Menu bar or right click with your mouse to bring up a drop down menu with Insert Rows as one of the options.
25
3. Press the down arrow key until Rows is highlighted. 4. Press Enter. Three new rows should be inserted. Your worksheet should now look similar to the one shown here.
26
Inserting Columns You can use OpenOffice.org Calc to insert or delete columns on the worksheet. You need to insert a column. 1. Move the cursor to cell A4. 2. Click on Insert, which is located on the Menu bar. 3. Press the down arrow key until Columns is highlighted. 4. Press Enter. 5. A new column is inserted.
27
Using Copy and Paste In Lesson Three you learned that you can copy and paste information. To copy the formula in cell B16 and paste it in cells C16 to D16, follow these steps:
Cut, Copy and Paste Icons 1. Move to cell B16. 2. Click on the Copy icon. Rotating dotted lines will appear around the cell. The rotating dotted lines designate the area to be copied. 3. Highlight cells C16 to D16. 4. Click on the Paste icon, which is located on the Standard toolbar. The formula in cell B16 is copied to cells C16 and D16. 5. Press Esc.
Creating a Border You can use the Border icon to place borders around a cell. You have several options on the type of border to use and where to place the borders. Borders can be placed above, below, and/or on the sides of cells. The following illustrates using borders: 1. Place the cursor in cell C16. 2. Highlight cells C16 to F16. 3. Click on the down arrow next to the Borders icon to open the Borders palette. ↓
28
4. Click on Top and Bottom Border (third icon from the left in the middle row).
Printing a Worksheet You have completed your first worksheet. You are now ready to print it. First, look at the worksheet in the Page Preview screen. 1. Click on File, which is located on the Menu bar. 2. Press the down arrow key until Page Preview is highlighted. 3. Press Enter. The worksheet as it will appear when printed should display. 4. Click on Setup. 5. Select Portrait on the Page tab. 6. Click on the Margin tab. 7. Place a check mark in the Center on Page Horizontally box. 8. Click on OK. 9. Click on Print. A dialog box will appear. 10. Check the setting in the dialog box. 11. Click on OK. Exit Calc You can exit Calc by using the file menu or the close button. If you make any changes to your notebook you will be prompted to save the changes.
**************************************** 29