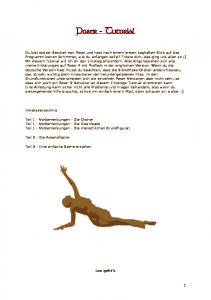
POSER TUTORIAL – TATTOO. Welcome to my Tutorial of my Artwork „Tattoo“.
This one is made for Poser but one for DAZ Studio will be made too, if someone ...
Du bist stolzer Besitzer von Poser und hast nach einem ersten zaghaften Blick
auf das ... dass sich auch ein Poser 5-Benutzer an diesem Einstiegs-Tutorial ...
BEGINNER POSER HAIR ROOM TUTORIAL. WOOLLY WORM. USING CP
BOOKWORM. IN POSER 7. IN POSER 7 POSE ROOM, SELECT BOOKWORM.
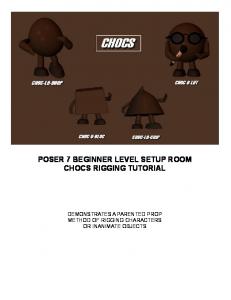
POSER 7 BEGINNER LEVEL SETUP ROOM. CHOCS RIGGING TUTORIAL.
DEMONSTRATES A PARENTED PROP. METHOD OF RIGGING CHARACTERS.
This tutorial has been made available again here for Poser 3 by courtesy of Dan
Nichols, the ... Dan has a new version of this tutorial for Poser 4 on his own site.
In these tutorials we do not describe basic World Builder operations like creating
... Also we suggest that you refer to Poser manual for more details on Poser.
Add actions to buttons. New Perspectives on Adobe Flash CS3 ... Event: situation
triggering execution of a script ... Script Assist mode: guides scripting of actions.
Oct 22, 2006 ... Visual3D : Tutorial : Signal Processing. Objectives (# 1346). The objective of this
tutorial is to provide an overview of signal processing in ...
Lesson 2: Building a Visual Basic Application. 2.1 Creating Your First Application.
In this section, we are not going into the technical aspect of VB programming, ...
Jan 15, 2004 ... NET Tutorial by: Paul ... apply our knowledge to implementing a small VB
program. ... Datagrid: Allows users see and edit multiple rows of data ...
Basic Tutorial of CircuitLogix. Introduction. The purpose of this tutorial is to
provide a basic overview of the electronics simulator. CircuitLogix, and to
demonstrate ...
Basic Tutorial ... All AutoCAD commands can be typed in at the command line. .....
To move an object a specified distance, type a distance at the second point of ...
The aim of this tutorial is to describe the typical sys- tem requirements for the ...
The equipment diagrams give a rough overview of the of the equipment broken ...
Arsitektur mikrokontroler jenis AVR pertamakali dikembangkan pada tahun 1996
oleh dua orang ... 1.2 Karakteristik mikrokontroler AVR seri ATMega8535.
Resumo do Tutorial: *Breve histórico. *Baixar e Instalar o Visual Studio 2008
Express Edition. *Conhecendo o Ambiente. *Desenvolvendo o seu primeiro
projeto ...
Launching AutoCad. 1. Start. 2. 3D and CAD. 3. AutoCad ... All AutoCAD
commands can be typed in at the command line. .... AutoCAD 2D Tutorial.
Shade tutorial: Shoes for Poser www.oscillator.se/3d. Notes. Welcome to the
Shade tutorial: Shoes for Poser. This is my first tutorial for. Shade. I was inspired
by ...
Jun 10, 2009 ... It is derived from SDLC (Synchronous Data Link. Control) developed by ... The
PPP protocol uses HDLC –like frame format to encapsulate data ...
Tutorial 5. Dirt Bikes's management wants to make sure it has policies and.
Developing a ..... telecommunications and networking hardware and software,
and.
Naïve Bayes Classifier. TUTORIAL 5. 1. Page 2. A.Calculating Probabilities. B. Laplace Estimator. C. C. Creating ... pr
Word Banks â these are writing grids that you can use for word banks. Keyboard ... you will need to have enough licens
In this tutorial, we will use a simple CMOS inverter to demonstrate how to measure circuit power ... power (all) option in the ADE window. Then simulate the ...
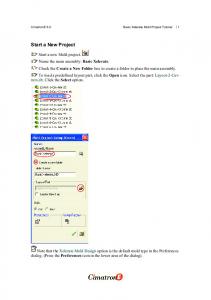
This box is a simple sketch that represents a preliminary mold base size. It can be
edited .... Load the New Mold Base from the Hasco mm Catalog: Select the 9 ...
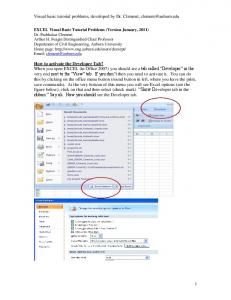
Visual basic tutorial problems, developed by Dr. Clement, [email protected]
... problem below shows how to create a VB button and rename it to name you ...
This tutorial will walk a user through the basic features of Poser 5 and the ... the
walk-through animation are provided for download at the end of the tutorial.
The Poser 5 Basic Tutorial This tutorial will walk a user through the basic features of Poser 5 and the creation of a simple animation. The Poser and bvh files of the walk-through animation are provided for download at the end of the tutorial.
Poser 5 - The Default Pose
To create an animation one must first prepare the default pose. Second Life only accepts animations saved from Poser in BioVision Hierarchy (bvh) format, created using a Poser 2 model. Only a Poser 2 model will work! Additionally, Second Life deletes the first frame of an animation, using it as a "normalizing frame" to orient the remaining animation. To begin, one must load a Poser 2 model and make the first frame a default stance, as follows: Open the Libraries window by choosing Window > Libraries. In the Libraries window, select a Poser 2 model by selecting Figures > Poser 1-4 > Poser 2 Hi > Casual Man P2. Set the total number of frames in the frame navigator at the bottom of the screen to 3. The frame navigator should now read 1 of 3 as seen below.
Frame Navigator Save this first frame as a key frame by clicking the "+" button in the key-frame navigator in the lower right corner of the Poser window as seen below. There will be more on key frames later.
Key-Frame Navigator Move to frame 2 by dragging the slider in the frame navigator. Save the second frame as a key frame by clicking the "+" button. Frame 2 is where your animation will begin. If you have difficulties or want to get right to making an animation, download this Poser default pose file. This will be the starting point of every animation you will make.
Make an Animation - Flapping Arms
This tutorial will walk through the construction of a simple two-second animation. To make this animation, the total number of frames needs to be increased. Given that there are 30 frames per second, a two-second animation will require 60 frames. Increase the total number of frames from 3 to 60 in the frame navigator. Move the slider to set the current frame to 30. The frame navigator should read "30 of 60" as seen below.
Frame Navigator Save frame 30 as a key frame by clicking the "+" button in the key-frame navigator. In Poser it is not necessary to design every frame of the animation. Instead key frames are defined every second or so and the software interpolates between those points, filling in the frames between the key frames automatically.
Key-Frame Navigator Open up the parameter dials window by choosing Window > Parameter Dials.
Parameter Dials Window Click on the model's right shoulder. The right shoulder is the upper most part of the right arm, not the shoulder itself. The name "Right Shoulder" should appear at the top of the parameter dials window. The parameter dials window is the best way to move a model. Dragging the model directly can often lead to frustration! Turn the parameter dial labeled Bend and set it to -5 degrees. Click on the model's left shoulder and turn the parameter dial labeled Bend to 5 degrees. The model should now look like it does below. The models arms should be stretched horizontal out to its side so the body makes a large "T" shape.
Frame 30 The animation will now be completed by repeating the steps for setting frame 30 for frame 60 with a different arm position. When uploaded as a looping animation in Second Life, the avatar will look like it's flapping its arms. Move the slider in the frame navigator to frame number 60 of 60.
Frame Navigator Save frame 60 as a key frame by clicking the "+" button in the key-frame navigator.
Key-Frame Navigator Use the parameter dials window to bend the left and right shoulder back down to their original position. The right shoulder should be 50 degrees and the left shoulder should be -50 degrees.
Frame 60 That finishes the animation. To preview it, press the play button in the animation navigator in the lower left corner of the Poser window.
Frame 60 Finally, save the Poser animation file (File > Save As...) and then export the animation as a bvh file by selecting File > Export > BVH Motion... and choosing Scale Automatically. Upload the bvh file in Second Life (not in Poser) by choosing File > Upload Animation. Provided here are files of the above animation in Poser format and bvh format.
This work is licensed under a Creative Commons License.
Second Life® and Linden Lab™ are trademarks or registered trademarks of Linden Research, Inc.