Bantam Java Compiler Project Lab Manual Extended Version 1.3 Marc L. Corliss
David Furcy
E Christopher Lewis
Hobart and William Smith Colleges
University of Wisconsin Oshkosh
VMware, Inc.
[email protected]
[email protected]
[email protected]
http://math.hws.edu/mcorliss
http://www.uwosh.edu/faculty staff/furcyd
http://www.eclewis.net/
c
2009, Marc L. Corliss, David Furcy, and E Christopher Lewis This manual is licensed under a Creative Commons Attribution-NonCommercial-NoDerivs 2.5 License (http://creativecommons.org/licenses/by-nc-nd/2.5/). This license allows you to duplicate and distribute this manual in unmodified form for non-commercial purposes. See the license for more details.
About the Authors Marc L. Corliss is an Assistant Professor in the Mathematics and Computer Science Department at Hobart and William Smith Colleges. In 2006, Professor Corliss received his PhD from the University of Pennsylvania in computer science. His research interests are in system design, and in particular the design of compilers and processors. He is also interested in computer science education and building new tools for teaching computer systems courses.
David Furcy is an Assistant Professor in the Computer Science Department at the University of Wisconsin Oshkosh. Professor Furcy obtained his PhD in computer science from the Georgia Institute of Technology in 2004. His research interests include artificial intelligence (heuristic search) and computer science education. Most recently, his passion for teaching has led him to investigate the design of effective algorithm and program visualization tools for education.
E Christopher Lewis is a Staff Engineer in the Advanced Development Group at VMware, Inc. He is exploring new technologies in the implementation and application of virtual machines. Before joining VMware in 2007, Dr. Lewis was a Professor in the Department of Computer and Information Science at the University of Pennsylvania. He received his PhD in computer science from the University of Washington in 2001.
Acknowledgements This work originally arose out of compiler classes taught at Hobart and William Smith Colleges and the University of Pennsylvania by two of the authors (Marc Corliss and E Christopher Lewis). Several significant contributions were added by the third author (David Furcy) in the process of teaching a compiler course at the University of Wisconsin Oshkosh. First and foremost, the authors wish to thank the students and teaching assistants involved with those courses for their useful comments and feedback. The authors also thank Steve Vegdahl at the University of Portland for discussions and advice on the Bantam Java language. In addition, the authors thank several undergraduate students at Hobart and William Smith Colleges for their contributions to this project. Lori Pietraszek (now at Lockheed Martin) and Josh Davis designed and implemented the initial optimization and interpreter components, respectively. Sara Young made several significant improvements to the garbage collector. Lex Kridler built a sizeable set of library classes for Bantam Java. Will van Steen worked on a tool for converting (many) Java programs into Bantam Java programs (this tool is still incomplete). Four of these students were supported by generous grants from the Provost’s Office at Hobart and William Smith Colleges. Finally, the authors wish to thank four institutions for their support: Hobart and William Smith Colleges, University of Wisconsin Oshkosh, VMware, and the University of Pennsylvania.
Contents 1
2
3
4
5
Introduction
1
1.1
Project Goals . . . . . . . . . . . . . . . . . . . . . . . . . . . . . . . . . . . . .
3
1.2
Resources . . . . . . . . . . . . . . . . . . . . . . . . . . . . . . . . . . . . . . .
5
1.3
About This Manual . . . . . . . . . . . . . . . . . . . . . . . . . . . . . . . . . .
6
1.4
Related Work . . . . . . . . . . . . . . . . . . . . . . . . . . . . . . . . . . . . .
6
1.5
Outline . . . . . . . . . . . . . . . . . . . . . . . . . . . . . . . . . . . . . . . .
7
Bantam Java Toolset
9
2.1
Overview and Installation Instructions using Make . . . . . . . . . . . . . . . . .
9
2.2
Overview and Installation Instructions using Ant . . . . . . . . . . . . . . . . . . 15
2.3
Using the Bantam Compiler . . . . . . . . . . . . . . . . . . . . . . . . . . . . . 20
2.4
Last Words . . . . . . . . . . . . . . . . . . . . . . . . . . . . . . . . . . . . . . 25
Bantam Java Language
26
3.1
Overview . . . . . . . . . . . . . . . . . . . . . . . . . . . . . . . . . . . . . . . 26
3.2
Inheritance . . . . . . . . . . . . . . . . . . . . . . . . . . . . . . . . . . . . . . 28
3.3
Class Definitions . . . . . . . . . . . . . . . . . . . . . . . . . . . . . . . . . . . 30
3.4
Member Definitions . . . . . . . . . . . . . . . . . . . . . . . . . . . . . . . . . . 32
3.5
Statements . . . . . . . . . . . . . . . . . . . . . . . . . . . . . . . . . . . . . . . 39
3.6
Expressions . . . . . . . . . . . . . . . . . . . . . . . . . . . . . . . . . . . . . . 47
3.7
Built-In Classes . . . . . . . . . . . . . . . . . . . . . . . . . . . . . . . . . . . . 62
3.8
Bantam vs. Java . . . . . . . . . . . . . . . . . . . . . . . . . . . . . . . . . . . . 65
3.9
Last Words . . . . . . . . . . . . . . . . . . . . . . . . . . . . . . . . . . . . . . 68
Bantam Java Compiler
69
4.1
Overview . . . . . . . . . . . . . . . . . . . . . . . . . . . . . . . . . . . . . . . 69
4.2
Data Structures . . . . . . . . . . . . . . . . . . . . . . . . . . . . . . . . . . . . 70
4.3
Last Words . . . . . . . . . . . . . . . . . . . . . . . . . . . . . . . . . . . . . . 80
Bantam Java Runtime System 5.1
81
Runtime System Responsibilities . . . . . . . . . . . . . . . . . . . . . . . . . . . 81
v
6
7
8
9
5.2
Calling Conventions . . . . . . . . . . . . . . . . . . . . . . . . . . . . . . . . . . 83
5.3
Encoding Objects and Primitives . . . . . . . . . . . . . . . . . . . . . . . . . . . 84
5.4
Last Words . . . . . . . . . . . . . . . . . . . . . . . . . . . . . . . . . . . . . . 89
Bantam Java Optimizer
90
6.1
Overview . . . . . . . . . . . . . . . . . . . . . . . . . . . . . . . . . . . . . . . 90
6.2
Naming Scheme . . . . . . . . . . . . . . . . . . . . . . . . . . . . . . . . . . . . 91
6.3
Control Flow Graph . . . . . . . . . . . . . . . . . . . . . . . . . . . . . . . . . . 92
6.4
Last Words . . . . . . . . . . . . . . . . . . . . . . . . . . . . . . . . . . . . . . 97
Project 1: Building a Lexer
98
7.1
Overview . . . . . . . . . . . . . . . . . . . . . . . . . . . . . . . . . . . . . . . 98
7.2
Files and Directories . . . . . . . . . . . . . . . . . . . . . . . . . . . . . . . . . 98
7.3
Lexer Details . . . . . . . . . . . . . . . . . . . . . . . . . . . . . . . . . . . . . 99
7.4
Testing the Lexer . . . . . . . . . . . . . . . . . . . . . . . . . . . . . . . . . . . 100
7.5
Last Words . . . . . . . . . . . . . . . . . . . . . . . . . . . . . . . . . . . . . . 100
Project 2: Building a Parser
101
8.1
Overview . . . . . . . . . . . . . . . . . . . . . . . . . . . . . . . . . . . . . . . 101
8.2
Files and Directories . . . . . . . . . . . . . . . . . . . . . . . . . . . . . . . . . 102
8.3
Parser Details . . . . . . . . . . . . . . . . . . . . . . . . . . . . . . . . . . . . . 102
8.4
Error Handling . . . . . . . . . . . . . . . . . . . . . . . . . . . . . . . . . . . . 104
8.5
Testing the Parser . . . . . . . . . . . . . . . . . . . . . . . . . . . . . . . . . . . 104
8.6
Last Words . . . . . . . . . . . . . . . . . . . . . . . . . . . . . . . . . . . . . . 105
Project 3: Building a Semantic Analyzer
106
9.1
Overview . . . . . . . . . . . . . . . . . . . . . . . . . . . . . . . . . . . . . . . 106
9.2
Files and Directories . . . . . . . . . . . . . . . . . . . . . . . . . . . . . . . . . 107
9.3
Semantic Analyzer Details . . . . . . . . . . . . . . . . . . . . . . . . . . . . . . 107
9.4
Error Handling . . . . . . . . . . . . . . . . . . . . . . . . . . . . . . . . . . . . 110
9.5
Testing the Semantic Analyzer . . . . . . . . . . . . . . . . . . . . . . . . . . . . 110
9.6
Last Words . . . . . . . . . . . . . . . . . . . . . . . . . . . . . . . . . . . . . . 111
vi
10 Project 4: Building a Code Generator
112
10.1 Overview . . . . . . . . . . . . . . . . . . . . . . . . . . . . . . . . . . . . . . . 112 10.2 Files and Directories . . . . . . . . . . . . . . . . . . . . . . . . . . . . . . . . . 112 10.3 MIPS/x86 Code Generator Details . . . . . . . . . . . . . . . . . . . . . . . . . . 113 10.4 JVM Code Generator Details . . . . . . . . . . . . . . . . . . . . . . . . . . . . . 117 10.5 Extra credit . . . . . . . . . . . . . . . . . . . . . . . . . . . . . . . . . . . . . . 121 10.6 Testing the Code Generator . . . . . . . . . . . . . . . . . . . . . . . . . . . . . . 121 10.7 Last Words . . . . . . . . . . . . . . . . . . . . . . . . . . . . . . . . . . . . . . 122 11 (Optional) Project 5: Building an Optimizer
123
11.1 Overview . . . . . . . . . . . . . . . . . . . . . . . . . . . . . . . . . . . . . . . 123 11.2 Files and Directories . . . . . . . . . . . . . . . . . . . . . . . . . . . . . . . . . 124 11.3 Optimizer Details . . . . . . . . . . . . . . . . . . . . . . . . . . . . . . . . . . . 124 11.4 Testing the Optimizer . . . . . . . . . . . . . . . . . . . . . . . . . . . . . . . . . 125 11.5 Last Words . . . . . . . . . . . . . . . . . . . . . . . . . . . . . . . . . . . . . . 126 12 (Optional) Project 6: Building a Bantam Java Interpreter
127
12.1 Overview . . . . . . . . . . . . . . . . . . . . . . . . . . . . . . . . . . . . . . . 127 12.2 Files and Directories . . . . . . . . . . . . . . . . . . . . . . . . . . . . . . . . . 127 12.3 Interpreter Details . . . . . . . . . . . . . . . . . . . . . . . . . . . . . . . . . . . 128 12.4 Testing the Interpreter . . . . . . . . . . . . . . . . . . . . . . . . . . . . . . . . . 128 12.5 Last Words . . . . . . . . . . . . . . . . . . . . . . . . . . . . . . . . . . . . . . 129 13 Closing Remarks
130
References
132
vii
1
Introduction
This manual describes a new programming language called Bantam Java and an infrastructure from which a student can build a Bantam Java compiler. The Bantam Java language and compiler are designed specifically for the classroom (i.e., a compilers course). As the name suggests, Bantam Java contains a subset of the Java programming language, which is the language used in many computer science programs. As such, Bantam Java will seem familiar to most students. The compiler infrastructure, as well as the language, are designed so that an undergraduate student can complete the compiler in a one semester course. Before describing the Bantam Java language and compiler, this manual motivates compiler construction for an undergraduate computer science student, which, unfortunately, some computer science programs have removed from their curriculum. There are many benefits in having an undergraduate student construct a compiler. First, constructing a compiler requires a deep understanding of the source programming language, the target machine, and everything in between. Very few aspects of computer programming seem like magic to a student after successfully implementing a compiler. A compiler also makes for a challenging software engineering project. Modern compilers are incredibly complex. To deal with this complexity, most compilers make use of modular design, well-organized layers of abstraction, and design patterns such as the visitor pattern [13]. Implementing a compiler gives students experience applying all of these techniques. It also provides students with an opportunity to take part in designing a large software infrastructure. A compiler is also a wonderful application of many concepts from other areas of computer science including programming languages, computational theory, data structures, algorithms, and complexity analysis. For instance, a compiler relies on finite automata and context-free grammars (usually covered in a computational theory course) for performing lexical and syntactic analysis. Building a compiler helps students appreciate the importance of these topics via their application in a practical context. In addition, a compilers course can help strengthen the understanding of those students who may have had some initial trouble with these often challenging concepts. For all of these reasons, incorporating compiler construction into an undergraduate computer science curriculum is important. Unfortunately, there are very few compilers that are suitable for an undergraduate course project. Commercial compilers are too complex to be undertaken in a one semester course. At the other extreme, there are a number of programming languages and 1
compilers [4, 21], which do not include some of the important features of modern languages such as objects and inheritance. Although these languages and compilers abstract aspects of real programming languages, they appear toy-like (and possibly irrelevant) to students. The challenge is building a compiler infrastructure, which has most of the important features of modern programming languages, but which can be designed and implemented in a one semester course. This manual presents a new programming language, Bantam Java, and a compiler infrastructure that are designed specifically for use in the classroom. The toolset will run on any Linux/x86 machine. Bantam Java (or Bantam for short) is a small subset of the Java language, making it reasonable to implement a compiler for it in a one semester course. (Bantam is a city in the north of the Indonesian island of Java and connotes smallness.) Although small, Bantam is sufficiently practical that it can easily be used to write any text-based application. The same cannot be said for many languages compiled by instructional compilers. Bantam also has several other virtues that make it well-suited for an undergraduate compiler course. First and foremost, the project uses a language similar to Java, which is commonly used in introductory programming courses. This approach leverages the student’s existing intuitions developed in earlier programming courses. The instructor also does not have to argue the relevance of the compiled language; the student instantly believes that the language is relevant and that the leap to a commercial compiler is in their grasp. Moreover, the insights that the student develops in constructing the compiler can be applied directly to Java. A second virtue of this project is that several aspects of the project are customizable. For instance, this project supports several tools (e.g., lexer and parser generators) and target architectures (e.g., MIPS, x86, JVM). This project also allows instructors to choose between a base language with a small set of core features or an extended language. In addition, the components of the project can be easily swapped in and out so that an instructor could, for example, choose to skip lexing and parsing and instead have students implement a garbage collector. The project is also easily extended if an instructor wanted to add additional language features or targets. A third virtue of this project is that it includes a free, comprehensive student manual (the document you are reading), which can be used in conjunction with any traditional compiler textbook [2, 22, 8, 19].
2
1.1
Project Goals
We had five goals in mind when designing the Bantam language and compiler. Well-known language. Our first goal was to design a language that was a subset of Java, since Java is often used in introductory programming courses. We wanted to leverage the student’s experience in earlier programming courses. The student spends less time learning the syntax and semantics of the language, and more time focusing on the implementation of the language, perhaps relearning some advanced language features, which they did not fully grasp the first time around. The student can also apply what they learn directly to Java. Finally, by using a Java-like language, the project as a whole is more compelling to the student. Carefully-selected features. Of course, we could not include all or even most of the Java features in our language. Building a compiler for such a language would require more than a single semester. Our second goal was to select an appropriate subset of Java so that the project retained the character of Java yet resulted in a project that can be realized in a semester-long course. We chose to emphasize object-oriented programming in our language leaving out such features as static methods and variables, interfaces, abstract classes, nested classes, packages, exceptions, arrays (at least in the base Bantam Java language), and most primitives (besides int and boolean). While some of these features add significant intellectual content to the compiler implementation, they all require a significant amount of time to implement. For more advanced compiler courses, we provide an extended Bantam language and compiler infrastructure, which includes all of the features of the base project plus some additional useful features. In particular, the extended language includes (single-dimensional) arrays and some language constructs, which are not strictly required but are convenient such as for loops and break statements. Well-engineered infrastructure. Our third goal was to build a well-engineered compiler infrastructure. We wanted instructors and students to be able to easily extend our infrastructure. By carefully designing our infrastructure, students can also complete more sophisticated assignments in less time. The compiler project also serves as an example of quality software engineering for students. Comprehensive documentation. Our fourth goal was to provide a comprehensive, free manual (the document you are reading) describing all aspects of the project. This manual will work well
3
in tandem with any traditional compiler textbook [2, 22, 8, 19]. Customizable project. Our fifth and final goal was to give instructors the flexibility to tailor the project to their own classroom needs. For instance, instructors can choose between a base source language with a small set of core features or an extended language with some additional useful features. The base language includes many object-oriented features of Java, but in order to ensure that the project is doable in a one semester course, it does not include arrays as well as some useful language constructs (e.g., for loops). In particular, the following features were added to the extended language: • • • • •
Single-dimensional arrays For loops Unlabeled break statements ++ and -- increment/decrement operators (prefix and postfix) Arbitrary placement of return statements
In addition, there are two other ways that instructors can customize this project. First, instructors can choose between two sets of popular lexer and parser generators. Our infrastructure supports using either the JLex scanner generator [7] and the Java Cup parser generator (an LALR parser generator) [14], or the JavaCC scanner and parser generator (an LL(k) parser generator) [6]. There are also two installation packages to choose from: one that uses the make utility and another that uses the Apache ant tool. The make installation package is intended for a *nix system. The ant installation package will potentially install on any machine with pre-installed versions of Java and ant. In fact, this package has been installed on a Windows XP machine. There are some optional assignments, which instructors can choose to incorporate into their courses. In one assignment, students build an optimizer for their compiler. In a second, students build a Bantam Java interpreter. In the future, we will add other optional projects such as a project in garbage collection. Finally, the infrastructure supports three target machines: MIPS, x86, and the Java Virtual Machine (JVM). The MIPS target uses the SPIM emulator [15], which can be downloaded and installed on any x86 machine. The x86 target is a native target. It will work on any 32-bit, Intel x86 machine running the Linux operating system (although other x86 processors and Unix-based operating systems may work). The JVM target generates textual Java bytecode (or Java assembly code), which can be assembled into class files via the open source Jasmin Java assembler [18, 4
17]. In addition to these three targets, there is also a fourth target available to instructors only. Instructors can email the first author to obtain a version of the compiler targeting the educational architecture Larc [10, 9], which can be as a resource in an introductory computer architecture course. Summary. We made the Bantam language a subset of an existing, ubiquitous programming language, Java, so that students would already be familiar with it, understand the relevance of the course projects, and be able to apply existing intuitions. Because the Bantam compiler had to be fairly simple, we could only choose a small subset of the Java features to include in Bantam. We chose to include those features that emphasize object-oriented programming. We use many tools from software engineering to make our infrastructure easy to understand and extend. We have written a comprehensive manual (this manual), which can be used in concert with a traditional compiler textbook [2, 22, 8, 19]. Finally, this project has some customizable components (language features, lexer/parser generator, target machine) that allow the instructor to tailor the project to their own classroom needs.
1.2
Resources
There are several resources for helping both students and instructors install and work with this toolset. They are all freely available online at http://www.bantamjava.com. These include: • Student manual. A comprehensive student manual (this manual), which documents all aspects of the Bantam Java compiler project (a PDF document). • SIGCSE paper. A condensed description of this work (a PDF document) published in SIGCSE 2008 [11]. The slides from the SIGCSE talk are also available (a PDF or PowerPoint document). • Bulletin board. An online bulletin board for submitting questions, comments, and requests. • Compiler API. The application programming interface (API) of the compiler generated from comments in the source code using the javadoc utility.
5
In addition, instructors (and instructors only) can obtain solution code for the project as well as a version of the compiler targeting the educational architecture Larc [10, 9] by emailing the first author of this manual.
1.3
About This Manual
This manual along with the corresponding toolset provide support code and documentation for course projects in a compilers course. This manual should be supplemented with a traditional compiler textbook [2, 22, 8, 19]. For example, this manual does not discuss the theory of lexing and parsing, nor does it discuss the compiler issues that arise when compiling languages besides Bantam. It also assumes that the student is following the design template laid out in the subsequent sections. It will offer limited help for those following a different design recipe. In addition, this compiler project and this manual are intended for students who already know some Java. It does not teach programming or programming in object-oriented languages, although it does discuss some of the concepts when describing the Bantam Java language. Students should be familiar with Java or at the very least familiar with a similar object-oriented language (e.g., C++, C#). For those students who are less familiar with Java, they may need to consult a Java reference book [5], while reading this manual. There are two versions of this lab manual: one that uses the Bantam Java base language and one that uses the Bantam Java extended language (which includes additional features such as arrays). You are reading the extended language version. If you would like the base language version, it is available online at http://www.bantamjava.com. There are also two versions of the toolset: a base version and an extended version. You should use the same version of the toolset as the manual. Either version of the toolset can be downloaded at http://www.bantamjava.com.
1.4
Related Work
The Bantam project is not the first classroom compiler project, but it does have some advantages over its predecessors. There are a number of compiler projects [4, 21], which do not use objectoriented source languages. The major drawback with these projects is that the dominant programming paradigm today is object-oriented programming. Most of the recent successful commercial languages are object-oriented (e.g., Java, C#, C++, Python).
6
The COOL (Classroom Object-Oriented Language) project by Alex Aikens [3] is one example of an object-oriented educational compiler project. This project uses a source language called COOL, a simple object-oriented language, which the authors are able to formally prove is type safe. While this project is appealing for a compiler course that emphasizes type theory, the language itself is syntactically and semantically different from any other language that students are familiar with. Students must spend significant time learning the COOL language before beginning the compiler project. Students may also have difficulty applying what they have learned to practical languages like Java. The MiniJava project [22] is another educational, Java-based compiler project. The MiniJava project is integrated into a particular compiler textbook [22], reducing the project management for the instructor, but this tight integration makes the project an impractical option for instructors wishing to employ a different text. In addition, the object-oriented aspects of the project appear in the “Advanced Topics” section of the text, relegating object-orientation to an optional add-on. Finally, the publisher-provided instructor code is incomplete. The Bantam Java project can be used with any textbook, object-orientation is fundamental, a complete implementation is available to instructors, and it has a complete and clear student manual. Although Bantam Java is significantly different from Cool and MiniJava, and has the virtues discussed above, many ideas were borrowed from both projects. First, the context-free grammar for Bantam Java is specified in a similar syntax to the Cool context-free grammar [3]. The encoding of objects, object construction, and parts of the runtime system also work in a similar way as in Cool [3]. The Bantam Java compiler makes use of the visitor design pattern as in MiniJava [22].
1.5
Outline
The remainder of this manual is organized as follows. Section 2 describes the Bantam Java toolset and provides instructions for installing the toolset. Section 3 describes in detail the Bantam Java language. Section 4 describes the (incomplete) Bantam Java compiler (minus the optimization component), which students will complete in course projects. Section 5 describes the Bantam Java runtime system, which will be used by the generated code. Section 6 describes the (incomplete) optimization component in the Bantam Java component, which students can complete in an optional course project. Section 7-10 contain the core project assignments and descriptions for building the lexer, parser, semantic analyzer, and code generator. Section 11-12 contains some 7
optional project assignments. Section 11 contains a project assignment for building an optimizer. Section 12 contains a project assignment for building a Bantam Java interpreter.
8
2
Bantam Java Toolset
This section gives an overview of the Bantam Java toolset as well as instructions for installing and running the compiler. The toolset can be built using either the Unix make utility or the Apache ant tool. The next two subsections describe how to install the toolset using make and ant, respectively. You can safely skip the subsection corresponding to the building tool that you are not using. However, even if your toolset is already pre-installed, you should still read (or at least skim) one of these subsections, as well as the following subsections, as they describe how the project infrastructure is layed out and how to run the Bantam Java compiler.
2.1
Overview and Installation Instructions using Make
The Bantam Java toolset will compile and should run on any linux/x86 machine, although it is primarily tested on an Intel 32-bit x86 machine running Suse, Red Hat, and Ubuntu Linux. It also may run on other *nix platforms and other architectures. It is available as a compressed tarball (bantamjava.tar.gz) at the website: http://www.bantamjava.com/. Note: there are two versions of the toolset: one for building a compiler for the base Bantam Java language and one for building a compiler for the extended language. Make sure that you have downloaded the correct toolset. The version of the toolset that you use should be the same as the version of this manual (you are reading the extended version). Once you have downloaded the tarball, move it to the appropriate location. To uncompress and untar the tarball, use the following: bash$ tar xvfz bantamjava.tar.gz
This command will create a new directory, bantamjava/ (the root directory), in the current location. The bantamjava/ directory contains the following files and directories (note: directories end with ‘/’, files do not): README
Makefile
api/
bin/
lib/
man/
src/
tests/
tools/
Each of these files and directories are described below (although not in order). README. The README file provides installation documentation as described in this chapter. It also indicates which version of the toolset you have downloaded (base or extended). bin. The bin/ directory contains executable files for running the compiler and other auxiliary tools. This directory is initially empty. Executable files are automatically added to bin/ when the toolset 9
is built. lib. The lib/ directory contains library files needed for building the compiler and also running auxiliary tools (e.g., Spim). This directory is initially empty. Library files and directories are automatically added when the toolset is built. man. The man/ directory contains man pages for the Bantam compiler as well as some of the auxiliary tools (e.g., Spim), although the man pages for the auxiliary tools are added only after the toolset is built. Makefile. The Makefile will compile and install all of the components of the toolset. There are basically five parts of the toolset: the Javadoc web documentation describing the Java class files of the compiler (api/), the source files for the (incomplete) compiler (src/), the bantam test programs for debugging the compiler (tests/), and various tools used by the compiler (tools/). These components are described in more detail below. To use the Makefile, you will need to edit one line of the Makefile. The definition of the variable PROJPATH (near the top of the Makefile) will probably be incorrect.
Set this variable to the path of
the installation directory. You may also want to edit a line just below the definition of PROJPATH that sets whether the compiler will be installed using the JLex and Java Cup lexer and parser generators or the JavaCC lexer and parser generator. The variable VERSION indicates which version will be installed. If it is set to “bantam” then JLex/Java Cup is used (the default), if it set to “bantam-jj” then JavaCC is used. To make the entire toolset, type either “make” or “make all” in the root directory. You can also make an individual component as discussed below. To uninstall the toolset, type “make clean” in the root directory or in any of the subdirectories, which contain a Makefile. Note: if the compiler is unimplemented (as it is when first installed) “make” will result in an error since the last thing the Makefile
attempts to do is compile the test programs using the Bantam Java compiler. However, if
installed correctly, this error should occur only at the point that the Makefile attempts to compile a test program, and not at any point before. api. The api/ directory houses the Javadoc application programming interface documentation. After uncompressing and untarring the toolset, the directory will contain only a Makefile. The documentation is created from comments in the source code using the javadoc command provided with the Sun JDK [20]. It is placed in a directory html/ within the api/ directory. After generating the API (from the Makefile), it can be viewed online by copying this directory to a website. For 10
example, if /var/www/ is a website directory viewable at http://www.foo.com/, then the following commands would make the API viewable at http://www.foo.com/bantam-api/. bash$ make api bash$ cp -r api/html/ /var/www/bantam-api
When making changes to the compiler, Javadoc comments should be maintained so that any changes will be reflected in the API documentation. free tutorial describing Javadoc commenting [20].
Sun Microsystems provides a
The API is also available online at
http://www.bantamjava.com/. tools. The tools directory houses external software required by the Bantam Java toolset. These tools include JLex, a lexer generator [7]; Java Cup, a parser generator [14]; JavaCC, a lexer and parser generator [6]; and SPIM, a MIPS emulator [15]. These tools do not come with the toolset, but must be downloaded and moved to the tools/ directory. Links to the respective websites are included online at http://www.bantamjava.com. These tools are built by typing “make tools” in the root directory or “make” in the tools/ directory. This manual does not describe these tools (at least the auxiliary tools) in much detail. For more information on these tools, check out their respective manuals [7, 14, 6, 15]. Although the tools/ directory does not initially contain the external tools, it does contain some code. First, it contains a directory lib/ that holds two Jar files, which contain reference Bantam Java compilers for each version of the compiler: one that uses JLex and Java Cup (bantamc-ref.jar) and one that uses JavaCC (bantamc-jj-ref.jar). The tools/lib/ directory also holds a runtime library file (containing assembly code) for two of the supported targets: MIPS/SPIM (exceptions.s) and x86/Linux (x86-runtime.s). In addition, it holds Java class files (TextIO.class and Sys.class), which serve as the runtime library when targeting the Java Virtual Machine (JVM). (Note: other built-in objects like Object and String as well as support for garbage collection need not be included in the JVM runtime library as they are already included in the JVM, itself.) In addition to lib/, the tools/ directory also contains a Makefile that will install each tool once they are downloaded, untarred and uncompressed, and moved to the tools/ directory. In order for the Makefile to work properly, you must use the following names for each tool: jlex, javacup, javacc, and spim. For JLex, JavaCC, and Spim you must simply unpack the source files in tools/ and rename each with the appropriate name (i.e., jlex, javacc, spim). For Java Cup, the latest jar file should be downloaded and put in the directory tools/javacup. The jar file should be called java-cup.jar. 11
Like the root directory Makefile, to use the Makefile in tools/ you will need to edit one line of the Makefile.
The definition of the variable, PROJPATH, on line 2 will probably be incorrect. Set this
variable to the path of the installation directory. Once the tools have been downloaded and moved to the correct location, type ‘make’ to install them (Note: if compiled from the root directory the PROJPATH
variable does not have to be changed. This change is only necessary when compiling
from the sub-directory.) Note that the tools do not have to necessarily be installed within the tools/ directory. They can be installed in other locations. However, a shell script or binary for running each tool must be installed in the bin/ directory within the root directory. In addition, the lib/ directory within the root directory must contain a link called JLex to the JLex directory within the installation of JLex. Also, the lib/ directory must contain a Java Cup jar file called java-cup.jar for running Java Cup. Finally, some files within tools/lib/ must be copied to lib/. These include the reference compilers (bantamcref.jar and bantamc-jj-ref.jar) and the runtime library assembly files for MIPS/SPIM (exceptions.s),
x86/Linux (x86-runtime.s), and JVM (TextIO.class and Sys.class). src. The source files for the compiler are contained within src/. The Bantam compiler is written entirely in Java. Of course, the compiler is incomplete and will need to be completed by the student (although the code will compile). This directory contains two directories, bantam/ and bantam-jj/. The bantam/ directory contains the source files that use the JLex lexer generator [7] and the Java Cup parser generator [14]. The bantam-jj/ directory contains the source files that use the JavaCC lexer and parser generator [6]. The bantam-jj/ directory uses some symbolic links to the bantam directory to prevent duplication of code. Students should implement the compiler within one of these directories (but probably not both) as specified by the course instructor. Within each directory (bantam/ and bantam-jj/) are the following files and directories: Makefile opt/
Main.java
parser/
Main.java
semant/
ast/ util/
cfg/
codegenjvm/
codegenmips/
codegenx86/
interp/
lexer/
visitor/
contains the main class file for running the compiler. The lexer/, parser/, semant/, opt/
directories contain Java packages for performing lexical analysis, syntactic analysis, semantic analysis, and optimization, respectively. The codegenmips/, codegenx86/, and codegenjvm directories contain packages for performing code generation to the MIPS architecture, x86 (32-bit) architecture, and Java Virtual Machine (JVM), respectively. The ast/, cfg/, util/, and visitor/ contain auxiliary class files required by the other packages. Finally, interp/ contains a package for interpreting
12
Bantam Java programs. These packages are described in more detail in Section 4. The bantam/ and bantam-jj/ directories share the ast, cfg, codegenjvm, codegenmips, codegenx86, interp, opt, semant, util, and visitor packages. The actual files are contained within bantam/.
The bantam-jj/ directory contains symbolic links to the shared directories in bantam/.
The Makefile within each of these directories will build the compiler. Each Makefile depends on auxiliary tools (in the tools/ directory within the root directory) and so the tools must be built before building the source code. Like the root directory Makefile, to use the Makefile in either bantam/
or bantam-jj/ you will need to edit one line of the Makefile. The definition of the variable,
PROJPATH,
on line 2 will probably be incorrect. Set this variable to the path of the installation
directory. To make the source, type “make” in either of the src/ subdirectories: src/bantam/ or src/bantam-jj/.
Alternatively, you can type “make src” in the root directory. This will build the
version of the compiler that is specified in the VERSION variable within the root directory Makefile. (Note: if compiled from the root directory the PROJPATH variable in the source makefiles does not have to be changed. This change is only necessary when compiling from the sub-directory.) As stated above, the Java code for the compiler is incomplete. In particular, the lexer, parser, semantic analyzer, and code generator packages contain only skeleton code. However, within each of these packages are working class files that will allow students to test their phases of the compiler in isolation. These files are backed up in files ending with “.ref” so if they are over-written or removed for some reason they can be recovered.
To build a compiler using the reference class
files, you can type “make ref” within the src/bantam/ or src/bantam-jj/ directories. tests. The tests directory contains several Bantam programs that can be used to test the Bantam compiler. It must be built after building the compiler. Bantam Java programs end with the suffix “.btm”. The tests/ directory contains several “.btm” files and a Makefile. The source code for the compiler (in src/) must be built before building the test files. In addition, compiling the test programs will fail, of course, if the compiler is not fully implemented. Alternatively, the reference class files within the source code directory (see above) can be used to compile the test programs before the compiler is fully implemented. Once a working version of the compiler is built and the program file bin/bantamc is built, then the test files can be compiled. To compile the Bantam Java test programs, you can either type “make tests” in the root directory or “make” in the tests/ directory. This will create several MIPS assembly files (the default target) with extension “.asm”, which can run via the SPIM simulator. Note: MIPS assembly files use extension
13
“.asm” and x86 assembly files use extension “.s” to avoid confusion. The SPIM simulator [15] can be used to run any one of the compiled programs, e.g., helloworld.asm (assuming
we are in tests/):
bash$ ../bin/spim hello-world.asm
The Makefile will also allow the user to compile for one of the other two targets: x86 or JVM. The target can be changed by editing the TARG variable in the Makefile. For example, the following will compile the tests for the x86 architecture (assuming we are in tests/): bash$ make TARG=x86
This will run the Bantam Java compiler on each source program producing an assembly file (ending in “.s”. The Makefile then uses gcc to assemble these into x86 binaries. Each binary has extension “.bin”, which can of course be run natively. For example, the following will run hello-world.bin: bash$ ./hello-world.bin
The following will compile for the JVM target: bash$ make TARG=jvm
This will eventually create a jar file with extension “.jar” for each source program. However, this build is done in several steps. For each source program, the Makefile first uses the Bantam Java compiler to generate Jasmin [18, 17] input files for each class defined in the program. It then uses Jasmin to assemble these into class files, which are finally bundled into a single jar file. The jar files can be run via the Java Virtual Machine. The following runs hello-world.jar using Sun’s JVM: bash$ java -jar hello-world.jar
In addition, you may also want to set some of the other Bantam Java compiler arguments. These can set by editing the FLAGS Makefile variable (the flags are discussed in more detail below). For instance, the following enables garbage collection (which is disabled by default) and debugging during parsing: bash$ make FLAGS=”-gc -dp”
Make automatically builds all of the test programs. One can also build a particular test program. The following will make only the x86 assembly file hello-world.s from the Bantam program HelloWorld.btm. bash$ make TARG=x86 hello-world
The base name for the output file (in the case above hello-world) can be found by looking at the TESTS variable
inside the Makefile. 14
The Bantam toolset includes a reference compiler for testing purposes. After implementing all of the compiler phases, the student’s compiler should work like the reference compiler. The reference compiler is built as part of the auxiliary tools (described above). After building the tools, the reference compiler is placed in bin/ (either bantamc-ref or bantamc-jj-ref). To run the reference compiler we could use the following: bash$ ../bin/bantamc-ref HelloWorld.btm
We can also use the Makefile in tests/ to compile the Bantam programs with the reference compiler by editing the BTMC variable in the Makefile. For example, the following will compile all of the Bantam programs with the reference compiler: bash$ make BTMC=../bin/bantamc-ref
2.2
Overview and Installation Instructions using Ant
The Bantam Java toolset will compile and should run on any Microsoft Windows or linux/x86 machine, although it is primarily tested on an Intel 32-bit x86 machine running Suse, Red Hat, and Ubuntu Linux. It may also run on other *nix platforms and other architectures. It is available as a ZIP file at the website: http://www.bantamjava.com. Note: there are two versions of the toolset: one for building a compiler for the base Bantam Java language and one for building a compiler for the extended language. Make sure that you have downloaded the correct toolset. The version of the toolset that you use should be the same as the version of this manual (you are reading the extended version). Once you have downloaded the ZIP file, move it to the appropriate location. Then extract its contents using the following command. Note: we show commands for *nix. For other operating systems, you will need to use the corresponding commands. bash$ unzip bantamjava.zip
Note: in some operations systems, like Windows, you will just need to click on the ZIP file to unpack it. This will create a new directory, bantamjava/ (the root directory), in the current location. The bantamjava/ directory contains the following files and directories (note: directories end with ‘/’, files do not): README
build.xml
api/
bin/
lib/
man/
src/
tests/
tools/
Each of these files and directories is described below (although not in order). README. The README file provides installation documentation as described in this chapter. It 15
also indicates which version of the toolset you have downloaded (base or extended). bin. The bin/ directory contains executable files for running the compiler and other auxiliary tools. This directory is initially empty. Executable files are automatically added to bin/ when the toolset is built. lib. The lib/ directory contains library files needed for building the compiler and also running auxiliary tools (e.g., JLex). This directory is initially empty. Library files and directories are automatically added when the toolset is built. man. The man/ directory contains man pages (for use on *nix systems) for the Bantam compiler as well as some of the auxiliary tools (e.g., Spim), although the man pages for the auxiliary tools are added only after the toolset is built. build.xml. The build.xml ant script will compile and install all of the components of the toolset. There are basically five parts in the toolset: the Javadoc web documentation describing the Java class files of the compiler (api/), the source files for the (incomplete) compiler (src/), the bantam test programs for debugging the compiler (tests/), and various tools used by the compiler (tools/). These components are described in more detail below. Before you start using the ant script, you may want to edit the value of the first two properties in build.xml. The first property, called “VERSION,” determines which version of the compiler will be installed: use the value “bantam” if you are using the JLex and Java Cup lexer and parser generators; use the value “bantam-jj” if you are using the JavaCC lexer and parser generator. The second property, called “TARGET,” determines which architecture your Bantam Java compiler will target. Use the value “mips” if your compiler’s target is the Spim simulator; use the value “jvm” if your compiler’s target is the Java Virtual Machine; otherwise, use the value “x86.” To build the entire toolset, type either “ant” or “ant all” in the root directory. You can also make an individual component as discussed below. To uninstall the toolset, type “ant cleanall” in the root directory or in any of the subdirectories that contain a build.xml file. Note: if the compiler is unimplemented (as it is when first installed) “ant” will result in an error initially since the last thing the build.xml script attempts to do is compile the test programs using the Bantam Java compiler. However, if installed correctly, no error should occur until the point where the script attempts to compile a test program. api. The api/ directory houses the Javadoc application programming interface documentation.
16
After uncompressing and untarring the toolset, the directory will contain only a build.xml ant script. The documentation is created from comments in the source code using the javadoc command provided with the Sun JDK [20]. It is placed in a directory html/ within the api/ directory. After generating the API (from the build.xml script), it can be viewed online by copying this directory to a website. For example, if /var/www/ is a website directory viewable at http://www.foo.com/, then the following commands would make the API viewable at http://www.foo.com/bantam-api/. bash$ ant api bash$ cp -r api/html/ /var/www/bantam-api
When making changes to the compiler, Javadoc comments should be maintained so that any changes will be reflected in the API documentation. free tutorial describing Javadoc commenting [20].
Sun Microsystems provides a
The API is also available online at
http://www.bantamjava.com/. tools. The tools/ directory houses external software required by the Bantam Java toolset. These tools include JLex, a lexer generator [7]; Java Cup, a parser generator [14]; JavaCC, a lexer and parser generator [6]; and SPIM, a MIPS emulator [15]. These tools do not come with the toolset, but must be downloaded and moved to the tools/ directory. Links to the respective websites are included online at http://www.bantamjava.com. These tools are built by typing “ant tools” in the root directory or “ant” in the tools/ directory. This manual does not describe these tools (at least the auxiliary tools) in much detail. For more information on these tools, check out their respective manuals [7, 14, 6, 15]. The tools/ directory initially contains the JLex, Java Cup, and JavaCC tools. It does not contain the SPIM simulator, which will need to be downloaded separately. The directory tools/lib holds two Jar files, which contain reference Bantam Java compilers for each version of the compiler: one that uses JLex and Java Cup (bantamc-ref.jar) and one that uses JavaCC (bantamc-jj-ref.jar). The tools/lib/ directory also holds a runtime library file (containing assembly code) for two of the supported targets: MIPS/SPIM (exceptions.s) and x86/Linux (x86-runtime.s). In addition, it holds Java class files (TextIO.class and Sys.class), which serve as the runtime library when targeting the Java Virtual Machine (JVM). (Note: other built-in classes like Object and String as well as support for garbage collection need not be included in the JVM runtime library as they are already included in the JVM itself.) In addition to lib/, the tools/ directory also contains a build.xml script that these tools and library files. src. The source files for the compiler are contained within src/. The Bantam compiler is written 17
entirely in Java. Of course, the compiler is incomplete and will need to be completed by the student (although the code will compile). This directory contains two directories, bantam/ and bantam-jj/. The bantam/ directory contains the source files that use the JLex lexer generator [7] and the Java Cup parser generator [14]. The bantam-jj/ directory contains the source files that use the JavaCC lexer and parser generator [6]. The bantam-jj/ directory uses some symbolic links to the bantam directory to prevent duplication of code. Students should implement the compiler within one of these directories (but probably not both) as specified by the course instructor. Within each directory (bantam/ and bantam-jj/) are the following files and directories: Makefile lexer/ Main.java
build.xml
opt/
parser/
Main.java
ast/
cfg/
semant/
util/
visitor/
codegenjvm/
codegenmips/
codegenx86/
interp/
contains the main class file for running the compiler. The lexer/, parser/, semant/, and
opt/ directories contain Java packages for performing lexical analysis, syntactic analysis, semantic
analysis, and optimization, respectively. The codegenmips/, codegenx86/, and codegenjvm directories contain packages for performing code generation to the MIPS architecture, x86 (32-bit) architecture, and Java Virtual Machine (JVM), respectively. The ast/, cfg/, util/, and visitor/ directories contain auxiliary class files required by the other packages. Finally, interp/ contains a package for interpreting Bantam Java programs. These packages are described in more detail in Section 4. The bantam/ and bantam-jj/ directories share the ast, cfg, codegenjvm, codegenmips, codegenx86, interp, opt, semant, util, and visitor packages. The actual files are contained within bantam/.
The bantam-jj/ directory contains symbolic links to the shared directories in bantam/.
The build.xml script within each of these directories will build the compiler. Each ant script depends on auxiliary tools (in the tools/ directory within the root directory) and so the tools must be built before building the source code. To compile the source, type “ant” in either of the src/ subdirectories: src/bantam/ or src/bantam-jj/. Alternatively, you can type “ant src” in the root directory. This will build the version of the compiler that is specified in the “VERSION” property within the root directory build.xml script. As stated above, the Java code for the compiler is incomplete. In particular, the lexer, parser, semantic analyzer, and code generator packages contain only skeleton code. However, within each of these packages are working class files that will allow students to test their phases of the compiler in isolation. These files are backed up in files ending with “.ref” so if they are over-written or removed for some reason they can be recovered.
To build a compiler using the reference class
files, you can type “ant ref” within the src/bantam/ or src/bantam-jj/ directories. 18
tests. The tests/ directory contains several Bantam programs that can be used to test the Bantam compiler. It must be built after building the compiler. Bantam Java programs end with the suffix “.btm”. The tests/ directory contains several “.btm” files and a build.xml script. The source code for the compiler (in src/) must be built before building the test files. In addition, compiling the test programs will fail, of course, if the compiler is not fully implemented. Alternatively, the reference class files within the source code directory (see above) can be used to compile the test programs before the compiler is fully implemented. Once a working version of the compiler is built and the program file bin/bantamc (or bin/bantamc.bat on Windows machines) is built, then the test files can be compiled. To compile the Bantam Java test programs, you can either type “ant tests” in the root directory or “ant” in the tests/ directory. This will create several MIPS assembly files (the default target) with extension “.asm”, which can run via the SPIM simulator. Note: MIPS assembly files use extension “.asm” and x86 assembly files use extension “.s” to avoid confusion. The SPIM simulator [15] can be used to run any one of the compiled programs, e.g., helloworld.asm (assuming
we are in tests/):
bash$ ../bin/spim hello-world.asm
The build.xml script will also allow the user to compile for one of the other two targets: x86 or JVM. The target can be changed by editing the “TARGET” property in the script. This change can be performed once and for all in the script file itself. Alternatively, a different target may be specified on the command line. For example, the following will compile the tests for the x86 architecture (assuming we are in tests/): bash$ ant -DTARGET=x86
(Note the “-D” in front of the “TARGET” property name). This will run the Bantam Java compiler on each source program producing an assembly file (ending in “.s”. The build.xml script then uses gcc to assemble these into x86 binaries. Each binary has extension “.bin,” which can of course be run natively. For example, the following will run hello-world.bin: bash$ ./hello-world.bin
The following will compile for the JVM target: bash$ ant -DTARGET=jvm
This will eventually create a jar file with extension “.jar” for each source program. However, this build is done in several steps. For each source program, the ant script first uses the Bantam Java compiler to generate Jasmin [18, 17] input files for each class defined in the program. It then 19
uses Jasmin to assemble these into class files, which are finally bundled into a single jar file. The jar files can be run via the Java Virtual Machine. The following runs hello-world.jar using Sun’s JVM: bash$ java -jar hello-world.jar
In addition, you may also want to set some of the other Bantam Java compiler arguments. These can be set by editing the “FLAGS” property in the build.xml script (the flags are discussed in more detail below). For instance, the following enables garbage collection (which is disabled by default) and debugging during parsing: bash$ ant -DFLAGS=”-gc -dp”
(Again, note the “-D” in front of the “FLAGS” property name). The ant script automatically builds all of the test programs. One can also build a particular test program. The following will make only the x86 assembly file hello-world.s from the Bantam program HelloWorld.btm. bash$ ant hello-world -DTARGET=x86
The base name for the target file (in the case above, hello-world) can be found by looking at the compile-all target
inside the build.xml file.
The Bantam Java toolset includes a reference compiler for testing purposes. After implementing all of the compiler phases, the student’s compiler should work like the reference compiler. The reference compiler is built as part of the auxiliary tools (described above). After building the tools, the reference compiler is placed in bin/ (either bantamc-ref or bantamc-jj-ref). To run the reference compiler we could use the following: bash$ ../bin/bantamc-ref HelloWorld.btm
We can also use the build.xml script in tests/ to compile the Bantam Java programs with the reference compiler by editing the BTMC variable in the build script. For example, the following will compile all of the Bantam programs with the reference compiler: bash$ ant -DBTMC=../bin/bantamc-ref
2.3
Using the Bantam Compiler
This subsection describes the command-line usage of the Bantam compiler. This material is also described in the Bantam Java compiler man page. Although parts of the compiler are unimplemented (and will be implemented by the student), the main class of the compiler is implemented, which includes command-line, flag handling. So the 20
unimplemented compiler will accept all options, although some may have no effect (e.g., enabling debugging for the code generator). The Bantam Java compiler accepts the following options: bantamc [-o ] [-t ] [-gc] [-int] [-opt ] [-dl] [-dp] [-ds] [-di] [-do] [-dc] [-sl] [-sp] [-ss] [-so]
Options. Each of the compiler options are enumerated and discussed below. -o output file
Specify the output file to use; the default is out.s. Note: with the JVM target the output file is ignored (instead an output is produced for each user-defined class). -t architecture
Specify the target architecture to generate code for; mips, x86, and jvm (must be all lowercase) are the currently supported target architectures. mips is the default. -gc
Enable the garbage collector. The Bantam compiler uses a simple, mark-and-sweep garbage collector. When the JVM is the target, garbage collection cannot be toggled (i.e., it is always enabled) and thus this flag is ignored. By default the garbage collector is disabled. -int
Enable interpretation of the Bantam Java code. This flag allows the compiler to act as an interpreter; it will execute the program rather than compiling it. Note: optimization is not supported while in interpreted so the “-opt”, “-so”, and “-do” flags are ignored in interpreter mode. Code generation specific flags are also ignored such as “-t”, “-dc”, and “-gc”. By default interpreter mode is disabled. -opt level
Set the optimization level. The level can be set to an integer between 0 and 4. The higher the level, the more aggressive the optimization. A level of 0 means optimization is disabled. By default the level is 0. -dl
Enable lexical analysis debugging. Note: students must add the debugging code that uses this flag. By default this flag is off. 21
-dp
Enable syntactic analysis debugging. Note: students must add the debugging code that uses this flag (unless using the Java Cup implementation, in which case, debugging code is automatically inserted by the parser generator). By default this flag is off. -ds
Enable semantic analysis debugging. Note: students must add the debugging code that uses this flag. By default this flag is off. -di
Enable interpreter debugging. This flag is ignored unless interpretation has been enabled via the -int flag. Note: students must add the debugging code that uses this flag. By default this flag is off. -do
Enable optimization debugging. This flag is ignored unless the optimization level has been set to a value greater than 0. Note: students must add the debugging code that uses this flag. By default this flag is off. -dc
Enable code generation debugging. Note: students must add the debugging code that uses this flag. By default this flag is off. -sl
Stop the compiler after lexing. If this flag is set, the compiler halts after performing lexical analysis. If lexical errors are discovered, these are printed to standard error, otherwise the scanned tokens are printed to standard output. By default this flag is off. -sp
Stop the compiler after parsing. If this flag is set, the compiler halts after performing syntactic analysis. If lexical or syntactic errors are discovered these are printed to standard error, otherwise the parsed program is printed to standard output (as a Bantam source program). If -sl is specified, then this flag is ignored. By default this flag is off. -ss
Stop the compiler after semantic analysis. If this flag is set, the compiler halts after perform22
ing semantic analysis. If errors are discovered these are printed to standard error, otherwise the annotated program (annotations indicate type information) is printed to standard output (as a Bantam source program with annotations in comments). If -sl or -sp is specified, then this flag is ignored. By default this flag is off. -so
Stop the compiler after optimization. If this flag is set, the compiler halts after performing optimization and prints the optimized program (as a set of control flow graphs) to standard output. If -sl, -sp, or -ss is specified, then this flag is ignored. By default this flag is off. Input files. The input files to the compiler must be Bantam files. These files should contain Bantam code (as discussed in Section 3) and end with the suffix “.btm”. If an input file is specified that does not end with “.btm” then the compiler will immediately print an error and exit. If the input files contain errors, then the compiler will not produce an output file, but instead print error messages and exit (unless the student has implemented a buggy compiler). Output file. The output file is either a MIPS assembly file or x86 assembly file depending on the particular target machine. Although not required, by convention this file should end with “.s”. By default, the compiler uses the file “out.s”. The output file is ignored when targeting the JVM. In this case, one Jasmin [18, 17] input file is created for each Bantam Java class in the program. These files have a “.j” extension. For example, if the program includes the classes Main and Foo then the compiler will create Jasmin assembly files Main.j and Foo.j. Jasmin can then be used to translate these into Java class files. Examples. Here are some example uses of the Bantam compiler. These examples assume we are in the tests/ directory. bash$ ../bin/bantamc -o foo.s Foo.btm bash$ ../bin/spim foo.s
The first command above will compile the Bantam program Foo.btm and create a MIPS assembly file (to be used with the Spim emulator [15]) called foo.s. The second command above runs the program using the Spim emulator for MIPS. bash$ ../bin/bantamc -t x86 -o foo.s Foo.btm bash$ gcc -o foo foo.s bash$ ./foo
23
The commands above compile and run Foo.btm on an x86, 32-bit machine. The first command compiles Foo.btm to foo.s, specifying the target as x86. The second command uses the gcc assembler [1] to translate the assembly file to an executable called foo. Finally, the third command runs the program. The x86 target uses the AT&T x86 assembly format, and must be run with an AT&T assembler, such as gas, the GNU assembler that is bundled with gcc. Currently, the x86 target can only be used on 32-bit x86 machines. In the future, we will add a target for 64-bit x86 machines. bash$ ../bin/bantamc -gc -t x86 -o foo.s Foo.btm bash$ gcc -o foo foo.s bash$ ./foo
The commands above are identical to the previous set of commands (they compile and run Foo.btm on an x86 machine) except in this case the garbage collector is used. bash$ ../bin/bantamc -t jvm Foo.btm bash$ jasmin Main.j bash$ jasmin Foo.j bash$ java -cp ../../lib:. Main
The commands above compile and run Foo.btm on the Java Virtual Machine (assume here that Foo.btm
contains two classes: Main and Foo). The first command compiles Foo.btm to the Jasmin
input files Main.j and Foo.j. The next two commands convert these text-based bytecode files into actual Java class files: Main.class and Foo.class. Finally, the last command runs the program by running the Main class. Note: it also includes the runtime library class files TextIO and Sys from ../../lib in
the classpath. One could also create a JAR file and run that as well as follows:
bash$ cp ../../lib/*.class . bash$ jar cvfm foo.jar manifest Main.class Foo.class TextIO.class Sys.class bash$ java -jar foo.jar
In this case, the class files from the program as well as the built-in class files TextIO and Sys are bundled together (the other built-in class files are already a part of the JVM). The file manifest is a simple JAR manifest file specifying that the main class is Main. The “-opt” flag can be used to optimize the compiled program: bash$ ../bin/bantamc -opt 4 Foo.btm
The command above turns on optimization and sets the optimization level to 4 (the most aggressive optimization). bash$ ../bin/bantamc -sl Foo.btm
The command above performs only lexical analysis on Foo.btm and then prints out the scanned 24
tokens to standard output, unless errors are discovered, in which case the errors are printed to standard error. bash$ ../bin/bantamc -dp -sp Foo.btm
The command above performs lexical and syntactical analysis on Foo.btm and then prints out the parsed program to standard output, unless errors are discovered, in which case the errors are printed to standard error. In addition, debugging is enabled during parsing. bash$ ../bin/bantamc -int Foo.btm
The command above interprets rather than compiles the source program Foo.btm.
2.4
Last Words
You have now seen how to install and use the Bantam Java compiler. The upcoming sections will look in more depth at both the Bantam Java language and the Bantam Java compiler, starting first with the language.
25
3
Bantam Java Language
This section presents the Bantam Java programming language, the source language for the compiler. Bantam Java is a subset of the Java language. This section discusses those Java features that were included and excluded from the Bantam language. This section also describes in some detail the included features, although for a more detailed explanation one should consult a Java reference [5]. This section and this manual are intended for students who are already familiar with the Java programming language and its features. Note that you are reading the extended language version of this manual.
3.1
Overview
Bantam Java, like Java, is an object-oriented programming language. As described in numerous textbooks [12, 5] (too many to cite all of them), an object is a self-sufficient component that has some data and behavior associated with it, which is meant for modeling a real world entity such as a player, animal, room, etc. To construct an object in Bantam or Java, one defines a class, which is effectively the blue print for all objects generated from that class. In other words, an object is an instance of a class. The class defines both the data elements and behavior of any object constructed from that class. A class in Bantam Java and Java is essentially a type. A type specifies how a value (in this case an object) of that type can be used. Bantam Java, like Java, is a strongly-typed language, meaning that the compiler, either during compilation or at runtime, prevents a value of one type being used where a value from a different type is required (there is an exception to this rule, which will be discussed in the next subsection). In other words, the compiler effectively prevents values from being used in an improper way. A Bantam program consists of one or more files (with suffix “.btm”), each of which contains one or more class definitions. All code must reside within a class definition in Bantam. For this reason, classes and objects are critical and necessary components of any Bantam program. Each class in Bantam, contains zero or more members. A member is either a field (part of the object’s data) or a method (part of the object’s behavior). A field is one kind of variable, which can hold various data values throughout the course of the owner object’s lifetime. A field has a type, which specifies the type of data it can store. A method, on the other hand, is effectively a
26
name for a block of code, which can be executed on behalf of the owner object. The method can be executed by referring to its name, which is known as a method call. We will show later how fields and methods can be declared and used. Unlike in Java, all fields and methods must be instance members, that is to say they cannot be declared static. In other words, each member is specific to a particular object; there are no class-wide members in Bantam. When an object is created, the syntax and semantics of which are discussed later in the section, it is allocated its own copy of each field. The object’s field values may differ from the field values of other objects created from the same class. When an object’s method is called, it may use the object’s fields, therefore the outcome of a method depends largely on the owner object. Before an object is created, it is set to the special value null, which loosely speaking means it is an empty object. One of the classes defined in a Bantam program must be called Main. This class must contain a method called main (among possibly other members). When a Bantam program is started, a Main object is created and the main method is called. The program terminates when the main method finishes. The main method does all of the work of the program or calls methods that do the work on its behalf. Note that this starting point is different than in Java. In Java, which has static members, a static main method within a user-specified class is initially called. There are also some built-in classes that allow the programmer to perform input and output to the screen or to a file (TextIO), exit the program (Sys), and store and manipulate sequences of characters (String). These are discussed in Section 3.7. In addition to classes, there are two primitive types of data in Bantam: int and boolean. A primitive, unlike an object, holds a simple value. An int holds a 32-bit signed integer. A boolean holds either true or false. Other primitives from Java, such as double and long were not included in Bantam. These additional types add little intellectual challenge to the design and implementation of the compiler and for this reason were excluded from the language. As in Java, primitive types can be used in similar places as object types (e.g., a field can have type int). One important distinction to make is between primitive variables and object variables. A primitive variable (e.g., a field) holds the value (e.g., 42). However, an object variable does not hold an object itself, but rather a reference, or more precisely a memory pointer, to the object. If two or more object variables refer to the same object, then we say that they alias. Bantam Java (the extended language) also includes arrays, which are a data type for storing 27
groups of indexed elements. Each element in the array is accessed via its index (an int). The first element is accessed at index 0, the second element is accessed at element 1, and so on. An array can hold any type of elements, besides arrays, however, the type of each element, which is called the base type, must be the same. The base type can be any primitive or class. Unlike in Java, the base type cannot, itself, be an array type. In other words, Bantam Java does not support multi-dimensional arrays. As in Java, arrays in Bantam Java are implemented as objects. Array types are not explicitly declared by the programmer. Instead if a programmer declares or creates an array within the program, then that array type (assuming it is legal) automatically exists. Each array type regardless of base type contains two members: a length field that holds the length of the array and a clone method for cloning the array. To distinguish between array types and other types, array types are written as [] where is replaced with the base type (e.g., int). Some example array types include int[] and String[]. Because an array is an object, an array can be set to null.
Memory management in Bantam Java is similar to Java. Memory allocation occurs when objects (including arrays) are constructed (using new). Memory deallocation is handled implicitly, i.e., a garbage collector is responsible for deallocating memory. Unlike in Java, the garbage collector is disabled by default and can be enabled using a compiler flag (see Section 2). There are two types of comments in Bantam Java. The first is a single line comment, which begins with //. The text following // up to and including the end of the current line is ignored by the compiler (including //). The second type of comment is a multi-line comment that begins with /*
and ends with */. As the name suggests, these may span multiple lines. The compiler ignores all
text in between /* and */ (including /* and */). Multi-line comments may not be nested. In the remainder of the section, we will look in more detail at defining classes and class members. But before doing that, we discuss a core feature of Bantam and most object-oriented languages, namely inheritance.
3.2
Inheritance
As in Java, Bantam allows classes to extend other classes. If class A extends class B then class A
inherits all of class B’s members including all the members that B inherits from other classes.
We say that A is a child of B and B is the parent of A. If a class does not explicitly extend another 28
Object
Main
String
TextIO
Sys
Tiger
Animal
Bear
Eagle
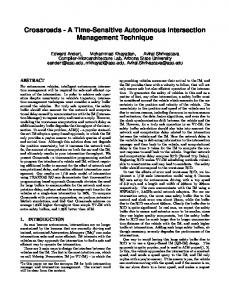
Figure 1: Example class hierarchy tree in Bantam. class then it automatically extends the built-in class Object, which is similar to the Object class from Java (albeit with less functionality). Bantam and Java support only single inheritance: a class inherits from exactly one other class except the built-in Object class, which does not extend any other class. To visualize the class dependencies, we can build a class hierarchy graph where each node in the graph represents a class. A directed edge is drawn from node A to node B if and only if class B
is the parent of class A. Because Bantam only supports single inheritance, the class hierarchy
graph of a well-defined Bantam program is actually a tree with the class Object as the root. Figure 1 shows an example class hierarchy tree in Bantam. Notice in the figure that the class Tiger
is a descendant of the class Object (it extends Animal, which extends Object). We say that
Tiger
is a subclass of Object and that Object is a superclass of Tiger. More precisely, a class A is a
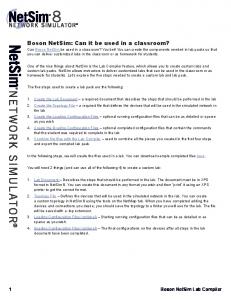
subclass of a class B (or equivalently, B is a superclass of A) if we must pass through node B to get to the root of the class hierarchy tree from node A. Because a class is actually a type, we also say that Tiger is a subtype of Object and that Object is a supertype of Tiger. Each class is defined to be a subclass (or subtype) and a superclass (or supertype) of itself. The class Object is a superclass of all classes and is only a subclass of itself. Because arrays are objects, they also inherit from other types. Every array type is a subtype of the generic type Object. In fact, the array method clone is inherited from Object (the field length is not). In addition, if the base type of an array type is a subtype of the base type of another array type, then the first array type is a subtype of the second array type. The class hierarchy tree must be modified slightly to accomodate arrays. In the updated graph, a node represents a class or an array type, assuming the array type is used in the program. An edge exists from each child node to its parent node. Figure 2 shows an example class hierarchy tree, assuming that the array types int[], String[], Animal[], and Tiger[] are used in the program. Because
29
Object
Main
String
TextIO
Sys
Animal
String[]
Tiger
Bear
Eagle
int[]
Animal[]
Tiger[]
Figure 2: Example class hierarchy tree in Bantam, which includes array types. Animal is a supertype of Tiger, Animal[] is a supertype of Tiger[].
Array types with a primitive base
type (e.g., int[]) are children of Object. The array types String[] and Animal[] are also children of Object.
If the program had used the array type Object[] then String[] and Animal[] would have been
children of Object[]. But because the program did not use Object[], String[] and Animal[] are instead children of Object. When a class A is a subclass of a class B, we also say that A conforms to B since A must contain all of the functionality of B (likewise for array types that are subtypes of other types). Therefore, anywhere that we can use an object of type B, we can also use an object of type A. The opposite is not true. Because A may have more functionality than B, an object of type B cannot be used in place of an object of type A. One implication of conformance is that the type of an object variable at compile time may differ from the type at runtime. For example, we can construct a new Tiger object and store it in a variable of type Object since Tiger conforms to Object. The compile time type of the variable, which is often called the static type, is Object, while the runtime type, which is often called the dynamic type, is Tiger. The dynamic type is often unknown until the program is run. We will have more to say about inheritance and conformance in our discussion of class members (3.4) and casting (3.6).
3.3
Class Definitions
The format of a class definition is:
30
[
class extends }
]{
where is replaced with the name of the class, is replaced with the name of the parent class, and is replaced with the class members (fields and/or methods). Note:
[
and
]
are not part of the language, but are instead used to indicate that extends is
optional. (Note: ‘[’ and ‘]’ are a part of the language.) A class can explicitly extend another class by using extends. Alternatively, extends can be omitted, in which case the class automatically extends the built-in class Object. Both class and extends are keywords in Bantam. Neither can be used as a name of a class, method, or variable. Bantam is case-sensitive, so class and extends are keywords, while Class and EXTENDS
are not. The class name () and parent name () are also case sensitive
(in fact, all tokens in Bantam are case sensitive). Therefore, a class named Animal is not the same as a class named aNimal. The names may contain any sequence of upper or lowercase letters, digits, or the symbol ‘ ’, although the name must start with a letter. By convention (taken from Java), class names generally start with an uppercase letter. If a class name contains multiple words combined into one name the start of each new word begins with an uppercase letter. For example, if we wanted a class name to include both “Bantam” and “Java” we would name the class BantamJava. Unlike in Java, class definitions cannot use modifiers such as public and package. Since there are no packages in Bantam these modifiers are not necessary and using one is illegal. In addition, Bantam does not include abstract and static classes so the abstract and static modifiers are also illegal. Bantam also does not include interfaces so a class cannot use the keyword implements nor can an interface be defined. Finally, classes cannot be nested within other classes. To define a (trivial) class Animal, we write the following: class Animal { }
This class implicitly extends Object. It defines no data elements and no behavior. To do this, we must define some class members.
31
3.4
Member Definitions
As stated above there are two kinds of class members: fields and methods. We look in turn at defining each, below. Fields. The format for defining a field (i.e., instance variable) is:
[ = ] ;
where is replaced with the field’s type, is replaced with the field’s name, and
is replaced with the field’s initialization expression. Note the ‘=’ and initialization
expression are optional. The must be either a primitive type (i.e., int or boolean), a class name (e.g., Object), or an array type (e.g., Object[]). The is a non-empty sequence of upper and lowercase letters, digits, and the special symbol ‘ ’. Each field defined within a particular class must have a distinct name. By convention, field names generally start with a lowercase letter. Like class names, when multiple words are combined into one variable name, the start of each word (except the first word) begins with an uppercase letter. For example, if we wanted a field name to contain “Bantam” and “Java” we would call it bantamJava. The beginning lowercase letter indicates it is not a class name and the subsequent uppercase letters indicate the separation of words embedded within the name. If the field is meant to be constant (i.e., never changed) then the convention is to use all uppercase and use ‘ ’ to indicate separation of words (e.g., BANTAM JAVA). Below is another (slightly more interesting) definition of class Animal, which includes three field definitions: class Animal { int numLegs = 4; boolean canFly; Animal mate; }
The first field, numLegs, is a primitive variable with type int, which initially holds the value 4, although this can be changed later. The second field, canFly, is a also a primitive variable, but with type boolean. It defines no initialization expression. When a field definition omits the initialization expression, it is automatically assigned a value based on its type. Fields with type
32
int
are automatically assigned 0, fields with type boolean are automatically assigned false, and
fields with object types (including array types) are automatically assigned null. Therefore, canFly is initially set to false. The third field is an object of type Animal. Its initial value is null, since it does not define an initialization expression. It has the same type as the class that is being defined, which is okay so long as we do not attempt to initially construct the object (object construction is discussed later in Subsection 3.6). If we try to construct a new Animal, we will end up in an endless cycle of Animal object constructions. This problem only occurs for objects with types that are a subclass of the defined class. We could have also written the following equivalent code: class Animal { int numLegs = 4; boolean canFly = false; Animal mate = null; }
It would not be equivalent to omit the assignment of numLegs to the value 4 since numLegs would have been automatically assigned 0. The initialization expression can be arbitrarily complicated as discussed in 3.6. For example, we could have the following: class Animal { int numLegs = 4; boolean canFly; Animal mate; int strength = (numLegs * 10) + 50; }
The (contrived) initialization value for the fourth field, strength, is the initialization value of numLegs
multiplied by 10, and added to 50 (i.e., 90). Note that the initialization expression uses
another field defined within the class. This is only legal if the referenced field is defined above the current field, since field initialization expressions are evaluated in the order in which they are defined in the class. Therefore the ordering of fields within the class matters. Also, the initialization expression is only evaluated once when the object is first created and used to assign a starting value to the field. If numLegs is changed after the object is created, the initialization expression for strength is not re-evaluated.
33
We could also define an array field variable. For example, some animals have multiple mates throughout the course of their life, so we could use an array rather than a single object variable to hold the list of mates: class Animal { int numLegs = 4; boolean canFly; Animal[] mates; // field array int strength = (numLegs * 10) + 50; }
As the variable mates is an object (because arrays are objects) it is initially set to null since there is no initialization expression. If a class extends another class, it can also reference any inherited fields: class Tiger extends Animal { int tigerStrength = strength * 2; }
Inherited fields are always evaluated before non-inherited fields, with the fields from the higher inherited classes (i.e., closer to the root of the class hierarchy tree) evaluated earlier than fields from lower inherited classes (i.e., farther from the root of the class hierarchy tree). When a Tiger object is created, the fields of Object are evaluated first, followed by the fields of Animal, and finally followed by the fields of Tiger. Inherited fields in an extended class can be redefined. For example, we can do the following: class Tiger extends Animal { int tigerStrength = strength * 2; Tiger mate; }
The new field, mate, is treated as a separate instance variable, which essentially hides the inherited field within class Tiger. Notice that mate does not have to have the same type as the hidden inherited variable (or actually even a conforming type). Every class implicitly has two special fields. The first variable, this, allows the programmer to refer to the current owner object. this can be used to pass the owner object to other methods. It can also be used to access members. The second, super, is similar to this, however, it only allows 34
access to inherited members, not members defined within the class. In particular, super allows programmers to access hidden members. Neither this or super can be altered (it is illegal to assign to this or super), they are implicitly set when an object is created. In addition, super can not be used as a stand-alone variable. It can only be used to reference hidden inherited members. Unlike in Java, Bantam fields have no modifiers (e.g., public, static). All fields are instance variables and are protected, and therefore field modifiers are not necessary and are actually illegal. Fields can only be accessed from within the class or a subclass of the class. In Java, protected fields can be accessed from classes within the same package. Since Bantam does not include packages, protected
fields cannot be directly accessed by any class that is not a subclass of the class where
the field is defined. Accessing fields from other classes can only be done via methods (which are public).
There is also no final modifier for indicating to the compiler that a field is constant. It is
the responsibility of the programmer to guarantee that a constant field is never changed. The use of protected variables is more restricted in Bantam Java than in Java. In Java, a protected variable can be accessed via an object variable (e.g., a field variable) so long as that variable’s type is the same or a super type of the class containing the object reference. In order to simplify the implementation of the compiler, Bantam Java disallows this usage. Therefore, the following is illegal in Bantam Java: class Tiger extends Animal { int tigerStrength = strength * 2; Tiger mate = ... // initialization not shown // LINE BELOW IS ILLEGAL IN BANTAM JAVA int mateStrength = mate.tigerStrength; }
In the code above, accessing tigerStrength using the object reference mate is illegal. In Bantam Java, only this and super can be used as an object reference in accessing a protected field. As discussed below, there are no restrictions on performing method calls as methods are public. In the code above, we could create a public method for accessing tigerStrength and use this method in the assignment to mateStrength. There is one exception to the rules outlined above. The field length within an array is public and final, meaning it is accessible from outside the class but it cannot be modified. If we have an array variable, called array, then we can access its length via array.length. It is illegal to assign array.length to
a value.
35
For reasons having to do with garbage collection, the maximum number of combined inherited and defined fields cannot exceed 1500. This restriction is not a part of the language (and could change in the future, although the maximum would only be made larger not smaller), but rather a part of the particular implementation of the language. Methods. The format of a method definition is: ( ) { }
where is the return type of the method (e.g., int, Object[]), is the name of the method, is a list of comma-separated formal parameters to the method (formal parameters are defined below), and is a list of statements (possibly empty) terminated by semi-colons, which will be executed when the method is called. Like fields, each method defined within a single class must have a unique name (as discussed below, method overloading is not allowed). Method names follow the same conventions as field names. Below is an example of method getStrength in class Animal: class Animal { int getStrength() { return strength; } }
The method getStrength takes no formal parameters and returns the value of the field strength (since the expression in the return statement is strength). This method is not contrived since fields are implicitly protected and can only be accessed from other classes via a public method. The method contains a single return statement. A return statement immediately returns from the method, perhaps returning a value (return statements will be discussed in more detail in Subsection 3.5). In this case, the return statement returns the value stored in strength. Because strength is an int, the return type of getStrength is int. Methods can also return nothing by declaring the return type as void. In this case, the return statement should not return an expression.
36
Here is another method in Animal, which is void: class Animal { void fight(int amount, boolean isWinner) { if (isWinner) strength = strength + amount * 5; else strength = 0; } }
Notice that the method fight has two formal parameters: amount and isWinner. A formal parameter is a variable declaration (like a field declaration without the initialization expression). The first formal parameter in fight, amount, is an int variable, indicating the amount to fight. The second formal parameter, isWinner is a boolean variable indicating whether the animal is the winner of the fight. During a call to the method, each formal parameter is assigned a value called an actual parameter passed from the call site. Because each call site can specify amount and isWinner, fight can be used to fight any numeric amount and it can be used both when the animal wins or loses the fight. Parameters effectively allow programmers to write general-purpose methods, which can be called in different contexts. In Section 3.6 we will look at calling a method. The method fight uses the two parameters to update the strength field in the animal object. The statement list in fight contains an if statement, which will be discussed in Subsection 3.5, but for now it is enough to know that the statement increments the strength by 5 times the parameter amount
if the animal is the winner, otherwise, it sets strength to 0. No value is returned so the
method must be declared void. For void methods, no return statement is necessary, although one can be used if the programmer wishes, so long as it does not return an expression (i.e., “return;”). For non-void methods, the last statement in the method must be a return statement, which cannot be embedded within another statement (e.g., an if statement). This requirement does not exist in Java, but without it, the compiler would have to prove that there is no path through the method that does not end with a return statement. This check requires a sophisticated analysis. By requiring a return statement at the end of the method (which must be executed on any path through the method), this analysis is not necessary. As in Java, return statements can be used at earlier points within the method besides the last 37
statement. However, unlike in Java, statements are allowed to follow a return statement even though they will not be executed. In Java, a statement must be reachable, meaning control must reach the statement via at least one path through the method. But to find unreachable statements requires a sophisticated analysis like the one needed to prove a return statement is executed on every path through the method. Again, to simplify the design of the compiler, statements in Bantam Java do not have to be reachable and can follow return statements. In Java, the signature of a method is the method name combined with the ordered list of parameter types. In the definitions above, the signature of getStrength is getStrength() and the signature of fight is fight(int,boolean). Methods within the same class, in Java, need only have a unique signature and not necessarily a unique name. This feature is called method overloading. In Bantam, method overloading is illegal and each method must have a unique name. However, fields and methods can share names. It is up to the compiler to determine, which is being referenced (the field or method) based on the context in which the name is used. In the definitions of getStrength and fight, the type in the return statement matches the declared return type (int and void, respectively). However, that is only necessary when the declared return type is primitive or void. If the declared return type is instead an object type (i.e., a class name or an array type), then the type of the return expression only has to conform to the declared return type. class Animal { Animal mate; Object getMate () { return mate; } }
The variable mate was defined with type Animal, however, the method getMate is declared to return type Object. This method definition is legal since Animal is a subclass of Object (although in this case we would probably want to specify Animal as the return type). We can also use array types as a return type or a parameter type in a method. For example, assume we use an array to hold a list of animal mates. Then getMates would look as follows:
38
class Animal { Animal[] mates; Animal[] getMates() { return mates; } }
The method getMates returns the mates array. As with non-array object types, the type returned in the return statement only has to conform to the declared return type. Therefore, we could also have declared getMates with return type Object or Object[]. There is one required method in any Bantam Java program: the main method within the Main class. This method is the starting point of a Bantam Java program. The main method must be declared void and define no parameters. Omitting the main method or defining main in any other way is an error. Unlike fields, there are no restrictions on the number of inherited and defined methods within a particular class. Like fields, methods do not have modifiers. All methods are public, meaning they can be called from within any class (given a dispatch object as discussed in 3.6). Like fields, methods can be redefined, however, a redefined method must have the same signature and return type as the inherited method. Let’s now take a closer look at the statements that we can use within a method.
3.5
Statements
There are eight types of statements in Bantam Java. We discuss each below. Block statement. The first statement, a block statement, allows us to insert multiple statements where exactly one is needed. The format of a block statement is: { }
The block statement begins and ends with ‘{’ and ’}’, respectively. Inside the braces are a list of statements. These statements can include potentially another block statement, i.e., a block statement nested within another block statement. The utility of the block statement will become clear when we look at the other types of statements. 39
Declaration statement. A declaration statement declares a new variable and assigns it an initial value. This new variable is called a local variable since it may be accessed only within the method (there are other rules for accessing the variable, which are discussed below). The format of a declaration statement is: = ;
where and are the type and name of the declared variable, respectively, and
is the initialization expression of the variable. Declaration statements must be ter-
minated with a semi-colon. The rules and conventions for declaration statements are similar to fields except that the initialization expression is not optional. The initialization expression is not required in Java, however, Java requires that all local variables are assigned before they are used. Determining whether the variable is assigned before its first use requires some advanced compiler techniques, which we wanted to avoid in the Bantam compiler. We get around this by requiring all locally declared variables to be initially assigned. Below is an example of a declaration statement: class Main { void main () { int x = 3; ... return; } }
In this case, we have declared a new variable x, which is local to the method main. The variable x cannot be used outside of the method main. In fact, it can only be used from the point it was defined until the end of the innermost enclosing block statement or the end of the method, whichever comes first. This range is called the scope of x. In this way, methods and block statements define new scoping levels. As in Java, a local variable can be defined using the same name as a field declared in the same class or an inherited class. While in the local variable’s scope, the field is hidden, although it can still be accessed via this. Two local variables defined within the same method can also use the same name as long as they do not have overlapping scopes. It is a compiler error to declare two local variables with overlapping scopes using the same name. The code below shows an example in Bantam Java of some variable declarations. Note: the 40
subscripts are not a part of the program, but instead, used to help the reader differentiate between block statements and variables with the same name. class Main { int x0 = 0; void main () { int a = x0 ; {b1 int b = x0 ; int x1 = 1; int c = x1 ; {b2 // this would be illegal: // int x2 = 2; int d = x1 ; }b2 }b1 {b3 int e = x0 ; int x3 = 3; int f = x2 ; }3 } return; }
The variable x0 is a field and its scope is the entire class Main. The assignment to a will use x0 (it will be assigned to the value 0) since no local variable x has yet been declared within main. The variable x1 is a local variable and its scope is from its declaration until the end of the first block statement (block statement labeled with subscript b1) within main. The assignment of b comes before the declaration of x1 so b is assigned the value of x0 (i.e., 0). The assignment of c comes after the declaration and within the first block statement so c is assigned the value of x1 (i.e., 1). Within the first block statement, there is a second block statement (labeled with subscript b2).
Within this second block statement, it would be illegal to declare another x (x2 ) since the
two variables would have overlapping scopes. The variable d is assigned the value in x1 since it is still within the first block statement and it appears after the declaration of x1 . The variable x3 is another local variable like x1 but it has a disjoint scope. Its scope is from the declaration until the end of the third block statement (labeled with subscript b3). The assignment of e comes before the declaration of x3 so e is assigned the value of x0 (i.e., 0). The assignment of f comes after the declaration of x3 and within the third block statement so f is assigned the value in x3 (i.e., 3). Notice that the declaration of local variables can hide field variables. However, these can still 41
be accessed via this. If statement. As in Java, an if statement allows the programmer to branch between statements based on some predicate. The format of an if statement is:
[
if ( ) else
]
where if and else are keywords, the is a boolean expression, the is a statement that is evaluated if the predicate evaluates to true, and the is a statement that is evaluated if the predicate evaluates to false. As in Java, the else statement is optional. Here is an example if statement: class Main { void main () { ... if (animal.getStrength() > 100) animal.fight(100, true); else animal.fight(100, false); ... } }
Only one statement can be used as the then or else statement. However, if we need to execute more than one statement in either of these (or both) we can use a block statement: class Main { void main () { ... if (animal.getStrength() > 100) { animal.fight(100, true); strength = animal.getStrength(); } ... } }
If more than one predicate needs to be tested, if statements can be cascaded as they are in Java. For example:
42
class Main { void main () { ... if (animal.getStrength() > 100) animal.fight(100, true); else if (animal.getStrength() > 50) animal.fight(50, false); else if (animal.getStrength() > 10) animal.fight(10, false); else animal.fight(0, false); ... } }
This code is actually made up of three if statements not one. The last two if statements are nested within the previous if statement’s else clause. Unlike Java, Bantam does not have switch statements, however, these can often be implemented using cascaded if statements like those in the code above. As shown in the example below, a potential ambiguity can arise due to the optional else statement: if (x > y) z = x; if (r > s) t = r; else t = s;
In the code above, the else could potentially bind to the first or second if statement. As in Java, an else always binds to the innermost, unclosed if. Therefore, the else in the code above binds to the second if (i.e., it is executed if and only if r =
Boolean
! && ||
Assignment
=
Increment/decrement (prefix and postfix)
++ --
Cast
(type)(expression)
Instanceof
instanceof
Member reference
.
Object construction
new
Array index
[]
Table 1: Bantam Java operators. earlier, is that the last statement in a non-void method is a return statement, which cannot be embedded within another statement (to simplify the compiler). Below is a simple method isEven, which determines whether an int n is even or not. It uses two return statements, which return either true (if n is even) or false (if n is odd). boolean isEven(int n) { if (n % 2 == 0) return true; return false; }
Because the declared return type of isEven is boolean, each return statement must include a return expression and that expression must have the type boolean. Note that in Bantam Java, it is not legal to put the “return false;” within an else clause. The last statement in the method must be a return statement, and this statement cannot be embedded within another statement. Let’s now look at the last category of language constructs in Bantam: expressions.
3.6
Expressions
Bantam supports a variety of expressions, which are described below. Figure 1 lists the operators that are supported in Bantam. Bantam supports most Java operators including arithmetic operators (+, -, *, /, and %), relational operators (==, !=, =), boolean operators (!, &&, ||), assignment (=), and increment/decrement shortcut operators (++, -- – other shortcut operations are not supported). Bantam also supports object construction, member reference, (object) casting, instanceof,
and array indexing []. We discuss each of these in more depth below.
47
Every expression in Bantam computes a value with some data type. The type of the computed value is the type of the expression. Because expressions are used within field declarations, statements, or other expressions, the type of the expression is often important. For example, an expression that computes a value of type int cannot be assigned to a boolean field. It is the responsibility of the compiler to determine the type of each expression and verify that it is used in the appropriate way. For each expression below, we will discuss both what the expression computes and its resulting data type. Assignment. An assignment expression has the form:
[ . ]
[ [ ] ]
=
where is an optional reference object (followed by ‘.’), is the name of the target variable, is the optional index expression (if refers to an array), and determines the value to assign to the variable.
The target must refer to some variable
defined in the same scope or an encompassing scope. The reference object can be used only in the assignment of a field.
Because fields are either protected (and protected is more restrictive in
Bantam Java than Java) such as user-defined fields or cannot be modified such as length in an array type, the reference object, if used, must be either this or super. Here is an example assignment: x = y + 2;
The expression on the right is evaluated first and then stored in the lefthand variable. The result of the entire expression is the result of the righthand expression. If the type of the righthand expression or the lefthand variable is primitive then the types must match, otherwise the (object) type on the right must conform to the (object) type of the lefthand variable. The static type of the entire expression is the static type of the righthand expression. Here is another example assignment, but this time the righthand expression is assigned to an element in an (int) array: this.numArray[i-1] = x * 5;
48
Dynamic dispatch. A dynamic dispatch is simply a method call of an instance method. To call a method in Bantam, we need a reference object (of an appropriate type) to invoke the method on. The reason for the name dynamic dispatch is that in object-oriented languages a method call of an instance method is often thought of as passing a message to the object, hence the word “dispatch” (the “dynamic” part will be discussed shortly). Notice that because the called method can access fields, the outcome of the method depends on the reference object. The format of a dynamic dispatch is:
[ . ]
( )
where is an optional expression that corresponds to the reference object, is the name of the method, and is a list of comma-separated actual parameters, each of which is an expression. If the reference expression is not included, then this is used as the reference object. In order for the dynamic dispatch to be legal, the called method must be declared within the reference object’s static type class or within a superclass. The number of actual parameters and declared formal parameters must match and the type of each actual parameter expression must conform to the type of the declared formal parameter or match if either type is a primitive or an array type. Finally, the dynamic dispatch must be used according to its declared return type. For example, a void method should not be used within a larger expression since it has no return value. A method that returns a boolean cannot be used in an arithmetic expression where an int is required. The following code below shows how to dispatch on methods fight and getStrength within class Animal (defined
on page 37): class Main { Animal animal = new Animal(); void main() { animal.fight(20*5, true); int halfStrength = animal.getStrength() / 2; ... } }
The dispatch on fight passes an int (20*5) as the first parameter and a boolean (true) as the second parameter, which match the declared formal parameters of fight. fight is a void method so it must 49
appear on a line by itself and not within a larger expression. The method getStrength takes no parameters and returns an int. Therefore, we can use the result of getStrength in an expression that requires an int. The actual parameter expressions in a dynamic dispatch are executed from left to right and passed to the method. They are evaluated after the reference expression. Bantam Java, like Java, uses call by value meaning that the formal parameter in the method is assigned the value from the corresponding actual parameter expression. In the code above, the formal parameter amount is set to 20*5 (i.e., 100) and the formal parameter isWinner is set to true. Below is another example of a (contrived) method call. In the call to foo from method main, because of call by value, the formal parameter y is set to the value in main’s variable x. But x and y
are separate variables. If foo sets y to a new value, this will have no effect on x in main. class Main { void main() { int x = 3; foo(x); } void foo(int y) { ... } }
The parameter in the code above has a primitive type (i.e., int). Call by value is also used for parameters with object types. However, as variables in Bantam Java store references (or memory pointers) to objects rather than the objects themselves, it is the reference that is copied not the object itself. For example, in the code below, the animal reference is passed to method foo. class Main { void main() { Animal animal = new Animal(); foo(animal); } void foo(Animal a) { ... } }
While in foo, the variables a and animal (which is not actually accessible in foo) refer to the 50
same object (i.e., alias). If we modify a field of a, then the field will be changed for animal. Of course, if we assign a to another Animal object, then the two variables would no longer alias. Because of inheritance, the exact method that is called on a dispatch is not always known at compile time, which is the reason for the word “dynamic” in dynamic dispatch. This property of object-oriented languages, i.e., that one call site can call multiple methods during the course of a program, is known as polymorphism. For example, the class Tiger could define its own version of fight:
class Tiger { void fight(int amount, boolean isWinner) { if (isWinner) strength = strength + amount * 10; else strength = 0; } }
If the method fight is called on an Animal object, which fight is called? It depends on the runtime type of the reference object, which as discussed above may differ from the static type (i.e., Animal). If at runtime, the object has type Animal, then the fight method within the Animal class is called. If, on the other hand, the object has dynamic type Tiger, then the fight method within the Tiger class is called. This example is illustrated in the Main class shown on page 49. Although we know the original dynamic type of animal is Animal, the dynamic type of this field may change later, and in general, it is impossible for the compiler to determine the dynamic type of a variable. The compiler must generate code for calling the appropriate method at runtime based on the dynamic type of the reference object. A runtime error is generated if the reference object is null.
The reference expression can evaluate to any object type (so long as that type includes the appropriate method) or can refer to the special variables this or super. Using this is not necessary since excluding the reference object has the same effect. However, using super is often helpful. It allows the programmer to call hidden methods. For example, in the Tiger class, if we want to call the fight method from Animal, we can only do this using super as the reference object. Object construction. We can use the new operator to create a new (non-array – array construction is discussed below) object from a class (called object construction). The format of a new operation 51
is: new ()
where new is a keyword and is replaced with a class name. For example, if we wanted to create an object from a class Tiger and store it in a variable of type Tiger we could do the following: Tiger t = new Tiger()
In Java, the programmer can define their own constructors that are called when the object is created. These allow the programmer to customize the object based on the particular context in which it is created. User-defined constructors are not allowed in Bantam. Object construction in Bantam creates a new object and initializes each field based on the initialization expression (or lack of). However, a Bantam programmer can write methods that simulate user-defined Java constructors. Of course, it is up to the programmer to make sure that the pseudo-constructor is called after every object construction. For example, in the Animal class, we could define a pseudoconstructor to set the number of legs and the flag indicating whether the animal can fly. class Animal { // simulates a constructor // must always be called immediately after construction Animal init(int l, boolean f) { numLegs = l; canFly = f; return this; } } class Main { void main() { Animal animal = (new Animal()).init(4, false); ... } }
52
Array construction. We can also use the new operator to construct a new array. The format of array construction is: new [ ]
where is a primitive type or a class name and is an int expression, which evaluates to the size of the array. The size must be non-negative, and for reasons related to garbage collection, must be less than or equal to 1500, but only if garbage collection is enabled. A runtime error occurs if the size evaluates to an illegal value (e.g., -1). If garbage collection is disabled the array size is unbounded, although it still must be non-negative. This upper bound is not a part of the language, but rather a part of the particular implementation of the language. The code below constructs an array of 10 int elements and assigns the newly-constructed array to the variable numArray: int[] numArray = new int[10];
Each element is initially set to a default value. If the base type is int (as it is above), then the default value is 0, if the base type is boolean, then the default value is false, and if the base type is an object type, then the default value is null. Casting. As we have already seen, we can store an object of one type into a variable whose type is a super type. For example, we can store a Tiger object into a variable with type Animal. This action is called upcasting, since we are moving up the class hierarchy tree. Upcasting can be done either implicitly or explicitly. For example, the following two statements are equivalent: Animal animal = new Tiger(); OR Animal animal = (Animal)(new Tiger());
In the first assignment statement, we implicitly upcast a Tiger object into an Animal so that it can be stored in animal. In the second assignment statement, we do the same except we explicitly show the upcast. The format of an explicit cast is as follows: ( ) ( )
53
where is the name of some existing class and is an expression with an object type (i.e., not a primitive). In Bantam, unlike in Java, the expression to be casted must be enclosed by parentheses (this simplifies parsing). In the example cast above (i.e., (Animal)(new Tiger())) only the static type of animal is Animal. The runtime type is still Tiger. The additional Tiger functionality (non-inherited members) is still maintained in the variable animal, however, it cannot be utilized. But it can be recovered by performing a downcast. For example, we could do the following: Tiger tiger = (Tiger)(animal);
In this case, the cast must be explicit since it needs to be checked at runtime, i.e., the compiler does not know statically whether animal is actually a Tiger or a subclass of Tiger. If the dynamic type of animal is not Tiger or a subclass of Tiger (e.g., Bear) then a runtime error occurs. Sometimes the compiler can statically catch an illegal cast, i.e., a cast that is neither an upcast or a downcast. In particular, any cast from one class to another class, which is neither a subclass or a superclass, is a compiler error. For example, the following is a compiler error: Bear bear = (Bear)(new Tiger());
Upcasting and downcasting are common operations in Bantam (as well as in Java, prior to the addition of generics). Upcasting and downcasting make it possible to create collections of heterogeneous objects like the Vector class in Java. The collection is simply an object that stores each element as an Object, i.e., objects are upcasted to Object. Because Object is a superclass of all classes, the collection can house any kind of object (but not a primitive). When an object is retrieved from the collection, it usually must be downcasted from Object to its original type. As in Java, arrays can be casted just like other objects. For example, we could perform the following downcast, which converts an array of Animal objects into an array of Tiger objects: Tiger[] tigers = (Tiger[])(animals);
Of course, the cast above is legal if and only if the array animals holds Tiger objects (or objects
54
whose type is a subtype of Tiger). A runtime error occurs if that is not the case. However, an additional problem can arise when casting arrays as shown in the code below: Animal[] animals = (Animal[])(tigers); animal[0] = new Bear();
The problem is that animals holds Tiger objects. It cannot be used to store Bear objects. A runtime error occurs when an array element is assigned a value that does not conform to the dynamic base type of the array. Bantam Java, unlike Java, does not have support for casting primitives. Therefore, it is a compiler error if the programmer attempts to cast to a primitive type or cast an expression, which has a primitive type. A compiler error also occurs if the target type does not exist. Instanceof. The instanceof operation in Bantam allows the programmer to determine the runtime type of an object. Like casting, instanceof is often a useful operation when dealing with collections of heterogeneous objects. If we pull an object off of a collection, such as a Vector, we may not know its exact type, but rather that the object is one of several types. The format of instanceof is: instanceof
where is an expression with an object type (i.e., not a primitive) and is some type (i.e., name of a class or an array type). instanceof evaluates to true if the dynamic type of the expression conforms to the righthand type. Otherwise, it evaluates to false. The following code illustrates a common use of instanceof. The code retrieves a generic Animal object from a list (via the method getNextAnimal). The instanceof operator is used to determine the specific type of Animal (Tiger, Bear, or Eagle) so that a counter can be updated, which keeps track of the total number of each kind of Animal. (Note: if the dynamic type of animal is Animal then none of the instanceof expressions will evaluate to true and none of the counters will be incremented.)
55
Animal animal = getNextAnimal(); if (animal instanceof Tiger) numTigers = numTigers + 1; else if (animal instanceof Bear) numBear = numBear + 1; else if (animal instanceof Eagle) numEagles = numEagles + 1;
We can also use instanceof on array types. For example, the following code tests whether an array animals holds Tiger objects, and if so, casts animals to a Tiger[] array: if (animals instanceof Tiger[]) { Tiger[] tigers = (Tiger[])(animals); ... }
A compiler error occurs if the lefthand expression in the instanceof expression has a primitive type. An error also occurs if the righthand type in the instanceof is primitive or does not exist. As with casting, a compiler error also occurs if the expression’s type is neither a subtype nor a supertype of the righthand type. Arithmetic operators. Bantam supports five binary arithmetic operators (+, -, *, /, %) and one unary arithmetic operator (-). The format of the binary operators is:
where and are both expressions with type int and is one of ‘+’, ‘-’, ‘*’, ‘/’, or ‘%’. The operators are similar to those in Java. + computes the sum of the left and right expressions, - computes the difference, * computes the product, / computes the integer division, and % computes the remainder when dividing the left expression by the right expression. The resulting type of these expressions is an int. The format of the unary operator is: -
where is an int expression. This operation computes the arithmetic negation of the expression. The resulting type is an int.
56
Here are some examples: int x = 0; int y = 1; int z = 2; x = y + z; // x is set to 3 x = y - z; // x is set to -1 x = y * z; // x is set to 2 x = y / z; // x is set to 0 x = y % z; // x is set to 1 x = - y; // x is set to -1
Boolean operators. Bantam supports two binary boolean operators (&& and ||) and one unary boolean operator (!). The format of the binary operators is:
where and are both expressions with type boolean and
is one of ‘&&’ or ‘||’. && computes the logical AND of the left and right expres-
sions. If both the left and right expressions evaluate to true, then the result of && will also be true. Otherwise, the result is false. || computes the logical OR of the left and right expressions. If both the left and right expressions evaluate to false, then the result of || will also be false. Otherwise, the result is true. The resulting type of these expressions is a boolean. The format of the unary operator is: !
where is a boolean expression. ! computes the complement of the expression. If the expression evaluates to false, the result is true. If the expression evaluates to true, the result is false.
The resulting type of these expressions is a boolean.
Here are some examples:
57
boolean b1 = false; boolean b2 = false; boolean b3 = true; b1 = b2 && b3; // b1 is set to false b1 = b2 || b3; // b1 is set to true b1 = !b2; // b1 is set to true
Relational operators. Bantam supports six binary relational operators (==, !=, =) for comparing two values. The format of the relational operators is:
If is ‘==’ or ‘!=’ then the two expressions must have the same type if either is primitive or one type must conform to the other type if either is an object. If is ‘=’ then the expressions must both have type int. The result of a relational operation is a boolean indicating whether the test succeeded. The == operator tests if the left and right expressions are equivalent. Note: if the expressions are objects the operator tests if the left and right expression refer to the exact same object. If they refer to different objects then the test fails, even if the objects have the exact same field values. If the left and right expressions are equivalent then the result of == is true, otherwise it is false. The !=
operator works like == except that it tests if the left are right expressions are not equivalent. If
the left and right expressions are equivalent then the result of != is false, otherwise it is true. The < operator tests if the lefthand int is less than the righthand int, tests if the lefthand int is greater than the righthand int, and >= tests if the lefthand int is greater than or equal to than the righthand int. If the test succeeds then the result is true, otherwise the result is false. Here are some examples:
58
boolean b = false; int i1 = 0; int i2 = 1; int i3 = 0; Object o1 = new Object(); Object o2 = new Object(); Object o3 = o1; b = i1 == i2; // b is set to false b = i1 != i2; // b is set to true b = o1 == o2; // b is set to false b = o1 == o3; // b is set to true b = i1 < i2; // b is set to true b = i1 >= i3; // b is set to true
Increment/decrement shortcuts. Bantam Java (the extended language) also includes the increment/decrement shortcut operators (++ and --). These are unary operator expressions. As in Java, these can be used as either prefix or postfix operators. The format of the ++ prefix shortcut operator is (the format of the -- prefix shortcut is the same): ++
where is either an int variable or an element in an int array. A compiler error occurs if the variable does not have type int. This expression is a short cut for: = + 1
The outcome of a (prefix) ++ or -- is that the variable is incremented or decremented, respectively, and the result is returned. For example, the code below passes the result of incrementing x (using prefix ++) to an auxiliary method print, which prints an int to the screen. int x = 5; print(++x);
The result of executing the code above is that x is set to 6 and 6 is printed to the screen. In addition, ++ and -- can be used as postfix operators. The format of the postfix ++ and -is the same as the prefix ++ and -- except that the operators appear after the variable rather than before. The semantics of the postfix operators are slightly different than the corresponding prefix 59
operators. The variable is still incremented/decremented, however, the expression evaluates to the previous value of the variable rather than the incremented/decremented value. For example, the following code prints 5 not 6 (note the change from ++x to x++): int x = 5; print(x++);
But although the code above prints 5, x is still incremented. If we added the statement print(x); to the bottom of the code above, this would print 6. The increment/decrement operators are particularly convenient within the for loop. For instance, we can use ++ to iterate over the elements of the array and print them out: for (i = 0; i < numArray.length; i++) print(numArray[i]);
Note: other shortcut operations such as +=, *=, and &&= are not supported. Constants. There are three constant types in Bantam: int, boolean, and String. An int constant is any sequence of numeric digits (e.g., 0, 124). It must be between 0 and 2147483647 (231 − 1) since it is stored as a 32-bit signed integer. Integer constants must be written in decimal, other forms such as hexadecimal are not supported. Leading 0’s are allowed in an int constant. A boolean constant is either true or false. These are keywords and may not be used as identifiers. A String constant is a sequence of characters between double quotes (e.g., “abc”). Unlike in Java, Bantam Java represents characters using an ASCII encoding rather than an Unicode encoding, which limits the types of characters that can be represented in a Bantam Java String constant. As in Java, String constants are treated as objects of type String (which is discussed in 3.7). String constants may not span multiple lines. A backslash is interpreted as an escape character within a String
constant, which allows the programmer to specify some special characters. These include
\n (newline), \t (tab), \” (double quote), \\ (backslash), and \f (form feed). Other special characters are illegal. In particular, a backslash within a String constant must be followed by ‘n’, ‘t’, ’f’, ‘\’, or a double quote. For garbage collection reasons, the size of a String constant (and a String variable)
is limited to 5000 characters.
Variables. A variable reference is also an expression. Of course, the variable must have been 60
., (params), [], ++ (postfix), -- (postfix) - (unary), !, ++ (prefix), -- (prefix) new, cast *, /, % +, , =, instanceof ==, != && || =
Table 2: Operator precedence and associativity. Operators with higher precedence are listed higher in the table than those with lower precedence. Operators in the same row have the same precedence. All binary operators are left-associative except assignment (‘=’). These rules were taken from the Java book by Arnold, Gosling, and Holmes (Gosling led the team at Sun, which created Java) [5]. Note: (params) refers to the parentheses and actual parameter list in a method call. previously declared, otherwise, it is an error. If the variable is a field, then it can be preceded by this followed by ‘.’. If the variable is an inherited field (hidden or otherwise) then it can be preceded with super followed by ‘.’. Finally, if the variable is length, then it can be preceded by an array variable followed by ‘.’ as this is a public field within each array. If the variable is an array (as opposed to the reference object), then it can be indexed to access a particular element. The format for accessing an array element is:
[ . ]
[ ]
where is the optional reference object (either this or super), is the name of the array, and is an expression that evaluates to the array index. The code below sets x to the third element (index 2) in the field numArray: int x = numArray[2];
Parentheses. The final type of expression is an expression within parentheses: ( ).
Parentheses are useful for grouping operations. Table 2 shows the order of operations and the
associativity for each operation discussed in this section. Parentheses should be used to override
61
precedence and/or associativity. For example, we could do the following to force the addition to occur before multiplication: int x = (2 + 3) * 5; // x is set to 25
3.7
Built-In Classes
There are four built-in classes in Bantam. These are listed in Table 3. Object. The Object class is similar to the Object class in Java except with less functionality. The Object
class is the only built-in class that can be extended, and in fact, all classes must either
directly or indirectly extend Object. Object
has three methods: clone, equals, and toString. The method clone takes no parameters
and makes a copy of the reference object. If the cloned object contains fields (inherited or otherwise) then the values of these fields are copied to the new object. If these fields are themselves objects, however, the contents of those objects are not copied. In this case, the field in both the original and the copy would refer to the same object. To overcome this limitation, one can always redefine the clone method when defining a new class. The method equals compares two objects. It takes as a parameter an object to compare to the reference object and returns a boolean indicating whether the two objects are equivalent. The method checks to see if two objects alias (i.e., refer to the same address). It does not check the contents of the two objects. However, this method can be overriden by other classes to compare the contents of two objects. The method toString returns a String representation of the reference object. The default representation has the following format: @. For example, calling toString on variable o might return Sys@3201 if the dynamic type of o is Sys and its address is 3201. In general, this method should be overriden by other subclasses to return a more informative String representation (as in the String class below). Sys. The Sys class contains one method for exiting the program. It extends Object. The method exit
takes one parameter, an int representing the exit status (0 is generally used for no error, non-
zero values are used when an error has occurred). It replaces the static call to System.exit in Java. The Sys class cannot be extended. 62
Class
Object
Sys
String
TextIO
Method signature
Method description
Object clone() boolean equals(Object s) String toString() void exit(int status) int time() * int random() * int length() boolean equals(Object s) String toString() String substring(int beginIndex, int endIndex) String concat(String s) void readFile(String filename) void writeFile(String filename) void readStdin() void writeStdout() void writeStderr() String getString() int getInt() void putString(String s) void putInt(int i)
copy an object test if objects are equal (i.e., alias) return string representation of object exit program with specified status return UTC time return random int return string length test if strings are equivalent return itself return substring between the indices return concatenated string set to read from specified file set to write to specified file set to read from standard input set to write to standard output set to write to standard error read next string read next int write specified string writes specified int
Table 3: Bantam built-in classes. Note: Sys, String, and TextIO cannot be extended. * indicates methods that are not automatically included when targeting MIPS. The Sys class may also contain two other methods depending on your implementation of the Bantam Java compiler. In particular, it can contain a method for obtaining the time and for computing a random integer. The method time computes the seconds since epoch (January 1st 1970) in UTC. The method random computes a random integer. If targeting MIPS, these methods are not automatically included since they cannot be implemented on the unmodified SPIM simulator [15]. Email the first author to obtain a MIPS runtime system and SPIM simulator that does support these methods. This is not an issue when using the other two targets (JVM or x86). String. The String class is a class for representing sequences of characters. It extends Object and cannot be extended. It is similar to the String class from Java, but with less functionality. For reasons having to do with garbage collection, the length of a String may not exceed 5000 characters. The characters in a String are represented using ASCII rather than Unicode, which limits the types of characters that can be stored in a Bantam Java String. String
has four methods: length, equals, substring, and concat. The method length takes no
parameters and returns the length (an int) of the String. For example, if the variable s is a String 63
representing “abc”, then calling s.length() returns 3. The method equals compares two strings. It overrides the equals method from the the Object class. It takes one parameter: an Object to compare to the reference String. If the parameter has the runtime type String and it represents the same sequence of characters as the reference string then equals returns true. Otherwise, it returns false. A runtime error occurs if the String parameter is null. Notice that this method behaves differently than ==. The operator == can only determine if the two strings refer to identical objects. It cannot be used to determine if two strings represent the same sequence of characters. The method toString takes no arguments and simply returns itself. It overrides the toString method from the Object class. The method substring takes two parameters: a beginning index (an int) and an end index (an int).
It returns the String that starts at the beginning index and ends at the end index. The character
at the beginning index is included in the resulting String, but the character at the end index is not included in the String. If s is a String representing “abc”, then calling s.substring(1,3) returns a String representing “bc”.
A runtime error occurs if the beginning index is less than 0, the end index
is greater than the length of the String, or the beginning index is greater than the end index. Finally, the method concat takes as parameter a String and returns a new string representing the concatenation of the reference String object with the parameter String object. For example, if s is a String representing “abc” and s2 is a String representing “def”, then s.concat(s2) would return a new String representing “abcdef”. A runtime error occurs if the String parameter is null or if the resulting String has more than 5000 characters. There is no method for copying strings, but because String extends Object, the clone method can be used to copy a String. TextIO. The TextIO class provides methods for performing file input and output. It extends Object. It is similar to the TextIO class defined by David Eck in his textbook [12], except the class does not use static members. Reading and writing are separately handled by this class and so it is possible with one TextIO object to read from one file, while writing to another. The TextIO class contains a method called readFile for setting the read file. This method takes as input a String representing the file name. It terminates the program if the file does not exist or the program does not have permission to read from the specified file. There is also a method called writeFile for setting the write file. This works similarly to readFile except the specified file need not exist. If the file
64
does not exist, then writeFile will create the specified file. The program does, however, have to have permission to write to the specified file. For both readFile and writeFile the programmer can specify a path along with the file name, e.g., “../file.txt” or “/home/someuser/foo”. A runtime error occurs in either method if the input String is null. TextIO
also contains methods for reading from standard input (readStdin) and writing to ei-
ther standard output (writeStdin) or standard error (writeStderr). These methods do not take any parameters. By default, TextIO reads from standard input and writes to standard output. None of the TextIO methods described above actually read or write any data, instead they set either the read location or the write location. To read or write from some location, the programmer can use getString, getInt, putString, or putInt. The method getString reads the next line of text (minus the newline character) from the current read location and returns a String representing this text. The method getInt reads the next line of text (minus the newline character) from the current read location and interprets the text as an int. If an int was entered then getInt returns the entered value otherwise it returns 0. The method putString takes a String parameter and writes it to the current write location. A runtime error occurs in putString if the input String is null. The method putInt takes an int parameter and writes it to the current write location. Neither putString or putInt write a newline character to the output stream, however, this can be achieved by performing putString(“\n”)
after writing the String or int.
Example. Figure 3 shows a somewhat contrived example class that uses all of the built-in classes. There is one Main class with three methods: main, getNextLine, and error. The main method prompts the user via standard input for a positive integer n and then calls getNextLine n times to read n lines from the file “input.txt”. It stops early if the program reads the string “quit”. The method getNextLine reads the next line from “input.txt” and calls error if either there is not another line to read or if the length of the read string is less than 2. The method error prints an error message to standard error and exits the program with status 1. After main gets the next line from getNextLine it concatenates it with the previous read output.
At the end of the method, main prints
the concatenated output to standard output and to the file “output.txt”.
3.8
Bantam vs. Java
Although we have described some of the differences between Bantam and Java throughout this section, we lay out the main differences below. We also show how to convert a Bantam program 65
class Main { TextIO io = new TextIO(); String output = “”; void error() { io.writeStderr(); io.putString(“Bad input; exiting\n”); (new Sys()).exit(1); } String getNextLine() { String s = io.getString(); if (s == null || s.length() < 2) error(); return s.substring(1, s.length()); } void main() { String s = “”; io.readStdin(); int n = io.getInt(); if (n < 1) error(); io.readFile(“input.txt”); int i = 0; for (i = 0; i < n && !s.equals(“quit”); i++) { s = getNextLine(); output = output.concat(s).concat(“\n”); } io.writeStdout(); io.putString(output.toString()); io.writeFile(“output.txt”); io.putString(output); } }
Figure 3: Example program using all of the built-in classes. to a Java program (note: converting a Java program to a Bantam program is a more difficult process, especially if the Java program uses a significant number of features that were excluded from Bantam Java). Differences. The Bantam Java (extended) language excludes the following features (this list may not be complete): • Primitives besides int and boolean • Multi-dimensional arrays 66
• • • • • • • • • • • • • • • • • • • • •
Static members Packages Modifiers such as public, private, protected, and package Nested classes Abstract classes Interfaces Final variables or methods Enumerations Generics Loops besides while loop and for loop Labeled break statements and continue statements Switch statements Logic operators (&, |, ˆ, >, >>) Shortcut operations besides ++ and -- (e.g., +=, *=) Conditional expressions Hexadecimal/octal representation of int constants User-defined constructors Method overloading Declaration statements without assignments Unicode characters in String objects (ASCII is used instead) Extensive library for graphics, networking, mathematical functions, etc.
Converting Bantam programs to Java programs. Because the Bantam language is a subset of the Java language, it is always straightforward to convert Bantam programs into Java programs. The programmer must perform the following steps: • • • •
Add the protected keyword in front of all fields Add the public keyword in front of all methods Create classes TextIO and Sys in Java Add the following static main method to the Main class (without replacing the original main method): public static void main(String[] args) { (new Main()).main(); }
Otherwise, the program will not need to be changed.
67
3.9
Last Words
We have now looked closely at the Bantam Java language. As was discussed throughout this section, it is the responsibility of the Bantam Java compiler to enforce the lexical, syntactic, and semantic rules of the Bantam Java language layed out in this section. Therefore, this section will be an important resource when implementing the compiler. The next section gives an overview of the Bantam Java compiler, which must be completed by the student.
68
Bantam Program
Lexer
Scanned Tokens
Parser
AST
Semantic Analyzer
Annotated AST
Code Generator
Assembly Code
Figure 4: Bantam Java compiler phases.
4
Bantam Java Compiler
This section describes the Bantam Java compiler. This section first gives an overview of the compiler and then discusses the data structures that students will need to use in course projects. Note: this section does not discuss the compiler components that are specific to optimization (an optional project), which are instead discussed in Section 6.
4.1
Overview
The compiler is written in the Java programming language and will run on any x86/Linux machine (and perhaps other Unix-based machines). As shown in Figure 4, the compiler is split into four phases: lexical analysis, syntactic analysis, semantic analysis, and code generation. This is a standard design template used in many educational compilers [3, 4, 22, 21]. These phases are unimplemented; students must complete them in four course assignments. Note: this design structure will vary slightly if using some of the optional projects such as the optimization project (which is discussed in Section 6). Compiler phases. The lexer and parser are built using automatic lexer and parser generators (either JLex [7]/Java Cup [14] or JavaCC [6]). Students must implement the lexer and parser specification files. The semantic analysis and code generation assignments are somewhat more challenging. Students must build these almost from scratch given some auxiliary data structures (e.g., symbol table). These two assignments will give students ample opportunity to make important design choices, such as how to build class hierarchy trees and class environments. Abstract syntax tree. For the most part, the compiler uses a single intermediate form (minus the optimizer, which is an optional project): an abstract syntax tree (AST). Both the semantic analyzer and the code generator must traverse this AST in order to check the semantics of the program and generate code, respectively. Auxiliary data structures. Several auxiliary data structures are provided for use in each of the compiler phases. These include (among others) a symbol table, an error handler, and AST nodes. 69
lexer
Performs lexical analysis
parser
Performs syntactic analysis
semant
Performs semantic analysis
codegenmips
Generates Mips code
codegenx86
Generates x86 code
util
Utility classes (symbol table, error handler, class tree node, location)
ast
AST node classes
visitor
Visitor classes (generic visitor, print visitor)
Table 4: Bantam compiler packages. Packaging. For modularity purposes, the compiler relies heavily on Java packaging. Figure 4 lists the packages used in the Bantam Java compiler. Each compiler phase is placed in a separate package: lexer, parser, semant, codegenmips, and codegenx86 (there are two packages for code generation, one for Mips and the other for x86.) In addition, three other packages provide auxiliary support (e.g., symbol table): ast, util, and visitor. The ast package provides classes for representing the nodes of the abstract syntax tree. The util package provides classes for error handling, for representing the class hierarchy tree, and for representing the symbol table. The visitor package provides classes for implementing the visitor design pattern [13]. Finally, there are a few packages for use in optional projects. Packages opt and cfg contain the optimizer and the optimization representation (a control flow graph), respectively. Visitor pattern. Again for modularity purposes, the source code also utilizes the visitor design pattern [13] for traversing a tree (i.e., the AST) from an outside class. With the visitor pattern, AST traversals for checking the program semantics can reside within the semantic analysis package. Similarly, AST traversals for generating code can reside within the code generation package. We will discuss the visitor design pattern in more detail in 4.2. Runtime system. The Bantam compiler includes a runtime system, which handles memory allocation and deallocation (i.e., the garbage collector) as well as all built-in object methods. The runtime system is provided to the student as it would take most students more than a single semester to implement on top of the rest of the compiler.
4.2
Data Structures
Below we describe the auxiliary data structures used by the compiler. This documentation is not complete, for example, we do not discuss every public method and field. This information is 70
already available within the API documentation (see Section 2 for instructions on how to make the API documentation). Instead, we describe at a high-level how to use each data structure. Error handler. The error handler data structure (ErrorHandler) allows for a unified way of handling and printing error messages from within any compiler phase. Each phase has an error handler object, which it uses to report errors. To report an error it must be registered with the error handler object by calling the register method. The register method does not immediately print the error, it is printed only after a call to the checkErrors method. checkErrors prints out all errors (if there are any) and exits if there are any errors. Before printing the errors, checkErrors sorts the errors based on where the errors were discovered, i.e., the filename and line number. It first sorts the errors based on filename (using alphabetic order) and then sorts errors within the same file based on line number (using numeric order). Class tree node. In order to compile a Bantam program, we must build a representation of the source program’s class hierarchy tree (shown in Figure 1). The class tree node (ClassTreeNode) data structure represents each node (i.e., a class) in the class hierarchy tree. Each class tree node contains a parent class tree node, which is null by default. It can and eventually should be set by calling setParent (only Object can have a null parent link). A class tree node also contains a list of child class tree nodes, which is empty by default. A child can be added by calling addChild. In general, only one of setParent and addChild needs to be called since both methods automatically set both the parent and child links. The parent class tree node, child class tree nodes, total children, and total descendants (total strict subclasses) can be accessed via public getter methods. Each class tree node also has a variable and method symbol table associated with it, which can be retrieved by calling getVarSymbolTable and getMethodSymbolTable, respectively. These are the symbol tables for the particular class that the class tree node represents. Note: two symbol tables are needed since the variables and methods have separate name spaces. The class tree node also contains other meta information about the class, such as the class name and whether the class is extendable. Location. The location data structure (Location) is a simple data structure for representing the location of a variable. It is used exclusively by the code generator (in concert with the symbol table) to record where a variable was allocated. The location data structure supports both variables allocated to memory and in a register. This information is needed during code generation. At a variable declaration, the variable name and location is added to the symbol table. At later 71
references to the same variable, the location can be retrieved from the symbol table. Symbol table. The Bantam compiler includes a symbol table (SymbolTable) for keeping track of all the identifiers and constants that appear within the source program. Unlike in commercial compilers, the symbol table in the Bantam compiler stores all symbols as strings. This simplifies the manipulation of symbols at the expense of a larger memory footprint. The symbol table supports scoping, i.e., nested name spaces. Given a symbol table object, the methods enterScope and exitScope will enter a new scope and exit the current scope, respectively. In Bantam, a subclass of another class has access to all of the inherited classes symbols. Rather than copying these symbols into the subclass, the symbol table has a setParent method for setting the parent symbol table. This method effectively nests the child class’s scopes inside the parent class’s scopes. The method add is used for adding a new name (a String) to the current scope. This method also takes a value (which can be any kind of object, e.g., a Location), which can be retrieved later. For example, we might add the name “x” with value “int” (a String) to indicate that the variable “x” was declared with type “int”. To lookup the value, we can use the method lookup, which takes as input a name. For example, we could call lookup(“x”), which would return “int” (as an Object). If no entry is found with name “x”, then null is returned. The method lookup looks for “x” in all scopes. To look in just the current scope we would use peek. Abstract syntax tree. Except during optimization (an optional project), the Bantam compiler uses an abstract syntax tree [2, 22, 8, 19] (AST) as its intermediate representation. The AST is defined within the ast package. It has many different types of nodes, which are enumerated and discussed below. ASTNode
An ASTNode is an abstract class that represents a generic node in the AST. It contains a line number indicating where the original source code (represented by the node) was scanned. All nodes in the AST extend ASTNode. • Program Each (correct) Bantam program contains one top-level Program node. A Program node extends ASTNode and contains a list of classes (ClassList). • Class 72
A Class node represents a class from the Bantam source program. It extends ASTNode and contains a filename (String), a class name (String), a parent name (String), and a list of class members (MemberList). • Member A Member node is an abstract class that represents a class member in a Bantam source program. It is extended by the following: • Method A Method node represents a method from the Bantam source program. It extends Member
and contains a return type (String), a name (String), a list of parameters
(FormalList), and a list of statements (StmtList). • Field A Field node represents a field from the Bantam source program. It extends Member and contains a declaration type (String), a name (String), and an (optional) initialization expression (Expr). For fields without initialization expressions, the initialization expression is null. • Stmt A Stmt node is an abstract class that represents a statement in a Bantam source program. It is extended by the following: • ExprStmt An ExprStmt represents an expression statement from the Bantam source program. It extends Stmt and contains an expression (Expr). • DeclStmt A DeclStmt represents a declaration statement from the Bantam source program. It extends Stmt and contains a declaration type (String), a name (String), and a (nonoptional) initialization expression (Expr). • IfStmt An IfStmt represents an if statement from the Bantam source program. It extends Stmt and contains a predicate expression (Expr), a then statement (Stmt), and an optional else statement (Stmt, which can be null). 73
• WhileStmt A WhileStmt represents a while statement from the Bantam source program. It extends Stmt
and contains a continuation expression (Expr) and a body statement (Stmt).
• ForStmt A ForStmt represents a for statement from the Bantam source program. It extends Stmt and contains an optional initialization expression (Expr, which can be null), an optional continuation expression (Expr, which can be null), an optional update expression (Expr, which can be null), and a body statement (Stmt). • BreakStmt A BreakStmt represents a break statement from the Bantam source program. It extends Stmt
and contains no additional fields.
• ReturnStmt A ReturnStmt represents a return statement from the Bantam source program. It extends Stmt
and contains an optional return expression (Expr, which can be null).
• BlockStmt A BlockStmt represents a block statement from the Bantam source program. It contains a list of expressions (StmtList). • Expr An Expr node is an abstract class that represents an expression in a Bantam source program. It is extended by the following: • AssignExpr An AssignExpr represents an assignment expression (where the assigned variable is not an indexed array) from the Bantam source program. It extends Expr and contains an optional reference object (String, which can be null), a lefthand variable name (String), and a righthand expression (Expr). • ArrayAssignExpr An ArrayAssignExpr represents an array assignment expression from the Bantam source program. It extends Expr and contains an optional reference object (String, which can be null), a lefthand array variable name (String), an index expression (Expr), and a righthand expression (Expr). 74
• DispatchExpr A DispatchExpr represents a dynamic dispatch expression from the Bantam source program. It extends Expr and contains an optional reference object (Expr, which can be null),
a method name (String), and a list of arguments (ExprList).
• CastExpr A CastExpr represents an explicit cast expression from the Bantam source program. It extends Expr and contains a target object type (String), an expression to cast (Expr), and a flag (boolean) indicating whether it is an upcast or a downcast. • InstanceofExpr A InstanceofExpr represents an instanceof operation in a Bantam source program. It extends Expr and contains an expression to test (Expr) and an object type (String). • BinaryExpr A BinaryExpr is an abstract class that represents all binary expressions where the left and right operands are both expressions (i.e., not casts or instanceof). It extends Expr and contains a lefthand expression (Expr) and a righthand expression (Expr). It is extended by the following: • BinaryArithExpr A BinaryArithExpr is an abstract class that represents binary arithmetic expressions. It extends BinaryExpr. It is subclassed by the following: • BinaryArithPlusExpr A BinaryArithPlusExpr represents an addition (‘+’) expression. • BinaryArithMinusExpr A BinaryArithMinusExpr represents a subtraction (‘-’) expression. • BinaryArithTimesExpr A BinaryArithTimesExpr represents a multiplication (‘*’) expression. • BinaryArithDivideExpr A BinaryArithDivideExpr represents a division (‘/’) expression. • BinaryArithModulusExpr A BinaryArithModulusExpr represents a modulus (‘%’) expression. • BinaryCompExpr 75
A BinaryCompExpr is an abstract class that represents binary comparison expressions. It extends BinaryExpr. It is subclassed by the following: • BinaryCompEqExpr A BinaryCompEqExpr represents an equivalence (‘==’) expression. • BinaryCompNeExpr A BinaryCompNeExpr represents a not equals (‘!=’) expression. • BinaryCompLtExpr A BinaryCompLtExpr represents a less than (‘=’) expression. • BinaryLogicExpr A BinaryLogicExpr is an abstract class that represents binary boolean logic expressions. It extends BinaryExpr. It is subclassed by the following: • BinaryLogicAndExpr A BinaryLogicAndExpr represents a logical AND (‘&&’) expression. • BinaryLogicOrExpr A BinaryLogicOrExpr represents a logical OR (‘||’) expression. • UnaryExpr A UnaryExpr is an abstract class that represents all unary expressions where the operand is an expression (i.e., not new). It extends Expr and contains an expression operand (Expr). It is extended by the following: • UnaryNegExpr A UnaryNegExpr represents a unary integer negation (‘-’) expression. • UnaryNotExpr A UnaryNotExpr represents a unary boolean complement (‘!’) expression. • UnaryIncrExpr 76
A UnaryIncrExpr represents a unary integer increment (‘++’) expression and contains a flag indicating whether it a prefix or postfix operation. • UnaryDecrExpr A UnaryDecrExpr represents a unary integer decrement (‘--’) expression and contains a flag indicating whether it a prefix or postfix operation. • ConstExpr A ConstExpr is an abstract class that represents all constant expressions. It extends Expr and
contains a constant value (String). It is extended by the following:
• ConstIntExpr A ConstIntExpr represents an integer constant (e.g., 12) expression. • ConstBooleanExpr A ConstBooleanExpr represent a boolean constant (e.g., true, false) expression. • ConstStringExpr A ConstStringExpr represent a string constant (e.g., “abc”) expression. • VarExpr A VarExpr represents a variable reference expression. It extends Expr and contains an optional reference object (Expr, which might be null) and a variable name (String). • ArrayExpr An ArrayExpr represents an array index expression. It extends Expr and contains an optional reference object (Expr, which might be null), a variable name (String), and an index expression (Expr). • ListNode A ListNode is an abstract class that represents a generic list of nodes in the AST. All lists of nodes must extend ListNode. These include the following: • ClassList A ClassList node extends ListNode and contains a list of Class nodes. • MemberList A MemberList node extends ListNode and contains a list of Member nodes.
77
• StmtList A StmtList node extends ListNode and contains a list of Stmt nodes. • ExprList An ExprList node extends ListNode and contains a list of Expr nodes. For more information on the API of each different class of AST node, view the API documentation off of the Bantam Java website at http://www.bantamjava.com/. Visitor pattern. The last data structure is the Visitor design pattern [13]. The Visitor pattern allows us to traverse a tree (such as an AST) from a separate class. Before describing how it works, let’s look at why we need it. In order to implement the various phases of the compiler (in the upcoming sections), it will be necessary to traverse the AST several times. For example, to print the AST (if the compiler option “-sp” or “-ss” is set), we must walk over each AST node and print out a representation of it. In Java, there are essentially two ways we can do this traversal. We will first discuss a na¨ıve approach and then discuss a better alternative. One approach is to add a method to each AST node that when called will print that particular node. The problem with this approach is that we have to add a method to every class in the ast package for printing that particular node. If printing was the only reason for traversing the AST then this solution might be acceptable. However, we will also need to traverse the AST to type check the program and to generate assembly code (and these might be further broken down into multiple traversals). Therefore, we would have to add a lot of code to each of the classes in the ast package (and there are more than 50 classes in the ast package!). Furthermore, in this approach, we are mixing functionality into the same classes. The AST classes should only contain code for representing a node in the abstract syntax tree. It should not contain code for printing the AST, or performing semantic analysis, or performing code generation. Imagine that we used this approach, and we wanted to make a small change to the semantic analyzer. This change could require making modifications to each class in the ast package! A better alternative is to put the traversal code in a separate class. If we are traversing the AST in order to type check it, then that class would be a part of the semant package. But care needs to be taken in designing this traversal code. For example, many AST nodes contain sub-nodes whose exact dynamic type is unknown. An if statement has a predicate sub-node, which has static type Expr. This sub-node could actually be an instanceof expression, a == expression, or any other 78
type of expression. We could potentially have some large nested case statements that perform the appropriate actions based on the dynamic type of each sub-node. This would quickly become far too error-prone and nearly impossible to maintain. Instead, we can use the Visitor pattern, which works as follows. We first build an abstract class called Visitor. Every class that needs to traverse the AST extends Visitor. The Visitor class defines a visit method for each type of AST node. For example, here is the visit method for BinaryArithPlusExpr:
public Object visit(BinaryArithPlusExpr node) { node.getLeftExpr().accept(this); node.getRightExpr().accept(this); return null; }
This method gets the left and right expressions and calls an accept method on each. This accept method must be added to each class in the ast package, however, it only has to be done once, rather than each time we want to do a different traversal. The accept method works as follows: public Object accept(Visitor v) { return v.visit(this); }
By calling visit and then accept, we can vector back into the appropriate visit method for the sub-node. For example, if the left-hand expression of the BinaryArithPlusExpr were a ConstIntExpr, then after calling visit on the left-hand expression, and then accept in ConstIntExpr, we would end up in the method visit(ConstIntExpr node). Essentially, we are simulating multiple dispatch with single dispatch. We need to call a method based on both the runtime type of a node in the AST as well as a particular type of visitor. Since Java only supports single dispatch, we can achieve this by first dispatching into the particular AST node, and then dispatching back into the visitor object. To build a new visitor class (for example, one that performs type checking), you will need to extend Visitor. You can then override each visit method with a method that traverses the AST and performs the additional functionality (e.g., type checking). As stated earlier, you will need to do this when type checking the program during semantic analysis and when generating code
79
during code generation. In fact, each phase, i.e., semantic analysis and code generation, may require multiple visitors. To view an example visitor, look at the PrintVisitor class in the visitor package, which traverses the AST and prints each node. Your visitors will look structurally similar to PrintVisitor.
4.3
Last Words
This section has given an overview of the Bantam Java compiler, which translates Bantam Java source code into assembly code. The student is responsible for implementing a working compiler, which must follow the language specifications layed out in the previous section and must use the data structures and code structure layed out in this section. In addition to these requirements, the assembly code generated by the student’s compiler must interoperate with the runtime library code for handling memory allocation and deallocation, and built-in class methods, among other things. This is the topic of the next section.
80
5
Bantam Java Runtime System
This section describes the Bantam Java runtime system for the MIPS and x86 targets. If you are generating code for the Java Virtual Machine (JVM) then you can skip this section. For JVM the runtime library is very simple; it contains class files representing the TextIO and Sys built-in classes (all other functionality is already built in to the JVM itself). On the other hand, the runtime system for the MIPS and x86 targets are more complicated. They contain assembly code for performing various tasks such as garbage collection and error handling (among others). For MIPS and x86, in order to use the runtime system (i.e., if you do not want to write your own runtime system), your compiler must use the same calling conventions and follow a specific format for encoding objects and primitives in memory. The runtime system is provided with the Bantam Java compiler in the lib/ directory within the main Bantam Java installation directory. If you are generating code for MIPS/SPIM then the runtime system is contained within the file exceptions.s. If you are generating code for x86/Linux then the runtime system is contained within the file runtime.s. Below we discuss each of the responsibilities of the runtime system, the calling conventions, and the format for encoding objects and primitives.
5.1
Runtime System Responsibilities
The runtime system contains assembly code for initiating the program, performing memory management, executing the built-in methods (e.g., Object.clone, String.concat), and for error handling. Program initiation. The compiled program begins executing in an initial subroutine within the runtime system ( start for Mips, main for x86). This subroutine does some initialization of runtime system data structures, and then calls the main method within the Main class, which is assembly code compiled by your compiler, i.e., it’s not part of the runtime system. Memory management. The runtime system also contains several subroutines for allocating and deallocating memory. Deallocation is done via a simple, mark-and-sweep garbage collector, unless garbage collection is disabled in which case there is no deallocation. None of the methods have to be called by the compiled code, they are called automatically every time an object is created (below, we discuss how to create objects). Built-in methods. The runtime system also contains the assembly code for every method of a 81
null pointer error
Null pointer referenced
No additional arguments
array index error
Array index out of bounds
Index passed in $t0 (Mips) or ebx (x86)
array size error
Illegal array size
Size passed in $t0 (Mips) or ebx (x86)
array store error
Array store error
Array type ID passed in $t0 (Mips) or ebx (x86),
class cast error
Class cast error
assigned object type ID passed in $t1 (Mips) or ecx (x86) Object ID passed in $t0 (Mips) or ebx (x86), target ID passed in $t1 (Mips) or ecx (x86) divide zero error
Divide (or mod) by zero
No additional arguments
Table 5: Bantam Java runtime system error subroutines. built-in class (methods within Object, Sys, String, and TextIO). Your compiler should not generate code for these methods. Error subroutines. Finally, the runtime system contains subroutines for handling errors. Most error handling subroutines are called automatically by code within the runtime system. There are some that must be called by your compiled code. These are shown in Figure 5. For example, if the program attempts to use a null object (e.g., dispatch on a null object), then the compiled code should call null pointer error, which prints an error message and exits. If the program attempts to store a value into an array, whose type does not conform to the dynamic base type of the array, then the compiled code should call array store error. All of these subroutines take as input the current line number and a pointer to a string representing the filename, so that the line number and filename can be printed in an error message. For a Mips target, the line number is passed via the $a1 register and the filename pointer is passed via the $a2 register. For the x86 target, the line number is passed by storing it to the memory address current line number and the filename pointer is passed by storing it to the memory address current filename ptr.
Both current line number and current filename ptr are defined within the
runtime system (and are globals). The line number and filename must also be set when dispatching to a method or when constructing an object, since either of these operations could result in a call to an error subroutine. In addition, some of the other subroutines take additional arguments. The error subroutines array index error and array size error take the illegal array index and size, respectively.
For Mips,
the index/size is passed via register $t0. For x86, the index/size is passed via register ebx. The error subroutine array store error takes two additional arguments: a numeric identifier that indicates the type of the lefthand array in the assignment and a numeric identifier that indicates the type of the righthand object in the assignment. These identifiers are used to print out the types in 82
the error message. For Mips, the array identifier is passed via $t0 and the righthand expression object identifier is passed via $t1. For x86, the array identifier is passed via ebx and the righthand expression object identifier is passed via ecx. The error subroutine class cast error takes two additional arguments: a numeric identifier that indicates the type of object being casted and a numeric identifier that indicates the target type in the cast expression. These identifiers are also used to print out the types in the error message. For Mips, the object identifier is passed via register $t0
and the target type identifier is passed via register $t1. For x86, the object identifier is passed
via register ebx and the target type identifier is passed via register ecx.
5.2
Calling Conventions
The Bantam Java runtime system uses precise calling conventions that must be followed in order for the compiled program to work correctly. These conventions are discussed below. Note that these conventions only apply to Bantam Java methods. The calling conventions for error subroutines are discussed in the previous subsection. Naming. Methods that are compiled to assembly subroutines are named using the format: .
where is the name of the class containing the method and
is the name of the method. The assembly subroutine for each built-in method follows this convention. So, for example, if you want to call the clone() method in the Object class at the assembly level, you would call Object.clone. The runtime system also assumes that your compiler uses this convention, although the only method it will need to call is main() in the Main class. It will assume the corresponding compiled subroutine is named Main.main. This subroutine label must also be global (using the “.globl Main.main” directive) to allow the runtime system access from another assembly file. Passing the reference object to the callee. Because Bantam Java does not support ‘static’ all methods calls are dispatches using a reference object. The reference object is an implicit argument and must be passed to the called method. As in Java, Bantam Java supports only call by value. For objects, it is the reference to the object that is copied not the object itself. In Mips this address is passed in the register $a0 and in x86 this address is passed in the accumulator register eax. Passing parameters to the callee. All other arguments are passed via the stack. Starting from the leftmost argument and proceeding to the rightmost argument, each actual parameter is evaluated
83
Numeric identifier Size in bytes Dispatch table pointer Value of field 1 Value of field 2 ... Value of field n
Figure 5: Bantam Java encoding of an object with n fields. and the result is pushed onto the stack. To push it onto the stack, the value is stored to the address held in the stack pointer and the stack pointer is decremented by one word (x86 actually has an instruction for performing a push). Passing the return value to the caller. The return value (if there is one) is passed via a register. In Mips it is passed via register $v0 and in x86 it is passed via the accumulator register eax.
5.3
Encoding Objects and Primitives
To use the runtime system, objects and primitives must be encoded using the format discussed below. Primitives. There are two types of primitives in Bantam Java: int and boolean. Nothing special needs to be done for int values. To generate a word (in assembly) with the value -10, the compiler would generate the following directive: .word -10
Assembly language does not have support for boolean values, so true and false must be encoded using numeric values. false is encoded using 0 and true is encoded using a non-zero value. Probably the best non-zero value to use for true is -1 (we leave it to the reader to figure out why). Objects. Figure 5 shows the encoding of an object. An object is encoded as a table with the following entries: (1) a numeric identifier that indicates the class or array type that the object was constructed from, (2) the size of the table in bytes, and (3) a pointer to the dispatch table (which are discussed below). The table also contains an entry per field defined (inherited or otherwise). If there are n fields then there are n words that follow the dispatch table pointer, each of which contains the value for the ith field. If a class has no fields then the dispatch table pointer is the last word in the object. In this case, the size of the object is 12 bytes. In general, for an object with n
84
.word 2 # String identifier .word 24 # size of object in bytes .word String dispatch table # pointer to String’s # dispatch table .word 4 # length of the string .byte 97 # ASCII encoding for ’a’ .byte 98 # ASCII encoding for ’b’ .byte 99 # ASCII encoding for ’c’ .byte 100 # ASCII encoding for ’d’ .byte 0 # null terminating byte .byte 0 # alignment byte .byte 0 # alignment byte .btye 0 # alignment byte
.word 2 # String identifier .word 24 # size of object in bytes .word String dispatch table # pointer to String’s # dispatch table .word 4 # length of the string .asciiz “abcd” # ASCII encoded “abcd”, # followed by null byte .align 2 # word align by padding # with null bytes
(a)
(b)
Figure 6: A string constant in Mips assembly code: (a) without the “.asciiz” and “.align” directives and (b) with the directives. fields (inherited or otherwise), the size of the object is 12+n*4. Order within the list of fields is important. First, the order of fields defined within the same class should be the same as the order that they appeared in the class declaration. More importantly, fields inherited from classes higher in the class hierarchy tree (i.e., closer to Object) should appear earlier in the list. If the program accesses a field in an object of type X, it should not matter whether the dynamic type of the object is X or some subtype of X; the field should reside at the same location in the object regardless of the dynamic type. By putting inherited fields earlier in the list, this property is guaranteed. Note: if an inherited field is redeclared, then it is treated as a separate variable, and so it has a separate entry in the list of fields. In this case, the static type of the object will determine which of the two fields is accessed at any point in the program. Strings. Strings have a slightly different format than other objects. This is because unlike other objects, the size of string objects can vary. The size of the object depends on the length of the sequence of characters. Like other objects, a string object contains an identifier, size, and dispatch table pointer. The fourth entry is the length of the string (in number of characters). Following that is a byte holding each character encoded in ASCII, followed by a null terminating byte (i.e., 0), and possibly followed by other null bytes so that the entire object is word-aligned. Figure 6(a) shows the assembly code in Mips for encoding the string “abcd”. If the ISA supports the directives “.asciiz” and “.align” (both Mips and x86 do), then we can use these to simplify 85
the assembly code as shown in Figure 6(b). The “.asciiz” directive automatically converts each character into the equivalent byte and terminates the string with a null byte. The “.align” directive automatically adds the necessary null bytes to word align the string object. Arrays. Arrays are similar to String objects. Like String objects the size varies from array object to array object. Each array contains one field length, which holds the size of the array. The elements of the array follow the length field. The size of the object is then 16 + length ∗ 4 (note: unlike String
objects each element takes a word in memory not a byte). Because the dispatch table of an
array type is the same as Object, an array types does not need a separate dispatch table. Instead, each array type can use Object’s dispatch table. Class name table. Your compiler will also need to generate a table that the runtime system uses for error reporting. Some error subroutines in the runtime system need to print class or array type names given an object (e.g., on a class cast error). To find the name, it uses a special table called class name table
(note: despite the name, this table is also for array types), which has an entry
for each built-in and user-defined class or array type. The table is indexed by the object identifier. Each entry contains a pointer to a string representing the name of the class or array type. Your compiler will have to generate the class name table as well as the strings for each class name, including strings for built-in classes. Object references and null. Objects are referred to using their memory address. An object reference (e.g., a variable) is simply a pointer in memory (a word) that contains the memory address of the object that it refers to. If an object reference is null, then the pointer contains the value 0. Therefore, testing for null is achieved by comparing the reference to 0. Dispatch tables. For each class, your compiler must generate a dispatch table, including for builtin classes. The dispatch table holds the addresses of every method that is visible from within that particular class. These should be named using the following format: dispatch table
In particular, the runtime system will need access to String’s dispatch table and will expect it to be named String dispatch table. In addition, the String dispatch table label will need to be made global (using “.globl”) to allow access from the runtime system. The dispatch table for each class contains memory addresses to all visible methods (inherited or otherwise). Each word in the dispatch table contains a memory address, specified as a label, to a particular method. As with the list of fields in an object, order within the dispatch table is 86
important. Methods from classes higher in the class hierarchy tree (i.e., closer to Object) should appear earlier in the dispatch table. The order of methods defined within a particular class should be fixed for each dispatch table. In the absence of redefined methods, the order is the same as the order in which the method was defined within the class. If an extended class redefines an inherited method, then the address of the redefined method is placed in the entry that originally contained the inherited method. A new entry is not created. This last requirement is important for handling inheritance and object casting. If an object is casted to a super type, and a method is called that was overriden in the extended class, then this encoding ensures that the overriden method is the method that is called. Object templates. Objects are not dynamically constructed from scratch. Instead, they are constructed from object templates. For each class, your compiler will generate an object template, including for built-in classes. These should be named using the following format: template
In particular, the runtime system will need access to String’s template and Main’s template, and will expect these to be named String template and Main template, respectively. In addition, these labels will also need to be made global (using “.globl”) to allow access from the runtime system. Each template is encoded using the format shown in Figure 5. The templates contain the numeric identifier corresponding to that particular object type, the size of the object in bytes, the pointer to the dispatch table, and the default value for each field in the class (0 for int, false for boolean, null
otherwise). When a new object is requested (using new), the template for the corre-
sponding object type is copied using the built-in subroutine Object.clone provided in the runtime library. Therefore, your compiler does not have to explicitly manage memory allocation. Instead, your compiler can use templates and Object.clone to construct new objects. Array construction is slightly more challenging than non-array object construction since the size of the constructed array can vary. However, by dynamically modifying the array template, we can use the same approach. Once the size of the array is known (which is not necessarily known until runtime), your compiler can compute the size of the array object in bytes and write this to the size entry in the array template. In addition, your compiler can write the length to the length field in the array template. The template can then be passed to Object.clone, which will copy the array. In fact, with arrays, it is easier to use a single template for all array types. The pointer to the dispatch table is the same for all array types (Object dispatch table). The numeric identifier, which
87
Object_template: 0 Object_dispatch_table:
12 Object_dispatch_table
Object.clone
Foo_template:
class Foo { int field1; boolean field2; void method1() { ... } void method2() { ... } } class Goo extends Foo { String field3; boolean field1; void method3() { ... } void method2() { ... } }
(a)
1 20
Foo_dispatch_table:
Foo_dispatch_table
Object.clone
0 (field1)
Foo.method1
0 (field2 - false)
Foo.method2
Goo_template: 2 Goo_dispatch_table:
28 Goo_dispatch_table
Object.clone
0 (field1)
Foo.method1
0 (field2 - false)
Goo.method2
0 (field3 - null)
Goo.method3
0 (field1 - false)
(b) Figure 7: Some example templates and dispatch tables. (a) shows some Bantam Java code (which is incomplete) and (b) shows the templates and dispatch tables for three of the classes: Object, Foo, and Goo. indicates the object type, does vary, however, it can be written during array construction. Since the size and length must be modified anyway, this adds very little additional overhead. This approach is used in the reference compiler. Object initialization. Your compiler will also need to generate subroutines for initializing an object based on the initialization expressions of each field within the object. These should be named using the following format: init
In particular, the runtime system will need access to Main’s initialization subroutine in order to 88
create a Main object during program initialization. In addition, the Main init label will need to be made global (using “.globl”). After constructing an object (which is discussed above), the corresponding initialization subroutine is called. The initialization subroutine will execute each field’s initialization expression and assign the resulting value to the corresponding field. Fields should be initialized in the same order in which they are defined within a class. Fields inherited from classes higher in the class hierarchy tree (e.g., closer to Object) should be initialized earlier than those from classes lower in the tree. However, an initialization subroutine does not have to directly initialize inherited fields. Instead, it can call the initialization subroutine for the parent class (which can call the initialization subroutine of its parent class, and so forth). Example. Figure 7(a) shows part of a (contrived) program. Figure 7(b) shows graphically three of the object templates and three of the dispatch tables that are generated by the compiler (note: other templates and dispatch tables would also be generated). Note that the method method2 in class Foo is overriden in class Goo. It appears in the same place in the dispatch table in the Goo dispatch table as it does in the Foo dispatch table, however, in the Goo dispatch table it points to the method in Goo rather than in Foo. Note also that the field field1 is redefined in class Goo. With fields, the redefined field does not replace the existing field. Instead a new entry is made for the redefined field. When executing code in class Goo, the second entry is used when field1 is referenced. Alternatively, when executing code in class Foo, the first entry is used when field1 is referenced.
5.4
Last Words
Over the past three sections, we looked at the Bantam Java language, compiler, and runtime system. If you are implementing an optimization component (an optional project), you will want to read the next section, which describes the Bantam Java optimization component. If not, then you are now ready to write your very own compiler. You can skip the next section and proceed to the following four sections where you will build the four components of a (non-optimizing) Bantam Java compiler: a lexer (Section 7), parser (Section 8), semantic analyzer (Section 9), and code generator (Section 10).
89
Figure 8: Bantam Java compiler phases including the optimizer.
6
Bantam Java Optimizer
This section describes the Bantam Java optimization component within the compiler. This section first gives an overview of the optimizer and then discusses the intermediate representation used by the optimizer. This section should be read after Sections 3-5. Moreover, the optimizer is an optional project so you should read this section only if you are doing the optimization project (described in Section 11).
6.1
Overview
As shown in Figure 8, the optimizer is a fifth phase in the Bantam Java compiler, which is positioned between the semantic analyzer and code generator. It takes as input the program represented as an abstract syntax tree (AST) and returns an optimized representation of the program. The program representation returned by the optimizer is a control flow graph [2, 22, 8, 19]. The Bantam Java optimizer focuses solely on reducing the overall execution time of the running program. Although commmercial compilers sometimes do other types of optimizations (e.g., optimizing for code size or power), these are ignored in the Bantam Java compiler. Optimization is performed on all user-defined Bantam Java methods as well as all initialization subroutines (see Section 5 for details on initialization subroutines). The built-in Bantam Java methods, error subroutines, and other code, which are a part of the runtime system are not optimized. In addition, the layout of the data section in the final generated assembly code is also not optimized. Optimization is enabled and disabled on the command-line by the user (see Section 2 for details on the compiler command-line options). If enabled, the user sets the optimization level: 1-4 (0 for no optimization). Based on the specified optimization level, the optimizer performs the following tasks. If the optimization level is greater than or equal to 1, then the optimizer converts the AST into a control flow graph and sends this control flow graph (as opposed to the AST)on to the code generator. If the level is exactly 1, then no actual optimization is done, just the program representation conversion. If the level is greater than 1, then some high-level transformations are
90
done in the process of converting the AST into a control flow graph (e.g., converting dynamic dispatches into direct calls when the called method is unambiguous). If the level is 2, then these are the only optimizations that are done. If the level is 3, then some low-level optimization is applied to the control flow graph (i.e., common subexpression elimination [2, 22, 8, 19]). The low level optimization makes use of a data flow analysis. Finally, if the optimization level is 4, then any additional optimizations (high- or low-level) are applied to both the AST as it is converted to a control flow graph and to the control flow graph, itself. The resulting control flow graph is passed to the code generator, which uses this representation to generate the final assembly code. The control flow graphs are passed to the code generator via the method symbol tables of each class. Each user-defined method is added to the method symbol table belonging to the class in which the method is defined. Likewise, the initialization subroutine is added to the method symbol table for the corresponding class. In both cases, the lookup key should be the final name used in the generated code (e.g., Main.main, Main init). See Section 5 on the runtime system for details on the naming of user-defined classes and initialization subroutines. The value added to the symbol table is simply the entrance node of the control flow graph.
6.2
Naming Scheme
Variables in the optimized representation must follow a specific naming scheme in order for the code generator to work correctly. In particular, the optimized representation does not contain scopes, therefore, it must be clear when a variable such as foo is used, the type of the variable: a local, a parameter, or a field. To distinguish between these different types of variables a special suffix is added to all variable names. For instance, the string “@l” (without the quotes) is added to all local variable names. If a variable foo is declared locally (within a method) then it is referred to as foo@l within the opimized representation. For formal parameters, the string “@p” (without the quotes) is added to the name. If goo is a formal parameter then it is referred to as goo@p in the optimized representation. For fields, the string “@f ” (without the quotes) where is replaced with the class name in which the field was defined. If boo is a field defined in the class Main, then it is referred to as boo@f Main in the optimized representation. In addition, the optimizer will need to generate some of its own temporary variables. These are named as “@t” (without the quotes) where is replaced with some non-negative integer. For temporary variables, there is no prefix in the name (since it did not come from a source 91
variable) just the suffix. For example, @t0 and @t15 are two different legal optimizer variables. There is only one exception to this naming scheme: this. The special variable this does not require any suffix as it is unambiguous. On the other hand, the reference super cannot be used in the optimized representation. However, it is also not necessary. For example, assume the source program references a hidden field x using super from a parent class Parent. This code (super.x) gets replaced with x@f Parent, which is still correct. If super is used to dispatch to an overriden method then this a direct call can be used to call the correct method in the parent. Constants in the optimization representation are the same as in the source program. For example, 1 and 501 are legal int constants; true and false are legal boolean constants; and “abc” and “” are legal String constants. In the optimized program representation, null is treated as a constant. It can be referred to simply as null.
6.3
Control Flow Graph
The optimizer converts the AST representation of the program (performing some high-level optimizations while doing this translation) into a control flow graph [2, 22, 8, 19]. This representation is contained in the package cfg. A control flow graph has nodes containing basic blocks and directed edges that indicate control transfers between blocks. A basic block is just a list of instructions with no interior control flow (only the last instruction can be a control instruction, control can only transfer to the first instruction). The instructions within the basic blocks are three-address code (3-AC) instructions. A 3-AC instruction is effectively a low-level but machine-independent instruction. For more details on control flow graphs, basic blocks, or 3-AC instructions see a compiler textbook [2, 22, 8, 19]. Basic blocks. Basic blocks in the Bantam Java compiler are represented by a class BasicBlock within the cfg package. To form a control flow graph, basic blocks are linked together. Each basic block has a set of out edges to successor blocks (i.e., blocks that could immediately follow it in some execution of the program). Each block also has a set of in edges to predecessor blocks. The out and in edges can be retrieved, set, removed, etc. When an out edge in block A is set to block B,
the corresponding in edge in B is also set to A. Likewise, when setting in edges. Therefore, you
need only set an out edge from one block to another or the equivalent in edge but not both. Each control flow graph has an entrance (or starting) basic block. This is the first basic block that is executed in the control flow graph. It should have no in edges. All other blocks should be 92
Class
Instruction
Example Use
If
Conditional branch
Call
Indirect call
if (@t0 < @t1) goto bb5 @t1 = indircall @t0, 3 @t1 = dircall Main.foo, 3 stdparam @t0 refparam @t0 errparam linenum 3 return @t0 @t0 = @t1 @t0 = 5 @t0 = TextIO init @t0 = @t1[3] @t0[3] = @t1 @t0 = - @t1 @t0 = ! @t1 @t0 = @t1 + @t2 @t0 = @t1 - @t2 @t0 = @t1 * @t2 @t0 = @t1 / @t2 @t0 = @t1 % @t2 @t0 = @t1 && @t2 @t0 = @t1 || @t2
Direct call Standard parameter Parameter
Reference parameter Error parameter
Return
Return Load variable Load constant
Load
Load address Load entry
Store
Store entry
Unary
Negation Not Addition Subtraction Multiplication
Binary
Division Modulus AND OR
Table 6: Three-address code instructions. reachable via the entrance block. As a result, the entrance block is used to represent the entire control flow graph. To add the control flow graph to the method symbol table, you should simply add the entrance block. Each basic block contains a list of 3-AC instructions, which can be retrieved, set, removed, etc. Table 6 shows the various 3-AC instructions supported by the Bantam Java compiler. Each 3-AC instruction is defined in a separate Java class within the cfg package. Each of these classes is a subclass of the generic class TACInst (short for Three-Address Code Instruction). There are eight classes of instructions described below. If instruction. First, there is an if instruction (IfInst) for performing conditional branches. The if instruction compares two operands and based on the comparison branches to one of two basic blocks. The comparison can be any one of the following: =, !=, =. More complicated predicates must be split into several instructions. In the example in Table 6, the instruction will branch to basic block bb5 if the value in the temporary variable @t0 is less than @t1, otherwise, it will fall through to the next basic block.
93
Call instructions. There are two types of call instructions: an indirect call (InDirCallInst) and a direct call (DirCallInst). Both classes representing each call extend a generic call class (CallInst), which contains the shared functionality. The indirect call can be used to call an address within a variable (like the call in a dynamic dispatch). The direct call can be used to jump to a specific target label. Both calls have an optional destination variable (null if unused) where the result of the call can be saved. Both calls also take the number of parameters required by the called method. Unlike in a source language dispatch, the reference object must be passed explicitly and it must be included in the parameter count. In fact, because Bantam Java has only instance methods, if at least one parameter is used, then this must include a reference parameter. In other words, all Bantam Java methods will have a parameter count of at least one. Only error subroutines (called when an error occurs such as a null pointer error) will have a 0 parameter count. In the examples in Table 6, the indirect call instruction will call the method whose address is stored in variable @t0. The value returned from the called method will be written to variable @t1. The called method has 3 parameters (1 reference and 2 standard). The direct call instruction is similar to the indirect call instruction except that it directly calls method Main.foo. Parameter instructions. There are also instructions for passing parameters to a called method. There are three types of parameter instructions: standard parameter (StdParamInst), reference parameter (RefParamInst), and special error subroutine parameters (ErrParamInst). All three classes representing each parameter instruction extend a generic class (ParamInst), which contains the shared functionality. Standard parameter instructions are used for passing conventional parameters (non-reference) to the called method. Reference parameter instructions are used for passing the reference parameter to a called method. In both instructions, the passed value must be either a variable (possibly a temporary variable generated by the optimizer) or a constant. Actual parameter expressions that are more complicated than this must be split into several instructions. In the examples in Table 6, the standard and reference parameters pass the values stored in variable @t0 to the called method. The legal ordering of standard and reference parameters is rigid. The reference parameter must come first followed by the standard parameters in the same order that they appear within the source program. Only one reference parameter can be used per called method. If any standard parameters are supplied, then a reference parameter must also be supplied (as all methods in Bantam Java are instance methods).
94
The error parameter instructions are for passing special error values to an error subroutine, which must be called when particular errors occur in the program, such as dispatching on a null object. These error subroutines are described in more detail in Section 5. Each subroutine needs to print out information about the error, such as the source line number where it occurred. This information is passed to the subroutine via the error parameters. There are six types of error parameters: filename, line number, object ID, target ID, array index, and array size. The first two are required in order to call any error subroutine. The others are needed for specific error subroutines. See Section 5 for more details. The passed value in the error subroutine must be a variable (possibly a temporary variable generated by the optimizer) or a constant. In the example in Table 6, the error parameter instruction passes line number 3 to the called error subroutine. Return instruction. A return instruction (ReturnInst) is used for returning from a method. It contains an optional return value (null if unused). This value can be either a variable (possibly a temporary variable generated by the optimizer) or a constant. In the example in Table 6, the return instruction returns the value stored in variable @t0 to the call site. Load instructions. There are several load instructions for loading values into a variable (possibly a temporary variable generated by the optimizer). All of the classes representing these loads extend the class LoadInst, which contains the shared functionality. There is a load variable instruction (LoadVarInst) for copying the value from one variable to another. In the load variable example in Table 6 variable @t0 is assigned to the value in variable @t1. There is also a load constant instruction (LoadConstInst) for loading a constant into a variable. In the load constant example in Table 6, variable @t0 is assigned the value 5. Load constant instructions can also be used with boolean and String
constants. There is also a load address instruction (LoadAddrInst) for loading the address
of a label into a variable. In the load address example in Table 6, variable @t0 is assigned the address of the label TextIO init. Finally, there is a load entry instruction (LoadEntryInst) for loading an entry within a variable. For example, if the source variable is an object, this instruction can be used to access entries within the object, such as the dispatch table pointer (see Section 5 for details on the encoding of objects). This last load instruction has an additional argument: the index of the entry that you want to load. In the example in Table 6, variable @t0 is assigned the value at index 3
within variable @t1. Note: @t1 must refer to a structure that can be indexed such as an object.
Note also: the index should not depend on the word size of the target machine. Store instruction. There is one store instruction for setting an entry within a variable. This works 95
like the load entry instruction. In the example in Table 6, entry 3 within the structure referred to by variable @t0 is assigned the value in variable @t1. Unary instructions. There are two unary instructions for setting a variable (possibly a temporary variable generated by the optimizer) to the result of a unary operation. Both classes representing unary operations extend the class UnaryInst, which contains the shared functionality. There is a negation instruction (UnaryNegInst) for negating an int variable or constant, and putting the result in a variable. There is a not instruction (UnaryNotInst) for complementing a boolean variable or constant, and putting the result in a variable. In the examples in Table 6, the unary instructions perform the operation on the value in variable @t1 and put the result in variable @t0. Binary instructions. There are seven binary instructions for setting a variable (possibly a temporary variable generated by the optimizer) to the result of a binary operation. All of the classes representing binary operations extend the class BinaryInst, which contains the shared functionality. There are five instructions for performing arithmetic operations: addition (BinaryAddInst), subtraction (BinarySubInst), multiplication (BinaryMulInst), division (BinaryDivInst), and modulus (BinaryModInst). Each of these instructions performs the corresponding operation on two source operands, which can be either an int variable or int constant. There are also two instructions for performing boolean logic operations: AND (BinaryAndInst) and OR (BinaryOrInst). Both instructions performs the corresponding operation on two source operands, which can be either a boolean variable or boolean constant. In the examples in Table 6, the binary instructions perform the operation on the values in variable @t1 and @t2, and put the result in variable @t0. You may notice that there is no unconditional goto or jump instruction. These are handled implicitly by linking basic blocks. If a basic block has one out edge to another basic block and the code for the successor block does not immediately follow the former block, then an unconditional jump is automatically inserted. Therefore, you need only correctly link basic blocks. Furthermore, linking basic blocks must always be done explicitly. This is not always obvious. For instance, an if instruction (IfInst) contains the blocks that are branched to when the comparison condition is true and when it is false. Even still, the block containing the if instruction must still be linked to these succesor blocks. A block without the correct linking will result in an error if printed or passed to the code generator. There are other correctness checks with regards to basic blocks and instructions. A basic block can have at most two out edges. If a block has two out edges, it must end with an if instruction. A 96
basic block with no out edges should end with either a return instruction or a call instruction to an error subroutine. In addition, an instruction cannot be added after an if instruction within a basic block since this instruction represents a control flow change. Every block must have at least one in edge except the starting block (otherwise, it would be unreachable). For more information on the API of each different 3-AC class and basic block, view the API documentation off of the Bantam Java website at http://www.bantamjava.com/.
6.4
Last Words
This section has given an overview of the Bantam Java optimizer, which performs various transformations on the program representation in order to reduce the overall execution time of the source program. The student is responsible for implementing a working optimizer, which must follow the specifications layed out in this section. You are now ready to implement the Bantam Java optimizer, which is the project described in Section 11.
97
Bantam Program
Lexer
Scanned Tokens
Parser
AST
Semantic Analyzer
Annotated AST
Code Generator
Assembly Code
Figure 9: Bantam Java compiler phases. The lexer phase is shaded.
7
Project 1: Building a Lexer
In the first project, you will build a lexer using an automatic scanner generator. You will need to complete the code within the lexer package of your compiler source code. Make sure that you have read Section 3 on the Bantam Java programming language and Section 4 on the Bantam Java compiler before starting this project.
7.1
Overview
The lexer is the phase of the compiler that builds tokens from a stream of characters. Figure 9 shows the lexer (shaded) along with the other compiler phases. The lexer matches on all keywords, identifiers, constants, and special symbols (e.g., ‘;’) in the program and builds a token for each match that is passed on to the parser for syntactic analysis. For example, if the lexer scans the text “ 99 ” (without the quotes), then it would pass an integer token to the parser. The lexeme (i.e., the matched text) of the token would be “99”. The lexer also removes all spaces, tabs, newlines, and comments from the program, simplifying the work of later compiler phases. Finally, the lexer finds all lexical errors, errors in the lexemes. For example, string constants cannot span multiple lines; a string that spans multiple lines is a lexical error. See a compiler textbook for more information on lexers [2, 22, 8, 19].
7.2
Files and Directories
All of the source code you will need to edit is within the lexer package. The particular files that you will need to modify depend on whether you’re using JLex or JavaCC to generate a lexer. JLex. If you’re using JLex then you will need to modify the file lexer.jlex (and only the file lexer.jlex).
This file contains an incomplete specification of the lexer, which you will need to
complete. See the JLex manual [7] for more information about building JLex specification files. There is also a (working) file called Token.java that contains a class for representing tokens. The lexer will need to pass a Token object to the parser, for each recognized token. See the API 98
documentation for how to construct a Token object. It will require knowing the identifier of the token, which can be found in the class TokenIds in the parser class. Tokens should still be sent to the parser even when errors are discovered. There is a special token identifier (LEX ERROR) that indicates a lexical error occurred. JavaCC. If you’re using JavaCC then you will need to modify the file lexer.jj (and only the file lexer.jj).
This file contains an incomplete specification of the lexer, which you will need to com-
plete. See the JavaCC manual [6] for more information about building JavaCC specification files.
7.3
Lexer Details
Your lexer must be able to handle the following types of tokens: • Special symbols (e.g., ‘{’, ‘}’, ‘;’, etc.) • Keywords (e.g., class, while, etc.) • Identifiers (e.g., foo, Foo, etc.) Identifiers are any non-keyword that starts with an uppercase or lowercase letter and is followed by a sequence of letters (upper or lowercase), digits, and ‘ ’. • Integer constants (e.g., 9, 32, etc.) Integer constants are any sequence of digits (with possibly leading zeros) that is between 0 and (231 − 1). Note: other integer constant forms such as hexadecimal are not supported. • Boolean constants (true or false) • String constants (e.g., “abc”) String constants start and end with double quotes. They may contain the following special symbols: \n (newline), \t (tab), \” (double quote), \\ (backslash), and \f (form feed). A string constant cannot exceed 5000 characters and cannot span multiple lines. Your lexer should remove all spaces, tabs, and newlines, as well as all comments. Bantam supports both multi-line comments (starting with /* and ending with */) and single line comments (starting with // and going until the end of the line). Your lexer should identify the following lexical errors:
99
• Unterminated multi-line comments • Unterminated string constants • String constants spanning multiple lines • String constants that are too long • Unsupported escape characters within a string (e.g., ‘\0’) • Integer constants that are too large • Unsupported characters (e.g., ‘?’, ‘@’) that are not within a comment or string constant
7.4
Testing the Lexer
You can test your lexer in one of two ways. First, you can supply the “-sl” flag to the Bantam compiler, which stops compilation after lexical analysis and prints the scanned tokens. You can compare the printed tokens with the printed tokens from the reference compiler. If they are different then this probably indicates an error in your lexer. A second way to test your lexer is to use the provided class files for performing syntactic and semantic analysis, and code generation, and fully compile some programs. If this produces incorrect assembly code, then this probably indicates an error in your lexer. As part of the assignment you should submit a Bantam soure program that tests your lexer (Test.btm). It should contain as many kinds of lexical errors as you can code in a single program. It should also contain each type of token. Important: take testing seriously in this project and all of the remaining projects. It is a critical part of the software design process. There is a strong correlation between students with working compilers and students who thoroughly test their code.
7.5
Last Words
Remember to start early on this project and all the remaining projects. It will take a significant amount of time (more than you probably think) and the sooner you finish the more time you can spend testing your lexer. Good luck and remember to have fun!
100
Bantam Program
Lexer
Scanned Tokens
Parser
AST
Semantic Analyzer
Annotated AST
Code Generator
Assembly Code
Figure 10: Bantam Java compiler phases. The parser phase is shaded.
8
Project 2: Building a Parser
In the second project, you will build a parser using an automatic parser generator. You will need to complete the code within the parser package of your compiler source code. Make sure that you have read Section 3 on the Bantam Java programming language and Section 4 on the Bantam Java compiler before starting this project.
8.1
Overview
The parser is the phase of the compiler that checks that the program is syntactically correct and, in addition, builds an internal representation of the program. Figure 10 shows the parser phase (shaded) along with the other compiler phases. The parser uses the lexer to build tokens from streams of characters (see Section 7). It then checks that these tokens form a syntactically correct sentence, i.e., a correct program. For example, if a Bantam program includes a class without an end brace (‘}’) the parser should catch this error, print an appropriate error message, and stop compilation after parsing is complete. As the parser is checking correctness, it builds an intermediate representation of the program. In the Bantam Java compiler, the program is represented using an abstract syntax tree, or AST. An AST has a node for every type of construct in the language (e.g., class, if statement, multiplication expression, int constant, etc.). These nodes may contain sub-nodes depending on the particular construct. For example, a class AST node contains a list of member definitions (methods and fields). See Section 4 for the details of the AST. If the program is syntactically correct then the AST representing the source program is passed on to later phases of the compiler (e.g., semantic analyzer, code generator). For more information on parsers and ASTs see a compiler textbook [2, 22, 8, 19].
101
8.2
Files and Directories
All of the source code you will need to edit is within the parser package. The particular files that you will need to modify depend on whether you’re using Java Cup or JavaCC to generate a parser. Java Cup. If you’re using Java Cup then you will need to modify the file parser.cup (and only the file parser.cup). This file contains an incomplete specification of the parser, which you will need to complete. See the Java Cup manual [14] for more information about building Java Cup specification files. JavaCC. If you’re using JavaCC then you will need to modify the file parser.jj (and only the file parser.jj).
This file contains an incomplete specification of the parser, which you will need to
complete. See the JavaCC manual [6] for more information about building JavaCC specification files.
8.3
Parser Details
Figure 11 shows a specification of the Bantam Java syntax. The specification is similar to a contextfree grammar, which is described in detail in any compiler textbook [2, 22, 8, 19]. This specification shows how we can generate any syntactically-correct program starting from the non-terminal P rogram. Note that the terminals identif ier, int const, boolean const, and string const are lexical tokens for identifiers (e.g., variable names, class names), int constants (e.g., 1, 29), boolean constants (e.g., true, false), and string constants (e.g., “abc”, “def”), respectively. Parser generators use context-free grammars to automatically construct a parser that can recognize syntactically-correct programs. You will write a specification for the context-free grammar in either the Java Cup or JavaCC format (depending on which parser generator you are using). You will then run the parser generator and build your Bantam parser by building the source (see Section 2 for details on building the source). Once you have a working specification, your parser should recognize any program that can be generated from this specification. Any program that cannot be generated from this specification is syntactically incorrect. For these programs, your parser should halt compilation and print out appropriate error messages. There are a few differences between the specification in Figure 11 and a context-free grammar. First,
[
and
]
(not to be confused with ‘[’ and ‘]’) are used to denote an optional sequence of
terminals and non-terminals within the righthand side of some production. Second, ∗ and + as
102
P rogram → Class+ Class → class identif ier
[
]
extends identif ier
{ M ember∗ }
M ember → M ethod | F ield M ethod → identif ier identif ier ( F ormal,∗ ) {Stmt∗ }
[
F ield → identif ier
] identif ier [ [ [ ] ] identif ier [ ]
F ormal → identif ier
= Expr
]
;
Stmt → ExprStmt | DeclStmt | If Stmt | W hileStmt | F orStmt | BreakStmt | ReturnStmt | BlockStmt ExprStmt → Expr ; DeclStmt → identif ier
[
[ ]
If Stmt → if ( Expr ) Stmt
] identif ier = [ else Stmt ]
Expr ;
W hileStmt → while ( Expr ) Stmt F orStmt → f or (
[
] ;[
Expr
Expr
] ;[
]
Expr
) Stmt
BreakStmt → break ; ReturnStmt → return
[
Expr
]
;
BlockStmt → { Stmt∗ } Expr → AssignExpr | DispatchExpr | N ewExpr | Instanceof Expr | CastExpr | BinaryExpr | U naryExpr | ConstExpr | V arExpr | ( Expr ) AssignExpr → V arExpr = Expr DispatchExpr →
[
Expr .
]
identif ier ( Expr,∗ )
N ewExpr → new identif ier ( ) | new identif ier [ Expr ] Instanceof Expr → Expr instanceof identif ier CastExpr → ( identif ier
[
[ ]
]
[
[ ]
]
) ( Expr )
BinaryExpr → BinaryArithExpr | BinaryCompExpr | BinaryLogicExpr U naryExpr → U naryN egExpr | U naryN otExpr | U naryIncrExpr | U naryDecrExpr ConstExpr → int const | boolean const | string const BinaryArithExpr → Expr + Expr | Expr − Expr | Expr ∗ Expr | Expr / Expr | Expr % Expr BinaryCompExpr → Expr == Expr | Expr ! = Expr | Expr < Expr | Expr Expr | Expr >= Expr BinaryLogicExpr → Expr && Expr | Expr || Expr U naryN egExpr → − Expr U naryN otExpr → ! Expr U naryIncrExpr → + + Expr | Expr + + U naryDecrExpr → − − Expr | Expr − − V arExpr →
[
identif ier .
]
identif ier
[
[ Expr ]
]
Figure 11: Bantam Java syntax specification. Non-terminals start with capital letters and terminals start with lowercase letters or a non-alphabetic character. P rogram is the starting non-terminal.
103
superscripts are used to denote zero or more occurrences or one or more occurrences, respectively. Finally, a comma as a subscript denotes comma-separated lists. A comma must appear between any two elements, but does not appear after the last element (if there are at least two elements – no comma is used for one or zero elements). You will need to figure out how to encode these into an unambiguous context-free grammar, which the parser generator will use to automatically construct the Bantam parser. Your parser generator (Java Cup or JavaCC) also allows you to execute programmer-specified Java code, called actions, whenever a particular production is applied. You will use this feature to perform syntax-directed translation, in this case, translating the Bantam source program into an abstract syntax tree. See the Java Cup or JavaCC manual for the details on how to define actions.
8.4
Error Handling
Error handling is an important component of the compiler. The compiler must identify errors and print meaningful error messages so that the Bantam programmer can fix any errors. At a bare minimum, if your parser encounters a token that it was not expecting, it should print “Unexpected token” along with the filename and line number where the error occurred. For extra credit, identify specific errors such as a missing return statement, a nested class or method, or an unterminated class. Your parser must halt compilation if at least one syntactic error is encountered, i.e., the semantic analyzer and code generator should not run. For syntactic analysis, it is enough to stop parsing after one error is encountered (this will not be acceptable for semantic analysis). Extra credit will be awarded to parsers that can catch multiple syntactic errors during a single compilation. You will need to be able to recover from an error in order to implement this feature. See the Java Cup or JavaCC manual for details on implementing error recovery. An ErrorHandler class is provided in the util package for printing and managing errors. See the API html documentation (click on class ErrorHandler) for details on using it.
8.5
Testing the Parser
You can test your parser in one of two ways. First, you can supply the “-sp” flag to the Bantam compiler, which stops compilation after syntactic analysis and prints the parsed program as a Bantam source program. You can compare the parsed program with the parsed program from 104
the reference compiler. If they are different then this probably indicates an error in your parser. A second way to test your parser is to use the provided class files for performing lexical and semantic analysis, and code generation, and fully compile some programs. If this produces incorrect assembly code, then this probably indicates an error in your parser. As part of the assignment you should submit two Bantam soure programs that test your parser (BadTest.btm and GoodTest.btm). The first, BadTest.btm, should contain as many kinds of syntactic errors as you can code in a single program. The second, GoodTest.btm, should contain a working Bantam source program that tests all of the Bantam syntax rules. Important: take testing seriously in this project. A parser is more complicated and thus more error-prone than a lexer, so be prepared to spend even more time debugging than in the previous project. Remember, testing is a critical part of the software design process. There is a strong correlation between students with working compilers and students who thoroughly test their code.
8.6
Last Words
Remember to start early on this project. It will take a significant amount of time (more time than the previous project) and the sooner you finish the more time you can spend testing your parser. Good luck and remember to have fun!
105
Bantam Program
Lexer
Scanned Tokens
Parser
AST
Semantic Annotated Analyzer AST
Code Generator
Assembly Code
Figure 12: Bantam Java compiler phases. The semantic analysis phase is shaded.
9
Project 3: Building a Semantic Analyzer
In the third project, you will build a semantic analyzer. You will need to complete the code within the semant package of your compiler source code. Make sure that you have read Section 3 on the Bantam Java programming language and Section 4 on the Bantam Java compiler before starting this project.
9.1
Overview
The semantic analyzer is the phase of the compiler that checks that the program is semantically correct. Your semantic analyzer will also annotate the intermediate representation with type information needed by the code generator, and will build a data structure for representing the class hierarchy tree, which is important for both semantic analysis and code generation. Figure 12 shows the semantic analysis phase (shaded) along with the other compiler phases. The semantic analyzer is passed the abstract syntax tree or AST (the intermediate representation) from the parser (see Section 8), assuming the program is syntactically correct. The semantic analyzer traverses the AST and checks that the program is semantically sound. For example, the semantic analyzer must verify that the operands in a multiplication expression both have type int (i.e., it must type check the expression). If this is not the case, then the semantic analyzer should catch this error, print an appropriate error message, and stop compilation after semantic analysis is complete. Therefore, in order to check that the program is semantically correct, your semantic analyzer will need to determine the type of each expression in the AST. The code generator also needs this information in order to generate correct assembly code. So it is the responsibility of the semantic analyzer to annotate each expression node with its discovered type. Because Bantam Java supports inheritance, to check that the program is semantically correct, your semantic analyzer will need a data structure for representing the class hierarchy tree (see Section 3 for a description of the class hierarchy tree). For example, if an expression with type A (an object type) is used at a place in the Bantam source program where type B (also an object type) 106
is required, this code is legal only if A is a subclass of B. With a data structure for representing the class hierarchy tree, this property can be verified. For more information on the theory of semantic analysis see a compiler textbook [2, 22, 8, 19].
9.2
Files and Directories
All of the source code you will need to edit is within the semant package. In particular, you will need to complete the file, SemanticAnalyzer.java, which contains some skeleton code for performing semantic analysis. You may also find it helpful to add other Java files to this package. For example, you might write a separate class (in a separate Java file) for traversing the AST and performing type checking (i.e., checking that types are used correctly within the program). In addition, you will find many of the files in the util and visitor packages useful, although you should not need to modify any of them. For example, in the util package, the file ClassTreeNode.java contains a class for representing nodes in the class hierarchy tree, the file SymbolTable.java contains a class for representing a symbol table, and the file ErrorHandler.java contains a class for managing and printing errors. In the visitor package, the file, Visitor.java contains an abstract class, which can be extended in order to traverse the AST using the visitor design pattern [13].
9.3
Semantic Analyzer Details
Your semantic analyzer will need to perform the following four steps: 1. Build a data structure representing the class hierarchy tree and check that it is well-formed (e.g., there are no cycles, no repeated classes, etc.). You should use the class ClassTreeNode in the util package for representing each node in the tree. Each node contains some metainformation about the class (e.g., a link to the parent and children nodes) and also the AST node for that particular class. The code generator takes the root of this tree (i.e., the Object node) as input. Note: array types do not need their own class tree nodes (in fact, the reference compiler does not create nodes for array types). By using the base type of an array, you will be able to determine, for example, whether one type conforms to another. 2. Build class environments. In order to type check the program (in the final step) you will need to know what methods and fields are defined in a particular class. For example, if 107
your semantic analyzer encounters x.foo() during type checking, where x has type X, your semantic analyzer will need to look up foo in class X and verify that it exists and it is used correctly. So in this step (2), you will add all class members (inherited or otherwise) to the class’s symbol table (using the symbol tables is discussed below). In addition, your semantic analyzer will need to check that methods and fields are defined correctly (e.g., there are no methods or fields defined with the same name). Note: you will not need to explicitly build the environment for array types as every array type has the same environment: a method clone
inherited from Object and a field length.
3. Check that the Main class is defined and contains a main() method, which has no parameters and no return value. Note: the Main class can extend another class and the main() method could be inherited. 4. Type check each field initialization expression and each method, annotating expressions as you type check. Anywhere a particular type is expected, you will need to verify that that type is used or a subtype is used (if the type is an object type). You will also annotate all expression nodes with their type, which is needed by the code generator. In addition, you will need to set a flag in cast and instanceof expressions, which indicates whether the cast/check is an upcast/upcheck (in which cast it is trivial to generate code for). Read Section 3 closely for details on the semantics of the Bantam Java language. For instance, Section 3 specifies the correct operand types for each particular expression. It also specifies the resulting type for each particular expression. In addition, Section 3 specifies the rules for method calls and for redefining methods and variables in an extended class. Data structures. Your semantic analyzer will need to build and use two important data structures: a class hierarchy tree and a symbol table. Both of these are provided in the util package. The class ClassTreeNode is used for representing a node in the class hierarchy tree. After (or while) checking that the class hierarchy tree is well formed, your semantic analyzer should then build a representation of the tree using ClassTreeNode. Each node in this tree contains all the information pertinent to that corresponding class including the name, the links to the parent and children class tree nodes, and a link to the AST node representing that class. The root of this tree, which is the node representing the built-in class Object, is passed to the code generator. See Section 4.2 or the API for more information on how to use this class. 108
The class SymbolTable is used for representing a symbol table. Each class tree node has two symbol tables: one for variables and one for methods. Variables and methods can be added to these symbol tables in order to later type check the program. For example, during type checking, if your semantic analyzer encounters an assignment to a variable x, it can look up x in the variable symbol table to make sure that it exists and that the type matches the type on the righthand side of the assignment. A similar strategy can be used when your semantic analyzer encounters a method call. These symbol tables support inheritance; each symbol table has a link to the corresponding symbol table in the parent class. When looking up a variable or method, first the current class’s symbol table is searched, and then if the symbol is not found, the parent class’s symbol table is searched. This process continues until the top of the class hierarchy tree is reached. The symbol table also supports nested scopes. For example, a block statement defines a new nested name space (nested within the current name space). When searching for symbols in the symbol table, your semantic analyzer can search either in the current scope (called a peek) or in any scope (called a lookup). See Section 4.2 or the API for more information on how to use this class. Visitor pattern. Your semantic analyzer will need to traverse the abstract syntax tree (AST) in order to perform semantic analysis. While you should not walk the AST needlessly, do not feel as though you need to optimize the total number of traversals (perhaps, by combining multiple traversals into one). Such optimizations will not reduce the compile time by all that much in most cases, and the performance of the compiler is generally not critical (as opposed to the performance of the compiled code). One approach might be to traverse the AST once and build the symbol tables for each class (bullet two in the four steps described above) and a second time to type check each class (bullet four in the four steps described above). As described in Section 4.2, the best approach for traversing an AST from a software engineering perspective is to use the visitor design pattern. This approach allows us to keep the AST functionality separate from the semantic analysis functionality. It also makes it easier to modify and maintain the semantic analyzer. A change in the semantic analyzer has no impact on the AST, which is important since there are more than 50 classes representing each particular type of AST node. To write a visitor class, you will write a class that extends the abstract class Visitor. This class will override each visit method with a method that traverses the AST and performs the ad-
109
ditional functionality (e.g., type checking). For an example, look at the PrintVisitor class in the visitor package, which traverses the AST and prints each node. For a more detailed description of the visitor design pattern, see Section 4.2.
9.4
Error Handling
Like in the parser, error handling is an important component of the semantic analyzer. The compiler must identify errors and print meaningful error messages so that the Bantam programmer can fix any errors. Unlike with parsing, error identification in the semantic analyzer should be more precise and more thorough. Your semantic analyzer should find all semantic errors within the program, assuming that one error does not hide another error. For example, imagine a programmer attempts to call a method foo, which takes an int as a parameter, and mistakenly mistypes the method name and forgets to pass any parameter in the call. Only the first error can be discovered in this case, the second error will only be discovered after the programmer fixes the first error. But excluding errors hidden by other errors, your semantic analyzer should find all semantic errors within the program. For each discovered error, you should print a meaningful error message and also print the filename and line number where the error occurred. For semantic analysis, unlike syntactic analysis, it is usually much easier to give a precise error message. Run the reference compiler (discussed underneath the heading “Testing the Semantic Analyzer”) to see some examples of good error messages. An ErrorHandler class is provided in the util package for printing and managing errors. See the API documentation for details on using ErrorHandler.
9.5
Testing the Semantic Analyzer
You can test your semantic analyzer in one of two ways. First, you can supply the “-ss” flag to the Bantam compiler, which stops compilation after semantic analysis and prints the intermediate representation as a Bantam source program. Annotations (i.e., expression types) are provided within comments in the source program. You can compare this output with the corresponding output from the reference compiler. If the output is different then this probably indicates an error in your semantic analyzer. A second way to test your semantic analyzer is to use the provided class files for performing lexical and syntactic analysis, and code generation, and fully compile some
110
programs. If this produces incorrect assembly code, then this probably indicates an error in your semantic analyzer. Important: take testing seriously in this project. A semantic analyzer is more complicated and thus more error-prone than a parser or a lexer, so be prepared to spend even more time debugging than in the previous two projects. Remember, testing is a critical part of the software design process. There is a strong correlation between students with working compilers and students who thoroughly test their code. As part of the assignment you should submit two Bantam soure programs that test your semantic analyzer (BadTest.btm and GoodTest.btm). The first, BadTest.btm, should contain as many kinds of semantic errors as you can code in a single program. The second, GoodTest.btm, should contain a working Bantam source program that tests all (or most) of the Bantam semantic rules described in Section 3.
9.6
Last Words
Remember to start early on this project. It will take a significant amount of time (more time than the previous two projects) and the sooner you finish the more time you can spend testing your semantic analyzer. Good luck and remember to have fun!
111
Bantam Program
Lexer
Scanned Tokens
Parser
AST
Semantic Analyzer
Annotated AST
Code Generator
Assembly Code
Figure 13: Bantam Java compiler phases. The code generation phase is shaded.
10
Project 4: Building a Code Generator
In the fourth and final core project, you will build a code generator. You will need to complete the code in one of the three code generator packages: codegenmips (if targeting MIPS), codegenx86 (if targeting x86), or codegenjvm (if targeting the JVM). Before starting this project, make sure that you have read Section 3 on the Bantam Java programming language, Section 4 on the Bantam Java compiler, and most importantly, Section 5 on the Bantam Java runtime system.
10.1
Overview
The code generator is the final phase of the compiler that takes as input the internal representation of the program and produces the target code (either assembly code or text-based java bytecode, depending on the target). Figure 13 shows the code generation phase (shaded) along with the other compiler phases. The code generator is passed the root node of the class hierarchy tree from the semantic analyzer. From the root node, we can of course reach any other class tree node. Each node contains meta-information about the class as well as a link to the AST node representing that particular class. Any expression AST nodes embedded within the class AST node is annotated with its type, which was done by the semantic analyzer. The code generator can assume that the program it is passed is a legal, Bantam program. The code generator traverses the class hierarchy tree and AST nodes (perhaps, multiple times) and generates target code. For more information on the theory of code generation see a compiler textbook [2, 22, 8, 19].
10.2
Files and Directories
All of the source code you will need to edit is within the codegenmips package, codegenx86 package, or codegenjvm package (depending on the particular target you are using). In particular, you will need to complete the file, MipsCodeGenerator.java, X86CodeGenerator.java, JVMCodeGenerator.java,
(again, depending on the target), which contains some skeleton code for performing code 112
generation. You may also find it helpful to add other Java files to this package. For example, you might write a separate class (in a separate Java file) for traversing each AST node and generating target code. In addition, you will find many of the files in the util and visitor packages useful, although you should not need to modify any of them. For example, in the util package, the file ClassTreeNode.java
contains a class for representing nodes in the class hierarchy tree and the file Symbol-
Table.java tor.java
contains a class for representing a symbol table. In the visitor package, the file, Visi-
contains an abstract class, which can be extended in order to traverse the AST using the
visitor design pattern [13].
10.3
MIPS/x86 Code Generator Details
If you are targeting MIPS or x86 then read this subsection for details on implementing your code generator. If you are targeting the JVM then skip this subsection and proceed to the next subsection. The code generator will need to work closely with the provided runtime system, which is discussed in Section 5. In particular, the code generator will need to use the same calling conventions as the runtime system and to encode data structures in memory as the runtime system expects. Many of the details are discussed in Section 5. Generated data/code. Your code generator will need to generate several different data structures and subroutines. The data structures must appear within the data section, i.e., they must follow the .data directive. The subroutines must appear within the text section, i.e., they must follow the .text
directive. A few of these are already implemented within the compiler, but most are not. In
particular, your code generator will need to generate the following: • Globals. Several of the data structures and subroutines discussed below must be made available to the runtime system. The data structures that must be made global include gc flag, class name table, Main template, String template,
and String dispatch table. The subrou-
tines that must be made global include Main init and Main.main. • Garbage collection. Your code generator will need to set a flag called gc flag to 1 or 0 depending on whether garbage collection is enabled or disabled, respectively. For example, if garbage collection is disabled, then the following code should appear in the data section:
113
gc flag:
.word 0
• String constants. Your code generator will need to scan the program to find all string constants (e.g., “abc”). For each string constant, you should generate a string object within the data section of the assembly program. Give each string constant a unique name. For example, you could use String const to name each string constant where is replaced with a unique numeric identifier. When that string constant is used in the program, you can use the address of the string object (which in assembly is simply the name). You will probably also need a data structure for mapping a string constant (e.g., “abc”) to its string object reference name (e.g., String const 5). As discussed in Section 5, you will also need to generate string objects for each built-in and user-defined class name as well as each program filename for use in error reporting. • Class name table. Your code generator will need to build a class name table (called class name table)
that contains pointers to the strings representing the class names. This
table is used by the runtime system for error reporting when a runtime error occurs. It is ordered by class identifier. For example, if the class Object has identifier 0, then a pointer to a string representing “Object” should be contained in the first entry. • Object templates. Your code generator will need to generate object templates (e.g., TextIO template)
for each built-in and user-defined class. These are used to construct new ob-
jects, i.e., they are cloned during object construction. See Section 5 for details on how to construct these templates. • Dispatch tables. Your code generator will need to generate dispatch tables for each builtin and user-defined class (e.g., String dispatch table). These are needed for implementing dynamic dispatch. See Section 5 for details on how to construct these tables. • Initialization subroutines. Your code generator will need to generate initialization subroutines for each built-in and user-defined class (e.g., Main init). These are called to initialize each field in an object after an object is constructed. See Section 5 for details on how to construct these subroutines.
114
• User-defined methods. Finally, your code generator will need to generate code for each user-defined method (e.g., Main.main). It will not need to generate code for built-in methods since these are defined within the runtime system. These methods should use the calling conventions discussed in Section 5. Traversing the AST. Your code generator will probably need to perform several traversals over the internal representation of the program. For example, you could traverse the program once to find string constants, a second time to generate initialization subroutines, and a third time to generate user-defined methods. Create visitor classes to traverse the program as in project 3. It is much easier to implement the code generator if you can generate the code for each node independently of where it is positioned in the AST. To do this you will have to set up some conventions between AST nodes. For example, if one expression is embedded within a larger expression (e.g., a variable within an multiplication expression) where can the encompassing expression (e.g., multiplication expression) expect the computed value from the inner expression (e.g., variable)? You should think carefully about this issue and related issues. Storing values. Another issue you will need to think about is where to store variables and other temporary values. Each variable or temporary value can either be stored in an available register or on the stack in memory. The easiest approach, and the one used by the reference compiler, is to put all variables and temporary values on the stack until they are needed in some computation (e.g., a multiplication operation). When they are needed, they can be retrieved from memory, put in a temporary register, and used in the computation. This approach avoids the complexities of register allocation. For extra credit (see below), you can look at implementing a more efficient approach. Regardless of where variables are stored, your code generator will need to keep track of their location. The symbol table, which you used in project 3 to keep track of types, can also be used to keep track of the location of each variable. To represent the location, you can use the Location class defined within the util package. Location can represent a location in memory or in a register. See the API for details. Testing conformance. One important task for your code generator is to generate code to test whether an object conforms to a particular type. This problem arises when the program executes an instanceof expression and when the program performs a down cast (to identify a cast error). In such cases, your generated code will need to use the numeric identifier that indicates the class that 115
an object was constructed from (see Section 5). This identifier can be compared with the identifier of the target type in either the instanceof expression or the cast expression. Unfortunately, this will not work in all cases. For example, the object’s dynamic type might be a strict subtype of the target type, in which case the identifiers will be different even though the object conforms to the target type. One solution is to compare the object’s identifier with the identifiers of all conforming types. But the cost of this check would depend on the number of conforming types and could be quite high in general. We can avoid this high-cost check if we use care in assigning numeric identifiers to object types. In fact, this check can be done in constant time. We leave this problem as an exercise to the student. Your generated code will also need to test conformance when assigning to an array element (to identify an array store error). This test is more difficult than in an instanceof or cast expression as the target type is not known statically. Instead, you will need to find the numeric identifier of the base type of the array given the numeric identifier of the array type. Again, if you use care with assigning numeric identifiers, then this can be done in constant time. Your generated code will then need to determine if the righthand value in the assignment conforms to this particular base type. This check will require at least one additional data structure. We also leave this problem as an exercise to the student. Error handling. Although the program was checked for lexical, syntactical, and semantic errors in previous phases, there are several errors that can still occur at runtime. Your code generator will also need to generate code to catch these runtime errors. These include: • Null pointer error. This error occurs when the program attempts to access a member of a null object.
• Array index error. This error occurs when the program attempts to index an array using an index that is out of bounds (i.e., < 0 or >=length). • Array size error. This error occurs when the program attempts to construct an array with an invalid size. If garbage collection is disabled, then the size must be >= 0. Otherwise, the size must be >= 0 and