“How To” Add a Course using UC's Online Registration System ...
Recommend Documents
Create your own Waseda-net ID for registration Without an ID, you CANNOT ... If your score meets the requirement, Englis
https://www.wsl.waseda.jp/syllabus/JAA101.php?pLng=en ..... that Japanese courses offered as language courses will be co
using the Web System. 1. Sequence for Course Registration using the Web
System. ○ Click "Menu for course guidance week" on the portal login screen,.
This Course Registration System is a web-based program aimed to make easier
and more convenient the class registration process, a hassle through which ...
price paid by the consumers? ! Solution. First, we need to add the two demand
curves to obtain market demand. This market demand (Dsum) has two segments:
.
You can design custom titles and images with Adobe Premiere Elements. Titles
are a valuable .... Figure 10 Select the object to save as a style. Figure 11 Save ...
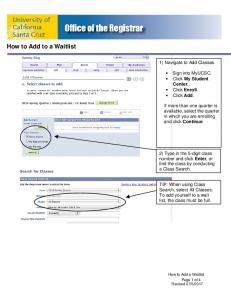
How to Add a Wait List. Page 1 of 4. Last updated 10/29/2011. How to Add to a
Wait List. 1) Navigate to Add Classes. • Sign into my.ucsc.edu. • Click Main Menu.
Online Registration System. CCSF at your fingertips! Step by Step Instructions.
Provided by the Registration Office. Revised 4/11 ... How to read the class listing!
will need to download the PaperCut client here. Page 1 of 1. how to add a printer.pdf. how to add a printer.pdf. Open. E
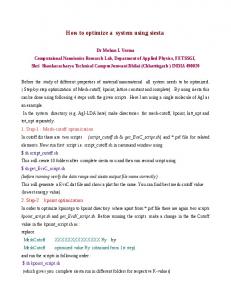
Before the study of different properties of material/nanomaterial all system needs to be optimized. ( Step-by-step optimization of Mesh-cutoff, kpoint, lattice ...
Open your web browser and cut and paste or type in the below web address http://community.cricket.com.au/coach. You will
root is normally where you have your index.html page.) 4. Open the highslide-‐
custom-‐example.htm from the zip file in Dreamweaver and click the. Code
button ...
Dec 6, 2013 - The Institute of Company Secretaries of India (ICSI) is a premier national professional body established u
How to add a Parent User to your BARC Account. The BARC Account belongs to
the student and they are the only ones who can add Parent. User(s) to their ...
procedure passed to call/cc's argument and the actual meta-level. continuation is ... is always called before the program enters the application of thunk,. and that ...
Dec 6, 2013 - ICSI COMPANY SECRETARIES (CS) COURSE ... to students, the Institute has been leveraging information techno
free, open-source software program that not only provides a set of features similar to those of its proprietary competitors but is often easier to use. (For more ...
Add a Xerox Printer to your Computer on Windows 7. 1. Click on START Button
on the lower left hand corner of computer screen. 2. Select DEVICES AND ...
How to Add A Network Printer On a Mac. 1. Go to the apple in the top left corner
of the screen. 2. After selecting the apple select system preferences. 3.
To enlarge photos, hold down the Ctrl and + buttons on your keyboard. Hold down the Ctrl and 0 (zero) buttons to return
Keywords: Course development; course development team; online course quality; quality standards .... Again, among a myriad of measures, the Sloan-C.
Non Conventional Energy sources - G.D.Rai - Khanna Publishers. BOOK FOR
STUDY. 1. Non Conventional Energy sources - G.D.Rai - Khanna Publishers.
decade have appeared with the aim of addressing non-factoid questions (Voorhees, 2003). In par- ticular, the problem of addressing definition ques- tions has ...
A humorous story or a good joke right at the beginning puts the audience at ....
today's comics or would-be comics use raunchy material and foul language as a
...
“How To” Add a Course using UC's Online Registration System ...
“How To” Add a Course using UC's Online Registration System (OneStop): 1) Go
to www.onestop.uc.edu. 2) Click on the “My Classes” tab. 3) Next, select “View ...
“How To” Add a Course using UC’s Online Registration System (OneStop): 1) Go to www.onestop.uc.edu 2) Click on the “My Classes” tab 3) Next, select “View Class Offerings” 4) Use the drop down menu to select the appropriate quarter 5) To search for a class, use the drop down menu to select the college where the course is housed and click continue. For example, 15ENGL101 (English Composition I) is housed in college 15 (McMicken College of Arts & Sciences). 6) Select the appropriate discipline for the course you are searching for and click submit. For example, “English” for English Composition I. 7) Find the course and section that fits your needs and note the call number. To check number of seats available in the course, right click on the course number in red. For example, right click on 15ENGL101 on the left hand side of your screen. A new screen will appear with the number of seats available for each section of the course. 8) Once you have selected the course you want to register for and have noted the call number, scroll to the bottom of the screen and select “connect to web registration” 9) Enter your Log In information 10) Select the term you wish to register for from the drop down menu 11) Enter the call number(s) for the class(es) you wish to add and click submit 12) Your schedule will populate. Click “View Schedule” to see a weekly view of your courses. If you have questions about which course(s) best fit your academic needs, make sure to speak with your academic advisor before altering your schedule. ** Remember to always consult the calendar before registering online for important dates and deadlines.
“How To” Drop a Course using UC’s Online Registration System: 1) If you are registered for a learning community you need to be granted permission from your academic advisor to drop a course within your learning community. Once you are given permission, contact the Center, @uc.edu, for drop permission. 2) Go to www.onestop.uc.edu 3) Click on “My Classes” tab 4) Select “Register for Classes” 5) Submit your log-in information 6) Your schedule will populate. Check the “drop” box next to the course that you wish to drop and click submit. 7) Wait for your drop to be processed. 8) Finally, click “view schedule” to verify the drop was processed and to print out your new schedule. If you have questions about which course(s) best fit your academic needs, make sure to speak with your academic advisor before altering your schedule. ** Remember to always consult the calendar before submitting a drop for important dates and deadlines.