The FPGA Implementation of a Neurostimulator Decebal Popescu1, Nirvana Popescu1, Marian Poboroniuc2 1 University Politehnica of Bucharest, Spl. Independentei 313, 060042, Romania,
[email protected];
[email protected] 2
Technical University of Iaşi, Romania, 700050, Romania,
[email protected]
Abstract: This paper presents the FPGA implementation of a neurostimulator for the recovery of handicapped persons due to the damage of the central nervous system. For this implementation the mathematical model of the neurostimulator was developed and simulated using the SIMULINK package from MATLAB. The obtained model was implemented in a FPGA circuit of SPARTAN 3E type 16,000 through the Xilinx package - System Generator Keywords: hardware implementation, neurostimulator, reconfigurable FPGA circuit
1. Introduction The paper presents an interdisciplinary project (automation, mechatronics, computer science, applied neurology recovery) consisting of the development of an embedded system of neurostimulator. This system is useful for the recovery needs of handicapped persons due to damage to the central nervous system (stroke, multiple sclerosis, cerebral palsy, spinal injuries, Parkinson's, etc.). This segment of patients represents an important limitation of autonomy as it directly affects quality of life. Neuroprosthesis, which play mobility of paralyzed subjects, are still in the prototype stage and expected new discoveries in electronic miniaturization, artificial methods of control of muscles, neurology, etc. to become used daily and with significant benefits for the user. By using the proposed embedded type neuroprosthesis, the patient will become more socially integrated, the new biotech product having a direct impact on the quality of his life. In fact, the real prosthesis generates a special waveform acting through sensors plug on certain nerve endings of sectional muscle of the patient [9] [5][8]. In order to achieve the waveform, MatlabSimulink was used because the software can provide all the blocks needed to achieve waveform [7] [12]. Parameters corresponding to a waveform of an electrical neurostimulator can be found in Figure 1.
Figure 1. The parameters for one waveform of the electrical stimulus
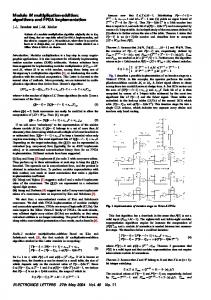
The mathematical model that defines the waveform was achieved using Simulink continuous type library elements. Once developed this model, it is implemented using Xilinx elements. These elements are integrated into Matlab environment with Xilinx installation (it should be noted that installations order matters: first to install Matlab and then to install Xilinx). All experiments through a Spartan 3E1600 development boards have concluded that such an approach is not feasible. The main reason unable developing a model based on Xilinx elements for implementing an integrator. To remove this problem, we started to develop a new model to achieve the same waveform as that shown in Figure 1, a model in which this time we will no longer use continue components, but we will only use discrete components [11]. The result, implemented using Xilinx blocks, is shown in Figure 2. Simulation results (in Matlab) of this model can be viewed in Figure 3. As it can be seen, the Figures 1 and 3 contain the same waveform, so that the model developed can be practically implemented using a development board Spartan 3E1600 [13].
Studies in Informatics and Control, Vol. 19, No. 1, March 2010
85
Figure 2. The corresponding model realized in Xilinx technology.
Figure 3.The Matlab simulated results of the developed model
86
Studies in Informatics and Control, Vol. 19, No. 1, March 2010
2. Dynamic Systems Via Simulation Simulink Simulating a dynamic system SIMULINK is done in two stages [6]:
using
size of another block. Each block of the diagram has a required functionality and the input / output dependency (in terms of the mathematical model) is well defined and independent of the position that the block occupies in the diagram [1], [2].
1. Initially, the system builds graphical model analyzed using Simulik editor; model developed characterized as temporary interdependence between input variables, state or output of the mathematical model to be simulated; 2. In the second stage analysis is performed on a model simulation time required, in the presence of exogenous signals specific dynamic system behavior. Simulink program can be launched by using the mouse's icon in the menu bar as shown in Figure 4.
Figure 4. The used icon from Simulink
Matlab / Simulink contains an impressive library of standard Xilinx blocks (Simulink blocks) as can be seen in Figure 5. To open a new model, the command New Model is chosen from the File menu. Simulink library blocks can be copied in the model editor by the Drag & Drop operation in order to form the block diagram of the dynamic system. In this simulation program, the block diagram has a fundamental role; it is a graphic design that replaces the system of equations that describe the mathematical model associated with the process. The block diagram contains a set of symbols called blocks, joined by interconnecting lines. Each block represents an elementary dynamic system, which, according to the input size, initial state and the specific parameters, produces a continue output for the continue blocks or output values in the case of discrete systems [3], [4].
Figure 5. The Xilinx standard blocks library available also in Simulink
Basically, a block represents an elementary dynamic system which knows how to program and simulate the behavior. The Simulink library contains continue and discreet blocks. Responses of continuous blocks of data are obtained by continuous time dependencies; on the other hand, the discrete blocks show output size variation at discrete moments of time, well defined by fixing samples of time. Discrete blocks save the output between two time values for sampling the first value. The main advantage offered by such software is that writing the dynamic equations is replaced by a graphical representation made by the interconnection of blocks available in its library and can be easily accessed. When the model is fitted to graphic window and the associated parameters were properly set, Simulink is able to run the simulation.
Connecting lines are oriented segments which connect an output size of a block and an input Studies in Informatics and Control, Vol. 19, No. 1, March 2010
87
3. Hardware
Implementation
3.1 Algorithms and hardware implementation flows methods Today, many signal processing products are implemented in FPGAs [2]. Modern FPGA boards can offer enhanced performance compared with standard DSP chips, making their presence very appropriate in many applications that use signal processing. Typically there are two groups involved in the design and implementation of DSP algorithms in an FPGA: -
DSP architectures
-
Hardware design engineers.
Unfortunately there is a „wall of abstraction” between engineers who create the algorithms and those who design them.
3.2. Instantiations IP and NETLIST-ING
necessary for the netlist implementation level, the designer having to offer only the RTL requirements such as time and area of use. Giving this information, synthesis engineer may quickly explore a significant number of alternative implementations and make the necessary optimizations to achieve the objectives. One such synthesis program is the Symplify DSP program.
3.3. The FPGA implementation of the proposed model In this chapter we will present methods for generating a board support package for XC3S1600E FPGA development board. Generating the package will be delivered by SBD Builder tool [1], [2]. For the package, the following steps must be taken: Step 1 - Setting XC3S1600E board support package.
FPGA's major producers (as is the case of the Xilinx) have created IP parameterized models where each model represents a DSP-specific operation (there are models for many functions such as FFT or FIR). Each model has an instance in Simulink (where is referred to as a blockset) and a similar instance in the FPGA. Once the design has been demonstrated in Simulink, it can be quickly and easily turned into a real implementation as a parameterized netlist. An observation is important to underline at this point, meaning that this solution is strongly dependent on the manufacturer's FPGA. It should be stressed that once the FPGA implementation is done, it will be not easy nor simple to make the implementation be portable to another manufacturer's FPGA.
1. Launch MATLAB and then launch the program running Simulink.
In practice, a major problem with this design flow is that there is a clear demarcation between the algorithmic area and the field of implementation. As discussed before, DSP architects must work to a high level of abstraction in Simulink. In reality, they are forced to parameterize every aspect of models with low level implementation specific decisions for hardware engineers.
6. Write the features of the board used for the implementation and the clock section as follows:
This new model is the model used in this project, but it should be noted also that there are some methods used for logic synthesis. These methods do not use the details 88
2. Create a new model of program Simulink model by choosing menu File -> New 3. In the Simulink Library Browser window, in the Libraries tab, extanding Xilinx Blockset library, the "System Generator" item could be selected. Once this item is selected, by a Drag & Drop operation, it will be brought in the new created model. 4. Double click on the System Generator item. 5. In the System Generator window, the Compilation field will be selected and then select Compilation Co-Simulation → New Compilation Target
-
Board name XC3S1600E
-
Frequency (MHz):
-
50 Pin Location: C9
The development board will connect to the USB port of a computer and the Power button of the board will be placed in position On. 7. The Detect button is selected to automatically detect the JTAG
Studies in Informatics and Control, Vol. 19, No. 1, March 2010
transmission parameters. The following detection values are obtained: -
-
scanning a perimeter position: 1 (xc3s1600E is the first device from the JTAG chain, followed by the Flash Platform and then by the CoolRunner ™-II device) the IR length: press the Detect button (see also 6, 8, 8).
Observation: You need to check the position of devices in JTAG chain programming using the IMPACT utility software provided by ISE Foundation; the IMPACT utility can be launched as a stand-alone program via the Start menu.
C:\Xilinx\10.1\DSP_Tools\sysgen\plugins\com pilation\HardwareCo-Simulation\XC3S1600E Step 2 – The neurostimulator simulation and the hardware model generation. 1. The neurostimulator model from the Xilinx version is shown in Figure 2. 2. Simulation design will produce the result shown in Figure 3. 3. The System Builder will check that the module has the following options selected: -
a compilation: HDL Co-Simulation → XC3S1600E
-
a target directory:. / hwcosim
-
a Tool for Synthesis: XST
-
a hardware description language: Verilog
The Generate button is selected from the System Generator window in order to generate the hardware model. Observation: System Generator will generate Verilog code [10] and the software will automatically launch the Xilinx ISE to generate thee string of bits. The above execution block represents the neurostimulator hardware model. Step 3 – Connecting the HW model and CoSim realization.
Figure 6. SBDbuilder specifications/options for Spartan 3E board
8. In Targetable Devices section, the following sequence of selections will be performed: -
Button ADD
-
Option spartan3e
-
Option xc3s1600e
-
Option -4
-
Option fg320
9. The Save file button has to be selected and, in this way, there are saved the files from the installation path System Builder Program as follows:
Before the execution of Co-Sim simulation, the hardware execution model will be connected to the project and some „in-loop” hardware checks are realized. 1. The execution block is added and linked as presented in Figure7. 2. Double-click on the HW co-simulation block and specify the USB Xilinx Platform and the download cable. 3. Select the Start Simulation button to perform the „hardware-in-loop” verification as it can be seen in Figure 8. The system generator will configure the FPGA and then it will simulate. The result of simulation (observed on the oscilloscope with two inputs) is presented in Figure 9. It may be noted that the waveforms resulting from the hardware simulation are identical with the waveforms obtained in the logic simulation case.
Studies in Informatics and Control, Vol. 19, No. 1, March 2010
89
Figure 7. JTAG Co-simulation
Figure 8. Hardware simulation for the proposed model
Figure 9. The hardware generated waveform is identical with the waveform generated by software.
90
Studies in Informatics and Control, Vol. 19, No. 1, March 2010
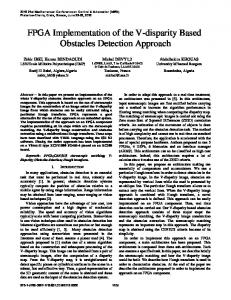
4. Developing a Hardware Prototype Once we got a hardware model that satisfies all the requirements, we have to create the hardware in order to ensure independent operation of the designed device. According to Figure 7, this could be realized if we find a way to retrieve the signal which is assumed to come from a continuous signal source. The signal should be converted to a digital signal in order to be used by the FPGA circuit. The signal conversion was achieved through the PMOD AD1 circuit that is shown in Figure 10. This module is used to convert a continuous signal into a digital one. The module contains 2 input signals and the conversion is done on 12 bits. The module provides a total of 1,000,000 samples / sec. The module integrates perfectly with the development board, being connected on the J7 connector, which is the input connector of the board.
Figure 12. The hardware assembly for complete implementation of the neurostimulator
The last hardware module that has to be added is the one for the conversion of the resulted signal. This module is necessary since the obtained signal is a digital signal and the output will be delivered as a continuous signal. This conversion is provided by the PMOD - DA1 module, shown in Figure 11. This module provides 4 outputs. Since the output must be on 8 channels, for the remaining 4 outputs we will use the 4 outputs that already exist on the development board. The general assembly is shown in Fig 12.
Figure 10. The PMOD AD1 module
The hwcosim „test_2” module prezented in Figure 7 is implemented in a FPGA circuit of Spartan 3E type; this circuit is contained by the development board.
The last hardware module that has to be added is the one for the conversion of the resulted signal. This module is necessary since the obtained signal is a digital signal and the output will be delivered as a continuous signal. This conversion is provided by the PMOD - DA1 module, shown in Figure 11. This module provides 4 outputs. Since the output must be on 8 channels, for the remaining 4 outputs we will use the 4 outputs that already exist on the development board. The general assembly is shown in Figure 12.
5. Conclusions
Figure 11. The PMOD DA1 module
This paper presented the FPGA implementation of a neurostimulator for the recovery of handicapped persons due to the damage of the central nervous system. The new neurostimulator was developed in SIMULINK. The resulting waveforms were shown in Figure 3. A hardware prototype was developed by means of a development board based on a FPGA circuit - Spartan 3E. The
Studies in Informatics and Control, Vol. 19, No. 1, March 2010
91
waveforms obtained at the output of the hardware device are identical to those obtained in the logic simulation model developed in SIMULINK. In this way, using the proposed embedded type neuroprosthesis, the patient will become more socially integrated, the new biotech product having a direct impact on the quality of his life.
REFERENCES 1. ASTROM, K. J., B. WITTERMARK, Computer-Controlled Systems Theory and Design, Ediţia a 2a, Prentice Hall International, 1990, ISBN 0-13-172784-2. 2. ESPOSITO, R., Digital Signal Processing: A Hardware Based Approach, Proceedings of the Middle Atlantic Section Fall Conference of the American Society for engineering Education, 2007. 3. GOLDEN, J., A. VERWER, Control System Design and Simulation, McGraw Hill, 1991, ISBN 0-07-707412-2. 4. GROUT, I., Digital Systems Design with FPGAs and CPLDs, Elsevier, 2008, ISBN 978-0-7506-8397-5. 5. HAMAKER, C., Optimization of Constrained Quadratic Function, Studies in Informatics and Control, vol. 8, issue 1, 2009.
7. *** MATLAB, The Mathworks Inc., http://www.themathworks.com 8. MOEZ BELHAOUANE, M., R. MTAR, H. BELKHIRIA AYADI, N. BENHADJ BRAIEK, An LMI Technique for the Global Stabilization of Nonlinear Polynomial Systems, International Journal of Computers, Communications. & Control, vol. 4, no. 4, 2009, ISSN 1841-9836, E-ISSN 1841-9844. 9. POBORONIUC, M., C. D. POPESCU, B. IGNAT, Stimularea electrică functională. Controlul neuroprotezelor (Functional Electrical Stimulation. Neuroprostheses Control), POLITEHNIUM Publishing House, Iaşi, 2005, ISBN 973621-133-9, pp.180. 10. POPESCU, D., Verilog HDL prin exemple, Politehnica Press, 2008, ISBN 978-973-7838-63-6 11. REYNERI, L. M., F. CUCINOTTA, A. SERA, L. LAVAGNO, A Hardware / Software Co-Design Flow and IP Library Based of Simulink, IEEE research paper from IEEE library. 12. *** SIMULINK, The Mathworks Inc., http://www.themathworks.com 13. *** XILINX Inc., System Generator for DSP Performing Hardware-in-theLoop with Spartan 3E Starter Kit.
6. KARNOFSKI, K., Simulink Brings Model-based Design to Embedded Signal Processing, Xcell Journal, Xilinx Inc., 2004
92
Studies in Informatics and Control, Vol. 19, No. 1, March 2010