NeatVision - Visual Programming for Computer Aided Diagnostic Applications 1
Paul F. Whelan, PhD Robert J.T. Sadleir, BEng Ovidiu Ghita, PhD
This work was supported by the EU Fifth Framework Programme and Science Foundation Ireland.
Address correspondence to: Paul F. Whelan Vision Systems Group, School of Electronic Engineering Dublin City University Dublin 9, Ireland. Tel: +353 1 7005489 Fax: +353 1 7005508 E-mail:
[email protected]
1
From the Vision Systems Group, School of Electronic Engineering, Dublin City University, Ireland.
1
Abstract This paper will detail a free visual programming based image analysis development environment for medical imaging applications. The environment provides high-level access to a wide range of image processing algorithms through a well-defined and easy to use graphical interface. The system contains over 300 image manipulation, processing and analysis algorithms. For more advanced users an upgrade path is provided to extend the core library using the developer’s interface. This additional freely available plug-in features, automatic source code generation, compilation with full error feedback and dynamic algorithm updates. The paper will also discuss key issues associated with the environment and outline the advantages in adopting such a system for computer aided diagnostic application development. A wide range of computer aided diagnostic sample applications will also be presented to illustrate the flexibility of the environment.
One sentence summary: This article introduces a freely available and user-friendly visual programming based image analysis development environment for computer aided diagnostic application development.
2
Introduction
With the ever-increasing capabilities of medical scanners, the quantity and quality of data to be handled is increasing significantly. Computer Aided Diagnosis (CAD) is one possible way to deal with such information overload as it assists radiologist undertake their tasks in an increasingly pressurised work environment. The development of robust and accurate CAD tools relies heavily on the incorporation of computer vision techniques into the imaging task. The development of such computer vision based CAD tools is not a trivial task and requires significant expertise and high quality easy to use development tools. One approach to this task is through the use of visual programming to develop the necessary computer vision modules for CAD, such as those dealing with the analysis of shape, colour (for standard imaging applications) and texture. Extracting useful information from images is a difficult task and as such requires a flexible application development environment. The visual programming environment outlined in this paper (refereed to as NeatVision (1)) is one such system. It aims to provide novice and experienced CAD developers with access to a multiplatform (realised through the use of Java) development system. The NeatVision environment provides an intuitive interface which is achieved using a drag and drop block diagram approach. Each image processing operation is represented by a graphical block with inputs and outputs that can be interconnected, edited and deleted as required. NeatVision (Version 2.1) is available free of charge and can be downloaded directly via the Internet (1).
While users may have had some prior programming language development experience, the level of competence can vary significantly. A number of difficulties 3
arose from using a standard programming language (such as ‘C’). From a technical perspective, it is clear that the support and maintenance of such libraries of functions for a wide range of operation systems is impractical. The multi-platform capabilities of Java led us to consider this as a viable alternative. But more importantly from a development point of view, we wanted to avoid the situation whereby novice developers spent a significant proportion of their time on the issues relating to the actual programming language. Instead we want the focus to be on the development of novel CAD approaches.
This paper will also outline a wide range of computer aided diagnostic sample applications, including: CT colon region segmentation, brain region segmentation and measurement, bilary tree region extraction for MRCP (Magnetic Resonance Cholangiopancreatography) and the calculation of the ejection fraction from MR cardio images. By examining these applications we clearly illustrated the power and flexibility of NeatVision as a CAD development tool.
4
NeatVision: An Interactive Development Environment Visual programming involves defining variables, specifying operations, which are to be performed on these variables and their derivatives in order to perform a specific task. This is achieved by creating a structured flow of data using branching, looping and conditional processing. Traditionally computer programs have been written using textual programming languages. These programs can process data in a complex fashion, unfortunately the data paths and the overall structure of the program can not be easily identified from the textual description. This can make it very difficult to appreciate the relationship between the source code and the functionality which it represents. Although the programmer specifies the data flow in a visual program, the order in which the components execute is defined by the availability of data. Conditional processing concepts are supported in the visual domain by using dedicated flow control components. The main disadvantages of existing visual programming environments includes their cost, lack of cross platform support and the fact that they tend to be focused on image processing rather than image analysis applications (the latter must be considered a key element of any practical CAD application). NeatVision is just one example of a visual programming development environment for computer vision; other notable examples include commercial programmes such as Khoros (2) and WiT (3). While Khoros and WiT lack a medical imaging focus, they do provide a good selection of general image processing tools.
Alternatives, such as the NIH’s ImageJ (4), offer a freely available user-friendly environment for image processing in Java. The advantages in using ImageJ, and other
5
Java related image processing packages, has been outlined elsewhere (5), and in many respects offers some of the key advantages of NeatVision. But unlike NeatVision, which allows for the parallel processing of data, ImageJ offers a sequential menu driven image-processing environment. This is generally sufficient for basic imaging tasks. The real strength of this environment is the plug-ins generally developed by third parties, many of which are medical imaging related. Unlike NeatVision it requires the user to have a significant level of Java programming ability to put together a realistic CAD process. NeatVision focus is on simplifying this development stage.
Java is an interpreted programming language and as such applications written in Java are not executed directly on the host computer, instead these applications are interpreted by the Java Virtual Machine. As a results Java programs generally run slower than native compiled programs written in languages such as C or C++. This performance issue is constantly being addressed by Sun Microsystems. Just-in-time compliers significantly improved the performance of Java applications by removing the need to reinterpret already executed code. Sun further improved the performance of Java by introducing HotSpot technology. This technology enhances application performance by optimising garbage collection and improving memory management. With the recent release of the Java 2 Platform Standard Edition 1.5.0 the performance of Java is approaching that of native programming languages.
Text based programming languages such as MATLAB (6) can be a powerful alternative to visual programming. Unfortunately building a CAD application in MATLAB is non-trivial (especially for novice users) and can approach the complexity
6
level of writing the CAD application directly in a standard programming language such as ‘C’. In addition to the disadvantages outlined with respect to the visual programming languages, text based approaches require the user to have a higher level of programming skills when compared to visual programming environments. Text based interactive environments are generally more suitable to experienced users, in fact experienced users can become frustrated by the visual programming environment as complex programmes can take longer to develop. Hence our aim is to produce a suitable environment for those new to the design of CAD techniques while retaining the flexibility of program design for the more experienced users. Based on our review of existing text and visual programming based computer vision development environments, the key criteria necessary are outlined below:
•
Multi-platform: The development environment must be able to run on a wide range of computer platforms.
•
Focused on computer vision: The environment should contain a wide range of image processing and analysis techniques necessary to implement practical CAD applications.
•
Easy to use: It should allow users to concentrate on the design of CAD based computer vision solutions, as opposed to emphasizing the programming task.
•
Upgradeable: The environment must contain a mechanism to allow users to develop custom CAD modules.
A visual program can be created by defining input data using the input components, then implementing the desired algorithm using the processing and flow control components. The data flow is specified by creating interconnections between the
7
components. The program can be completed by adding output components to view the data resulting from the algorithm execution. For those who wish to delve further, details on the design of the NeatVision development environment appear elsewhere (7).
NeatVisions Graphical User Interface The NeatVision Graphical User Interface (GUI) (Figure 1) consists primarily of a workspace where the processing blocks reside. The processing blocks represent the functionality available to the user. Support is provided for the positioning of blocks around the workspace, the creation and registration of interconnections between blocks. The lines connecting each block represent the path of the data through the system. Some of the blocks can generate child windows, which can be used for viewing outputs, setting parameters or selecting areas of interest from an image. If each block is thought of as a function, then the application can be thought of as a visual programming language. The inputs to each block correspond to the arguments of a function and the outputs from a block correspond to the return values. The advantage of this approach is that a block can return more than one value without the added complexity of using C-style pointers. In addition, the path of data through a visual program can be dictated using special flow control components. A visual program can range in complexity from three components upwards and is limited only by the availability of free memory.
As each block is processed it is highlighted (in green) to illustrate that it is active. This allows users to see the relevant speeds of parallel data streams within a visual program. This can help identify potential processing bottlenecks within the workspace 8
allowing for a more efficient balanced design. The colour coding of the blocks data connection type and its status also aids in the design process. To aid user operation each data connection has two colour coded properties, namely the block data type and connection status. NeatVision currently supports nine data types, i.e. 2D Image (red), Integer / Array data (green), Double precision Floating point data (blue), Boolean data (orange), String data (pink), Fourier data (light blue), Coordinate data (purple), 3D data volume (black) and Undefined data (black). The other connection property relates to its status. There are three main states for a connection, connected (green), disconnected (red) and disconnected but using default value (orange).
This approach provides a fast and simple alternative to conventional text based programming, while still providing much of the power and flexibility. The visual workspace can be compiled and executed as with a conventional programming language. Errors and warnings are generated depending on the situation. There is currently support for 15 input graphics file formats (including DICOM and Analyze) and 13 output formats (including DICOM and raw volume data). DICOM and Analyze data is processed via our NeatMed Medical Imaging Application Developers Interface (API) (8,9), which is also included as part of NeatVision. This allows NeatVision to have straightforward access to medical image encoded according to either the DICOM or Analyze formats. System parameters can be adjusted and the system may be reset and executed again until the desired response is obtained. At any stage blocks may be added or removed from the system. NeatVision also contains a built in web browser to allow easy access to online notes and support tools.
9
Design Details NeatVision is designed to work at two levels. The user level allows the design of imaging solutions within the visual programming environment using NeatVision's core set of functions. NeatVision contains 300 image manipulation, processing and analysis functions, ranging from pixel manipulation to colour image analysis to data visualisation. To aid novice users, a full introductory tutorial and some sample programmes can be found on the NeatVision website (1). A brief description of the main system2 components is given below (a full users guide is also available (10)):
•
Data types: Image, integer, double, string, Boolean, array, medical image sequences.
•
Flow control: Path splitting, feedback, if (else), for loop.
•
Utilities: Rotation, pixel manipulation, resize, URL control, additive noise generators, region of interest, masking operations.
•
Arithmetic operators: Add, subtract, multiply, divide, logical operators.
•
Histogram: General histogram analysis algorithms, local equalization.
•
Image Processing: Look-up tables (LUT), threshold, contrast manipulation.
•
Neighbourhood based filtering: Lowpass, median, sharpen, DOLPS, convolution, adaptive smoothing (or filtering).
•
Edge detection: Roberts, Laplacian, Sobel, zero crossing, Canny
•
Edge features: Line/arc fitting, edge labelling and linking.
•
Analysis: Thinning, binary detection, blob analysis, labelling, shape feature measures, bounding regions, grey scale corner detectors.
2
Items in italics are only included in the NeatVision advanced edition. This is available on request.
10
•
Clustering: K-means (grey scale and colour), unsupervised colour clustering.
•
Image transforms: Hough (line and circle), Medial Axis, DCT, Cooccurrance, Fourier, distance transforms.
•
Morphology: Several 2D morphological operators, including erosion, dilation, opening, closing, top-hat, hit-and-miss, watershed.
•
Colour: Colour space conversion algorithms, RGB, HSI, XYZ, YIQ, Lab.
•
3D Volume: 3D Operators (thinning, Sobel, threshold, labelling), maximum and average intensity projections, rendering engine (Java and Intel native: wire frame, flat, Gouraud, Phong), DICOM utilities, XYZ viewer, 3D to 2D conversion, data scaling, 3D windowing, 3D arithmetic, 3D image processing, 3D labelling, 3D morphological operators, 3D reconstruction, 3D clustering
•
Low Level: Pixel level operators; get pixel value, set pixel value and basic shape generation.
•
String: String operators, object addition, to upper case and to lower case.
•
Maths: An extensive range of numerical operators and utilities, including constants and random number generation.
•
JAI Colour: Colour algorithms implemented using JAI (Java Advance Imaging (11)), operators, processing, filters and edge detectors.
•
OSMIA functions (12) (Wintel native only): NEMA and AIFF image reader, ejection fraction measurement, 2D optical flow (Lucas & Kanasde and Horn & Shcunck courtesy of Barron (13) via the European Union funded OSMIA project (12)), XY normalization, Aorta tracking (courtesy of Thacker (14) also via the OSMIA project)
11
At the more advanced developers level, NeatVision allows experienced CAD application designers to develop and integrate their own functionality through the development and integration of new image processing/analysis modules. Refer to the online NeatVision (15) developers guide for more details on developing and integrating custom computer vision based CAD applications.
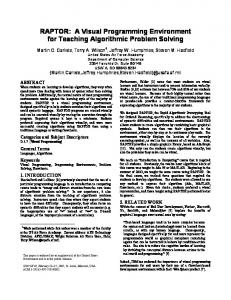
Sample Applications NeatVision provides an image analysis software development environment that can work at several levels. For example, at a relatively low level, individual pixels can be manipulated. Alternatively, NeatVision's built in functionality can be used to generate solutions to complex computer vision based CAD tasks. This section outlines four sample CAD applications. Figure 2 outlines a common imaging task, namely the clustering of similar regions in 2D space. Here an automated (i.e. unsupervised) clustering methodology is adopted. The input image is a selected region from a CT DICOM data set of the colon. In this application we require to isolate the pixel regions immediately surrounding the inflated region of the colon, i.e. the air tissue boundary. This is achieved by selecting one of the cluster regions produced by the unsupervised clustering stage by means of the double threshold function (see (7) for details). The second application, Figure 3, is more involved. In this case we are interested in the extraction, measurement and visualisation of a user-defined region of the brain. The user does not have to fully define the region of interest, but rather select a single point. The software then isolates connecting regions allowing a computer assisted segmentation of the region. The user can then make point-to-point measurements on
12
the isolated region. In this example we also illustrate how a region of interest can be selected to allow a dynamic 3-dimensional visualisation.
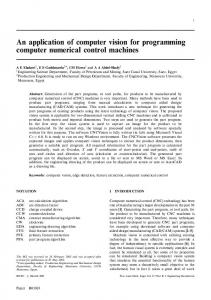
The sample application illustrated in Figure 4 involves working with 3D imaging techniques. The application requires the isolation of the bilary tree with minimal user intervention. The input is a 14 slice MRI DICOM data set. After windowing the user is requested to select a point of interest (similar to the previous example). The key difference with this application is that we now cluster in 3D space to segment the region of interest. A fully dynamic surface rendering of the region along with its associated maximum intensity projection is also illustrated.
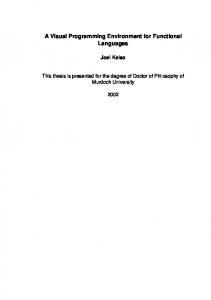
The final sample application deals with the complex issue of calculating the hearts ejection fraction from MR cardio images. This implementation is based on true segmentation of the left ventricle excluding fat and papillary muscles on the endocardium. A 3D surface rendering of left ventricle volume (end-diastole and endsystole) is also illustrated.
13
Developers Environment NeatVision was originally designed so that it could be easily extended by building on previously developed algorithms. This feature has been finalised with the release of version 2.1 of the NeatVision visual programming environment. This allows users to:
•
Develop new NeatVision components that can ultimately be reused by other NeatVision developers
•
Reuse the core NeatVision components in new user defined components
•
Submit your component or library of components to wider NeatVision community.
NeatVision development assumes a basic level of familiarity with the Java programming language from Sun Microsystems and the NeatVision developers plugin. Additional details on developing for NeatVision (15) and the design concepts behind NeatVision along with detailed explanations of many of the its algorithms can be found are also available (7)
When the developer’s interface and the Java Developers Kit (JDK) are present a ‘user’ tab appears alongside the ‘system’ tab in the component explorer. The developer can add a new component by right clicking anywhere within the ‘user’ view of the component explorer. After right clicking, a popup menu will appear. The ‘Add New Component’ option must be selected from this menu in order to create a new file (Figure 6). The user is then queried as to whether they would like to create a NeatVision Component, a Java Class or a Java Interface (Note: a NeatVision Component is just a special type of Java class). A filename for the class or interface 14
must be specified at this point. If a Java Interface or standard Java class is specified at then a text editor window is displayed with the relevant skeleton source code. The developer may edit and compile this code as desired. If a NeatVision component is specified then a component development wizard is launched.
The wizard allows the developer to specify the visual appearance of the component including width and height in pixels, component name and number of inputs and outputs. The wizard also allows the developer to specify the data type and data description associated with each of the inputs and outputs. Once all of the required information has been entered the developer need only press the ‘Create’ button to generate to skeleton source code for the desired NeatVision component. The developer can then edit the skeleton source code as required in order to implement the desired component functionality. At any stage the source code for the component can be compiled. This is achieved by selecting the relevant compile option from the ‘Project’ menu. Selecting the compile option launches the Java compiler distributed with the JDK and any errors in the specified file(s) are subsequently listed in the message window at the bottom of the main NeatVision window. For each error a description, filename and line number are provided. The user need only click on an error message to highlight the relevant error in the source code. Once all errors have been corrected the message ‘compilation succeeded’ is printed in the status bar. Following successful compilation the block is available for use and can be included in a workspace like any core NeatVision component.
The NeatVision developers interface extends and complements the visual programming interface by allowing users to develop custom components that can
15
encapsulate the functionality of core NeatVision components, thus extending the already vast NeatVision library of components. Full details relating to the development of source code for NeatVision component is provided on the NeatVision website (1).
16
Summary NeatVision was designed to allow novice and experienced users to focus on the computer vision design task for CAD applications rather than concerns about the subtlety of a given programming language. It allows the designers of image analysis based computer aided diagnostic techniques to implement their ideas in a dynamic and straightforward manner. NeatVision standard and developers versions are freely available via the Internet and are capable of running on a wide range of computer platforms (e.g. Windows, Solaris, Linux).
Acknowledgments: We would like to acknowledge Dr. Helen Fenlon (Department of Radiology) and Dr. Padraic Mac Mathuna (Gastrointestinal Unit) of the Mater Misericordiae Hospital Dublin Ireland for supplying the colon and MRCP data sets used in this paper. Many thanks to Rob van der Geest, Department of Radiology, Leiden University whose help was gratefully appreciated. He also generously supplied gradient-echo DICOM cardiac image sequences shown in this paper courtesy of Cory Swingen, University of Minnesota, Minneapolis. We would like to acknowledge the EU for funding the Fifth Framework Programme (IST: Accompanying Measures) OSMIA (Open Source Medical Image Analysis) project. Finally, we would like to acknowledge the generous financial support of Science Foundation Ireland (www.sfi.ie) for our medical imaging research programme.
17
References 1. NeatVision: Image Analysis and Software Development Environment. Available at http://www.neatvision.com 2004; Accessed April 28. 2. Khoros: Khoral Research, Inc Available at http://www.khoral.com 2004; Accessed April 28. 3. WiT: Logical Vision, Available at http://www.logicalvision.com 2004; Accessed April 28. 4. ImageJ, National Institute of Health (USA). Available at http://rsb.info.nih.gov/ij/ 2004; Accessed April 28. 5. Sage D and Unser M, Teaching Image Processing Programming in Java. IEEE Signal Processing Magazine 2003: Nov:43-52 6. MathWorks: Matlab, Available at http://www.mathworks.com 2004; Accessed April 28. 7. Whelan PF and Molloy D (2000), "Machine Vision Algorithms in Java: Techniques and Implementation", Springer-Verlag, London 8. Sadleir RJT, Whelan PF, Bruzzi JF, Moss AC, MacMathuna P and Fenlon HM. A Portable Toolkit for Providing Straightforward Access to Medical Image Data. Radiographics 2004; July (In-Press) 9. NeatMed Medical Imaging Application Programmers Interface. Available at http://www.eeng.dcu.ie/~vsl/DICOM/index.html 2004; Accessed April 28. 10. NeatVision: Users Guide, Available at http://neatvision.eeng.dcu.ie/user.html 2004; Accessed April 28.
18
11. JAI: The Java Advanced Imaging (API), Available at http://java.sun.com/products/java-media/jai 2004; Accessed April 28. 12. OSMIA - Open Source Medical Image Analysis, EU Fifth Framework Programme (IST: Accompanying Measures). Available at http://www.eeng.dcu.ie/~whelanp/osmia/ 2004; Accessed February 12. 13. Barron JL, Fleet DJ and Beauchemin S. Performance of optical flow techniques. International Journal of Computer Vision 1994; 12(1):43-77. 14. Lacey AJ, Watson NA, Thacker NA and Jackson A. Automatic tracking of the aortic boundary in blood flow analysis using cardiac MR images. In: Proc. ECR 2000, volume 9. European Congress of Radiology, Springer, March 2000 15. NeatVision: Developers Guide, Available at http://neatvision.eeng.dcu.ie/developer.html 2004; Accessed April 28.
19
Figures
20
Figure 1: Key features of the NeatVision environment.
21
a
b
c
d
Figure 2: 2D data clustering. (a) NeatVision workspace. (b) Original DICOM image [1] (to aid in understanding the workspace each relevant image block has been labelled numerically and referenced via square brackets within the figure legend). (c) Pseudo colour display of the regions automatically clusters using an unsupervised approach [2]. (d) A single cluster region is selected and isolated [3].
22
a
b
c
d
e
f
g
Figure 3: Brain region extraction, measurement and visualisation. (a) NeatVision workspace. (b) User selects region they which to extract by means of a single mouse click (as indicated by the crosshair in the image) on the two dimensional image [1]. (c) Automated region removal [2]. (d) User selected region based on the point marked in (b). The user can then select points on which to make distance measurements (i.e. the line connecting the two user selected crosshair points). This distance
23
measurement is displayed in the workspace illustrated in (a) [3]. (e) Edge only information relating to the isolated region [4]. (f) User selected region of interest to allow 3-dimensional visualisation [5]. (f) Visualisation of region selected in (f).
24
a
b
c
d
e
Figure 4: Bilary tree region extraction using 3D imaging. (a) NeatVision workspace. (b) The user loads the 14 slice bilary tree MRI DICOM volume in to the users workspace [1]. (c) User selects region to be isolated and processed [2]. (d) 3D surface
25
rendering of volume using Phong shading techniques. The volume is capable of been fully manipulated by the user [3]. (e) Maximum intensity projection (MIP) of the isolated volume [4].
26
a
c b
d
e
Figure 5: Calculation of the hearts ejection fraction based on true segmentation of the left ventricle excluding fat and papillary muscles on the endo-cardium. (a) NeatVision
27
workspace. (b) The user loads the MRI DICOM volumes for both the systolic and diastolic phases in to the NeatVision workspace [1]. (c) The user selects the left ventricle region (by clicking on a single point) in both systolic and diastolic volumes. These regions are then automatically to be isolated and processed [2]. (d) 3D surface rendering of left ventricle volume (end-diastole). The volume is capable of been fully manipulated by the user [3]. (e) 3D surface rendering of left ventricle volume (endsystole). The actual value for the ejection fraction is indicated in the NeatVision workspace (a) [4].
28
a
b
29
c
Figure 6: NeatVision component development wizard. (a) Select Add New Component from the popup menu of the user area of the component explorer. (b) Select component to be added. (c) Define the component skeleton (i.e. the number and type of inputs and outputs for the associate block). This generates the necessary component wrapping code. Users can then insert their own custom code to compete the component generation procedure.
30
Figure Legends
31
Figure 1: Key features of the NeatVision environment.
Figure 2: 2D data clustering. (a) NeatVision workspace. (b) Original DICOM image [1] (to aid in understanding the workspace each relevant image block has been labelled numerically and referenced via square brackets within the figure legend). (c) Pseudo colour display of the regions automatically clusters using an unsupervised approach [2]. (d) A single cluster region is selected and isolated [3].
Figure 3: Brain region extraction, measurement and visualisation. (a) NeatVision workspace. (b) User selects region they which to extract by means of a single mouse click (as indicated by the crosshair in the image) on the two dimensional image [1]. (c) Automated region removal [2]. (d) User selected region based on the point marked in (b). The user can then select points on which to make distance measurements (i.e. the line connecting the two user selected crosshair points). This distance measurement is displayed in the workspace illustrated in (a) [3]. (e) Edge only information relating to the isolated region [4]. (f) User selected region of interest to allow 3-dimensional visualisation [5]. (f) Visualisation of region selected in (f).
Figure 4: Bilary tree region extraction using 3D imaging. (a) NeatVision workspace. (b) The user loads the 14 slice bilary tree MRI DICOM volume in to the users workspace [1]. (c) User selects region to be isolated and processed [2]. (d) 3D surface rendering of volume using Phong shading techniques. The volume is capable of been fully manipulated by the user [3]. (e) Maximum intensity projection (MIP) of the isolated volume [4].
32
Figure 5: Calculation of the hearts ejection fraction based on true segmentation of the left ventricle excluding fat and papillary muscles on the endo-cardium. (a) NeatVision workspace. (b) The user loads the MRI DICOM volumes for both the systolic and diastolic phases in to the NeatVision workspace [1]. (c) The user selects the left ventricle region (by clicking on a single point) in both systolic and diastolic volumes. These regions are then automatically to be isolated and processed [2]. (d) 3D surface rendering of left ventricle volume (end-diastole). The volume is capable of been fully manipulated by the user [3]. (e) 3D surface rendering of left ventricle volume (endsystole). The actual value for the ejection fraction is indicated in the NeatVision workspace (a) [4].
Figure 6: NeatVision component development wizard. (a) Select Add New Component from the popup menu of the user area of the component explorer. (b) Select component to be added. (c) Define the component skeleton (i.e. the number and type of inputs and outputs for the associate block). This generates the necessary component wrapping code. Users can then insert their own custom code to compete the component generation procedure.
33