J Intell Robot Syst (2012) 66:401–414 DOI 10.1007/s10846-011-9614-0
Design and Implementation of Wireless Camera, Communication, and Control Modules for a Transformable Unmanned Aerial Vehicle Tarek Sobh · Khaled Elleithy · Jeongkyu Lee · Ali El-Rashedy · Jovin Joy · Leon Manole
Received: 30 May 2011 / Accepted: 6 June 2011 / Published online: 24 August 2011 © Springer Science+Business Media B.V. 2011
Abstract In this paper, we present the design and implementation of the wireless camera component, communications, and control components for a gun-launched, transformable Unmanned Aerial Vehicle (UAV). The transformable UAV is designed to be able to detect standard targets. In addition, the transformable UAV can be converted from a gun-launched projectile transformed to a UAV, and bevisually guided to a target. The implementation and design of the system presented in this paper addresses four tasks. The first task is the investigation of wireless components, including transmitter, receiver, and antenna. The second task is system implementation, i.e., the design and integration of the wireless components with the UAV Control. The third task is the implementation of the wireless camera component through installation of the video camera on the UAV for display on a PC. The last task is the demonstration of the wireless link and camera components of the transformable UAV system.
T. Sobh (B) · K. Elleithy · J. Lee · A. El-Rashedy · J. Joy Department of Computer Science and Engineering, University of Bridgeport, Bridgeport, CT 06604, USA e-mail:
[email protected] L. Manole ARDEC, Picatinny Arsenal, NJ 07806, USA
Keywords Unmanned Aerial Vehicle (UAV) · Gun-launched projectile · Stepper motor · Sensor board and base station gateway
1 Introduction Unmanned Aerial Vehicle (UAV) systems have been used for a variety of applications. For example, they can be used for surveillance purposes to search targets or to assist in rescue missions. They can be referred to as autonomous flight systems as well [1–4]. The most popular UAV applications are for military use, such as object recognition, dangerous area observation, maritime surveillance, and mine removal [5, 6]. Many of these applications are equipped with a vision system that is composed of a micro camera and transmitter. The captured image signals are relayed and processed at the ground control system, with control signals sent to the UAV. In this paper, we present the complete details of the design and implementation of the wireless camera, communications and control components for a gun-launched, transformable UAV. The transformable UAV is designed to be able to detect standard targets. In addition, the transformable UAV can be converted from a gunlaunched projectile and be visually guided to a target.
402
J Intell Robot Syst (2012) 66:401–414
The first part of the project is the design and implementation of the wireless camera component for the transformable UAV. A transformable UAV and typical UAV are similar from the following standpoints: (1) both are airborne objects, (2) both use a wireless link to transfer captured video in real-time, and (3) both have military application. However, there are some advantages to the wireless camera components of a transformable UAV over a typical UAV: • •
The transformable UAV’s flying speed is much faster than a typical UAV, i.e., over 150 mph, and, The camera can be placed inside the transformable UAV, whereas the UAV always mounts the camera outside.
For these reasons, we chose to implement and test a wireless camera component in a transformable UAV. In the second part, we present the design and implementation of the wireless link and control components for the gun-launched transformable UAV. The transformable UAV is designed to be able to detect standard targets. In addition, the transformable UAV can be converted from a gunlaunched projectile and be visually guided to a target. The goal of the second part of the project is to be able to control the motion of that projectile via wireless link. There are two components to this part: (1) an electronic circuit to control the two wings of the projectile, and (2) the software Fig. 1 Overview of wireless transformable UAV system
to incorporate sending and receiving the control signal from a base station to the projectile.
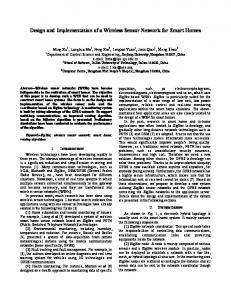
2 System Overview Figure 1 illustrates an overview of the entire system, which is expected to be implemented over a period of 1.5–2 years. The system implemented in this project consists of two main parts: (1) a wireless camera component, and (2) wireless control components. As shown in Fig. 1, the transformable UAV sends a video signal after being launched by a gun. A ground control system can process the video signal, and send control signal back to the UAV via wireless link. In order to meet the requirements of the statement of work (SOW) of the project, we identified the following objectives for the wireless camera component: 1. Investigate available options for the micro wireless camera, wireless control devices, and miniature power supply to be installed in the transformable UAV. 2. Integrate micro wireless camera and control devices with the transformable UAV and stream captured video to the base station on the ground. 3. Display the captured video in real-time on the base station’s monitor on the ground and send a control signal to the motors.
J Intell Robot Syst (2012) 66:401–414
4. Demonstrate that the transformable UAV can be controlled from the base station. The UAV may be on a guided wire while the system is being tested.
3 Wireless Camera Component in Transformable UAV The primary objective of this section is to demonstrate the viability of mounting a wireless camera component inside a transformable UAV and the base station’s ability to receive and display captured video. To meet this objective, we developed a wireless camera component for a transformable UAV. Figure 2 illustrates an overview of the proposed wireless camera component for the transformable UAV. The system consists of two central components: (1) the wireless camera mounted in the transformable UAV, and (2) the base station that receives and displays the video signal. We installed an ultra compact, wireless camera with a 9 V battery. We used a “dummy” projectile, a cylinder-shaped mailing tube, as the transformable UAV for demonstration purposes. The prototype transformable UAV has been under development at the University of Hartford, so we will use the dummy projectile until the prototype is completed. The camera was mounted inside the cylinder, with a small hole created for the camera lens. A base station was configured with a very sensitive receiver (aided by an antenna) to receive and display the video captured by the camera. Fig. 2 Overview of wireless camera component in a transformable UAV
403
Since the output signal of this receiver was analog, a video converter was used to produce a DV signal for the base station. The DV signal is displayed on specialized software located in the base station. The software should be able to process video data to generate the control signal for relay to small motors. The videos captured in the base station are stored for future development and study. 3.1 Specifications of Wireless Camera Equipment Table 1 shows a list of equipment that are used in our preliminary test. The CMDX-8S is an ultra compact, wireless, color complementary Metal–Oxide–Semiconductor (CMOS) camera with 2.4 GHz operating frequency. We selected this camera for its small size, i.e., 0.7 × 0.8 × 0.7 ft, and extreme low operating power requirement, i.e., 4.7 ∼ 9 V. This makes it useful in UAV systems. The image quality of 330 horizontal lines of resolution can transmit up to 3,000 ft (0.6 mile) in open air with proper equipment [7]. The VRX-24L is the most sensitive audio/video receiver, including eight channels in a 2.40 ∼ 2.5 GHz frequency range. The power supply for the receiver is 9–12 V, with 300 mA. It has an SMA-type antenna connector [7]. The ADVC-300 is used for converting analog video signals to digital signals. The video converter supports high-quality image enhancing technology, including digital noise reduction and
404 Table 1 List of wireless camera component equipment in the hybrid projectile
J Intell Robot Syst (2012) 66:401–414 Name/part number
Description
Quantity
CMDX-8S VRX-24L ADVC-300
Wireless micro-camera system Video receiver DV converter >Analog to digital Desktop >Data storage (images and videos) Notebook computer >Base station
2 1 1
$720 $272 $500
1
$1800
1
$2600
Precision workstation T5400 Thinkpad X300
image stabilization. In addition, since the converter supports a wide range of DV and analog video equipments, it is easy to configure the wireless video component in a transformable UAV system [7]. A Thinkpad X300 and a Precision workstation T5400 are configured as the base station and as file server, respectively. Special software is developed and installed on the base station to process and display the video. The generated video data are stored at the workstation for management purposes.
3.2 Integration of Wireless Camera with Dummy Projectile The equipment purchased for the wireless camera component is integrated with the transformable UAV based on the proposed system. Figure 2 illustrates the integrated wireless camera component system. Since the transformable UAV is still under development, we decided to mimic the transformable UAV (i.e., dummy projectile) using a cylinder-shaped, paper mailing tube, as shown in Fig. 2. The dummy projectile is 10 ft long with diameter of 2 ft, which is slightly larger than an actual transformable UAV. We make a small hole in the dummy projectile so that the wireless camera can gain an outside view while it is mounted inside the dummy projectile. In addition, the dummy projectile has a 9 V battery inside and a customized regulator to maintain battery power. As shown in Fig. 2, the base station consists of a laptop, a video receiver and a video converter. Since the video converter (ADVC-300) supports various types of connection, we selected the IEEE 1394 to connect it to the laptop. However, it could
Price
be replaced by another interface, e.g., USB 2.0 video capture device (S-Video and RCA), to connect using a USB port. 3.3 Control Interface for the Base Station We developed control interface software for the base station as a part of the wireless camera component for the transformable UAV project. The software was developed based on the following components: • • •
Operating System: Ubuntu Linux 8.10 (kernel 2.6.27-13), Tiny OS (controlling motor) Development tool kit: kino and gtk+2.5 (GUI) Other important libraries: OpenCV 1.0 (Image processing), Libdv (Video processing)
A screenshot of the control interface software is provided in Fig. 3. The software consists of the following functionalities: 1. Display module: the captured video can be displayed to provide real time visual information to a user. 2. Analysis module: the captured video is processed to analyze the visual contents. In this project, we implemented a very simple video processing algorithm that determined the most changed area from the image frame, using a pixel-by-pixel comparison. 3. Control signal module: Based on the results of the analysis module, we generated four different control signals: (1) left turn on left wheel, (2) right turn on left wheel, (3) left turn on right wheel, and (4) right turn on right wheel.
J Intell Robot Syst (2012) 66:401–414
405
Fig. 3 Screenshot of control interface software
4 Design Overview of Control Component In this section of the paper, we describe the design of a circuit to control the motion of the projectile using two stepper motors for two wings. Each motor has two possible motions, right and left, which means up and down for the ailerons part of the wing, as shown in Fig. 4 [8]. The ailerons’
Fig. 4 Different ailerons positions and airplane motion [8]
positions determine the direction of rotation for any plane (Fig. 4). So, using two stepper motors, we can control the motion of the plane. The stepper motor that we used is very small in dimension; the Diameter–Body is 15.01 mm, so it needs a high torque to move it. Figure 5 shows the stepper motor. To solve this problem, we used a special kind of compatible, integrated circuit (IC), called
406
J Intell Robot Syst (2012) 66:401–414
ships to these applied input pulses. The sequence of the applied pulses is directly related to the direction of the motor shaft’s rotation. The speed of the motor shaft’s rotation is directly related to the frequency of the input pulses and the length of rotation is directly related to the number of input pulses applied.
5 Design Optimization Fig. 5 The stepper motor used in the design [9]
H-Bridge IC “L293D”, for each motor. The internal connection for H-Bridge is shown in Fig. 6 [9]. We selected a stepper motor because it is an electromechanical device that converts electrical pulses into discrete mechanical movements. The shaft or spindle of a stepper motor rotates in discrete step increments when electrical command pulses are applied to it in the proper sequence. The motor’s rotation has several direct relation-
Fig. 6 Internal connection of L293D IC using four inputs
To minimize the number of control lines for each motor to two rather than four, we used an open collector inverter “SN7404”, as shown in Fig. 7 [10]. The internal connection of the open collector inverter SN7404 is illustrated in Fig. 8 [11]. To control the stepper motor, we apply a voltage to each of the input lines in a certain sequence. The sequence is shown in Table 2 [12]: By applying the previous sequence in a periodic manner, a stepper motor will rotate clockwise with one step, which is 18◦ in the stepper motor that we used. The rate of the rotation for the stepper motor depends on the rate of the input sequence. The
J Intell Robot Syst (2012) 66:401–414
407
Fig. 7 Two control lines for each motor [10]
stepper motor can rotate in the opposite direction, counterclockwise, by reversing the sequence of the input signals to the input lines, as shown in Table 3. The main problem in this circuit is the need for an additional open collector inverter since the open collector outputs require pullup resistors to perform correctly. These outputs can be connected to other open-collector outputs to implement “active-low wired-OR” or “active-high wired-AND” functions. In our design, then, we used an additional inverter to work as a pull-up resistor for the first inverter.
6 Circuit Design Using Eagle 5 printed circuit board design software, we designed the circuit, as shown in Figs. 9 and 10. The input pins to the first motor should
be pin numbers 3 and 4, with pins 5 and 6 for the second motor (Fig. 9). However, instead of pin 3, we used pin number 23 because we found that there is a conflict between the wireless link and pin number 3. Consequently, pin number 3 is not recommended for this design. The schematic diagram was designed and, with the help of Eagle software, used for the board diagram, as illustrated in the previous figures. In this particular circuit, we must use a connector to join the derived motor circuit to the wireless sensor. This connector should be a 51 pin female connector, in order to be compatible with the male connector in the wireless sensor [13]. The connectors are shown in Fig. 11. We contracted with the Imagineering, Inc Company [14] to manufacture the designed board according to our specifications. Design specifications include the following requirements: first, the circuit must be very small in dimension
408
J Intell Robot Syst (2012) 66:401–414
Fig. 8 Internal connection of the SN7404 inverter [11]
(2 × 1.2 ft) to be compatible with the receiving wireless IRIS device. Second, the 51 pin connector should be on the other side of the board, so the connected ICs, designed circuit ICs and IRIS ICs, are not positioned face to face. The designed circuit is shown in Figs. 12 and 13. A special kind of soldering machine was used to solder the manufactured board. SmartHeat®, shown in Fig. 14 [17], applies heat directly from the heater to the joint. Metcal tip cartridges detect the thermal load and instantly adjust the power in order to deliver an accurate amount of heat precisely where it is needed. If the tip cools while transferring heat to a joint, SmartHeat® immediately responds by safely increasing the power to maintain a constant tip temperature. As a result,
operators are relieved of the responsibility to regulate the temperature, thus eliminating the risk of thermal damage to the component or to the PCB. SmartHeat® soldering systems are comprised of three basic elements: a high frequency power supply, a tip cartridge and a hand-piece. The cartridge contains the solder tip, a heater and the wire coil.
Table 2 Input sequence of stepper motor in clockwise direction
Table 3 Input sequence of stepper motor in counterclockwise direction
Line 1
Line 2
Line 1
Line 2
0 1 1 0
1 1 0 0
0 1 1 0
0 0 1 1
7 Wireless Link System The second component of the project was comprised of the task to send a wireless signal from the base station to the projectile in order to control it. A wireless sensor device developed by Crossbow Technology Company was used [16]. The wireless
J Intell Robot Syst (2012) 66:401–414
409
Fig. 9 Schematic diagram for the designed circuit
sensor network consists of three main parts, as described in this section. 7.1 Wireless Module The wireless module is called IRIS (Fig. 15). IRIS is a 2.4 GHz Mote module that is used to enable low-power, wireless sensor networks. The IRIS Mote features several new capabilities that enhance the overall functionality of Crossbow’s wireless sensor. The IRIS wireless sensor device has many preferred features: • •
Outdoor line-of-sight tests have yielded ranges as far as 500 m between nodes without amplification. An IEEE 802.15.4 compliant RF transceiver 2.4 to 2.48 GHz, a globally compatible ISM band.
• • •
A direct sequence spread spectrum radio, which is resistant to RF interference and provides inherent data security. A 250 kbps data rate. A wireless sensor network platform supported by MoteWorks™ for reliable, ad-hoc mesh networking.
IRIS is based on the open-source, TinyOS operating system, and provides reliable, ad-hoc mesh networking, over-the-air programming capabilities, cross-development tools, server middleware for enterprise network integration, and client user interface for analysis and configuration. 7.2 Sensor Board The sensor boards, as shown in Fig. 16 [17], combined with a wireless module, provide an out-of-the-box wireless sensor network for rapid
410
J Intell Robot Syst (2012) 66:401–414
Fig. 10 Board diagram for the designed circuit
prototyping, application development and deployment. Sensing capabilities include: ambient light, barometric pressure, GPS, magnetic field, sound, photo-sensitive light, photo resistor, humidity and temperature.
interface or gateway board (Fig. 17). The gateway provides a serial/USB interface for both programming and data communications.
7.3 Base Station Gateway A base station allows the aggregation of sensor network data onto a PC or other computer platform. Any IRIS Mote can function as a base station when it is connected to a standard PC
Fig. 11 51 pin female and male connectors
Fig. 12 The designed circuit prior to IC connection
J Intell Robot Syst (2012) 66:401–414
411
Fig. 13 The designed circuit after connecting the proper ICs
Fig. 15 Wireless sensor device, IRIS
The NesC and Tinyos software were used to program the IRIS device, one as a sender and one as a receiver, using programming language, NesC [18]. NesC is used as a programming language and TinyOS as an environment under Linux. The following steps were used to program the IRIS device as a transmitter and receiver:
3. IRIS connected to the gateway; IRIS then functioned as a receiver. 4. Uploaded the developed software program for the receiver to the IRIS device. 5. Disconnected the IRIS and connected it to the designed circuit. 6. Connected the second IRIS device to the gateway; the second IRIS then functioned as a transmitter. 7. Ran the transmitter software program on the computer. 8. The transmitter sent a control signal to the receiver via a wireless link.
1. A software program for transmitter and receiver using TinyOS was created. 2. We connected the gateway to our computer via USB.
Fig. 14 SmartHeat® soldering machine [15]
Fig. 16 Sensor board
412
J Intell Robot Syst (2012) 66:401–414
(CMDX-8S) and video receiver (VRX-24L), the system should be able to transmit up to 3,000 ft (0.6 mile) in open air with the proper equipment. In order to test this specification, we tested the integrated system outdoors as follows: • • •
Location: Seaside Park, Bridgeport, Connecticut Car 1 (Blue): Base station, consisting of a laptop, a video receiver, and a video converter Car 2 (Red): Dummy projectile fitted with a wireless camera and a 9 V battery
Fig. 17 Gateway board
To assess our proposed design for the hybrid projectile, we performed two demonstrations: (1) testing the wireless camera component, and (2) testing the integrated component with a dummy projectile. In this section, we present the two demonstrations and their results.
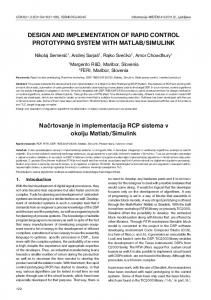
Seaside Park, Bridgeport, Connecticut was selected for the test location since it provided an open area, as viewed in Fig. 19. We used Car 1 (Blue) to visualize the base station, while Car 2 (Red) was the dummy projectile. In order to simulate a dummy projectile, Car 2 (Red) was moving at a speed of 40 miles/h from the base station. While Car 2 (Red) was moving, we captured an image every 0.1 mile, after the first 0.2 mile. The captured images are displayed in Fig. 19. As shown in the figure, the captured image after 0.4 mile is not very clear. We realized that the integrated wireless camera component is only able to transmit a clear image at less than 0.4 mile. Although we tested the system in an open area, we concluded that the reachable distance was shorter than the specification because, (1) the transmitter for the wireless camera was hidden inside the dummy projectile, and (2) the antenna for the video receiver was an average-powered one. If we used a more powerful antenna, such as an MT-24L, the distance covered could possibly be longer. We determined that the distance limitation of the wireless camera should be able to be resolved by integrating the camera and its transmitter with a wireless transceiver.
8.1 Wireless Camera Component
8.2 Integration of All Components
The purpose of this demonstration was to verify the specifications of the wireless camera component in an outdoor environment. According to the technology specification of the wireless camera
To assess our proposed wireless link and wireless camera components of the transformable UAV system, we performed a demonstration by integrating all implementations: (1) wireless link,
Fig. 18 Wireless link system
Figure 18 illustrates the complete system used in our project.
8 Integration of All Components
J Intell Robot Syst (2012) 66:401–414
413
Fig. 19 Demonstration set up at Seaside Park, Bridgeport, CT and images captured every 0.1 mile
(2) UAV control, and (3) wireless camera. We set up the demonstration as follows: • • • •
Location: Wireless Mobile Laboratory, University of Bridgeport, Connecticut Base Station: control software, displaying and processing software Wireless Component: transmitter, receiver, and control motors Dummy Projectile: wireless camera and battery
5. The generated control signal was transmitted from the transmitter to receiver using the wireless link component. 6. The transmitted control signal operated the small motors.
Figure 20a shows the overall arrangement for the demonstration, which included a base station, dummy projectile with wireless camera, video receiver/converter, wireless link transmitter/ receiver and motors. Using the implemented system, we tested the wireless link and wireless camera components of the transformable UAV system, based on the following scenario: 1. A dummy projectile, hanging on a string, captured a video using a wireless camera mounted inside the tube (see Fig. 20b). 2. A video signal was sent, using a transmitter integrated with a camera. 3. In the base station, a video receiver received the wireless video signal, and then sent the signal to a PC via a video converter. 4. In the base station (PC), the software for the video component displayed the captured video, and processed it to generate a control signal.
Fig. 20 Setting up the integrated demonstration
414
J Intell Robot Syst (2012) 66:401–414
9 Concluding Remarks
References
For the first phase of the Gun-Launched Transformable UAV project, the development team at University of Bridgeport accomplished the following goals:
1. Caballero, F., et al.: A visual odometer without 3D reconstruction for aerial vehicles. Application to building inspection. IEEE ICRA (2005) 2. Sato, A.: Research, development and civil application of an autonomous, unmanned helicopter. Aeronautic Operations, YAMAHA MOTOR CO., LTD., Shizuoka, Japan (2000) 3. Fravolini, M.L., Ficola, A., Campa, G., Napolitano, M.R., Seanor, B.: Modeling and control issues for autonomous aerial refueling for UAVs using a probedrogue refueling system. J. Aerosp. Sci. Technol. 8(7), 611–618 (2004) 4. Merino, L., Caballero, F., de Dios, J.M., Ollero, A.: Cooperative fire detection using unmanned aerial vehicles. In: Proceedings of the IEEE International Conference on Robotics and Automation, pp. 1884–1889 (2005) 5. Pine, K., Evans, M.E., Sammut, K., He, F.: Radio direction finding for maritime search and rescue. In: 5th Asian Control Conference, vol. 2, pp. 723–730 (2004) 6. Barnes, M.J., Matz, M.F.: Crew simulations for unmanned aerial vehicle (UAV) applications: sustained effects, shift factors, interface issues, and crew size. In: Proceedings of the Human Factors and Ergonomics Society 42nd Annual Meeting. Santa Monica, CA (1998) 7. B&H: http://www.bhphotovideo.com/ 8. http://rcvehicles.about.com/od/rcairplanes/ss/RCAirplane Basic_4.htm 9. http://search.datasheetcatalog.net/key/L293D 10. http://www.arduino.cc/en/Reference/StepperTwoPins 11. http://search.datasheetcatalog.net/key/7404 12. http://www.solarbotics.net/library/pdflib/pdf/motorbas. pdf 13. http://www.tigoe.net/pcomp/code/category/arduinowiring/ 51 14. http://www.pcbnet.com 15. http://www.okinternational.com/binary/catalogs/Metcal %20Catalogue%202006.pdf 16. http://www.xbow.com 17. http://www.xbow.com/Products/Product_pdf_files/ Wireless_pdf/IRIS_Datasheet.pdf 18. http://www.tinyos.net
1. Investigation of the wireless components, transmitter, receiver and antenna. 2. Design and implementation of the UAV wireless and control units. 3. Design and integration of the wireless camera components with UAV Control. 4. Installation of the video camera on the UAV and display on the PC. 5. Demonstration of the hybrid projectile’s wireless camera components. In addition, a prototype was built and successfully tested. The prototype demonstrated the following functions: 1. A wireless camera sends a signal to the base station. 2. The base station sends a wireless signal to the control circuitry of the motors installed in the projectile. 3. The control circuitry advances the stepper motors forward or backward to control the wings of the projectile.
Acknowledgements This research has been supported by a grant from the Armament Research, Development & Engineering Center (ARDEC) through the Imperial Machine and Tool Company. ARDEC is an internationally acknowledged hub for the advancement of armaments technology and engineering innovation.