Jan 5, 2010 - these blocks define code protection boundaries within the program Flash space. ...... Watchdog Timer Posts
PIC18F1XK50/PIC18LF1XK50 Flash Memory Programming Specification 1.0
DEVICE OVERVIEW
This document includes the programming specifications for the following devices:
operate from 1.8 to 3.6 volts. All other aspects of the PIC18F1XK50 with regards to the PIC18LF1XK50 devices are identical.
• PIC18F13K50
• PIC18LF13K50
2.1
• PIC18F14K50
• PIC18LF14K50
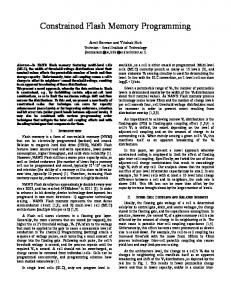
In High-Voltage ICSP mode, the PIC18F1XK50/ PIC18LF1XK50 devices require two programmable power supplies: one for VDD and one for MCLR/VPP/ RA3. Both supplies should have a minimum resolution of 0.25V. Refer to Section 8.1 “AC/DC Characteristics Timing Requirements for Program/Verify Test Mode” for additional hardware parameters.
2.0
PROGRAMMING OVERVIEW
The PIC18F1XK50/PIC18LF1XK50 devices can be programmed using either the high-voltage In-Circuit Serial Programming™ (ICSP™) method or the lowvoltage ICSP method. Both methods can be done with the device in the user’s system. The low-voltage ICSP method is slightly different than the high-voltage method and these differences are noted where applicable. The PIC18F1XK50 devices operate from 1.8 to 5.5 volts, and the PIC18LF1XK50 devices
FIGURE 2-1:
1 2 3 4 5 6 7 8 9 10
PIC18F1XK50
0.1 F
Note:
The VIH voltage levels on port pins RA0/ D+/PGD and RA1/D-/PGC must be limited to 3.3V maximum, due to USB circuitry. The device must not be attached to a USB host and the USB module must be disabled. Refer to Figure 2-1, Figure 2-2 and Figure 2-3.
IN-CIRCUIT SERIAL PROGRAMMING™ (ICSP™) PIC18F1XK50 RECOMMENDED CIRCUIT Translator
Application
10K
Hardware Requirements
2010 Microchip Technology Inc.
20 19 18 17 16 15 14 13 12 11
Programmer
MCLR
VPP
VDD
+5V
VSS PGD PGC VUSB
Y1 A1 Y2 A2 Bidirectional V2 Level Translator V1
VSS ICSPDAT ICSPCLK
330 nF
Advance Information
DS41342E-page 1
PIC18F1XK50/PIC18LF1XK50 FIGURE 2-2:
IN-CIRCUIT SERIAL PROGRAMMING™ (ICSP™) PIC18LF1XK50 RECOMMENDED CIRCUIT Application
FIGURE 2-3:
1 2 3 4 5 6 7 8 9 10
DS41342E-page 2
MCLR
VPP
VDD
+3V
VSS PGD PGC
VSS ICSPDAT ICSPCLK
330 nF
OUT OF CIRCUIT PROGRAMMING
PIC18F1XK50/ PIC18LF1XK50
0.1 F
6 7 8 9 10
20 19 18 17 16 15 14 13 12 11
PIC18LF1XK50
10K
1 2 3 4 5
Programmer
20 19 18 17 16 15 14 13 12 11
MCLR
VPP
VDD
+3V
VSS PGD PGC VUSB
Advance Information
VSS ICSPDAT ICSPCLK
2010 Microchip Technology Inc.
PIC18F1XK50/PIC18LF1XK50 2.1.1
LOW-VOLTAGE ICSP PROGRAMMING
In Low-Voltage ICSP mode, the PIC18F1XK50/ PIC18LF1XK50 devices can be programmed using a single VDD source in the operating range. The MCLR/ VPP/RA3 does not have to be brought to a different voltage, but can instead be left at the normal operating voltage. Refer to Section 8.1 “AC/DC Characteristics Timing Requirements for Program/Verify Test Mode” for additional hardware parameters.
2.1.1.1
Single-Supply ICSP Programming
The LVP bit in Configuration register, CONFIG4L, enables single-supply (low-voltage) ICSP programming. The LVP bit defaults to a ‘1’ (enabled) from the factory. If Single-Supply Programming mode is not used, the LVP bit can be programmed to a ‘0’ and RC3/PGM becomes a digital I/O pin. However, the LVP bit may only be programmed by entering the High-Voltage ICSP mode, where MCLR/VPP/RA3 is raised to VIHH. Once the LVP bit is programmed to a ‘0’, only the High-Voltage ICSP mode is available and only the High-Voltage ICSP mode can be used to program the device. Note 1: The High-Voltage ICSP mode is always available, regardless of the state of the LVP bit, by applying VIHH to the MCLR/ VPP/RA3 pin. 2: While in Low-Voltage ICSP mode, the RC3 pin can no longer be used as a general purpose I/O.
2010 Microchip Technology Inc.
Advance Information
DS41342E-page 3
PIC18F1XK50/PIC18LF1XK50 2.2
Pin Diagrams
The pin diagrams for the PIC18F1XK50/ PIC18LF1XK50 family are shown in Figure 2-4 and Figure 2-5.
TABLE 2-1:
PIN DESCRIPTIONS (DURING PROGRAMMING): PIC18F1XK50/PIC18LF1XK50 During Programming
Pin Name
Pin Name
Pin Type
MCLR/VPP/RA3
VPP
P
Programming Enable
VDD(2) VUSB(3) VSS(2)
VDD
P
Power Supply
VUSB
P
Internal USB 3.3V Voltage Regulator
VSS
P
Ground
RC3
PGM
I
Low-Voltage ICSP™ input when LVP Configuration bit equals ‘1’(1)
RA1
PGC
I
Serial Clock
RA0
PGD
I/O
Serial Data
Legend: Note 1: 2: 3:
Pin Description
I = Input, O = Output, P = Power See Figure 6-1 for more information. All power supply (VDD) and ground (VSS) pins must be connected. Valid only for PIC18LF1XK50. This pin should be connected to VDD during programming.
FIGURE 2-4:
20-PIN PDIP, SSOP AND SOIC PIN DIAGRAM FOR PIC18F1XK50 AND PIC18LF1XK50
VDD RA5/OSC1/CLKI RA4/AN3/OSC2/CLKO RA3/MCLR/VPP RC5/CCP1/P1A/T0CKI RC4/P1B/C12OUT/SRQ RC3/AN7/P1C/C12IN3-/PGM RC6/AN8/SS/T13CKI/T1OSCI RC7/AN9/SDO/T1OSCO RB7/TX/CK
DS41342E-page 4
1 2 3 4 5 6 7 8 9 10
PIC18F1XK50/ PIC18LF1XK50
PDIP, SSOP, SOIC (300 MIL)
20 19 18 17 16 15 14 13 12 11
Advance Information
VSS RA0/D+/PGD RA1/D-/PGC VUSB RC0/AN4/C12IN+/INT0/VREF+ RC1/AN5/C12IN1-/INT1/VREFRC2/AN6/P1D/C12IN2-/CVREF/INT2 RB4/AN10/SDI/SDA RB5/AN11/RX/DT RB6/SCK/SCL
2010 Microchip Technology Inc.
PIC18F1XK50/PIC18LF1XK50 20-Pin QFN 5x5 mm
RA5/OSC1/CLKI VDD Vss RA0/D+/PGD
20-PIN QFN PIN DIAGRAMS FOR PIC18F1XK50 AND PIC18LF1XK50 RA4/AN3/OSC2/CLKO
FIGURE 2-5:
RA3/MCLR/VPP RC5/CCP1/P1A/T0CKI RC4/P1B/C12OUT/SRQ RC3/AN7/P1C/C12IN3-/PGM RC6/AN8/SS/T13CKI/T1OSCI
1 2 3 4 5
PIC18F1XK50/ PIC18LF1XK50
20 19 18 17 16 15 14 13 12 11
RA1/D-/PGC VUSB RC0/AN4/C12IN+/INT0/VREF+ RC1/AN1/C12IN1-/INT1/VREFRC2/AN6/P1D/C12IN2-/CVREF/INT2
RC7/AN9/SDO/T1OSCO RB7/TX/CK RB6/SCK/SCL RB5/AN11/RX/DT RB4/AN10/SDI/SDA
6 7 8 9 10
2010 Microchip Technology Inc.
Advance Information
DS41342E-page 5
PIC18F1XK50/PIC18LF1XK50 3.0
MEMORY MAPS
For the PIC18F14K50/PIC18LF14K50 device, the program Flash space extends from 0000h to 03FFFh (16 Kbytes) in two 8-Kbyte blocks. For the PIC18F13K50/PIC18LF13K50 device, the program Flash space extends from 0000h to 01FFFh (8 Kbytes) in two 4-Kbyte blocks.
of the Boot Block in the PIC18F13K50/PIC18LF13K50 devices can be configured as 1K, or 2 Kbytes, as illustrated in Figure 3-1. This is done through the BBSIZ bit in the Configuration register, CONFIG4L. It is important to note that increasing the size of the Boot Block decreases the size of the Block 0.
TABLE 3-1:
For the PIC18F14K50/PIC18LF14K50 addresses 0000h through 0FFFh, however, define a “Boot Block” region that is treated separately from Block 0. For the PIC18F13K50/PIC18LF13K50 addresses 0000h through 07FFh, define the “Boot Block” region. All of these blocks define code protection boundaries within the program Flash space. The size of the Boot Block in the PIC18F14K50/PIC18LF14K50 devices can be configured as 2K, or 4 Kbyte (see Figure 3-1). The size
FIGURE 3-1:
IMPLEMENTATION OF PROGRAM FLASH
Device
Program Flash Size (Words)
PIC18F13K50/ PIC18LF13K50
000000h-000FFFh (4K)
PIC18F14K50/ PIC18LF14K50
000000h-001FFFh (8K)
MEMORY MAP AND THE PROGRAM FLASH SPACE FOR PIC18F14K50/ PIC18LF14K50 DEVICES 000000h 00FFFFh
Program Flash MEMORY SIZE/DEVICE
Address Range
8 KW (PIC18F14K50) Unimplemented Read as ‘0’
BBSIZ = 1
BBSIZ = 0 Boot Block(1)
Boot Block*
000000h 0003FFh 000400h 0007FFh
Block 0
000800h
Block 0 000FFFh
100000h
001000h
Block 1
Block 1
Configuration and ID Space
001FFFh 002000h
Unimplemented Read ‘0’s
Unimplemented Read ‘0’s
1FFFFFh
Note 1:
DS41342E-page 6
00FFFFh
Boot Block size is determined by the BBSIZ bit in the CONFIG4L register.
Advance Information
2010 Microchip Technology Inc.
PIC18F1XK50/PIC18LF1XK50 FIGURE 3-2:
MEMORY MAP AND THE PROGRAM FLASH SPACE FOR PIC18F13K50/ PIC18LF13K50 DEVICES 000000h 00FFFFh
Program Flash MEMORY SIZE/DEVICE
Address Range
4 KW (PIC18F13K50) Unimplemented Read as ‘0’
BBSIZ = 1
BBSIZ = 0 Boot Block(1)
Boot Block*
000000h 0001FFh 000200h 0003FFh
Block 0
000400h
Block 0 0007FFh
100000h
000800h
Block 1
Block 1
Configuration and ID Space
000FFFh 001000h
Unimplemented Read ‘0’s
Unimplemented Read ‘0’s
1FFFFFh
Note 1:
00FFFFh
Boot Block size is determined by the BBSIZ bit in the CONFIG4L register.
2010 Microchip Technology Inc.
Advance Information
DS41342E-page 7
PIC18F1XK50/PIC18LF1XK50 In addition to the program Flash space, there are three blocks in the Configuration and ID space that are accessible to the user through table reads and table writes. Their locations in the memory map are shown in Figure 3-3.
3.1
Users may store identification information (ID) in eight ID registers. These ID registers are mapped in addresses 200000h through 200007h. The ID locations read out normally, even after code protection is applied.
• TBLPTRU, at RAM address 0FF8h • TBLPTRH, at RAM address 0FF7h • TBLPTRL, at RAM address 0FF6h
Locations 300000h through 30000Dh are reserved for the Configuration bits. These bits select various device options and are described in Section 6.0 “Configuration Word”. These Configuration bits read out normally, even after code protection. Locations 3FFFFEh and 3FFFFFh are reserved for the device ID bits. These bits may be used by the programmer to identify what device type is being programmed, and are described in Section 6.0 “Configuration Word”. These device ID bits read out normally, even after code protection.
FIGURE 3-3:
Memory Address Pointer
Memory in the address space, 0000000h to 3FFFFFh, is addressed via the Table Pointer register, which is comprised of three Pointer registers:
TBLPTRU
TBLPTRH
TBLPTRL
Addr[21:16]
Addr[15:8]
Addr[7:0]
The 4-bit command, ‘0000’ (core instruction), is used to load the Table Pointer prior to using any read or write operations.
CONFIGURATION AND ID LOCATIONS FOR PIC18F1XK50/PIC18LF1XK50 DEVICES
000000h 01FFFFh
Program Flash
Unimplemented Read as ‘0’
1FFFFFh
ID Location 1
200000h
ID Location 2
200001h
ID Location 3
200002h
ID Location 4
200003h
ID Location 5
200004h
ID Location 6
200005h
ID Location 7
200006h
ID Location 8
200007h
CONFIG1L
300000h
CONFIG1H
300001h
CONFIG2L
300002h
CONFIG2H
300003h
CONFIG3H
300005h
CONFIG4L
300006h
CONFIG5L
300008h
300004h Configuration and ID Space
300007h
2FFFFFh
CONFIG5H
300009h
CONFIG6L
30000Ah
CONFIG6H
30000Bh
CONFIG7L
30000Ch
CONFIG7H
30000Dh
Device ID1
3FFFFEh
Device ID2
3FFFFFh
3FFFFFh
Note:
DS41342E-page 8
Sizes of memory areas are not to scale.
Advance Information
2010 Microchip Technology Inc.
PIC18F1XK50/PIC18LF1XK50 3.2
High-Level Overview of the Programming Process
3.3
Entering and Exiting High-Voltage ICSP Program/Verify Mode
Figure 3-4 shows the high-level overview of the programming process. First, a Bulk Erase is performed. Next, the program Flash, ID locations and data EEPROM are programmed. These memories are then verified to ensure that programming was successful. If no errors are detected, the Configuration bits are then programmed and verified.
As shown in Figure 3-6, the High-Voltage ICSP Program/Verify mode is entered by holding PGC and PGD low and then raising MCLR/VPP/RA3 to VIHH (high voltage). Once in this mode, the program Flash, data EEPROM, ID locations and Configuration bits can be accessed and programmed in serial fashion. Figure 3-7 shows the exit sequence.
FIGURE 3-4:
The sequence that enters the device into the Program/ Verify mode places all unused I/Os in the high-impedance state.
HIGH-LEVEL PROGRAMMING FLOW Start
FIGURE 3-5:
VPP-FIRST PROGRAM/ VERIFY MODE ENTRY
Perform Bulk Erase
P13
P12
P1 D110
Program Memory
MCLR/VPP/RA3 Program IDs
VDD PGD
Program Data EE PGC PGD = Input Verify Program
Note:
This method of entry is valid, regardless of Configuration Word selected.
Verify IDs
FIGURE 3-6: Verify Data
VDD-FIRST PROGRAM/ VERIFY MODE ENTRY P13
Program Configuration Bits
Verify Configuration Bits Done
P12
P1 D110 MCLR/VPP/RA3 VDD PGD PGC PGD = Input
2010 Microchip Technology Inc.
Advance Information
DS41342E-page 9
PIC18F1XK50/PIC18LF1XK50 FIGURE 3-7:
EXITING HIGH-VOLTAGE PROGRAM/VERIFY MODE
EXITING LOW-VOLTAGE PROGRAM/VERIFY MODE P16
P17
P16
D110
P18 VIH
MCLR/VPP/RA3
P1
MCLR/VPP/RA3
FIGURE 3-9:
VDD
VDD PGM PGD PGD
VIH
PGC PGC PGD = Input
3.4
PGD = Input
Entering and Exiting Low-Voltage ICSP Program/Verify Mode
When the LVP Configuration bit is ‘1’ (see Section 2.1.1.1 “Single-Supply ICSP Programming”), the Low-Voltage ICSP mode is enabled. As shown in Figure 3-8, Low-Voltage ICSP Program/Verify mode is entered by holding PGC and PGD low, placing a logic high on PGM and then raising MCLR/VPP/RA3 to VIH. In this mode, the RC3/PGM pin is dedicated to the programming function and ceases to be a general purpose I/O pin. Figure 3-9 shows the exit sequence. The sequence that enters the device into the Program/ Verify mode places all unused I/Os in the high-impedance state.
FIGURE 3-8:
ENTERING LOW-VOLTAGE PROGRAM/VERIFY MODE P15
P12
VIH MCLR/VPP/RA3
VDD VIH PGM PGD PGC PGD = Input
DS41342E-page 10
Advance Information
2010 Microchip Technology Inc.
PIC18F1XK50/PIC18LF1XK50 3.5
Serial Program/Verify Operation
3.5.2
The core instruction passes a 16-bit instruction to the CPU core for execution. This is needed to set up registers as appropriate for use with other commands.
The PGC pin is used as a clock input pin and the PGD pin is used for entering command bits and data input/ output during serial operation. Commands and data are transmitted on the rising edge of PGC, latched on the falling edge of PGC, and are Least Significant bit (LSb) first.
3.5.1
CORE INSTRUCTION
TABLE 3-2:
4-BIT COMMANDS
4-Bit Command
Description
All instructions are 20 bits, consisting of a leading 4-bit command, followed by a 16-bit operand, which depends on the type of command being executed. To input a command, PGC is cycled four times. The commands needed for programming and verification are shown in Table 3-2. Depending on the 4-bit command, the 16-bit operand represents 16 bits of input data or 8 bits of input data, and 8 bits of output data. Throughout this specification, commands and data are presented as illustrated in Table 3-3. The 4-bit command, Most Signification bit (MSb), is shown first. The command operand, or “Data Payload”, is shown . Figure 3-10 demonstrates how to serially present a 20-bit command/operand to the device.
FIGURE 3-10:
COMMANDS FOR PROGRAMMING
Core Instruction (Shift in16-bit instruction)
0000
Shift out TABLAT register
0010
Table Read
1000
Table Read, post-increment
1001
Table Read, post-decrement
1010
Table Read, pre-increment
1011
Table Write
1100
Table Write, post-increment by 2
1101
Table Write, start programming, post-increment by 2
1110
Table Write, start programming
1111
TABLE 3-3:
SAMPLE COMMAND SEQUENCE
4-Bit Command
Data Payload
1101
3C 40
Core Instruction Table Write, post-increment by 2
TABLE WRITE, POST-INCREMENT TIMING DIAGRAM (1101) P2 1
2
3
4
P2A P2B 1
2
3
4
5
6
7
8
9
10
11
12
13
14
15
16
2
1
3
4
PGC P5A
P5 P4 P3
PGD
1
0
1
1
0
0
0 0
4-bit Command
0
0
0
1
0
0
0
1
4 C 16-bit Data Payload
1
1
1
0
0
n
n
n
n
3 Fetch Next 4-bit Command
PGD = Input
2010 Microchip Technology Inc.
Advance Information
DS41342E-page 11
PIC18F1XK50/PIC18LF1XK50 4.0
DEVICE PROGRAMMING
Programming includes the ability to erase or write the various memory regions within the device. In all cases, except high-voltage ICSP Bulk Erase, the EECON1 register must be configured in order to operate on a particular memory region. When using the EECON1 register to act on program Flash, the EEPGD bit must be set (EECON1 = 1) and the CFGS bit must be cleared (EECON1 = 0). The WREN bit must be set (EECON1 = 1) to enable writes of any sort (e.g., erases) and this must be done prior to initiating a write sequence. The FREE bit must be set (EECON1 = 1) in order to erase the program space being pointed to by the Table Pointer. The erase or write sequence is initiated by setting the WR bit (EECON1 = 1). It is strongly recommended that the WREN bit only be set immediately, prior to a program or erase.
4.1 4.1.1
ICSP Erase HIGH-VOLTAGE ICSP BULK ERASE
Erasing program Flash or data EEPROM is accomplished by configuring two Bulk Erase Control registers, located at 3C0004h and 3C0005h. Program Flash may be erased portions at a time, or the user may erase the entire device in one action. Bulk Erase operations will also clear any code-protect settings associated with the memory block erased. Erase options are detailed in Table 4-1. If data EEPROM is code-protected (CPD = 0), the user must request an erase of data EEPROM (e.g., 0084h as shown in Table 4-1).
TABLE 4-1:
BULK ERASE OPTIONS
Description
Data (3C0005h:3C0004h)
Chip Erase
0F8Fh
Erase User IDs
0088h
Erase Data EEPROM
0084h
Erase Boot Block
0081h
Erase Config Bits
0082h
Erase Program Flash Block 0
0180h
Erase Program Flash Block 1
0280h
Erase Program Flash Block 2
0480h
Erase Program Flash Block 3
0880h
The code sequence to erase the entire device is shown in Table 4-2 and the flowchart is shown in Figure 4-1. Note:
TABLE 4-2:
BULK ERASE COMMAND SEQUENCE
4-Bit Command
Data Payload
0000
0E 3C
MOVLW 3Ch
0000
6E F8
MOVWF TBLPTRU
0000
0E 00
MOVLW 00h
0000
6E F7
MOVWF TBLPTRH
0000
0E 05
MOVLW 05h
0000
6E F6
MOVWF TBLPTRL
1100
0F 0F
Write 0Fh to 3C0005h
0000
0E 3C
MOVLW 3Ch
0000
6E F8
MOVWF TBLPTRU
0000
0E 00
MOVLW 00h
0000
6E F7
MOVWF TBLPTRH
0000
0E 04
MOVLW 04h
0000
6E F6
MOVWF TBLPTRL
1100
8F 8F
Write 8F8Fh TO 3C0004h to erase entire device.
0000
00 00
NOP
0000
00 00
Hold PGD low until erase completes.
FIGURE 4-1:
The actual Bulk Erase function is a self-timed operation. Once the erase has started (falling edge of the 4th PGC after the NOP command), serial execution will cease until the erase completes (parameter P11). During this time, PGC may continue to toggle but PGD must be held low.
DS41342E-page 12
A Bulk Erase is the only way to reprogram code-protect bits from an “on” state to an “off” state.
Advance Information
Core Instruction
BULK ERASE FLOW Start Write 0F0Fh to 3C0005h Write 8F8Fh to 3C0004h to Erase Entire Device
Delay P11 + P10 Time Done
2010 Microchip Technology Inc.
PIC18F1XK50/PIC18LF1XK50 FIGURE 4-2:
BULK ERASE TIMING DIAGRAM P10
1
2
3
4
2
1
15 16
1
2
4
3
1
2
15 16
1
2
3
4
1
2
n
n
PGC
PGD
0
0
1
1
4-bit Command
P5
P5A
P5
1
1
0
0
16-bit Data Payload
0
0
0
0
4-bit Command
P5A
0
0
0
0
16-bit Data Payload
P11
0
0
0
0
4-bit Command
Erase Time
16-bit Data Payload
PGD = Input
4.1.2
LOW-VOLTAGE ICSP BULK ERASE
When using low-voltage ICSP, the part must be supplied by the voltage specified in parameter D111 if a Bulk Erase is to be executed. All other Bulk Erase details, as described above, apply. If it is determined that a program memory erase must be performed at a supply voltage below the Bulk Erase limit, refer to the erase methodology described in Section 4.1.3 “ICSP Row Erase” and Section 4.2.1 “Modifying Program Flash”. If it is determined that a data EEPROM erase must be performed at a supply voltage below the Bulk Erase limit, follow the methodology described in Section 4.3 “Data EEPROM Programming” and write ‘1’s to the array.
4.1.3
ICSP ROW ERASE
Regardless of whether high or low-voltage ICSP is used, it is possible to erase one row (64 bytes of data), provided the block is not code or write-protected. Rows are located at static boundaries, beginning at program memory address 000000h, extending to the internal program memory limit (see Section 3.0 “Memory Maps”). The Row Erase duration is self-timed. After the WR bit in EECON1 is set, two NOPs are issued. Erase starts upon the 4th PGC of the second NOP. It ends when the WR bit is cleared by hardware. The code sequence to Row Erase a PIC18F1XK50/ PIC18LF1XK50 device is shown in Table 4-3. The flowchart shown in Figure 4-3 depicts the logic necessary to completely erase the PIC18F1XK50/PIC18LF1XK50 devices. The timing diagram for Row Erase is identical to the data EEPROM write timing, shown in Figure 4-7. Note 1: The TBLPTR register can point at any byte within the row intended for erase. 2: ICSP row erase of the User ID locations is also possible using the technique described in Section 4.1.3 “ICSP Row Erase”. The address argument used should be 0x200000. A row erase of the User ID locations is required when VDD is below the Bulk Erase threshold.
2010 Microchip Technology Inc.
Advance Information
DS41342E-page 13
PIC18F1XK50/PIC18LF1XK50 TABLE 4-3: 4-bit Command
ERASE PROGRAM FLASH CODE SEQUENCE Data Payload
Core Instruction
Step 1: Direct access to program Flash and enable writes. 8E A6 9C A6 84 A6
0000 0000 0000
BSF BCF BSF
EECON1, EEPGD EECON1, CFGS EECON1, WREN
Step 2: Point to first row in program Flash. 6A F8 6A F7 6A F6
0000 0000 0000
CLRF CLRF CLRF
TBLPTRU TBLPTRH TBLPTRL
Step 3: Enable erase and erase single row. 88 A6 82 A6 00 00 00 00
0000 0000 0000 0000
BSF BSF NOP NOP
EECON1, FREE EECON1, WR Erase starts on the 4th clock of this instruction
Step 4: Poll WR bit. Repeat until bit is clear. 50 A6 6E F5 00 00
0000 0000 0000 0010
MOVF EECON1, W, 0 MOVWF TABLAT NOP Shift out data(1)
Step 5: Hold PGC low for time P10. Step 6: Repeat step 3 with Address Pointer incremented by 64 until all rows are erased. Step 7: Disable writes. 94 A6
0000 Note 1:
BCF EECON1, WREN
See Figure 5-4 for details on shift out data timing.
DS41342E-page 14
Advance Information
2010 Microchip Technology Inc.
PIC18F1XK50/PIC18LF1XK50 FIGURE 4-3:
SINGLE ROW ERASE PROGRAM FLASH FLOW Start Addr = 0 Configure Device for Row Erases
Perform Erase Sequence Addr = Addr + 64 WR Bit Clear?
No
Yes No
All Rows done? Yes Done
2010 Microchip Technology Inc.
Advance Information
DS41342E-page 15
PIC18F1XK50/PIC18LF1XK50 4.2
Program Flash Programming
Programming program Flash is accomplished by first loading data into the write buffer and then initiating a programming sequence. The write and erase buffer sizes shown in Table 4-4 can be mapped to any location of the same size, beginning at 000000h. The actual memory write sequence takes the contents of this buffer and programs the proper amount of program Flash that contains the Table Pointer. The programming duration is externally timed and is controlled by PGC. After a Start Programming command is issued (4-bit command, ‘1111’), a NOP is issued, where the 4th PGC is held high for the duration of the programming time, P9.
TABLE 4-4:
After PGC is brought low, the programming sequence is terminated. PGC must be held low for the time specified by parameter P10 to allow high-voltage discharge of the memory array. The code sequence to program a PIC18F1XK50/ PIC18LF1XK50 device is shown in Table 4-5. The flowchart shown in Figure 4-4 depicts the logic necessary to completely write a PIC18F1XK50/ PIC18LF1XK50 device. The timing diagram that details the Start Programming command and parameters P9 and P10 is shown in Figure 4-5. Note:
The TBLPTR register must point to the same region when initiating the programming sequence as it did when the write buffers were loaded.
WRITE AND ERASE BUFFER SIZES Write Buffer Size (bytes)
Erase Size (bytes)
PIC18F14K50
16
64
PIC18F13K50
8
64
Devices
TABLE 4-5: 4-bit Command
WRITE PROGRAM FLASH CODE SEQUENCE Data Payload
Core Instruction
Step 1: Direct access to program Flash. 0000 0000 0000
8E A6 9C A6 84 A6
BSF BCF BSF
EECON1, EEPGD EECON1, CFGS EECON1, WREN
MOVLW MOVWF MOVLW MOVWF MOVLW MOVWF
TBLPTRU TBLPTRH TBLPTRL
Step 2: Point to row to write. 0000 0000 0000 0000 0000 0000
0E 6E F8 0E 6E F7 0E 6E F6
Step 3: Load write buffer. Repeat for all but the last two bytes. 1101
Write 2 bytes and post-increment address by 2.
Step 4: Load write buffer for last two bytes and start programming. 1111 0000
00 00
Write 2 bytes and start programming. NOP - hold PGC high for time P9 and low for time P10.
To continue writing data, repeat steps 2 through 4, where the Address Pointer is incremented by 2 at each iteration of the loop.
DS41342E-page 16
Advance Information
2010 Microchip Technology Inc.
PIC18F1XK50/PIC18LF1XK50 FIGURE 4-4:
PROGRAM FLASH FLOW Start N=1 LoopCount = 0 Configure Device for Writes
Load 2 Bytes to Write Buffer at
N=N+1
All bytes written?
No
Yes
N=1 LoopCount = LoopCount + 1
Start Write Sequence and Hold PGC High until Done and Wait P9 Hold PGC Low for Time P10
All locations done?
No
Yes Done
FIGURE 4-5:
TABLE WRITE AND START PROGRAMMING INSTRUCTION TIMING DIAGRAM (1111) P10
1
2
3
4
1
3
2
4
5
6
15
16
1
2
3
4
PGC
2
3
P9 P5A
P5
PGD
1
(1)
1
1
1
1
4-bit Command
n
n
n
n
n
n
n
n
16-bit Data Payload
0
0
0
0
4-bit Command
0 Programming Time
0
0
16-bit Data Payload
PGD = Input
Note 1: Use P9A for Configuration Word programming.
2010 Microchip Technology Inc.
Advance Information
DS41342E-page 17
PIC18F1XK50/PIC18LF1XK50 4.2.1
MODIFYING PROGRAM FLASH
The previous programming example assumed that the device has been Bulk Erased prior to programming (see Section 4.1.1 “High-Voltage ICSP Bulk Erase”). It may be the case, however, that the user wishes to modify only a section of an already programmed device.
TABLE 4-6:
The appropriate number of bytes required for the erase buffer must be read out of program Flash (as described in Section 5.2 “Verify Program Flash and ID Locations”) and buffered. Modifications can be made on this buffer. Then, the block of program Flash that was read out must be erased and rewritten with the modified data. The WREN bit must be set if the WR bit in EECON1 is used to initiate a write sequence.
MODIFYING PROGRAM FLASH
4-bit Command
Data Payload
Core Instruction
Step 1: Direct access to program Flash. 0000 0000
8E A6 9C A6
BSF BCF
EECON1, EEPGD EECON1, CFGS
Step 2: Read program Flash into buffer (Section 5.1 “Read Program Flash, ID Locations and Configuration Bits”). Step 3: Set the Table Pointer for the block to be erased. 0000 0000 0000 0000 0000 0000
0E 6E F8 0E 6E F7 0E 6E F6
MOVLW MOVWF MOVLW MOVWF MOVLW MOVWF
TBLPTRU TBLPTRH TBLPTRL
Step 4: Enable memory writes and setup an erase. 0000 0000
84 A6 88 A6
BSF BSF
EECON1, WREN EECON1, FREE
88 A6 82 A6 00 00 00 00
BSF BSF NOP NOP
EECON1, FREE EECON1, WR
Step 5: Initiate erase. 0000 0000 0000 0000
Erase starts on the 4th clock of this instruction
Step 6: Poll WR bit. Repeat until bit is clear. 0000 0000 0000 0000
50 A6 6E F5 00 00
MOVF EECON1, W, 0 MOVWF TABLAT NOP Shift out data(1)
Step 7: Load write buffer. The correct bytes will be selected based on the Table Pointer. 0000 0000 0000 0000 0000 0000 1101 • • • 1111 0000
0E 6E F8 0E 6E F7 0E 6E F6 • • • 00 00
MOVLW MOVWF TBLPTRU MOVLW MOVWF TBLPTRH MOVLW MOVWF TBLPTRL Write 2 bytes and post-increment address by 2. Repeat as many times as necessary to fill the write buffer Write 2 bytes and start programming. NOP - hold PGC high for time P9 and low for time P10.
To continue modifying data, repeat Steps 2 through 6, where the Address Pointer is incremented by the appropriate number of bytes (see Table 4-4) at each iteration of the loop. The write cycle must be repeated enough times to completely rewrite the contents of the erase buffer. Step 8: Disable writes. 0000
DS41342E-page 18
94 A6
BCF
EECON1, WREN
Advance Information
2010 Microchip Technology Inc.
PIC18F1XK50/PIC18LF1XK50 4.3
Data EEPROM Programming
FIGURE 4-6:
PROGRAM DATA FLOW Start
Data EEPROM is accessed one byte at a time via an Address Pointer (register pair EEADRH:EEADR) and a data latch (EEDATA). Data EEPROM is written by loading EEADRH:EEADR with the desired memory location, EEDATA, with the data to be written and initiating a memory write by appropriately configuring the EECON1 register. A byte write automatically erases the location and writes the new data (erase-before-write).
Set Address
Set Data
Enable Write
When using the EECON1 register to perform a data EEPROM write, both the EEPGD and CFGS bits must be cleared (EECON1 = 00). The WREN bit must be set (EECON1 = 1) to enable writes of any sort and this must be done prior to initiating a write sequence. The write sequence is initiated by setting the WR bit (EECON1 = 1).
Start Write Sequence
The write begins on the falling edge of the 24th PGC after the WR bit is set. It ends when the WR bit is cleared by hardware.
Yes No
After the programming sequence terminates, PGC must be held low for the time specified by parameter P10 to allow high-voltage discharge of the memory array.
FIGURE 4-7:
No
WR bit clear?
done? Yes Done
DATA EEPROM WRITE TIMING DIAGRAM P10
1
2
3
4
1
2
1
15 16
2
PGC
PGD
0
0
0
P5A
P5A
P5
P11A n
0
4-bit Command
2 NOP commands
BSF EECON1, WR
Poll WR bit, Repeat until Clear (see below)
n
16-bit Data Payload
PGD = Input
1
2
3
4
1
2
15 16
1
2
3
4
1
2
15 16
PGC P5
P5
P5A
P5A
Poll WR bit PGD
0
0
0
0
4-bit Command
0 MOVF EECON1, W, 0
0
0
0
4-bit Command
PGD = Input
2010 Microchip Technology Inc.
Advance Information
MOVWF TABLAT
Shift Out Data (see Figure 4-4)
PGD = Output
DS41342E-page 19
PIC18F1XK50/PIC18LF1XK50 TABLE 4-7:
PROGRAMMING DATA MEMORY
4-bit Command
Data Payload
Core Instruction
Step 1: Direct access to data EEPROM. 9E A6 9C A6
0000 0000
BCF EECON1, EEPGD BCF EECON1, CFGS
Step 2: Set the data EEPROM Address Pointer. 0000 0000 0000 0000
0E 6E A9 OE 6E AA
MOVLW MOVWF MOVLW MOVWF
EEADR EEADRH
Step 3: Load the data to be written. 0E 6E A8
0000 0000
MOVLW MOVWF EEDATA
Step 4: Enable memory writes. 0000
84 A6
BSF EECON1, WREN
82 A6 00 00 00 00
BSF EECON1, WR NOP NOP ;write starts on 4th clock of this instruction
Step 5: Initiate write. 0000 0000 0000
Step 6: Poll WR bit, repeat until the bit is clear. 0000 0000 0000 0010
50 A6 6E F5 00 00
MOVF EECON1, W, 0 MOVWF TABLAT NOP Shift out data(1)
Step 7: Hold PGC low for time P10. Step 8: Disable writes. 0000
94 A6
BCF EECON1, WREN
Repeat steps 2 through 8 to write more data. Note 1: See Figure 5-4 for details on shift out data timing.
DS41342E-page 20
Advance Information
2010 Microchip Technology Inc.
PIC18F1XK50/PIC18LF1XK50 4.4
ID Location Programming
The ID locations are programmed much like the program Flash. The ID registers are mapped in addresses 200000h through 200007h. These locations read out normally even after code protection. Note:
The user only needs to fill the first 8 bytes of the write buffer, in order to write the ID locations.
TABLE 4-8: 4-bit Command
Table 4-8 demonstrates the code sequence, required to write the ID locations. In order to modify the ID locations, refer to the methodology described in Section 4.2.1 “Modifying Program Flash”. As with program Flash, the ID locations must be erased before being modified.
WRITE ID SEQUENCE Data Payload
Core Instruction
Step 1: Direct access to program Flash. 0000 0000 0000
8E A6 9C A6 84 A6
BSF EECON1, EEPGD BCF EECON1, CFGS BSF EECON1, WREN
Step 2: Set Table Pointer to ID. Load write buffer with 8 bytes and write. 0000 0000 0000 0000 0000 0000 1101 1101 1101 1111 0000
4.5
0E 20 6E F8 0E 00 6E F7 0E 00 6E F6 00 00
MOVLW MOVWF MOVLW MOVWF MOVLW MOVWF Write Write Write Write NOP -
20h TBLPTRU 00h TBLPTRH 00h TBLPTRL 2 bytes and post-increment address by 2 bytes and post-increment address by 2 bytes and post-increment address by 2 bytes and start programming. hold PGC high for time P9 and low for
Boot Block Programming
4.6
The code sequence detailed in Table 4-5 should be used, except that the address used in “Step 2” will be in the range of 000000h to 0007FFh.
time P10.
Configuration Bits Programming
Unlike program Flash, the Configuration bits are programmed a byte at a time. The Table Write, Begin Programming 4-bit command (‘1111’) is used, but only 8 bits of the following 16-bit payload will be written. The LSB of the payload will be written to even addresses and the MSB will be written to odd addresses. The code sequence to program two consecutive configuration locations is shown in Table 4-9. See Figure 4-5 for the timing diagram. Note:
2010 Microchip Technology Inc.
2. 2. 2.
Advance Information
The address must be explicitly written for each byte programmed. The addresses cannot be incremented in this mode.
DS41342E-page 21
PIC18F1XK50/PIC18LF1XK50 TABLE 4-9:
SET ADDRESS POINTER TO CONFIGURATION LOCATION
4-bit Command
Data Payload
Core Instruction
Step 1: Direct access to config memory. 8E A6 8C A6 84 A6
0000 0000 0000
BSF EECON1, EEPGD BSF EECON1, CFGS BSF EECON1, WREN
Step 2(1): Set Table Pointer for config byte to be written. Write even/odd addresses. 0E 30 6E F8 0E 00 6E F7 0E 00 6E F6 00 00 0E 01 6E F6 00 00
0000 0000 0000 0000 0000 0000 1111 0000 0000 0000 1111 0000 Note 1:
MOVLW 30h MOVWF TBLPTRU MOVLW 00h MOVWF TBLPRTH MOVLW 00h MOVWF TBLPTRL Load 2 bytes and start programming. NOP - hold PGC high for time P9 and low for time P10. MOVLW 01h MOVWF TBLPTRL Load 2 bytes and start programming. NOP - hold PGC high for time P9A and low for time P10.
Enabling the write protection of Configuration bits (WRTC = 0 in CONFIG6H) will prevent further writing of Configuration bits. Always write all the Configuration bits before enabling the write protection for Configuration bits.
FIGURE 4-8:
DS41342E-page 22
CONFIGURATION PROGRAMMING FLOW Start
Start
Load Even Configuration Address
Load Odd Configuration Address
Program LSB
Program MSB
Delay P9 and P10 Time for Write
Delay P9 and P10 Time for Write
Done
Done
Advance Information
2010 Microchip Technology Inc.
PIC18F1XK50/PIC18LF1XK50 5.0
READING THE DEVICE
5.1
Read Program Flash, ID Locations and Configuration Bits
The 4-bit command is shifted in LSb first. The read is executed during the next 8 clocks, then shifted out on PGD during the last 8 clocks, LSb to MSb. A delay of P6 must be introduced after the falling edge of the 8th PGC of the operand to allow PGD to transition from an input to an output. During this time, PGC must be held low, as illustrated in Figure 5-1. This operation also increments the Table Pointer by one, pointing to the next byte in program Flash for the next read.
Program Flash is accessed one byte at a time via the 4-bit command, ‘1001’ (table read, post-increment). The contents of memory pointed to by the Table Pointer (TBLPTRU:TBLPTRH:TBLPTRL) are serially output on PGD.
TABLE 5-1:
This technique will work to read any memory in the 000000h to 3FFFFFh address space, so it also applies to the reading of the ID and Configuration registers.
READ PROGRAM FLASH SEQUENCE
4-bit Command
Data Payload
Core Instruction
Step 1: Set Table Pointer 0E 6E F8 0E 6E F7 0E 6E F6
0000 0000 0000 0000 0000 0000
MOVLW MOVWF MOVLW MOVWF MOVLW MOVWF
Addr[21:16] TBLPTRU TBLPTRH TBLPTRL
Step 2: Read memory and then shift out on PGD, LSb to MSb 00 00
1001
FIGURE 5-1:
TBLRD *+
TABLE READ POST-INCREMENT INSTRUCTION TIMING DIAGRAM (1001)
1
2
3
4
1
2
3
4
5
6
7
9
8
10
11
12
13
14
15
1
16
2
3
4
PGC P5
P5A
P6 P14
(Note 1) PGD
1
0
0
LSb 1
1
2
3
4
5
6
MSb
Shift Data Out
PGD = Input Note 1:
PGD = Output
n
n
n
n
Fetch Next 4-bit Command
PGD = Input
Magnification of the high-impedance delay between PGC and PGD is shown in Figure 5-5.
2010 Microchip Technology Inc.
Advance Information
DS41342E-page 23
PIC18F1XK50/PIC18LF1XK50 5.2
Verify Program Flash and ID Locations
The Table Pointer must be manually set to 200000h (base address of the ID locations) once the program Flash has been verified. The post-increment feature of the Table Read 4-bit command can not be used to increment the Table Pointer beyond the program Flash space. In a 64-Kbyte device, for example, a postincrement read of address FFFFh will wrap the Table Pointer back to 000000h, rather than point to unimplemented address, 010000h.
The verify step involves reading back the program Flash space and comparing it against the copy held in the programmer’s buffer. Memory reads occur a single byte at a time, so two bytes must be read to compare against the word in the programmer’s buffer. Refer to Section 5.1 “Read Program Flash, ID Locations and Configuration Bits” for implementation details of reading program Flash.
FIGURE 5-2:
VERIFY PROGRAM FLASH FLOW Start
Set TBLPTR = 0
Set TBLPTR = 200000h
Read Low Byte with Post-increment
Read Low Byte with Post-Increment
Read High Byte with Post-increment
Does Word = Expect data? Yes No
All program Flash verified?
Increment Pointer
No
Read High byte with Post-Increment
Does Word = Expect data?
Failure, Report Error
No
Failure, Report Error
Yes No
All ID locations verified? Yes
Yes
Done
DS41342E-page 24
Advance Information
2010 Microchip Technology Inc.
PIC18F1XK50/PIC18LF1XK50 5.3
Verify Configuration Bits
FIGURE 5-3:
READ DATA EEPROM FLOW
A Configuration address may be read and output on PGD via the 4-bit command, ‘1001’. Configuration data is read and written in a byte-wise fashion, so it is not necessary to merge two bytes into a word prior to a compare. The result may then be immediately compared to the appropriate Configuration data in the programmer’s memory for verification. Refer to Section 5.1 “Read Program Flash, ID Locations and Configuration Bits” for implementation details of reading Configuration data.
5.4
Start Set Address
Read Byte
Read Data EEPROM Memory
Move to TABLAT
Data EEPROM is accessed one byte at a time via an Address Pointer (register pair EEADRH:EEADR) and a data latch (EEDATA). Data EEPROM is read by loading EEADRH: EEADR with the desired memory location and initiating a memory read by appropriately configuring the EECON1 register. The data will be loaded into EEDATA, where it may be serially output on PGD via the 4-bit command, ‘0010’ (Shift Out Data Holding register). A delay of P6 must be introduced after the falling edge of the 8th PGC of the operand to allow PGD to transition from an input to an output. During this time, PGC must be held low, as shown in Figure 5-4.
Shift Out Data
No
done? Yes Done
The command sequence to read a single byte of data is shown in Table 5-2.
TABLE 5-2: 4-bit Command
READ DATA EEPROM MEMORY Data Payload
Core Instruction
Step 1: Direct access to data EEPROM. 0000 0000
9E A6 9C A6
BCF EECON1, EEPGD BCF EECON1, CFGS
Step 2: Set the data EEPROM Address Pointer. 0000 0000 0000 0000
0E 6E A9 OE 6E AA
MOVLW MOVWF MOVLW MOVWF
EEADR EEADRH
Step 3: Initiate a memory read. 0000
80 A6
BSF EECON1, RD
Step 4: Load data into the Serial Data Holding register. 0000 0000 0000 0010 Note 1:
50 A8 6E F5 00 00
MOVF EEDATA, W, 0 MOVWF TABLAT NOP Shift Out Data(1)
The is undefined. The is the data.
2010 Microchip Technology Inc.
Advance Information
DS41342E-page 25
PIC18F1XK50/PIC18LF1XK50 FIGURE 5-4: 1
SHIFT OUT DATA HOLDING REGISTER TIMING DIAGRAM (0010)
2
3
4
1
2
3
4
5
6
7
9
8
10
11 12 13
(Note 1) 2 1
14 15 16
3
4
PGC P5
P5A
P6 P14
(Note 1) PGD
0
1
0
LSb 1
0
2
3
4
5
MSb
6
Note
1:
PGD = Output
HIGH-IMPEDANCE DELAY P3
n
PGD = Input
PGC
MSb
n
5.6
Blank Check
The term “Blank Check” means to verify that the device has no programmed memory cells. All memories must be verified: program Flash, data EEPROM, ID locations and Configuration bits. The device ID registers (3FFFFEh:3FFFFFh) should be ignored.
2
1
A “blank” or “erased” memory cell will read as a ‘1’. Therefore, Blank Checking a device merely means to verify that all bytes read as FFh except the Configuration bits. Unused (reserved) Configuration bits will read ‘0’ (programmed). Refer to Table 6-1 for blank configuration expect data for the various PIC18F1XK50/PIC18LF1XK50 devices.
n
P19
5.5
n
Magnification of the High-Impedance delay between PGC and PGD is shown in Figure 5-5.
FIGURE 5-5:
PGD
n
Fetch Next 4-bit Command
Shift Data Out PGD = Input
n
Verify Data EEPROM
A data EEPROM address may be read via a sequence of core instructions (4-bit command, ‘0000’) and then output on PGD via the 4-bit command, ‘0010’ (TABLAT register). The result may then be immediately compared to the appropriate data in the programmer’s memory for verification. Refer to Section 5.4 “Read Data EEPROM Memory” for implementation details of reading data EEPROM.
Given that Blank Checking is merely code and data EEPROM verification with FFh expect data, refer to Section 5.4 “Read Data EEPROM Memory” and Section 5.2 “Verify Program Flash and ID Locations” for implementation details.
FIGURE 5-6:
BLANK CHECK FLOW Start
Blank Check Device
Is device blank?
Yes
Continue
No Abort
DS41342E-page 26
Advance Information
2010 Microchip Technology Inc.
PIC18F1XK50/PIC18LF1XK50 6.0
CONFIGURATION WORD
6.2
The device ID word for the PIC18F1XK50/ PIC18LF1XK50 devices is located at 3FFFFEh:3FFFFFh. These bits may be used by the programmer to identify what device type is being programmed and read out normally, even after code or read protection. See Table 6-2 for a complete list of device ID values.
The PIC18F1XK50/PIC18LF1XK50 devices have several Configuration Words. These bits can be set or cleared to select various device configurations. All other memory areas should be programmed and verified prior to setting Configuration Words. These bits may be read out normally, even after read or code protection. See Table 6-1 for a list of Configuration bits and device IDs, and Table 6-3 for the Configuration bit descriptions.
6.1
Device ID Word
FIGURE 6-1:
READ DEVICE ID WORD FLOW
ID Locations
Start
A user may store identification information (ID) in eight ID locations, mapped in 200000h:200007h. It is recommended that the Most Significant nibble of each ID be Fh. In doing so, if the user code inadvertently tries to execute from the ID space, the ID data will execute as a NOP.
Set TBLPTR = 3FFFFE Read Low Byte with Post-Increment Read High Byte with Post-Increment Done
TABLE 6-1:
CONFIGURATION BITS AND DEVICE IDs
File Name
Bit 7
Bit 6
Bit 5
Bit 4
Bit 3
Bit 2
Bit 1
Bit 0
Default/ Unprogrammed Value
300000h
CONFIG1L
—
—
USBDIV
CPUDIV1
CPUDIV0
—
—
—
--00 0---
300001h
CONFIG1H
IESO
FCMEN
PCLKEN
PLLEN
FOSC3
FOSC2
FOSC1
FOSC0
0010 0111
300002h
CONFIG2L
—
—
VREG(3)
BORV1
BORV0
BOREN1
BOREN0
PWRTEN
--q1 1111
300003h
CONFIG2H
—
—
—
WDTPS3
WDTPS2
WDTPS1
WDTPS0
WDTEN
---1 1111 1--- 1---
300005h
CONFIG3H
MCLRE
—
—
—
HFOFST
—
—
—
300006h
CONFIG4L
—
XINST
—
—
BBSIZ
LVP
—
STVREN
10-- 01-1
300008h
CONFIG5L
—
—
—
—
—
—
CP1
CP0
---- --11
300009h
CONFIG5H
CPD
CPB
—
—
—
—
—
—
11-- ----
30000Ah
CONFIG6L
—
—
—
—
—
—
WRT1
WRT0
---- --11
30000Bh
CONFIG6H
WRTD
WRTB
WRTC
—
—
—
—
—
111- ----
30000Ch
CONFIG7L
—
—
—
—
—
—
EBTR1
EBTR0
---- --11
30000Dh
CONFIG7H
—
EBTRB
—
—
—
—
—
—
-1-- ----
3FFFFEh
DEVID1(2)
DEV2
DEV1
DEV0
REV4
REV3
REV2
REV1
REV0
See Table 6-2
3FFFFFh
DEVID2(2)
DEV10
DEV9
DEV8
DEV7
DEV6
DEV5
DEV4
DEV3
See Table 6-2
Legend: Note 1: 2: 3:
x = unknown, u = unchanged, – = unimplemented. Shaded cells are unimplemented, read as ‘0’, q = conditional. These bits are only implemented on specific devices. Refer to Section 3.0 “Memory Maps” to determine which bits apply based on available memory. DEVID registers are read-only and cannot be programmed by the user. VREG is read-only. VREG = 1 for PIC18F1XK50 devices and VREG = 0 for PIC18LF1XK50 devices. The VREG bit value should not be included in any Verify or Checksum operation.
2010 Microchip Technology Inc.
Advance Information
DS41342E-page 27
PIC18F1XK50/PIC18LF1XK50 TABLE 6-2:
DEVICE ID VALUE Device
DEVID2
DEVID1
47h
000x xxxx
PIC18LF14K50
47h
001x xxxx
PIC18F13K50
47h
010x xxxx
PIC18F14K50
47h
011x xxxx
PIC18LF13K50
Note:
Device ID Value
The ‘x’s in DEVID1 contain the device revision code.
DS41342E-page 28
Advance Information
2010 Microchip Technology Inc.
PIC18F1XK50/PIC18LF1XK50 TABLE 6-3: Bit Name
PIC18F1XK50/PIC18LF1XK50 BIT DESCRIPTIONS Configuration Words
Description
USBDIV
CONFIG1L
USB Clock Selection bit Selects the clock source for low-speed USB operation 1 = USB clock comes from the OSC1/OSC2 divided by 2 0 = USB clock comes directly from the OSC1/OSC2 Oscillator block; no divide
CPUDIV
CONFIG1L
CPU System Clock Selection bits 11 = CPU system clock divided by 4 10 = CPU system clock divided by 3 01 = CPU system clock divided by 2 00 = No CPU system clock divide
IESO
CONFIG1H
Internal External Switchover bit 1 = Internal External Switchover mode enabled 0 = Internal External Switchover mode disabled
FCMEN
CONFIG1H
Fail-Safe Clock Monitor Enable bit 1 = Fail-Safe Clock Monitor enabled 0 = Fail-Safe Clock Monitor disabled
PCLKEN
CONFIG1H
Primary Clock Enable bit 1 = Primary Clock enabled 0 = Primary Clock disabled
PLLEN
CONFIG1H
4 X PLL Enable bit 1 = Oscillator multiplied by 4 0 = Oscillator used directly
FOSC
CONFIG1H
Oscillator Selection bits 1111 = External RC oscillator, CLKOUT function on OSC2 1110 = External RC oscillator, CLKOUT function on OSC2 1101 = EC oscillator (low) 1100 = EC oscillator, CLKOUT function on OSC2 (low) 1011 = EC oscillator (medium) 1010 = EC oscillator, CLKOUT function on OSC2 (medium) 1001 = Internal RC oscillator, CLKOUT function on OSC2 1000 = Internal RC oscillator 0111 = External RC oscillator 0110 = External RC oscillator, CLKOUT function on OSC2 0101 = EC oscillator (high) 0100 = EC oscillator, CLKOUT function on OSC2 (high) 0011 = External RC oscillator, CLKOUT function on OSC2 0010 = HS oscillator 0001 = XT oscillator 0000 = LP oscillator
BORV
CONFIG2L
Brown-out Reset Voltage bits 11 = VBOR set to 1.9V 10 = VBOR set to 2.2V 01 = VBOR set to 2.7V 00 = VBOR set to 3.0V
VREG
CONFIG2L
This bit is a read-only bit 1 = PIC18F1XK50 0 = PIC18LF1XK50 Do not include the VREG bit value in any Verify or Checksum operation.
2010 Microchip Technology Inc.
Advance Information
DS41342E-page 29
PIC18F1XK50/PIC18LF1XK50 TABLE 6-3: Bit Name
PIC18F1XK50/PIC18LF1XK50 BIT DESCRIPTIONS (CONTINUED) Configuration Words
Description
BOREN
CONFIG2L
Brown-out Reset Enable bits 11 = Brown-out Reset enabled in hardware only (SBOREN is disabled) 10 = Brown-out Reset enabled in hardware only and disabled in Sleep mode SBOREN is disabled) 01 = Brown-out Reset enabled and controlled by software (SBOREN is enabled) 00 = Brown-out Reset disabled in hardware and software
PWRTEN
CONFIG2L
Power-up Timer Enable bit 1 = PWRT disabled 0 = PWRT enabled
WDTPS
CONFIG2H
Watchdog Timer Postscaler Select bits 1111 = 1:32,768 1110 = 1:16,384 1101 = 1:8,192 1100 = 1:4,096 1011 = 1:2,048 1010 = 1:1,024 1001 = 1:512 1000 = 1:256 0111 = 1:128 0110 = 1:64 0101 = 1:32 0100 = 1:16 0011 = 1:8 0010 = 1:4 0001 = 1:2 0000 = 1:1
WDTEN
CONFIG2H
Watchdog Timer Enable bit 1 = WDT enabled 0 = WDT disabled (control is placed on SWDTEN bit)
MCLRE
CONFIG3H
MCLR Pin Enable bit 1 = MCLR pin enabled, RA3 input pin disabled 0 = RA3 input pin enabled, MCLR pin disabled
HFOFST
CONFIG3H
HFINTOSC Fast Start 1 = HFINTOSC output is not delayed 0 = HFINTOSC output is delayed until oscillator is stable (IOFS = 1)
XINST
CONFIG4L
Extended Instruction Set Enable bit 1 = Instruction set extension and Indexed Addressing mode enabled 0 = Instruction set extension and Indexed Addressing mode disabled (Legacy mode)
BBSIZ
CONFIG4L
Boot Block Size Select bit 1 = 2 kW Boot Block size for PIC18F14K50 (1 kW Boot Block size for PIC18F13K50) 0 = 1 kW Boot Block size for PIC18F14K50 (512 W Boot Block size for PIC18F13K50)
LVP
CONFIG4L
Low-Voltage Programming Enable bit 1 = Low-Voltage Programming enabled, RC3 is the PGM pin 0 = Low-Voltage Programming disabled, RC3 is an I/O pin
DS41342E-page 30
Advance Information
2010 Microchip Technology Inc.
PIC18F1XK50/PIC18LF1XK50 TABLE 6-3: Bit Name
PIC18F1XK50/PIC18LF1XK50 BIT DESCRIPTIONS (CONTINUED) Configuration Words
Description
STVREN
CONFIG4L
Stack Overflow/Underflow Reset Enable bit 1 = Reset on stack overflow/underflow enabled 0 = Reset on stack overflow/underflow disabled
CP1
CONFIG5L
Code Protection bits (Block 1 program Flash area) 1 = Block 1 is not code-protected 0 = Block 1 is code-protected
CP0
CONFIG5L
Code Protection bits (Block 0 program Flash area) 1 = Block 0 is not code-protected 0 = Block 0 is code-protected
CPD
CONFIG5H
Code Protection bits (Data EEPROM) 1 = Data EEPROM is not code-protected 0 = Data EEPROM is code-protected
CPB
CONFIG5H
Code Protection bits (Boot Block memory area) 1 = Boot Block is not code-protected 0 = Boot Block is code-protected
WRT1
CONFIG6L
Write Protection bits (Block 1 program Flash area) 1 = Block 1 is not write-protected 0 = Block 1 is write-protected
WRT0
CONFIG6L
Write Protection bits (Block 0 program Flash area) 1 = Block 0 is not write-protected 0 = Block 0 is write-protected
WRTD
CONFIG6H
Write Protection bit (Data EEPROM) 1 = Data EEPROM is not write-protected 0 = Data EEPROM is write-protected
WRTB
CONFIG6H
Write Protection bit (Boot Block memory area) 1 = Boot Block is not write-protected 0 = Boot Block is write-protected
WRTC
CONFIG6H
Write Protection bit (Configuration registers) 1 = Configuration registers are not write-protected 0 = Configuration registers are write-protected
EBTR1
CONFIG7L
Table Read Protection bit (Block 1 program Flash area) 1 = Block 1 is not protected from table reads executed in other blocks 0 = Block 1 is protected from table reads executed in other blocks
EBTR0
CONFIG7L
Table Read Protection bit (Block 0 program Flash area) 1 = Block 0 is not protected from table reads executed in other blocks 0 = Block 0 is protected from table reads executed in other blocks
EBTRB
CONFIG7H
Table Read Protection bit (Boot Block memory area) 1 = Boot Block is not protected from table reads executed in other blocks 0 = Boot Block is protected from table reads executed in other blocks
DEV
DEVID2
Device ID bits These bits are used with the DEV bits in the DEVID1 register to identify part number.
DEV
DEVID1
Device ID bits These bits are used with the DEV bits in the DEVID2 register to identify part number.
REV
DEVID1
2010 Microchip Technology Inc.
Revision ID bits These bits are used to indicate the revision of the device.
Advance Information
DS41342E-page 31
PIC18F1XK50/PIC18LF1XK50 7.0
EMBEDDING CONFIGURATION WORD INFORMATION IN THE HEX FILE
Table 7-1 describes how to calculate the checksum for each device. Note:
To allow portability of code, a PIC18F1XK50/ PIC18LF1XK50 programmer is required to read the Configuration Word locations from the hex file. If Configuration Word information is not present in the hex file, then a simple warning message should be issued. Similarly, while saving a hex file, all Configuration Word information must be included. An option to not include the Configuration Word information may be provided. When embedding Configuration Word information in the hex file, it should start at address 300000h.
The checksum calculation differs depending on the code-protect setting. Since the program Flash locations read out differently, depending on the codeprotect setting, the table describes how to manipulate the actual program Flash values to simulate the values that would be read from a protected device. When calculating a checksum by reading a device, the entire program Flash can simply be read and summed. The Configuration Word and ID locations can always be read.
Microchip Technology Inc. feels strongly that this feature is important for the benefit of the end customer.
7.1
Embedding Data EEPROM Information In the HEX File
To allow portability of code, a PIC18F1XK50/ PIC18LF1XK50 programmer is required to read the data EEPROM information from the hex file. If data EEPROM information is not present, a simple warning message should be issued. Similarly, when saving a hex file, all data EEPROM information must be included. An option to not include the data EEPROM information may be provided. When embedding data EEPROM information in the hex file, it should start at address F00000h. Microchip Technology Inc. believes that this feature is important for the benefit of the end customer.
7.2
Checksum Computation
The checksum is calculated by summing the following: • The contents of all program Flash locations • The Configuration Word, appropriately masked • ID locations (only if any portion of program memory is code-protected) The Least Significant 16 bits of this sum are the checksum. Code protection limits access to program memory by both external programmer (code-protect) and code execution (table read protect). The ID locations, when included in a code protected checksum, contain the checksum of an unprotected part. The unprotected checksum is distributed: one nibble per ID location. Each nibble is right justified.
DS41342E-page 32
Advance Information
2010 Microchip Technology Inc.
PIC18F1XK50/PIC18LF1XK50 TABLE 7-1:
CHECKSUM COMPUTATION Code-Protect BBSIZ = 0
Device
Blank Value
0xAA at 0 and Max Address
None
SUM[0000:01FFF]+SUM[2000:3FFF]+ (CONFIG1L & 38h)+(CONFIG1H & FFh)+(CONFIG2L & 1Fh)+ (CONFIG2H & 1F)+(CONFIG3L & 00h)+(CONFIG3H & 88h)+ (CONFIG4L & 4Dh)+(CONFIG4H & 00h)+(CONFIG5L & 03h)+ (CONFIG5H & C0h)+(CONFIG6L & 03h)+(CONFIG6H & E0h)+ (CONFIG7L & 03h)+(CONFIG7H & 40h)
C2DB
C231
Boot Block
SUM[0800:1FFF]+SUM[2000:3FFF]+ (CONFIG1L & 38h)+(CONFIG1H & FFh)+(CONFIG2L & 1Fh)+ (CONFIG2H & 1F)+(CONFIG3L & 00h)+ (CONFIG3H & 88h)+ (CONFIG4L & 4Dh)+(CONFIG4H & 00h)+(CONFIG5L & 03h)+ (CONFIG5H & C0h)+(CONFIG6L & 03h)+(CONFIG6H & E0h)+ (CONFIG7L & 03h)+(CONFIG7H & 40h)+SUM_ID
CAC1
CA58
Boot/ Block 0
SUM[2000:3FFF]+ (CONFIG1L & 38h)+(CONFIG1H & FFh)+(CONFIG2L & 1Fh)+ (CONFIG2H & 1F)+(CONFIG3L & 00h)+(CONFIG3H & 88h)+ (CONFIG4L & 4Dh)+(CONFIG4H & 00h)+(CONFIG5L & 03h)+ (CONFIG5H & C0h)+(CONFIG6L & 03h)+(CONFIG6H & E0h)+ (CONFIG7L & 03h)+(CONFIG7H & 40h)+SUM_ID
E2C0
E257
All
(CONFIG1L & 38h)+(CONFIG1H & FFh)+(CONFIG2L & 1Fh)+ (CONFIG2H & 1F)+(CONFIG3L & 00h)+(CONFIG3H & 88h)+ (CONFIG4L & 4Dh)+(CONFIG4H & 00h)+(CONFIG5L & 03h)+ (CONFIG5H & C0h)+(CONFIG6L & 03h)+(CONFIG6H & E0h)+ (CONFIG7L & 03h)+(CONFIG7H & 40h)+SUM_ID
02BE
02AA
None
SUM[0000:0FFF]+SUM[1000:1FFF]+ (CONFIG1L & 38h)+(CONFIG1H & FFh)+(CONFIG2L & 1Fh)+ (CONFIG2H & 1F)+(CONFIG3L & 00h)+(CONFIG3H & 88h)+ (CONFIG4L & 4Dh)+(CONFIG4H & 00h)+(CONFIG5L & 03h)+ (CONFIG5H & C0h)+(CONFIG6L & 03h)+(CONFIG6H & E0h)+ (CONFIG7L & 03h)+(CONFIG7H & 40h)
E2DB
E231
Boot Block
SUM[0400:0FFF]+SUM[1000:1FFF]+ (CONFIG1L & 38h)+(CONFIG1H & FFh)+(CONFIG2L & 1Fh)+ (CONFIG2H & 1F)+(CONFIG3L & 00h)+ (CONFIG3H & 88h)+ (CONFIG4L & 4Dh)+(CONFIG4H & 00h)+(CONFIG5L & 03h)+ (CONFIG5H & C0h)+(CONFIG6L & 03h)+(CONFIG6H & E0h)+ (CONFIG7L & 03h)+(CONFIG7H & 40h)+SUM_ID
E6C3
E65A
Boot/ Block 0
SUM[1000:1FFF]+ (CONFIG1L & 38h)+(CONFIG1H & FFh)+(CONFIG2L & 1Fh)+ (CONFIG2H & 1F)+(CONFIG3L & 00h)+(CONFIG3H & 88h)+ (CONFIG4L & 4Dh)+(CONFIG4H & 00h)+(CONFIG5L & 03h)+ (CONFIG5H & C0h)+(CONFIG6L & 03h)+(CONFIG6H & E0h)+ (CONFIG7L & 03h)+(CONFIG7H & 40h)+SUM_ID
F2C2
F259
All
(CONFIG1L & 38h)+(CONFIG1H & FFh)+(CONFIG2L & 1Fh)+ (CONFIG2H & 1F)+(CONFIG3L & 00h)+(CONFIG3H & 88h)+ (CONFIG4L & 4Dh)+(CONFIG4H & 00h)+(CONFIG5L & 03h)+ (CONFIG5H & C0h)+(CONFIG6L & 03h)+(CONFIG6H & E0h)+ (CONFIG7L & 03h)+(CONFIG7H & 40h)+SUM_ID
02C0
02AC
PIC18F14K50
PIC18F13K50
Legend:
Checksum
Item CONFIGx SUM[a:b] SUM_ID + &
= = = = =
Description Configuration Word Sum of locations, a to b inclusive Byte-wise sum of lower four bits of all customer ID locations Addition Bit-wise AND
2010 Microchip Technology Inc.
Advance Information
DS41342E-page 33
PIC18F1XK50/PIC18LF1XK50 8.0
ELECTRICAL SPECIFICATIONS
Absolute Maximum Ratings(†) Ambient temperature under bias ....................................................................................................... -40°C to +125°C Storage temperature ........................................................................................................................ -65°C to +150°C Voltage on VDD with respect to VSS, PIC18F1XK50 .......................................................................... -0.3V to +6.0V Voltage on VDD with respect to VSS, PIC18LF1XK50 ........................................................................ -0.3V to +4.0V Voltage on MCLR with respect to Vss ................................................................................................. -0.3V to +9.0V Voltage on VUSB pin with respect to VSS ............................................................................................ -0.3V to +4.0V Voltage on D+ and D- pins with respect to VSS ...................................................................... -0.3V to (VUSB + 0.3V) Voltage on all other pins with respect to VSS ............................................................................ -0.3V to (VDD + 0.3V) Total power dissipation(1) ...............................................................................................................................800 mW Maximum current out of VSS pin ...................................................................................................................... 95 mA Maximum current into VDD pin ......................................................................................................................... 95 mA Clamp current, IK (VPIN < 0 or VPIN > VDD)20 mA Maximum output current sunk by any I/O pin.................................................................................................... 25 mA Maximum output current sourced by any I/O pin............................................................................................... 25 mA Maximum current sunk by all ports....................................................................................................................90 mA Maximum current sourced by all ports ............................................................................................................. 90 mA Note 1:
Power dissipation is calculated as follows: PDIS = VDD x {IDD – IOH} + {(VDD – VOH) x IOH} + (VOl x IOL).
† NOTICE: Stresses above those listed under “Absolute Maximum Ratings” may cause permanent damage to the device. This is a stress rating only and functional operation of the device at those or any other conditions above those indicated in the operation listings of this specification is not implied. Exposure above maximum rating conditions for extended periods may affect device reliability.
DS41342E-page 34
Advance Information
2010 Microchip Technology Inc.
PIC18F1XK50/PIC18LF1XK50 8.1
AC/DC Characteristics Timing Requirements for Program/Verify Test Mode
Standard Operating Conditions Operating Temperature: 25C is recommended Param No. D110
Sym.
Characteristic
Min.
Max.
Units
VIHH
High-Voltage Programming Voltage on MCLR/VPP/RA3
8
9
V
D110A VIHL
Low-Voltage Programming Voltage on MCLR/VPP/RA3
1.80
VDD
V
D111
PIC18F1XK50 (includes Bulk Erase)
2.70
5.50
V
PIC18LF1XK50 (includes Bulk Erase)
2.70
3.60
V
VDD
Conditions
D112
IPP
Programming Current on MCLR/VPP/RA3
—
5
mA
D113
IDDP
Supply Current During Programming
—
5
mA
D031
VIL
Input Low Voltage
VSS
0.2 VDD
V
D041
VIH
Input High Voltage
0.8 VDD
VDD
V
Except RA0 and RA1
D042
VIH
Input High Voltage on RA0 and RA1 pins only
0.8 VDD
VDD
V
VDD